
In this post, we will be exploring manual enumeration techniques that can be used to get a “lay of the land” on a target host once a foothold has been established.
Manual enumeration is an important skill to possess as an attacker because it provides the best and deepest insight into what is on the target system and where potential privilege escalation vectors may be present.
Tools are great and they definitely help a lot; however, a skilled attacker never relies solely on tools. It is very easy for tools to miss something important; furthermore, it is even easier for us to miss something from the output of our tools if we do not truly understand what those tools are actually doing.
We will NOT be covering all enumeration points, but we will cover the main ones, including user enumeration, system enumeration, network enumeration, program enumeration, and a set of commands that we can use when we first obtain a foothold to look for quick wins (my personal set of manual commands I use before using tools).
Keep in mind that this is very high-level enumeration that allows us to understand what we are working with. This is not password hunting, weak permission enumeration, or specific vulnerability enumeration. Those topics are covered in different posts. Actually, each privilege escalation post I write shows how to find the vulnerability both manually and using tools.
For this example, we have obtained a foothold on a Linux target as the user juggernaut, and we currently know little-to-no information about the target.
Terminal Upgrade to Full TTY
The very first thing we should always try to do when we obtain a foothold on a Linux target, is to try and upgrade our shell to full TTY (interactive shell).
Non-Interactive Shell
Consider the typical FTP login process before a session:
- You FTP into the remote host with the command ftp 172.16.1.50
- You are prompted to enter a Username and then a Password
- Then you interact with the service (get, put, etc.)
- Lastly you type bye to end the FTP session
This is an example of an interactive program; it requires user intervention to complete.
When you get a reverse shell on a netcat listener, odds are that it is a non-interactive shell. From a non-interactive shell, the same FTP session would fail immediately as we would not be receiving any feedback in our shell.
For example, I started an FTP server on my attacker machine, but when I try to access it from the target machine, I get no output.
ftp 172.16.1.30
However, we can use Python or Python3 to upgrade our shell to a fully interactive one.
Upgrading to an Interactive Shell
The Python interpreter, comes with a standard module named PTY that allows for creation of pseudo-terminals. By using this module, we can spawn a separate process from our remote shell and obtain a fully interactive shell.
python3 -c 'import pty;pty.spawn("/bin/bash");'Immediately after running the initial Python command, we will see an improved bash shell.
Next, press CTRL + Z to background the session, and then run the following command:
stty raw -echoOnce that is done, type the following two commands to bring the session back to the foreground and then export the terminal emulator (xterm) for full TTY.
fg
export TERM=xterm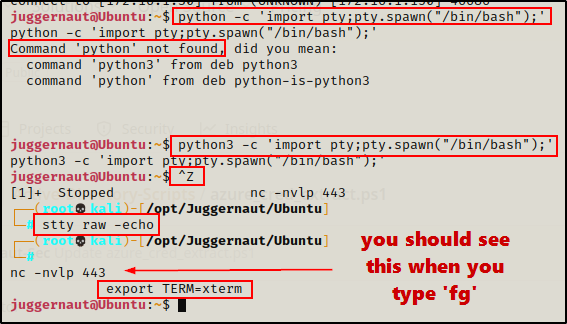
Here we can see that when we tested Python, it was not installed, so instead we needed to use Python3.
We should have a fully interactive shell now. To confirm, we can test FTP again.

Amazing! We successfully upgraded and can now receive output from interactive programs. In addition to this, we can also use the arrow keys to edit commands and view command history, and we can also clear our terminal screen.
User Enumeration
After obtaining a foothold on the target and hopefully being able to upgrade to full TTY, we want to begin enumerating information about our current user, followed by information about other user accounts on the system.
Current User Account
To start we want to use the whoami and id commands to see who the current user is as well as which groups they are in.
whoami ; id
Here we can see that we are the user ‘juggernaut’ and that have a UID of 1000. We can also see the group memberships, most notably the sudo group; however, the ‘lxd’ group should not be overlooked because it is an immediate privilege escalation vector to root.
To see how to escalate privileges to root utilizing LXD group permissions, check out this post here.
Next, we should quickly check our PATH environmental variable for any non-standard / interesting global directory paths.
echo $PATH
This is just the default PATH; however, had there been an interesting directory path, then that may be worth making a note of, as it could be a piece of the puzzle necessary to escalate privileges. For example, the PATH may point to a directory where a cron job is running or that contains a SUID binary that can be exploited.
Moving on, we saw that our current user is in the sudo group, so the next thing we want to determine is if the current user has sudo access without a password.
sudo -l
This is a huge finding! We did not get prompt for a password and we can see the user has (ALL : ALL), which means they can use sudo and run any command as root. This is a quick privilege escalation opportunity by simply issuing the sudo su command.
If you are prompt for a password, you will need to hunt for it on the system.
After checking sudo, we should look at what other user accounts are on the system.
Other User Accounts
We can view all users / accounts on the system by checking the contents of the /etc/passwd file.
cat /etc/passwdThis will create a large output, which is mostly comprised of service accounts.
While we should definitely check every account on the system, we can also narrow this down to just user accounts with the following command:
cat /etc/passwd | grep -i '/bin/.*sh'
User accounts have a shell (terminal) assigned to them for interactive logins, which is why we are able to find them with this grep match. However, it’s important to note the wild card in the grep. Not all shells are bash so ‘.*sh’ will use a wildcard and find all shell types.
Note that all accounts with a UID of 0 are root users!
Continuing on, we can check what groups each user is a member of with the following ‘for’ loop:
for user in $(cat /etc/passwd | grep -i '/bin/.*sh' | awk -F: '{print $1}');do echo "$user" ; id "$user";done
Another thing worth checking is which user’s are currently logged into the system. The command to check this is quite simple, as it’s only a single letter.
w
This shows us the number of users currently logged in as well as which users they are.
Now that we have discovered all of the user accounts and their group memberships, we can begin to dig deeper by checking what access our current user has.
Next Steps – What can our Current User Access?
At this point, we want to see what our current user has access to [weak file permissions] as well as if there are any passwords lying around [password hunting].
Depending on what files the current user has access to, we may get lucky and find a quick root. For example, we may find that the current user can read the /etc/shadow file. Alternatively, we may find a password in a MySQL database that gets us access to a different user who is a member of an interesting group.
System Enumeration
System enumeration is looking for information such as: OS distro, kernel version, architecture, hostname, drives, running processes, etc. Basically, just looking at everything about the system from a high-level.
The first thing we should look for when performing system enumeration is the hostname.
hostname
Here we can see the host is name ‘Ubuntu’, this is useful for two reasons. We have a hostname, but we also found that this distro is Ubuntu.
Now that we have a hostname, we want to find which kernel version is running. There are two commands that we can use to find this information:
uname -a
cat /proc/version
Both commands provide very similar information including the kernel version, distro, and architecture.
It’s important to know that everything in Linux is a file so that is why we commonly find both commands and files we can use to gather information. Actually, its common in Linux for binaries to be created to extract the info from the file in an easier way.
At this point, we have an idea about which distro is running (Ubuntu); however, we do not know which version. Fortunately for us, we can actually find the exact distro / version with the following command:
cat /etc/*-release
Great! This provides a better description about the distro as it also tells us the exact version as well as much more info.
Alternatively, we can also check in the /etc/issue file for a quick dirty output of the exact version.
cat /etc/issue
Although the uname -a command provided us with information about the architecture, we can confirm the exact arch by checking the CPU details.
lscpu | grep -i 'arch\|op-mode\|byte'
Armed with kernel version as well as the exact distro, version, and arch on the system, we can take this information and try and find a kernel exploit.
To learn more about kernel exploits, check out my post on the topic here.
Alright, the last thing we will look at in terms of system enumeration are the running processes.
To view all running processes, we can use the following command:
ps -efw
There will be quite a bit of output; however, it’s worth taking the time to scroll through all of it. There could be interesting information in there; for example, you may come across a service like the Jenkins one above.
The goal is to look for interesting root processes, but that doesn’t mean we shouldn’t check all of them. We can learn a lot from running processes; for example, we can see if there are containers running, cron jobs, a MySQL server, and much more.
Network Enumeration
Network enumeration is important because it allows us to know which machines our target host is communicating with. We want to learn a few things about our target, such as which ports are open internally, the IP architecture (multiple adapters?), the routing table, and the arp table.
To start, we can check which ports are open on the host and if there are any interactions with other machines, like so:
netstat -nao
Here we can see quite a few ports open. Again, we want to take note of all the ones that nmap did not find as they may lead to a potential privilege escalation opportunity via port forwarding
If you are interested in learning more about port forwarding, I did a post on that too, which you can find here.
Another thing we should look for are established connections with other hosts in the network. It may be useful to note for a potential pivoting opportunity.
Moving on, we can look to see if the target host is “dual-homed”, which is a fancy way of saying it has multiple adapters. If we find our host has multiple adapters, it could provide a pivot opportunity into another network.
ip a
Cool! When a foothold was obtained on this machine, it was done so through IP 172.16.1.150; however, this machine also has an IP address in the 10.0.3.0/24 subnet, which means its a doorway into another network. We could use a tool like sshuttle to setup a tunnel through this machine into the other network.
Alternatively, we can use the following command to get the same information:
ifconfig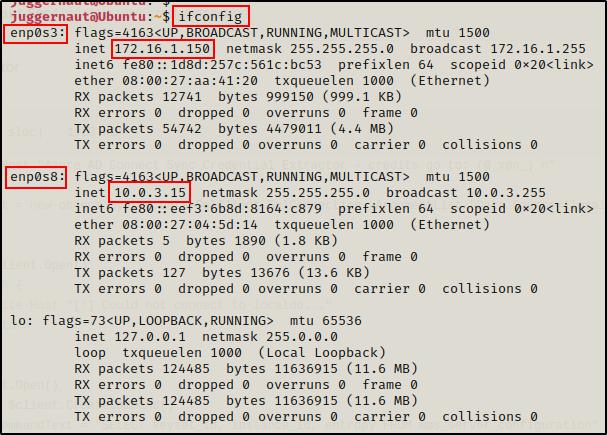
Moving on, we can further enumerate routes into different networks using the following command:
ip route
Here we can see two routes into different subnets. This confirms that this machine is a doorway into another network.
Finally, we can check the arp table to see if there are other machines the target host is communicating with in the network.
ip neigh
This shows the target communicating with our attacker (172.16.1.30), a machine in the other network (10.0.3.2), and the router.
Another command that does the same thing is the following:
arp -a
Program Enumeration
The key to program enumeration is to find the version of different programs on the host, and then determining if any of them are vulnerable to any publicly known exploits.
To check the version of any program, you can use the following command:
dpkg -l | grep -w 'ii sudo'By replacing the program name with something different, we can keep using the same command to find the versions of different programs installed on the host.
dpkg -l | grep -w 'ii mysql'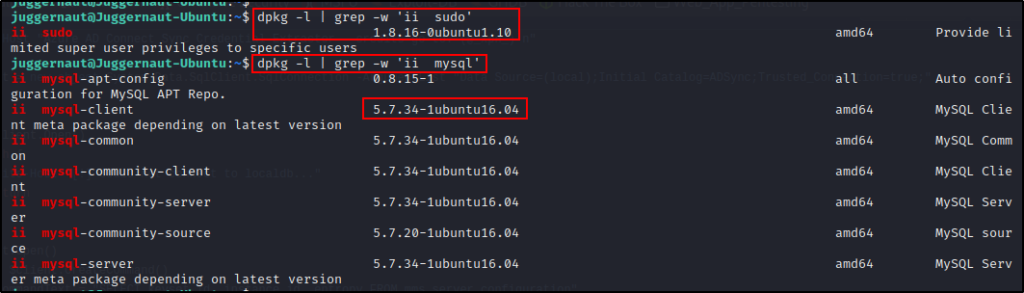
Alternatively, we could also use the programs themselves to tell us their version. For example, we could get version info on sudo.
sudo --version
sudo has suffered from quite a few different CVEs over the years, so it’s worth Googling if the version is vulnerable.
Next on the list is mysql. If the target host is running an older version of MySQL, then a UDF exploit may be possible,
mysql --version
These are just two examples of interesting programs to enumerate. We can also check the permissions of all the programs in hopes that they have the SUID-bit set, but that will be saved for a post on SUID privilege escalation.
My Personal Set of Manual Commands Before Using Tools
Alright, that was a very quick and dirty example of high-level manual enumeration, but the concept is very important.
Generally, we would not run all of these commands manually, as there are many good tools that do this enumeration for us, plus a lot more.
However, I do have a set of manual enumeration commands I typically run when I get a foothold on a target host prior to using tools. These are manual commands are geared towards quickly understanding who and what I am working with, as well as some quick win checks.
When I first get on a host, I like to run the following 5 commands right away:
whoami ; id
uname -a
sudo -l
cat ~/.bash_history- I start with whoami and id to see which account I have gotten a foothold on (Standard user? Service account? Root account?)
- Next, I use uname -a to see if the target host is running an outdated kernel as well as to determine what architecture the system is (kernel exploit?)
- After that, I like to run sudo -l to look for a quick win (what can I run as root?)
- Lastly, I check the current users bash history file for interesting commands, hints, or passwords
After running the above commands, I like to do quick check of all the users on the system.
cat /etc/passwd- I like to see which accounts are on the system to get an idea of potential escalation paths, both horizontally and vertically.
- Additionally, I will check if I can su into any user account I find by supplying their username as the password.
- Lastly, if a service like SSH is open, I will commonly take all user accounts (put them in a TXT file) and then start trying to brute force their passwords with a tool like hydra.
Next, I look for quick wins by checking the permissions on both the /etc/passwd file as well as the /etc/shadow file.
ls -l /etc/passwd
ls -l /etc/shadow- Here I am looking for write permissions on the passwd file and either read or write permissions on the shadow file.
Lastly, I do some directory enumeration to look for interesting files, as well as to see which files I have have access to (read or write). I do these searches in the following order:
ls -la
ls -la /
cd /home && find -maxdepth 3 -type d -ls
ls -la /opt
ls -la /tmp
ls -la /var/www
ls -la /var/www/html- The first directory I am interested in is the one I landed in when I got my shell.
- Second, I check the root of the file system for any non-standard files or directories, as well as any non-standard permissions on the files and directories.
- Third, I attempt to view all of the user’s home directories, making it recursive up to 3 directories to reduce output and make it more digestible.
- Lastly, I check for any interesting files in /opt, /tmp, /var/www, and /var/www/html. In the web folders I am looking for config files or php files with credentials.
At this point, I will have either found my privilege escalation path already and have begun getting to work on it– OR, and this is most often the case, I will now need bring some tools over to help me enumerate the host further.
There are the four tools I like to bring over to the target host, and I do so in the following order:
Generally, LinPEAS is all we will need to find our privesc path. It has a CVE check built in, and it is just overall my favourite enumeration script. However, all tools are not created equally, so if nothing turns up from LinPEAS, that’s when we should start thinking about bringing the other tools over to see what they can find for us.