
In this post we will be exploring manual enumeration techniques that can be used to get a “lay of the land” on the target once a foothold has been established.
Manual enumeration is an important skill to possess as an attacker because it provides the best and deepest insight into what is on the target system and where potential privilege escalation vectors may be present.
Tools are great and they definitely help a lot; however, a skilled attacker never relies solely on tools. It is very easy for tools to miss something important; furthermore, it is even easier for us to miss something from the output of our tools if we do not truly understand what those tools are actually doing.
We will NOT be covering all enumeration points, but we will cover the main ones, including user enumeration, system enumeration, software enumeration, network enumeration, anti-virus and firewall enumeration, and finally a set of commands that we can use when we first obtain a foothold to look for quick wins (my personal set of manual commands I use before using tools).
Keep in mind that this is very high-level enumeration that allows us to understand what we are working with. This is not password hunting, weak permission enumeration, or specific vulnerability enumeration. Those topics are covered in different posts. Actually, each privilege escalation post I write shows how to find the vulnerability both manually and using tools.
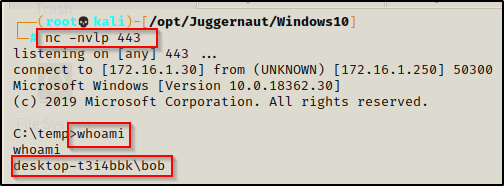
For this example, we have obtained a foothold on a Windows target as the user bob and we currently know little-to-no information about the target.
User Enumeration
Once we have gotten a foothold on a target machine, we want to start by enumerating information about our current user, followed by information about other user accounts on the system.
Current User Account
The first thing we want to do when we get onto a target Windows machine is find some info on our current user. To start we want to use the whoami command to see who we are.
Once we determine who we are, we want to see what privileges our user has. To do this we can use the whoami command again, like so:
whoami /priv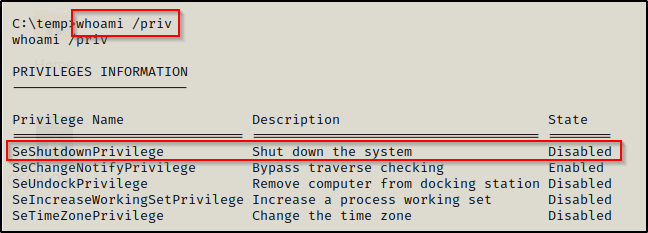
Here we can see that we have the SeShutdownPrivilege, which is worth taking note of as this is commonly needed when exploiting a vulnerable service to get a SYSTEM shell.
There are many interesting privileges that can be used as a means for privilege escalation; for example, the SeImpersonate and SeBackup Privilege’s can both be used to get a SYSTEM shell quite easily.
To learn more about various different privileges and how they can be abused, check out this GitHub page here.
Another great use of the whoami command is to check which groups our current user is in.
whoami /groups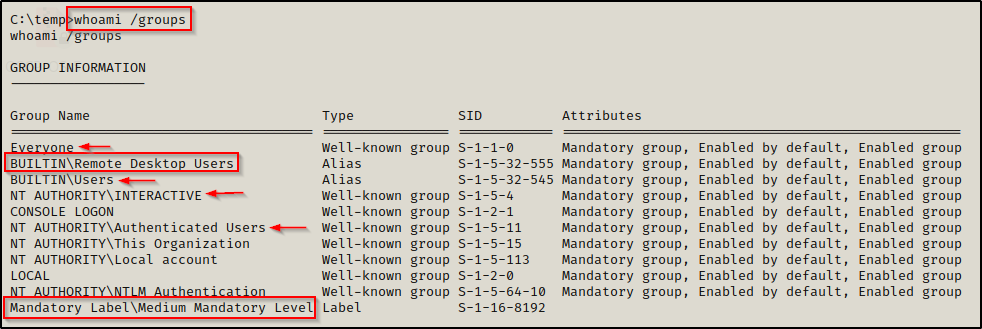
This tells us a few things. First, the four arrows show all the different groups that ALL standard users are a part of. This is important to know for checking permissions on different files and folders using icacls or accesschk.
Additionally, we can see that our user is in the Remote Desktop Users group, which means we can grab a GUI session on this victim if we find our user’s password.
When doing CTFs, if you find your current user is in a group that would increase access; for example, the Remote Desktop Users group, but you do not have the current user’s password because you got a shell from an exploit– then odds are you want to start password hunting.
Lastly, I wanted to point out the Mandatory level. This is important to look for when you use a tool like BeEF and hook an IE or Edge browser and then exploit the browser with Metasploit to get a shell, let’s say. When you do this, you will be in a low mandatory level shell, which means you wont be able to write to any regular folders.
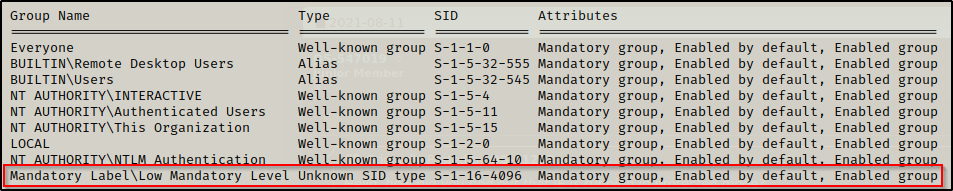
To overcome this issue, we need to navigate to the users %USERPROFILE%\AppData\LocalLow folder and we will be able to write files there and transfer our tools.
Finally, we can use the whoami /all command to view user information, group information, and privilege information all at once.
Now we can turn our focus onto other user accounts on the system.
Other User Accounts
We can view all users on the system with the net user command. It’s good to know what users exist on the system as our privilege escalation path might not always be straight to admin or SYSTEM. Sometimes we will find that we need to escalate horizontally to another standard user first before we find our oath to admin / SYSTEM.
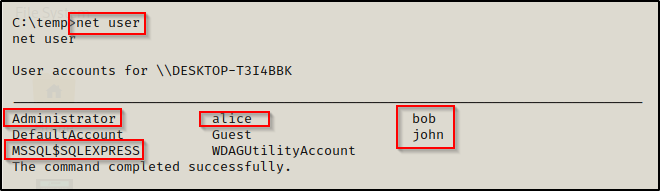
The output shows that there are 5 accounts of interest and each one should be enumerated further.
Guest is almost always disabled.
To gather information about a specific user, we can user the following command:
net user alice
This provides a lot of great information about the account including if their account is active, if the account has a password, comments (if any exist), and group information.
Here we can see that alice is part of the Remote Desktop Users and the Remote Management Users groups. This means that alice can either login using RDP (3389) or WinRM (5985). All we would need is to find Alice’s password and we would have access to another account.
Lastly, we should always check to see which user accounts are in the local administrators group. To do this, we can use the following command:
net localgroup administrators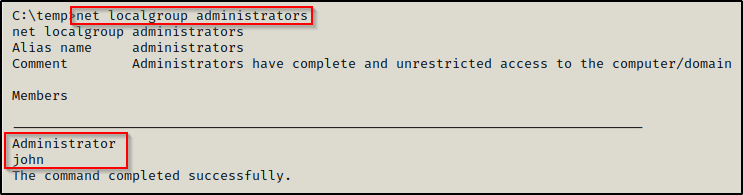
Great! We discovered that in addition to the built in Administrator account, john is also a local admin on this system.
You can replace “administrators” in the above command with any group you wish to enumerate.
Now that we know “who” we are working with, its time to turn our focus on to “what” we are working with, beginning with a high-level of the system itself.
System Enumeration
System enumeration is looking at things like system info, OS name / version, architecture, hostname, patches/hotfixes applied, drives, etc. Just basically looking at everything from a high-level.
To view a great deal of information about the system, simply use the systeminfo command.
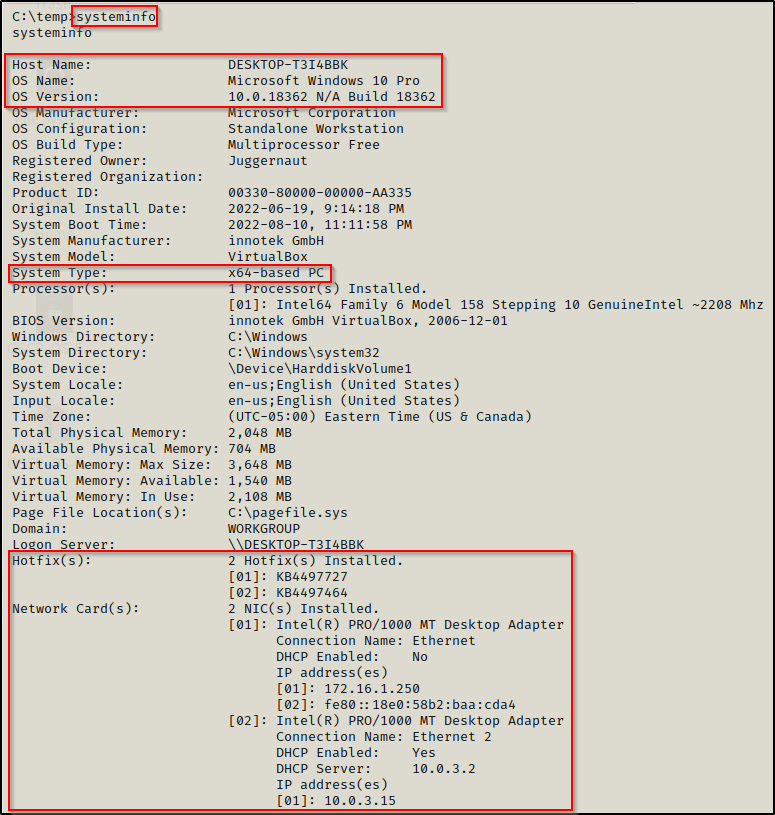
This provides a lot of good information; however, we can clean up the output and only target the information highlighted above using the following command instead:
systeminfo | findstr /B /C:"Host Name" /C:"OS Name" /C:"OS Version" /C:"System Type" /C:"Network Card(s)" /C:"Hotfix(s)"
This is much nicer and provides us with only the information we are most interested in. This shows us that the victim machine is a Windows 10 – Build 18362 (version 1903) – 64-bit operating system. This also shows us that there are two hotfixes installed, which may cause issues for us if we try to use kernel exploits; and that there are two NICs installed. which likely indicates an opportunity to pivot into a different network!
That’s a lot of great info! Now we can further investigate the hotfixes to see how far back they date. Additionally, we know to keep an eye out for information about the second NIC when we do our network enumeration.
To drill down into the hotfixes and enumerate the patching on this system further, we can use the wmic command to pull info from the local system.
wmic qfe get Caption,Description,HotFixID,InstalledOn
This shows us that the last patch was applied on April 1st, 2019 as well as the KB numbers assigned to those patches. This also tells us that this machine is likely vulnerable to any CVE / kernel exploit from a date later than 04/01/2019!
Check out my posts on kernel exploits here and modern kernel exploits here.
Another thing worth checking is additional drives on the system (D, E, F?). After enumerating C:\ we may find that we are stuck when there was a second drive to check right under our noses all along.
To check the drives on the system, we can use either this wmic command or the PowerShell equivalent:
wmic logicaldisk get caption,description,providername

Get-PSDrive | where {$_.Provider -like "Microsoft.PowerShell.Core\FileSystem"}| ft Name,Root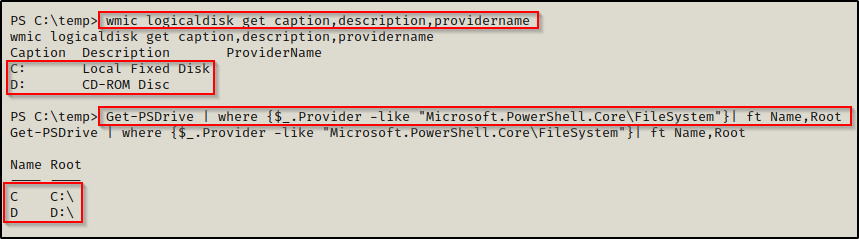
Now that we have enumerated some solid information about the system itself, we can now check the software that is installed and/or running on the system.
Software Enumeration
The easiest way to check for installed software is to manually enumerate the default file locations used when installing third party software. The file locations are C:\ ; C:\Program Files ; and C:\Program Files (x86).
Starting with C:\, we can use the following command to search for any interesting folders that may contain third party programs:
dir /a C:\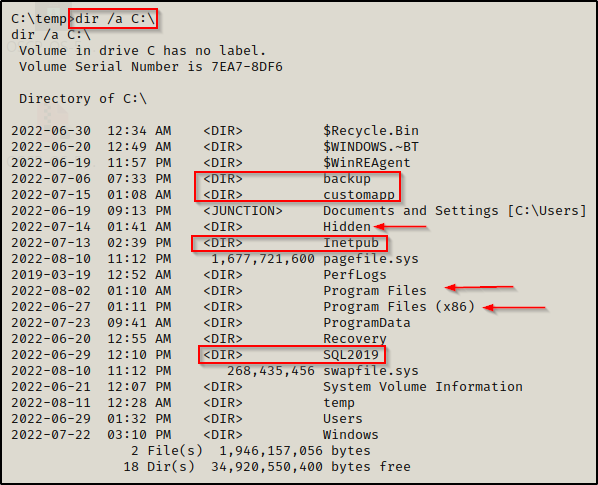
Using the /a switch allows us to see hidden folders, leaving no stone unturned (hidden folder named Hidden). He we can see quite a few non-standard folders that are definitely worth investigating further (customapp, backup, etc.). We also see both Program Files folders, which is generally the default file location for most installed software.
Next we want to check both Program Files folders and see what non-standard / non-default software is installed on the host.
We should be looking to find the version of the software by checking the changelog file, other log files, config files, etc. Dig through to find version info and take that to Google or Searchsploit. Even if we cannot find a version number, we can Google the software to see if there is a history of vulnerabilities. Additionally, we should be checking our permissions on the folders that house the software as this may be an easy service exploit that lands us a SYSTEM shell by replacing a legitimate service binary with a malicious one.
By default, standard users have the ability to write in any non-default subfolder of C:\ — If a program does not specify folder permissions and the program is downloaded to C:\, odds are we can write to that folder and get malicious.
Another way to check for interesting software that is installed is by using the following wmic command:
wmic product get name,version | findstr /i /v "Microsoft"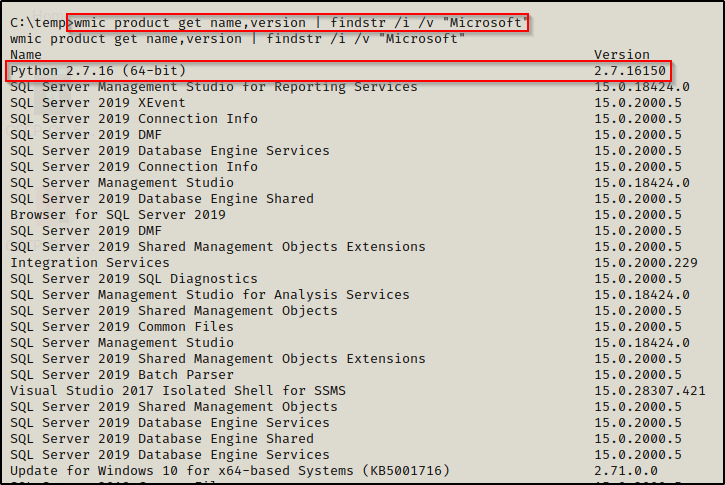
This search will look through all (most) installed software on the system. We add the findstr filter at the end to remove all matches that include “Microsoft” since we are primarily interested in third-party or non-default software. Here we can see a non-standard program installed along with the version number: Python 2.7.16.
To add more filters to the findstr command, delimit with a space; for example: “Microsoft Windows SQL” acts as an “OR” operator so Microsoft OR Windows OR SQL will be omitted.
It is important to manually check the three folders above and not solely rely on this WMIC search. It does work well but it could miss programs downloaded in a non-conventional sense. The best approach is to use the WMIC search first and then manually check C:\ and the Program Files folders.
Software can exist outside of C:\ and the Program Files folders, so make sure to enumerate the current users home profile, especially in the Downloads folder for any hints towards downloaded software.
Lastly, one more thing we can look at are the running processes using the tasklist command. Based on the processes that are running, we can get an idea of what software is installed on the host.
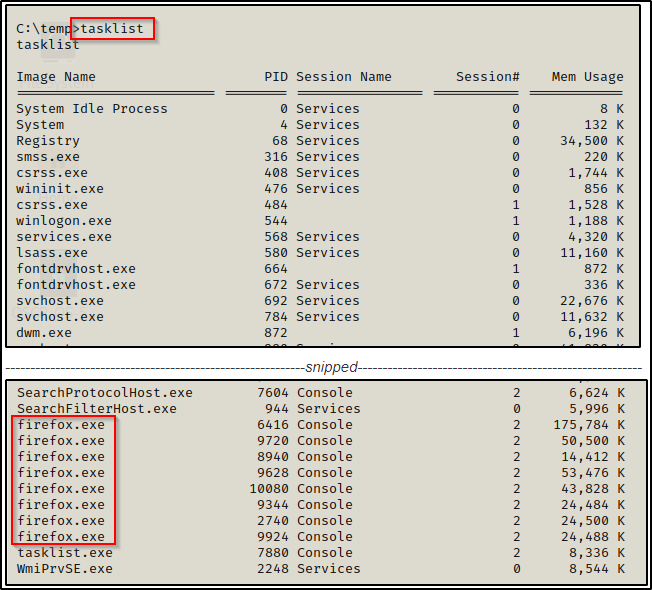
Here we see Firefox running, which tells us this is installed on the host for one, but also that we may want to drill deeper into the process using a tool like procdump from the Sysinternals Suite of Tools.
Now that we understand how to enumerate software on the system, we can move on to network enumeration.
Network Enumeration
When we talk about network enumeration, what we are most interested in is how the victim system can communicate with other systems, who the system is communicating with, and what the system is communicating.
Beginning with the “how”, it is important to understand that a system can have multiple hardware addresses (MAC address) as well as multiple IP addresses, depending on the number of NICs installed on the machine.
NIC = Network Interface Card and simply refers to the Network or “Ethernet” Adapters on the system
To view the IP address of the victim machine we have gotten a foothold on, we can use the ipconfig command.
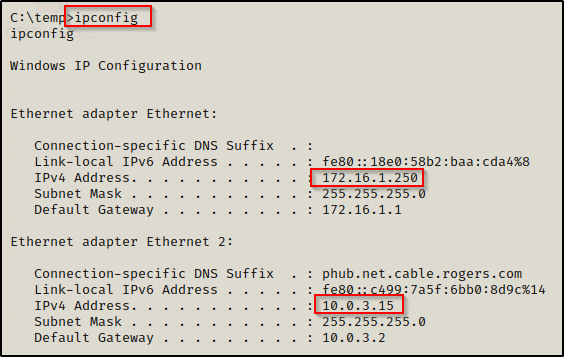
Here we can see that this machine has two IP addresses, which should pique our interest as this means this machine may be a doorway into the 10.0.3.0/24 network!
Additionally, this command shows the IPv6 address, the subnet mask, and the default gateway assigned to each adapter.
To view even more information including the MAC address, DNS server, etc. we can use the following extension of ipconfig:
ipconfig /all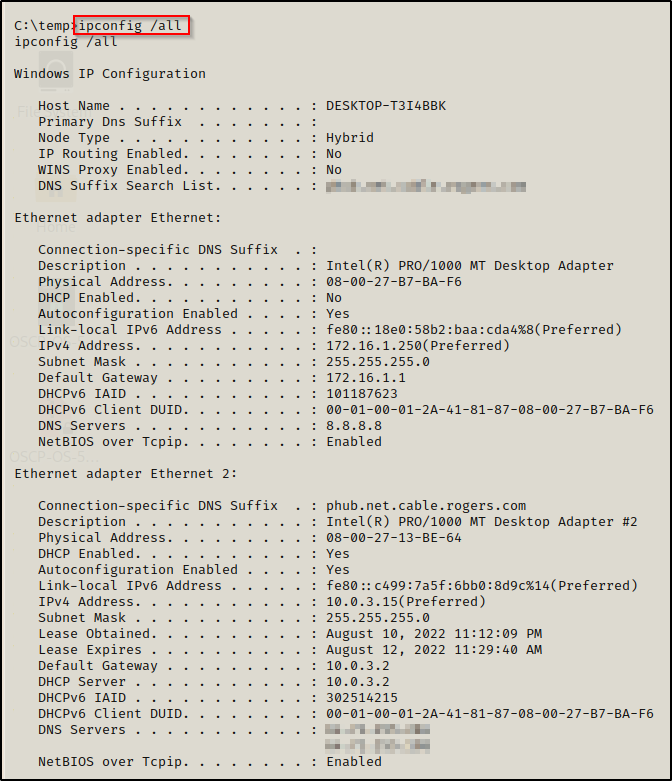
After obtaining IP information, another thing we want to look at is the ARP table. Whenever two machine communicate, a record of the IP address and MAC address of the devices (source and destination device) is created and stored into a table.
By querying the info in this table, we may find that the victim is communicating with another machine, which may in-turn provide a pivot opportunity.
arp -a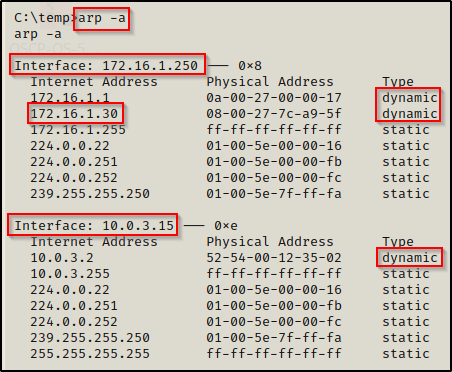
Here we can see the ARP table for each NIC installed on the target. We can also see the communication between our attacker machine and the victim (172.16.1.30 = attacker machine). Note that the dynamic connections are the most interesting to us because these are connections that were established automatically or “learned”.
Another important table to check for possible pivot opportunities is the routing table. The routing table will shows us if there are other networks we can communicate with.
route print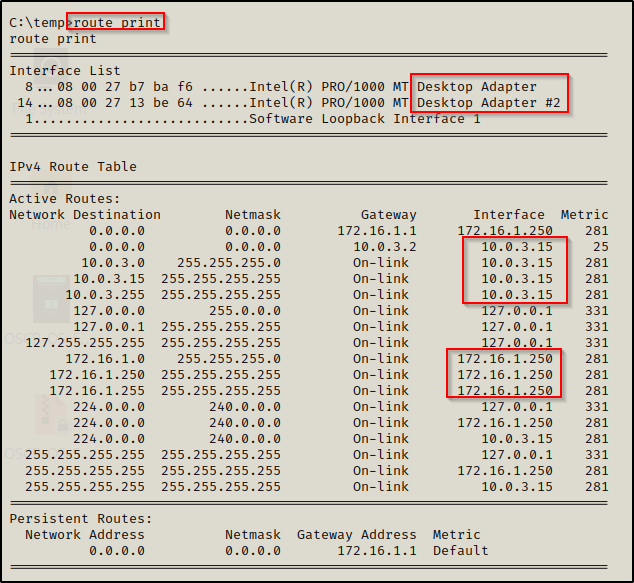
This shows us that we have access to two different networks from this machine (2 NICs) as well as the IPs that each NIC is communicating with. Essentially, we are seeing that there is a door to 10.0.3.0/24 and 172.16.1.0/24 from inside this host.
Below the IPv4 table is the IPv6 routing table and Persistent routes, which did not make it into the screenshot above.
Finally, the last thing we want to look for during our network enumeration is the running services along with the ports assigned to them. This can be accomplished using the following command:
netstat -nao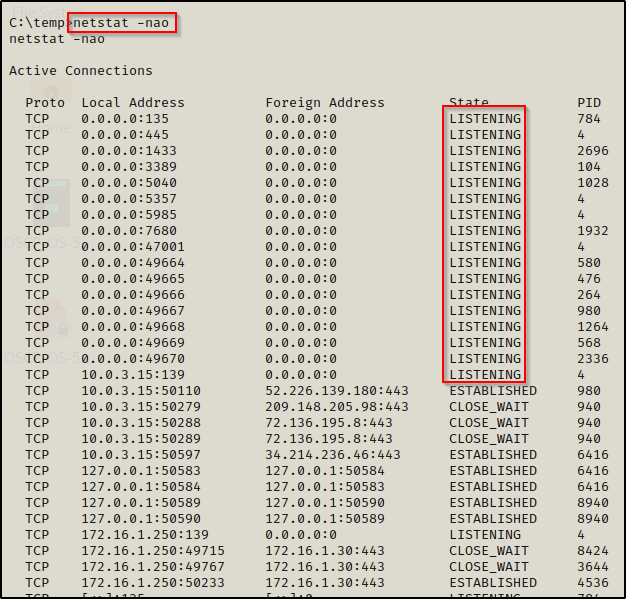
We are mainly focused on the LISTENING ports. This will show us all the ports we saw when we ran our initial nmap scan; however, it may also reveal additional open ports that are only visible from the inside.
If we find that there are services running locally, that could be a key finding and instrumental in how we escalate privileges. When we find any service running locally (not on 0.0.0.0), then by port forwarding we are able to interreact with the localhost and connect to the services from our attacker machine as if they were available externally. This can be accomplished using Chisel, Plink, or Meterpreter.
For a deeper understanding on forwarding local and external ports / services and how that all works, check out my post on port forwarding here.
Anti-Virus (AV) and Firewall Enumeration
In today’s environments, we will almost ALWAYS be dealing with additional layers of defence, which include both AV and firewall’s. As an attacker, it is a good idea to find what the system is using for AV (Defender or third party?) so that we can work out a way to bypass the protections that have been put in place.
To begin, we can query which AV software is installed on the host with the following wmic command:
wmic /node:localhost /namespace:\\root\securitycenter2 path antivirusproduct get displayname
Great! This shows us that the victim does not have any third party AV programs installed and that the system is solely relying on Defender as it’s AV.
From a high-level, we could query EVERY service running on the target and then go through the list and see if we can find tools used to block our efforts (AV, firewall, IDS, etc.).
sc query type= service | findstr /i "SERVICE_NAME DISPLAY_NAME STATE"This command will produce a lot of output, so we need to take the time to review all of it and determine what is running on here that might thwart our efforts.
The above step will require you to know about different blue team (defence) tools so that when you see them running, you know what they are.
It is also important to note that AV bypass techniques are changing all the time. What works today likely will not work tomorrow.
After enumerating the AV on the system, we will want to turn our efforts to the firewall.
We want to see the firewall settings, so that we can determine which ports are open and which ports we can work with. Also, we want to know which ports are open internally so we can enumerate those further.
Our goal is to figure out why we are (or may be) getting blocked on certain ports as well as which ports we can use mask our traffic (like 4444 being blocked but 443 being open).
Note that firewalls generally only allow outbound access on specific ports. If you are trying to get a reverse shell from an exploit that you are absolutely convinced should be working but is not for some reason, then you need to adjust the port. Rule of thumb is that if all else fails, port 80 will let you through. Other ports to consider are 21, 443, and 445.
On modern Windows operating systems, the command to view the status of the firewall is the following:
netsh advfirewall show allprofiles | findstr -i "profile state policy"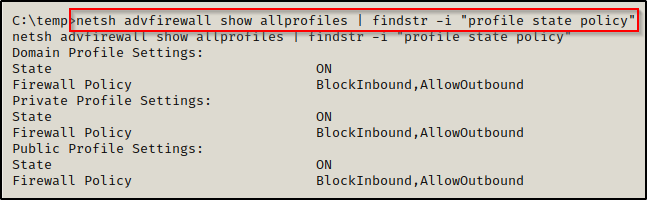
This command shows us which profiles are turned on and what their policy is (allow / block).
On older Windows operating systems, such as Windows 7, we need to use a different command to gather this information:
netsh firewall show stateNow that we have determined that the firewall is running, we need to check the configuration, which will show us specific ports that are open as well as any special configurations.
netsh firewall show config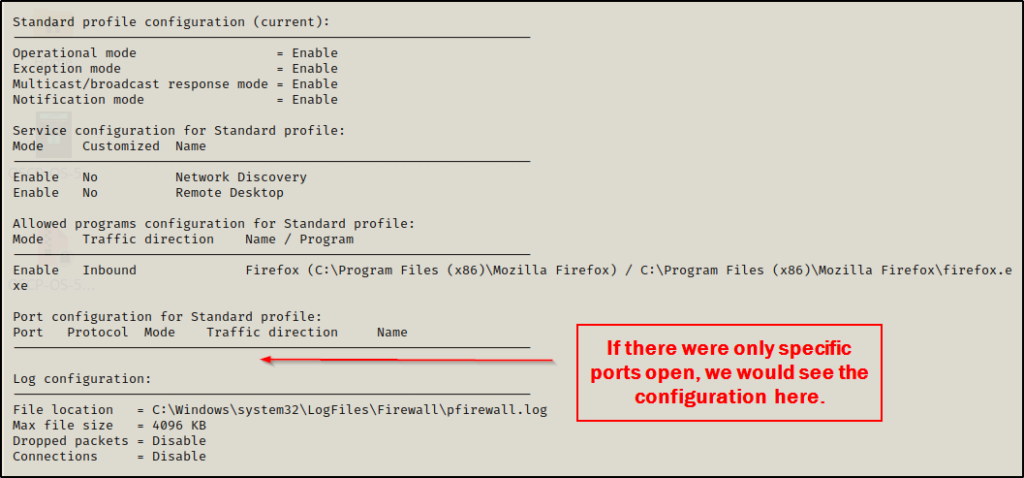
Finally, let’s say we have managed to get a SYSTEM or Administrator shell. With elevated privileges, we can turn the firewall off completely, which may help us when trying to pivot to another host. To do this, we can use the following command:
netsh advfirewall set allprofiles state offMy Personal Set of Manual Commands Before Using Tools
Generally I would NOT do all of this enumeration manually and I would leave Network and AV/Firewall enumeration for tools to do for me. However, it is important that we understand what our tools are doing for us. Also, if we find ourselves unable to use tools for whatever reason, then we need to know how to manually enumerate all of these things ourselves.
What I am going to show here is just a quick set of commands that I like to use when I first get on a host. I like to check for quick wins first and also get a lay of the land and then I will load up a few tools, which I use in a specific order.
When I first get on a host, I like to run the following 5 commands right away:
whoami

whoami /priv

whoami /groups

systeminfo | findstr /B /C:"Host Name" /C:"OS Name" /C:"OS Version" /C:"System Type" /C:"Hotfix(s)"

cmdkey /list- I start with whoami to see what account I have gotten a foothold on (Standard user? Service account? Admin account?)
- Next, I use whoami /priv to see if the user has any special privileges (including shutdown).
- After that, whoami /groups helps me to determine if this user has elevated access from a group that they are in.
- Then, I use systeminfo to understand the host I am on and how I will approach my next steps (32bit or 64bit? Old OS or new OS? Hotfixes?) — We need to be thinking kernel exploit when an old OS is found or when there are little-to-no hotfixes installed. Arch is important for tools and exploits, make sure you bring the right tools for the job.
- Lastly, I use cmdkey to check for stored passwords for a really quick win.
After running the above commands, I like to do quick user and group enum where I check all the users on the system as well as which users are in the administrators group.
net user

net localgroup administrators
If I find additional users on this machine aside from the current user, I make note of it and then in the back of my head I know there is a possibility that there is a password for this user on this machine somewhere. So at this time, I would likely start password hunting in a few of the places mentioned in the post I have on the topic. Also, I like to keep note of any user in the local admins group as they are high value targets.
When I find other user accounts on the system apart from the current user I have a shell as, I will use the command net user <username> for each of them to see what groups they are in.
The next thing I will manually check for are interesting files or folders.
The commands below are written with the intention that we are currently in a PowerShell prompt.
Get-ChildItem -Recurse -Depth 4 C:\users | Select FullName

cmd.exe /c dir /a C:\

ls "C:\Program Files"

ls "C:\Program Files (x86)"- The first command recursively checks in each user profile on the system for a max depth of 4 (edit/remove depth for your needs). What that means is that it will check C:\Users\x\x\x\x — where the first ‘x’ is the user accounts like C:\users\bob. The second ‘x’ is for the folders in the user profiles such as Desktop, Documents, Downloads, etc. The third ‘x’ is any subfolder or file inside the main folders, and then the same thing again one layer deeper for the fourth ‘x’ – just for good measure. This helps us to determine two things: First, if we can access other users profiles; secondly, if there are any interesting files / folders in our current users home profile.
- The second command just simply shows all folders / files (including hidden ones) in the C:\ directory. Any non-default or hidden folder / file should be explored in depth.
- The third and fourth command are used to simply enumerate all the subfolders within the Program Files folders. Again, I am looking for non-standard and non-default programs in here that I may be able to perform a service exploit on (this is where shutdown privs often come in handy).
Finally, there is only one more command that I like to use before I start bringing my tools over onto the victim, and that is:
netstat -naoThis is to quickly look for any services running or open ports that I did not see when running nmap. If any are found, this tells me there is a port forwarding opportunity- especially if the port is common (80, 443, 445, 8080, 8xxx, etc.)
At this point, I will have either found my privilege escalation path already and have begun getting to work on it– OR, and this is most often the case, I will now bring some tools over to help me enumerate the host further.
These are the four tools I will bring over (well first 3 I bring over, the fourth is used locally on attacker machine) and I will use them in this specific order:
- PowerUp
- WinPEAS
- Watson (newer OS)
- Windows Exploit Suggester (older OS)
If I still am stuck at this point, I will consider SeatBelt.exe for a second opinion to what PEAS gave me, but generally between the manual enumeration and PowerUp / WinPEAS I will find my privesc path.